
pipeline拓扑裁剪规则
1.1 概述
在一些usecase中,会有多个使用场景。根据不同的场景,需要构建不同的pipeline拓扑。例如,高通SAT usecase有多个场景:EIS-Disable, EISv3等等
对于这种情况有两种解决方案:
1、第一个是为这类用例设计不同的pipeline,以适应其不同的usecase。然后,在场景变化时切换到相应的pipeline。
2、第二种是设计一个超级pipeline,包含每个场景的pipeline拓扑,然后通过修剪超级pipeline来生成与特定场景匹配的pipeline拓扑。
显然,第二种解决方案更有利于避免代码冗余。本文档是一个逐步指导,用于修剪用例的pipeline。以下数据结构与pipeline修剪有关。
1.1.1 pipeline xml中的PrunableVariant
PrunableVariant是在管道中配置的xml标记。它由VariantGroup和VariantType项组成。PrunableVariant可以标记当前元素的使用场景。例如,在camxMultiCameraSAT.xml中配置了以下PrunableVariant,并指出在EIS或EISMCTF已启用。
 <Node>

     <NodeName>ChiMCTFNode</NodeName>

     <NodeId>255</NodeId>

     <NodeInstance>ChiNodeInstanceName9</NodeInstance>

     <NodeInstanceId>9</NodeInstanceId>

     <PrunableVariant variantGroup="EIS" variantType="Enabled"/>

     <PrunableVariant variantGroup="EIS" variantType="EISv3"/>

     <PrunableVariant variantGroup="EISMCTF" variantType="Enabled"/>

     <NodeProperty>
     ...
  <Node>
1.1.2 静态VariantGroup and VariantType数据
以下数组和枚举是通过解析pipeline xml中配置的所有PrunableVariant(s)生成的。后面提到的PruneVariant是通过查找并从中获取相应的值来指定的。
enum EVariantGroup

{

     InvalidVariantGroup = 0,

     PruneGroupDS64 = 1,

     ……

};

static const CHAR* g_stringMapVariantGroup[]

{

     "DS64",

     "EIS",

     ……

};

enum EVariantType

{

     InvalidVariantType = 0,

     PruneType4K = 1,

     ……

};

static const CHAR* g_stringMapVariantType[]

{

     "4K",

     "4KEISv3",

     ……

};
1.1.3 PruneVariant
PruneVariant由VariantGroup和VariantType组成。PruneVariant对应于PrunableVariant。它将用于进行修剪决策。
typedef UINT VariantGroup; // A prunable variant group identifier

typedef UINT VariantType; // A name to a prunable variant group


/// @brief A tuple like struct associating a VariantGroup and VariantType used in Pruning comparisions

struct PruneVariant {

     VariantGroup group; ///< The VariantGroup
     VariantType type; ///< The VariantType of the above VariantGroup

};
1.1.4 PruneSettings
/// @brief A list of PruneVariants

struct PruneSettings {

     UINT numSettings; ///< The length of pVariants

     const PruneVariant* pVariants; ///< A list of PruneVariants

};
1.1.5 chiNode
如下,PruneSettings被包含在ChiNode中。
管道中 xml标记中配置的PrunableVariant将被解析并填充到这里的pruneProperties中。
/// @brief Chi node info

typedef struct ChiNode

{

     CHINODEPROPERTY* pNodeProperties; ///< Properties associated with the node

     UINT32 nodeId; ///< Node identifier

     UINT32 nodeInstanceId; ///< Node instance identifier

     CHINODEPORTS nodeAllPorts; ///< Information about all ports

     UINT32 numProperties; ///< Count of NodeProperty instances in pNodeProperties

     PruneSettings pruneProperties; ///< A list of prune properties

} CHINODE;
1.1.6 ChiLinkNodeDescriptor
如下所示,PruneSettings包含在ChiLinkNodeDescriptor中。管道中 xml标记中配置的PrunableVariant将被解析并填充到这里的pruneProperties中。
/// @brief Information about a node in the link descriptor that defines connection between two nodes

typedef struct ChiLinkNodeDescriptor

{

     UINT32 nodeId; ///< Node identifier

     UINT32 nodeInstanceId; ///< Node instance id

     UINT32 nodePortId; ///< Node port id

     UINT32 portSourceTypeId; ///< Port source type id

     PruneSettings pruneProperties; ///< A list of prune properties

} CHILINKNODEDESCRIPTOR;
1.1.7 ChiPipelineTargetCreateDescriptor
如下所示,pipeline的链接、接收目标和源目标信息包含在ChiPipelineTargetCreateDescriptor中。管道的所有PruneSettings都包含在内。
/// @brief Combination of pipeline information with buffer information

struct ChiPipelineTargetCreateDescriptor

{

     const CHAR* pPipelineName; ///< The name of this pipeline

     ChiPipelineCreateDescriptor pipelineCreateDesc; ///< A description of the nodes/links of this pipeline

     ChiTargetPortDescriptorInfo sinkTarget; ///< The list of this pipeline's sink targets descriptors

     ChiTargetPortDescriptorInfo sourceTarget; ///< The list of this pipeline's source targets descriptors

};
1.1.8 chiUsecase
一个usecase的所有pipeline相关信息,包括PruneSettings,都包含在其中ChiUsecase。如下所示,PruneSettings和ChiPipelineTargetCreateDescriptor包含在ChiUsecase。pipeline xml中为TargtBuffer配置的PrunableVariant将被解析并填充到这里的ptargetprunessettings中。
struct ChiUsecase

{

     const CHAR* pUsecaseName; ///< The name of this Usecase

     UINT streamConfigMode; ///< The operation_mode under which to use this Usecase

     UINT numTargets; ///< The number of targets (Sink+Source) of ppChiTargets

     ChiTarget** ppChiTargets; ///< An array of all targets within this Usecase

     UINT numPipelines; ///< The number of pipelines defined in this Usecase

     ChiPipelineTargetCreateDescriptor* pPipelineTargetCreateDesc; ///< A list of all pipelines in this Usecase

     const PruneSettings* pTargetPruneSettings; ///< Pointer to this Usecase's prune settings

     BOOL isOriginalDescriptor; ///< TRUE if this structure lives in g_pipelines.h

                                 ///When TRUE, this structure should NEVER be modified/freed

};
1.2 添加Usecase的pruning设置
为usecase添加pruning设置有两个步骤。首先,需要在pipeline xml中设置PrunableVariant(s)。其次,我们需要在OnPruneUsecaseDescriptor()中为相应的feature添加PruneVariant(s)。
1.2.1 在pipeline xml文件中设置PrunableVariant
这一步是通过在pipeline xml中添加PrunableVariant标记来区分不同场景的pipeline拓扑。pipeline设计人员知道在不同的场景中需要删减哪些内容。PrunableVariant的内容应该易于理解和清晰
有两个位置可以添加标记
1、在标签中插入一个或多个标签,将一个节点标注为属于一个或多个场景。
2、将一个或多个<PrunableVariant>标记插入<DstPort>标记,以将目标缓冲区或输入端口注释为属于一个或更多场景情节。(注意:应在管道xml中的<Link>标记的<DstPort>标记中配置PrunableVariant,而不是<SrcPort>标记。)
例如,在camxInternalZSLYuv2Jpeg.xml中有四个PrunableVariants。
1、VariantGroup都是相同的(“Snapshot”)。
2、将变量类型为“JPEG”的PrunableVariant添加到JPEG- node -0和DstPortTARGET_BUFFER_SNAPSHOT中。
3、将带有变量类型“HEIC”的PrunableVariant添加到DstPortTARGET_BUFFER_HEIC_YUV和DstPort-TARGET_BUFFER_HEIC_BLOB。
chi-cdk/oem/qcom/topology/titan/usecase-components/usecases/UsecaseZSL/pipelines/camxInternalZSLYuv2Jpeg.xml

<Pipeline>

    <PipelineName>InternalZSLYuv2Jpeg</PipelineName>

        <NodesList>

            ……

            <Node>

                <NodeName>JPEG</NodeName>

                <NodeId>65537</NodeId>

                <NodeInstance>JPEGInstanceName0</NodeInstance>

                <NodeInstanceId>0</NodeInstanceId>

                <PrunableVariant variantGroup="Snapshot" variantType="JPEG" />

            </Node>

                ……

        </NodesList>

        <PortLinkages>

            <Link>

                <SrcPort>

                    <PortName>IPEOutputPortVideo</PortName>

                    <PortId>9</PortId>

                    <NodeName>IPE</NodeName>

                    <NodeId>65538</NodeId>

                    <NodeInstance>IPEInstanceName5</NodeInstance>

                    <NodeInstanceId>5</NodeInstanceId>
                </SrcPort>

                <DstPort>

                    <PortName>TARGET_BUFFER_HEIC_YUV</PortName>

                    <PortId>0</PortId>

                    <NodeName>SinkBuffer</NodeName>

                    <NodeId>2</NodeId>

                    <NodeInstance>SinkInstanceName5</NodeInstance>

                    <NodeInstanceId>5</NodeInstanceId>

                    <PrunableVariant variantGroup="Snapshot" variantType="HEIC" />

                </DstPort>

            </Link>

                ……

            <Link>

                <SrcPort>

                    <PortName>JPEGAggregatorOutputPort0</PortName>

                    <PortId>1</PortId>

                    <NodeName>JPEGAggregator</NodeName>

                    <NodeId>6</NodeId>

                    <NodeInstance>JPEGAggregatorInstanceName0</NodeInstance>

                    <NodeInstanceId>0</NodeInstanceId>

                </SrcPort>

                <DstPort>

                    <PortName>TARGET_BUFFER_HEIC_BLOB</PortName>

                    <PortId>0</PortId>

                    <NodeName>SinkBuffer</NodeName>

                    <NodeId>2</NodeId>

                    <NodeInstance>SinkInstanceName2</NodeInstance>

                    <NodeInstanceId>2</NodeInstanceId>

                    <PrunableVariant variantGroup="Snapshot" variantType="HEIC" />

                </DstPort>

                <DstPort>

                    <PortName>TARGET_BUFFER_SNAPSHOT</PortName>

                    <PortId>0</PortId>

                    <NodeName>SinkBuffer</NodeName>

                    <NodeId>2</NodeId>

                    <NodeInstance>SinkInstanceName0</NodeInstance>

                    <NodeInstanceId>0</NodeInstanceId>

                    <PrunableVariant variantGroup="Snapshot" variantType="JPEG" />

                </DstPort>

            </Link>

            ……

        </PortLinkages>
</Pipeline>
在上面的示例中,这意味着该管道需要适应SnapshotUsecase中的两个场景。一个用于JPEG,另一个用于HEIC。在下一节中,我们将解释如何根据场景动态地为用例指定variantGroup和variantType。
1.2.2 在OnPruneUsecaseDescriptor()中设置PruneVariant
这一步是指定用例在运行时需要的VariantType(s)和VariantGroup(s)。
如前所述,VariantGroup(s)和VariantType(s)的所有相关数据PrunableVariant将分别被填充到一个静态数组中。然后,它们的值可以通过分别调用usecaselector::GetVariantGroup()和usecaselector::GetVariantType()来获得。(它们的名称需要用作函数的形参)。要指定variantGroup和variantType,需要将相应的prunevvariant (s)添加到OnPruneUsecaseDescriptor函数在相应的特性。
例如,VariantGroup在以下代码中被指定为“Snapshot”。VariantType将根据不同的条件指定为"HEIC", "JPEG"或"JPEGNATIVE"。
vendor\qcom\proprietary\chi-cdk\oem\qcom\feature2\chifeature2generic\chifeature2generic.cpp

CDKResult ChiFeature2Generic::OnPruneUsecaseDescriptor(

     const ChiFeature2CreateInputInfo* pCreateInputInfo,

     std::vector<PruneVariant>& rPruneVariants

     ) const

{

     ……

     PruneVariant pruneVariant;

     ……

     pruneVariant.group = UsecaseSelector::GetVariantGroup("Snapshot");

     pruneVariant.type = UsecaseSelector::GetVariantType(

         (TRUE == hasHeic) ? "HEIC" : (FALSE == isNativeResolution) ? "JPEG" : "JPEGNATIVE");

     rPruneVariants.push_back(pruneVariant);

     ……

}
1.3 Pruning the pipeline
添加修剪设置后,pipeline的修剪将在SM8450 ChiFeature2Base: PruneUsecaseDescriptor()。(usecasselector::PruneUsecaseDescriptor()在SM8450之前用于修剪)。在OnPruneUsecaseDescriptor()中指定的prunevvariant会与在a中的prunessettings进行比较用ChiUsecase来决定对应pipeline的哪一部分需要修剪。
修剪规则如下:
1. 如果pipeline xml中没有配置对应的元素“PrunableVariant”或没有“PruneVariant”被添加到相应特性的OnPruneUsecaseDescriptor()中,修剪将被跳过。
2. 只有当其所有的PruneGroups和PruneTypes至少有一个集合被添加到相应特性的OnPruneUsecaseDescriptor()时,带有PrunableVariant标记的节点、输入端口和目标才会存在(而不是被修剪)在最终的Pipeline拓扑中。
3.如果需要修剪相应的Node或target,则需要修剪相关的链接
4.修剪后将删除悬空端口/链接。
1.4 Pruning实例
我们使用管道(InternalZSLYuv2Jpeg)和功能(chifeature2generic),可以在快照—以用例为例。如我们所知,不进行修剪的管道InternalZSLYuv2Jpeg的拓扑如下所示。
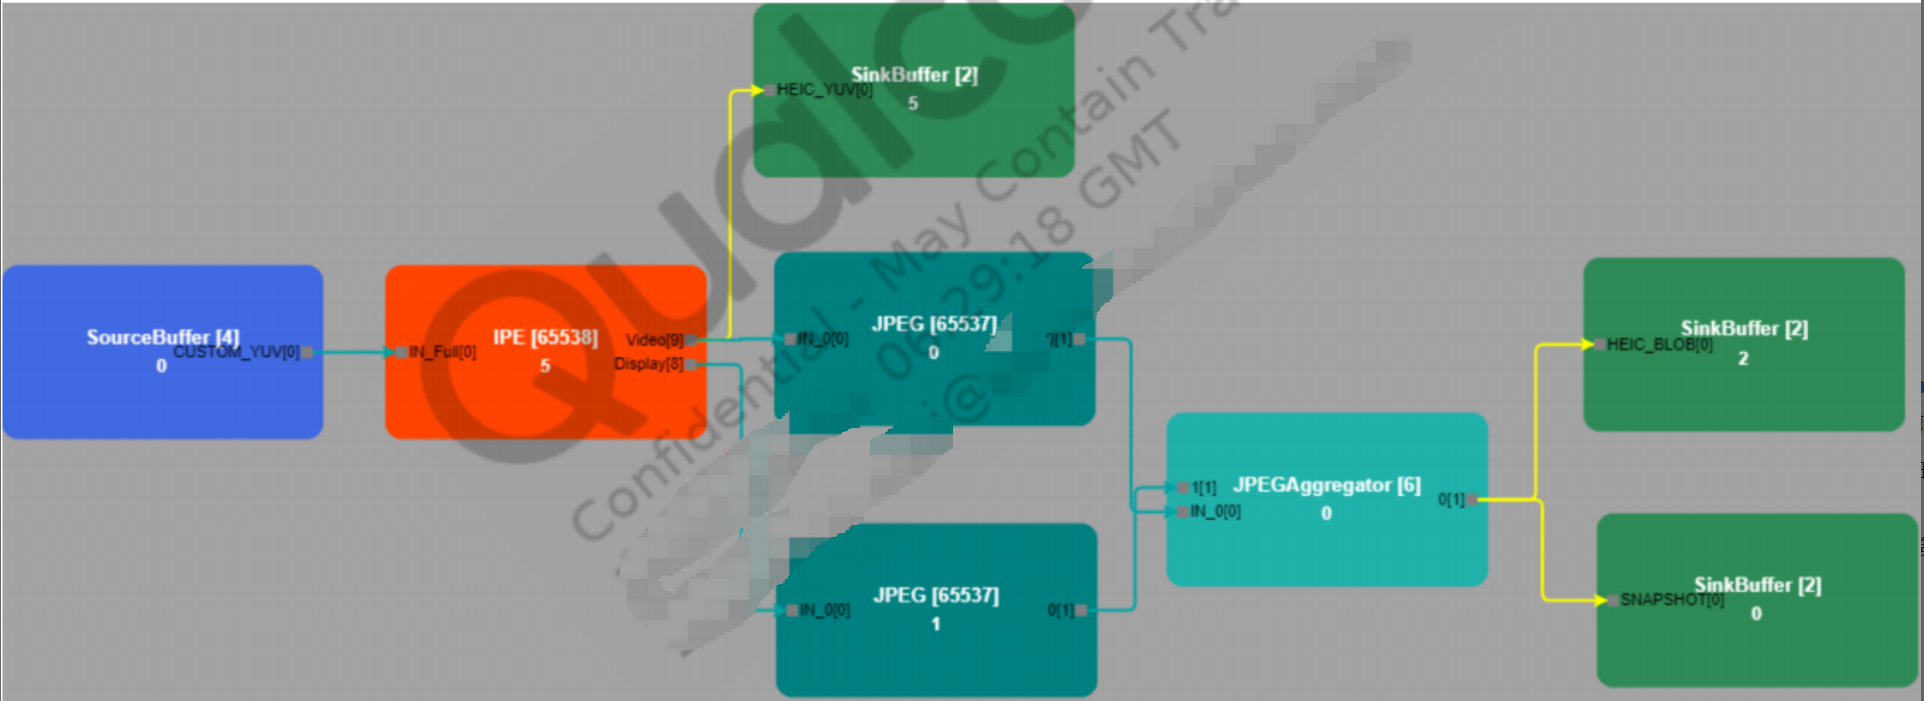
正如在1.2.1章节中提到的,管道中的元素中添加了四个prunablevariant。根据1.3章中提到的第一条修剪规则,我们知道没有prunablevariant不会被裁剪
正如我们在1.2.2章中看到的,VariantGroup开始出现ChiFeature2Generic::OnPruneUsecaseDescriptor()将始终是"Snapshot"。这与pipeline xml中配置的所有VariantGroups相同。
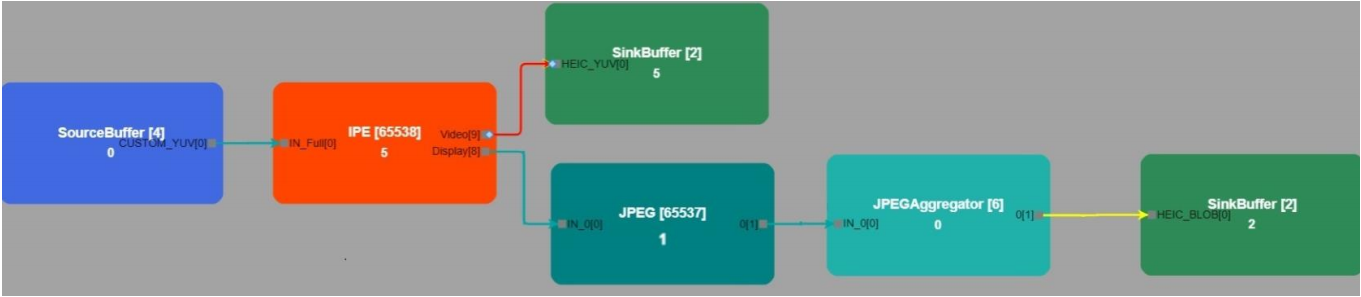
如果“hasHeic”为Ture,则pruneVariant.type将被设置为"HEIC"(更精确的语句是usecasselector::GetVariantType("HEIC")的返回值)。根据1.3章中提到的第二、第三、第四条剪枝规则,我们知道JPEG-Node-0和TARGET_BUFFER_SNAPSHOT将被修剪。与它们有关的联系也将被删减。修剪后的管道拓扑:
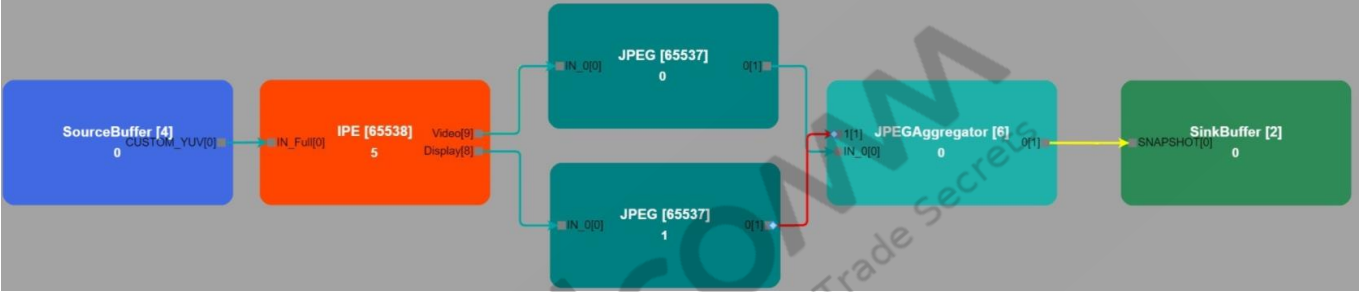
类似地,如果pruneVariant类型设置为“JPEG”。TARGET_BUFFER_HEIC_YUV和TARGET_ BUFFER-HEIC_ BLOB将被删除。与它们相关的链接也将被删除。修剪后的管道拓扑如下:
1.5 裁剪自己的pipeline
总之,定制管道修剪需要两个步骤。
1、参考第1.2.1章,在管道xml中设置相应的可修剪变量。
2、参考第1.2.2章,在OnPruneUsecaseDescriptor()中指定相应功能的PruneVariant。

 浙公网安备 33010602011771号