

近段时间在搭建我司的用例管理平台,有如下需求:
1、需要根据项目--版本--轮次的形式来管理项目用例,用例统一保存在git工程。
2、执行用例时,如果用例执行失败,可以通过平台在Jira上提bug。
通过调研发现可以使用GitHub api和Jira api,通过http调用的方式来实现,那么获取使用Api的Authentication作为第一步就尤为重要。其实Git作为代码管理工具,Jira作为需求、缺陷等项目与事务跟踪工具,已被大部分公司使用,只是平时我们没有类似上述的需求。下面简述下我如何使用。
一、获取Jira api Authentication
首先:这是jira api地址:https://developer.atlassian.com/cloud/jira/platform/rest/v2/#api-rest-api-2-field-fieldKey-option-get 这个文档中 Authentication and authorization章节介绍的获取Authentication 都比较麻烦。
其次:通过搜索我发现另外一个Api介绍文档https://developer.atlassian.com/server/jira/platform/basic-authentication/ 该文档中Security章节中介绍了几种访问api的方式,我使用了Basic Authentication,这种方式相对来说最简单、最容易理解,因为它使用的是自己登录Jira的用户名和密码。下面就说明如何使用
方法一:
英文原文如下:
Most client software for sending requests automatically generate the authorization header when you provide a username and password.
For example, in cURL you can specify a username and password combination with the -u argument to send a request to a Jira site
意思就是说如果我们提供用户名和密码,大多数用于发送请求的客户端软件会自动生成授权标头
比如:curl -u username:password -X GET -H "Content-Type: application/json" http://localhost:8080/rest/api/2/issue/createmeta 即可调通api了。
这种方式需要明文提供自己的用户名和密码,相对风险比较高。况且如果我们想使用httpClient调用,这种方式也不满足要求
方法二:
英文原文如下:
- Build a string of the form
username:password. - Encode the string to Base64.
- Supply an authorization header with format
Authorization: Basic {encoded-string}. Make sure to replace{encoded-string}with your encoded string from Step 2
意思就是通过Base64加密的方式加密username:password,然后在http请求的header中添加Basic {encoded-string}即可
比如:curl -H "Authorization: Basic {encoded-string}" -X GET -H "Content-Type: application/json" http://localhost:8080/rest/api/2/issue/createmeta 即可调通api了
第三:编写自己调用httpClient的工具,在header中设置Authorization: Basic {encoded-string}即可,就可以随意调用Jira api。
二、获取GitHub api Authentication
首先:git api地址:http://git.51.nb/help/api/README.md。登录公司的git, 点击头像后,选择help,在help页面提供的文档中选择API。
其次:在api首页我们可以看到,官网提供了三种方式获取Authentication:OAuth2 tokens、Personal access tokens、Session cookie。
我们选择第二种方式,同样是因为相对来说最简单、最容易理解。
英文原文如下:
1、Log in to your GitLab account.
2、Go to your Profile settings.
3、Go to Access tokens.
4、Choose a name and optionally an expiry date for the token.
5、Choose the desired scopes.
6、Click on Create personal access token.
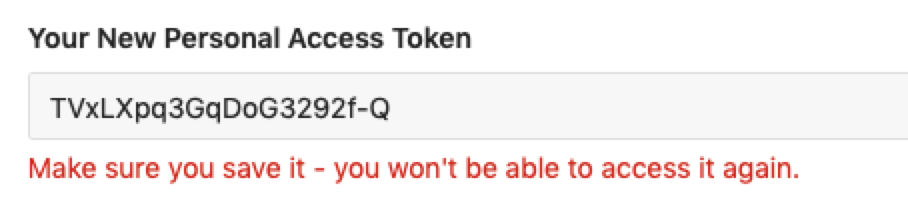
7、Save the personal access token somewhere safe. Once you leave or refresh the page, you won't be able to access it again.
意思就是登录公司的git后,在头像--settings--Access tokens 页面,填写name、失效时间以及使用范围,点击创建personal access token。创建成功后,页面会显示新的access token,页面刷新后这个值就不再显示,所以我们要保存在某个地方

比如:curl -H 'private-token: xxxxxxxxxxx' -X GET http://xxxxxx/api/v4/projects/xxxx 即可调通GitHub Api.
第三:编写自己调用httpClient的工具,在header中设置private-token: xxxxxxxxxxx即可,就可以随意调用GitHub Api。
更多文章请关注公众号


 浙公网安备 33010602011771号