
centos7之KVM的web端WebVirtMgr
参考地址:
https://www.cnblogs.com/nulige/p/9236191.html
操作系统:CentOS Linux release 7.4.1708 (Core)
一、部署KVM
可以参考我前面的博客https://www.cnblogs.com/lei0213/p/8623995.html,只需要做完前8步骤即可。
二、部署webvirtmgr
参考官网:https://github.com/retspen/webvirtmgr/wiki/Install-WebVirtMgr
1、更新yum源
yum install -y epel-release
1.1、安装依赖包
yum install git python-pip libvirt-python libxml2-python python-websockify supervisor nginx -y
1.2、从git-hub中下载相关的webvirtmgr代码
# cd /usr/local/src/
# git clone git://github.com/retspen/webvirtmgr.git
1.3、安装webvirtmgr
# cd webvirtmgr/
# pip install -r requirements.txt
1.4、检查sqlite3 (备注:自带不需要安装,导入模块检查一下。)
[root@localhost home]# python
Python 2.7.5 (default, Aug  4 2017, 00:39:18)
[GCC 4.8.5 20150623 (Red Hat 4.8.5-16)] on linux2
Type "help", "copyright", "credits" or "license" for more information.
>>> import sqlite3
>>> exit()
1.5、初始化账号
[root@webvirtmg webvirtmgr]# pwd
/usr/local/src/webvirtmgr<br>
[root@webvirtmg webvirtmgr]# ./manage.py syncdb
WARNING:root:No local_settings file found.
Creating tables ...
Creating table auth_permission
Creating table auth_group_permissions
Creating table auth_group
Creating table auth_user_groups
Creating table auth_user_user_permissions
Creating table auth_user
Creating table django_content_type
Creating table django_session
Creating table django_site
Creating table servers_compute
Creating table instance_instance
Creating table create_flavor

You just installed Django's auth system, which means you don't have any superusers defined.
Would you like to create one now? (yes/no): yes   #创建管理账户
Username (leave blank to use 'root'): admin   #设置web登录账户
Email address:xxxx@qq.com  ###你的邮箱地址
Password:  #设置密码
Password (again):  #确认密码
Superuser created successfully.
Installing custom SQL ...
Installing indexes ...
Installed 6 object(s) from 1 fixture(s)
1.6、拷贝web到 相关目录
# mkdir -pv /var/www
# cp -Rv /usr/local/src/webvirtmgr /var/www/webvirtmgr
1.7、设置ssh
# ssh-keygen -t rsa             //产生公私钥
# ssh-copy-id  172.16.9.240        //由于这里webvirtmgr和kvm服务部署在同一台机器,所以这里本地信任。如果kvm部署在其他机器,那么这个是它的ip
# ssh 172.16.9.240  -L localhost:8000:localhost:8000 -L localhost:6080:localhost:60
1.8、编辑nginx配置文件
#添加这行代码: include /etc/nginx/conf.d/*.conf;
# cd /etc/nginx/
# mv nginx.conf /tmp
#cp nginx.conf.default nginx.conf
#编辑配置文件
#vim nginx.conf
加入这句即可,其他的不用动。include /etc/nginx/conf.d/*.conf;
#user  nobody;
worker_processes  1;

#error_log  logs/error.log;
#error_log  logs/error.log  notice;
#error_log  logs/error.log  info;

#pid        logs/nginx.pid;


events {
    worker_connections  1024;
}


http {
    include       mime.types;
    default_type  application/octet-stream;
    include /etc/nginx/conf.d/*.conf;
    #log_format  main  '$remote_addr - $remote_user [$time_local] "$request" '
    #                  '$status $body_bytes_sent "$http_referer" '
    #                  '"$http_user_agent" "$http_x_forwarded_for"';

    #access_log  logs/access.log  main;

    sendfile        on;
    #tcp_nopush     on;

    #keepalive_timeout  0;
    keepalive_timeout  65;

    #gzip  on;

    server {
        listen       80;
        server_name  localhost;

        #charset koi8-r;

        #access_log  logs/host.access.log  main;

        location / {
            root   html;
            index  index.html index.htm;
        }

        #error_page  404              /404.html;

        # redirect server error pages to the static page /50x.html
        #
        error_page   500 502 503 504  /50x.html;
        location = /50x.html {
            root   html;
        }

        # proxy the PHP scripts to Apache listening on 127.0.0.1:80
        #
        #location ~ \.php$ {
        #    proxy_pass   http://127.0.0.1;
        #}

        # pass the PHP scripts to FastCGI server listening on 127.0.0.1:9000
        #
        #location ~ \.php$ {
        #    root           html;
        #    fastcgi_pass   127.0.0.1:9000;
        #    fastcgi_index  index.php;
        #    fastcgi_param  SCRIPT_FILENAME  /scripts$fastcgi_script_name;
        #    include        fastcgi_params;
        #}

        # deny access to .htaccess files, if Apache's document root
        # concurs with nginx's one
        #
        #location ~ /\.ht {
        #    deny  all;
        #}
    }


    # another virtual host using mix of IP-, name-, and port-based configuration
    #
    #server {
    #    listen       8000;
    #    listen       somename:8080;
    #    server_name  somename  alias  another.alias;

    #    location / {
    #        root   html;
    #        index  index.html index.htm;
    #    }
    #}


    # HTTPS server
    #
    #server {
    #    listen       443 ssl;
    #    server_name  localhost;

    #    ssl_certificate      cert.pem;
    #    ssl_certificate_key  cert.key;

    #    ssl_session_cache    shared:SSL:1m;
    #    ssl_session_timeout  5m;

    #    ssl_ciphers  HIGH:!aNULL:!MD5;
    #    ssl_prefer_server_ciphers  on;

    #    location / {
    #        root   html;
    #        index  index.html index.htm;
    #    }
    #}

}
#添加 /etc/nginx/conf.d/webvirtmgr.conf 配置文件
# vim /etc/nginx/conf.d/webvirtmgr.conf
server {
listen 80 default_server;

server_name $hostname;
#access_log /var/log/nginx/webvirtmgr_access_log;

location /static/ {
root /var/www/webvirtmgr/webvirtmgr; # or /srv instead of /var
expires max;
}

location / {
proxy_pass http://127.0.0.1:8000;
proxy_set_header X-Real-IP $remote_addr;
proxy_set_header X-Forwarded-for $proxy_add_x_forwarded_for;
proxy_set_header Host $host:$server_port;
proxy_set_header X-Forwarded-Proto $remote_addr;
proxy_connect_timeout 600;
proxy_read_timeout 600;
proxy_send_timeout 600;
client_max_body_size 1024M; # Set higher depending on your needs
}
}
#重启nginx服务
systemctl restart nginx
1.9、关闭防火墙并设置开机不启动,关闭selinux
2.0、授权
chown -R nginx:nginx /var/www/webvirtmgr
2.1、设置 supervisor (如果iptables防火墙开启的话,就必须要开通80、8000、6080端口访问)
# vim /etc/supervisord.conf //在文件末尾添加,注意将默认的python改为python2,因为上面只有用这个版本执行才不报错!
内容:
[program:webvirtmgr]
command=/usr/bin/python2 /var/www/webvirtmgr/manage.py run_gunicorn -c /var/www/webvirtmgr/conf/gunicorn.conf.py                     //启动8000端口
directory=/var/www/webvirtmgr
autostart=true
autorestart=true
logfile=/var/log/supervisor/webvirtmgr.log
log_stderr=true
user=nginx

[program:webvirtmgr-console]
command=/usr/bin/python2 /var/www/webvirtmgr/console/webvirtmgr-console                               //启动6080端口(这是控制台vnc端口)
directory=/var/www/webvirtmgr
autostart=true
autorestart=true
stdout_logfile=/var/log/supervisor/webvirtmgr-console.log
redirect_stderr=true
user=nginx
#检查
#vim /var/www/webvirtmgr/conf/gunicorn.conf.py //确保下面bind绑定的是本机的8000端口,这个在nginx配置中定义了,被代理的端口
bind = '127.0.0.1:8000'
#设置开机启动
systemctl enable supervisord.service
#设置开机加载
#vim /etc/rc.local
加一条(强制保存退出):
/usr/sbin/setsebool httpd_can_network_connect true
#重启服务
# systemctl restart supervisord
#systemctl status supervisord
2.2、查看端口 备注:6080和8000已经启动
netstat -nultp
2.3、如果现在登录后肯定会报错,在webvirtmgr服务器(服务端)生成密钥,并切换到nginx用户下生成秘钥对(如果认真观察的同学,会发现,其实整个2.3就是添加受控端,只不过这里我们服务端和受控端都在一台机器上)
1)在webvirtmgr服务器(服务端)上(这里kvm和WebVirtMgr部署在同一台机器上)创建nginx用户家目录(默认nginx服务安装时是没有nginx家目录的),生成nginx的公私钥
[root@localhost]# cd /home/
[root@localhosthome home]# mkdir nginx
[root@localhosthome home]# chown nginx.nginx nginx/
[root@localhosthome home]# chmod 700 nginx/ -R
[root@localhosthome home]# su - nginx -s /bin/bash
-bash-4.1$ ssh-keygen                             #期间输入yes后直接回车,回车
-bash-4.1$ touch ~/.ssh/config && echo -e "StrictHostKeyChecking=no\nUserKnownHostsFile=/dev/null" >> ~/.ssh/config
-bash-4.1$ chmod 0600 ~/.ssh/config
-bash-4.1$ exit
#在webvirtmgr服务器(服务端)上(也就是在受控端),将nginx用户的ssh-key上传到kvm服务器上(这里kvm和WebVirtMgr部署在同一台机器上)
[root@bogon home]# su - nginx -s /bin/bash
Last login: Sun Apr 28 21:12:38 EDT 2019 on pts/2
-bash-4.2$ ssh-copy-id root@172.16.9.240
/bin/ssh-copy-id: INFO: Source of key(s) to be installed: "/var/lib/nginx/.ssh/id_rsa.pub"
/bin/ssh-copy-id: INFO: attempting to log in with the new key(s), to filter out any that are already installed
/bin/ssh-copy-id: INFO: 1 key(s) remain to be installed -- if you are prompted now it is to install the new keys
Warning: Permanently added '172.16.9.240' (ECDSA) to the list of known hosts.
root@172.16.9.240's password:  #输入本机ip地址(受控端)

Number of key(s) added: 1

Now try logging into the machine, with:   "ssh 'root@172.16.9.240'"
and check to make sure that only the key(s) you wanted were added.
-bash-4.2$ exit  #退出
#在kvm(受控端)服务器上(这里kvm和WebVirtMgr部署在同一台机器上)配置 libvirt ssh授权
# vim /etc/polkit-1/localauthority/50-local.d/50-libvirt-remote-access.pkla
内容如下:
[Remote libvirt SSH access]
Identity=unix-user:root #注意这里采用的是root用户
Action=org.libvirt.unix.manage
ResultAny=yes
ResultInactive=yes
ResultActive=yes
设置权限
# chown -R root.root /etc/polkit-1/localauthority/50-local.d/50-libvirt-remote-access.pkla
#重启服务
systemctl restart nginx
systemctl enable nginx
systemctl restart libvirtd
注意:如果你用的是虚拟机,记得处理器数量别给一个,我一般都是1个处理器、每个处理器是2核,否则就会报accept: Too many open files这个错误,而且web页面也打不开。
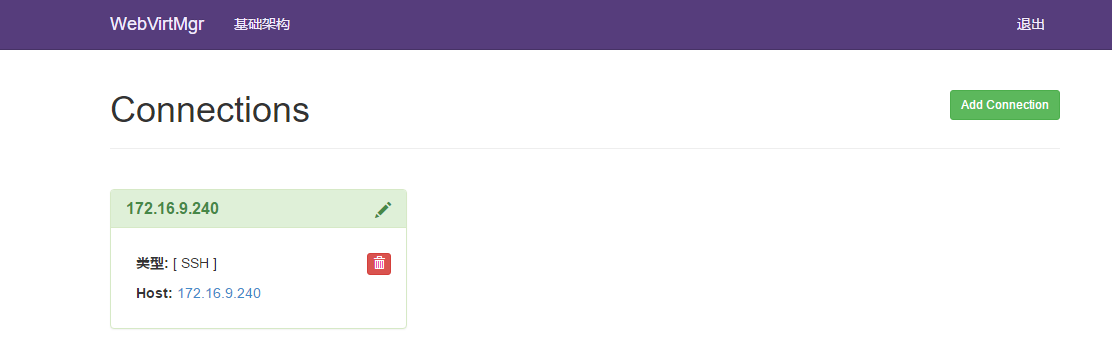
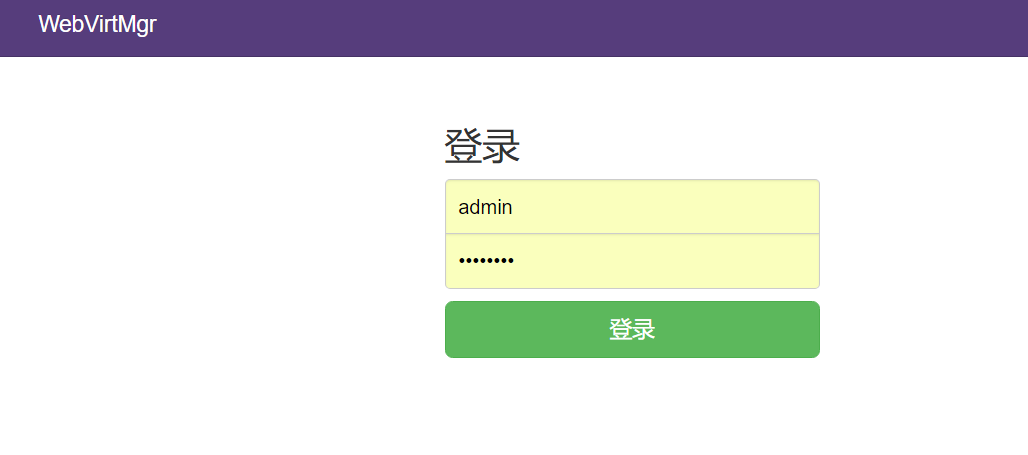
2.4、访问地址:http://172.16.9.240/login/
账号信息:
username: admin
passwd:************
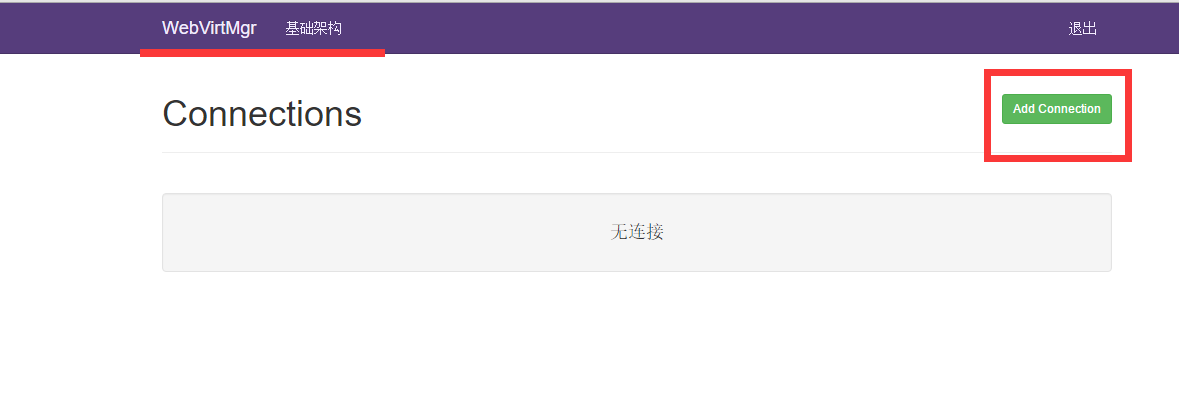
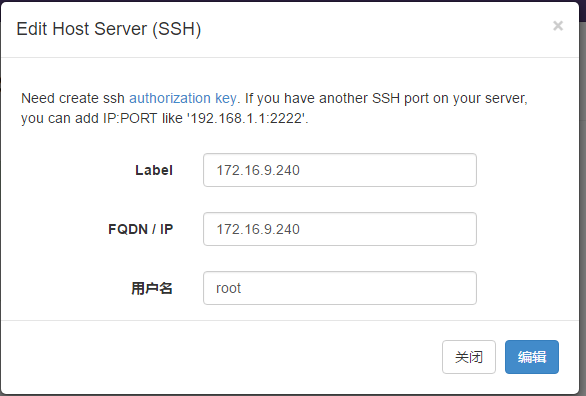
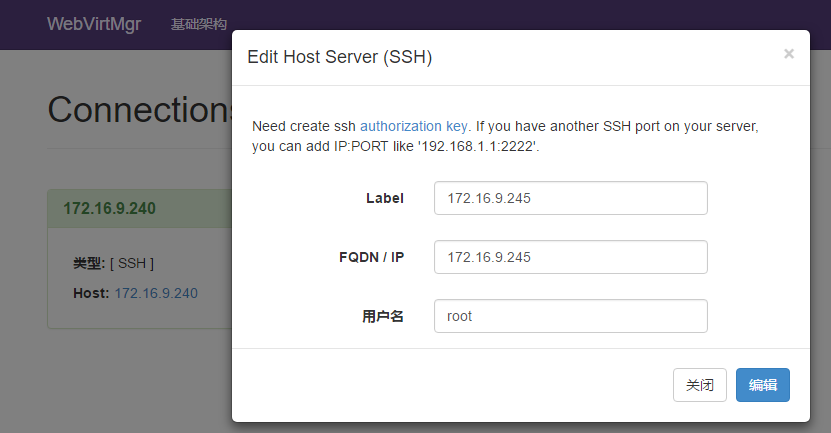
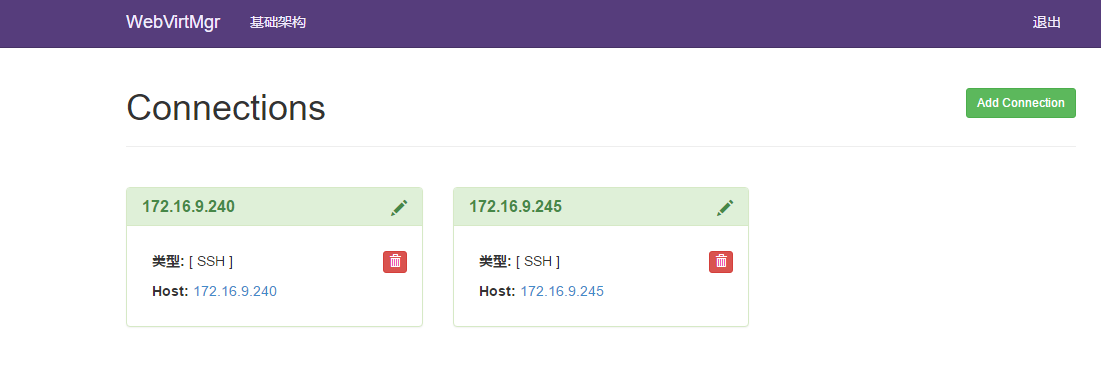
三、添加SSH类型连接的客户端
可以参考我前面的博客https://www.cnblogs.com/lei0213/p/8623995.html,只需要做完前8步骤即可。
3.1、在webvirtmgr服务器(服务端)上,将ssh-key上传到kvm服务器上
[root@localhost home]# su - nginx -s /bin/bash
Last login: Sun Apr 28 04:51:51 EDT 2019 on pts/0
-bash-4.2$ ssh-copy-id  root@172.16.9.245   #输入受控端的root用户和ip
/bin/ssh-copy-id: INFO: Source of key(s) to be installed: "/var/lib/nginx/.ssh/id_rsa.pub"
/bin/ssh-copy-id: INFO: attempting to log in with the new key(s), to filter out any that are already installed
/bin/ssh-copy-id: INFO: 1 key(s) remain to be installed -- if you are prompted now it is to install the new keys
Warning: Permanently added '172.16.9.245' (ECDSA) to the list of known hosts.
root@172.16.9.245's password:  #输入受控端root的ssh密码

Number of key(s) added: 1

Now try logging into the machine, with:   "ssh 'root@172.16.9.245'"
and check to make sure that only the key(s) you wanted were added.
3.2、受控端操作
vim /etc/polkit-1/localauthority/50-local.d/50-libvirt-remote-access.pkla

[Remote libvirt SSH access]
Identity=unix-user:webvirtmgr
Action=org.libvirt.unix.manage
ResultAny=yes
ResultInactive=yes
ResultActive=yes
并设置权限
chown -R root.root /etc/polkit-1/localauthority/50-local.d/50-libvirt-remote-access.pkla
#重启 libvirtd 服务
systemctl restart libvirtd
服务端操作:
Show time
四、使用TCP连接可以参考一下网站
https://www.cnblogs.com/kevingrace/p/5737724.html
五、注意事项
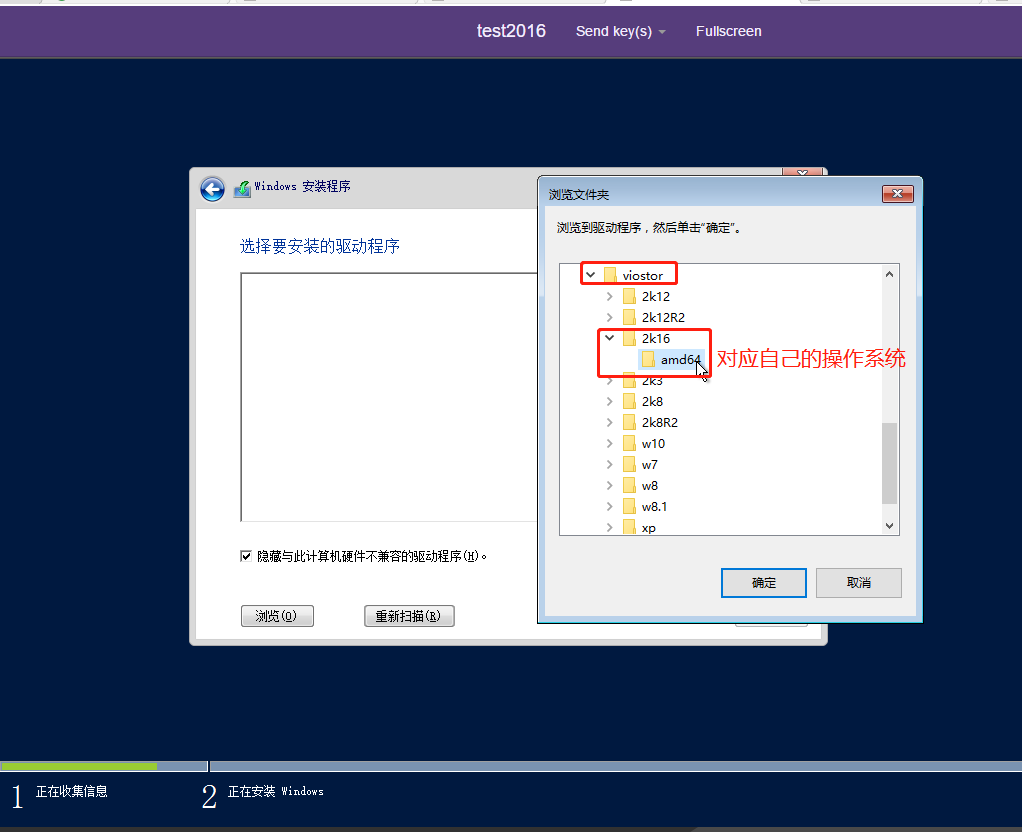
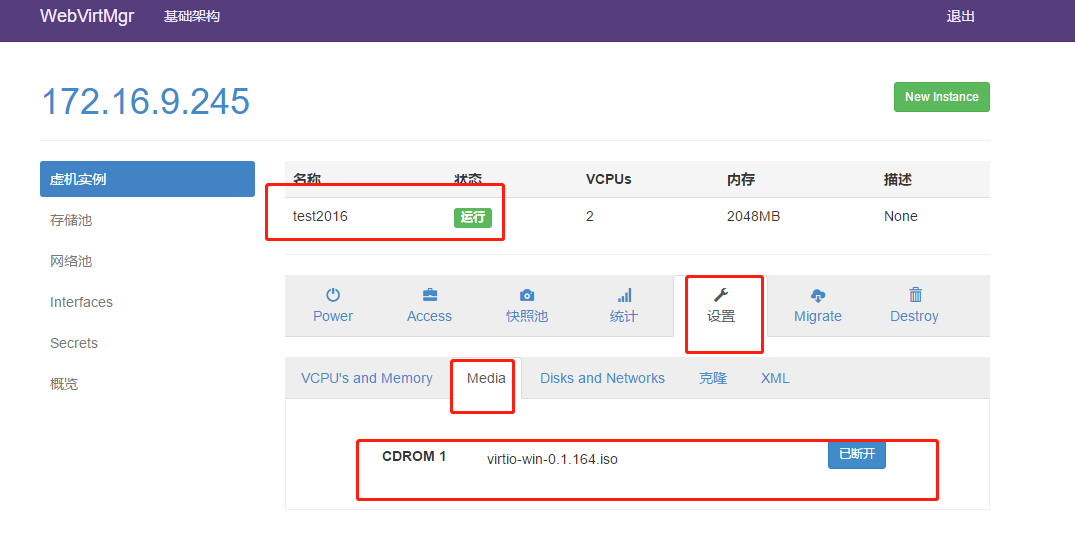
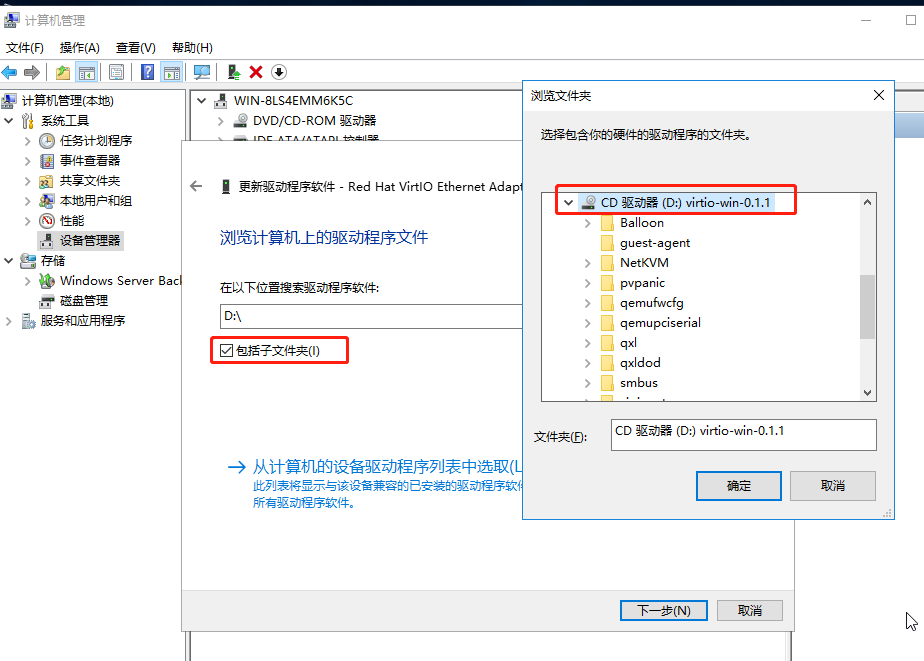
1、windows2016再安装的时候,到硬盘分区的时候,提示找不到硬盘,这里需要下载virtio驱动。可以去https://fedorapeople.org/groups/virt/virtio-win/direct-downloads/archive-virtio/下载。使用的时候是如果提示找不到硬盘,需要把virtio这个iso文件上传到你kvm主机上的的iso目录。然后再webvirtmgr上挂载上(如下图一),然后。如果加载到硬盘的话,继续选择回操作系统文件,继续安装操作系统。安装操作系统以后如果提醒没有网卡驱动,需要挂在virtio这个iso,然后进设备管理器里面,选中网卡搜索驱动。注意,这里只需要点击到virtio这个iso文件的根目录就行(如图二)。
图一
图二
图三
2、需要创建统一的iso和images文件存放位置,方便管理。
3、默认使用的NAT网卡模式,需要自己手动创建桥接模式。如果虚拟机创建完毕,就无法更改。
4、在存储池里面创建完镜像文件存储位置后,需要手动创建镜像,这里需要注意创建的时候去掉metadata勾选项。
5、做快照或还原快照都需要关机重启操作。
6、删除已经创建完成的操作,会删除.img和xml文件,还会删除在存储池里面的images文件里面的镜像。


 浙公网安备 33010602011771号