目录
模拟flannel host-gw 直接路由,实现不同主机之间docker容器互相通信
0、实验环境:
- macos 10.15.7
- virtual box 6.1.18
- vagrant 2.2.14
vagrant教程参考 https://zhuanlan.zhihu.com/p/259833884
可以手动安装配置虚拟机,不用vagrant。
- centos7
- docker 19.03.15

一、虚拟机创建
1、docker1 虚拟机Vagrantfile
# -*- mode: ruby -*-
# vi: set ft=ruby :

# All Vagrant configuration is done below. The "2" in Vagrant.configure
# configures the configuration version (we support older styles for
# backwards compatibility). Please don't change it unless you know what
# you're doing.
Vagrant.configure("2") do |config|
  # The most common configuration options are documented and commented below.
  # For a complete reference, please see the online documentation at
  # https://docs.vagrantup.com.

  # Every Vagrant development environment requires a box. You can search for
  # boxes at https://vagrantcloud.com/search.
  config.vm.box = "centos-7"

  # Disable automatic box update checking. If you disable this, then
  # boxes will only be checked for updates when the user runs
  # `vagrant box outdated`. This is not recommended.
  # config.vm.box_check_update = false

  # Create a forwarded port mapping which allows access to a specific port
  # within the machine from a port on the host machine. In the example below,
  # accessing "localhost:8080" will access port 80 on the guest machine.
  # NOTE: This will enable public access to the opened port
  # config.vm.network "forwarded_port", guest: 80, host: 8080

  # Create a forwarded port mapping which allows access to a specific port
  # within the machine from a port on the host machine and only allow access
  # via 127.0.0.1 to disable public access
  # config.vm.network "forwarded_port", guest: 80, host: 8080, host_ip: "127.0.0.1"

  # Create a private network, which allows host-only access to the machine
  # using a specific IP.
  config.vm.network "private_network", ip: "192.168.33.12"

  # Create a public network, which generally matched to bridged network.
  # Bridged networks make the machine appear as another physical device on
  # your network.
  # config.vm.network "public_network"

  # Share an additional folder to the guest VM. The first argument is
  # the path on the host to the actual folder. The second argument is
  # the path on the guest to mount the folder. And the optional third
  # argument is a set of non-required options.
  # config.vm.synced_folder "../data", "/vagrant_data"

  # Provider-specific configuration so you can fine-tune various
  # backing providers for Vagrant. These expose provider-specific options.
  # Example for VirtualBox:
  #
  # config.vm.provider "virtualbox" do |vb|
  #   # Display the VirtualBox GUI when booting the machine
  #   vb.gui = true
  #
  #   # Customize the amount of memory on the VM:
  #   vb.memory = "1024"
  # end
  #
  # View the documentation for the provider you are using for more
  # information on available options.

  # Enable provisioning with a shell script. Additional provisioners such as
  # Ansible, Chef, Docker, Puppet and Salt are also available. Please see the
  # documentation for more information about their specific syntax and use.
  config.vm.provision "shell", inline: <<-SHELL
  #   apt-get update
  #   apt-get install -y apache2
  sudo yum install -y yum-utils lvm2
  sudo curl -fsSL https://repo.huaweicloud.com/docker-ce/linux/centos/docker-ce.repo -o /etc/yum.repos.d/docker-ce.repo
  sudo sed -i 's+download.docker.com+repo.huaweicloud.com/docker-ce+' /etc/yum.repos.d/docker-ce.repo
  sudo yum makecache fast
  sudo yum install -y docker-ce-19.03.15 docker-ce-cli-19.03.15 containerd.io
  sudo rm -f /etc/localtime
  sudo ln -s /usr/share/zoneinfo/Asia/Shanghai /etc/localtime
  SHELL
end
2、docker2虚拟机Vagrantfile
# -*- mode: ruby -*-
# vi: set ft=ruby :

# All Vagrant configuration is done below. The "2" in Vagrant.configure
# configures the configuration version (we support older styles for
# backwards compatibility). Please don't change it unless you know what
# you're doing.
Vagrant.configure("2") do |config|
  # The most common configuration options are documented and commented below.
  # For a complete reference, please see the online documentation at
  # https://docs.vagrantup.com.

  # Every Vagrant development environment requires a box. You can search for
  # boxes at https://vagrantcloud.com/search.
  config.vm.box = "centos-7"

  # Disable automatic box update checking. If you disable this, then
  # boxes will only be checked for updates when the user runs
  # `vagrant box outdated`. This is not recommended.
  # config.vm.box_check_update = false

  # Create a forwarded port mapping which allows access to a specific port
  # within the machine from a port on the host machine. In the example below,
  # accessing "localhost:8080" will access port 80 on the guest machine.
  # NOTE: This will enable public access to the opened port
  # config.vm.network "forwarded_port", guest: 80, host: 8080

  # Create a forwarded port mapping which allows access to a specific port
  # within the machine from a port on the host machine and only allow access
  # via 127.0.0.1 to disable public access
  # config.vm.network "forwarded_port", guest: 80, host: 8080, host_ip: "127.0.0.1"

  # Create a private network, which allows host-only access to the machine
  # using a specific IP.
  config.vm.network "private_network", ip: "192.168.33.11"

  # Create a public network, which generally matched to bridged network.
  # Bridged networks make the machine appear as another physical device on
  # your network.
  # config.vm.network "public_network"

  # Share an additional folder to the guest VM. The first argument is
  # the path on the host to the actual folder. The second argument is
  # the path on the guest to mount the folder. And the optional third
  # argument is a set of non-required options.
  # config.vm.synced_folder "../data", "/vagrant_data"

  # Provider-specific configuration so you can fine-tune various
  # backing providers for Vagrant. These expose provider-specific options.
  # Example for VirtualBox:
  #
  # config.vm.provider "virtualbox" do |vb|
  #   # Display the VirtualBox GUI when booting the machine
  #   vb.gui = true
  #
  #   # Customize the amount of memory on the VM:
  #   vb.memory = "1024"
  # end
  #
  # View the documentation for the provider you are using for more
  # information on available options.

  # Enable provisioning with a shell script. Additional provisioners such as
  # Ansible, Chef, Docker, Puppet and Salt are also available. Please see the
  # documentation for more information about their specific syntax and use.
  config.vm.provision "shell", inline: <<-SHELL
  #   apt-get update
  #   apt-get install -y apache2
  sudo yum install -y yum-utils lvm2
  sudo curl -fsSL https://repo.huaweicloud.com/docker-ce/linux/centos/docker-ce.repo -o /etc/yum.repos.d/docker-ce.repo
  sudo sed -i 's+download.docker.com+repo.huaweicloud.com/docker-ce+' /etc/yum.repos.d/docker-ce.repo
  sudo yum makecache fast
  sudo yum install -y docker-ce-19.03.15 docker-ce-cli-19.03.15 containerd.io
  sudo rm -f /etc/localtime
  sudo ln -s /usr/share/zoneinfo/Asia/Shanghai /etc/localtime
  SHELL
end
二、docker网络配置
3、docker1虚拟机 daemon.json 的配置
bip: docker0 网卡的ip
fixed-cidr: docker run默认的ip地址
default-address-pools: 创建其他bridge网桥如docker-compose的网桥,会从这里挑地址
{

  "bip": "173.17.0.1/16",
  "fixed-cidr": "173.17.0.1/16",
  "default-address-pools": [
    {
      "base": "173.18.0.0/16",
      "size": 24
    },
    {
      "base": "173.19.0.0/16",
      "size": 24
    }
  ],

  "registry-mirrors": [
      "https://docker.mirrors.ustc.edu.cn"
    ]


}
4、docker机器2 daemon.json 的配置
{
  "bip": "174.17.0.1/16",
  "fixed-cidr": "174.17.0.1/16",
  "default-address-pools": [
    {
      "base": "174.18.0.0/16",
      "size": 24
    },
    {
      "base": "174.19.0.0/16",
      "size": 24
    }
  ],

  "registry-mirrors": [
      "https://docker.mirrors.ustc.edu.cn"
    ]


}
三、虚拟机路由表配置
5、docker1虚拟机 的路由表配置
# 添加docker2上容器的ip范围和docker2虚拟机的ip
ip route add 174.0.0.0/8 via 192.168.33.11
6、docker2虚拟机 的路由表配置
# 添加docker1上容器的ip范围和docker1虚拟机的ip

ip route add 173.0.0.0/8 via 192.168.33.12
阶段成果:
首先分别在两台主机上创建一个容器
docker run --rm -d  --name nginx1 nginx:alpine
docker run --rm -d  --name nginx2 nginx:alpine
这时已经能 traceroute到另一台机器上的容器ip了。

也能ping通另一台机器上的docker0了,因为docker0的ip时算local的,机器的default网络栈直接给应答了,流量都不会走到docker0。
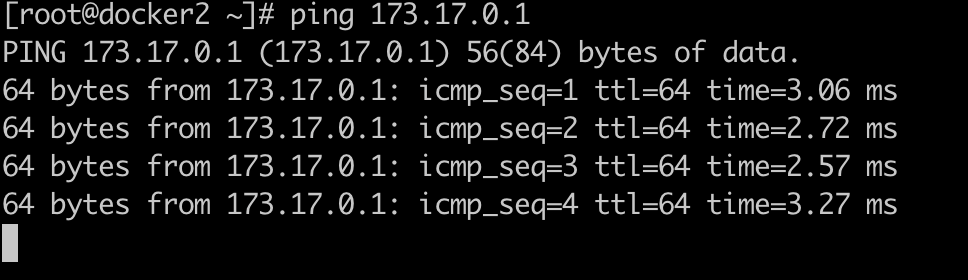
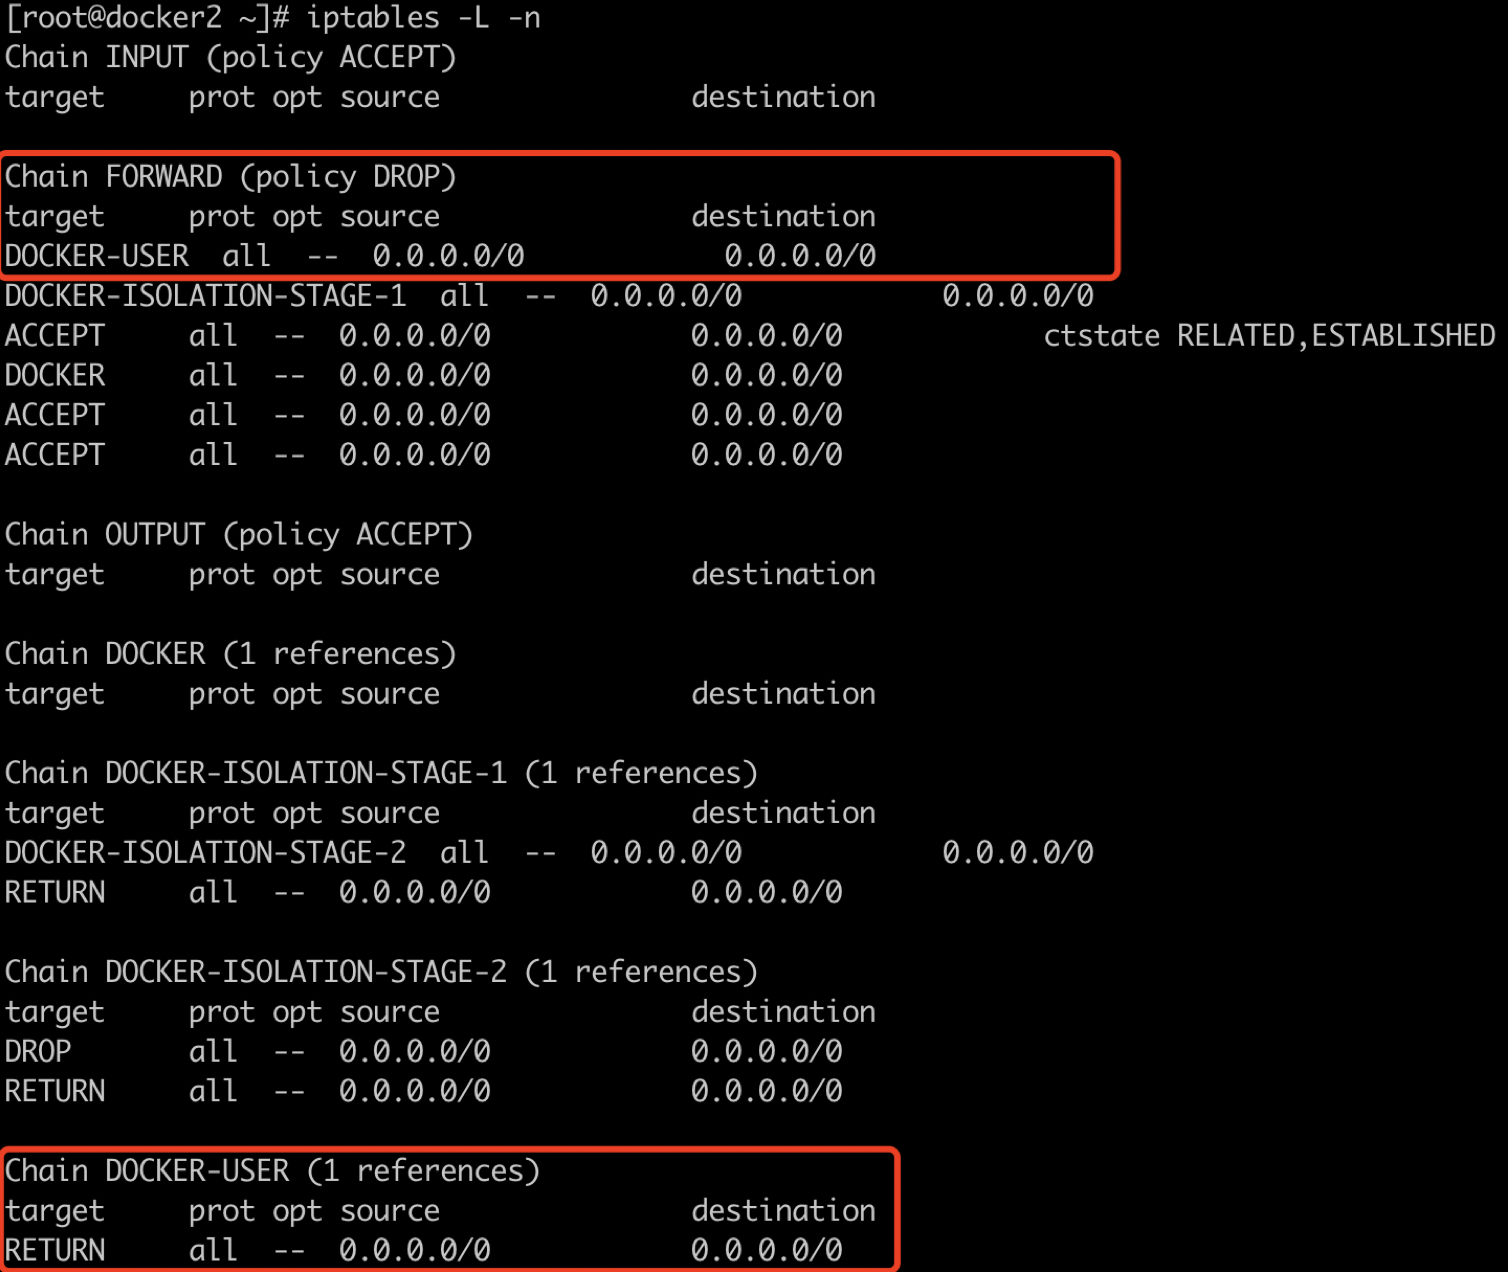
但是还不能ping通 另一台主机上的容器,因为docker默认的iptables规则FORWARD链做了限制:
在docker版本19.03.15中,iptables filter表 FORWARD链中DOCKER-USER会把所有流量都RETURN。
- 疑问:为什么只有另一台主机来的会走到这里?本地主机ping容器ip不会走到FORWARD链?
在docker1虚拟机上ping docker2上的nginx2,这时流量会走到docker2的FORWARD-》DOCKER-USER 被RETURN
在docker2虚拟机上ping nginx2,这时流量不会走到FORWARD,直接会走到nginx2.
可能:因为本地主机中有 arp记录,没有走routing路由,在二层直接发给docker0 ,没有走iptables?
你能帮帮我吗?
四、虚拟机iptables规则配置
7、docker1虚拟机 的iptables配置
iptables -I DOCKER-USER -s 0.0.0.0/0 -d 0.0.0.0/0 -j LOG  --log-level 4
iptables -I DOCKER-USER -s 0.0.0.0/0 -d 0.0.0.0/0 -j ACCEPT
8、docker2虚拟机 的iptables配置
iptables -I DOCKER-USER -s 0.0.0.0/0 -d 0.0.0.0/0 -j LOG  --log-level 4
iptables -I DOCKER-USER -s 0.0.0.0/0 -d 0.0.0.0/0 -j ACCEPT
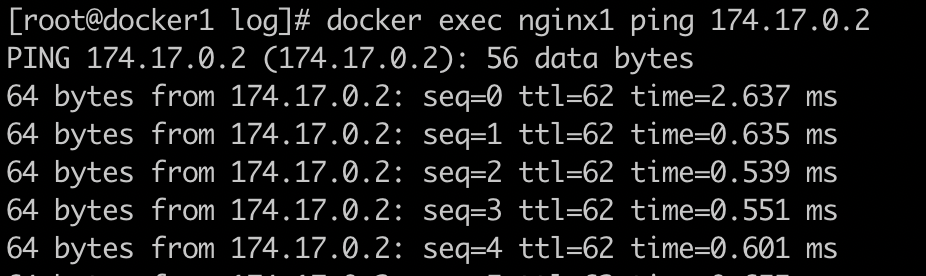
9、ping
# 在docker1 上
docker exec nginx1 ip a
173.17.0.2/16
# 在docker2 上
docker exec nginx2  ip a
174.17.0.2/16

# 在docker1 上 nginx1 ping docker2上的nginx2
docker exec nginx1 ping 174.17.0.2


 浙公网安备 33010602011771号