39.用户登录和注册【前后端】
一、登录业务介绍
1. 用户登录业务介绍
1.1. 单一服务器模式
早期单一服务器,用户认证。使用session对象实现,登录成功之后,将用户数据放到session里面,从seeion获取数据,判断是否登录成功。
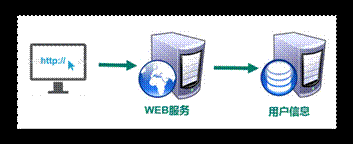
缺点:单点性能压力,无法扩展
1.2. SSO(single sign on)模式
分布式,SSO(single sign on)模式,也称单点登录
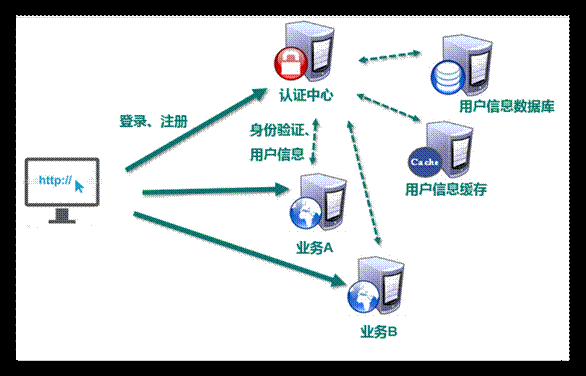
优点 :
用户身份信息独立管理,更好的分布式管理。
可以自己扩展安全策略
缺点:
认证服务器访问压力较大。
常见方式:
第一种:session广播机制实现,session复制
第二种:使用cookie+redis实现:
1)在项目中任何一个模块进行登录,登录之后,把数据放到两个地方
①redis,在key:生成唯一随机值(ip、用户id等等);在value:用户数据
②cookie:把redis里面生成的key值放到cookie里面
2)访问项目中其他模块,发送请求带着cookie进行发送,获取cookie值,到redis中进行查询,根据key进行查询,如果查询到数据就是登录
第三种:使用token实现:
1)在项目某个模块进行登录,登录之后,按照规则生成字符串,把登录之后用户包含到生成的字符串里面,最后将字符串返回
①可以把字符串通过cookie返回
②把字符串通过地址栏返回
2)再去访问项目其他模块,每次访问在地址栏带着生成字符串,在访问模块里面获取地址栏字符串,根据字符串获取用户信息,如可以获取到,就是登录
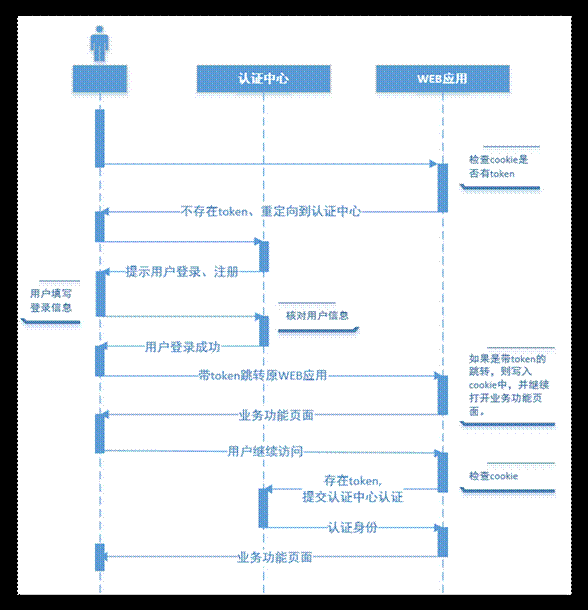
1.3. Token模式
业务流程图{用户访问业务时,必须登录的流程}
优点:
无状态: token无状态,session有状态的
基于标准化: 你的API可以采用标准化的 JSON Web Token (JWT)
缺点:
占用带宽
无法在服务器端销毁
注:基于微服务开发,选择token的形式相对较多,因此我使用token作为用户认证的标准
二、整合JWT
1、使用JWT进行跨域身份验证
1.1、传统用户身份验证
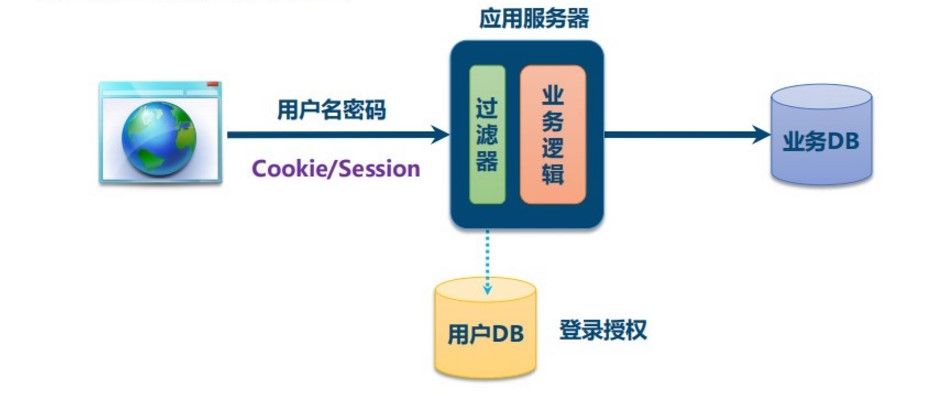
Internet服务无法与用户身份验证分开。一般过程如下:
- 用户向服务器发送用户名和密码。
- 验证服务器后,相关数据(如用户角色,登录时间等)将保存在当前会话中。
- 服务器向用户返回session_id,session信息都会写入到用户的Cookie。
- 用户的每个后续请求都将通过在Cookie中取出session_id传给服务器。
- 服务器收到session_id并对比之前保存的数据,确认用户的身份。
这种模式最大的问题是,没有分布式架构,无法支持横向扩展。
1.2、解决方案
- session广播
- 将透明令牌存入cookie,将用户身份信息存入redis
另外一种灵活的解决方案:
使用自包含令牌,通过客户端保存数据,而服务器不保存会话数据。 JWT是这种解决方案的代表。
2、JWT令牌
2.1、访问令牌的类型
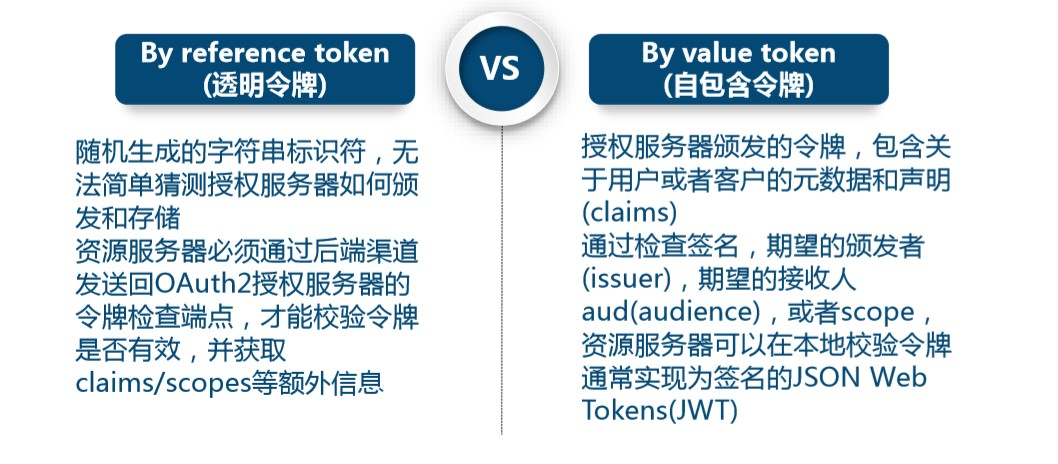
2.2、JWT的组成

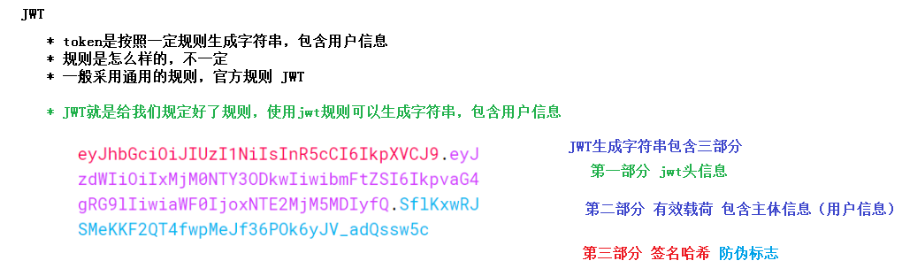
该对象为一个很长的字符串,字符之间通过"."分隔符分为三个子串。
每一个子串表示了一个功能块,总共有以下三个部分:JWT头、有效载荷和签名
JWT头
JWT头部分是一个描述JWT元数据的JSON对象,通常如下所示。
{
  "alg": "HS256",
  "typ": "JWT"
}
在上面的代码中,alg属性表示签名使用的算法,默认为HMAC SHA256(写为HS256);typ属性表示令牌的类型,JWT令牌统一写为JWT。最后,使用Base64 URL算法将上述JSON对象转换为字符串保存。
有效载荷
有效载荷部分,是JWT的主体内容部分,也是一个JSON对象,包含需要传递的数据。 JWT指定七个默认字段供选择。
iss:发行人
exp:到期时间
sub:主题
aud:用户
nbf:在此之前不可用
iat:发布时间
jti:JWT ID用于标识该JWT
除以上默认字段外,我们还可以自定义私有字段,如下例:
{
  "sub": "1234567890",
  "name": "Helen",
  "admin": true
}
请注意,默认情况下JWT是未加密的,任何人都可以解读其内容,因此不要构建隐私信息字段,存放保密信息,以防止信息泄露。
JSON对象也使用Base64 URL算法转换为字符串保存。
签名哈希
签名哈希部分是对上面两部分数据签名,通过指定的算法生成哈希,以确保数据不会被篡改。
首先,需要指定一个密码(secret)。该密码仅仅为保存在服务器中,并且不能向用户公开。然后,使用标头中指定的签名算法(默认情况下为HMAC SHA256)根据以下公式生成签名。
HMACSHA256(base64UrlEncode(header) + "." + base64UrlEncode(claims), secret)
在计算出签名哈希后,JWT头,有效载荷和签名哈希的三个部分组合成一个字符串,每个部分用"."分隔,就构成整个JWT对象。
Base64URL算法
如前所述,JWT头和有效载荷序列化的算法都用到了Base64URL。该算法和常见Base64算法类似,稍有差别。
作为令牌的JWT可以放在URL中(例如api.example/?token=xxx)。 Base64中用的三个字符是"+","/"和"=",由于在URL中有特殊含义,因此Base64URL中对他们做了替换:"="去掉,"+"用"-"替换,"/"用"_"替换,这就是Base64URL算法。
2.3、JWT的原则
JWT的原则是在服务器身份验证之后,将生成一个JSON对象并将其发送回用户,如下所示。
{
  "sub": "1234567890",
  "name": "Helen",
  "admin": true
}
之后,当用户与服务器通信时,客户在请求中发回JSON对象。服务器仅依赖于这个JSON对象来标识用户。为了防止用户篡改数据,服务器将在生成对象时添加签名。
服务器不保存任何会话数据,即服务器变为无状态,使其更容易扩展。
2.4、JWT的用法
客户端接收服务器返回的JWT,将其存储在Cookie或localStorage中。
此后,客户端将在与服务器交互中都会带JWT。如果将它存储在Cookie中,就可以自动发送,但是不会跨域,因此一般是将它放入HTTP请求的Header Authorization字段中。当跨域时,也可以将JWT被放置于POST请求的数据主体中。
简单来说:
3、整合JWT令牌
3.1、在common_utils模块中添加jwt工具依赖
<dependencies>
    <!-- JWT-->
    <dependency>
        <groupId>io.jsonwebtoken</groupId>
        <artifactId>jjwt</artifactId>
    </dependency>
</dependencies>
3.2、创建JWT工具类
在common_utils模块中创建JwtUtils工具类


public class JwtUtils {

    //常量
    public static final long EXPIRE = 1000 * 60 * 60 * 24; //token过期时间-需更改
    public static final String APP_SECRET = "ukc8BDbRigUDaY6pZFfWus2jZWLPHO"; //秘钥

    //生产token字符串的方法
    public static String getJwtToken(String id, String nickname){

        String JwtToken = Jwts.builder()
                //头信息,固定,不需要更改
                .setHeaderParam("typ", "JWT")
                .setHeaderParam("alg", "HS256")
                //设置过期时间
                .setSubject("guli-user")  //分类-需更改
                .setIssuedAt(new Date())
                .setExpiration(new Date(System.currentTimeMillis() + EXPIRE))
                //设置token主体部分,存储用户信息-可更改
                .claim("id", id)
                .claim("nickname", nickname)
                //签名hash,根据秘钥进行编码
                .signWith(SignatureAlgorithm.HS256, APP_SECRET)
                .compact();

        return JwtToken;
    }

    /**
     * 判断token是否存在与有效
     * @param jwtToken
     * @return
     */
    public static boolean checkToken(String jwtToken) {
        if(StringUtils.isEmpty(jwtToken)) return false;
        try {
            Jwts.parser().setSigningKey(APP_SECRET).parseClaimsJws(jwtToken);
        } catch (Exception e) {
            e.printStackTrace();
            return false;
        }
        return true;
    }

    /**
     * 判断token是否存在与有效
     * @param request
     * @return
     */
    public static boolean checkToken(HttpServletRequest request) {
        try {
            String jwtToken = request.getHeader("token");
            if(StringUtils.isEmpty(jwtToken)) return false;
            Jwts.parser().setSigningKey(APP_SECRET).parseClaimsJws(jwtToken);
        } catch (Exception e) {
            e.printStackTrace();
            return false;
        }
        return true;
    }

    /**
     * 根据token获取会员id
     * @param request
     * @return
     */
    public static String getMemberIdByJwtToken(HttpServletRequest request) {
        String jwtToken = request.getHeader("token");
        if(StringUtils.isEmpty(jwtToken)) return "";
        Jws<Claims> claimsJws = Jwts.parser().setSigningKey(APP_SECRET).parseClaimsJws(jwtToken);
        Claims claims = claimsJws.getBody();
        return (String)claims.get("id");
    }
}
三、整合阿里云短信服务
帮助文档:
1、开通阿里云短信服务
1.1、添加签名管理与模板管理
(1)添加模板管理
选择 国内消息 - 模板管理 - 添加模板
点击 添加模板,进入到添加页面,输入模板信息
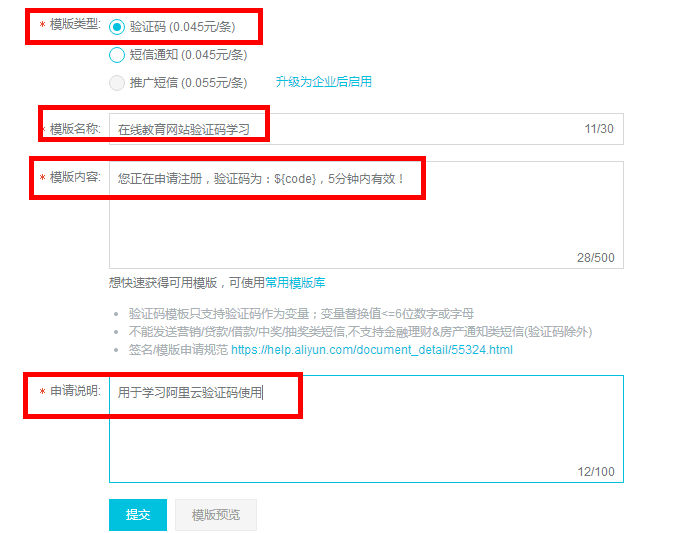
点击提交,等待审核,审核通过后可以使用
(2)添加签名管理
选择 国内消息 - 签名管理 - 添加签名
点击添加签名,进入添加页面,填入相关信息
注意:签名要写的有实际意义
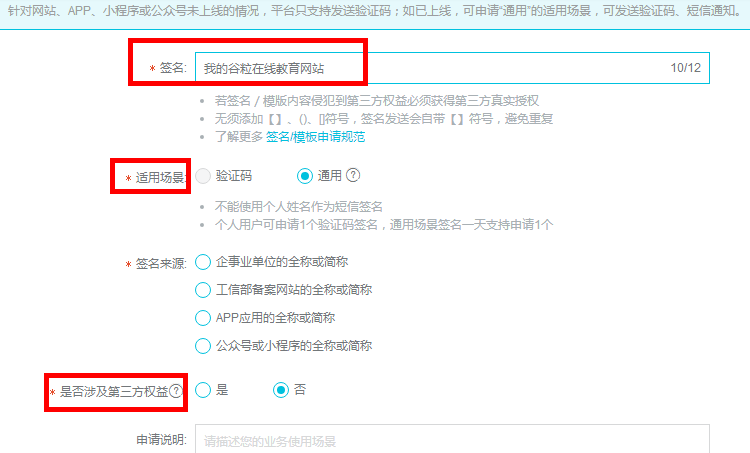
点击提交,等待审核,审核通过后可以使用(我还没申请成功,放弃了,太难了。。。=-=)
2、创建短信微服务模块并编写发送短信接口
2.1、在service模块下创建子模块service-msm
2.2、创建controller和service代码

2.3、配置application.properties
# 服务端口
server.port=8005
# 服务名
spring.application.name=service-msm

# mysql数据库连接
spring.datasource.driver-class-name=com.mysql.cj.jdbc.Driver
spring.datasource.url=jdbc:mysql://localhost:3306/guli?characterEncoding=UTF-8&serverTimezone=GMT%2B8
spring.datasource.username=root
spring.datasource.password=123

spring.redis.host=192.168.73.128
spring.redis.port=6379
spring.redis.database= 0
spring.redis.timeout=1800000

spring.redis.lettuce.pool.max-active=20
spring.redis.lettuce.pool.max-wait=-1
#最大阻塞等待时间(负数表示没限制)
spring.redis.lettuce.pool.max-idle=5
spring.redis.lettuce.pool.min-idle=0
#最小空闲


#返回json的全局时间格式
spring.jackson.date-format=yyyy-MM-dd HH:mm:ss
spring.jackson.time-zone=GMT+8

#配置mapper xml文件的路径
mybatis-plus.mapper-locations=classpath:com/atguigu/cmsservice/mapper/xml/*.xml

#mybatis日志
mybatis-plus.configuration.log-impl=org.apache.ibatis.logging.stdout.StdOutImpl
注意:需要在nacos添加对应接口并重启nacos
2.4、创建启动类
@ComponentScan({"com.atguigu"})
@SpringBootApplication(exclude = DataSourceAutoConfiguration.class)//取消数据源自动配置
public class MsmApplication {
    public static void main(String[] args) {
        SpringApplication.run(MsmApplication.class, args);
    }
}
2.5、在service-msm的pom中引入依赖
    <dependencies>
        <dependency>
            <groupId>com.alibaba</groupId>
            <artifactId>fastjson</artifactId>
        </dependency>
        <dependency>
            <groupId>com.aliyun</groupId>
            <artifactId>aliyun-java-sdk-core</artifactId>
        </dependency>
    </dependencies>
2.6、编写controller,根据手机号发送短信
@RestController
@RequestMapping("/edumsm/msm")
@CrossOrigin
public class MsmController {

    @Autowired
    private MsmService msmService;

    @Autowired
    private RedisTemplate<String,String> redisTemplate;

    //发送短信的方法
    @GetMapping("send/{phone}")
    public R sendMsm(@PathVariable String phone) {
        //1 从redis获取验证码,如果获取到直接返回
        String code = redisTemplate.opsForValue().get(phone);
        if (!StringUtils.isEmpty(code)) {
            return R.ok();
        }

        //2 如果redis获取 不到,进行阿里云发送
        //生产随机值,传递给阿里云进行发送
        code = RandomUtil.getFourBitRandom();
        Map<String,Object> param = new HashMap<>();
        param.put("code",code);
        //调用service发送短信的方法
        boolean isSend = msmService.send(param,phone);
        if(isSend) {
            //发送成功,把发送成功验证码放到redis里面
            //设置有效时间5分钟
            redisTemplate.opsForValue().set(phone,code,5, TimeUnit.MINUTES);
            return R.ok();
        } else {
            return R.error().message("发送短信失败");
        }
    }
}
2.7、编写service
public class MsmServiceImpl implements MsmService {
    //发送短信的方法
    //TODO
    @Override
    public boolean send(Map<String, Object> param, String phone) {
        if(StringUtils.isEmpty(phone)) return false;
        //需更改--id和secret
        DefaultProfile profile =
                DefaultProfile.getProfile("default", "LTAI4GAeLQ4ByaQARKZMnXyj", "JSh6nc9XFq2LjRNOBBgyKMCPhEE0c7");
        IAcsClient client = new DefaultAcsClient(profile);

        //设置相关参数
        CommonRequest request = new CommonRequest();
        //request.setProtocol(ProtocolType.HTTPS);
        request.setMethod(MethodType.POST);
        request.setDomain("dysmsapi.aliyuncs.com");
        request.setVersion("2017-05-25");
        request.setAction("SendSms");

        //设置发送相关的参数
        request.putQueryParameter("PhoneNumbers",phone);
        request.putQueryParameter("SignName", "雷同学在线教育网站");//申请的阿里云名称--需更改
        request.putQueryParameter("TemplateCode", "templateCode");//申请的阿里云模板code--需更改
        request.putQueryParameter("TemplateParam", JSONObject.toJSONString(param));//将验证码转换为json数据传递

        //最终发送
        try {
            CommonResponse response = client.getCommonResponse(request);
//            System.out.println(response.getData());
            boolean success = response.getHttpResponse().isSuccess();
            return success;
        } catch (Exception e) {
            e.printStackTrace();
        }

        return false;
    }
}
四、用户登录和注册【后端】
1、新建用户微服务
1.1、在service模块下创建子模块service-ucenter
1.2、使用代码生成器生成代码
(1)创建ucenter_member表
# Host: 47.93.118.241:33306 (Version 5.7.21) # Date: 2019-11-15 11:58:11 # Generator: MySQL-Front 6.1 (Build 1.26) # # Structure for table "ucenter_member" # CREATE TABLE `ucenter_member` ( `id` char(19) NOT NULL COMMENT '会员id', `openid` varchar(128) DEFAULT NULL COMMENT '微信openid', `mobile` varchar(11) DEFAULT '' COMMENT '手机号', `password` varchar(255) DEFAULT NULL COMMENT '密码', `nickname` varchar(50) DEFAULT NULL COMMENT '昵称', `sex` tinyint(2) unsigned DEFAULT NULL COMMENT '性别 1 女,2 男', `age` tinyint(3) unsigned DEFAULT NULL COMMENT '年龄', `avatar` varchar(255) DEFAULT NULL COMMENT '用户头像', `sign` varchar(100) DEFAULT NULL COMMENT '用户签名', `is_disabled` tinyint(1) NOT NULL DEFAULT '0' COMMENT '是否禁用 1(true)已禁用, 0(false)未禁用', `is_deleted` tinyint(1) NOT NULL DEFAULT '0' COMMENT '逻辑删除 1(true)已删除, 0(false)未删除', `gmt_create` datetime NOT NULL COMMENT '创建时间', `gmt_modified` datetime NOT NULL COMMENT '更新时间', PRIMARY KEY (`id`) ) ENGINE=InnoDB DEFAULT CHARSET=utf8mb4 COMMENT='会员表'; # # Data for table "ucenter_member" # INSERT INTO `ucenter_member` VALUES ('1',NULL,'13700000001','96e79218965eb72c92a549dd5a330112','小三123',1,5,'http://thirdwx.qlogo.cn/mmopen/vi_32/DYAIOgq83eoj0hHXhgJNOTSOFsS4uZs8x1ConecaVOB8eIl115xmJZcT4oCicvia7wMEufibKtTLqiaJeanU2Lpg3w/132',NULL,0,0,'2019-01-01 12:11:33','2019-11-08 11:56:01'),('1080736474267144193',NULL,'13700000011','96e79218965eb72c92a549dd5a330112','用户XJtDfaYeKk',1,19,'http://thirdwx.qlogo.cn/mmopen/vi_32/DYAIOgq83eoj0hHXhgJNOTSOFsS4uZs8x1ConecaVOB8eIl115xmJZcT4oCicvia7wMEufibKtTLqiaJeanU2Lpg3w/132',NULL,0,0,'2019-01-02 12:12:45','2019-01-02 12:12:56'),('1080736474355224577',NULL,'13700000002','96e79218965eb72c92a549dd5a330112','用户wUrNkzAPrc',1,27,'http://thirdwx.qlogo.cn/mmopen/vi_32/DYAIOgq83eoj0hHXhgJNOTSOFsS4uZs8x1ConecaVOB8eIl115xmJZcT4oCicvia7wMEufibKtTLqiaJeanU2Lpg3w/132',NULL,0,0,'2019-01-02 12:13:56','2019-01-02 12:14:07'),('1086387099449442306',NULL,'13520191388','96e79218965eb72c92a549dd5a330112','用户XTMUeHDAoj',2,20,'http://thirdwx.qlogo.cn/mmopen/vi_32/DYAIOgq83eoj0hHXhgJNOTSOFsS4uZs8x1ConecaVOB8eIl115xmJZcT4oCicvia7wMEufibKtTLqiaJeanU2Lpg3w/132',NULL,0,0,'2019-01-19 06:17:23','2019-01-19 06:17:23'),('1086387099520745473',NULL,'13520191389','96e79218965eb72c92a549dd5a330112','用户vSdKeDlimn',1,21,'http://thirdwx.qlogo.cn/mmopen/vi_32/DYAIOgq83eoj0hHXhgJNOTSOFsS4uZs8x1ConecaVOB8eIl115xmJZcT4oCicvia7wMEufibKtTLqiaJeanU2Lpg3w/132',NULL,0,0,'2019-01-19 06:17:23','2019-01-19 06:17:23'),('1086387099608825858',NULL,'13520191381','96e79218965eb72c92a549dd5a330112','用户EoyWUVXQoP',1,18,'http://thirdwx.qlogo.cn/mmopen/vi_32/DYAIOgq83eoj0hHXhgJNOTSOFsS4uZs8x1ConecaVOB8eIl115xmJZcT4oCicvia7wMEufibKtTLqiaJeanU2Lpg3w/132',NULL,0,0,'2019-01-19 06:17:23','2019-01-19 06:17:23'),('1086387099701100545',NULL,'13520191382','96e79218965eb72c92a549dd5a330112','用户LcAYbxLNdN',2,24,'http://thirdwx.qlogo.cn/mmopen/vi_32/DYAIOgq83eoj0hHXhgJNOTSOFsS4uZs8x1ConecaVOB8eIl115xmJZcT4oCicvia7wMEufibKtTLqiaJeanU2Lpg3w/132',NULL,0,0,'2019-01-19 06:17:23','2019-01-19 06:17:23'),('1086387099776598018',NULL,'13520191383','96e79218965eb72c92a549dd5a330112','用户dZdjcgltnk',2,25,'http://thirdwx.qlogo.cn/mmopen/vi_32/DYAIOgq83eoj0hHXhgJNOTSOFsS4uZs8x1ConecaVOB8eIl115xmJZcT4oCicvia7wMEufibKtTLqiaJeanU2Lpg3w/132',NULL,0,0,'2019-01-19 06:17:23','2019-01-19 06:17:23'),('1086387099852095490',NULL,'13520191384','96e79218965eb72c92a549dd5a330112','用户wNHGHlxUwX',2,23,'http://thirdwx.qlogo.cn/mmopen/vi_32/DYAIOgq83eoj0hHXhgJNOTSOFsS4uZs8x1ConecaVOB8eIl115xmJZcT4oCicvia7wMEufibKtTLqiaJeanU2Lpg3w/132',NULL,0,0,'2019-01-19 06:17:23','2019-01-19 06:17:23'),('1106746895272849410','o1R-t5u2TfEVeVjO9CPGdHPNw-to',NULL,NULL,'檀梵\'',NULL,NULL,'http://thirdwx.qlogo.cn/mmopen/vi_32/zZfLXcetf2Rpsibq6HbPUWKgWSJHtha9y1XBeaqluPUs6BYicW1FJaVqj7U3ozHd3iaodGKJOvY2PvqYTuCKwpyfQ/132',NULL,0,0,'2019-03-16 10:39:57','2019-03-16 10:39:57'),('1106822699956654081',NULL,NULL,NULL,NULL,NULL,NULL,'http://thirdwx.qlogo.cn/mmopen/vi_32/DYAIOgq83eoj0hHXhgJNOTSOFsS4uZs8x1ConecaVOB8eIl115xmJZcT4oCicvia7wMEufibKtTLqiaJeanU2Lpg3w/132',NULL,0,0,'2019-03-16 15:41:10','2019-03-16 15:41:10'),('1106823035660357634','o1R-t5i4gENwHYRb5lVFy98Z0bdk',NULL,NULL,'GaoSir',NULL,NULL,'http://thirdwx.qlogo.cn/mmopen/vi_32/Q0j4TwGTfTJI53RcCuc1no02os6ZrattWGiazlPnicoZQ59zkS7phNdLEWUPDk8fzoxibAnXV1Sbx0trqXEsGhXPw/132',NULL,0,0,'2019-03-16 15:42:30','2019-03-16 15:42:30'),('1106823041599492098',NULL,NULL,NULL,NULL,NULL,NULL,'http://thirdwx.qlogo.cn/mmopen/vi_32/DYAIOgq83eoj0hHXhgJNOTSOFsS4uZs8x1ConecaVOB8eIl115xmJZcT4oCicvia7wMEufibKtTLqiaJeanU2Lpg3w/132',NULL,0,0,'2019-03-16 15:42:32','2019-03-16 15:42:32'),('1106823115788341250','o1R-t5l_3rnbZbn4jWwFdy6Gk6cg',NULL,NULL,'换个网名哇、',NULL,NULL,'http://thirdwx.qlogo.cn/mmopen/vi_32/jJHyeM0EN2jhB70LntI3k8fEKe7W6CwykrKMgDJM4VZqCpcxibVibX397p0vmbKURGkLS4jxjGB0GpZfxCicgt07w/132',NULL,0,0,'2019-03-16 15:42:49','2019-03-16 15:42:49'),('1106826046730227714','o1R-t5gyxumyBqt0CWcnh0S6Ya1g',NULL,NULL,'我是Helen',NULL,NULL,'http://thirdwx.qlogo.cn/mmopen/vi_32/Q0j4TwGTfTKDRfib8wy7A2ltERKh4VygxdjVC1x5OaOb1t9hot4JNt5agwaVLdJLcD9vJCNcxkvQnlvLYIPfrZw/132',NULL,0,0,'2019-03-16 15:54:28','2019-03-16 15:54:28'),('1106828185829490690','o1R-t5nNlou5lRwBVgGNJFm4rbc4',NULL,NULL,' 虎头',NULL,NULL,'http://thirdwx.qlogo.cn/mmopen/vi_32/Q0j4TwGTfTKxCqRzuYWQmpwiaqQEjNxbC7WicebicXQusU306jgmfoOzUcFg1qaDq5BStiblwBjw5dUOblQ2gUicQOQ/132',NULL,0,0,'2019-03-16 16:02:58','2019-03-16 16:02:58'),('1106830599651442689','o1R-t5hZHQB1cbX7HZJsiM727_SA',NULL,NULL,'是吴啊',NULL,NULL,'http://thirdwx.qlogo.cn/mmopen/vi_32/Q0j4TwGTfTJ9CsqApybcs7f3Dyib9IxIh0sBqJb7LicbjU4WticJFF0PVwFvHgtbFdBwfmk3H2t3NyqmEmVx17tRA/132',NULL,0,0,'2019-03-16 16:12:34','2019-03-16 16:12:34'),('1106830976199278593','o1R-t5meKOoyEJ3-IhWRCBKFcvzU',NULL,NULL,'我才是Helen',NULL,NULL,'http://thirdwx.qlogo.cn/mmopen/vi_32/DYAIOgq83epMicP9UT6mVjYWdno0OJZkOXiajG0sllJTbGJ9DYiceej2XvbDSGCK8LCF7jv1PuG2uoYlePWic9XO8A/132',NULL,0,0,'2019-03-16 16:14:03','2019-03-16 16:14:03'),('1106831936900415490','o1R-t5jXYSWakGtnUBnKbfVT5Iok',NULL,NULL,'文若姬',NULL,NULL,'http://thirdwx.qlogo.cn/mmopen/vi_32/3HEmJwpSzguqqAyzmBwqT6aicIanswZibEOicQInQJI3ZY1qmu59icJC6N7SahKqWYv24GvX5KH2fibwt0mPWcTJ3fg/132',NULL,0,0,'2019-03-16 16:17:52','2019-03-16 16:17:52'),('1106832491064442882','o1R-t5sud081Qsa2Vb2xSKgGnf_g',NULL,NULL,'Peanut',NULL,NULL,'http://thirdwx.qlogo.cn/mmopen/vi_32/DYAIOgq83eoj0hHXhgJNOTSOFsS4uZs8x1ConecaVOB8eIl115xmJZcT4oCicvia7wMEufibKtTLqiaJeanU2Lpg3w/132',NULL,0,0,'2019-03-16 16:20:04','2019-03-16 16:20:04'),('1106833021442510849','o1R-t5lsGc3I8P5bDpHj7m_AIRvQ',NULL,NULL,'食物链终结者',NULL,NULL,'http://thirdwx.qlogo.cn/mmopen/vi_32/MQ7qUmCprK9am16M1Ia1Cs3RK0qiarRrl9y8gsssBjIZeS2GwKSrnq7ZYhmrzuzDwBxSMMAofrXeLic9IBlW4M3Q/132',NULL,0,0,'2019-03-16 16:22:11','2019-03-16 16:22:11'),('1191600824445046786',NULL,'15210078344','96e79218965eb72c92a549dd5a330112','IT妖姬',1,5,'http://thirdwx.qlogo.cn/mmopen/vi_32/DYAIOgq83eoj0hHXhgJNOTSOFsS4uZs8x1ConecaVOB8eIl115xmJZcT4oCicvia7wMEufibKtTLqiaJeanU2Lpg3w/132',NULL,0,0,'2019-11-05 14:19:10','2019-11-08 18:04:43'),('1191616288114163713',NULL,'17866603606','96e79218965eb72c92a549dd5a330112','xiaowu',NULL,NULL,'http://thirdwx.qlogo.cn/mmopen/vi_32/DYAIOgq83eoj0hHXhgJNOTSOFsS4uZs8x1ConecaVOB8eIl115xmJZcT4oCicvia7wMEufibKtTLqiaJeanU2Lpg3w/132',NULL,0,0,'2019-11-05 15:20:37','2019-11-05 15:20:37'),('1195187659054329857',NULL,'15010546384','96e79218965eb72c92a549dd5a330112','qy',NULL,NULL,'http://thirdwx.qlogo.cn/mmopen/vi_32/DYAIOgq83eoj0hHXhgJNOTSOFsS4uZs8x1ConecaVOB8eIl115xmJZcT4oCicvia7wMEufibKtTLqiaJeanU2Lpg3w/132',NULL,0,0,'2019-11-15 11:51:58','2019-11-15 11:51:58');
(2)使用代码生成器生成代码
1.3、配置application.properties
# 服务端口
server.port=8006
# 服务名
spring.application.name=service-ucenter

# mysql数据库连接
spring.datasource.driver-class-name=com.mysql.cj.jdbc.Driver
spring.datasource.url=jdbc:mysql://localhost:3306/guli?characterEncoding=UTF-8&serverTimezone=GMT%2B8
spring.datasource.username=root
spring.datasource.password=123

spring.redis.host=192.168.73.128
spring.redis.port=6379
spring.redis.database= 0
spring.redis.timeout=1800000
spring.redis.lettuce.pool.max-active=20
spring.redis.lettuce.pool.max-wait=-1
#最大阻塞等待时间(负数表示没限制)
spring.redis.lettuce.pool.max-idle=5
spring.redis.lettuce.pool.min-idle=0
#最小空闲

#返回json的全局时间格式
spring.jackson.date-format=yyyy-MM-dd HH:mm:ss
spring.jackson.time-zone=GMT+8

#配置mapper xml文件的路径
mybatis-plus.mapper-locations=classpath:com/atguigu/educenter/mapper/xml/*.xml

#mybatis日志
mybatis-plus.configuration.log-impl=org.apache.ibatis.logging.stdout.StdOutImpl

# nacos服务地址
spring.cloud.nacos.discovery.server-addr=127.0.0.1:8848

#开启熔断机制
feign.hystrix.enabled=true
# 设置hystrix超时时间,默认1000ms
hystrix.command.default.execution.isolation.thread.timeoutInMilliseconds=6000
2、创建登录和注册接口
2.1、创建LoginVo和RegisterVo用于数据封装
LoginVo
@Data
@ApiModel(value="登录对象", description="登录对象")
public class LoginVo {

    @ApiModelProperty(value = "手机号")
    private String mobile;

    @ApiModelProperty(value = "密码")
    private String password;
}
RegisterVo
@Data
@ApiModel(value="注册对象", description="注册对象")
public class RegisterVo {

    @ApiModelProperty(value = "昵称")
    private String nickname;

    @ApiModelProperty(value = "手机号")
    private String mobile;

    @ApiModelProperty(value = "密码")
    private String password;

    @ApiModelProperty(value = "验证码")
    private String code;
}
2.2、创建controller编写登录和注册方法
UcenterMemberController类
    @Autowired
    private UcenterMemberService memberService;

    //登录
    @PostMapping("login")
    public R loginUser(@RequestBody UcenterMember member) {
        //调用service方法实现登录
        //返回token值,使用jwt生成
        String token = memberService.login(member);
        return R.ok().data("token",token);
    }

    //注册
    @ApiOperation(value = "会员注册")
    @PostMapping("register")
    public R register(@RequestBody RegisterVo registerVo){
        memberService.register(registerVo);
        return R.ok();
    }
2.3、创建service接口和实现类
@Service
public class UcenterMemberServiceImpl extends ServiceImpl<UcenterMemberMapper, UcenterMember> implements UcenterMemberService {

    @Autowired
    private RedisTemplate<String, String> redisTemplate;

    @Override
    public String login(UcenterMember member) {
        //获取登录手机号和密码
        String mobile = member.getMobile();
        String password = member.getPassword();

        //手机号和密码非空判断
        if (StringUtils.isEmpty(mobile)||StringUtils.isEmpty(password)) {
            throw new GuliException(20001,"登录失败");
        }

        //判断手机号是否正确
        QueryWrapper<UcenterMember> wrapper = new QueryWrapper<>();
        wrapper.eq("mobile",mobile);
        UcenterMember mobileMember = baseMapper.selectOne(wrapper);
        //判断查询对象是否为空
        if(mobileMember == null) { //没有这个手机号
            throw new GuliException(20001,"登录失败");
        }

        //判断密码
        //存储在数据库中的密码为加密的
        //需要先把输入的密码进行MD5加密,再进行比较

        if (!MD5.encrypt(password).equals(mobileMember.getPassword())){
            throw new GuliException(20001,"登录失败");
        }

        //判断用户是否被禁用  is_disabled
        if (mobileMember.getIsDisabled()){
            throw new GuliException(20001,"登录失败");
        }

        //登录成功
        //生成token字符串,使用jwt工具类
        String jwtToken = JwtUtils.getJwtToken(mobileMember.getId(), mobileMember.getNickname());

        return jwtToken;
    }

    //注册的方法
    @Override
    public void register(RegisterVo registerVo) {
        //获取注册信息,进行校验
        String nickname = registerVo.getNickname();//昵称
        String mobile = registerVo.getMobile();//手机号
        String password = registerVo.getPassword();//密码
        String code = registerVo.getCode();//验证码

        //校验参数,都不为空
        if(StringUtils.isEmpty(mobile) ||
                StringUtils.isEmpty(mobile) ||
                StringUtils.isEmpty(password) ||
                StringUtils.isEmpty(code)) {
            throw new GuliException(20001,"注册失败");
        }

        //校验校验验证码
        //从redis获取发送的验证码
        String mobleCode = redisTemplate.opsForValue().get(mobile);
        if(!code.equals(mobleCode)) {
            throw new GuliException(20001,"注册失败");
        }

        //查询数据库中是否存在相同的手机号码
        Integer count = baseMapper.selectCount(new QueryWrapper<UcenterMember>().eq("mobile", mobile));
        if(count.intValue() > 0) {
            throw new GuliException(20001,"注册失败");
        }

        //添加注册信息到数据库
        UcenterMember member = new UcenterMember();
        member.setNickname(nickname);
        member.setMobile(registerVo.getMobile());
        member.setPassword(MD5.encrypt(password));
        member.setIsDisabled(false);
        member.setAvatar("https://edu-0317.oss-cn-beijing.aliyuncs.com/2021/03/18/d81f01c36f9b424b888893e2d356ff32file.png");
        baseMapper.insert(member);
    }
}
2.4、创建接口根据token获取用户信息
在UcenterMemberController中创建方法
    @ApiOperation(value = "根据token获取登录信息")
    @GetMapping("getMemberInfo")
    public R getLoginInfo(HttpServletRequest request){
        try {
            //调用jwt工具类的方法,根据request对象获取头信息,返回用户id
            String memberId = JwtUtils.getMemberIdByJwtToken(request);
            UcenterMember member = memberService.getById(memberId);
            return R.ok().data("userInfo", member);
        }catch (Exception e){
            e.printStackTrace();
            throw new GuliException(20001,"error");
        }
    }
五、用户登录和注册【前端】
1、在nuxt环境中安装插件
1.1、安装element-ui 和 vue-qriously
(1)执行命令安装
npm install element-ui
npm install vue-qriously
1.2、修改配置文件 nuxt-swiper-plugin.js,使用插件
import Vue from 'vue'
import VueAwesomeSwiper from 'vue-awesome-swiper/dist/ssr'
import VueQriously from 'vue-qriously'
import ElementUI from 'element-ui' //element-ui的全部组件
import 'element-ui/lib/theme-chalk/index.css'//element-ui的css
Vue.use(ElementUI) //使用elementUI
Vue.use(VueQriously)
Vue.use(VueAwesomeSwiper)
2、用户注册功能前端整合
2.1、在api文件夹中创建注册的js文件,定义接口
register.js
import request from '@/utils/request'
export default {
    //根据手机号发送验证码
  sendCode(phone) {
    return request({
      url: `/edumsm/msm/send/${phone}`,
      method: 'get'
    })
  },

  //用户注册
  submitRegister(formItem) {
    return request({
      url: `/educenter/member/register`,
      method: 'post',
      data: formItem
    })
  }
}
2.2、在pages文件夹中创建注册页面,调用方法
(1)在layouts创建布局页面
sign.vue
<template>
  <div class="sign">
    <!--标题-->
    <div class="logo">
      <img src="~/assets/img/logo.png" alt="logo">
    </div>
    <!--表单-->
    <nuxt/>
  </div>
</template>
(2)创建注册页面
修改layouts文件夹里面default.vue页面,修改登录和注册超链接地址
在pages文件夹下,创建注册页面(register.vue)和登录页面(login.vue)
register.vue
<template>
  <div class="main">
    <div class="title">
      <a href="/login">登录</a>
      <span>·</span>
      <a class="active" href="/register">注册</a>
    </div>

    <div class="sign-up-container">
      <el-form ref="userForm" :model="params">

        <el-form-item class="input-prepend restyle" prop="nickname" :rules="[{ required: true, message: '请输入你的昵称', trigger: 'blur' }]">
          <div>
            <el-input type="text" placeholder="你的昵称" v-model="params.nickname"/>
            <i class="iconfont icon-user"/>
          </div>
        </el-form-item>

        <el-form-item class="input-prepend restyle no-radius" prop="mobile" :rules="[{ required: true, message: '请输入手机号码', trigger: 'blur' },{validator: checkPhone, trigger: 'blur'}]">
          <div>
            <el-input type="text" placeholder="手机号" v-model="params.mobile"/>
            <i class="iconfont icon-phone"/>
          </div>
        </el-form-item>

        <el-form-item class="input-prepend restyle no-radius" prop="code" :rules="[{ required: true, message: '请输入验证码', trigger: 'blur' }]">
          <div style="width: 100%;display: block;float: left;position: relative">
            <el-input type="text" placeholder="验证码" v-model="params.code"/>
            <i class="iconfont icon-phone"/>
          </div>
          <div class="btn" style="position:absolute;right: 0;top: 6px;width: 40%;">
            <a href="javascript:" type="button" @click="getCodeFun()" :value="codeTest" style="border: none;background-color: none">{{codeTest}}</a>
          </div>
        </el-form-item>

        <el-form-item class="input-prepend" prop="password" :rules="[{ required: true, message: '请输入密码', trigger: 'blur' }]">
          <div>
            <el-input type="password" placeholder="设置密码" v-model="params.password"/>
            <i class="iconfont icon-password"/>
          </div>
        </el-form-item>

        <div class="btn">
          <input type="button" class="sign-up-button" value="注册" @click="submitRegister()">
        </div>
        <p class="sign-up-msg">
          点击 “注册” 即表示您同意并愿意遵守简书
          <br>
          <a target="_blank" href="http://www.jianshu.com/p/c44d171298ce">用户协议</a>
          和
          <a target="_blank" href="http://www.jianshu.com/p/2ov8x3">隐私政策</a> 。
        </p>
      </el-form>
      <!-- 更多注册方式 -->
      <div class="more-sign">
        <h6>社交帐号直接注册</h6>
        <ul>
          <li><a id="weixin" class="weixin" target="_blank" href="http://huaan.free.idcfengye.com/api/ucenter/wx/login"><i
            class="iconfont icon-weixin"/></a></li>
          <li><a id="qq" class="qq" target="_blank" href="#"><i class="iconfont icon-qq"/></a></li>
        </ul>
      </div>
    </div>
  </div>
</template>

<script>
  import '~/assets/css/sign.css'
  import '~/assets/css/iconfont.css'

  import registerApi from '@/api/register'

  export default {
    layout: 'sign',
    data() {
      return {
        params: { //封装注册输入数据
          mobile: '',
          code: '',
          nickname: '',
          password: ''
        },
        sending: true,      //是否发送验证码
        second: 60,        //倒计时间
        codeTest: '获取验证码'
      }
    },
    methods: {
      //通过输入手机号发送验证码
      getCodeFun() {
        //sending = false
        //his.sending原为true,请求成功,!this.sending == true,主要是防止有人把disabled属性去掉,多次点击;
        if (!this.sending)
          return;

        //debugger
        // prop 换成你想监听的prop字段
        this.$refs.userForm.validateField('mobile', (errMsg) => {
          if (errMsg == '') {
            registerApi.sendCode(this.params.mobile).then(res => {
              this.sending = false;
              //调用倒计时的方法
              this.timeDown();
            });
          }
        })
      },
      //倒计时
      timeDown() {
        let result = setInterval(() => {
          --this.second;
          this.codeTest = this.second
          if (this.second < 1) {
            clearInterval(result);
            this.sending = true;
            //this.disabled = false;
            this.second = 60;
            this.codeTest = "获取验证码"
          }
        }, 1000);

      },
      submitRegister() {
        this.$refs['userForm'].validate((valid) => {
          if (valid) {
            registerApi.submitRegister(this.params).then(response => {
              //提示注册成功
              this.$message({
                type: 'success',
                message: "注册成功"
              })
              this.$router.push({path: '/login'})
            })
          }
        })
      },

      checkPhone (rule, value, callback) {
        //debugger
        if (!(/^1[34578]\d{9}$/.test(value))) {
          return callback(new Error('手机号码格式不正确'))
        }
        return callback()
      }
    }
  }
</script>
3、用户登录功能前端整合
3.1、在api文件夹中创建登录的js文件,定义接口
login.js
import request from '@/utils/request'
export default {
  //登录
  submitLogin(userInfo) {
    return request({
      url: `/educenter/member/login`,
      method: 'post',
      data: userInfo
    })
  },
  //根据token获取用户信息
  getLoginInfo() {
    return request({
      url: `/educenter/member/getMemberInfo`,
      method: 'get',
     // headers: {'token': cookie.get('guli_token')}
    })
    //headers: {'token': cookie.get('guli_token')}
  }
}
3.2、在pages文件夹中创建登录页面,调用方法
(1)安装js-cookie插件
npm install js-cookie
(2)login.vue
<template>
  <div class="main">
    <div class="title">
      <a class="active" href="/login">登录</a>
      <span>·</span>
      <a href="/register">注册</a>
    </div>

    <div class="sign-up-container">
      <el-form ref="userForm" :model="user">

        <el-form-item class="input-prepend restyle" prop="mobile" :rules="[{ required: true, message: '请输入手机号码', trigger: 'blur' },{validator: checkPhone, trigger: 'blur'}]">
          <div >
            <el-input type="text" placeholder="手机号" v-model="user.mobile"/>
            <i class="iconfont icon-phone" />
          </div>
        </el-form-item>

        <el-form-item class="input-prepend" prop="password" :rules="[{ required: true, message: '请输入密码', trigger: 'blur' }]">
          <div>
            <el-input type="password" placeholder="密码" v-model="user.password"/>
            <i class="iconfont icon-password"/>
          </div>
        </el-form-item>

        <div class="btn">
          <input type="button" class="sign-in-button" value="登录" @click="submitLogin()">
        </div>
      </el-form>
      <!-- 更多登录方式 -->
      <div class="more-sign">
        <h6>社交帐号登录</h6>
        <ul>
          <li><a id="weixin" class="weixin" target="_blank" href="http://qy.free.idcfengye.com/api/ucenter/weixinLogin/login"><i class="iconfont icon-weixin"/></a></li>
          <li><a id="qq" class="qq" target="_blank" href="#"><i class="iconfont icon-qq"/></a></li>
        </ul>
      </div>
    </div>

  </div>
</template>

<script>
  import '~/assets/css/sign.css'
  import '~/assets/css/iconfont.css'
  import cookie from 'js-cookie'

  import loginApi from '@/api/login'
  export default {
    layout: 'sign',

    data () {
      return {
        user:{
          mobile:'',
          password:''
        },
        loginInfo:{}
      }
    },

    methods: {
      //登录方法
      submitLogin(){
        //第一步 调用接口进行登录,返回token字符串
        loginApi.submitLogin(this.user)
          .then(response => {
            if(response.data.success){
              //第二步 把token存在cookie中(名称,值,作用范围)  第三步在request.js中,拦截器
              cookie.set('guli_token', response.data.data.token, { domain: 'localhost' })
              //第四步 登录成功根据token获取用户信息
              loginApi.getLoginInfo()
                .then(response => {
                  this.loginInfo = response.data.data.userInfo
                  //将用户信息记录cookie
                  cookie.set('guli_ucenter', this.loginInfo, { domain: 'localhost' })
                  //跳转页面
                  window.location.href = "/";
                  //this.$router.push({path: '/'})
              })
            }
        })
      },

      checkPhone (rule, value, callback) {
        //debugger
        if (!(/^1[34578]\d{9}$/.test(value))) {
          return callback(new Error('手机号码格式不正确'))
        }
        return callback()
      }
    }
  }
</script>
<style>
   .el-form-item__error{
    z-index: 9999999;
  }
</style>
3.3、在request.js添加拦截器,用于传递token信息
import axios from 'axios'
import { MessageBox, Message } from 'element-ui'
import cookie from 'js-cookie'

// 创建axios实例
const service = axios.create({
   //baseURL: 'http://qy.free.idcfengye.com/api', // api 的 base_url
  //baseURL: 'http://localhost:8210', // api 的 base_url
  baseURL: 'http://localhost:9001',
  timeout: 15000 // 请求超时时间

})

// http request 拦截器
service.interceptors.request.use(
  config => {
  //debugger
  if (cookie.get('guli_token')) {
    config.headers['token'] = cookie.get('guli_token');
  }
    return config
  },
  err => {
  return Promise.reject(err);
})
// http response 拦截器
service.interceptors.response.use(
  response => {
    //debugger
    if (response.data.code == 28004) {
        console.log("response.data.resultCode是28004")
        // 返回 错误代码-1 清除ticket信息并跳转到登录页面
        //debugger
        window.location.href="/login"
        return
    }else{
      if (response.data.code !== 20000) {
        //25000:订单支付中,不做任何提示
        if(response.data.code != 25000) {
          Message({
            message: response.data.message || 'error',
            type: 'error',
            duration: 5 * 1000
          })
        }
      } else {
        return response;
      }
    }
  },
  error => {
    return Promise.reject(error.response)   // 返回接口返回的错误信息
});

export default service
3.4、修改layouts中的default.vue页面
(1)显示登录之后的用户信息
<script>
import "~/assets/css/reset.css";
import "~/assets/css/theme.css";
import "~/assets/css/global.css";
import "~/assets/css/web.css";

import cookie from 'js-cookie'
import userApi from '@/api/login'

export default {
  data() {
    return {
      token: '',
      loginInfo: {
        id: '',
        age: '',
        avatar: '',
        mobile: '',
        nickname: '',
        sex: ''
      }
    }
  },

  created() {
    this.showInfo()
  },

  methods: {
    //从cookie获取信息
    showInfo() {
      //从cookie获取用户信息
      var jsonStr = cookie.get("guli_ucenter");
      //把字符串"{'AGE':20}"转换json对象{'AGE':20}(去引号)
      if (jsonStr) {
        this.loginInfo = JSON.parse(jsonStr)
      }
    },
    //退出
    logout() {
      //清空cookie值
      cookie.set('guli_ucenter', "", {domain: 'localhost'})
      cookie.set('guli_token', "", {domain: 'localhost'})

      //跳转页面
      window.location.href = "/"
    }
  }
}
</script>
(2)default.vue页面显示登录之后的用户信息
<!-- / nav --> <ul class="h-r-login"> <li v-if="!loginInfo.id" id="no-login"> <a href="/login" title="登录"> <em class="icon18 login-icon"> </em> <span class="vam ml5">登录</span> </a> | <a href="/register" title="注册"> <span class="vam ml5">注册</span> </a> </li> <li v-if="loginInfo.id" id="is-login-one" class="mr10"> <a id="headerMsgCountId" href="#" title="消息"> <em class="icon18 news-icon"> </em> </a> <q class="red-point" style="display: none"> </q> </li> <li v-if="loginInfo.id" id="is-login-two" class="h-r-user"> <a href="/ucenter" title> <img :src="loginInfo.avatar" width="30" height="30" class="vam picImg" alt > <span id="userName" class="vam disIb">{{ loginInfo.nickname }}</span> </a> <a href="javascript:void(0);" title="退出" @click="logout()" class="ml5">退出</a> </li> <!-- /未登录显示第1 li;登录后显示第2,3 li --> </ul>
步骤说明:
第一步:调用接口登录返回token字符串
第二步:将第一步返回的token字符串放到cookie里面
第三步:创建前端拦截器,判断cookie里面是否有token字符串,如果有,把token字符串放到header(请求头)
第四步:根据token值,调用接口,根据token获取用户信息,为了首页面显示(即将调用接口返回的用户信息放到cookie里面)
第五步:在首页面显示用户信息,从第四步cookie获取用户信息
退出:清空cookie值即可。

 浙公网安备 33010602011771号