

一般Android各种视图(或者控件)的创建都是写定在.xml的布局文件中的,这样的好处是使用方便,创建视图的时候就能实时看到效果,管理也比较方便。但是,有的时候需要动态创建一些视图,其实.xml文件中的任何视图都是可以在程序中创建的,而每个视图的属性也都有对应的设置的方法。
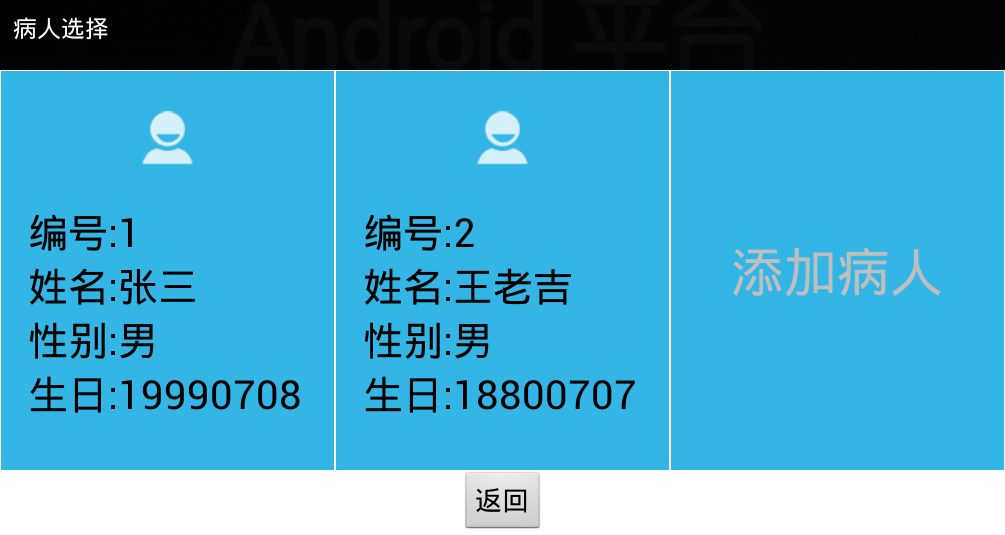
下面有个小例子,可以横向滑动的多个选项卡,并且可以动态添加选项卡:
动态显示选项卡的主要代码:
public class MainActivity extends Activity{
    private TextView addText = null;
    private LinearLayout lp = null;
    private int i = 0;public static String NAME = "";
    public static String BIRTH = "";
    public static int SEX = 1;
    //是否点击选项卡标志
    public static boolean Click_Flag = false;
    @Override
    protected void onCreate(Bundle savedInstanceState) {
        // TODO Auto-generated method stub
        super.onCreate(savedInstanceState);
        setContentView(R.layout.main);
        addText = (TextView)findViewById(R.id.add);
        lp = (LinearLayout)findViewById(R.id.linear);//点击按钮添加一个新的选项卡
        addText.setOnClickListener(new OnClickListener() {

            @Override
            public void onClick(View v) {
                // TODO Auto-generated method stub
                Intent intent = new Intent();
                intent.setClass(MainActivity.this, InfoActivity.class);
                MainActivity.this.startActivity(intent);
            }
        });
    }

    @Override
    protected void onResume() {
        // TODO Auto-generated method stub
        super.onResume();
        if(InfoActivity.added_FLAG == true) {
            add(i++);
            InfoActivity.added_FLAG = false;
        }
    }

    //添加选项卡的函数,参数是添加的位置
    public void add(int i){
        //在水平的LinearLayout lp里面添加一个垂直的LinearLayout ll
        final LinearLayout ll = new LinearLayout(MainActivity.this);
        //0是水平,1是垂直,默认水平
        ll.setOrientation(1);
        ll.setBackgroundColor(Color.rgb(0x33, 0xb5, 0xe5));
        final LinearLayout.LayoutParams llp = new LinearLayout.LayoutParams(DensityUtil.dip2px(this, 250),LinearLayout.LayoutParams.FILL_PARENT);
        llp.setMargins(1, 1, 1, 1);
        lp.addView(ll, i, llp);

        //在ll里面添加ImageView
        final ImageView im = new ImageView(MainActivity.this);
        im.setScaleType(ScaleType.CENTER_INSIDE);
        im.setImageResource(R.drawable.person);
        final LayoutParams imp = new LayoutParams(LayoutParams.FILL_PARENT, DensityUtil.dip2px(this, 100));
        ll.addView(im, 0, imp);

        //在ll里面添加TextView
        final TextView tv1 = new TextView(MainActivity.this);
        tv1.setText(getString(R.string.num)+":"+NUM);
        tv1.setTextSize(30);
        tv1.setTextColor(Color.BLACK);
        final LinearLayout.LayoutParams tvp1 = new LinearLayout.LayoutParams(LayoutParams.FILL_PARENT,LayoutParams.WRAP_CONTENT);
        tvp1.setMargins(DensityUtil.dip2px(this, 20), 0, DensityUtil.dip2px(this, 20), 0);
        ll.addView(tv1, 1, tvp1);

        //在ll里面添加TextView
        final TextView tv2 = new TextView(MainActivity.this);
        tv2.setText(getString(R.string.name)+":"+NAME);
        tv2.setTextSize(30);
        tv2.setTextColor(Color.BLACK);
        final LinearLayout.LayoutParams tvp2 = new LinearLayout.LayoutParams(LayoutParams.FILL_PARENT,LayoutParams.WRAP_CONTENT);
        tvp2.setMargins(DensityUtil.dip2px(this, 20), 0, DensityUtil.dip2px(this, 20), 0);
        ll.addView(tv2, 2, tvp2);

        //在ll里面添加TextView
        final TextView tv3 = new TextView(MainActivity.this);
        String sSEX;
        if(SEX == 1)
            sSEX = getString(R.string.male);
        else
            sSEX = getString(R.string.female);
        tv3.setText(getString(R.string.sex)+":"+sSEX);
        tv3.setTextSize(30);
        tv3.setTextColor(Color.BLACK);
        final LinearLayout.LayoutParams tvp3 = new LinearLayout.LayoutParams(LayoutParams.FILL_PARENT,LayoutParams.WRAP_CONTENT);
        tvp3.setMargins(DensityUtil.dip2px(this, 20), 0, DensityUtil.dip2px(this, 20), 0);
        ll.addView(tv3, 3, tvp3);

        //在ll里面添加TextView
        final TextView tv4 = new TextView(MainActivity.this);
        tv4.setText(getString(R.string.birth)+":"+BIRTH);
        tv4.setTextSize(30);
        tv4.setTextColor(Color.BLACK);
        final LinearLayout.LayoutParams tvp4 = new LinearLayout.LayoutParams(LayoutParams.FILL_PARENT,LayoutParams.WRAP_CONTENT);
        tvp4.setMargins(DensityUtil.dip2px(this, 20), 0, DensityUtil.dip2px(this, 20), 0);
        ll.addView(tv4, 4, tvp4);
        //内容描述,用于监听器的识别
        ll.setContentDescription("Num"+NUM+":"+NAME);
        //为新添加的卡设置监听器
        ll.setOnClickListener(new cardListener());
        //改变按下效果的监听器
        ll.setOnTouchListener(new cardTouchListener());

    }
  //选项卡点击监听类
    class cardListener implements OnClickListener {
        @Override
        public void onClick(View v) {
            // TODO Auto-generated method stub
            Click_Flag = true;
       //每个选项卡控件是用代码动态创建的,那怎么知道哪个选项卡触发了监听器呢,在这里用了一个内容描述,每次添加的时候都会有描述
            OtherActivity.NUMANDNAME =    v.getContentDescription();

            finish();
        }
    }

    //改变按下效果的监听器
    class cardTouchListener implements OnTouchListener {
        @Override
        public boolean onTouch(View v, MotionEvent event) {
            // TODO Auto-generated method stub
            if(event.getAction() == MotionEvent.ACTION_DOWN || event.getAction() == MotionEvent.ACTION_MOVE){
                //更改为按下时的图片
                v.setBackgroundColor(Color.rgb(0x00, 0x33, 0xcc));
            }else if(event.getAction() == MotionEvent.ACTION_UP || !v.hasFocus()){
                //改为抬起时的图片
                v.setBackgroundColor(Color.rgb(0x33, 0xb5, 0xe5));
            }
            return false;
        }
    }
}
布局文件如下:
<LinearLayout xmlns:android="http://schemas.android.com/apk/res/android"
    xmlns:tools="http://schemas.android.com/tools"
    android:orientation="vertical"
    android:layout_width="wrap_content"
    android:layout_height="wrap_content"
    android:background="#ffffff"
    tools:context=".MainActivity" >
    <HorizontalScrollView
        android:id="@+id/hsv"
        android:layout_width="wrap_content"
        android:layout_height="wrap_content"
        android:fillViewport="true"
        android:scrollbars="none"
        >
        <LinearLayout
            android:id="@+id/linear"
            android:layout_width="wrap_content"
            android:layout_height="wrap_content"
            android:orientation="horizontal"
            >
            <TextView
                android:id="@+id/add"
                android:layout_width="250dp"
                android:layout_height="300dp"
                android:gravity="center"
                android:text="@string/add"
                android:background="#33b5e5"
                android:textSize="40sp"
                android:layout_margin="1dp"
            />
        </LinearLayout>

    </HorizontalScrollView>
    <Button
        android:id="@+id/back"
        android:layout_height="wrap_content"
        android:layout_width="wrap_content"
        android:text="@string/back"
        android:textSize="20sp"
        android:layout_gravity="center_horizontal"
        />
</LinearLayout>
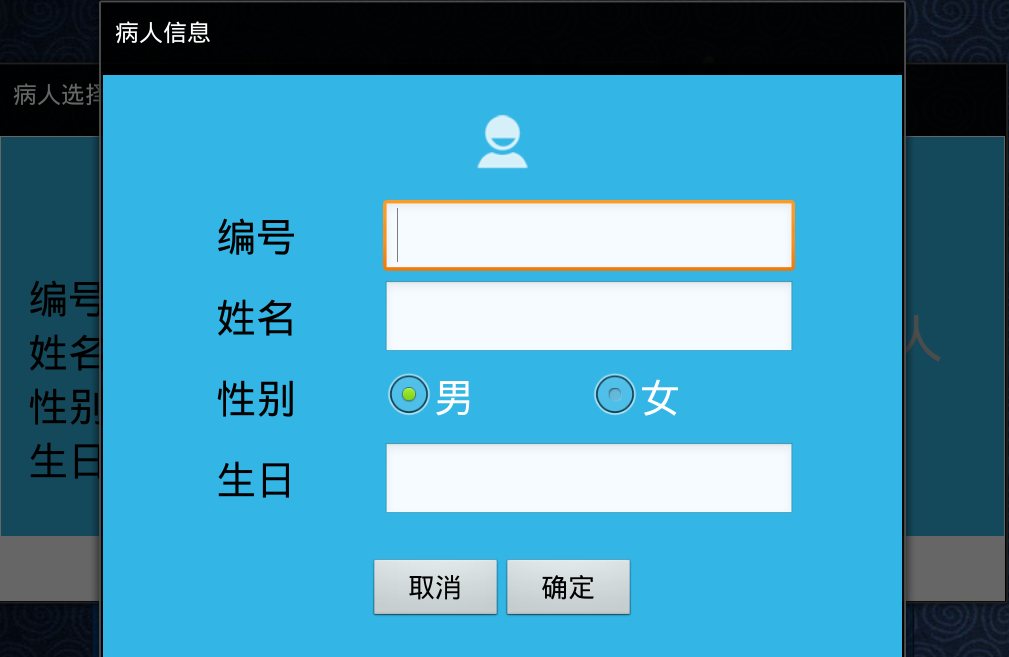
点击添加弹出另一个窗口,在新窗口中添加新信息然后返回并建立新的选项卡,新窗口的主要代码如下:
public class InfoActivity extends Activity{
    private EditText numEdit = null;
    private EditText nameEdit = null;
    private RadioButton maleRadio = null;
    private RadioButton femaleRadio = null;
    private EditText birthEdit = null;
    private Button okButton = null;
    private Button cancelButton = null;
    //是否添加的标志,否代表点了取消
    public static boolean added_FLAG = false;
    //选择过性别的标志
    private boolean radiochacked_flag = false;
   private String sNum;
    private String sName;
    private String sBirth;
    @Override
    protected void onCreate(Bundle savedInstanceState) {
        // TODO Auto-generated method stub
        super.onCreate(savedInstanceState);
        setContentView(R.layout.info);

        numEdit = (EditText)findViewById(R.id.et_num);
        nameEdit = (EditText)findViewById(R.id.et_name);
        birthEdit = (EditText)findViewById(R.id.et_birth);

        maleRadio = (RadioButton)findViewById(R.id.rb_male);
        maleRadio.setOnClickListener(new radioClickListener());
        femaleRadio = (RadioButton)findViewById(R.id.rb_female);
        femaleRadio.setOnClickListener(new radioClickListener());

        okButton = (Button)findViewById(R.id.info_ok);
        cancelButton = (Button)findViewById(R.id.info_cancel);
        cancelButton.setOnClickListener(new OnClickListener() {

            @Override
            public void onClick(View v) {
                // TODO Auto-generated method stub
                added_FLAG = false;
                finish();
            }
        });

        okButton.setOnClickListener(new okButtonListener());
    }

    class radioClickListener implements OnClickListener {
        @Override
        public void onClick(View v) {
            // TODO Auto-generated method stub
            radiochacked_flag = true;

            switch(v.getId()) {
            case R.id.rb_male:
                MainActivity.SEX = 1;
                break;

            case R.id.rb_female:
                MainActivity.SEX = 0;
                break;

            }
        }
    }
    class okButtonListener implements OnClickListener{
     Toast toast = null;
        @Override
        public void onClick(View v) {
            // TODO Auto-generated method stub
            added_FLAG = true;
            usednumber_flag = false;
            //没有选择性别则默认男
            if(radiochacked_flag == false)
                MainActivity.SEX = 1;

            sNum = numEdit.getText().toString();
            sName = nameEdit.getText().toString();
            sBirth = birthEdit.getText().toString();

            if(!"".equals(sNum.trim()) && !"".equals(sName.trim()) && !"".equals(sBirth.trim())) {
                    PatientActivity.NUM = sNum;
                    PatientActivity.NAME = sName;
                    PatientActivity.BIRTH = sBirth;
                    finish();
            }
            else {
                toast = Toast.makeText(getApplicationContext(),
                        "信息填写不完整!", Toast.LENGTH_LONG);
                toast.setGravity(Gravity.CENTER, 0, 0);
                toast.show();
            }

        }
    }
}
具体效果如下:
有几个注意点:
1、在xml文件中,我们一般使用的视图长度单位是dp,这个单位是脱离具体像素的,对不同大小的屏幕有较好的适应性。但是在程序中,长度设置方法的参数是没有单位的,默认就是像素px,所以要进行dp到px的转化。我采用的转化方法是网上找的:
public class DensityUtil {

    /**
     * 根据手机的分辨率从 dp 的单位 转成为 px(像素)
     */
    public static int dip2px(Context context, float dpValue) {
        final float scale = context.getResources().getDisplayMetrics().density;
        return (int) (dpValue * scale + 0.5f);
    }

    /**
     * 根据手机的分辨率从 px(像素) 的单位 转成为 dp
     */
    public static int px2dip(Context context, float pxValue) {
        final float scale = context.getResources().getDisplayMetrics().density;
        return (int) (pxValue / scale + 0.5f);
    }
}
2、我们在xml文件中创建视图的时候,如果要对某个视图使用监听器,则单独进行绑定即可,一般过程是先通过ID找到视图,然后绑定监听器SetOnClickListener()等,但是如果动态创建视图,就无法每个视图绑定不同的监听器,一般绑定同一个监听器,然后在监听器的类中进行判断是那个视图触发的监听器。判断可以采用内容描述,在动态创建视图时加上setContentDescription()这个方法,然后根据不同的内容描述进行判断,同样的思路也可以采用setID(),这样就和RadioButton的一般用法相似。
 posted on

 浙公网安备 33010602011771号