

android学习笔记----软键盘换行按键效果测试(imeOptions)
主要属性就是android:imeOptions和android:imeActionLabel
但是android:imeActionLabel属性有的输入法没做,所以就没有效果,但是在模拟器上看得出来,真机具体根据输入法会有不同结果。
注意:看到其他的博客上写的都是用的android:singleLine="true"(因为默认是多行模式,而右下角的按键是用于换行的,当设置为单行模式后就没必要换行了)
但是这个方法文档显示已经废弃了
关于singleLine:@deprecated不推荐使用此属性
格式:boolean
将文本约束为单个水平滚动线,而不是让它包裹在多行上,并在按Enter键时提前聚焦而不是插入换行符。
对于不可编辑的文本,默认值为false(多行换行文本模式),但如果为inputType指定任何值,则默认值为true(单行输入字段模式)。
使用maxLines来改变静态文本的布局(比如TextView需要singleLine效果),并使用inputType属性中的textMultiLine标志代替可编辑的文本视图(比如EditText需要singleLine效果)(如果提供了singleLine和inputType,则inputType标志将覆盖singleLine的值)。
简而言之
想要达到android:singleLine="true"的效果,只需要设置inputType即可,除了textMultiLine参数均可
想要达到android:singleLine="false"的效果,只需要设置inputType="textMultiLine"均可
如果同时有singleLine和inputType属性,则以inputType属性为准,singleLine失效。
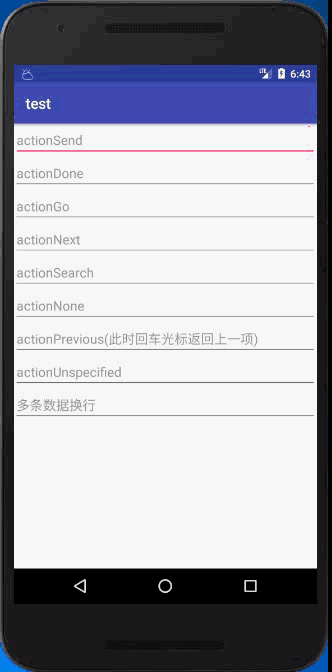
模拟器效果图:
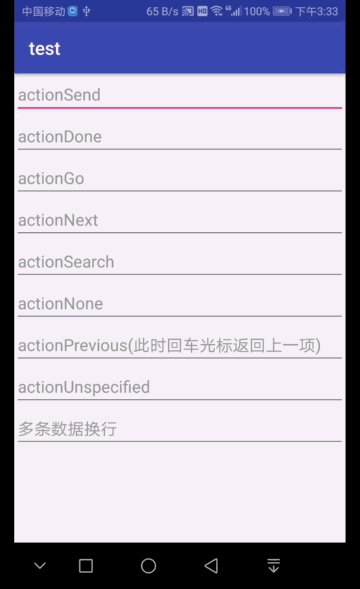
真机效果图(华为荣耀v9,输入法是百度输入法华为版):
activity_main.xml
<?xml version="1.0" encoding="utf-8"?>
<LinearLayout xmlns:android="http://schemas.android.com/apk/res/android"
    android:layout_width="match_parent"
    android:layout_height="match_parent"
    android:orientation="vertical">

    <EditText
        android:id="@+id/edittext0"
        android:layout_width="match_parent"
        android:layout_height="wrap_content"
        android:hint="actionSend"
        android:imeOptions="actionSend"
        android:imeActionLabel="呵呵哒"
        android:inputType="text" />
    <!--imeActionLabel属性有的输入法没做,所以就没有效果,但是在模拟器上看得出来,具体根据输入法会有不同结果-->
    <EditText
        android:id="@+id/edittext1"
        android:layout_width="match_parent"
        android:layout_height="wrap_content"
        android:hint="actionDone"
        android:imeOptions="actionDone"
        android:inputType="text" />

    <EditText
        android:id="@+id/edittext2"
        android:layout_width="match_parent"
        android:layout_height="wrap_content"
        android:hint="actionGo"
        android:imeOptions="actionGo"
        android:inputType="text" />

    <EditText
        android:id="@+id/edittext3"
        android:layout_width="match_parent"
        android:layout_height="wrap_content"
        android:hint="actionNext"
        android:imeOptions="actionNext"
        android:inputType="text" />

    <EditText
        android:id="@+id/edittext4"
        android:layout_width="match_parent"
        android:layout_height="wrap_content"
        android:hint="actionSearch"
        android:imeOptions="actionSearch"
        android:inputType="text" />

    <EditText
        android:id="@+id/edittext5"
        android:layout_width="match_parent"
        android:layout_height="wrap_content"
        android:hint="actionNone"
        android:imeOptions="actionNone"
        android:inputType="text" />

    <EditText
        android:id="@+id/edittext6"
        android:layout_width="match_parent"
        android:layout_height="wrap_content"
        android:hint="actionPrevious(此时回车光标返回上一项)"
        android:imeOptions="actionPrevious"
        android:inputType="text" />

    <EditText
        android:id="@+id/edittext7"
        android:layout_width="match_parent"
        android:layout_height="wrap_content"
        android:hint="actionUnspecified"
        android:imeOptions="actionUnspecified"
        android:inputType="text" />

    <EditText
        android:id="@+id/edittext8"
        android:layout_width="match_parent"
        android:layout_height="wrap_content"
        android:hint="多条数据换行"
        android:imeOptions="actionSend"
        android:inputType="textMultiLine" />

</LinearLayout>
MainActivity.java
import android.os.Bundle;
import android.support.v7.app.AppCompatActivity;
import android.util.Log;
import android.view.KeyEvent;
import android.view.inputmethod.EditorInfo;
import android.widget.EditText;
import android.widget.TextView;
import android.widget.Toast;

public class MainActivity extends AppCompatActivity {
    private static final String TAG = "MainActivity";

    private EditText editText0, editText1, editText2, editText3, editText4, editText5, editText6, editText7, editText8;

    @Override
    protected void onCreate(Bundle savedInstanceState) {
        super.onCreate(savedInstanceState);
        setContentView(R.layout.activity_main);
        editText0 = (EditText) findViewById(R.id.edittext0);
        editText1 = (EditText) findViewById(R.id.edittext1);
        editText2 = (EditText) findViewById(R.id.edittext2);
        editText3 = (EditText) findViewById(R.id.edittext3);
        editText4 = (EditText) findViewById(R.id.edittext4);
        editText5 = (EditText) findViewById(R.id.edittext5);
        editText6 = (EditText) findViewById(R.id.edittext6);
        editText7 = (EditText) findViewById(R.id.edittext7);
        editText8 = (EditText) findViewById(R.id.edittext7);
        editText2.setOnEditorActionListener(new TextView.OnEditorActionListener() {
            @Override
            public boolean onEditorAction(TextView v, int actionId, KeyEvent event) {
                switch (actionId) {
                    case EditorInfo.IME_ACTION_GO:
                        Toast.makeText(MainActivity.this, "前往的逻辑开始...", Toast.LENGTH_SHORT).show();
                        break;
                }
                Log.d(TAG, "actionid=======" + actionId);
                return true;
            }
        });
    }
}
这里只写了edittext2的监听事件,actionId为EditorInfo.IME_ACTION_GO
这几个imeOptions的ID分别为:
public static final int IME_MASK_ACTION = 0x000000ff;
public static final int IME_ACTION_UNSPECIFIED = 0x00000000;
public static final int IME_ACTION_NONE = 0x00000001;
public static final int IME_ACTION_GO = 0x00000002;
public static final int IME_ACTION_SEARCH = 0x00000003;
public static final int IME_ACTION_SEND = 0x00000004;
public static final int IME_ACTION_NEXT = 0x00000005;
public static final int IME_ACTION_DONE = 0x00000006;
public static final int IME_ACTION_PREVIOUS = 0x00000007;
可以设置相应的操作。
========================Talk is cheap, show me the code========================

 浙公网安备 33010602011771号