
Python学习之模块篇
模块与包
- 模块的概念
#在计算机程序的开发过程中,随着程序代码越写越多,在一个文件里代码就会越来越长,越来越不容易维护。
#为了编写可维护的代码,我们把很多函数分组,分别放到不同的文件里,这样,每个文件包含的代码就相对较少,
很多编程语言都采用这种组织代码的方式。在Python中,一个.py文件就称之为一个模块(Module)。
- 模块的好处
#最大的好处是大大提高了代码的可维护性。其次,编写代码不必从零开始。当一个模块编写完毕,就可以被其他地方引用。
我们在编写程序的时候,也经常引用其他模块,包括Python内置的模块和来自第三方的模块。
- 模块的操作


#!/usr/bin/env python3
# -*- coding: utf-8 -*-

' a test module '

__author__ = 'Michael Liao'

import sys

def test():
    args = sys.argv
    if len(args)==1:
        print('Hello, world!')
    elif len(args)==2:
        print('Hello, %s!' % args[1])
    else:
        print('Too many arguments!')

if __name__=='__main__':
    test()
内置模块
- time模块
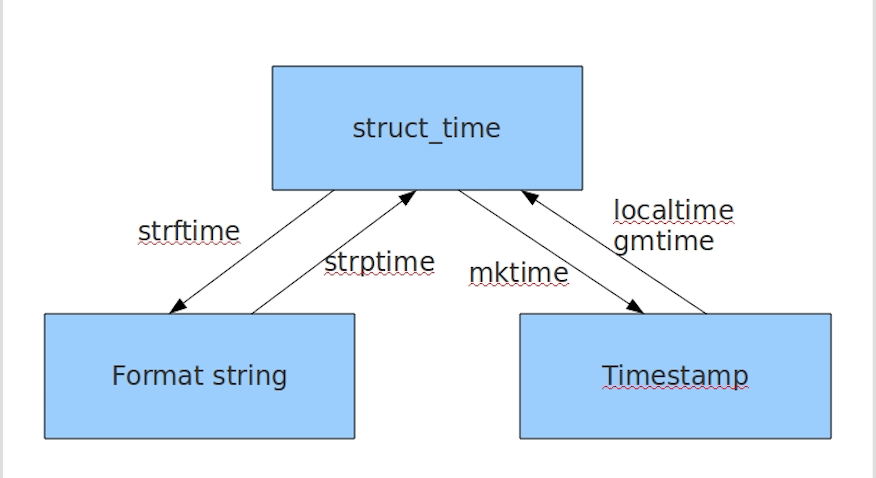
 1 import time
 2
 3 # 1 time() :返回当前时间的时间戳
 4 time.time()  #1473525444.037215
 5
 6 #----------------------------------------------------------
 7
 8 # 2 localtime([secs])
 9 # 将一个时间戳转换为当前时区的struct_time。secs参数未提供,则以当前时间为准。
10 time.localtime() #time.struct_time(tm_year=2016, tm_mon=9, tm_mday=11, tm_hour=0,
11 # tm_min=38, tm_sec=39, tm_wday=6, tm_yday=255, tm_isdst=0)
12 time.localtime(1473525444.037215)
13
14 #----------------------------------------------------------
15
16 # 3 gmtime([secs]) 和localtime()方法类似,gmtime()方法是将一个时间戳转换为UTC时区(0时区)的struct_time。
17
18 #----------------------------------------------------------
19
20 # 4 mktime(t) : 将一个struct_time转化为时间戳。
21 print(time.mktime(time.localtime()))#1473525749.0
22
23 #----------------------------------------------------------
24
25 # 5 strftime(format[, t]) : 把一个代表时间的元组或者struct_time(如由time.localtime()和
26 # time.gmtime()返回)转化为格式化的时间字符串。如果t未指定,将传入time.localtime()。如果元组中任何一个
27 # 元素越界,ValueError的错误将会被抛出。
28 print(time.strftime("%Y-%m-%d %X", time.localtime()))#2016-09-11 00:49:56
29
30 # 6 time.strptime(string[, format])
31 # 把一个格式化时间字符串转化为struct_time。实际上它和strftime()是逆操作。
32 print(time.strptime('2011-05-05 16:37:06', '%Y-%m-%d %X'))
33
34 #time.struct_time(tm_year=2011, tm_mon=5, tm_mday=5, tm_hour=16, tm_min=37, tm_sec=6,
35 #  tm_wday=3, tm_yday=125, tm_isdst=-1)
36
37 #在这个函数中,format默认为:"%a %b %d %H:%M:%S %Y"。
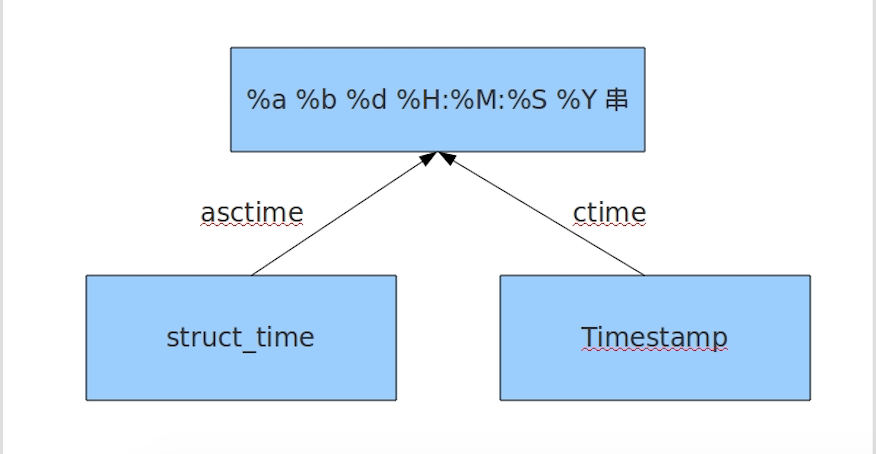
 1 import time
 2
 3 # 1 asctime([t]) : 把一个表示时间的元组或者struct_time表示为这种形式:'Sun Jun 20 23:21:05 1993'。
 4 # 如果没有参数,将会将time.localtime()作为参数传入。
 5 print(time.asctime())#Sun Sep 11 00:43:43 2016
 6
 7 #----------------------------------------------------------
 8
 9 # 2 ctime([secs]) : 把一个时间戳(按秒计算的浮点数)转化为time.asctime()的形式。如果参数未给或者为
10 # None的时候,将会默认time.time()为参数。它的作用相当于time.asctime(time.localtime(secs))。
11 print(time.ctime())  # Sun Sep 11 00:46:38 2016
12
13 print(time.ctime(time.time()))  # Sun Sep 11 00:46:38 2016
- datetime模块
#时间加减
import datetime

# print(datetime.datetime.now()) #返回 2016-08-19 12:47:03.941925
#print(datetime.date.fromtimestamp(time.time()) )  # 时间戳直接转成日期格式 2016-08-19
# print(datetime.datetime.now() )
# print(datetime.datetime.now() + datetime.timedelta(3)) #当前时间+3天
# print(datetime.datetime.now() + datetime.timedelta(-3)) #当前时间-3天
# print(datetime.datetime.now() + datetime.timedelta(hours=3)) #当前时间+3小时
# print(datetime.datetime.now() + datetime.timedelta(minutes=30)) #当前时间+30分


#
# c_time  = datetime.datetime.now()
# print(c_time.replace(minute=3,hour=2)) #时间替换
- random模块
 1 import random
 2
 3 print(random.random())#(0,1)----float    大于0且小于1之间的小数
 4
 5 print(random.randint(1,3))  #[1,3]    大于等于1且小于等于3之间的整数
 6
 7 print(random.randrange(1,3)) #[1,3)    大于等于1且小于3之间的整数
 8
 9 print(random.choice([1,'23',[4,5]]))#1或者23或者[4,5]
10
11 print(random.sample([1,'23',[4,5]],2))#列表元素任意2个组合
12
13 print(random.uniform(1,3))#大于1小于3的小数,如1.927109612082716
14
15
16 item=[1,3,5,7,9]
17 random.shuffle(item) #打乱item的顺序,相当于"洗牌"
18 print(item)
import random

#chr() 用一个范围在 range(256)内的(就是0~255)整数作参数,返回一个对应的字符。
def v_code():

    code = ''
    for i in range(5):

        num=random.randint(0,9)
        alf=chr(random.randint(65,90))
        add=random.choice([num,alf])
        code += str(add)
    return code

print(v_code())
- os模块
os.getcwd() 获取当前工作目录,即当前python脚本工作的目录路径
os.chdir("dirname")  改变当前脚本工作目录;相当于shell下cd
os.curdir  返回当前目录: ('.')
os.pardir  获取当前目录的父目录字符串名:('..')
os.makedirs('dirname1/dirname2')    可生成多层递归目录
os.removedirs('dirname1')    若目录为空,则删除,并递归到上一级目录,如若也为空,则删除,依此类推
os.mkdir('dirname')    生成单级目录;相当于shell中mkdir dirname
os.rmdir('dirname')    删除单级空目录,若目录不为空则无法删除,报错;相当于shell中rmdir dirname
os.listdir('dirname')    列出指定目录下的所有文件和子目录,包括隐藏文件,并以列表方式打印
os.remove()  删除一个文件
os.rename("oldname","newname")  重命名文件/目录
os.stat('path/filename')  获取文件/目录信息
os.sep    输出操作系统特定的路径分隔符,win下为"\\",Linux下为"/"
os.linesep    输出当前平台使用的行终止符,win下为"\t\n",Linux下为"\n"
os.pathsep    输出用于分割文件路径的字符串 win下为;,Linux下为:
os.name    输出字符串指示当前使用平台。win->'nt'; Linux->'posix'
os.system("bash command")  运行shell命令,直接显示
os.environ  获取系统环境变量
os.path.abspath(path)  返回path规范化的绝对路径
os.path.split(path)  将path分割成目录和文件名二元组返回
os.path.dirname(path)  返回path的目录。其实就是os.path.split(path)的第一个元素
os.path.basename(path)  返回path最后的文件名。如何path以/或\结尾,那么就会返回空值。即os.path.split(path)的第二个元素
os.path.exists(path)  如果path存在,返回True;如果path不存在,返回False
os.path.isabs(path)  如果path是绝对路径,返回True
os.path.isfile(path)  如果path是一个存在的文件,返回True。否则返回False
os.path.isdir(path)  如果path是一个存在的目录,则返回True。否则返回False
os.path.join(path1[, path2[, ...]])  将多个路径组合后返回,第一个绝对路径之前的参数将被忽略
os.path.getatime(path)  返回path所指向的文件或者目录的最后存取时间
os.path.getmtime(path)  返回path所指向的文件或者目录的最后修改时间
- json模块
#----------------------------序列化
import json

dic={'name':'alvin','age':23,'sex':'male'}
print(type(dic))#<class 'dict'>

j=json.dumps(dic)
print(type(j))#<class 'str'>


f=open('序列化对象','w')
f.write(j)  #-------------------等价于json.dump(dic,f)
f.close()
#-----------------------------反序列化<br>
import json
f=open('序列化对象')
data=json.loads(f.read())#  等价于data=json.load(f)
- pickle模块
#与json模块的区别
#1、尺寸用字节形式保存
#2、可保存函数,并提取函数,对象
##----------------------------序列化
import pickle

dic={'name':'alvin','age':23,'sex':'male'}

print(type(dic))#<class 'dict'>

j=pickle.dumps(dic)
print(type(j))#<class 'bytes'>


f=open('序列化对象_pickle','wb')#注意是w是写入str,wb是写入bytes,j是'bytes'
f.write(j)  #-------------------等价于pickle.dump(dic,f)

f.close()
#-------------------------反序列化
import pickle
f=open('序列化对象_pickle','rb')

data=pickle.loads(f.read())#  等价于data=pickle.load(f)


print(data['age'])
- xml模块
<?xml version="1.0"?>
<data>
    <country name="Liechtenstein">
        <rank updated="yes">2</rank>
        <year>2008</year>
        <gdppc>141100</gdppc>
        <neighbor name="Austria" direction="E"/>
        <neighbor name="Switzerland" direction="W"/>
    </country>
    <country name="Singapore">
        <rank updated="yes">5</rank>
        <year>2011</year>
        <gdppc>59900</gdppc>
        <neighbor name="Malaysia" direction="N"/>
    </country>
    <country name="Panama">
        <rank updated="yes">69</rank>
        <year>2011</year>
        <gdppc>13600</gdppc>
        <neighbor name="Costa Rica" direction="W"/>
        <neighbor name="Colombia" direction="E"/>
    </country>
</data>
import xml.etree.ElementTree as ET

tree = ET.parse("xmltest.xml")
root = tree.getroot()
print(root.tag)

#遍历xml文档
for child in root:
    print(child.tag, child.attrib)
    for i in child:
        print(i.tag,i.text)

#只遍历year 节点
for node in root.iter('year'):
    print(node.tag,node.text)
#---------------------------------------

import xml.etree.ElementTree as ET

tree = ET.parse("xmltest.xml")
root = tree.getroot()

#修改
for node in root.iter('year'):
    new_year = int(node.text) + 1
    node.text = str(new_year)
    node.set("updated","yes")

tree.write("xmltest.xml")


#删除node
for country in root.findall('country'):
   rank = int(country.find('rank').text)
   if rank > 50:
     root.remove(country)

tree.write('output.xml')
import xml.etree.ElementTree as ET


new_xml = ET.Element("namelist")
name = ET.SubElement(new_xml,"name",attrib={"enrolled":"yes"})
age = ET.SubElement(name,"age",attrib={"checked":"no"})
sex = ET.SubElement(name,"sex")
sex.text = '33'
name2 = ET.SubElement(new_xml,"name",attrib={"enrolled":"no"})
age = ET.SubElement(name2,"age")
age.text = '19'

et = ET.ElementTree(new_xml) #生成文档对象
et.write("test.xml", encoding="utf-8",xml_declaration=True)

ET.dump(new_xml) #打印生成的格式
- configparser模块
[DEFAULT]
ServerAliveInterval = 45
Compression = yes
CompressionLevel = 9
ForwardX11 = yes

[bitbucket.org]
User = hg

[topsecret.server.com]
Port = 50022
ForwardX11 = no
import configparser

config = configparser.ConfigParser()

#---------------------------------------------查
print(config.sections())   #[]

config.read('example.ini')

print(config.sections())   #['bitbucket.org', 'topsecret.server.com']

print('bytebong.com' in config)# False

print(config['bitbucket.org']['User']) # hg

print(config['DEFAULT']['Compression']) #yes

print(config['topsecret.server.com']['ForwardX11'])  #no


for key in config['bitbucket.org']:
    print(key)


# user
# serveraliveinterval
# compression
# compressionlevel
# forwardx11


print(config.options('bitbucket.org'))#['user', 'serveraliveinterval', 'compression', 'compressionlevel', 'forwardx11']
print(config.items('bitbucket.org'))  #[('serveraliveinterval', '45'), ('compression', 'yes'), ('compressionlevel', '9'), ('forwardx11', 'yes'), ('user', 'hg')]

print(config.get('bitbucket.org','compression'))#yes


#---------------------------------------------删,改,增(config.write(open('i.cfg', "w")))


config.add_section('yuan')

config.remove_section('topsecret.server.com')
config.remove_option('bitbucket.org','user')

config.set('bitbucket.org','k1','11111')

config.write(open('i.cfg', "w"))

增删改查
- re模块

 浙公网安备 33010602011771号