从壹开始前后端分离[.NetCore ] 38 ║自动初始化数据库(不定期更新)
缘起
哈喽大家好呀,我们又见面啦,这里先祝大家圣诞节快乐哟,昨天的红包不知道有没有小伙伴抢到呢。今天的这篇内容灰常简单,只是对我们的系统的数据库进行CodeFirst,然后就是数据处理,因为这几个月来,还是有小伙伴陆陆续续的向我索要数据,本来想着都是很简单的数据,就不给了,然后仅仅是提供了一个Sql的表结构,但是想想一个完整的项目,怎么能没有一个初始化的功能呢(不仅仅是表结构,还是要一些简单的数据)?所以就想着写今天这篇文章了,这篇文章虽然可能看起来很简单,不过也是给大家提供了一个思路,就是自己以后在写项目的时候,如何添加一个初始化的Seed Data,我也是参考其他小伙伴的,这里重点表扬下QQ群里,@初久童鞋,没有他的博客园地址,就没办法放他的首页了。
投稿作者:初久,个人地址:null,实现项目启动的时候,自动初始化数据,其中会涉及到上下文、SqlSugar、依赖注入等知识。
好啦,话不多说,直接开始动手。
一、对Mode实体类进行配置
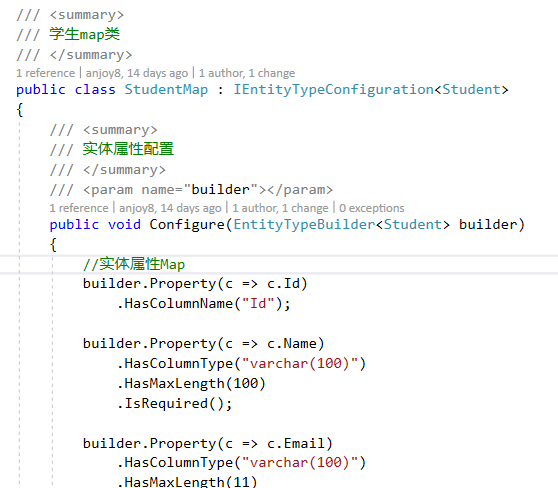
因为要使用到了CodeFirst了,所以我们必须要对我们的实体类 Model 进行配置,当然也有很多的小伙伴,使用的是EFCore,当然是可以的,EFCore不需要对实体类进行处理,只是需要额外的配置上下文和Map映射,比如这样:
EFCore的我就不多少了,很简单,如果有不会的小伙伴,可以看我的第二个系列的《让你明白DDD的小故事 & EFCore初探》和《剪不断理还乱的 值对象和Dto》这两篇文章都有对EFCore的配置有提到,有需要的可以看看。
因为本系列是用的SqlSugar ORM,所以就来说说,它是如何配置的,那咱们就配置下我们的SqlSugar吧。
这里只用 Advertisement.cs 来举例吧,其他的,大家可以自行去查看我的Github上的code:
    public class Advertisement : RootEntity
    {

        /// <summary>
        /// 广告图片
        /// </summary>
        [SugarColumn(Length = 512, IsNullable = true)]
        public string ImgUrl { get; set; }

        /// <summary>
        /// 广告标题
        /// </summary>
        [SugarColumn(Length = 64, IsNullable = true)]
        public string Title { get; set; }

        /// <summary>
        /// 广告链接
        /// </summary>
        [SugarColumn(Length = 256, IsNullable = true)]
        public string Url { get; set; }

        /// <summary>
        /// 备注
        /// </summary>
        [SugarColumn(Length = int.MaxValue, IsNullable = true)]
        public string Remark { get; set; }

        /// <summary>
        /// 创建时间
        /// </summary>
        public DateTime Createdate { get; set; } = DateTime.Now;
    }

    public class RootEntity
    {
        /// <summary>
        /// ID
        /// </summary>
        [SugarColumn(IsNullable = false, IsPrimaryKey = true, IsIdentity = true)]
        public int Id { get; set; }
    }
大家可以看到,SqlSugar 和 EFCore在操作上还是不一样的,sugar不需要配置额外的Map 映射,只需要对当前类进行操作,不过还是有很多小伙伴反映,还是EFCore 在使用上或者在功能上更健壮,这里就不多说二者了,今天的主题是数据自动初始化,不能本末倒置了。
这个就很简单的了,主要就是属性 SugarColumn() ,里边有一些属性,可以自行配置,这里给大家简单注释一下:
 public class SugarColumn : Attribute
 {
     public SugarColumn();

     public string ColumnName { get; set; }//列名
     public bool IsIgnore { get; set; }//是否忽略
     public bool IsPrimaryKey { get; set; }//是否是主键
     public bool IsIdentity { get; set; }//是否自增
     public string MappingKeys { get; set; }//映射key
     public string ColumnDescription { get; set; }//列描述
     public int Length { get; set; }//长度
     public bool IsNullable { get; set; }//是否为空
     public string OldColumnName { get; set; }//旧的列名
     public string ColumnDataType { get; set; }//列类型,自定义
     public int DecimalDigits { get; set; }//dicimal精度
     public string OracleSequenceName { get; set; }//Oracle序列名
     public bool IsOnlyIgnoreInsert { get; set; }//是否仅对添加忽略
     public bool IsEnableUpdateVersionValidation { get; set; }
 }

这里我已经配置完成了,而且是尽量的仿照着我的数据库来的,可能会有细微的差别,如果你要想使用的话,可以用一个测试的数据库来实验。
二、配置上下文与初始数据
大家是否还记得之前在仓储Repository中,我们创建了一个上下文,这里可以直接拿来用,不过因为我们的 API 层已经和 Repository 层解耦分割了,所以我就在 Mode 层来实现这个功能吧。如果你不解耦,可以直接使用仓储层的上下文即可。
1、建立 SqlSugar 上下文
在 Blog.Core.Model 层新建一个 Seed 文件夹,然后把仓储层中的 context 拷贝过去,我重命名为 MyContext.cs:
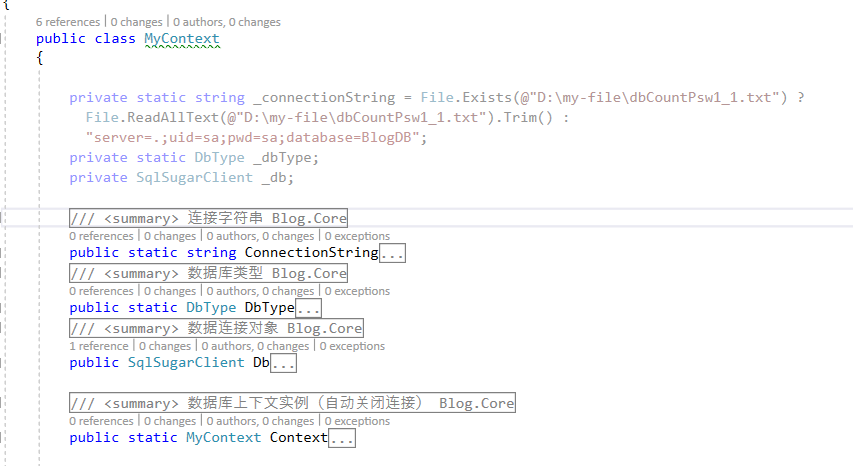
重点就是构造函数,要实现实例化 SqlSugarClient 的作用:
 public MyContext()
 {
     if (string.IsNullOrEmpty(_connectionString))
         throw new ArgumentNullException("数据库连接字符串为空");
     _db = new SqlSugarClient(new ConnectionConfig()
     {
         ConnectionString = _connectionString,//数据库字符串
         DbType = DbType.SqlServer,//数据库类型
         IsAutoCloseConnection = true,//自动关闭数据库
         IsShardSameThread = false,//启用异步多线程
         InitKeyType = InitKeyType.Attribute,//mark
         ConfigureExternalServices = new ConfigureExternalServices()
         {
             //DataInfoCacheService = new HttpRuntimeCache()
         },
         MoreSettings = new ConnMoreSettings()
         {
             //IsWithNoLockQuery = true,
             IsAutoRemoveDataCache = true
         }
     });
 }

2、实现初始化种子数据的功能
上边咱们创建了好上下文,那接下来咱们就应该实现 CodeFirst 功能了,
还是再 Seed 文件夹,新建 DBSeed.cs 类:
    public class DBSeed
    {
        /// <summary>
        /// 异步添加种子数据
        /// </summary>
        /// <param name="myContext"></param>
        /// <returns></returns>
        public static async Task SeedAsync(MyContext myContext)
        {
            try
            {
                // 注意!一定要先手动创建一个空的数据库,5.x 版本会自动创建数据库了
                // 会覆盖,可以设置为true,来备份数据
                // 如果生成过了,第二次,就不用再执行一遍了,注释掉该方法即可
                myContext.CreateTableByEntity(false, typeof(Advertisement), typeof(BlogArticle), typeof(Guestbook), typeof(Module), typeof(ModulePermission), typeof(OperateLog),
typeof(PasswordLib), typeof(Permission), typeof(Role), typeof(RoleModulePermission), typeof(sysUserInfo), typeof(Topic), typeof(TopicDetail), typeof(UserRole));


                // 下边的就是种子数据
                #region Advertisement
                if (!await myContext.Db.Queryable<Advertisement>().AnyAsync())
                {
                    myContext.GetEntityDB<Advertisement>().Insert(
                       new Advertisement()
                       {
                           Createdate = DateTime.Now,
                           Remark = "mark",
                           Title = "good"
                       });
                }
                #endregion

                #region BlogArticle Guestbook
                if (!await myContext.Db.Queryable<BlogArticle>().AnyAsync())
                {
                    int bid = myContext.GetEntityDB<BlogArticle>().InsertReturnIdentity(
                         new BlogArticle()
                         {
                             bsubmitter = "admins",
                             btitle = "老张的哲学",
                             bcategory = "技术博文",
                             bcontent = "<p>1。。。。。。",
                             btraffic = 1,
                             bcommentNum = 0,
                             bUpdateTime = DateTime.Now,
                             bCreateTime = DateTime.Now
                         });

                    if (bid > 0)
                    {

                        if (!await myContext.Db.Queryable<Guestbook>().AnyAsync())
                        {
                            myContext.GetEntityDB<Guestbook>().Insert(
                               new Guestbook()
                               {
                                   blogId = bid,
                                   createdate = DateTime.Now,
                                   username = "user",
                                   phone = "110",
                                   QQ = "100",
                                   body = "很不错",
                                   ip = "127.0.0.1",
                                   isshow = true,
                               });
                        }
                    }
                }
                #endregion

                #region Module
                int mid = 0;
                if (!await myContext.Db.Queryable<Module>().AnyAsync())
                {
                    mid = myContext.GetEntityDB<Module>().InsertReturnIdentity(
                        new Module()
                        {
                            IsDeleted = false,
                            Name = "values的接口信息",
                            LinkUrl = "/api/values",
                            OrderSort = 1,
                            IsMenu = false,
                            Enabled = true,
                        });

                }
                #endregion

                #region Role
                int rid = 0;
                if (!await myContext.Db.Queryable<Role>().AnyAsync())
                {
                    rid = myContext.GetEntityDB<Role>().InsertReturnIdentity(
                        new Role()
                        {
                            IsDeleted = false,
                            Name = "Admin",
                            Description = "我是一个admin管理员",
                            OrderSort = 1,
                            CreateTime = DateTime.Now,
                            Enabled = true,
                            ModifyTime = DateTime.Now
                        });

                }
                #endregion

                #region RoleModulePermission
                if (mid > 0 && rid > 0)
                {
                    if (!await myContext.Db.Queryable<RoleModulePermission>().AnyAsync())
                    {
                        myContext.GetEntityDB<RoleModulePermission>().Insert(
                            new RoleModulePermission()
                            {
                                IsDeleted = false,
                                RoleId = rid,
                                ModuleId = mid,
                                CreateTime = DateTime.Now,
                                ModifyTime = DateTime.Now
                            });
                    }
                }
                #endregion

                #region sysUserInfo
                int uid = 0;
                if (!await myContext.Db.Queryable<sysUserInfo>().AnyAsync())
                {
                    uid = myContext.GetEntityDB<sysUserInfo>().InsertReturnIdentity(
                        new sysUserInfo()
                        {
                            uLoginName = "admins",
                            uLoginPWD = "admins",
                            uRealName = "admins",
                            uStatus = 0,
                            uCreateTime = DateTime.Now,
                            uUpdateTime = DateTime.Now,
                            uLastErrTime = DateTime.Now,
                            uErrorCount = 0

                        });

                }
                #endregion

                #region UserRole
                if (uid > 0 && rid > 0)
                {
                    if (!await myContext.Db.Queryable<UserRole>().AnyAsync())
                    {
                        myContext.GetEntityDB<UserRole>().Insert(
                            new UserRole()
                            {
                                IsDeleted = false,
                                UserId = uid,
                                RoleId = rid,
                                CreateTime = DateTime.Now,
                                ModifyTime = DateTime.Now
                            });
                    }
                }
                #endregion

                #region Topic TopicDetail
                if (!await myContext.Db.Queryable<Topic>().AnyAsync())
                {
                    int tid = myContext.GetEntityDB<Topic>().InsertReturnIdentity(
                         new Topic()
                         {
                             tLogo = "/Upload/20180626/95445c8e288e47e3af7a180b8a4cc0c7.jpg",
                             tName = "《罗马人的故事》",
                             tDetail = "这是一个荡气回肠的故事",
                             tIsDelete = false,
                             tRead = 0,
                             tCommend = 0,
                             tGood = 0,
                             tCreatetime = DateTime.Now,
                             tUpdatetime = DateTime.Now,
                             tAuthor = "laozhang"
                         });

                    if (tid > 0)
                    {

                        if (!await myContext.Db.Queryable<TopicDetail>().AnyAsync())
                        {
                            myContext.GetEntityDB<TopicDetail>().Insert(
                               new TopicDetail()
                               {
                                   TopicId = tid,
                                   tdLogo = "/Upload/20180627/7548de20944c45d48a055111b5a6c1b9.jpg",
                                   tdName = "第一章 罗马的诞生 第一节 传说的年代",
                                   tdContent = "<p>第一节 传说的年代</时代走出,近入了历史时代。</p><p><br></p>",
                                   tdDetail = "第一回",
                                   tdIsDelete = false,
                                   tdRead = 1,
                                   tdCommend = 0,
                                   tdGood = 0,
                                   tdCreatetime = DateTime.Now,
                                   tdUpdatetime = DateTime.Now,
                                   tdTop = 0,
                               });
                        }
                    }
                }
                #endregion


            }
            catch (Exception ex)
            {

            }
        }
    }
是不是很简单,上边的 CreateTableByEntity 是用来创建数据库的表结构的,第一次执行完成后,剩下的就可以不用执行了。下边的是添加种子数据,我增加了判断,其他的大家可以自定义处理。
这个时候我们已经把初始化表结构,和添加种子数据完成了,那我们应该怎么用呢,别慌,请往下看。
三、在项目启动的时候,执行初始化
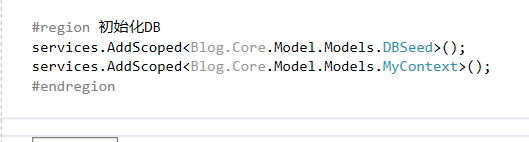
1、将上边的类注入服务
这个很简单,相信大家都能看懂,我就直接注入到服务,然后服务会自动注入到Autofac:
2、在主程序 Main 中启动初始化
相信大家都应该知道,其实 .net core 本身是一个控制台程序,所以项目启动是在 Program.cs 中的 Main主程序方法中的,我们做一下修改:
    public class Program
    {
        public static void Main(string[] args)
        {
            // 生成承载 web 应用程序的 Microsoft.AspNetCore.Hosting.IWebHost。Build是WebHostBuilder最终的目的,将返回一个构造的WebHost。
            var host = CreateWebHostBuilder(args).Build();

            // 创建可用于解析作用域服务的新 Microsoft.Extensions.DependencyInjection.IServiceScope。
            using (var scope = host.Services.CreateScope())
            {
                var services = scope.ServiceProvider;
                var loggerFactory = services.GetRequiredService<ILoggerFactory>();

                try
                {
                    // 从 system.IServicec提供程序获取 T 类型的服务。
                    var myContext = services.GetRequiredService<MyContext>();
                    DBSeed.SeedAsync(myContext).Wait();
                }
                catch (Exception e)
                {
                    var logger = loggerFactory.CreateLogger<Program>();
                    logger.LogError(e, "Error occured seeding the Database.");
                }
            }

            // 运行 web 应用程序并阻止调用线程, 直到主机关闭。
            // 创建完 WebHost 之后,便调用它的 Run 方法,而 Run 方法会去调用 WebHost 的 StartAsync 方法
            // 将Initialize方法创建的Application管道传入以供处理消息
            // 执行HostedServiceExecutor.StartAsync方法
            host.Run();
        }

        public static IWebHostBuilder CreateWebHostBuilder(string[] args) =>
            //使用预配置的默认值初始化 Microsoft.AspNetCore.Hosting.WebHostBuilder 类的新实例。
            WebHost.CreateDefaultBuilder(args)
                //指定要由 web 主机使用的启动类型。相当于注册了一个IStartup服务。
                .UseStartup<Startup>();
    }
执行流程就是,我们项目启动,首先会创建一个初始化WebHostBuilder 实例,然后使用启动默认的 Startup 服务,当然你也可以自定义这个启动服务,比如 StatupDevelopment 。
这样写 .UseStartup(typeof(StartupDevelopment).GetTypeInfo().Assembly.FullName)
接下来,就是 Build 我们的刚刚实例化的 webhostbuilder ,生成一个 WebHost 宿主主机。
中间我们就可以对宿主下的服务进行配置,
最后就是执行 Run() 方法,启动应用程序,直到主机关闭。
如果有小伙伴想更多的了解 .net core 的启动配置相关知识,可以看这里有一个QQ群管理Dave 大神的视频:
四、测试结果
1、用动图来演示效果
经过配置,我这里先建立了一个空的数据库 DBInitTest ,然后看看效果:

这里要注意下:根据数据库大小的不同,中间可能经历的时间不一样,我们已经成功的生成了数据库,并初始化出来了数据。
好啦,今天的这个小技巧就说到这里了,你也可以根据自己的情况,根据自己的ORM来设计哟,特别适用于一个给别人展示的Demo项目,和自己的小项目。
2、如果用EFCore会更简单
上边咱们说到了,有的小伙伴会使用EFCore,而且上边咱们也简单说了,在EFCore 进行实体映射以后,就可以直接进行Code First 和 种子数据初始化了:
官方地址:https://docs.microsoft.com/en-us/ef/core/modeling/data-seeding
 try
 {
     // TODO: Only run this if using a real database
     myContext.Database.Migrate();

     if (!myContext.Posts.Any())
     {
         myContext.Posts.AddRange(
             new List<Post>{
         new Post{
             Title = "Post Title 1",
             Body = "Post Body 1",
             Author = "Dave",
             LastModified = DateTime.Now
         }
             }
         );
         await myContext.SaveChangesAsync();
     }
 }
最后,圣诞节快乐
最后来个今天火的不得了的小图:

(图片来源于网络,侵删)
五、Github & Gitee
https://github.com/anjoy8/Blog.Core
https://gitee.com/laozhangIsPhi/Blog.Core
--END

 浙公网安备 33010602011771号