

002-android 布局(layout)
-------------------------------- LinearLayout (线性布局) --------------
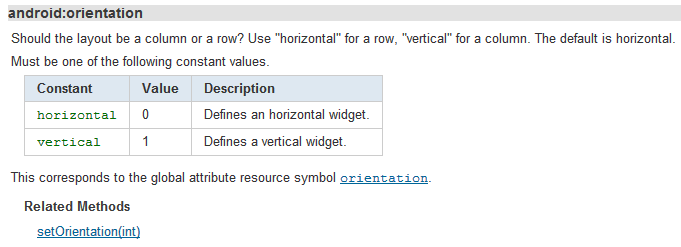
布局里面组件的排列方式
horizontal 以行的方式显示组件(水平)
vertical 以列的方式显示组件(垂直)
------
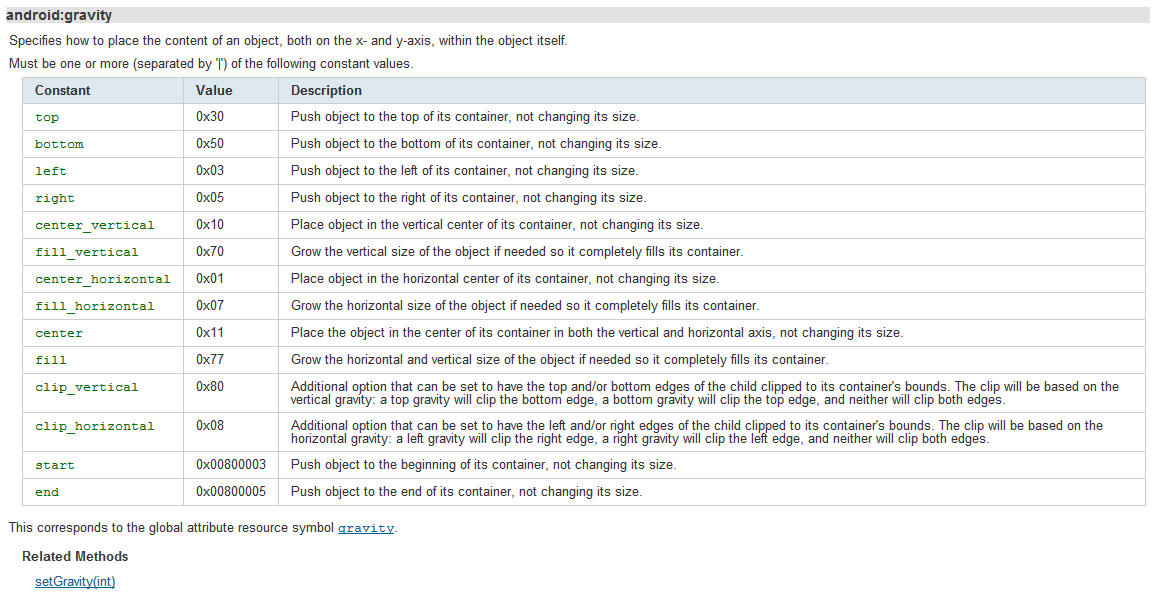
设置布局管理器内组件对象的对齐方式,可以设置多个属性,属性之间用 '|' (竖线) 隔开。
例如 left|center_vertical 代表出现在屏幕左边并且居中
注意:当组件太多以至于按照当前的布局定义 显示所有组件, 组件会遵循当前的布局定义, 即: 有的布局会显示到屏幕外(看不到了)
例如定义了水平排放组件,5个按钮 第5个按钮显示异常(不完整不协调)
 View Code

<LinearLayout xmlns:android="http://schemas.android.com/apk/res/android"
    android:layout_width="fill_parent"
    android:layout_height="fill_parent"
    android:orientation="horizontal" >

    <Button
        android:id="@+id/bn1"
        android:layout_width="wrap_content"
        android:layout_height="wrap_content"
        android:text="@string/btn1"
        />
    <Button
        android:id="@+id/bn2"
        android:layout_width="wrap_content"
        android:layout_height="wrap_content"
        android:text="@string/btn2"
        />
    <Button
        android:id="@+id/bn3"
        android:layout_width="wrap_content"
        android:layout_height="wrap_content"
        android:text="@string/btn3"
        />
    <Button
        android:id="@+id/bn4"
        android:layout_width="wrap_content"
        android:layout_height="wrap_content"
        android:text="@string/btn4"
        />
    <Button
        android:id="@+id/bn5"
        android:layout_width="wrap_content"
        android:layout_height="wrap_content"
        android:text="@string/btn5"
        />

</LinearLayout>
图:

------------------------------ tableLayout (表格布局) ------------
表格布局可以指定的属性如下:
主要有 : 允许压缩,允许拉伸,隐藏和普通
当在 tableLayout 中插入组件的时候如果没有加入 <TableRow /> 那么组件会默认占用表格的一行。
像如下代码
View Code
    <!-- 定义一个表格布局:第 1 列允许收缩,第 2 列允许拉伸, 第 3 列普通, 第 4 列隐藏-->
    <TableLayout
        android:id="@+id/tableLayout"
        android:layout_width="fill_parent"
        android:layout_height="wrap_content"
        android:shrinkColumns="0"
        android:stretchColumns="1"
        android:collapseColumns="3"
        >
            <!-- 这里放组件 -->
            <Button android:text="line_button"/>

            <TableRow
                >
                <Button android:text="shrinkable"/>
                <Button android:text="strethable"/>
                <Button android:text="general"/>
                <Button android:text="collapse"/>

            </TableRow>
    </TableLayout>
运行效果如下,第一行的一个组件占据了一行,第二行的组件分别按照定义的布局方式共享一行,最后一个组件隐藏了。
------------------------------------------------- FrameLayout (帧布局) -----------
像java 的 卡片布局,不同的是点击下面的组件,组件不会跑到上面来。
下面的定义了五个 同高度 不同宽度 不同背景颜色的 textView 实现渐变的效果
code:
View Code
<FrameLayout xmlns:android="http://schemas.android.com/apk/res/android"
    android:layout_width="fill_parent"
    android:layout_height="fill_parent"
    >
    <!-- 定义5个 textView 呈现祯效果 -->
    <TextView android:width="150dp"
        android:height="50dp"
        android:background="#00FF00"
        android:layout_width="wrap_content"
        android:layout_height="wrap_content"/>
    <TextView android:width="120dp"
        android:height="50dp"
        android:background="#00AA00"
        android:layout_width="wrap_content"
        android:layout_height="wrap_content"/>
    <TextView android:width="90dp"
        android:height="50dp"
        android:background="#006600"
        android:layout_width="wrap_content"
        android:layout_height="wrap_content"/>
    <TextView android:width="60dp"
        android:height="50dp"
        android:background="#004400"
        android:layout_width="wrap_content"
        android:layout_height="wrap_content"/>
    <TextView android:width="30dp"
        android:height="50dp"
        android:background="#003300"
        android:layout_width="wrap_content"
        android:layout_height="wrap_content"/>
</FrameLayout>
运行效果:
------------------------------------------------------------- relationLayout (相对布局) -------------
组件之间以相对位置的方式进行布局,通常以一个为起点,布局其他组件
像下面的官方代码:
View Code
<RelativeLayout xmlns:android="http://schemas.android.com/apk/res/android"
    android:layout_width="fill_parent"
    android:layout_height="fill_parent">
    <TextView
        android:id="@+id/label"
        android:layout_width="fill_parent"
        android:layout_height="wrap_content"
        android:text="Type here:"/>
    <EditText
        android:id="@+id/entry"
        android:layout_width="fill_parent"
        android:layout_height="wrap_content"
        android:background="@android:drawable/editbox_background"
        android:layout_below="@id/label"/>    <!-- EditText 在Type here 下面 -->
    <Button
        android:id="@+id/ok"
        android:layout_width="wrap_content"
        android:layout_height="wrap_content"
        android:layout_below="@id/entry"
        android:layout_alignParentRight="true"
        android:layout_marginLeft="10dip"
        android:text="OK" />                <!-- "OK"Button 在 EditText 下面(android:layout_below="@id/entry")
                                                            相对 EditText 位于 EditText 的右方(android:layout_alignParentRight="true")
                                                              与左边的组件间隔 10dip (android:layout_marginLeft="10dip")
                                             -->
    <Button
        android:layout_width="wrap_content"
        android:layout_height="wrap_content"
        android:layout_toLeftOf="@id/ok"
        android:layout_alignTop="@id/ok"
        android:text="Cancel" />            <!-- "Cancel"Button 在 "OK"Button 的左方居上(左上方) -->
</RelativeLayout>
运行效果:
更多的属性:

 浙公网安备 33010602011771号