android 入门 001 (界面布局)
学android 首先学会怎么布局界面,我开始是学.net的,因工作需要学习一下安卓,外行写的不好,请多多见谅指教 。这一篇文章然我们来学习一下四种布局吧!
RelativeLayout(相对布局) 、LinearLayout(线性布局) 、TableLayout(表格布局) 、FrameLayout(帧布局)
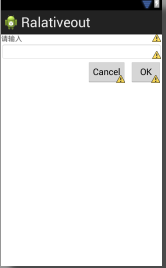
1、RelativeLayout<RelativeLayout xmlns:android="http://schemas.android.com/apk/res/android" xmlns:tools="http://schemas.android.com/tools" android:layout_width="fill_parent" android:layout_height="match_parent" > <TextView android:id="@+id/lable" android:layout_width="fill_parent" android:layout_height="wrap_content" android:text="请输入" /> <EditText android:id="@+id/txt" android:layout_width="fill_parent" android:layout_height="wrap_content" android:background="@android:drawable/editbox_background" android:layout_below="@id/lable" /> <Button android:id="@+id/OK" android:layout_width="wrap_content" android:layout_height="wrap_content" android:layout_below="@id/txt" android:text="OK" android:layout_alignParentRight="true" android:layout_marginLeft="10px" /> /> <Button android:id="@+id/Cancel" android:layout_width="wrap_content" android:layout_height="wrap_content" android:layout_toLeftOf="@id/OK" android:layout_alignTop="@id/OK" android:text="Cancel" /> </RelativeLayout>
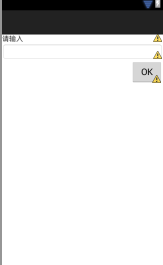
2、LinearLayout
<LinearLayout xmlns:android="http://schemas.android.com/apk/res/android"
    xmlns:tools="http://schemas.android.com/tools"
    android:layout_width="fill_parent"
    android:layout_height="fill_parent"
     android:orientation="vertical"
    >

    <TextView
        android:id="@+id/lable"
        android:layout_width="fill_parent"
        android:layout_height="wrap_content"
        android:text="请输入" />
    <EditText
         android:id="@+id/txt"
        android:layout_width="fill_parent"
        android:layout_height="wrap_content"
         android:background="@android:drawable/editbox_background"
         android:layout_below="@id/lable"

        />
    <Button
        android:id="@+id/OK"
        android:layout_width="wrap_content"
        android:layout_height="wrap_content"
        android:layout_below="@id/txt"
        android:text="OK"
       android:layout_gravity="right"
        />
         />


</LinearLayout>
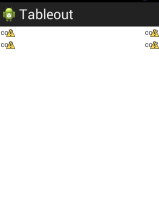
3、TableLayout
<TableLayout xmlns:android="http://schemas.android.com/apk/res/android"

    android:layout_width="fill_parent"
    android:layout_height="fill_parent"
    android:stretchColumns="1"
    >
   <TableRow >
       <TextView
           android:text="col1"
           android:padding="3dip"
           />
        <TextView
           android:text="col2"
           android:padding="3dip"
           android:gravity="right"
           />

   </TableRow>
    <TableRow >
       <TextView
           android:text="col1"
           android:padding="3dp"
           />
        <TextView
           android:text="col2"
           android:padding="3dp"
           android:gravity="right"
           />

   </TableRow>

</TableLayout>
4、FrameLayout
<FrameLayout xmlns:android="http://schemas.android.com/apk/res/android"
    xmlns:tools="http://schemas.android.com/tools"
    android:layout_width="fill_parent"
    android:layout_height="fill_parent"
    >


     <ImageView
         android:layout_height="fill_parent"
         android:layout_width="fill_parent"
         android:src="@drawable/movie"

         />
     <ImageView
         android:layout_height="wrap_content"
         android:layout_width="wrap_content"
         android:src="@drawable/play"
          android:layout_gravity="center"
         />

</FrameLayout>


转载 请注明原文地址并标明转载:http://www.cnblogs.com/laopo
商业用途请与我联系:lcfhn168@163.com

 浙公网安备 33010602011771号