微服务-17 AOP动态切换数据源,应用场景-SaaS系统中的-数据源/库-隔离数据,(本次案例数据库读写分离)
AOP动态切换数据源,应用场景-SaaS系统的数据库隔离,(本次测试读写分离)
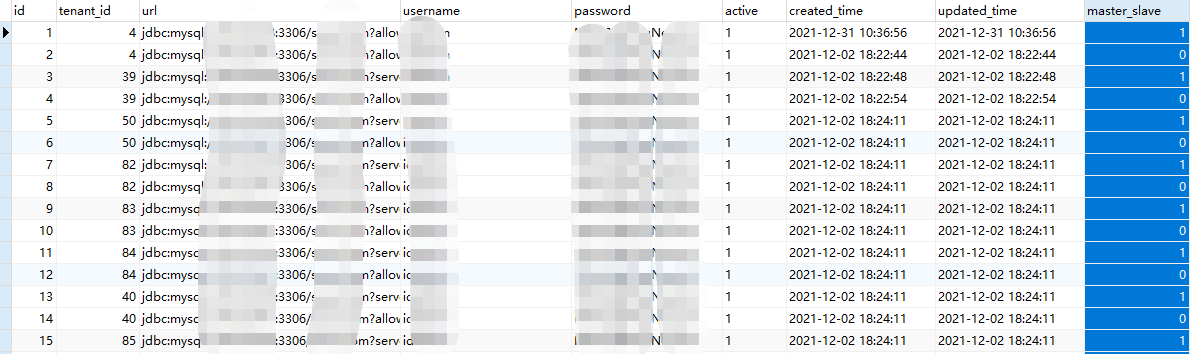
标注: 数据库的读写分离,一般我们都会用数据库的中间件做处理,例如: mysql-proxy / Mycat / Amoeba ,但是我们在做Saas服务系统时,每个商户都购买了你的产品,那么每个商户的数据安全你都应该考虑到,出一点差错都不行,所以我们有必要做数据库隔离数据,这就用到了我们的多数据源。如下图:
本次测试的案例,就让我们在程序当中,每一个请求都可以动态的切换数据源,以主从的方式来回切换
前言:
在日常的项目开发当中,很多时候都会用到多数据源 或者是 数据库的主从关系,我们希望给数据库减轻压力,查询操作从库 ,写入操作主库,那么我们应该如何维护多数据源实现读写分离呢?目前也有一些框架在做例如 sharding-jdbc 这类框架,但是这种框架性能太低了,我们本次要实现的是,基于SpringBoot+Mybatis来操作动态切换数据源,在这之前需要认识一些类
AbstractRoutingDataSource: (抽象路由数据源)
Spring提供了AbstractRoutingDataSource 根据用户定义规则选择当前数据源,我们只需要重写determineCurrentLookupKey方法 赋予我们本次想操作的数据源就好, 基于AbstractRoutingDataSource的多数据源动态切换,可以实现读写分离,这么做缺点也很明显,无法动态的增加数据源。AbstractRoutingDataSource类得targetDataSources属性允许我们赋予一个Map数据源得集合,Map得key由使用者自定义,Map得Value由具体得数据源,这样在每次执行过程中,使用者可以在 determineCurrentLookupKey方法动态得切换数据源,AbstractRoutingDataSource类得 DefaultTargetDataSource 方法需要一个默认得数据源
事务管理:
Spring提供的AbstractRoutingDataSource 只支持单库事务,也就是说切换数据源要在开启事务之前执行。 spring DataSourceTransactionManager进行事务管理,开启事务,会将数据源缓存到DataSourceTransactionObject对象中进行后续的commit rollback等事务操作。在事务开启后,数据源就不能再进行随意切换了,也就是说,一个事务对应一个数据源。传统的Spring管理事务是放在Service业务层操作的,所以更换数据源的操作要放在这个操作之前进行。也就是切换数据源操作放在Controller层
快速开始:
一、
本案例,测试多数据源,添加jar包到pom文件中,涉及到的jar包
<dependency>
<groupId>org.springframework.boot</groupId>
<artifactId>spring-boot-starter-web</artifactId>
</dependency>
<dependency>
<groupId>org.mybatis.spring.boot</groupId>
<artifactId>mybatis-spring-boot-starter</artifactId>
<version>2.0.0</version>
</dependency>
<dependency>
<groupId>mysql</groupId>
<artifactId>mysql-connector-java</artifactId>
<scope>runtime</scope>
</dependency>
<dependency>
<groupId>org.springframework.boot</groupId>
<artifactId>spring-boot-starter-aop</artifactId>
</dependency>
<!-- druid数据源 -->
<dependency>
<groupId>com.alibaba</groupId>
<artifactId>druid-spring-boot-starter</artifactId>
<version>1.1.10</version>
</dependency>
二、
创建切换枚举类
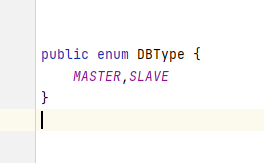
public enum DBType {
MASTER,SLAVE
}
三、
创建 数据源动态切换类
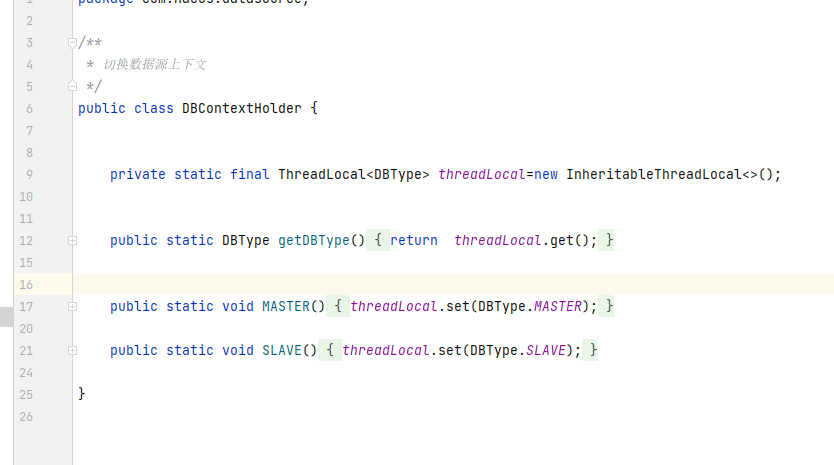
/**
* 切换数据源上下文
*/
public class DBContextHolder {
private static final ThreadLocal<DBType> threadLocal=new InheritableThreadLocal<>();
public static DBType getDBType(){
return threadLocal.get();
}
public static void MASTER(){
threadLocal.set(DBType.MASTER);
}
public static void SLAVE(){
threadLocal.set(DBType.SLAVE);
}
}
四、
创建一个实现类 继承 AbstractRoutingDataSource 类 并且重写实现 determineCurrentLookupKey 类方法,该方法返回的是本次使用那个数据源
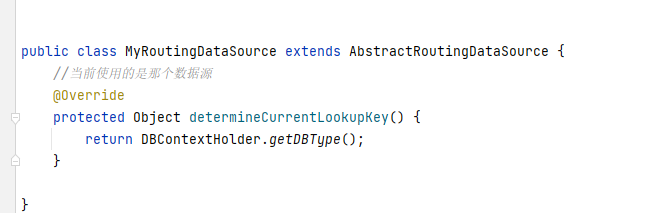
public class MyRoutingDataSource extends AbstractRoutingDataSource {
//当前使用的是那个数据源
@Override
protected Object determineCurrentLookupKey() {
return DBContextHolder.getDBType();
}
}
五、 DBInfoInit初始数据源
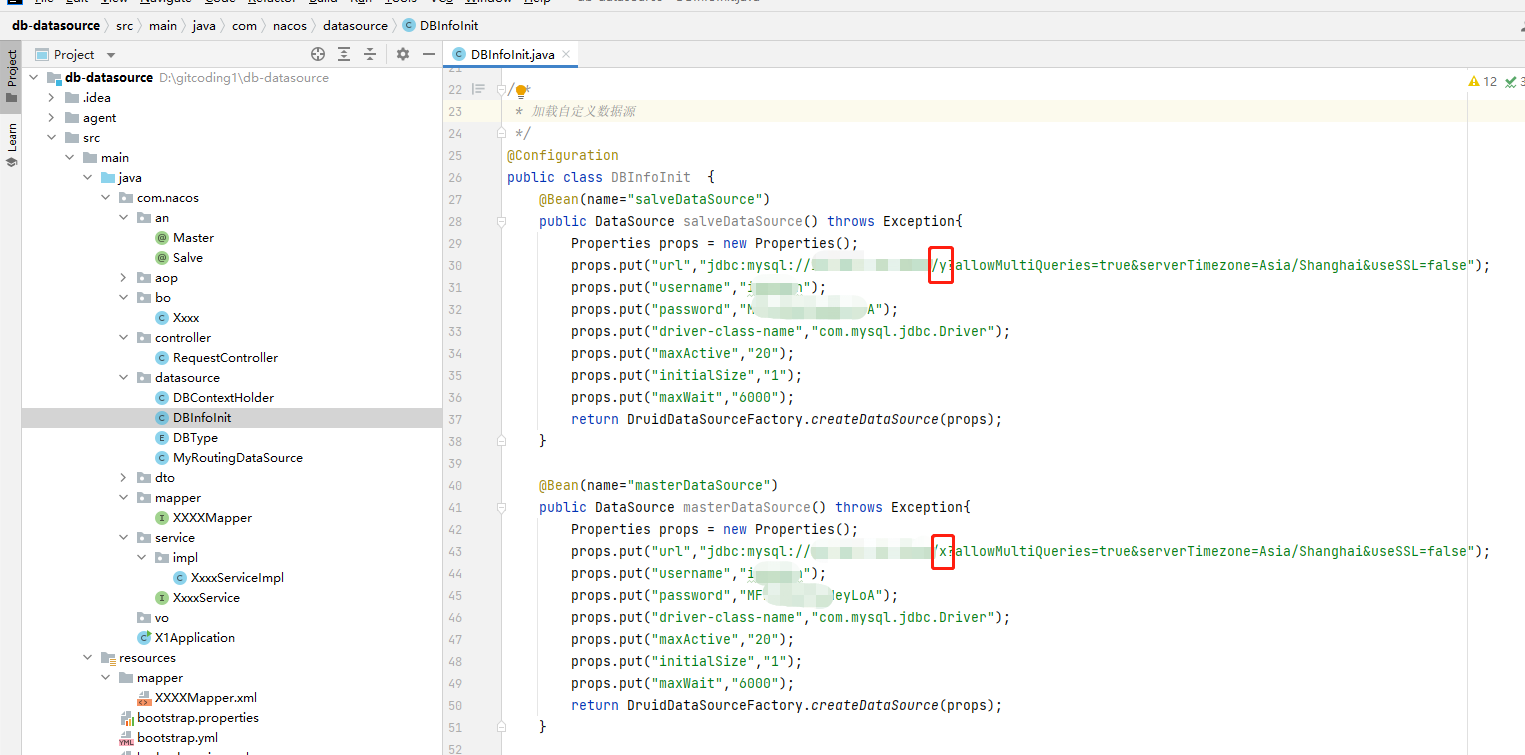
创建多数据源的Bean,该类可以从配置文件中读取数据库的配置参数,也可以从数据库表中读取,我本次测试的案例是在程序里 写死了,因为这样可以帮助 读者更好的理解,授人与鱼不如授人与渔,从哪里读取 ,观众说的算,下面是创建两个数据源 并且数据源bean 的名称 = salveDataSource 和 masterDataSource
代码在尾部 一起copy出来
六、
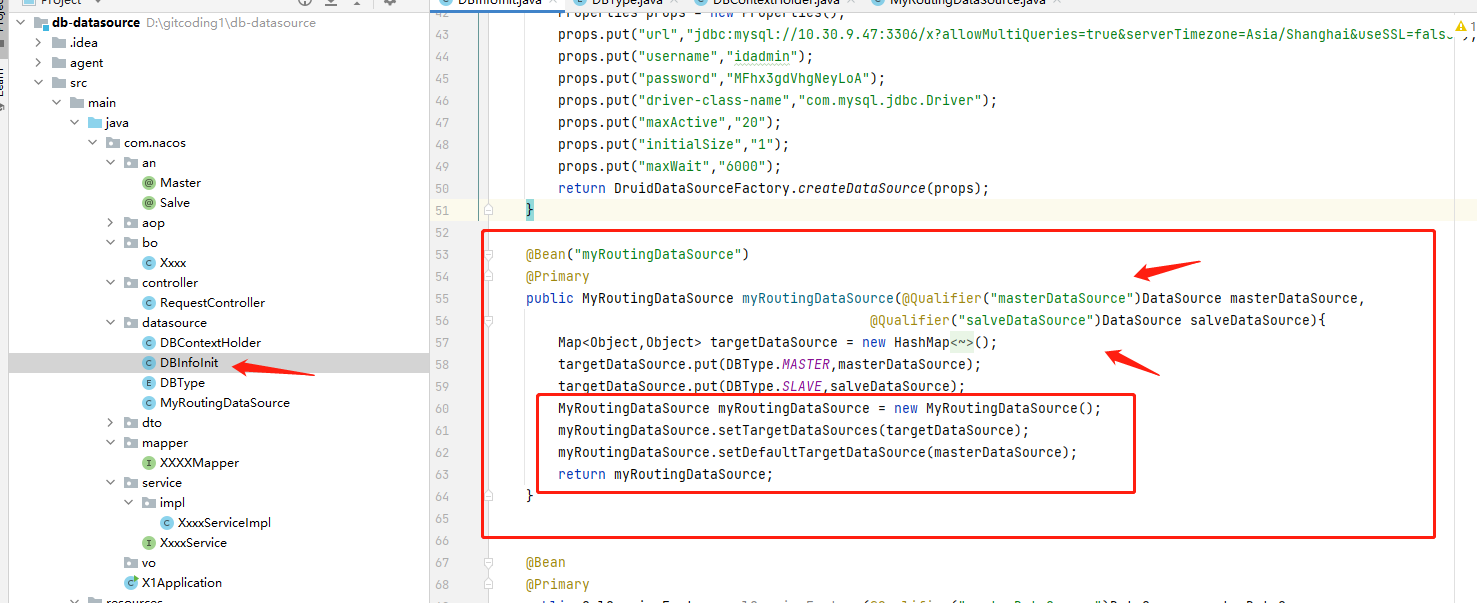
把我们这两个数据源 注入到 AbstractRoutingDataSource 的实现类当中, 并且要给该实现类 赋予 全部数据源setTargetDataSources,和默认数据源 setDefaultTargetDataSource,这两个类都是 AbstractRoutingDataSource 抽象类中的属性,这样在切换数据源的过程中,就可以根据key去取当前的value对应的数据源了 ![]()
七、
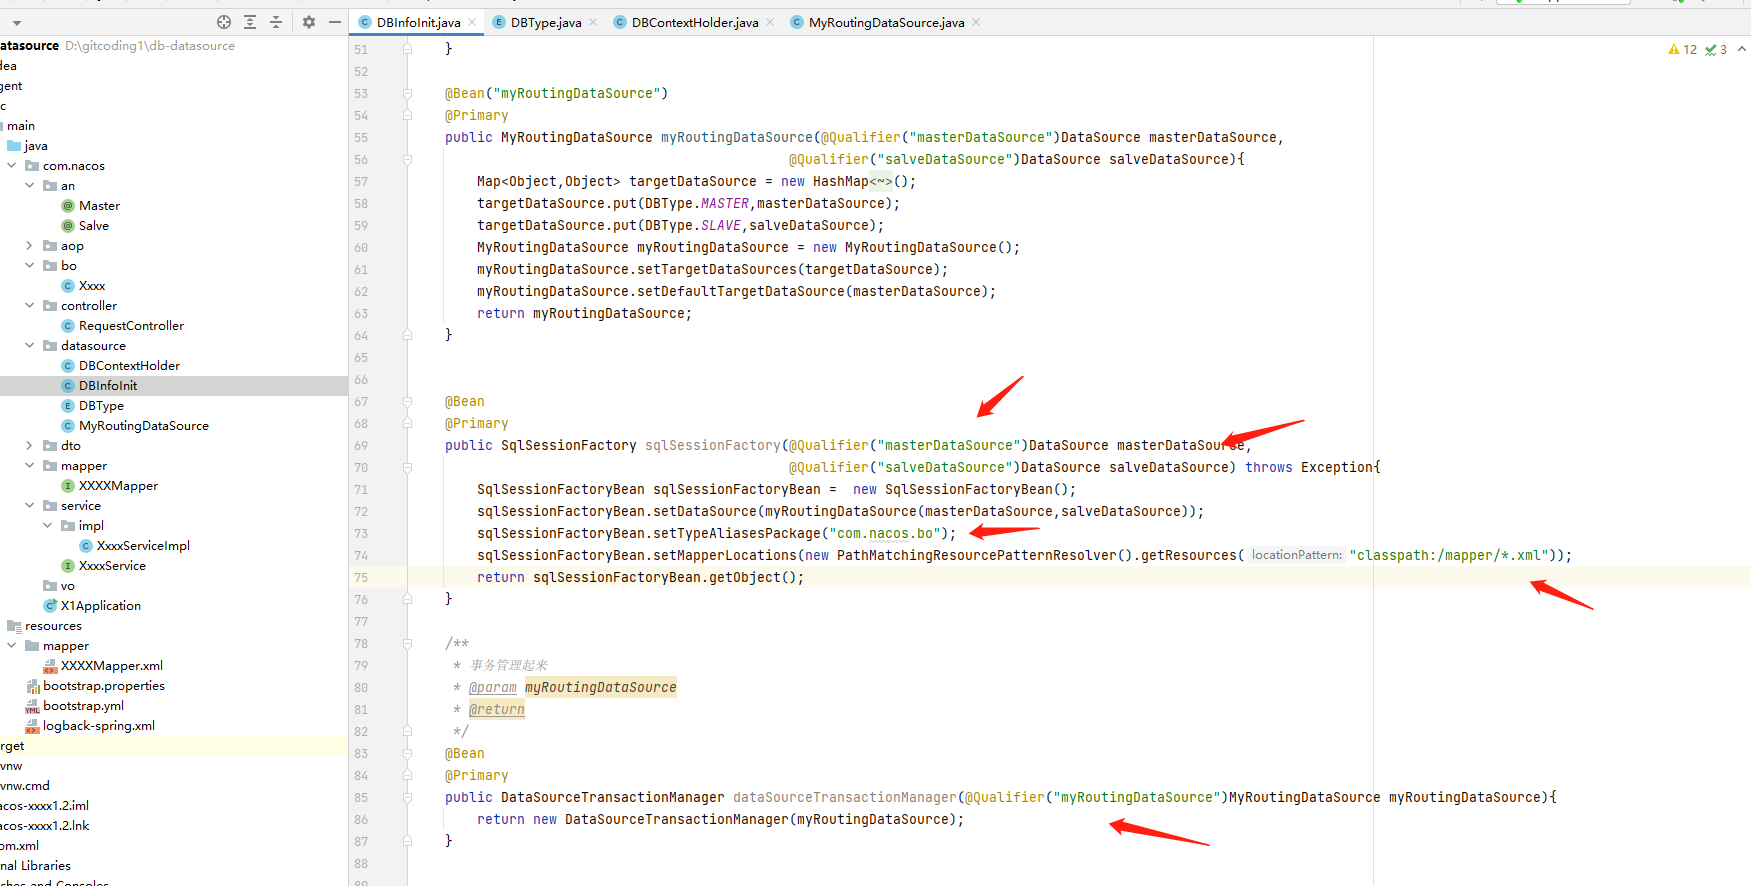
把两个数据源添加到SqlSessionFactory中, 并且把当前具体的执行数据源 放到 事务中进行管理。,指定我们的Mapper的配置文件路径,和类别名的路径
/**
* 加载自定义数据源
*/
@Configuration
public class DBInfoInit {
@Bean(name="salveDataSource")
public DataSource salveDataSource() throws Exception{
Properties props = new Properties();
props.put("url","jdbc:mysql://127.0.0.1:3306/y?allowMultiQueries=true&serverTimezone=Asia/Shanghai&useSSL=false");
props.put("username","idadmin");
props.put("password","MFhx3gdVhgNeyLoA");
props.put("driver-class-name","com.mysql.jdbc.Driver");
props.put("maxActive","20");
props.put("initialSize","1");
props.put("maxWait","6000");
return DruidDataSourceFactory.createDataSource(props);
}
@Bean(name="masterDataSource")
public DataSource masterDataSource() throws Exception{
Properties props = new Properties();
props.put("url","jdbc:mysql://127.0.0.1:3306/x?allowMultiQueries=true&serverTimezone=Asia/Shanghai&useSSL=false");
props.put("username","idadmin");
props.put("password","MFhx3gdVhgNeyLoA");
props.put("driver-class-name","com.mysql.jdbc.Driver");
props.put("maxActive","20");
props.put("initialSize","1");
props.put("maxWait","6000");
return DruidDataSourceFactory.createDataSource(props);
}
@Bean("myRoutingDataSource")
@Primary
public MyRoutingDataSource myRoutingDataSource(@Qualifier("masterDataSource")DataSource masterDataSource,
@Qualifier("salveDataSource")DataSource salveDataSource){
Map<Object,Object> targetDataSource = new HashMap<Object,Object>();
targetDataSource.put(DBType.MASTER,masterDataSource);
targetDataSource.put(DBType.SLAVE,salveDataSource);
MyRoutingDataSource myRoutingDataSource = new MyRoutingDataSource();
myRoutingDataSource.setTargetDataSources(targetDataSource);
myRoutingDataSource.setDefaultTargetDataSource(masterDataSource);
return myRoutingDataSource;
}
@Bean
@Primary
public SqlSessionFactory sqlSessionFactory(@Qualifier("masterDataSource")DataSource masterDataSource,
@Qualifier("salveDataSource")DataSource salveDataSource) throws Exception{
SqlSessionFactoryBean sqlSessionFactoryBean = new SqlSessionFactoryBean();
sqlSessionFactoryBean.setDataSource(myRoutingDataSource(masterDataSource,salveDataSource));
sqlSessionFactoryBean.setTypeAliasesPackage("com.nacos.bo");
sqlSessionFactoryBean.setMapperLocations(new PathMatchingResourcePatternResolver().getResources("classpath:/mapper/*.xml"));
return sqlSessionFactoryBean.getObject();
}
/**
* 事务管理起来
* @param myRoutingDataSource
* @return
*/
@Bean
@Primary
public DataSourceTransactionManager dataSourceTransactionManager(@Qualifier("myRoutingDataSource")MyRoutingDataSource myRoutingDataSource){
return new DataSourceTransactionManager(myRoutingDataSource);
}
八、搭建MVC三层
附上实体类
public class Xxxx {
private int id;
private String name;
public int getId() {
return id;
}
public void setId(int id) {
this.id = id;
}
public String getName() {
return name;
}
public void setName(String name) {
this.name = name;
}
}
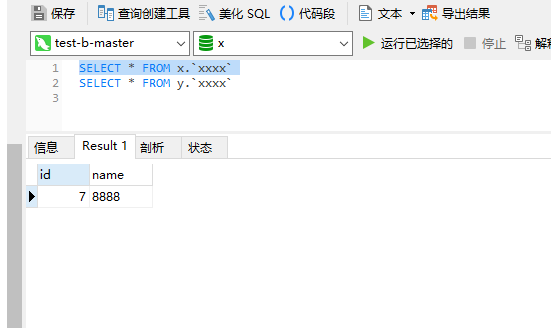
编写mapper文件,因为我们本次 资源有限,是在1个数据源上创建不同的库,x库 和y库 而这两个库都有 xxxx表,
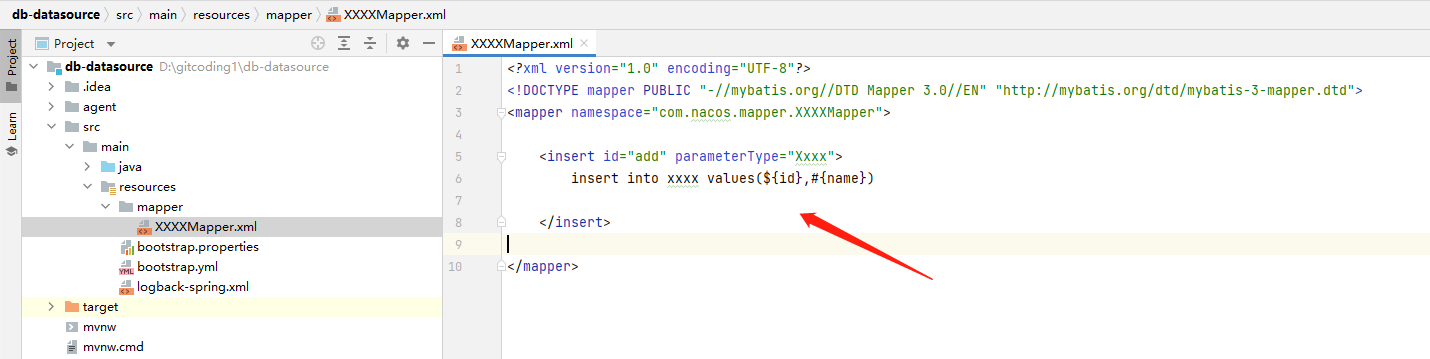
<?xml version="1.0" encoding="UTF-8"?>
<!DOCTYPE mapper PUBLIC "-//mybatis.org//DTD Mapper 3.0//EN" "http://mybatis.org/dtd/mybatis-3-mapper.dtd">
<mapper namespace="com.nacos.mapper.XXXXMapper">
<insert id="add" parameterType="Xxxx">
insert into xxxx values(${id},#{name})
</insert>
</mapper>
编写mapper文件对应的 数据访问接口类
import com.nacos.bo.Xxxx;
import org.apache.ibatis.annotations.Mapper;
@Mapper
public interface XXXXMapper {
void add(Xxxx xxxx);
}
编写Service,以及实现类
import com.nacos.bo.Xxxx;
public interface XxxxService {
void add(Xxxx xxxx);
}
实现类
import com.nacos.bo.Xxxx;
import com.nacos.mapper.XXXXMapper;
import com.nacos.service.XxxxService;
import org.springframework.stereotype.Service;
import javax.annotation.Resource;
import java.util.concurrent.atomic.AtomicInteger;
@Service
public class XxxxServiceImpl implements XxxxService {
@Resource
XXXXMapper xXXXMapper;
@Override
public void add(Xxxx x){
xXXXMapper.add(x);
}
}
编写Controller
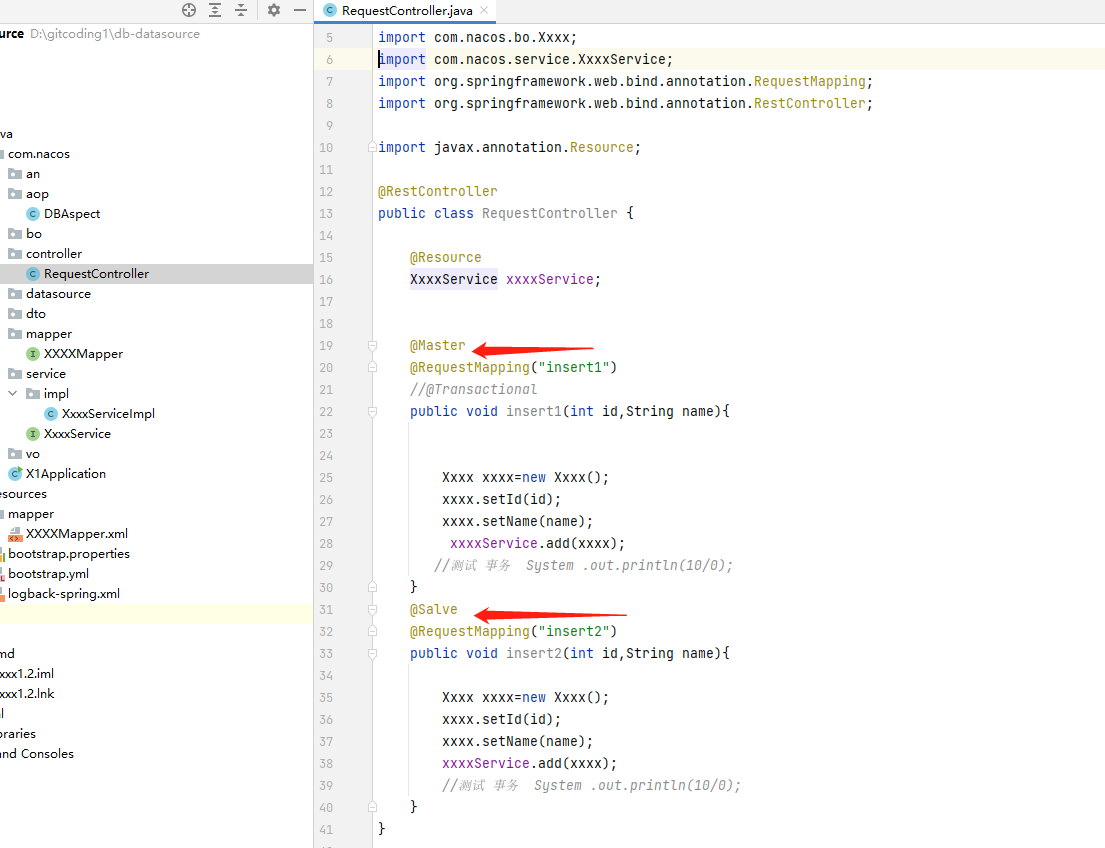
import com.nacos.an.Master;
import com.nacos.an.Salve;
import com.nacos.bo.Xxxx;
import com.nacos.service.XxxxService;
import org.springframework.web.bind.annotation.RequestMapping;
import org.springframework.web.bind.annotation.RestController;
import javax.annotation.Resource;
@RestController
public class RequestController {
@Resource
XxxxService xxxxService;
@Master
@RequestMapping("insert1")
//@Transactional
public void insert1(int id,String name){
Xxxx xxxx=new Xxxx();
xxxx.setId(id);
xxxx.setName(name);
xxxxService.add(xxxx);
//测试 事务 System .out.println(10/0);
}
@Salve
@RequestMapping("insert2")
public void insert2(int id,String name){
Xxxx xxxx=new Xxxx();
xxxx.setId(id);
xxxx.setName(name);
xxxxService.add(xxxx);
//测试 事务 System .out.println(10/0);
}
}
九、编写Aop对于Controller层面的接口 Master Salve 注解进行数据源切换
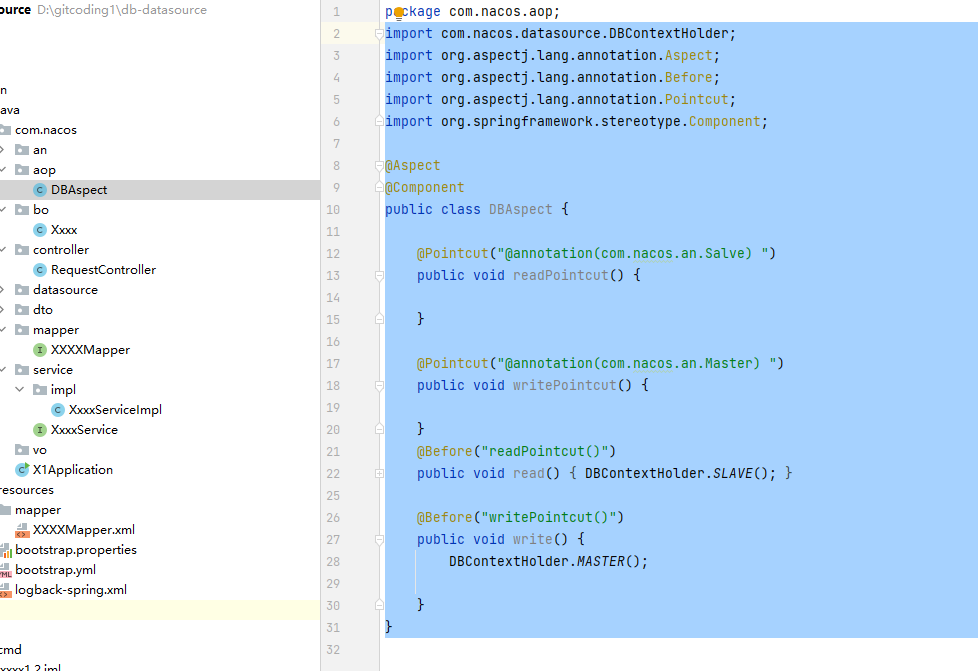
package com.nacos.aop;
import com.nacos.datasource.DBContextHolder;
import org.aspectj.lang.annotation.Aspect;
import org.aspectj.lang.annotation.Before;
import org.aspectj.lang.annotation.Pointcut;
import org.springframework.stereotype.Component;
@Aspect
@Component
public class DBAspect {
@Pointcut("@annotation(com.nacos.an.Salve) ")
public void readPointcut() {
}
@Pointcut("@annotation(com.nacos.an.Master) ")
public void writePointcut() {
}
@Before("readPointcut()")
public void read() {
DBContextHolder.SLAVE();
}
@Before("writePointcut()")
public void write() {
DBContextHolder.MASTER();
}
}
十 开始测试、
看效果:


 浙公网安备 33010602011771号