

两台虚拟机搭建openstack-stein
centos7 搭建openstack-stein
openstack 官网地址:https://docs.openstack.org/2023.1.antelope/
1.主机准备
|
名称 |
IP地址 |
主机名称 |
备注 |
|
控制节点 |
192.168.10.11 |
controller |
最小4G,开启虚拟化 |
|
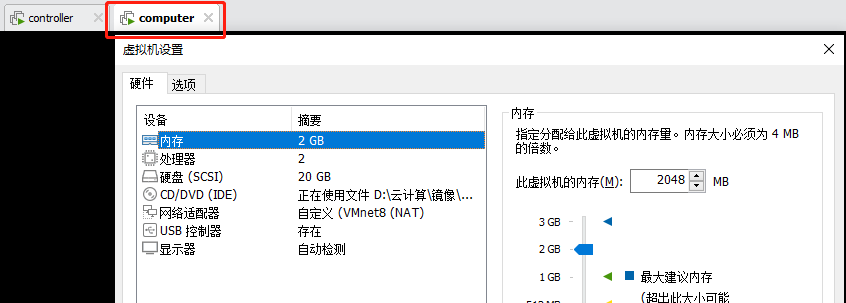
计算节点 |
192.168.10.31 |
computer |
最小2G,开启虚拟化 |
1.2.控制节点

1.3.计算节点
2.基础配置
#修改主机IP地址,主机名称,做hosts解析,关闭selinux,关闭防火墙
2.1.控制节点
#修改主机IP地址
vim /etc/sysconfig/network-scripts/ifcfg-eth0

TYPE=Ethernet

BOOTPROTO=static

NAME=eth0

DEVICE=eth0

ONBOOT=yes

IPADDR=192.168.10.11 ##修改为指定IP地址

NETMASK=255.255.255.0

GATEWAY=192.168.10.2

DNS1=223.5.5.5

systemctl restart network #修改完成后重启网卡
#修改主机名称
hostnamectl set-hostname controller

bash
#做hosts解析
vim /etc/hosts

127.0.0.1   localhost localhost.localdomain localhost4 localhost4.localdomain4

::1         localhost localhost.localdomain localhost6 localhost6.localdomain6

192.168.10.11       controller

192.168.10.31       computer
#做完hosts解析可以使用scp发送到另一台机器上
scp -rp /etc/hosts root@192.168.10.31:/etc/hosts
2.2.计算节点
#修改主机IP地址
vim /etc/sysconfig/network-scripts/ifcfg-eth0

TYPE=Ethernet

BOOTPROTO=static

NAME=eth0

DEVICE=eth0

ONBOOT=yes

IPADDR=192.168.10.31 ##修改为指定IP地址

NETMASK=255.255.255.0

GATEWAY=192.168.10.2

DNS1=223.5.5.5

systemctl restart network #修改完成后重启网卡
#修改主机名称
hostnamectl set-hostname compute1

bash
#做hosts解析
vim /etc/hosts

127.0.0.1   localhost localhost.localdomain localhost4 localhost4.localdomain4

::1         localhost localhost.localdomain localhost6 localhost6.localdomain6

192.168.10.11       controller

192.168.10.31       computer
2.3.密码参考
|
密码名称 |
描述 |
|
ADMIN_PASS |
admin用户密码admin123 |
|
CINDER_DBPASS |
块设备存储服务的数据库密码 |
|
CINDER_PASS |
块设备存储服务的cinder密码 |
|
DEMO_PASS |
demo用户的密码 |
|
glance123 |
镜像服务的数据库密码glance123 |
|
glance123 |
镜像服务的glance用户密码glance123 |
|
KEYSTONE_DBPASS |
认证服务的数据库密码 |
|
NEUTRON_DBPASS |
网络服务的数据库密码 |
|
NEUTRON_PASS |
网络服务的neutron用户密码 |
|
nova123 |
计算服务的数据库密码nova123 |
|
nova123 |
计算服务中nova用户的密码nova123 |
|
RABBIT_PASS |
RabbitMQ的guest用户密码 |
2.4.时间同步
2.4.1控制节点
#下载安装chrony
yum -y install chrony

#修改配置文件/etc/chrony.conf

vim /etc/chrony.conf

#修改第三行

server time1.aliyun.com iburst

#修改allow

allow 192.168.10.0/24

#启动并加入开机自启

systemctl enable chronyd.service

systemctl start chronyd.service
2.4.2计算节点
#下载安装chrony
yum -y install chrony

#修改配置文件/etc/chrony.conf

vim /etc/chrony.conf

#修改第三行

server controller iburst

#启动并加入开机自启

systemctl enable chronyd.service

systemctl start chronyd.service
2.5.安装通用包
#所有节点上执行(控制节点+计算节点)
#下载openstack源

yum install centos-release-openstack-stein -y

#下载所需要的软件

yum install python-openstackclient openstack-selinux -y
2.6.安装SQL数据库
#控制节点安装即可
yum install mariadb mariadb-server python2-PyMySQL -y

vim /etc/my.cnf.d/openstack.cnf

[mysqld]

bind-address = 192.168.10.11

default-storage-engine = innodb

innodb_file_per_table

max_connections = 4096

collation-server = utf8_general_ci

character-set-server = utf8

#启动并加入开机自启

systemctl enable mariadb.service

systemctl start mariadb.service

#查看端口验证

netstat -tnulp|grep 3306

#跳坑

mysql_secure_installation

回车-N-Y-Y-Y-Y
2.7.控制节点安装rabbitmq消息队列
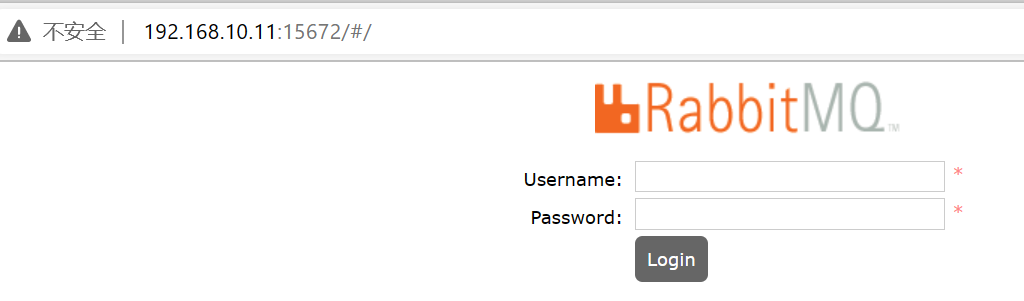
#下载并且安装rabbitmq

yum install rabbitmq-server -y

#启动并加入开机自启

systemctl enable rabbitmq-server.service

systemctl start rabbitmq-server.service

#验证端口是否存在

netstat -lntp|grep 5672

#创建用户并且设置权限

rabbitmqctl add_user openstack RABBIT_PASS

rabbitmqctl set_permissions openstack ".*" ".*" ".*"     #这里三个.*代表可读可写可配置

rabbitmqctl list_users

systemctl restart rabbitmq-server.service

#安装监控插件

rabbitmq-plugins enable rabbitmq_management

#安装成功会出现15672端口

netstat -tnulp|grep 15672

#可以访问web页面查看

http://192.168.10.11:15672/

默认用户名:guest

默认密码:guest
##注:监控是运维最主要的工作之一.
2.8.安装memcached缓存token
#下载并且安装memcached
yum install memcached python-memcached -y

#sed -i 's#127.0.0.1#0.0.0.0#g' /etc/sysconfig/memcached

#启动并加入开机自启

systemctl enable memcached.service

systemctl start memcached.service
2.9.认证服务keystone
2.9.1创库,授权
#进入数据库

mysql

#创建数据库并且授权

CREATE DATABASE keystone;

GRANT ALL PRIVILEGES ON keystone.* TO 'keystone'@'localhost' \

  IDENTIFIED BY 'KEYSTONE_DBPASS';

GRANT ALL PRIVILEGES ON keystone.* TO 'keystone'@'%' \

  IDENTIFIED BY 'KEYSTONE_DBPASS';
2.9.2安装软件包
yum install openstack-keystone httpd mod_wsgi -y
2.9.3自动配置
 #复制备份配置文件

cp /etc/keystone/keystone.conf{,.bak}

#先把手动配置的配置文件删除掉

grep '^[a-Z\[]' /etc/keystone/keystone.conf.bak >/etc/keystone/keystone.conf

#下载并且安装自动配置工具(openstack专门用来自动修改配置文件的工具)

yum install openstack-utils -y

#执行下列命令即可完成自动配置

#复制备份配置文件

cp /etc/keystone/keystone.conf{,.bak}

#清理空行与注释掉的行

grep '^[a-Z\[]' /etc/keystone/keystone.conf.bak >/etc/keystone/keystone.conf

#执行下列语句自动修改配置文件

openstack-config --set /etc/keystone/keystone.conf DEFAULT admin_token  ADMIN_TOKEN

openstack-config --set /etc/keystone/keystone.conf database connection  mysql+pymysql://keystone:KEYSTONE_DBPASS@controller/keystone

openstack-config --set /etc/keystone/keystone.conf token provider  fernet

#生成MD5验证

[root@controller ~]# md5sum /etc/keystone/keystone.conf

6784beebe33b43d2f771f655431c6cbe  /etc/keystone/keystone.conf
2.10 同步数据库
 #同步数据库

su -s /bin/sh -c "keystone-manage db_sync" keystone

#验证

mysql -e 'use keystone;show tables;'
2.11初始化Fernet keys
# keystone-manage fernet_setup --keystone-user keystone --keystone-group keystone

# keystone-manage credential_setup --keystone-user keystone --keystone-group keystone
2.12 配置httpd服务器
echo "ServerName controller" >> /etc/httpd/conf/httpd.conf
#创建文件并且写配置
vi /etc/httpd/conf.d/wsgi-keystone.conf  #这里直接可以复制粘贴

Listen 5000

Listen 35357

<VirtualHost *:5000>

    WSGIDaemonProcess keystone-public processes=5 threads=1 user=keystone group=keystone display-name=%{GROUP}

    WSGIProcessGroup keystone-public

    WSGIScriptAlias / /usr/bin/keystone-wsgi-public

    WSGIApplicationGroup %{GLOBAL}

    WSGIPassAuthorization On

    ErrorLogFormat "%{cu}t %M"

    ErrorLog /var/log/httpd/keystone-error.log

    CustomLog /var/log/httpd/keystone-access.log combined


    <Directory /usr/bin>

        Require all granted

    </Directory>

</VirtualHost>


<VirtualHost *:35357>

    WSGIDaemonProcess keystone-admin processes=5 threads=1 user=keystone group=keystone display-name=%{GROUP}

    WSGIProcessGroup keystone-admin

    WSGIScriptAlias / /usr/bin/keystone-wsgi-admin

    WSGIApplicationGroup %{GLOBAL}

    WSGIPassAuthorization On

    ErrorLogFormat "%{cu}t %M"

    ErrorLog /var/log/httpd/keystone-error.log

    CustomLog /var/log/httpd/keystone-access.log combined


    <Directory /usr/bin>

        Require all granted

    </Directory>

</VirtualHost>

#启动httpd

systemctl enable httpd.service

systemctl start httpd.service

#验证端口是否存在

netstat -lntp|grep -E '80|5000|35357'
2.13 创建服务实体和API端点
#创建

export OS_TOKEN=ADMIN_TOKEN

export OS_URL=http://controller:35357/v3

export OS_IDENTITY_API_VERSION=3

#验证

env|grep OS
#自动配置
openstack service create \

  --name keystone --description "OpenStack Identity" identity

openstack endpoint create --region RegionOne \

  identity public http://controller:5000/v3

openstack endpoint create --region RegionOne \

  identity internal http://controller:5000/v3

openstack endpoint create --region RegionOne \

  identity admin http://controller:35357/v3
#创建域,项目(租户),用户,角色
openstack domain create --description "Default Domain" default

openstack project create --domain default \

  --description "Admin Project" admin

openstack user create --domain default \

  --password ADMIN_PASS admin

openstack role create admin
#关联项目,用户,角色
openstack role add --project admin --user admin admin

#在admin项目上,给admin用户赋予admin角色

openstack project create --domain default \

  --description "Service Project" service

#验证

unset OS_TOKEN OS_URL #使用unset删除环境变量

env|grep OS
openstack --os-auth-url http://controller:35357/v3 \

  --os-project-domain-name default --os-user-domain-name default \

  --os-project-name admin --os-username admin --os-password ADMIN_PASS token issue

#

openstack --os-auth-url http://controller:35357/v3   --os-project-domain-name default --os-user-domain-name default   --os-project-name admin --os-username admin --os-password ADMIN_PASS user list

#创建脚本(变量)

vi admin-openrc

iexport OS_PROJECT_DOMAIN_NAME=default

export OS_USER_DOMAIN_NAME=default

export OS_PROJECT_NAME=admin

export OS_USERNAME=admin

export OS_PASSWORD=ADMIN_PASS

export OS_AUTH_URL=http://controller:35357/v3

export OS_IDENTITY_API_VERSION=3

export OS_IMAGE_API_VERSION=2

#刷新变量

[root@controller ~]# source admin-openrc

[root@controller ~]# env|grep OS

#写入开机自启

Vim .bashrc

source admin-openrc

#验证keystone服务是否正常的命令

openstack token issue

2.14镜像服务
2.14.1创库,授权
 CREATE DATABASE glance;

GRANT ALL PRIVILEGES ON glance.* TO 'glance'@'localhost' \

  IDENTIFIED BY 'glance123';

GRANT ALL PRIVILEGES ON glance.* TO 'glance'@'%' \

  IDENTIFIED BY 'glance123';
2.14.2创建glance用户并关联角色
openstack user create --domain default --password glance123 glance

openstack role add --project service --user glance admin
2.14.3创建服务实体和后端api
openstack service create --name glance \

  --description "OpenStack Image" image

openstack endpoint create --region RegionOne \

  image public http://controller:9292

openstack endpoint create --region RegionOne \

  image internal http://controller:9292

openstack endpoint create --region RegionOne \

  image admin http://controller:9292
2.14.4安装软件
yum install openstack-glance -y
2.14.5自动配置
#配置glance-api.conf

cp /etc/glance/glance-api.conf{,.bak}

grep '^[a-Z\[]' /etc/glance/glance-api.conf.bak >/etc/glance/glance-api.conf

openstack-config --set /etc/glance/glance-api.conf  database  connection  mysql+pymysql://glance:glance123@controller/glance

openstack-config --set /etc/glance/glance-api.conf  glance_store stores  file,http

openstack-config --set /etc/glance/glance-api.conf  glance_store default_store  file

openstack-config --set /etc/glance/glance-api.conf  glance_store filesystem_store_datadir  /var/lib/glance/images/

openstack-config --set /etc/glance/glance-api.conf  keystone_authtoken auth_uri  http://controller:5000

openstack-config --set /etc/glance/glance-api.conf  keystone_authtoken auth_url  http://controller:35357

openstack-config --set /etc/glance/glance-api.conf  keystone_authtoken memcached_servers  controller:11211

openstack-config --set /etc/glance/glance-api.conf  keystone_authtoken auth_type  password

openstack-config --set /etc/glance/glance-api.conf  keystone_authtoken project_domain_name  default

openstack-config --set /etc/glance/glance-api.conf  keystone_authtoken user_domain_name  default

openstack-config --set /etc/glance/glance-api.conf  keystone_authtoken project_name  service

openstack-config --set /etc/glance/glance-api.conf  keystone_authtoken username  glance

openstack-config --set /etc/glance/glance-api.conf  keystone_authtoken password  glance123

openstack-config --set /etc/glance/glance-api.conf  paste_deploy flavor  keystone
#配置glance-registry.conf
cp /etc/glance/glance-registry.conf{,.bak}

grep '^[a-Z\[]' /etc/glance/glance-registry.conf.bak > /etc/glance/glance-registry.conf

openstack-config --set /etc/glance/glance-registry.conf  database  connection  mysql+pymysql://glance:glance123@controller/glance

openstack-config --set /etc/glance/glance-registry.conf  keystone_authtoken auth_uri  http://controller:5000

openstack-config --set /etc/glance/glance-registry.conf  keystone_authtoken auth_url  http://controller:35357

openstack-config --set /etc/glance/glance-registry.conf  keystone_authtoken memcached_servers  controller:11211

openstack-config --set /etc/glance/glance-registry.conf  keystone_authtoken auth_type  password

openstack-config --set /etc/glance/glance-registry.conf  keystone_authtoken project_domain_name  default

openstack-config --set /etc/glance/glance-registry.conf  keystone_authtoken user_domain_name  default

openstack-config --set /etc/glance/glance-registry.conf  keystone_authtoken project_name  service

openstack-config --set /etc/glance/glance-registry.conf  keystone_authtoken username  glance

openstack-config --set /etc/glance/glance-registry.conf  keystone_authtoken password  glance123

openstack-config --set /etc/glance/glance-registry.conf  paste_deploy flavor  keystone
2.14.6同步数据库
su -s /bin/sh -c "glance-manage db_sync" glance

#验证

mysql -e 'use glance;show tables;'
2.14.7启动
systemctl enable openstack-glance-api.service \

  openstack-glance-registry.service

systemctl start openstack-glance-api.service \

  openstack-glance-registry.service

#验证tcp端口

netstat -lntp|grep -E '9191|9292'

2.14.8上传镜像验证
#下载镜像

wget http://download.cirros-cloud.net/0.3.4/cirros-0.3.4-x86_64-disk.img

#上传镜像

openstack image create "cirros" \

  --file cirros-0.3.4-x86_64-disk.img \

  --disk-format qcow2 --container-format bare \

  --public

#查看镜像

openstack image list

2.15 nova计算服务
nova-api:接受并响应所有的计算服务请求,管理虚拟机(云主机)生命周期

nova-compute (多个)):真正管理虚拟机(nova-compute调用libvist)

nova-scheduler:nova调度器(挑选出最合适的nova-compute来创建虚机)

nova-conductor:帮助nova-compute代理修改数据库中虚拟机的状态

nova-network:早期openstack版本管理虚拟机的网络(已弃用,neutron)

nova-consoleauth和nova-novncproxy: web版的vnc来直接操作云主机

novncproxy:web版vnc客户端

nova-api-metadata:接受来自虚拟机发送的元数据请求
2.15.1控制节点创库,授权
CREATE DATABASE nova_api;

CREATE DATABASE nova;

GRANT ALL PRIVILEGES ON nova_api.* TO 'nova'@'localhost' \

  IDENTIFIED BY 'nova123';

GRANT ALL PRIVILEGES ON nova_api.* TO 'nova'@'%' \

  IDENTIFIED BY 'nova123';

GRANT ALL PRIVILEGES ON nova.* TO 'nova'@'localhost' \

  IDENTIFIED BY 'nova123';

GRANT ALL PRIVILEGES ON nova.* TO 'nova'@'%' \

  IDENTIFIED BY 'nova123';
2.15.2创建nova用户,关联角色
# openstack user create --domain default \

  --password nova123 nova

# openstack role add --project service --user nova admin

# openstack service create --name nova \

  --description "OpenStack Compute" compute

# openstack endpoint create --region RegionOne \

  compute public http://controller:8774/v2.1

# openstack endpoint create --region RegionOne \

  compute internal http://controller:8774/v2.1
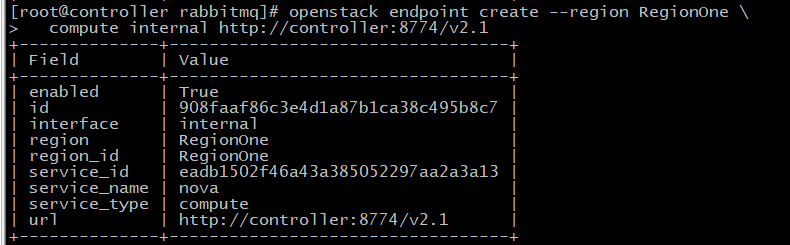
# openstack endpoint create --region RegionOne \

  compute admin http://controller:8774/v2.1

2.15.3安装软件
yum install openstack-nova-api openstack-nova-conductor \

  openstack-nova-console openstack-nova-novncproxy \

  openstack-nova-scheduler -y
2.15.4自动配置
cp /etc/nova/nova.conf{,.bak}

grep '^[a-Z\[]' /etc/nova/nova.conf.bak >/etc/nova/nova.conf

openstack-config --set /etc/nova/nova.conf  DEFAULT enabled_apis  osapi_compute,metadata

openstack-config --set /etc/nova/nova.conf  DEFAULT rpc_backend  rabbit

openstack-config --set /etc/nova/nova.conf  DEFAULT auth_strategy  keystone

openstack-config --set /etc/nova/nova.conf  DEFAULT my_ip  192.168.10.11

openstack-config --set /etc/nova/nova.conf  DEFAULT use_neutron  True

openstack-config --set /etc/nova/nova.conf  DEFAULT firewall_driver  nova.virt.firewall.NoopFirewallDriver

openstack-config --set /etc/nova/nova.conf  api_database connection  mysql+pymysql://nova:nova123@controller/nova_api

openstack-config --set /etc/nova/nova.conf  database  connection  mysql+pymysql://nova:nova123@controller/nova

openstack-config --set /etc/nova/nova.conf  glance api_servers  http://controller:9292

openstack-config --set /etc/nova/nova.conf  keystone_authtoken  auth_uri  http://controller:5000

openstack-config --set /etc/nova/nova.conf  keystone_authtoken  auth_url  http://controller:35357

openstack-config --set /etc/nova/nova.conf  keystone_authtoken  memcached_servers  controller:11211

openstack-config --set /etc/nova/nova.conf  keystone_authtoken  auth_type  password

openstack-config --set /etc/nova/nova.conf  keystone_authtoken  project_domain_name  default

openstack-config --set /etc/nova/nova.conf  keystone_authtoken  user_domain_name  default

openstack-config --set /etc/nova/nova.conf  keystone_authtoken  project_name  service

openstack-config --set /etc/nova/nova.conf  keystone_authtoken  username  nova

openstack-config --set /etc/nova/nova.conf  keystone_authtoken  password  nova123

openstack-config --set /etc/nova/nova.conf  oslo_concurrency lock_path  /var/lib/nova/tmp

openstack-config --set /etc/nova/nova.conf  oslo_messaging_rabbit   rabbit_host  controller

openstack-config --set /etc/nova/nova.conf  oslo_messaging_rabbit   rabbit_userid  openstack

openstack-config --set /etc/nova/nova.conf  oslo_messaging_rabbit   rabbit_password  RABBIT_PASS

openstack-config --set /etc/nova/nova.conf  vnc vncserver_listen  '$my_ip'

openstack-config --set /etc/nova/nova.conf  vnc vncserver_proxyclient_address  '$my_ip'
2.15.6同步数据库
su -s /bin/sh -c "nova-manage api_db sync" nova

su -s /bin/sh -c "nova-manage db sync" nova
2.15.7 加入开机自启并启动
systemctl enable openstack-nova-api.service \

  openstack-nova-consoleauth.service openstack-nova-scheduler.service \

  openstack-nova-conductor.service openstack-nova-novncproxy.service


systemctl start openstack-nova-api.service \

  openstack-nova-consoleauth.service openstack-nova-scheduler.service \

  openstack-nova-conductor.service openstack-nova-novncproxy.service
2.15.8 验证
netstat -tnulp|grep -E '6080|8774|8775'
附:controller节点的nova配置文件


[DEFAULT]
#vif_plugging_is_fatal=false
enabled_apis = osapi_compute,metadata
rpc_backend = rabbit
auth_strategy = keystone
my_ip = 192.168.10.11
use_neutron = true
firewall_driver = nova.virt.firewall.NoopFirewallDriver
transport_url = rabbit://openstack:RABBIT_PASS@controller
[api]
[api_database]
connection = mysql+pymysql://nova:nova123@controller/nova_api
[barbican]
[cache]
[cells]
[cinder]
[compute]
[conductor]
[console]
[consoleauth]
[cors]
[database]
connection = mysql+pymysql://nova:nova123@controller/nova
[devices]
[ephemeral_storage_encryption]
[filter_scheduler]
[glance]
api_servers = http://controller:9292
[guestfs]
[healthcheck]
[hyperv]
[ironic]
[key_manager]
[keystone]
[keystone_authtoken]
auth_uri = http://controller:5000
auth_url = http://controller:35357
memcached_servers = controller:11211
auth_type = password
project_domain_name = default
user_domain_name = default
project_name = service
username = nova
password = nova123
[libvirt]
[metrics]
[mks]
[neutron]
url = http://controller:9696
auth_url = http://controller:35357
auth_type = password
project_domain_name = default
user_domain_name = default
region_name = RegionOne
project_name = service
username = neutron
password = NEUTRON_PASS
service_metadata_proxy = True
metadata_proxy_shared_secret = METADATA_SECRET
[notifications]
[osapi_v21]
[oslo_concurrency]
lock_path = /var/lib/nova/tmp
[oslo_messaging_amqp]
[oslo_messaging_kafka]
[oslo_messaging_notifications]
[oslo_messaging_rabbit]
rabbit_host = controller
rabbit_userid = openstack
rabbit_password = RABBIT_PASS
[oslo_middleware]
[oslo_policy]
[pci]
[placement]
[placement_database]
[powervm]
[privsep]
[profiler]
[quota]
[rdp]
[remote_debug]
[scheduler]
[serial_console]
[service_user]
[spice]
[upgrade_levels]
[vault]
[vendordata_dynamic_auth]
[vmware]
[vnc]
enabled = true
vncserver_listen = $my_ip
vncserver_proxyclient_address = $my_ip
[workarounds]
[wsgi]
[xenserver]
[xvp]
[zvm]
2.15.9计算节点
#安装所需软件
yum install openstack-nova-compute openstack-utils -y
2.15.10自动配置
#cp /etc/nova/nova.conf{,.bak}

#grep '^[a-Z\[]' /etc/nova/nova.conf.bak >/etc/nova/nova.conf

#openstack-config --set /etc/nova/nova.conf  DEFAULT enabled_apis  osapi_compute,metadata

openstack-config --set /etc/nova/nova.conf  DEFAULT rpc_backend  rabbit

openstack-config --set /etc/nova/nova.conf  DEFAULT auth_strategy  keystone

openstack-config --set /etc/nova/nova.conf  DEFAULT my_ip  192.168.10.31

openstack-config --set /etc/nova/nova.conf  DEFAULT use_neutron  True

openstack-config --set /etc/nova/nova.conf  DEFAULT firewall_driver  nova.virt.firewall.NoopFirewallDriver

openstack-config --set /etc/nova/nova.conf  DEFAULT transport_url  rabbit://openstack:RABBIT_PASS@controller

openstack-config --set /etc/nova/nova.conf  glance api_servers  http://controller:9292

openstack-config --set /etc/nova/nova.conf  keystone_authtoken  auth_uri  http://controller:5000

openstack-config --set /etc/nova/nova.conf  keystone_authtoken  auth_url  http://controller:35357

openstack-config --set /etc/nova/nova.conf  keystone_authtoken  memcached_servers  controller:11211

openstack-config --set /etc/nova/nova.conf  keystone_authtoken  auth_type  password

openstack-config --set /etc/nova/nova.conf  keystone_authtoken  project_domain_name  default

openstack-config --set /etc/nova/nova.conf  keystone_authtoken  user_domain_name  default

openstack-config --set /etc/nova/nova.conf  keystone_authtoken  project_name  service

openstack-config --set /etc/nova/nova.conf  keystone_authtoken  username  nova

openstack-config --set /etc/nova/nova.conf  keystone_authtoken  password  nova123

openstack-config --set /etc/nova/nova.conf  oslo_concurrency lock_path  /var/lib/nova/tmp

openstack-config --set /etc/nova/nova.conf  oslo_messaging_rabbit   rabbit_host  controller

openstack-config --set /etc/nova/nova.conf  oslo_messaging_rabbit   rabbit_userid  openstack

openstack-config --set /etc/nova/nova.conf  oslo_messaging_rabbit   rabbit_password  RABBIT_PASS

openstack-config --set /etc/nova/nova.conf  vnc enabled  True

openstack-config --set /etc/nova/nova.conf  vnc vncserver_listen  0.0.0.0

openstack-config --set /etc/nova/nova.conf  vnc vncserver_proxyclient_address  '$my_ip'

openstack-config --set /etc/nova/nova.conf  vnc novncproxy_base_url  http://controller:6080/vnc_auto.html
附:computer节点的nova配置文件
[root@computer tmp]# cat /etc/nova/nova.conf
[DEFAULT]
#vif_plugging_is_fatal=false
enabled_apis = osapi_compute,metadata
rpc_backend = rabbit
auth_strategy = keystone
my_ip = 192.168.10.31
use_neutron = true
firewall_driver = nova.virt.firewall.NoopFirewallDriver
transport_url = rabbit://openstack:RABBIT_PASS@controller
#rpc_backend = rabbit
[api]
auth_strategy = keystone
[api_database]
[barbican]
[cache]
[cells]
[cinder]
[compute]
[conductor]
[console]
[consoleauth]
[cors]
[database]
[devices]
[ephemeral_storage_encryption]
[filter_scheduler]
[glance]
api_servers = http://controller:9292
[guestfs]
[healthcheck]
[hyperv]
[ironic]
[key_manager]
[keystone]
[keystone_authtoken]
auth_url = http://controller:5000/v3
auth_url = http://controller:35357
memcached_servers = controller:11211
auth_type = password
project_domain_name = default
user_domain_name = default
project_name = service
username = nova
password = nova123
[libvirt]
virt_type = qemu
[metrics]
[mks]
[neutron]
url = http://controller:9696
auth_url = http://controller:35357
auth_type = password
project_domain_name = default
user_domain_name = default
region_name = RegionOne
project_name = service
username = neutron
password = NEUTRON_PASS
[notifications]
[osapi_v21]
[oslo_concurrency]
lock_path = /var/lib/nova/tmp
[oslo_messaging_amqp]
[oslo_messaging_kafka]
[oslo_messaging_notifications]
[oslo_messaging_rabbit]
rabbit_host = controller
rabbit_userid = openstack
rabbit_password = RABBIT_PASS
[oslo_middleware]
[oslo_policy]
[pci]
[placement]
[placement_database]
[powervm]
[privsep]
[profiler]
[quota]
[rdp]
[remote_debug]
[scheduler]
[serial_console]
[service_user]
[spice]
[upgrade_levels]
[vault]
[vendordata_dynamic_auth]
[vmware]
[vnc]
enabled = True
vncserver_listen = 0.0.0.0
vncserver_proxyclient_address = $my_ip
novncproxy_base_url = http://controller:6080/vnc_auto.html
[workarounds]
[wsgi]
[xenserver]
[xvp]
[zvm]
2.15.11加入开机自启并启动
systemctl enable libvirtd.service openstack-nova-compute.service

systemctl start libvirtd.service openstack-nova-compute.service
2.15.12验证操作
#回到控制节点
nova service-list 或者openstack compute service list

2.16 neutron网络服务
neutron-server端口(9696)api:接受和响应外部的网络管理请求

neutron-linuzbridge-agent :负责创建桥接网卡

neutron-dhcp-agent:负责分配IP

neutron-metadata-agent:配合nova-metadata-api实现虚拟机的定制化操作
2.16.1登录控制节点
2.16.1.1创库,授权
mysql

CREATE DATABASE neutron;

GRANT ALL PRIVILEGES ON neutron.* TO 'neutron'@'localhost' \

  IDENTIFIED BY 'NEUTRON_DBPASS';

GRANT ALL PRIVILEGES ON neutron.* TO 'neutron'@'%' \

  IDENTIFIED BY 'NEUTRON_DBPASS';
2.16.1.2创建用户,关联角色
openstack user create --domain default --password NEUTRON_PASS neutron

openstack role add --project service --user neutron admin  #添加``admin`` 角色到``neutron`` 用户:

openstack service create --name neutron \

  --description "OpenStack Networking" network  #创建``neutron``服务实体:

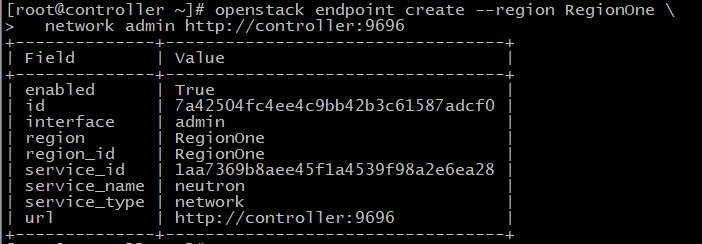
openstack endpoint create --region RegionOne \

  network public http://controller:9696      #创建网络服务API端点:

openstack endpoint create --region RegionOne \

  network internal http://controller:9696

 openstack endpoint create --region RegionOne \

  network admin http://controller:9696
2.16.1.3控制节点安装组件
yum install openstack-neutron openstack-neutron-ml2 \

  openstack-neutron-linuxbridge ebtables -y
2.16.1.4自动配置
#/etc/neutron/neutron.conf

cp /etc/neutron/neutron.conf{,.bak}

grep '^[a-Z\[]' /etc/neutron/neutron.conf.bak >/etc/neutron/neutron.conf

openstack-config --set /etc/neutron/neutron.conf  DEFAULT core_plugin  ml2

openstack-config --set /etc/neutron/neutron.conf  DEFAULT service_plugins

openstack-config --set /etc/neutron/neutron.conf  DEFAULT rpc_backend  rabbit

openstack-config --set /etc/neutron/neutron.conf  DEFAULT auth_strategy  keystone

openstack-config --set /etc/neutron/neutron.conf  DEFAULT notify_nova_on_port_status_changes  True

openstack-config --set /etc/neutron/neutron.conf  DEFAULT notify_nova_on_port_data_changes  True

openstack-config --set /etc/neutron/neutron.conf  database connection  mysql+pymysql://neutron:NEUTRON_DBPASS@controller/neutron

openstack-config --set /etc/neutron/neutron.conf  keystone_authtoken auth_uri  http://controller:5000

openstack-config --set /etc/neutron/neutron.conf  keystone_authtoken auth_url  http://controller:35357

openstack-config --set /etc/neutron/neutron.conf  keystone_authtoken memcached_servers  controller:11211

openstack-config --set /etc/neutron/neutron.conf  keystone_authtoken auth_type  password

openstack-config --set /etc/neutron/neutron.conf  keystone_authtoken project_domain_name  default

openstack-config --set /etc/neutron/neutron.conf  keystone_authtoken user_domain_name  default

openstack-config --set /etc/neutron/neutron.conf  keystone_authtoken project_name  service

openstack-config --set /etc/neutron/neutron.conf  keystone_authtoken username  neutron

openstack-config --set /etc/neutron/neutron.conf  keystone_authtoken password  NEUTRON_PASS

openstack-config --set /etc/neutron/neutron.conf  nova auth_url  http://controller:35357

openstack-config --set /etc/neutron/neutron.conf  nova auth_type  password

openstack-config --set /etc/neutron/neutron.conf  nova project_domain_name  default

openstack-config --set /etc/neutron/neutron.conf  nova user_domain_name  default

openstack-config --set /etc/neutron/neutron.conf  nova region_name  RegionOne

openstack-config --set /etc/neutron/neutron.conf  nova project_name  service

openstack-config --set /etc/neutron/neutron.conf  nova username  nova

openstack-config --set /etc/neutron/neutron.conf  nova password  nova123

openstack-config --set /etc/neutron/neutron.conf  oslo_concurrency lock_path  /var/lib/neutron/tmp

openstack-config --set /etc/neutron/neutron.conf  oslo_messaging_rabbit rabbit_host  controller

openstack-config --set /etc/neutron/neutron.conf  oslo_messaging_rabbit rabbit_userid  openstack

openstack-config --set /etc/neutron/neutron.conf  oslo_messaging_rabbit rabbit_password  RABBIT_PASS


#/etc/neutron/plugins/ml2/ml2_conf.ini

cp /etc/neutron/plugins/ml2/ml2_conf.ini{,.bak}

grep '^[a-Z\[]' /etc/neutron/plugins/ml2/ml2_conf.ini.bak >/etc/neutron/plugins/ml2/ml2_conf.ini

openstack-config --set /etc/neutron/plugins/ml2/ml2_conf.ini  ml2 type_drivers  flat,vlan

openstack-config --set /etc/neutron/plugins/ml2/ml2_conf.ini  ml2 tenant_network_types

openstack-config --set /etc/neutron/plugins/ml2/ml2_conf.ini  ml2 mechanism_drivers  linuxbridge

openstack-config --set /etc/neutron/plugins/ml2/ml2_conf.ini  ml2 extension_drivers  port_security

openstack-config --set /etc/neutron/plugins/ml2/ml2_conf.ini  ml2_type_flat flat_networks  provider

openstack-config --set /etc/neutron/plugins/ml2/ml2_conf.ini  securitygroup enable_ipset  True


#/etc/neutron/plugins/ml2/linuxbridge_agent.ini

cp /etc/neutron/plugins/ml2/linuxbridge_agent.ini{,.bak}

grep '^[a-Z\[]' /etc/neutron/plugins/ml2/linuxbridge_agent.ini.bak >/etc/neutron/plugins/ml2/linuxbridge_agent.ini

openstack-config --set /etc/neutron/plugins/ml2/linuxbridge_agent.ini  linux_bridge physical_interface_mappings  provider:eth0

openstack-config --set /etc/neutron/plugins/ml2/linuxbridge_agent.ini  securitygroup enable_security_group  True

openstack-config --set /etc/neutron/plugins/ml2/linuxbridge_agent.ini  securitygroup firewall_driver  neutron.agent.linux.iptables_firewall.IptablesFirewallDriver

openstack-config --set /etc/neutron/plugins/ml2/linuxbridge_agent.ini  vxlan enable_vxlan  False


cp /etc/neutron/dhcp_agent.ini{,.bak}

grep '^[a-Z\[]' /etc/neutron/dhcp_agent.ini.bak >/etc/neutron/dhcp_agent.ini

openstack-config --set /etc/neutron/dhcp_agent.ini  DEFAULT interface_driver neutron.agent.linux.interface.BridgeInterfaceDriver

openstack-config --set /etc/neutron/dhcp_agent.ini  DEFAULT dhcp_driver neutron.agent.linux.dhcp.Dnsmasq

openstack-config --set /etc/neutron/dhcp_agent.ini  DEFAULT enable_isolated_metadata True


cp /etc/neutron/metadata_agent.ini{,.bak}

grep '^[a-Z\[]' /etc/neutron/metadata_agent.ini.bak >/etc/neutron/metadata_agent.ini

openstack-config --set /etc/neutron/metadata_agent.ini DEFAULT nova_metadata_ip  controller

openstack-config --set /etc/neutron/metadata_agent.ini DEFAULT metadata_proxy_shared_secret  METADATA_SECRET


#再次修改/etc/nova/nova.conf

openstack-config --set /etc/nova/nova.conf  neutron url  http://controller:9696

openstack-config --set /etc/nova/nova.conf  neutron auth_url  http://controller:35357

openstack-config --set /etc/nova/nova.conf  neutron auth_type  password

openstack-config --set /etc/nova/nova.conf  neutron project_domain_name  default

openstack-config --set /etc/nova/nova.conf  neutron user_domain_name  default

openstack-config --set /etc/nova/nova.conf  neutron region_name  RegionOne

openstack-config --set /etc/nova/nova.conf  neutron project_name  service

openstack-config --set /etc/nova/nova.conf  neutron username  neutron

openstack-config --set /etc/nova/nova.conf  neutron password  NEUTRON_PASS

openstack-config --set /etc/nova/nova.conf  neutron service_metadata_proxy  True

openstack-config --set /etc/nova/nova.conf  neutron metadata_proxy_shared_secret  METADATA_SECRET
2.16.1.5同步数据库
ln -s /etc/neutron/plugins/ml2/ml2_conf.ini /etc/neutron/plugin.ini

su -s /bin/sh -c "neutron-db-manage --config-file /etc/neutron/neutron.conf \

  --config-file /etc/neutron/plugins/ml2/ml2_conf.ini upgrade head" neutron
2.16.1.6加入开机自启并启动
systemctl restart openstack-nova-api.service

systemctl enable neutron-server.service \

  neutron-linuxbridge-agent.service neutron-dhcp-agent.service \

  neutron-metadata-agent.service

systemctl start neutron-server.service \

  neutron-linuxbridge-agent.service neutron-dhcp-agent.service \

  neutron-metadata-agent.service
2.16.2计算节点
2.16.2.1安装软件
yum install openstack-neutron-linuxbridge ebtables ipset -y
2.16.2.2自动配置
#配置neutron.conf
cp /etc/neutron/neutron.conf{,.bak}

grep '^[a-Z\[]' /etc/neutron/neutron.conf.bak >/etc/neutron/neutron.conf

openstack-config --set /etc/neutron/neutron.conf  DEFAULT rpc_backend  rabbit

openstack-config --set /etc/neutron/neutron.conf  DEFAULT auth_strategy  keystone

openstack-config --set /etc/neutron/neutron.conf  keystone_authtoken auth_uri  http://controller:5000

openstack-config --set /etc/neutron/neutron.conf  keystone_authtoken auth_url  http://controller:35357

openstack-config --set /etc/neutron/neutron.conf  keystone_authtoken memcached_servers  controller:11211

openstack-config --set /etc/neutron/neutron.conf  keystone_authtoken auth_type  password

openstack-config --set /etc/neutron/neutron.conf  keystone_authtoken project_domain_name  default

openstack-config --set /etc/neutron/neutron.conf  keystone_authtoken user_domain_name  default

openstack-config --set /etc/neutron/neutron.conf  keystone_authtoken project_name  service

openstack-config --set /etc/neutron/neutron.conf  keystone_authtoken username  neutron

openstack-config --set /etc/neutron/neutron.conf  keystone_authtoken password  NEUTRON_PASS

openstack-config --set /etc/neutron/neutron.conf  oslo_concurrency lock_path  /var/lib/neutron/tmp

openstack-config --set /etc/neutron/neutron.conf  oslo_messaging_rabbit rabbit_host  controller

openstack-config --set /etc/neutron/neutron.conf  oslo_messaging_rabbit rabbit_userid  openstack

openstack-config --set /etc/neutron/neutron.conf  oslo_messaging_rabbit rabbit_password  RABBIT_PASS


#配置linuxbridge_agent.ini

cp /etc/neutron/plugins/ml2/linuxbridge_agent.ini{,.bak}

grep '^[a-Z\[]' /etc/neutron/plugins/ml2/linuxbridge_agent.ini.bak >/etc/neutron/plugins/ml2/linuxbridge_agent.ini

openstack-config --set /etc/neutron/plugins/ml2/linuxbridge_agent.ini  linux_bridge physical_interface_mappings  provider:eth0

openstack-config --set /etc/neutron/plugins/ml2/linuxbridge_agent.ini  securitygroup enable_security_group  True

openstack-config --set /etc/neutron/plugins/ml2/linuxbridge_agent.ini  securitygroup firewall_driver  neutron.agent.linux.iptables_firewall.IptablesFirewallDriver

openstack-config --set /etc/neutron/plugins/ml2/linuxbridge_agent.ini  vxlan enable_vxlan  False


#配置nova.conf

openstack-config --set /etc/nova/nova.conf  neutron url  http://controller:9696

openstack-config --set /etc/nova/nova.conf  neutron auth_url  http://controller:35357

openstack-config --set /etc/nova/nova.conf  neutron auth_type  password

openstack-config --set /etc/nova/nova.conf  neutron project_domain_name  default

openstack-config --set /etc/nova/nova.conf  neutron user_domain_name  default

openstack-config --set /etc/nova/nova.conf  neutron region_name  RegionOne

openstack-config --set /etc/nova/nova.conf  neutron project_name  service

openstack-config --set /etc/nova/nova.conf  neutron username  neutron

openstack-config --set /etc/nova/nova.conf  neutron password  NEUTRON_PASS
2.16.2.3加入开机自启并启动
systemctl restart openstack-nova-compute.service

systemctl enable neutron-linuxbridge-agent.service

systemctl start neutron-linuxbridge-agent.service
2.16.2.4验证
#在控制节点上验证
neutron agent-list

2.17安装dashboard(web操作界面)
OpenStack仪表板Dashboard服务的项目名称是Horizon,它所需的唯一服务是身份服务keystone,开发语言是python的web框架Django
2.17.1控制节点安装
yum install openstack-dashboard -y
2.17.2编写配置文件
vim /etc/openstack-dashboard/local_settings

import os

from django.utils.translation import ugettext_lazy as _

from openstack_dashboard.settings import HORIZON_CONFIG

DEBUG = False

ALLOWED_HOSTS = ['*']

LOCAL_PATH = '/tmp'

SECRET_KEY='60eeac4448ab9733b7d8'

SESSION_ENGINE = 'django.contrib.sessions.backends.cache'

CACHES = {

    'default': {

         'BACKEND': 'django.core.cache.backends.memcached.MemcachedCache',

         'LOCATION': 'controller:11211',

    }

}

EMAIL_BACKEND = 'django.core.mail.backends.console.EmailBackend'

OPENSTACK_HOST = "controller"

OPENSTACK_KEYSTONE_URL = "http://%s:5000/v3" % OPENSTACK_HOST

OPENSTACK_KEYSTONE_MULTIDOMAIN_SUPPORT = True

OPENSTACK_API_VERSIONS = {

    "identity": 3,

    "image": 2,

    "volume": 3,

}

OPENSTACK_KEYSTONE_DEFAULT_DOMAIN = "Default"

OPENSTACK_KEYSTONE_DEFAULT_ROLE = "user"

OPENSTACK_NEUTRON_NETWORK = {

    'enable_auto_allocated_network': False,

    'enable_distributed_router': False,

    'enable_fip_topology_check': False,

    'enable_ha_router': False,

    'enable_lb': False,

    'enable_firewall': False,

    'enable_vpn': False,

    'enable_ipv6': True,

    'enable_quotas': False,

    'enable_rbac_policy': True,

    'enable_router': False,

    'default_dns_nameservers': [],

    'supported_provider_types': ['*'],

    'segmentation_id_range': {},

    'extra_provider_types': {},

    'supported_vnic_types': ['*'],

    'physical_networks': [],

}

TIME_ZONE = "Asia/Shanghai"

LOGGING = {

    'version': 1,

    'disable_existing_loggers': False,

    'formatters': {

        'console': {

            'format': '%(levelname)s %(name)s %(message)s'

        },

        'operation': {

            'format': '%(message)s'

        },

    },

    'handlers': {

        'null': {

            'level': 'DEBUG',

            'class': 'logging.NullHandler',

        },

        'console': {

            'level': 'DEBUG' if DEBUG else 'INFO',

            'class': 'logging.StreamHandler',

            'formatter': 'console',

        },

        'operation': {

            'level': 'INFO',

            'class': 'logging.StreamHandler',

            'formatter': 'operation',

        },

    },

    'loggers': {

        'horizon': {

            'handlers': ['console'],

            'level': 'DEBUG',

            'propagate': False,

        },

        'horizon.operation_log': {

            'handlers': ['operation'],

            'level': 'INFO',

            'propagate': False,

        },

        'openstack_dashboard': {

            'handlers': ['console'],

            'level': 'DEBUG',

            'propagate': False,

        },

        'novaclient': {

            'handlers': ['console'],

            'level': 'DEBUG',

            'propagate': False,

        },

        'cinderclient': {

            'handlers': ['console'],

            'level': 'DEBUG',

            'propagate': False,

        },

        'keystoneauth': {

            'handlers': ['console'],

            'level': 'DEBUG',

            'propagate': False,

        },

        'keystoneclient': {

            'handlers': ['console'],

            'level': 'DEBUG',

            'propagate': False,

        },

        'glanceclient': {

            'handlers': ['console'],

            'level': 'DEBUG',

            'propagate': False,

        },

        'neutronclient': {

            'handlers': ['console'],

            'level': 'DEBUG',

            'propagate': False,

        },

        'swiftclient': {

            'handlers': ['console'],

            'level': 'DEBUG',

            'propagate': False,

        },

        'oslo_policy': {

            'handlers': ['console'],

            'level': 'DEBUG',

            'propagate': False,

        },

        'openstack_auth': {

            'handlers': ['console'],

            'level': 'DEBUG',

            'propagate': False,

        },

        'django': {

            'handlers': ['console'],

            'level': 'DEBUG',

            'propagate': False,

        },

        'django.db.backends': {

            'handlers': ['null'],

            'propagate': False,

        },

        'requests': {

            'handlers': ['null'],

            'propagate': False,

        },

        'urllib3': {

            'handlers': ['null'],

            'propagate': False,

        },

        'chardet.charsetprober': {

            'handlers': ['null'],

            'propagate': False,

        },

        'iso8601': {

            'handlers': ['null'],

            'propagate': False,

        },

        'scss': {

            'handlers': ['null'],

            'propagate': False,

        },

    },

}

SECURITY_GROUP_RULES = {

    'all_tcp': {

        'name': _('All TCP'),

        'ip_protocol': 'tcp',

        'from_port': '1',

        'to_port': '65535',

    },

    'all_udp': {

        'name': _('All UDP'),

        'ip_protocol': 'udp',

        'from_port': '1',

        'to_port': '65535',

    },

    'all_icmp': {

        'name': _('All ICMP'),

        'ip_protocol': 'icmp',

        'from_port': '-1',

        'to_port': '-1',

    },

    'ssh': {

        'name': 'SSH',

        'ip_protocol': 'tcp',

        'from_port': '22',

        'to_port': '22',

    },

    'smtp': {

        'name': 'SMTP',

        'ip_protocol': 'tcp',

        'from_port': '25',

        'to_port': '25',

    },

    'dns': {

        'name': 'DNS',

        'ip_protocol': 'tcp',

        'from_port': '53',

        'to_port': '53',

    },

    'http': {

        'name': 'HTTP',

        'ip_protocol': 'tcp',

        'from_port': '80',

        'to_port': '80',

    },

    'pop3': {

        'name': 'POP3',

        'ip_protocol': 'tcp',

        'from_port': '110',

        'to_port': '110',

    },

    'imap': {

        'name': 'IMAP',

        'ip_protocol': 'tcp',

        'from_port': '143',

        'to_port': '143',

    },

    'ldap': {

        'name': 'LDAP',

        'ip_protocol': 'tcp',

        'from_port': '389',

        'to_port': '389',

    },

    'https': {

        'name': 'HTTPS',

        'ip_protocol': 'tcp',

        'from_port': '443',

        'to_port': '443',

    },

    'smtps': {

        'name': 'SMTPS',

        'ip_protocol': 'tcp',

        'from_port': '465',

        'to_port': '465',

    },

    'imaps': {

        'name': 'IMAPS',

        'ip_protocol': 'tcp',

        'from_port': '993',

        'to_port': '993',

    },

    'pop3s': {

        'name': 'POP3S',

        'ip_protocol': 'tcp',

        'from_port': '995',

        'to_port': '995',

    },

    'ms_sql': {

        'name': 'MS SQL',

        'ip_protocol': 'tcp',

        'from_port': '1433',

        'to_port': '1433',

    },

    'mysql': {

        'name': 'MYSQL',

        'ip_protocol': 'tcp',

        'from_port': '3306',

        'to_port': '3306',

    },

    'rdp': {

        'name': 'RDP',

        'ip_protocol': 'tcp',

        'from_port': '3389',

        'to_port': '3389',

    },

}
2.17.3重建apache的dashboard配置文件
#以下两步官方文档中没有,但是需要执行,否则dashboard打不开或显示不对
cd /usr/share/openstack-dashboard

python manage.py make_web_conf --apache > /etc/httpd/conf.d/openstack-dashboard.conf
2.17.4加入开机自启并启动
systemctl enable httpd.service

systemctl restart httpd.service
由于dashboard的运行机制是把网站下的所有文件删除之后再重新复制,所以重启httpd需要等待一段时间。
systemctl restart memcached.service
2.17.5 验证
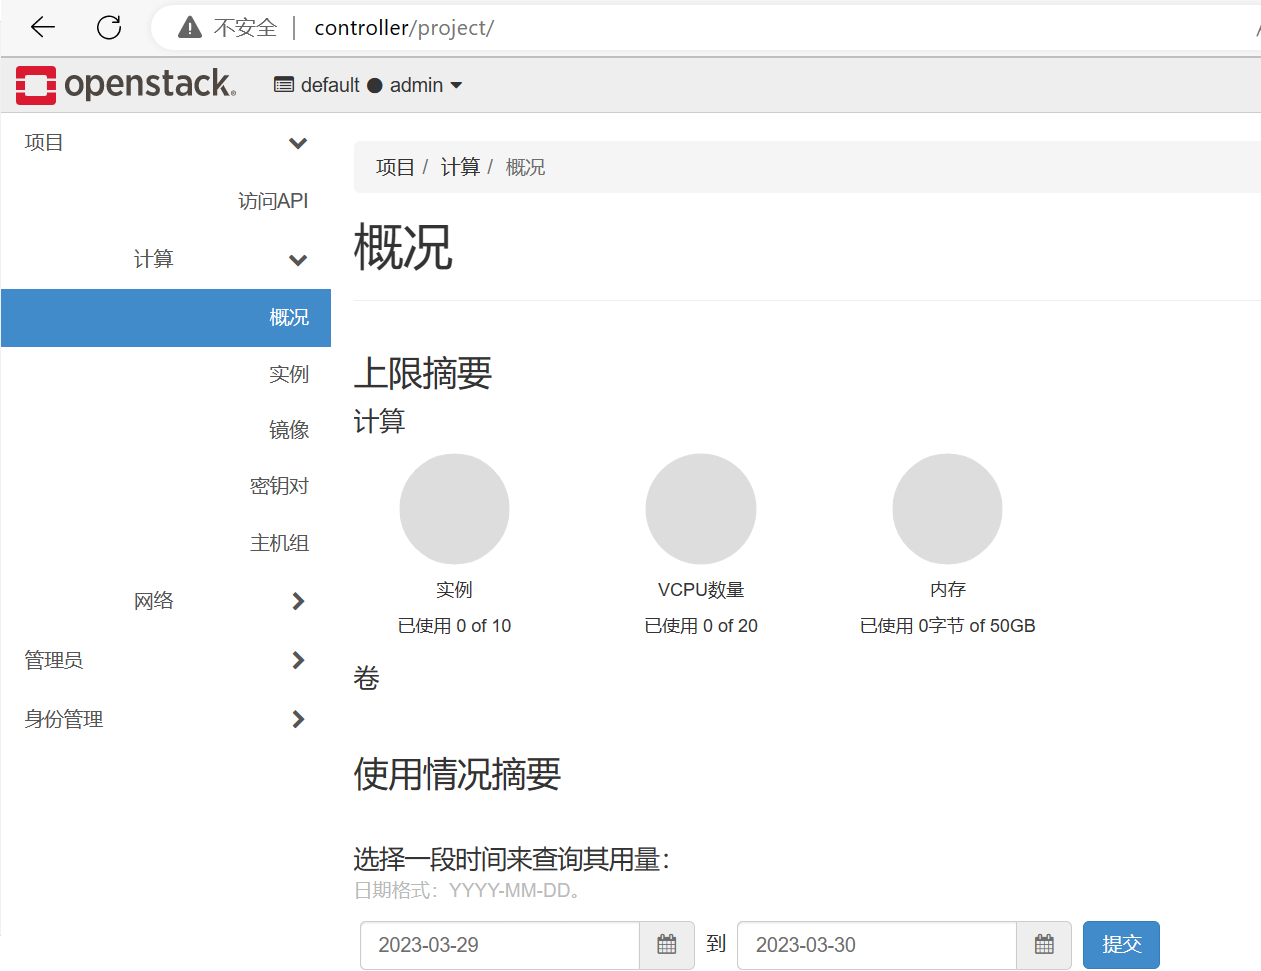
#修改window的hosts文件
C:\Windows\System32\drivers\etc\hosts文件
#添加控制节点的解析
192.168.10.11 controller
#使用浏览器访问
http://controller或者192.168.10.11

#域
default
#用户名
admin
#密码
admin123

 浙公网安备 33010602011771号