

JDKProxy和CGLIBProxy的分析
先写一下分析的结论。
我们比较一下SKDProxy和CGLIBProxy的区别:

实现方式:

SKDProxy需要接口,需要传入对象,不需要无参构造器,生成该接口的实现类。

CGLIB不需要接口,不需要传入对象,被代理类需要有public构造器,生成该类的子类,因此CGLIB无法代理final方法。

比较:

1、生成代理类的源码,SDKProxy生成的是实现类,CGLIB生成的是子类,

2、当我们执行Method A的invoke方法时,

SDKProxy的方式是

Object obj = method.invoke(this.target,args);
该方法第一次执行是,需要生成methodAccessor,这个生成很快。第16次执行时,需要生成字节码,会慢一下。
第二次执行不需要生成MethodAccessor。但是执行另一方方法时,依然需要methodAccessor。
CGLIBProxy的执行方式有两种:

1、Object obj = method.invoke(method.getDeclaringClass().newInstance(),args);
那么就是普通的反射调用,注意,不能用o做参数,因为会造成死循环。

这种方式,和SDKProxy一样,因为CGLIB生成的代理类也把method对象存为类变量,所以执行效率也一样。
2、Object obj = methodProxy.invokeSuper(o,objects); 这种方式,第一次执行时,会生成两个fast类,因此比sdkproxy慢,
第二次执行该方法,因为SDKProxy需要执行invoke,所以CGLIB更快。
当执行另一个方法时,因为SDKProxy需要生成methodAccessor并执行invoke,所以CGLIB更快。
代理模式
在代理模式(Proxy Pattern)中,一个类代表另一个类的功能。
在代理模式中,我们创建持有现有对象(可以用该类的接口)的代理对象,以便向外界提供功能接口。
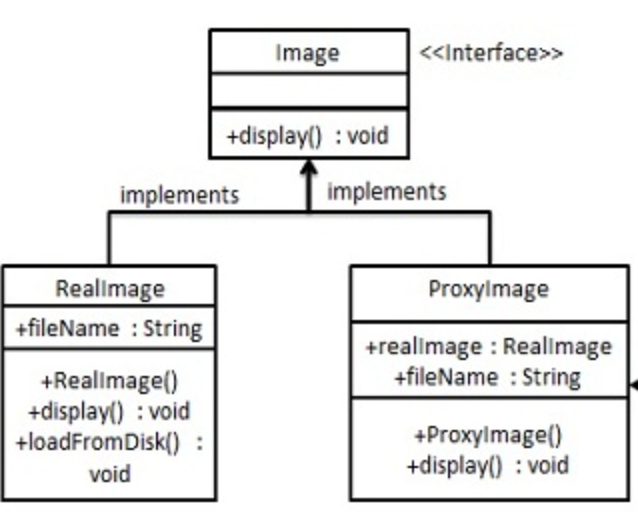
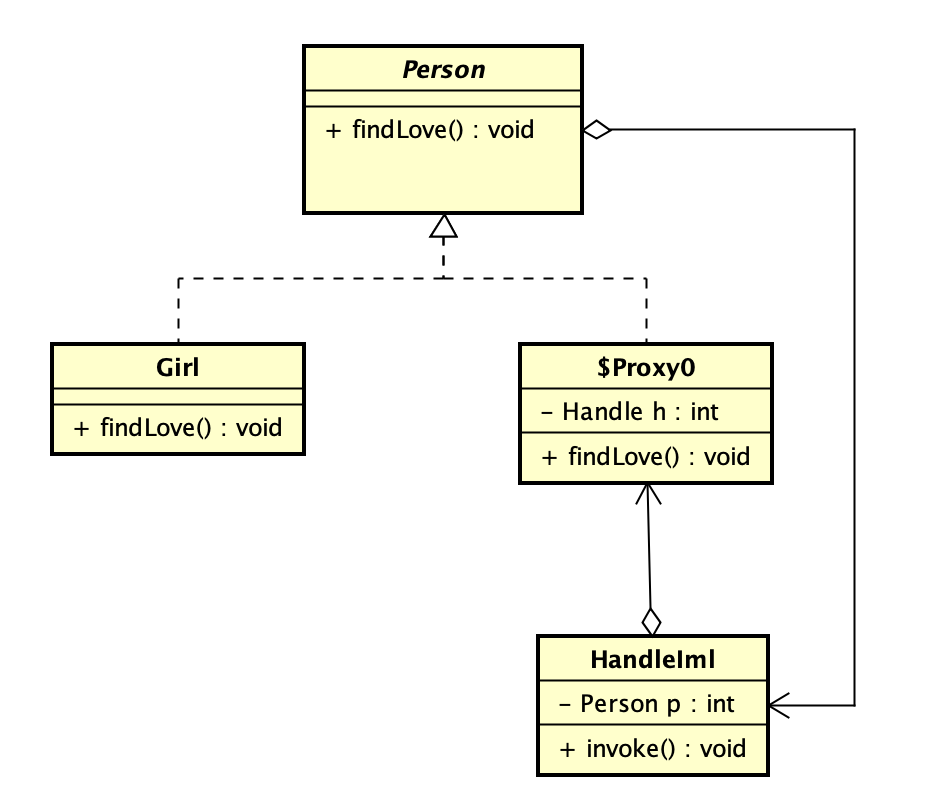
JDK动态代理:$Proxy0是动态生成的,这个实现了盒子套盒子。
Proxy.newProxyInstance(clazz.getClassLoader(),clazz.getInterfaces(),this);
关于这个方法的参数,
1、用clazz.getInterfaces()是用来生成$Proxy0.java用的,
2、把$Proxy0.java编译成$Proxy0.class
3、用clazz.getClassLoader()是用来把$Proxy0.class文件加载进jvm(Class proxyClass = classLoader.findClass("$Proxy0");)

4、加载文件时,执行$Proxy0的static代码块,把所有的非final方法以及Object的equals,hashcode,toString方法都加载成 类变量
5、获取$Proxy0的带参构造函数,并把 this(被代理对象) 设置进$Proxy0

当我们调用$Proxy0的findLove()时,执行的如下:
public final class $Proxy0 extends Proxy implements Person {
  private static Method m1;
  private static Method m3;
  private static Method m2;
  private static Method m0;

  public $Proxy0(InvocationHandler var1) throws  {
    super(var1);
  }

  public final boolean equals(Object var1) throws  {
    try {
      return (Boolean)super.h.invoke(this, m1, new Object[]{var1});
    } catch (RuntimeException | Error var3) {
      throw var3;
    } catch (Throwable var4) {
      throw new UndeclaredThrowableException(var4);
    }
  }

  public final void findLove() throws  {
    try {
      super.h.invoke(this, m3, (Object[])null);
    } catch (RuntimeException | Error var2) {
      throw var2;
    } catch (Throwable var3) {
      throw new UndeclaredThrowableException(var3);
    }
  }

  public final String toString() throws  {
    try {
      return (String)super.h.invoke(this, m2, (Object[])null);
    } catch (RuntimeException | Error var2) {
      throw var2;
    } catch (Throwable var3) {
      throw new UndeclaredThrowableException(var3);
    }
  }

  public final int hashCode() throws  {
    try {
      return (Integer)super.h.invoke(this, m0, (Object[])null);
    } catch (RuntimeException | Error var2) {
      throw var2;
    } catch (Throwable var3) {
      throw new UndeclaredThrowableException(var3);
    }
  }

  static {
    try {
      m1 = Class.forName("java.lang.Object").getMethod("equals", Class.forName("java.lang.Object"));
      m3 = Class.forName("com.gupaoedu.vip.pattern.proxy.Person").getMethod("findLove");
      m2 = Class.forName("java.lang.Object").getMethod("toString");
      m0 = Class.forName("java.lang.Object").getMethod("hashCode");
    } catch (NoSuchMethodException var2) {
      throw new NoSuchMethodError(var2.getMessage());
    } catch (ClassNotFoundException var3) {
      throw new NoClassDefFoundError(var3.getMessage());
    }
  }
}
  protected Proxy(InvocationHandler h) {
        Objects.requireNonNull(h);
        this.h = h;
    }
此时我们执行代理类的findLove方法,执行的是这个:
 super.h.invoke(this, m3, (Object[])null);
这里需要注意的是,m3这个参数是静态变量,而不是反射获得,因此效率很快。
而h.invoke方法的实现如下:
invoke(Object proxy, Method method, Object[] args)
这个invoke的三个参数都是什么呢?
从$Proxy0.class可以看出,
Object proxy 就是$Proxy0的实例对象,
Method method 是被代理类的method方法对象
Object[] args 这里看不出来,从源码里看,args是第二个参数method对象的参数
public class JDKMeipo implements InvocationHandler {

    private Object target;
    public Object getInstance(Object person) throws Exception{
        this.target = person;
        Class<?> clazz = target.getClass();
        //System.getProperties().put("sun.misc.ProxyGenerator.saveGeneratedFiles", "true"); //设置系统属性
        return Proxy.newProxyInstance(clazz.getClassLoader(),clazz.getInterfaces(),this);
    }

    public Object invoke(Object proxy, Method method, Object[] args) throws Throwable {
        before();
        Object obj = method.invoke(this.target,args);
        after();
       return obj;
    }

    private void before(){
        System.out.println("我是媒婆,我要给你找对象,现在已经确认你的需求");
        System.out.println("开始物色");
    }

    private void after(){
        System.out.println("OK的话,准备办事");
    }
}
我们看一下Object obj = method.invoke(this.target,args);的执行
    public Object invoke(Object obj, Object... args)
        throws IllegalAccessException, IllegalArgumentException,
           InvocationTargetException
    {
        if (!override) {
            if (!Reflection.quickCheckMemberAccess(clazz, modifiers)) {
                Class<?> caller = Reflection.getCallerClass();
                checkAccess(caller, clazz, obj, modifiers);
            }
        }
        MethodAccessor ma = methodAccessor;             // read volatile
        if (ma == null) {
            ma = acquireMethodAccessor();
        }
        return ma.invoke(obj, args);
    }
重点看ma = acquireMethodAccessor();和return ma.invoke(obj, args);
先看ma = acquireMethodAccessor();
    // NOTE that there is no synchronization used here. It is correct
    // (though not efficient) to generate more than one MethodAccessor
    // for a given Method. However, avoiding synchronization will
    // probably make the implementation more scalable.
    private MethodAccessor acquireMethodAccessor() {
        // First check to see if one has been created yet, and take it
        // if so
        MethodAccessor tmp = null;
        if (root != null) tmp = root.getMethodAccessor();
        if (tmp != null) {
            methodAccessor = tmp;
        } else {
            // Otherwise fabricate one and propagate it up to the root
            tmp = reflectionFactory.newMethodAccessor(this);//这个方法是重点
            setMethodAccessor(tmp);
        }

        return tmp;
    }
private static boolean noInflation = false;
private static int inflationThreshold = 15;
public MethodAccessor newMethodAccessor(Method var1) {
    checkInitted();
    if (noInflation && !ReflectUtil.isVMAnonymousClass(var1.getDeclaringClass())) {
      return (new MethodAccessorGenerator()).generateMethod(var1.getDeclaringClass(), var1.getName(), var1.getParameterTypes(), var1.getReturnType(), var1.getExceptionTypes(), var1.getModifiers());
    } else {
      NativeMethodAccessorImpl var2 = new NativeMethodAccessorImpl(var1);
      DelegatingMethodAccessorImpl var3 = new DelegatingMethodAccessorImpl(var2);
      var2.setParent(var3);
      return var3;
    }
  }
class NativeMethodAccessorImpl extends MethodAccessorImpl {
  private final Method method;
  private DelegatingMethodAccessorImpl parent;
  private int numInvocations;

  NativeMethodAccessorImpl(Method var1) {
    this.method = var1;
  }

  public Object invoke(Object var1, Object[] var2) throws IllegalArgumentException, InvocationTargetException {
    if (++this.numInvocations > ReflectionFactory.inflationThreshold() && !ReflectUtil.isVMAnonymousClass(this.method.getDeclaringClass())) {
      MethodAccessorImpl var3 = (MethodAccessorImpl)(new MethodAccessorGenerator()).generateMethod(this.method.getDeclaringClass(), this.method.getName(), this.method.getParameterTypes(), this.method.getReturnType(), this.method.getExceptionTypes(), this.method.getModifiers());
      this.parent.setDelegate(var3);
    }

    return invoke0(this.method, var1, var2);
  }

  void setParent(DelegatingMethodAccessorImpl var1) {
    this.parent = var1;
  }

  private static native Object invoke0(Method var0, Object var1, Object[] var2);
}
class DelegatingMethodAccessorImpl extends MethodAccessorImpl {
  private MethodAccessorImpl delegate;

  DelegatingMethodAccessorImpl(MethodAccessorImpl var1) {
    this.setDelegate(var1);
  }

  public Object invoke(Object var1, Object[] var2) throws IllegalArgumentException, InvocationTargetException {
    return this.delegate.invoke(var1, var2);
  }

  void setDelegate(MethodAccessorImpl var1) {
    this.delegate = var1;
  }
}
我对delegate和proxy目前分不清,所以这里不区分,只看实现方式:
最开始,DMAI用delegate属性持有了NMAI,并且NMAI也用parent属性持有了DMAI,并把DMAI返回。
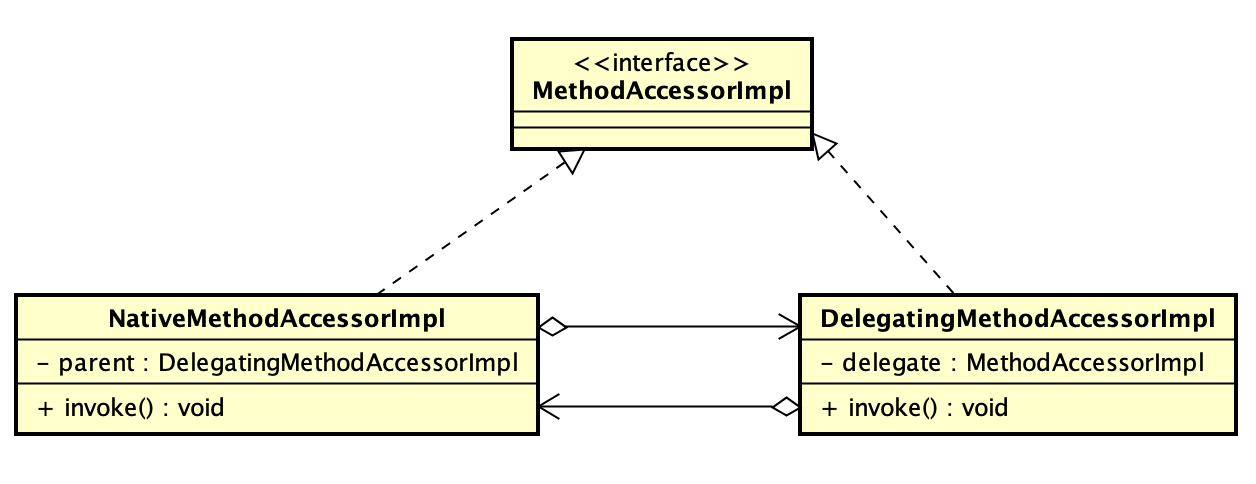
每次执行DMAI执行invoke()方法时, 实际执行的时delegate属性的invoke方法,也就是执行了NMAI的invoke方法。
当NMAI的invoke方法执行超过15次以后,NMAI生成了MagicAccessorImpl对象,并把DMAI的delete改为MagicAccessorImpl,变成了如下:
以后DMAI执行invoke方法时,实际执行的时delegate属性的invoke方法,也就是执行了MagicAccessorImpl的invoke方法。
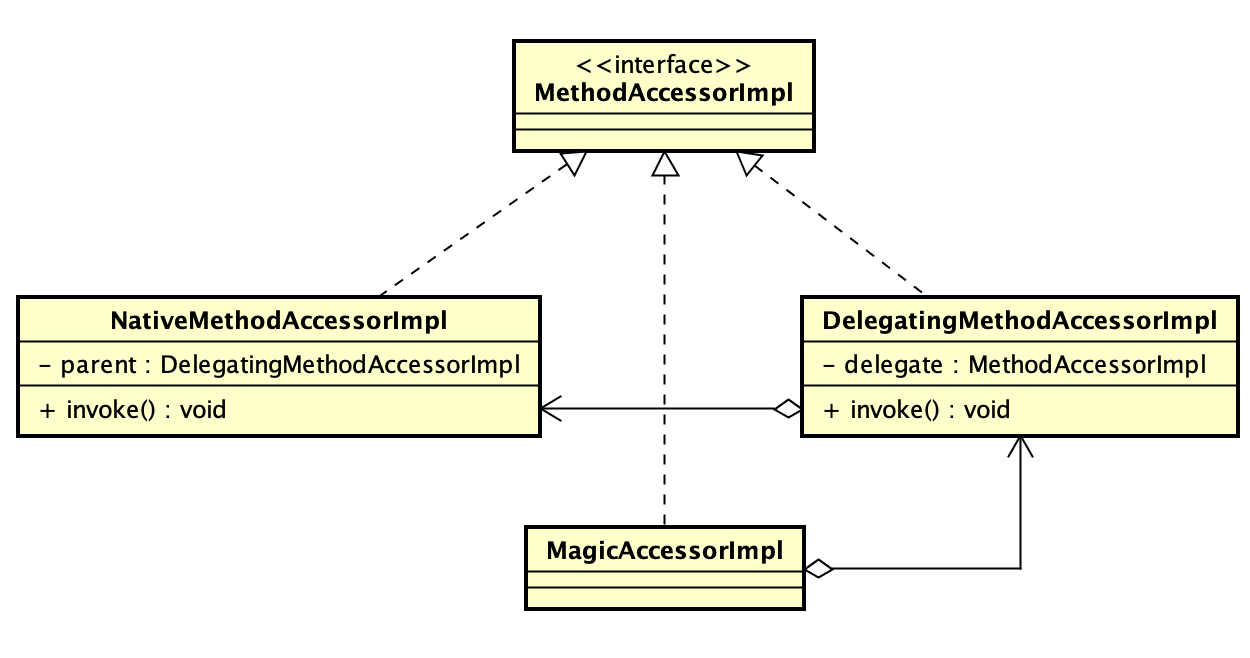
为什么要设置这个15呢?因为native的invoke方法执行比较快,但是JVM无法优化,少量执行时可以的,
如果大量执行,那么还是JVM会用MagicAccessorImpl,因为可以被JVM优化,从而效率上高于native的invoker方法
继续看ma.invoke(obj, args)
如上分析所示,如果时NMAI的invoke方法,执行的时本地方法,无法查看。
当超过15次以后,用的时ASM生成的字节码
所以,当method A执行invoke时,会生成method A的MethodAccessor,当method A再次执行时,会使用以前的MethodAccessor。
但是当method B执行invoke时,会继续生成method B的MethodAccessor。
生成字节码如下(用的是阿里巴巴的arthas进行运行时反编译捕获到的)
从动态生成的字节码对象GeneratedMethodAccessor1可以看出,该对象赋值给了delegate,
当调用invoke方法时,实际上调用的是GeneratedMethodAccessor1的invoke方法,该方法直接调用了被反射调用的方法。
但是也可以看到,这个只是针对这一个方法的,MagicAccessorImpl的不同方法不会复用MethodAccessor,每个方法都会重新生成新的字节码。
/*
 * Decompiled with CFR.
 *
 * Could not load the following classes:
 *  com.lxtest.springbootdemo.invoke.InvokeTest
 */
package sun.reflect;

import com.lxtest.springbootdemo.invoke.InvokeTest;
import java.lang.reflect.InvocationTargetException;
import sun.reflect.MethodAccessorImpl;

public class GeneratedMethodAccessor1 extends MethodAccessorImpl {
    /*
     * Loose catch block
     * Enabled aggressive block sorting
     * Enabled unnecessary exception pruning
     * Enabled aggressive exception aggregation
     * Lifted jumps to return sites
     */
    public Object invoke(Object object, Object[] arrobject) throws InvocationTargetException {
        InvokeTest invokeTest;
        block5: {
            if (object == null) {
                throw new NullPointerException();
            }
            invokeTest = (InvokeTest)object;
            if (arrobject == null || arrobject.length == 0) break block5;
            throw new IllegalArgumentException();
        }
        try {
            invokeTest.t1();
            return null;
        }
        catch (Throwable throwable) {
            throw new InvocationTargetException(throwable);
        }
        catch (ClassCastException | NullPointerException runtimeException) {
            throw new IllegalArgumentException(super.toString());
        }
    }
}
CGLib使用起来要比JDKProxy简单一些:如下:
public class CGlibMeipo implements MethodInterceptor {
    public Object getInstance(Class<?> clazz) throws Exception{
        //相当于Proxy,代理的工具类
        Enhancer enhancer = new Enhancer();
        enhancer.setSuperclass(clazz);
        enhancer.setCallback(this);
        return enhancer.create();
    }

    public Object intercept(Object o, Method method, Object[] objects, MethodProxy methodProxy) throws Throwable {
        before();
        method.invoke(method.getDeclaringClass().newInstance(),objects);
        Object obj = methodProxy.invokeSuper(o,objects);
        after();
        return obj;
    }

    private void before(){
        System.out.println("我是媒婆,我要给你找对象,现在已经确认你的需求");
        System.out.println("开始物色");
    }

    private void after(){
        System.out.println("OK的话,准备办事");
    }
}
cglib构建不需要new一个对象,直接传类对象即可,但是这样会导致一个问题,那就是无法定制代理对象。
当执行enhancer.create();时,生成代理类对象
Customer$$EnhancerByCGLIB$$e1de0c0c extends Customer implements Factory
这个对象初始化过程如下:
  static {
    CGLIB$STATICHOOK1();
  }
 private boolean CGLIB$BOUND;
  private static final ThreadLocal CGLIB$THREAD_CALLBACKS;
  private static final Callback[] CGLIB$STATIC_CALLBACKS;
  private MethodInterceptor CGLIB$CALLBACK_0;
  private static final Method CGLIB$findLove$0$Method;
  private static final MethodProxy CGLIB$findLove$0$Proxy;
  private static final Object[] CGLIB$emptyArgs;
  private static final Method CGLIB$finalize$1$Method;
  private static final MethodProxy CGLIB$finalize$1$Proxy;
  private static final Method CGLIB$equals$2$Method;
  private static final MethodProxy CGLIB$equals$2$Proxy;
  private static final Method CGLIB$toString$3$Method;
  private static final MethodProxy CGLIB$toString$3$Proxy;
  private static final Method CGLIB$hashCode$4$Method;
  private static final MethodProxy CGLIB$hashCode$4$Proxy;
  private static final Method CGLIB$clone$5$Method;
  private static final MethodProxy CGLIB$clone$5$Proxy;

  static void CGLIB$STATICHOOK1() {
    CGLIB$THREAD_CALLBACKS = new ThreadLocal();
    CGLIB$emptyArgs = new Object[0];
    Class var0 = Class.forName("com.gupaoedu.vip.pattern.proxy.dynamicproxy.cglibproxy.Customer$$EnhancerByCGLIB$$e1de0c0c");
    Class var1;
    CGLIB$findLove$0$Method = ReflectUtils.findMethods(new String[]{"findLove", "()V"}, (var1 = Class.forName("com.gupaoedu.vip.pattern.proxy.dynamicproxy.cglibproxy.Customer")).getDeclaredMethods())[0];
    CGLIB$findLove$0$Proxy = MethodProxy.create(var1, var0, "()V", "findLove", "CGLIB$findLove$0");
    Method[] var10000 = ReflectUtils.findMethods(new String[]{"finalize", "()V", "equals", "(Ljava/lang/Object;)Z", "toString", "()Ljava/lang/String;", "hashCode", "()I", "clone", "()Ljava/lang/Object;"}, (var1 = Class.forName("java.lang.Object")).getDeclaredMethods());
    CGLIB$finalize$1$Method = var10000[0];
    CGLIB$finalize$1$Proxy = MethodProxy.create(var1, var0, "()V", "finalize", "CGLIB$finalize$1");
    CGLIB$equals$2$Method = var10000[1];
    CGLIB$equals$2$Proxy = MethodProxy.create(var1, var0, "(Ljava/lang/Object;)Z", "equals", "CGLIB$equals$2");
    CGLIB$toString$3$Method = var10000[2];
    CGLIB$toString$3$Proxy = MethodProxy.create(var1, var0, "()Ljava/lang/String;", "toString", "CGLIB$toString$3");
    CGLIB$hashCode$4$Method = var10000[3];
    CGLIB$hashCode$4$Proxy = MethodProxy.create(var1, var0, "()I", "hashCode", "CGLIB$hashCode$4");
    CGLIB$clone$5$Method = var10000[4];
    CGLIB$clone$5$Proxy = MethodProxy.create(var1, var0, "()Ljava/lang/Object;", "clone", "CGLIB$clone$5");
  }
该过程把被代理类和代理类里面的方法一一对应的绑定在一堆MethodProxy中。这些方法包括代理类的方法findLove和Object的所有public方法。
我们看一下该过程:
上面代码里的var0是生成的代理类Customer$$Enhancerxxxxx,var1是被代理类Customer
这里我们重点看一个对象:MethodProxy
CGLIB$findLove$0$Proxy = MethodProxy.create(var1, var0, "()V", "findLove", "CGLIB$findLove$0");
  public static MethodProxy create(Class c1, Class c2, String desc, String name1, String name2) {
        MethodProxy proxy = new MethodProxy();
        proxy.sig1 = new Signature(name1, desc);
        proxy.sig2 = new Signature(name2, desc);
        proxy.createInfo = new CreateInfo(c1, c2);
        return proxy;
    }
记住sig1代表findLove, sig2代表CGLIB$findLove$0
    private static class CreateInfo{
        Class c1;
        Class c2;
        NamingPolicy namingPolicy;
        GeneratorStrategy strategy;
        boolean attemptLoad;
        public CreateInfo(Class c1, Class c2)
        {
            this.c1 = c1;
            this.c2 = c2;
            AbstractClassGenerator fromEnhancer = AbstractClassGenerator.getCurrent();//获取代码生成器
            if (fromEnhancer != null) {
                namingPolicy = fromEnhancer.getNamingPolicy();
                strategy = fromEnhancer.getStrategy();
                attemptLoad = fromEnhancer.getAttemptLoad();
            }
        }
    }
所以,我们知悉这个生成的MethodProxy信息如下:
public class MethodProxy {
    private Signature sig1;//findLove
    private Signature sig2;//CGLIB$findLove$0
    private CreateInfo createInfo;//c1是被代理类Customer,c2是生成的代理类Customer$$Enhancerxxxxx,还有一个代码生成器,
private final Object initLock = new Object();

private volatile FastClassInfo fastClassInfo;
之后我们看一下该代理类默认的构造方法:主要是把我们传入的MethodInterceptor(被放入了threadLocal变量里)设置到该代理类中,供以后回调
public Object intercept(Object o, Method method, Object[] objects, MethodProxy methodProxy)
 public Customer$$EnhancerByCGLIB$$e1de0c0c() {
    CGLIB$BIND_CALLBACKS(this);
  }

  public static void CGLIB$SET_THREAD_CALLBACKS(Callback[] var0) {
    CGLIB$THREAD_CALLBACKS.set(var0);
  }

  public static void CGLIB$SET_STATIC_CALLBACKS(Callback[] var0) {
    CGLIB$STATIC_CALLBACKS = var0;
  }

  private static final void CGLIB$BIND_CALLBACKS(Object var0) {
    Customer$$EnhancerByCGLIB$$e1de0c0c var1 = (Customer$$EnhancerByCGLIB$$e1de0c0c)var0;
    if (!var1.CGLIB$BOUND) {
      var1.CGLIB$BOUND = true;
      Object var10000 = CGLIB$THREAD_CALLBACKS.get();
      if (var10000 == null) {
        var10000 = CGLIB$STATIC_CALLBACKS;
        if (CGLIB$STATIC_CALLBACKS == null) {
          return;
        }
      }
      var1.CGLIB$CALLBACK_0 = (MethodInterceptor)((Callback[])var10000)[0];
    }

  }
当我们调用生成的代理类的findLove方法时,过程怎样呢?实际调用的是MethodInterceptor的intercept方法
  final void CGLIB$findLove$0() {
    super.findLove();
  }

  public final void findLove() {
    MethodInterceptor var10000 = this.CGLIB$CALLBACK_0;
    if (this.CGLIB$CALLBACK_0 == null) {
      CGLIB$BIND_CALLBACKS(this);
      var10000 = this.CGLIB$CALLBACK_0;
    }

    if (var10000 != null) {
      var10000.intercept(this, CGLIB$findLove$0$Method, CGLIB$emptyArgs, CGLIB$findLove$0$Proxy);
    } else {
      super.findLove();
    }
  }
该方法的几个参数分别代表什么呢?
    public Object intercept(Object o, Method method, Object[] objects, MethodProxy methodProxy) throws Throwable {
        before();
        method.invoke(method.getDeclaringClass().newInstance(),objects);
        Object obj = methodProxy.invokeSuper(o,objects);
        after();
        return obj;
    }
Object o 是被生成的代理对象Customer$$Enhancerxxxxx
Method method 是 Customer的findLove方法对象。
Object[] objects 是 findLove的参数
MethodProxy methodProxy 含义如下:
public class MethodProxy {
    private Signature sig1;//findLove
    private Signature sig2;//CGLIB$findLove$0
    private CreateInfo createInfo;//包含c1、c2、和一个代码生成器,其中c1是被代理类Customer,c2是生成的代理类Customer$$Enhancerxxxxx
private final Object initLock = new Object();
private volatile FastClassInfo fastClassInfo;
此时,我们在intercept方法中调用原始方法:
如果像jdk那么写:
Object obj = method.invoke(method.getDeclaringClass().newInstance(),objects);
那么就是普通的反射调用,注意,不能用o做参数,因为会造成死循环。
此时CGLIB不会生成fast类
如果这样写:
Object obj = methodProxy.invokeSuper(o,objects);
CGLIB会生成customer的fast类,和Customer$$Enhancerxxxxx的fast类

看一下执行过程:
    public Object invokeSuper(Object obj, Object[] args) throws Throwable {
        try {
            init();
            FastClassInfo fci = fastClassInfo;
            return fci.f2.invoke(fci.i2, obj, args);
        } catch (InvocationTargetException e) {
            throw e.getTargetException();
        }
    }
先看初始化:
    private void init()
    {
        /*
         * Using a volatile invariant allows us to initialize the FastClass and
         * method index pairs atomically.
         *
         * Double-checked locking is safe with volatile in Java 5.  Before 1.5 this
         * code could allow fastClassInfo to be instantiated more than once, which
         * appears to be benign.
         */
        if (fastClassInfo == null)
        {
            synchronized (initLock)
            {
                if (fastClassInfo == null)
                {
                    CreateInfo ci = createInfo;

                    FastClassInfo fci = new FastClassInfo();
            //生成customer的fast类,和Customer$$Enhancerxxxxx的fast类
                    fci.f1 = helper(ci, ci.c1);//c1是customer,f1是customer的fast类
            fci.f2 = helper(ci, ci.c2);//c2是生成的customer代理类 ,f2是代理类的fast类
            fci.i1 = fci.f1.getIndex(sig1);
            fci.i2 = fci.f2.getIndex(sig2);
            fastClassInfo = fci;
         }
       }
      }
    }
private static FastClass helper(CreateInfo ci, Class type) {
    FastClass.Generator g = new FastClass.Generator();
    g.setType(type);
    g.setClassLoader(ci.c2.getClassLoader());
    g.setNamingPolicy(ci.namingPolicy);
    g.setStrategy(ci.strategy);
    g.setAttemptLoad(ci.attemptLoad);
    return g.create();//生成fast类,这里需要注意的是,默认是useCache=ture,如果fast存在则不会二次生成fast类,如果改为false,则会重新生成fast类
}
private static class FastClassInfo
{
    FastClass f1;
    FastClass f2;
    int i1;
    int i2;
}
之后看一下这两行代码执行了啥:
fci.i1 = fci.f1.getIndex(sig1);
fci.i2 = fci.f2.getIndex(sig2);
看一下fci.i1 = fci.f1.getIndex(sig1);
public int getIndex(Signature var1) {
    String var10000 = var1.toString();//name+desc,也就是findLove()V
    switch(var10000.hashCode()) { //findLove()V的hashCode是1192015562
    case -1725733088:
      if (var10000.equals("getClass()Ljava/lang/Class;")) {
        return 7;
      }
      break;
    case 1192015562:
      if (var10000.equals("findLove()V")) {
        return 0;
      }
      break;
    case 1826985398:
      if (var10000.equals("equals(Ljava/lang/Object;)Z")) {
        return 4;
      }
      break;case 1913648695:
      if (var10000.equals("toString()Ljava/lang/String;")) {
        return 5;
      }
      break;
    case 1984935277:
      if (var10000.equals("hashCode()I")) {
        return 6;
      }
    }
//我在这里删除了无关的方法的代码,其实还有好多,像wait,notify等
    return -1;
  }
于是我们得到fci.i1=0,同理,可以得到fci.i2=8;
于是,我们执行了init()后,得到如下信息:
如果fastClassInfo不存在,则初始化,如果存在则跳过
private static class FastClassInfo
{
    FastClass f1;//f1是customer的fast类
FastClass f2;//f2是代理类的fast类
   int i1; //0  findLove()V的索引
   int i2; //8  CGLIB$findLove0()V的索引
}
查看
fci.f2.invoke(fci.i2, obj, args);//i2是8,obj是被生成的代理对象Customer$$Enhancerxxxxx,args是 findLove的参数
public Object invoke(int var1, Object var2, Object[] var3) throws InvocationTargetException {
    e1de0c0c var10000 = (e1de0c0c)var2;
    int var10001 = var1;//8

    try {
      switch(var10001) {
      case 0:
        return new Boolean(var10000.equals(var3[0]));
      case 1:
        return var10000.toString();
      case 2:
        return new Integer(var10000.hashCode());
      ...case 6:
        var10000.findLove();
        return null;
      case 7:
        return e1de0c0c.CGLIB$findMethodProxy((Signature)var3[0]);
      case 8:
        var10000.CGLIB$findLove$0();//var10000就是被生成的代理对象Cuseomer$$Enhancerxxxxx
        return null;
      ...case 26:
        var10000.notifyAll();
        return null;
      }
    } catch (Throwable var4) {
      throw new InvocationTargetException(var4);
    }
    throw new IllegalArgumentException("Cannot find matching method/constructor");
  }
查看Cuseomer$$Enhancerxxxxx类的CGLIB$findLove$0()
 final void CGLIB$findLove$0() {
    super.findLove();
  }
因为super是customer,所以调用类customer的findLove()方法,通过在fast类里对方法加索引的方案,避开了反射调用,因此提高了效率。
这也是为何CGLIBProxy比JDKProxy效率高的原因。
我们比较一下SKDProxy和CGLIBProxy的区别:
实现方式:
SKDProxy需要接口,需要传入对象,不需要无参构造器,生成该接口的实现类。
CGLIB不需要接口,不需要传入对象,被代理类需要public的构造器,生成该类的子类,因此CGLIB无法代理final方法。
比较:
1、生成代理类的源码,SDKProxy生成的是实现类,CGLIB生成的是子类,
2、当我们执行Method A的invoke方法时,
SDKProxy的方式是
Object obj = method.invoke(this.target,args);
该方法第一次执行是,需要生成methodAccessor,这个生成很快。第16次执行时,需要生成字节码,会慢一下。
第二次执行不需要生成MethodAccessor。但是执行另一方方法时,依然需要methodAccessor。
CGLIBProxy的执行方式有两种:
1、Object obj = method.invoke(method.getDeclaringClass().newInstance(),objects);
那么就是普通的反射调用,注意,不能用o做参数,因为会造成死循环。
这种方式,和SDKProxy一样,因为CGLIB生成的代理类也把method对象存为类变量,所以执行效率也一样。

2、Object obj = methodProxy.invokeSuper(o,objects);
这种方式,第一次执行时,会生成两个fast类,因此比sdkproxy慢,
第二次执行该方法,因为SDKProxy需要执行invoke,所以CGLIB更快。
第无数次执行时,因为SDKProxy也动态生成了直接调用的对象,所以速度差不多,甚至可能CGLIB会快一点。
当执行另一个方法时,因为SDKProxy需要生成methodAccessor并执行invoke,CGLIB不需要,所以CGLIB更快。
------------恢复内容结束------------

 浙公网安备 33010602011771号