SpringBoot --- 自定义 Starter
SpringBoot --- 自定义 Starter
创建
1、需要创建一个新的空工程
2、新的工程需要引入两个模块
一个Maven 模块 作为启动器
一个SpringBoot 模块 作为自动配置模块
3、在Starter 模块(即启动器模块)的 pom.xml 引入 自动配置模块
    <!--启动器-->
    <groupId>com.ling.starter</groupId>
    <artifactId>ling-spring-boot-starter</artifactId>
    <version>1.0-SNAPSHOT</version>

    <dependencies>
<!--        引入自动配置模块-->
        <dependency>
            <groupId>com.ling.starter</groupId>
            <artifactId>ling-spring-boot-starter-autoconfigurer</artifactId>
            <version>0.0.1-SNAPSHOT</version>
        </dependency>
    </dependencies>
4、接下来主要的工作是编写自动配置包 ling-spring-boot-starter-autoconfigurer
首先,我们要明确,需要使用者配置的属性有哪些,需要编写一个类并用 @ConfigurationProperties 标注,用 prefix 明确配置的字首部分,约定后,使用者配置。
package com.ling.starter;

import org.springframework.boot.context.properties.ConfigurationProperties;

@ConfigurationProperties(prefix = "ling.hello")
public class HelloProperties {
    private String prefix;
    private String suffix;

    public String getPrefix() {
        return prefix;
    }

    public void setPrefix(String prefix) {
        this.prefix = prefix;
    }

    public String getSuffix() {
        return suffix;
    }

    public void setSuffix(String suffix) {
        this.suffix = suffix;
    }
}
5、接下来是编写Service 类,明确的是,以上的配置,用于哪些处理。
package com.ling.starter;

public class HelloService {

    HelloProperties helloProperties;

    public HelloProperties getHelloProperties() {
        return helloProperties;
    }

    public void setHelloProperties(HelloProperties helloProperties) {
        this.helloProperties = helloProperties;
    }

    public String syaHello(String name){  // 做业务处理
        return helloProperties.getPrefix()+ "---" + name + "---" + helloProperties.getSuffix();
    }
}
编写配置类(类似 xml ),注入Bean。
@Configuration     //表明这是一个配置类
@ConditionalOnWebApplication   //判断是否是web 工程,是则配置
@EnableConfigurationProperties(HelloProperties.class)  //需要注入哪些类到容器中
public class HelloAutoconfiguration {

    @Autowired
    HelloProperties helloProperties;

    @Bean
    public HelloService helloService(){
        HelloService helloService = new HelloService();
        helloService.setHelloProperties(helloProperties);
        return helloService;
    }
}
到这里自定义 starter 已经完成。
测试
1、创建一个web 工程,测试
2、导入自定义的 starter 依赖
<!--        测试 自定义 starter-->
        <dependency>
            <groupId>com.ling.starter</groupId>
            <artifactId>ling-spring-boot-starter</artifactId>
            <version>1.0-SNAPSHOT</version>
        </dependency>
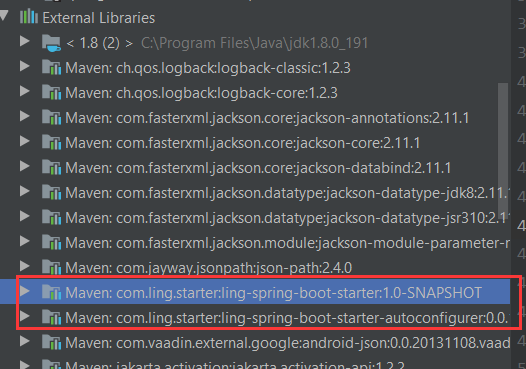
3、导入成功后,可以在依赖库中找到自定义 starter 的包,因为 ling-spring-boot-starter 的 pom 文件已经导入了 ling-spring-boot-starter-autoconfigurer 的依赖。所以会自动导入ling-spring-boot-starter 所依赖的包。
4、创建并配置 properties.yml 文件(配置是没有相关提示属于正常,按照约定好的字首和属性名配置即可)
ling:
hello:
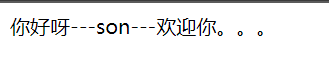
prefix: 你好呀
suffix: 欢迎你。。。
5、编写Contriller 类
@RestController  //非JSON 数据,可用 @RestController
/* @RestController== @ResponseBody +@Controller*/
public class HWcontroller {

    @Autowired
    HelloService helloService;

    @RequestMapping("/hello")
    public String hello(){
        return helloService.syaHello("son");
    }
}
6、启动工程,访问
http://localhost:8080/hello

 浙公网安备 33010602011771号