Django Rest Framework --认证
基本结构
urls.py
from django.conf.urls import url, include
from web.viewsimport TestView

urlpatterns = [
    url(r'^test/', TestView.as_view()),
]
views.py
from rest_framework.views import APIView
from rest_framework.response import Response
from rest_framework.authentication import BaseAuthentication
from rest_framework.request import Request
from rest_framework import exceptions


class TestAuthentication(BaseAuthentication):
    def authenticate(self, request):
        """
        用户认证代码逻辑编写区
        """
    if 验证成功:
        return ('登录用户', '用户token')
    else 验证失败
        #抛出验证失败异常
        raise exceptions.AuthenticationFailed('用户认证失败')
    def authenticate_header(self, request):
        """
        Return a string to be used as the value of the `WWW-Authenticate`
        header in a `401 Unauthenticated` response, or `None` if the
        authentication scheme should return `403 Permission Denied` responses.
        """
        # 验证失败时,返回的响应头WWW-Authenticate对应的值
        pass


class TestView(APIView):
    authentication_classes = [TestAuthentication, ]

    def get(self, request, *args, **kwargs):
        print(request.user)
        print(request.auth)
        return Response('GET请求,响应内容')

    def post(self, request, *args, **kwargs):
        return Response('POST请求,响应内容')

    def put(self, request, *args, **kwargs):
        return Response('PUT请求,响应内容')
注意事项:
1.使用认证类
在需要认证的视图类中,写入authentication_classes = [TestAuthentication, ],变量属性authentication_classes是个列表,列表中可写多个认证类,通过认证方才执行视图类的方法。(此方法属于局部的类的认证方式)
2.返回值
(1)元组形式(登录用户,用户token),元组中第一个元素是用户名,第二个元素是认证数据token。这个返回值会在我们的视图类中通过request.user 和 request.auth获取到。在实际使用中可以传递你自己需要使用的数据。
(2)none,跳过当前认证类,处理下个认证类。
(3)抛出异常,父类接收异常,返回错误。
源码分析
(1)寻找函数入口
通过urls.py文件,我们首先要寻找TestView类的as_view()方法,我们能在APIView类找到as_view()方法,APIView继承了View中as_view()方法,返回了一个view函数最终的结果就是调用了dispatch方法,整个视图类的入口就找到了。


(2)为什么要使用authentication_classes 属性变量?
现在我们开始寻找dispatch方法,这时候请注意,我们应该从子类TestView中开始寻找这个方法,因为在子类中可能会重构父类的dispatch方法,最后我们在APIView类中找到了dispatch方法。
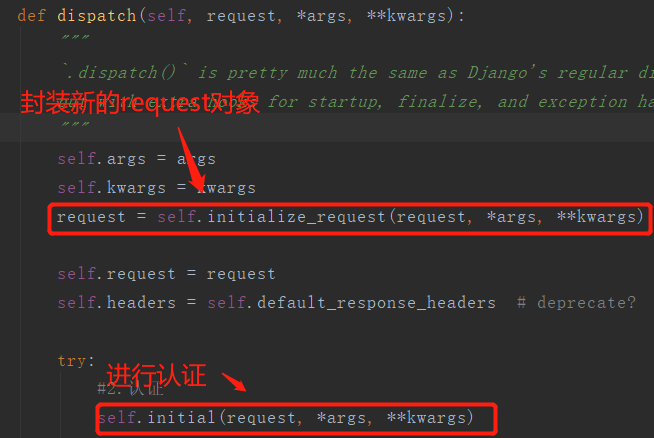

由initialize_request方法的实现过程可以看出,将其封装实例化成了一个Request对象。而authenticators属性就是认证属性。

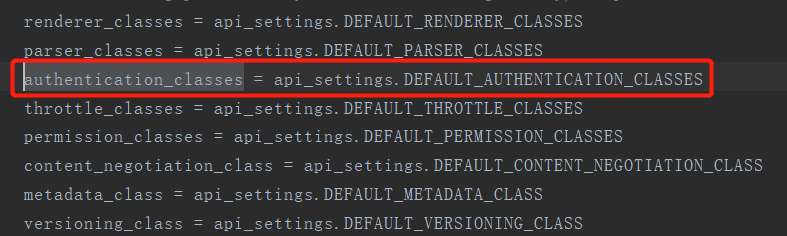
从上图可以看出authentication_classes是一个列表,并且这个列表中的每个元素都是一个个认证类,所以我们会在需要认证的视图类顶部将authentication_classes赋值,也可以在配置文件中全局配置(下面会说如何进行全局认证),我们新封装的request对象中authenticators属性就是由一个个认证类实例组成的列表。
(3)为什么要认证类中要使用authenticate方法?
回到前面说是的dispatch方法来,在做完了对django原生的request的封装和实例化后,紧接着就会开始认证(try...中,捕获异常,如果没有捕获到异常,说明认证成功,就会继续执行下面的反射过程)。认证的过程就包含在下图中的inital方法中,有图可知,是通过perform_authentication方法实现的认证。
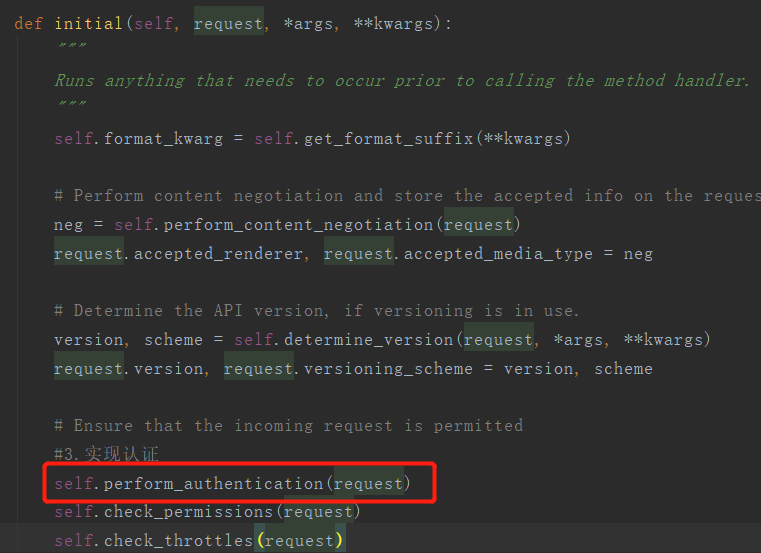

在perform_authentication方法中可以看到,只调用了一个request.user,而这个user一定是方法,不会是属性变量,因为如果是属性变量,那么就一定有语法错误,变量一定是要赋值的,不可能孤零零的写到那里。我们在源码中找到它,就明白了,之所以它能这么写,就是因为有了property装饰器。在user方法中找到_authenticate方法,这就是认证的方法。
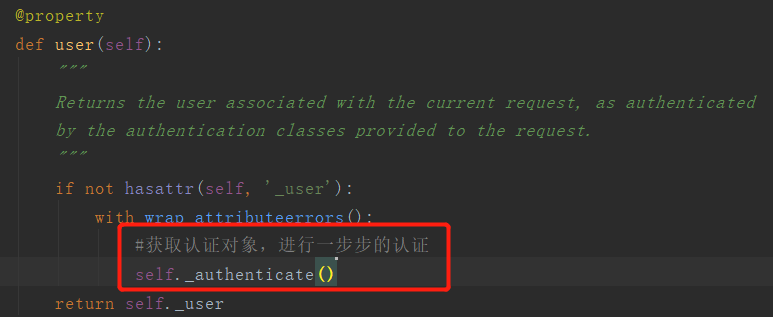
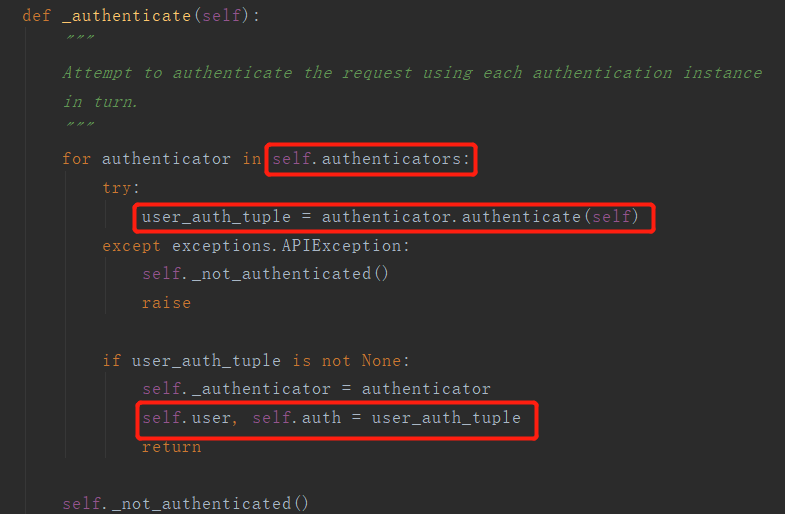
在这个方法中,一切答案都就找到了。首先看authenticators,是不是很眼熟,没错它就是前面说的,封装和实例化原生request的Request类中所定义的属性变量。在实例化时,我们就将authentication_classes列表的值通过get_authenticators方法中的列表生成式赋值给了authenticators。再往下看,authenticator.autheneicate(self)中的authenticator是不是就是我们自己定义的认证类,而它在源码中要做“.authenticate(self)”的操作,那自然而然,我们定义的认证类中要实现这个方法了。
(4)为什么认证成功后的返回值在request.user和request.auth中?
由 (3)中最后一个图可知,当我们认证成功后会执行“self.user, self.auth = user_auth_tuple”代码,我们在认证类定义的方法authenticate的返回值就保存在 user_auth_tuple中,所以我们通过request.user 和 request.auth 就可以获取到了。
实例


1 from django.conf.urls import url, include
2 from web.viewsimport TestView
3
4 urlpatterns = [
5     url(r'^test/', TestView.as_view()),
6 ]
 1 from rest_framework.views import APIView
 2 from rest_framework.response import Response
 3 from rest_framework.authentication import BaseAuthentication
 4 from rest_framework.request import Request
 5 from rest_framework import exceptions
 6
 7 token_list = [
 8     'sfsfss123kuf3j123',
 9     'asijnfowerkkf9812',
10 ]
11
12
13 class TestAuthentication(BaseAuthentication):
14     def authenticate(self, request):
15         """
16         用户认证,如果验证成功后返回元组: (用户,用户Token)
17         :param request:
18         :return:
19             None,表示跳过该验证;
20                 如果跳过了所有认证,默认用户和Token和使用配置文件进行设置
21                 self._authenticator = None
22                 if api_settings.UNAUTHENTICATED_USER:
23                     self.user = api_settings.UNAUTHENTICATED_USER()
24                 else:
25                     self.user = None
26
27                 if api_settings.UNAUTHENTICATED_TOKEN:
28                     self.auth = api_settings.UNAUTHENTICATED_TOKEN()
29                 else:
30                     self.auth = None
31             (user,token)表示验证通过并设置用户名和Token;
32             AuthenticationFailed异常
33         """
34         val = request.query_params.get('token')
35         if val not in token_list:
36             raise exceptions.AuthenticationFailed("用户认证失败")
37
38         return ('登录用户', '用户token')
39
40     def authenticate_header(self, request):
41         """
42         Return a string to be used as the value of the `WWW-Authenticate`
43         header in a `401 Unauthenticated` response, or `None` if the
44         authentication scheme should return `403 Permission Denied` responses.
45         """
46         # 验证失败时,返回的响应头WWW-Authenticate对应的值
47         pass
48
49
50 class TestView(APIView):
51     authentication_classes = [TestAuthentication, ]
52     permission_classes = []
53
54     def get(self, request, *args, **kwargs):
55         print(request.user)
56         print(request.auth)
57         return Response('GET请求,响应内容')
58
59     def post(self, request, *args, **kwargs):
60         return Response('POST请求,响应内容')
61
62     def put(self, request, *args, **kwargs):
63         return Response('PUT请求,响应内容')
全局配置
如果要进行全局配置,由上面的源码分析可知,我们只需要在配置文件中配置我们存储到authentication_classes的值即可。但还要注意的是,在写配置文件时,要使用的是路径,所以最好在和views.py同级目录下新建一个文件夹(我习惯叫utils),再在该文件夹下新建一个认证文件(auth.py),将我们的认证类都写到这里。
REST_FRAMEWORK = {
    "DEFAULT_AUTHENTICATION_CLASSES" :['api.utils.auth.MyAuthentication]
}
MyAuthentication类就是我们写在utils文件夹下auth.py文件中的认证类。
注意:如果有部分类不需要认证的话,可以在这里类中添加“authentication_classes = []”,即可。

 浙公网安备 33010602011771号