进阶3: zookeeper-3.4.9.tar.gz和hbase-1.2.4-bin.tar.gz 环境搭建(hbase 伪分布式)
前提条件:
成功安装了 jdk1.8, hadoop2.7.3
注意条件:
zookeeper,hbase 版本必须要和hadoop 安装版本相互兼容,否则容易出问题;
本次:安装包 zookeeper-3.4.9.tar.gz 和 hbase-1.2.4-bin.tar.gz
zookeeper 安装步骤:
1. 下载安装包 zookeeper-3.4.9.tar.gz,并上传到linux 目录;
2. 解压文件
tar zxvf zookeeper-3.4.9.tar.gz
3. 进入 zookeeper-3.4.9 , 拷贝 conf /zoo_sample.cfg
cp conf/zoo_sample.cfg conf/zoo.cfg
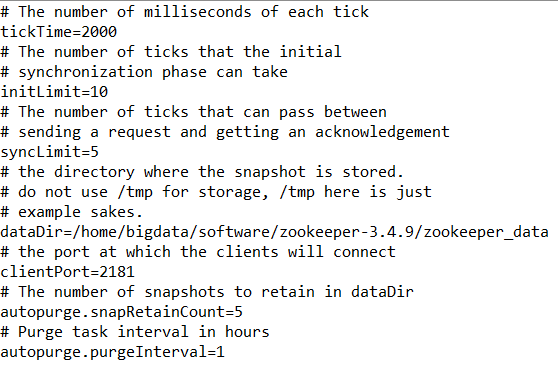
4. 编辑配置文件 conf/zoo.cfg ,如下图:
# The number of milliseconds of each tick
tickTime=2000
# The number of ticks that the initial
# synchronization phase can take
initLimit=10
# The number of ticks that can pass between
# sending a request and getting an acknowledgement
syncLimit=5
# the directory where the snapshot is stored.
# do not use /tmp for storage, /tmp here is just
# example sakes.
dataDir=/usr/local/hadoop-soft/etc/zookeeper-3.4.9/zookeeper_data
# the port at which the clients will connect
clientPort=2181
# The number of snapshots to retain in dataDir
autopurge.snapRetainCount=5
# Purge task interval in hours
autopurge.purgeInterval=1
5. 配置环境变量:
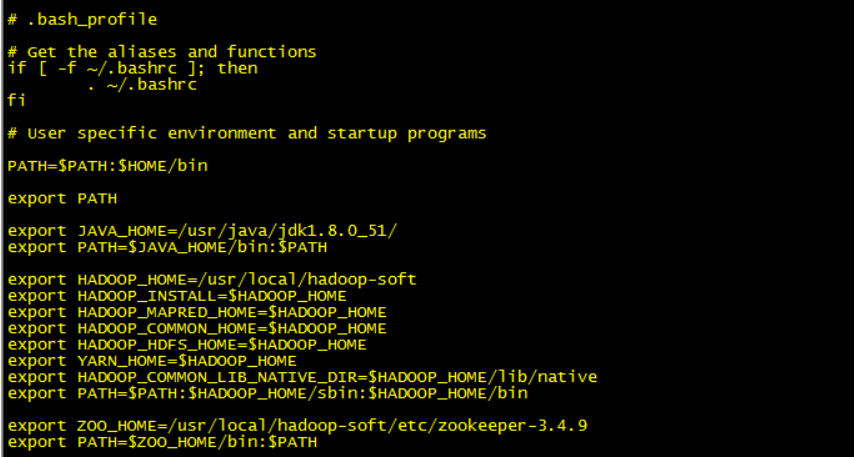
a. 进入根目录,编辑 ./bash_profile 文件,设置环境变量:
export ZOO_HOME=/usr/local/hadoop-soft/etc/zookeeper-3.4.9
export PATH=$ZOO_HOME/bin:$PATH

6. 启动zookeeper
bin/zkServer.sh start
7. 验证启动zookeeper成功
a. 验证进程
jps | grep Quorum
b. 如果产生如下输出,则表明进程启动正常:

HBase 安装步骤(伪分布式版):
1.上传hbase-1.2.4 安装包到linux ;
2.进入根目录,编辑 ./bash_profile 文件,设置HBase 环境变量:
export HBASE_HOME=/usr/local/hadoop-soft/etc/hbase-1.2.4
export PATH=$HBASE_HOME/bin:$PATH
3.解压hbase-1.2.4 安装文件
tar zxvf hbase-1.2.4-bin.tar.gz
4.编辑 conf/hbash-env.sh 文件,可以添加,也可以松开hbash-env.sh 代码注解
export JAVA_HOME=/usr/java/jdk1.8.0_51
export HBASE_MANAGES_ZK=false 如果你是使用hbase自带的zk就是true,如果使用自己的zk就是false,此次我们使用的是zoopkeeper 提供的,所以为false
5. 编辑 conf/hbase-site.xml
<configuration>
  <property>
       <!-- 是否分布式-->
      <name>hbase.cluster.distributed</name>
      <value>true</value>
   </property>
   <property>
      <!-- hbase 持久化保存目录-->
      <name>hbase.rootdir</name>
      <value>hdfs://master:9000/hbase</value>
   </property>
   <property>
       <!-- 指定要连接zk的节点 -->
      <name>hbase.zookeeper.quorum</name>
      <value>bigdata</value>
   </property>
</configuration>
为了防止因为hbase和hadoop版本不一致而出现的问题,可以看下{hbase_home}/lib/下相关hadoop*.jar的jar包,跟你的hadoop是否是同一个版本,如果不是可以从{hadoop_home}/ share/hadoop/ 下复制
6. 编辑conf/regionservers文件
master
该文件表示在哪些主机上启动RegionServers,每一行表示一个主机名,执行命令的时候需要这些机器上的SSH登陆权限
7. (如果zookeeper 没启动,先启动zookeeper)启动HDFS :
start-dfs.sh

假如遇到遇到如下问题:如下截图dataNode

此截图就没有启动DataNode ,解决办法:将对应的HDFS (hdfs-site.xml) nameNode ,dataNode 节点对应的目录删除,重新分区:
a 如下图:将dfs 所有目录先删除,然后在将nameNode,dataNode 对应的目录手动删除,在手动创建

b. 执行hdfs 分区操作:
hdfs namenode -format

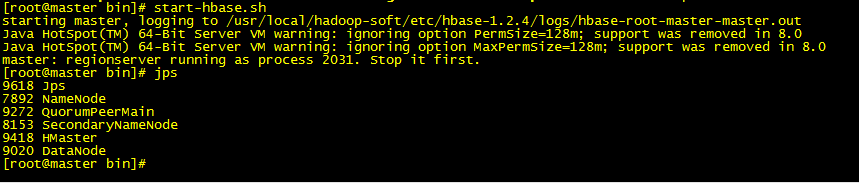
8.启动 hbase
bin/start-hbase.sh
9. jps ,如果看到如下 进程。
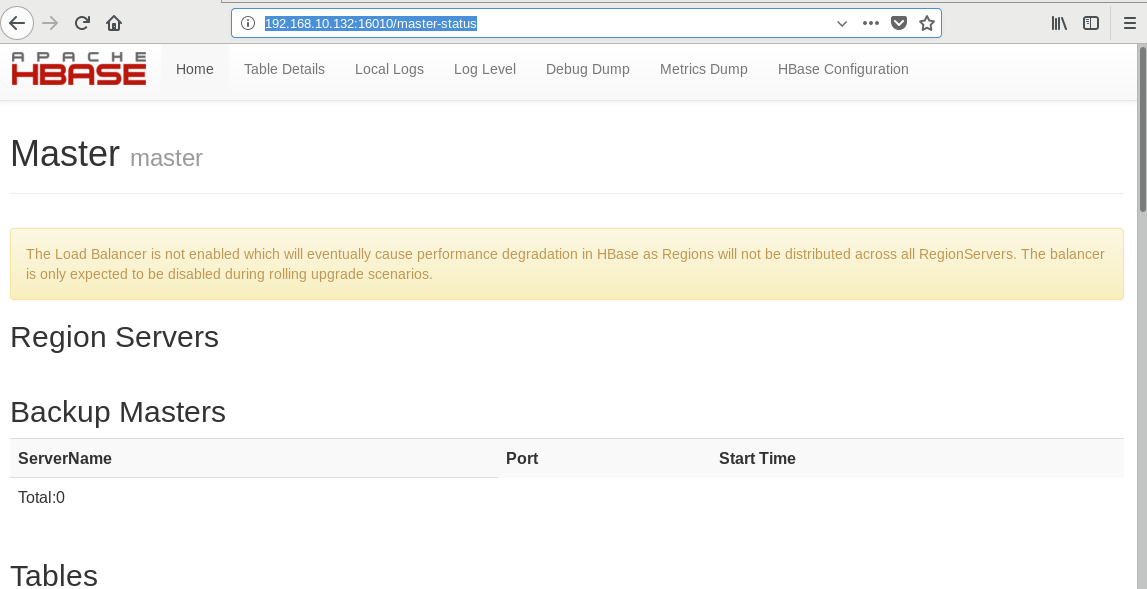
10. 查看是否启动成功, http://master:16010/master-status

 浙公网安备 33010602011771号