

GCD介绍/GCD的基本使用/GCD的常见用法
2015-07-29 15:24 另十 阅读(1388) 评论(0) 收藏 举报GCD介绍
一、简单介绍
1.什么是GCD?
全称是Grand Central Dispatch,可译为“牛逼的中枢调度器”
纯C语言,提供了非常多强大的函数
2.GCD的优势
GCD是苹果公司为多核的并行运算提出的解决方案
GCD会自动利用更多的CPU内核(比如双核、四核)
GCD会自动管理线程的生命周期(创建线程、调度任务、销毁线程)
程序员只需要告诉GCD想要执行什么任务,不需要编写任何线程管理代码
3.提示
二、任务和队列
GCD中有2个核心概念
(1)任务:执行什么操作
(2)队列:用来存放任务
GCD的使用就2个步骤
(1)定制任务
(2)确定想做的事情
将任务添加到队列中,GCD会自动将队列中的任务取出,放到对应的线程中执行
提示:任务的取出遵循队列的FIFO原则:先进先出,后进后出
三、执行任务
1.GCD中有2个用来执行任务的函数
说明:把右边的参数(任务)提交给左边的参数(队列)进行执行。
(1)用同步的方式执行任务 dispatch_sync(dispatch_queue_t queue, dispatch_block_t block);
参数说明:
queue:队列
block:任务
(2)用异步的方式执行任务 dispatch_async(dispatch_queue_t queue, dispatch_block_t block);
2.同步和异步的区别
同步:在当前线程中执行
异步:在另一条线程中执行
四、队列
1.队列的类型
GCD的队列可以分为2大类型
(1)并发队列(Concurrent Dispatch Queue)
可以让多个任务并发(同时)执行(自动开启多个线程同时执行任务)并发功能只有在异步(dispatch_async)函数下才有效
(2)串行队列(Serial Dispatch Queue)
让任务一个接着一个地执行(一个任务执行完毕后,再执行下一个任务)
2.补充说明
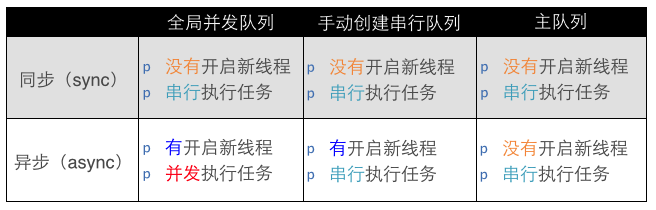
有4个术语比较容易混淆:同步、异步、并发、串行
同步和异步决定了要不要开启新的线程
同步:在当前线程中执行任务,不具备开启新线程的能力
异步:在新的线程中执行任务,具备开启新线程的能力
并发和串行决定了任务的执行方式
并发:多个任务并发(同时)执行
串行:一个任务执行完毕后,再执行下一个任务
3.串行队列
GCD中获得串行有2种途径
(1)使用dispatch_queue_create函数创建串行队列
dispatch_queue_t dispatch_queue_create(const char *label, dispatch_queue_attr_t attr); // 队列名称, 队列属性,一般用NULL即可
示例:
dispatch_queue_t queue = dispatch_queue_create("wendingding", NULL); // 创建
dispatch_release(queue); // 非ARC需要释放手动创建的队列
(2)使用主队列(跟主线程相关联的队列)
主队列是GCD自带的一种特殊的串行队列,放在主队列中的任务,都会放到主线程中执行
使用dispatch_get_main_queue()获得主队列
示例:
dispatch_queue_t queue = dispatch_get_main_queue();
4.并发队列
GCD默认已经提供了全局的并发队列,供整个应用使用,不需要手动创建
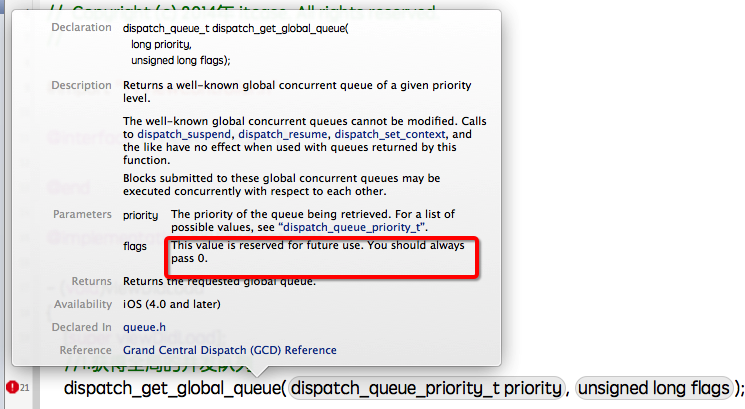
使用dispatch_get_global_queue函数获得全局的并发队列
dispatch_queue_t dispatch_get_global_queue(dispatch_queue_priority_t priority,unsigned long flags); // 此参数暂时无用,用0即可
示例:
dispatch_queue_t queue = dispatch_get_global_queue(DISPATCH_QUEUE_PRIORITY_DEFAULT, 0); // 获得全局并发队列
说明:全局并发队列的优先级
#define DISPATCH_QUEUE_PRIORITY_HIGH 2 // 高
#define DISPATCH_QUEUE_PRIORITY_DEFAULT 0 // 默认(中)
#define DISPATCH_QUEUE_PRIORITY_LOW (-2) // 低
#define DISPATCH_QUEUE_PRIORITY_BACKGROUND INT16_MIN // 后台
5.各种队列的执行效果
五、代码示例
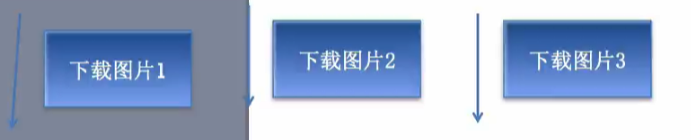
(1)用异步函数往并发队列中添加任务

 9 #import "YYViewController.h"
10
11 @interface YYViewController ()
12
13 @end
14
15 @implementation YYViewController
16
17 - (void)viewDidLoad
18 {
19     [super viewDidLoad];
20     //1.获得全局的并发队列
21    dispatch_queue_t queue =  dispatch_get_global_queue(DISPATCH_QUEUE_PRIORITY_DEFAULT, 0);
22     //2.添加任务到队列中,就可以执行任务
23     //异步函数:具备开启新线程的能力
24     dispatch_async(queue, ^{
25         NSLog(@"下载图片1----%@",[NSThread currentThread]);
26     });
27     dispatch_async(queue, ^{
28         NSLog(@"下载图片2----%@",[NSThread currentThread]);
29     });
30     dispatch_async(queue, ^{
31         NSLog(@"下载图片2----%@",[NSThread currentThread]);
32     });
33 //打印主线程
34     NSLog(@"主线程----%@",[NSThread mainThread]);
35
36 }
37
38 @end

总结:同时开启三个子线程
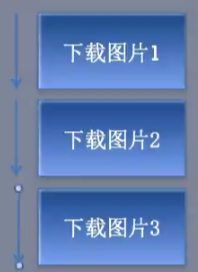
(2)用异步函数往串行队列中添加任务
 9 #import "YYViewController.h"
10
11 @interface YYViewController ()
12
13 @end
14
15 @implementation YYViewController
16
17 - (void)viewDidLoad
18 {
19     [super viewDidLoad];
20
21     //打印主线程
22     NSLog(@"主线程----%@",[NSThread mainThread]);
23
24     //创建串行队列
25     dispatch_queue_t  queue= dispatch_queue_create("wendingding", NULL);
26     //第一个参数为串行队列的名称,是c语言的字符串
27     //第二个参数为队列的属性,一般来说串行队列不需要赋值任何属性,所以通常传空值(NULL)
28
29     //2.添加任务到队列中执行
30     dispatch_async(queue, ^{
31         NSLog(@"下载图片1----%@",[NSThread currentThread]);
32     });
33     dispatch_async(queue, ^{
34         NSLog(@"下载图片2----%@",[NSThread currentThread]);
35     });
36     dispatch_async(queue, ^{
37         NSLog(@"下载图片2----%@",[NSThread currentThread]);
38     });
39
40     //3.释放资源
41 //    dispatch_release(queue);
42 }
43
44 @end

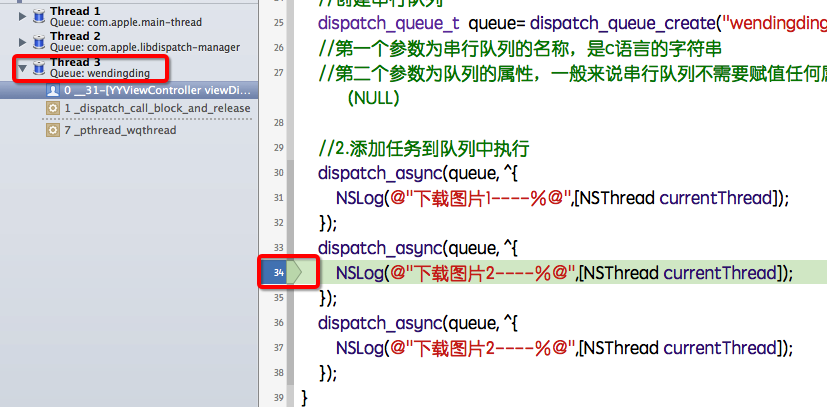
总结:会开启线程,但是只开启一个线程
(3)用同步函数往并发队列中添加任务
 9 #import "YYViewController.h"
10
11 @interface YYViewController ()
12
13 @end
14
15 @implementation YYViewController
16 /**
17  *  用同步函数往并发队列中添加任务
18  */
19 - (void)viewDidLoad
20 {
21     [super viewDidLoad];
22
23     //打印主线程
24     NSLog(@"主线程----%@",[NSThread mainThread]);
25
26     //创建串行队列
27     dispatch_queue_t  queue= dispatch_get_global_queue(DISPATCH_QUEUE_PRIORITY_DEFAULT, 0);
28
29
30     //2.添加任务到队列中执行
31     dispatch_sync(queue, ^{
32         NSLog(@"下载图片1----%@",[NSThread currentThread]);
33     });
34     dispatch_sync(queue, ^{
35         NSLog(@"下载图片2----%@",[NSThread currentThread]);
36     });
37     dispatch_sync(queue, ^{
38         NSLog(@"下载图片3----%@",[NSThread currentThread]);
39     });
40 }
41
42 @end

总结:不会开启新的线程,并发队列失去了并发的功能
(4)用同步函数往串行队列中添加任务
 9 #import "YYViewController.h"
10
11 @interface YYViewController ()
12
13 @end
14
15 @implementation YYViewController
16
17
18 /**
19  *用同步函数往串行队列中添加任务
20  */
21 - (void)viewDidLoad
22 {
23     [super viewDidLoad];
24      NSLog(@"用同步函数往串行队列中添加任务");
25     //打印主线程
26     NSLog(@"主线程----%@",[NSThread mainThread]);
27
28     //创建串行队列
29     dispatch_queue_t  queue= dispatch_queue_create("wendingding", NULL);
30
31     //2.添加任务到队列中执行
32     dispatch_sync(queue, ^{
33         NSLog(@"下载图片1----%@",[NSThread currentThread]);
34     });
35     dispatch_sync(queue, ^{
36         NSLog(@"下载图片2----%@",[NSThread currentThread]);
37     });
38     dispatch_sync(queue, ^{
39         NSLog(@"下载图片3----%@",[NSThread currentThread]);
40     });
41 }
42
43 @end

总结:不会开启新的线程
(5)补充
补充:队列名称的作用:
将来调试的时候,可以看得出任务是在哪个队列中执行的。
(6)小结
说明:同步函数不具备开启线程的能力,无论是什么队列都不会开启线程;异步函数具备开启线程的能力,开启几条线程由队列决定(串行队列只会开启一条新的线程,并发队列会开启多条线程)。
同步函数
(1)并发队列:不会开线程
(2)串行队列:不会开线程
异步函数
(1)并发队列:能开启N条线程
(2)串行队列:开启1条线程
补充:
GCD的基本使用
一、主队列介绍
dispatch_queue_t queue=dispatch_get_main_queue();
(1)使用异步函数执行主队列中得任务,代码示例:
 8
 9 #import "YYViewController.h"
10
11 @interface YYViewController ()
12
13 @end
14
15 @implementation YYViewController
16
17 - (void)viewDidLoad
18 {
19     [super viewDidLoad];
20
21     //打印主线程
22      NSLog(@"打印主线程--%@", [NSThread mainThread]);
23
24     //1.获取主队列
25     dispatch_queue_t queue=dispatch_get_main_queue();
26     //2.把任务添加到主队列中执行
27     dispatch_async(queue, ^{
28         NSLog(@"使用异步函数执行主队列中的任务1--%@",[NSThread currentThread]);
29     });
30     dispatch_async(queue, ^{
31         NSLog(@"使用异步函数执行主队列中的任务2--%@",[NSThread currentThread]);
32     });
33     dispatch_async(queue, ^{
34         NSLog(@"使用异步函数执行主队列中的任务3--%@",[NSThread currentThread]);
35     });
36 }
37
38 @end
执行效果:

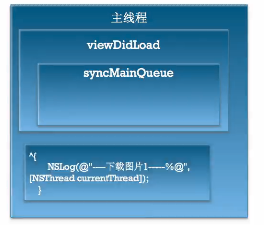
(2)使用同步函数,在主线程中执行主队列中得任务,会发生死循环,任务无法往下执行。示意图如下:
二、基本使用
1.问题
任务1和任务2是在主线程执行还是子线程执行,还是单独再开启一个新的线程?
 8
 9 #import "YYViewController.h"
10
11 @interface YYViewController ()
12
13 @end
14
15 @implementation YYViewController
16
17 - (void)viewDidLoad
18 {
19     [super viewDidLoad];
20     //开启一个后台线程,调用执行test方法
21     [self performSelectorInBackground:@selector(test) withObject:nil];
22 }
23
24 -(void)test
25 {
26     NSLog(@"当前线程---%@",[NSThread currentThread]);
27     dispatch_queue_t queue = dispatch_get_global_queue(DISPATCH_QUEUE_PRIORITY_DEFAULT, 0);
28
29     //异步函数
30     dispatch_async(queue, ^{
31         NSLog(@"任务1所在的线程----%@",[NSThread currentThread]);
32     });
33
34     //同步函数
35     dispatch_sync(queue, ^{
36         NSLog(@"任务2所在的线程----%@",[NSThread currentThread]);
37     });
38 }
39
40 @end
打印结果:

2.开启子线程,加载图片
 9 #import "YYViewController.h"
10
11 @interface YYViewController ()
12 @property (weak, nonatomic) IBOutlet UIImageView *imageView;
13
14 @end
15
16 @implementation YYViewController
17
18 - (void)viewDidLoad
19 {
20     [super viewDidLoad];
21
22 }
23
24 //当手指触摸屏幕的时候,从网络上下载一张图片到控制器的view上显示
25 -(void)touchesBegan:(NSSet *)touches withEvent:(UIEvent *)event
26 {
27
28     //1.获取一个全局串行队列
29     dispatch_queue_t queue = dispatch_get_global_queue(DISPATCH_QUEUE_PRIORITY_DEFAULT, 0);
30     //2.把任务添加到队列中执行
31     dispatch_async(queue, ^{
32
33         //打印当前线程
34         NSLog(@"%@",[NSThread currentThread]);
35       //3.从网络上下载图片
36         NSURL *urlstr=[NSURL URLWithString:@"http://h.hiphotos.baidu.com/baike/w%3D268/sign=30b3fb747b310a55c424d9f28f444387/1e30e924b899a9018b8d3ab11f950a7b0308f5f9.jpg"];
37         NSData *data=[NSData dataWithContentsOfURL:urlstr];
38         UIImage *image=[UIImage imageWithData:data];
39         //提示
40         NSLog(@"图片加载完毕");
41
42         //4.回到主线程,展示图片
43         [self.imageView performSelectorOnMainThread:@selector(setImage:) withObject:image waitUntilDone:NO];
44     });
45 }
46
47 @end
显示效果:

打印结果:

要求使用GCD的方式,在子线程加载图片完毕后,主线程拿到加载的image刷新UI界面。
 9 #import "YYViewController.h"
10
11 @interface YYViewController ()
12 @property (weak, nonatomic) IBOutlet UIImageView *imageView;
13
14 @end
15
16 @implementation YYViewController
17
18 - (void)viewDidLoad
19 {
20     [super viewDidLoad];
21
22 }
23
24 //当手指触摸屏幕的时候,从网络上下载一张图片到控制器的view上显示
25 -(void)touchesBegan:(NSSet *)touches withEvent:(UIEvent *)event
26 {
27
28     //1.获取一个全局串行队列
29     dispatch_queue_t queue = dispatch_get_global_queue(DISPATCH_QUEUE_PRIORITY_DEFAULT, 0);
30     //2.把任务添加到队列中执行
31     dispatch_async(queue, ^{
32
33         //打印当前线程
34         NSLog(@"%@",[NSThread currentThread]);
35       //3.从网络上下载图片
36         NSURL *urlstr=[NSURL URLWithString:@"http://h.hiphotos.baidu.com/baike/w%3D268/sign=30b3fb747b310a55c424d9f28f444387/1e30e924b899a9018b8d3ab11f950a7b0308f5f9.jpg"];
37         NSData *data=[NSData dataWithContentsOfURL:urlstr];
38         UIImage *image=[UIImage imageWithData:data];
39         //提示
40         NSLog(@"图片加载完毕");
41
42         //4.回到主线程,展示图片
43 //        [self.imageView performSelectorOnMainThread:@selector(setImage:) withObject:image waitUntilDone:NO];
44         dispatch_async(dispatch_get_main_queue(), ^{
45             self.imageView.image=image;
46             //打印当前线程
47             NSLog(@"%@",[NSThread currentThread]);
48         });
49     });
50 }
51
52 @end
打印结果:

好处:子线程中得所有数据都可以直接拿到主线程中使用,更加的方便和直观。
三、线程间通信
GCD的常见用法
(1)调用NSObject的方法
[self performSelector:@selector(run) withObject:nil afterDelay:2.0];
// 2秒后再调用self的run方法
(2)使用GCD函数
dispatch_after(dispatch_time(DISPATCH_TIME_NOW, (int64_t)(2.0 * NSEC_PER_SEC)), dispatch_get_main_queue(), ^{
// 2秒后异步执行这里的代码...
});
2.说明
[self performSelector:@selector(run) withObject:nil afterDelay:3.0];
说明:在3秒钟之后,执行run函数
代码示例:
 9 #import "YYViewController.h"
10
11 @interface YYViewController ()
12
13 @end
14
15 @implementation YYViewController
16
17 - (void)viewDidLoad
18 {
19     [super viewDidLoad];
20     NSLog(@"打印线程----%@",[NSThread currentThread]);
21     //延迟执行
22     //第一种方法:延迟3秒钟调用run函数
23     [self performSelector:@selector(run) withObject:nil afterDelay:2.0];
24
25 }
26 -(void)run
27 {
28     NSLog(@"延迟执行----%@",[NSThread currentThread]);
29 }
30
31 -(void)touchesBegan:(NSSet *)touches withEvent:(UIEvent *)event
32 {
33     //在异步函数中执行
34     dispatch_queue_t queue = dispatch_queue_create("wendingding", 0);
35
36     dispatch_sync(queue, ^{
37         [self performSelector:@selector(test) withObject:nil afterDelay:1.0];
38     });
39     NSLog(@"异步函数");
40 }
41 -(void)test
42 {
43     NSLog(@"异步函数中延迟执行----%@",[NSThread currentThread]);
44 }
45 @end
说明:如果把该方法放在异步函数中执行,则方法不会被调用(BUG?)

dispatch_after(dispatch_time(DISPATCH_TIME_NOW, (int64_t)(5.0 * NSEC_PER_SEC)), dispatch_get_main_queue(), ^{
//延迟执行的方法
});
说明:在5秒钟之后,执行block中的代码段。
参数说明:

什么时间,执行这个队列中的这个任务。
代码示例:
 3 //  02-GCD常见使用(延迟执行2)
 4 //

 8
 9 #import "YYViewController.h"
10
11 @interface YYViewController ()
12
13 @end
14
15 @implementation YYViewController
16
17 - (void)viewDidLoad
18 {
19     [super viewDidLoad];
20
21     NSLog(@"打印当前线程---%@",  [NSThread currentThread]);
22
23     //延迟执行,第二种方式
24      //可以安排其线程(1),主队列
25      dispatch_queue_t queue= dispatch_get_main_queue();
26     dispatch_after(dispatch_time(DISPATCH_TIME_NOW, (int64_t)(5.0 * NSEC_PER_SEC)), queue, ^{
27         NSLog(@"主队列--延迟执行------%@",[NSThread currentThread]);
28     });
29
30     //可以安排其线程(2),并发队列
31     //1.获取全局并发队列
32     dispatch_queue_t queue1= dispatch_get_global_queue(DISPATCH_QUEUE_PRIORITY_DEFAULT, 0);
33     //2.计算任务执行的时间
34     dispatch_time_t when=dispatch_time(DISPATCH_TIME_NOW, (int64_t)(5.0 * NSEC_PER_SEC));
35     //3.会在when这个时间点,执行queue中的这个任务
36     dispatch_after(when, queue1, ^{
37         NSLog(@"并发队列-延迟执行------%@",[NSThread currentThread]);
38     });
39 }
40
41 @end

延迟执行:不需要再写方法,且它还传递了一个队列,我们可以指定并安排其线程。
如果队列是主队列,那么就在主线程执行,如果队列是并发队列,那么会新开启一个线程,在子线程中执行。
二、一次性代码
1.实现一次性代码
需求:点击控制器只有第一次点击的时候才打印。
实现代码:
 9 #import "YYViewController.h"
10
11 @interface YYViewController ()
12 @property(nonatomic,assign) BOOL log;
13 @end
14
15 @implementation YYViewController
16
17 -(void)touchesBegan:(NSSet *)touches withEvent:(UIEvent *)event
18 {
19     if (_log==NO) {
20         NSLog(@"该行代码只执行一次");
21         _log=YES;
22     }
23 }
24 @end
缺点:这是一个对象方法,如果又创建一个新的控制器,那么打印代码又会执行,因为每个新创建的控制器都有自己的布尔类型,且新创建的默认为NO,因此不能保证改行代码在整个程序中只打印一次。
2.使用dispatch_once一次性代码
使用dispatch_once函数能保证某段代码在程序运行过程中只被执行1次
static dispatch_once_t onceToken;
dispatch_once(&onceToken, ^{
// 只执行1次的代码(这里面默认是线程安全的)
});
整个程序运行过程中,只会执行一次。
代码示例:
 1 //
 2 //
 3 //  03-GCD常见使用(一次性代码)
 4 //
 5 //
 6 //
 7 //
 8
 9 #import "YYViewController.h"
10
11 @interface YYViewController ()
12 @property(nonatomic,assign) BOOL log;
13 @end
14
15 @implementation YYViewController
16
17 //-(void)touchesBegan:(NSSet *)touches withEvent:(UIEvent *)event
18 //{
19 //    if (_log==NO) {
20 //        NSLog(@"该行代码只执行一次");
21 //        _log=YES;
22 //    }
23 //}
24
25 -(void)touchesBegan:(NSSet *)touches withEvent:(UIEvent *)event
26 {
27     static dispatch_once_t onceToken;
28     dispatch_once(&onceToken, ^{
29         NSLog(@"该行代码只执行一次");
30     });
31 }
32 @end
效果(程序运行过程中,打印代码只会执行一次):
三、队列组
需求:从网络上下载两张图片,把两张图片合并成一张最终显示在view上。
1.第一种方法
代码示例:
 3 //  04-GCD基本使用(队列组下载图片)

 8
 9 #import "YYViewController.h"
10 //宏定义全局并发队列
11 #define global_quque    dispatch_get_global_queue(DISPATCH_QUEUE_PRIORITY_DEFAULT, 0)
12 //宏定义主队列
13 #define main_queue       dispatch_get_main_queue()
14
15 @interface YYViewController ()
16 @property (weak, nonatomic) IBOutlet UIImageView *imageView1;
17 @property (weak, nonatomic) IBOutlet UIImageView *imageView2;
18 @property (weak, nonatomic) IBOutlet UIImageView *imageView3;
19
20 @end
21
22 @implementation YYViewController
23
24 - (void)viewDidLoad
25 {
26     [super viewDidLoad];
27 }
28 -(void)touchesBegan:(NSSet *)touches withEvent:(UIEvent *)event
29 {
30     //获取全局并发队列
31 //    dispatch_queue_t queue= dispatch_get_global_queue(DISPATCH_QUEUE_PRIORITY_DEFAULT, 0);
32     //获取主队列
33 //    dispatch_queue_t queue= dispatch_get_main_queue();
34
35 //    图片1:http://d.hiphotos.baidu.com/baike/c0%3Dbaike80%2C5%2C5%2C80%2C26/sign=2b9a12172df5e0fefa1581533d095fcd/cefc1e178a82b9019115de3d738da9773912ef00.jpg
36 //    图片2:http://h.hiphotos.baidu.com/baike/c0%3Dbaike80%2C5%2C5%2C80%2C26/sign=f47fd63ca41ea8d39e2f7c56f6635b2b/1e30e924b899a9018b8d3ab11f950a7b0308f5f9.jpg
37     dispatch_async(global_quque, ^{
38         //下载图片1
39        UIImage *image1= [self imageWithUrl:@"http://d.hiphotos.baidu.com/baike/c0%3Dbaike80%2C5%2C5%2C80%2C26/sign=2b9a12172df5e0fefa1581533d095fcd/cefc1e178a82b9019115de3d738da9773912ef00.jpg"];
40         NSLog(@"图片1下载完成---%@",[NSThread currentThread]);
41
42         //下载图片2
43        UIImage *image2= [self imageWithUrl:@"http://h.hiphotos.baidu.com/baike/c0%3Dbaike80%2C5%2C5%2C80%2C26/sign=f47fd63ca41ea8d39e2f7c56f6635b2b/1e30e924b899a9018b8d3ab11f950a7b0308f5f9.jpg"];
44         NSLog(@"图片2下载完成---%@",[NSThread currentThread]);
45
46         //回到主线程显示图片
47         dispatch_async(main_queue, ^{
48              NSLog(@"显示图片---%@",[NSThread currentThread]);
49             self.imageView1.image=image1;
50             self.imageView2.image=image2;
51             //合并两张图片
52             UIGraphicsBeginImageContextWithOptions(CGSizeMake(200, 100), NO, 0.0);
53             [image1 drawInRect:CGRectMake(0, 0, 100, 100)];
54             [image2 drawInRect:CGRectMake(100, 0, 100, 100)];
55             self.imageView3.image=UIGraphicsGetImageFromCurrentImageContext();
56             //关闭上下文
57             UIGraphicsEndImageContext();
58                NSLog(@"图片合并完成---%@",[NSThread currentThread]);
59         });
60         //
61     });
62 }
63
64 //封装一个方法,传入一个url参数,返回一张网络上下载的图片
65 -(UIImage *)imageWithUrl:(NSString *)urlStr
66 {
67     NSURL *url=[NSURL URLWithString:urlStr];
68     NSData *data=[NSData dataWithContentsOfURL:url];
69     UIImage *image=[UIImage imageWithData:data];
70     return image;
71 }
72 @end
显示效果:
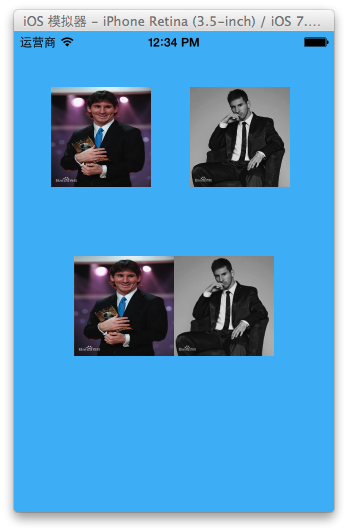
打印查看:

问题:这种方式的效率不高,需要等到图片1.图片2都下载完成后才行。
提示:使用队列组可以让图片1和图片2的下载任务同时进行,且当两个下载任务都完成的时候回到主线程进行显示。
2.使用队列组解决
步骤:
创建一个组
开启一个任务下载图片1
开启一个任务下载图片2
同时执行下载图片1\下载图片2操作
等group中的所有任务都执行完毕, 再回到主线程执行其他操作
代码示例
  8
  9 #import "YYViewController.h"
 10 //宏定义全局并发队列
 11 #define global_quque    dispatch_get_global_queue(DISPATCH_QUEUE_PRIORITY_DEFAULT, 0)
 12 //宏定义主队列
 13 #define main_queue       dispatch_get_main_queue()
 14
 15 @interface YYViewController ()
 16 @property (weak, nonatomic) IBOutlet UIImageView *imageView1;
 17 @property (weak, nonatomic) IBOutlet UIImageView *imageView2;
 18 @property (weak, nonatomic) IBOutlet UIImageView *imageView3;
 19
 20 @end
 21
 22 @implementation YYViewController
 23
 24 - (void)viewDidLoad
 25 {
 26     [super viewDidLoad];
 27 }
 28 -(void)touchesBegan:(NSSet *)touches withEvent:(UIEvent *)event
 29 {
 30     //    图片1:http://d.hiphotos.baidu.com/baike/c0%3Dbaike80%2C5%2C5%2C80%2C26/sign=2b9a12172df5e0fefa1581533d095fcd/cefc1e178a82b9019115de3d738da9773912ef00.jpg
 31     //    图片2:http://h.hiphotos.baidu.com/baike/c0%3Dbaike80%2C5%2C5%2C80%2C26/sign=f47fd63ca41ea8d39e2f7c56f6635b2b/1e30e924b899a9018b8d3ab11f950a7b0308f5f9.jpg
 32
 33
 34     //1.创建一个队列组
 35         dispatch_group_t group = dispatch_group_create();
 36
 37     //2.开启一个任务下载图片1
 38     __block UIImage *image1=nil;
 39     dispatch_group_async(group, global_quque, ^{
 40         image1= [self imageWithUrl:@"http://d.hiphotos.baidu.com/baike/c0%3Dbaike80%2C5%2C5%2C80%2C26/sign=2b9a12172df5e0fefa1581533d095fcd/cefc1e178a82b9019115de3d738da9773912ef00.jpg"];
 41         NSLog(@"图片1下载完成---%@",[NSThread currentThread]);
 42     });
 43
 44     //3.开启一个任务下载图片2
 45     __block UIImage *image2=nil;
 46     dispatch_group_async(group, global_quque, ^{
 47         image2= [self imageWithUrl:@"http://h.hiphotos.baidu.com/baike/c0%3Dbaike80%2C5%2C5%2C80%2C26/sign=f47fd63ca41ea8d39e2f7c56f6635b2b/1e30e924b899a9018b8d3ab11f950a7b0308f5f9.jpg"];
 48         NSLog(@"图片2下载完成---%@",[NSThread currentThread]);
 49     });
 50
 51     //同时执行下载图片1\下载图片2操作
 52
 53    //4.等group中的所有任务都执行完毕, 再回到主线程执行其他操作
 54     dispatch_group_notify(group,main_queue, ^{
 55         NSLog(@"显示图片---%@",[NSThread currentThread]);
 56         self.imageView1.image=image1;
 57         self.imageView2.image=image2;
 58
 59         //合并两张图片
 60         //注意最后一个参数是浮点数(0.0),不要写成0。
 61         UIGraphicsBeginImageContextWithOptions(CGSizeMake(200, 100), NO, 0.0);
 62         [image1 drawInRect:CGRectMake(0, 0, 100, 100)];
 63         [image2 drawInRect:CGRectMake(100, 0, 100, 100)];
 64         self.imageView3.image=UIGraphicsGetImageFromCurrentImageContext();
 65         //关闭上下文
 66         UIGraphicsEndImageContext();
 67
 68         NSLog(@"图片合并完成---%@",[NSThread currentThread]);
 69     });
 70
 71 }
 72 -(void)download2image
 73 {
 74     //获取全局并发队列
 75 //    dispatch_queue_t queue= dispatch_get_global_queue(DISPATCH_QUEUE_PRIORITY_DEFAULT, 0);
 76     //获取主队列
 77 //    dispatch_queue_t queue= dispatch_get_main_queue();
 78
 79     dispatch_async(global_quque, ^{
 80         //下载图片1
 81        UIImage *image1= [self imageWithUrl:@"http://news.baidu.com/z/resource/r/image/2014-06-22/2a1009253cf9fc7c97893a4f0fe3a7b1.jpg"];
 82         NSLog(@"图片1下载完成---%@",[NSThread currentThread]);
 83
 84         //下载图片2
 85        UIImage *image2= [self imageWithUrl:@"http://news.baidu.com/z/resource/r/image/2014-06-22/2a1009253cf9fc7c97893a4f0fe3a7b1.jpg"];
 86         NSLog(@"图片2下载完成---%@",[NSThread currentThread]);
 87
 88         //回到主线程显示图片
 89         dispatch_async(main_queue, ^{
 90              NSLog(@"显示图片---%@",[NSThread currentThread]);
 91             self.imageView1.image=image1;
 92             self.imageView2.image=image2;
 93             //合并两张图片
 94             UIGraphicsBeginImageContextWithOptions(CGSizeMake(200, 100), NO, 0.0);
 95             [image1 drawInRect:CGRectMake(0, 0, 100, 100)];
 96             [image2 drawInRect:CGRectMake(0, 0, 100, 100)];
 97             self.imageView3.image=UIGraphicsGetImageFromCurrentImageContext();
 98             //关闭上下文
 99             UIGraphicsEndImageContext();
100                NSLog(@"图片合并完成---%@",[NSThread currentThread]);
101         });
102         //
103     });
104 }
105
106 //封装一个方法,传入一个url参数,返回一张网络上下载的图片
107 -(UIImage *)imageWithUrl:(NSString *)urlStr
108 {
109     NSURL *url=[NSURL URLWithString:urlStr];
110     NSData *data=[NSData dataWithContentsOfURL:url];
111     UIImage *image=[UIImage imageWithData:data];
112     return image;
113 }
114 @end
打印查看(同时开启了两个子线程,分别下载图片):

2.补充说明
有这么1种需求:
首先:分别异步执行2个耗时的操作
其次:等2个异步操作都执行完毕后,再回到主线程执行操作
如果想要快速高效地实现上述需求,可以考虑用队列组
dispatch_group_t group = dispatch_group_create();
dispatch_group_async(group, dispatch_get_global_queue(DISPATCH_QUEUE_PRIORITY_DEFAULT, 0), ^{
// 执行1个耗时的异步操作
});
dispatch_group_async(group, dispatch_get_global_queue(DISPATCH_QUEUE_PRIORITY_DEFAULT, 0), ^{
// 执行1个耗时的异步操作
});
dispatch_group_notify(group, dispatch_get_main_queue(), ^{
// 等前面的异步操作都执行完毕后,回到主线程...
});

 浙公网安备 33010602011771号