
7 多条件登录极验验证码的接入
多条件登录
JWT扩展的登录视图,在收到用户名与密码时,也是调用Django的认证系统中提供的authenticate()来检查用户名与密码是否正确。
我们可以通过修改Django认证系统的认证后端(主要是authenticate方法)来支持登录账号既可以是用户名也可以是手机号。
修改Django认证系统的认证后端需要继承django.contrib.auth.backends.ModelBackend,并重写authenticate方法。
authenticate(self, request, username=None, password=None, **kwargs)方法的参数说明:
-
request 本次认证的请求对象
-
username 本次认证提供的用户账号
-
password 本次认证提供的密码
我们想要让用户既可以以用户名登录,也可以以手机号登录,那么对于authenticate方法而言,username参数即表示用户名或者手机号。
重写authenticate方法的思路:
-
根据username参数查找用户User对象,username参数可能是用户名,也可能是手机号
-
若查找到User对象,调用User对象的check_password方法检查密码是否正确
在users/utils.py中编写:
def get_user_by_account(account):
    """
    根据帐号获取user对象
    :param account: 账号,可以是用户名,也可以是手机号
    :return: User对象 或者 None
    """
    try:
        if re.match('^1[3-9]\d{9}$', account):
            # 帐号为手机号
            user = User.objects.get(mobile=account)
        else:
            # 帐号为用户名
            user = User.objects.get(username=account)
    except User.DoesNotExist:
        return None
    else:
        return user


class UsernameMobileAuthBackend(ModelBackend):
    """
    自定义用户名或手机号认证
    """

    def authenticate(self, request, username=None, password=None, **kwargs):
        user = get_user_by_account(username)
        if user is not None and user.check_password(password):
            return user
在配置文件settings.py中告知Django使用我们自定义的认证后端:
AUTHENTICATION_BACKENDS = [
    'users.utils.UsernameMobileAuthBackend',
]
获取id,key

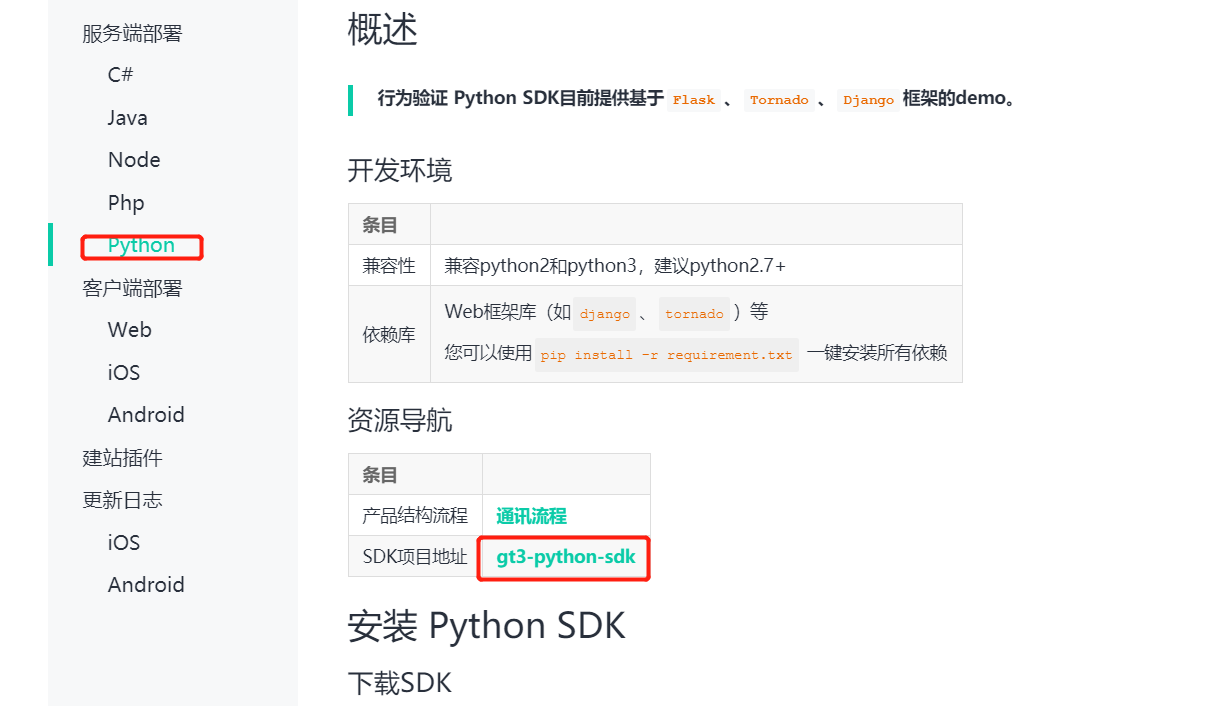
极验验证部署文档:
https://docs.geetest.com/install/deploy/server/python
里面的get 和post 方法进行相应的复制
下载包:
将

在users应用中的views.py, 创建基于极验验证 的验证码视图
from luffy.utils.geetest import GeetestLib
from rest_framework.views import APIView
from rest_framework.response import Response
# Create your views here.

class VerifyCode(APIView):
    def get(self,request):
        user_id = 'test'
        pc_geetest_id = "a9feefab99c8d4bbcf0d9e3021048312"
        pc_geetest_key = "aa467ab83be3c44929bc7da76eb88028"
        gt = GeetestLib(pc_geetest_id, pc_geetest_key)
        status = gt.pre_process(user_id, JSON_FORMAT=0, ip_address="127.0.0.1")
        if not status:
            status = 2
        request.session[gt.GT_STATUS_SESSION_KEY] = status
        request.session["user_id"] = user_id
        response_str = gt.get_response_str()
        print( response_str )
        return Response(response_str)

    def post(self,request):
        pc_geetest_id = "a9feefab99c8d4bbcf0d9e3021048312"
        pc_geetest_key = "aa467ab83be3c44929bc7da76eb88028"
        gt = GeetestLib(pc_geetest_id, pc_geetest_key)

        challenge = request.data.get(gt.FN_CHALLENGE, "")
        validate = request.data.get(gt.FN_VALIDATE, "")
        seccode = request.data.get(gt.FN_SECCODE, "")
        status = request.session[gt.GT_STATUS_SESSION_KEY]
        user_id = request.session["user_id"]
        if status == 1:
            result = gt.success_validate(challenge, validate, seccode, user_id, JSON_FORMAT=0)
        else:
            result = gt.failback_validate(challenge, validate, seccode)
            request.session["user_id"] = user_id
        return Response({{"message":result}})
配置访问路由users.urls:
from . import views
urlpatterns=[
   ....
    path(r'verify',views.VerifyCode.as_view()),
]
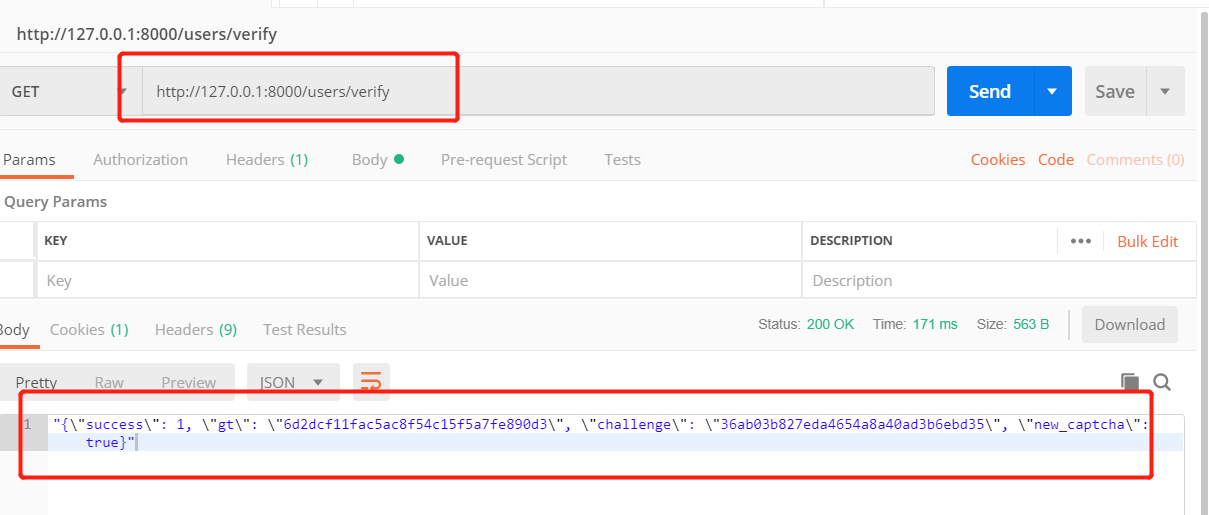
访问效果:
get:

2. 前端的登录页面中,login.vue
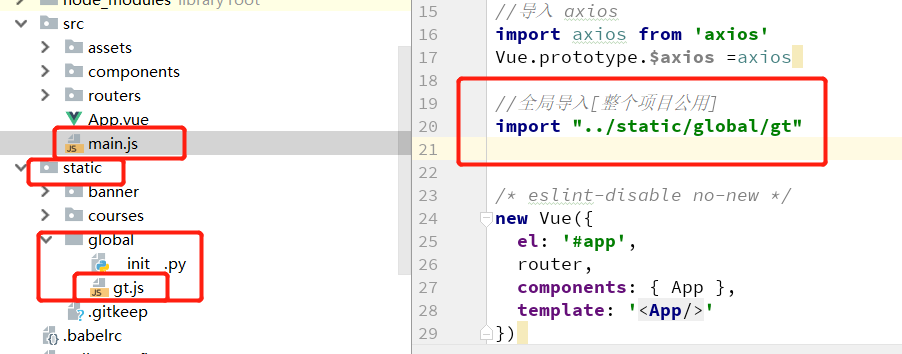
把下载验证码模块包中的gt.js放置到前端项目中,并在main.js中引入
在前端项目的static文件夹中创建一个global文件夹,把gt.js 放在该目录下。

把极验验证的外部文件gt.js 文件引入到main.js 中, 实现该文件的能在整个项目中公用。
在login.vue 中写短信识别验证码逻辑:
添加的逻辑代码部分:

 <style>

#geetest {
    margin-top: 20px;
  }
</style>
login.vue整体代码:


<template>
  <div class="login box">
    <img src="https://www.luffycity.com/static/img/Loginbg.3377d0c.jpg" alt="">
    <div class="login">
      <div class="login-title">
        <img src="https://www.luffycity.com/static/img/Logotitle.1ba5466.png" alt="">
        <p>帮助有志向的年轻人通过努力学习获得体面的工作和生活!</p>
      </div>
      <div class="login_box">
        <div class="title">
          <span @click="login_type=1" :class="login_type==1?'current':''">密码登录</span>
          <span @click="login_type=2" :class="login_type==2?'current':''">短信登录</span>
        </div>
        <div class="inp" :class="login_type==1?'show':''">
          <input v-model='username' type="text" placeholder="用户名 / 手机号码" class="user">
          <input v-model='password' type="password" name="" class="pwd" placeholder="密码">
          <div id="geetest"></div>
          <div class="rember">
            <p>
              <input type="checkbox" class="no" name="a" v-model="remmber" ></input>
              <span>记住密码</span>
            </p>
            <p>忘记密码</p>
          </div>
          <button class="login_btn" @click="loginheader">登录</button>
          <p class="go_login">没有账号 <span>立即注册</span></p>
        </div>
        <div class="inp" :class="login_type==2?'show':''">
          <input v-model='username' type="text" placeholder="手机号码" class="user">
          <input v-model='password' type="password" name="" class="pwd" placeholder="短信验证码">
          <div class="rember">
            <p>
              <input type="checkbox" class="no" name="a" v-model="remmber"></input>
              <span>记住密码</span>
            </p>
            <p>忘记密码</p>
          </div>
          <button class="login_btn" >登录</button>
          <p class="go_login">没有账号 <span>立即注册</span></p>
        </div>
      </div>
    </div>
  </div>
</template>

<script>
  export default {
    name: "Login",
    data() {
      return {
        remmber:false,//是否记住密码
        login_type: 1,//登录方式,短信登录还是密码登录
        username: "",// 登录账号
        password: "",// 登录密码
        mobile: "",//手机号码
        sms: "",// 手机短信验证码
        validateResult:false,
      }
    },

    methods:{
      loginheader:function () {
        //登录函数
        this.$axios.post('http://127.0.0.1:8000/users/login',{
          'username':this.username,
          'password':this.password},{responseType:'json'}
          ).then(
          response=>{
            //请求成功,保存登录状态
            console.log(response);
            //当要记住密码时:
            if (this.remmber){
              // 记住密码时
              let data = response.data;
              localStorage.token=data.token;
              localStorage.id=data.id;
              localStorage.username=data.username;
            }else {
              //不记住密码
              localStorage.removeItem('token');
              let data = response.data;
              sessionStorage.token=data.token;
              sessionStorage.id=data.id;
              sessionStorage.username=data.username;
            }
             //登录成功之后跳转页面
          this.$router.go(-1);// 跳转到之前的访问页面
            // this.$router.push('/home') // 或者跳转到首页
          }

        ).catch(error=>{
          console.log(error)
        })
      },
        handlerPopup(captchaObj){
        // 成功的回调
        let _this = this;
        captchaObj.onSuccess(function () {
            var validate = captchaObj.getValidate();
            _this.$axios.post("http://127.0.0.1:8000/users/verify",{
                    geetest_challenge: validate.geetest_challenge,
                    geetest_validate: validate.geetest_validate,
                    geetest_seccode: validate.geetest_seccode
                },{
                  responseType:"json",
            }).then(response=>{
              // 请求成功
              console.log(response);
              console.log(response.data);  // 获取验证结果
            }).catch(error=>{
              // 请求失败
              console.log(error)
            })
        });
        // $("#popup-submit").click(function () {
        //     captchaObj.show();
        // });
        // 将验证码加到id为captcha的元素里
        captchaObj.appendTo("#geetest");
      }

    },
    created(){
      //极验验证
      this.$axios.get('http://127.0.0.1:8000/users/verify',{responseType:'json',
      }).then(response=>{
        //请求成功
        let data = response.data;
        console.log(data)
        // console.log(typeof data)   data为一个对象
        //使用initGeetest 接口
        // 参数1 配置参数
        // 参数2  回调,回调的第一个参数验证码对象,之后可以使用它做appendto之类的事件

        console.log(data);

        initGeetest({
              gt: data.gt,
                challenge: data.challenge,
                product: "embed", // 产品形式,包括:float,embed,popup。注意只对PC版验证码有效
                offline: !data.success // 表示用户后台检测极验服务器是否宕机,一般不需要关注
                // 更多配置参数请参见:http://www.geetest.com/install/sections/idx-client-sdk.html#config
            }, this.handlerPopup);


    }).catch(error=>{
      console.log(error);
      })

    },
    components: {},


  }
</script>

<style scoped>
  .box {
    width: 100%;
    position: relative;

  }

  .box img {
    width: 100%;
  }

  .box .login {
    position: absolute;
    width: 500px;
    height: 400px;
    top: 50%;
    left: 50%;
    margin-left: -250px;
    margin-top: -300px;
  }

  .login .login-title {
    width: 100%;
    text-align: center;
  }

  .login-title img {
    width: 190px;
    height: auto;
  }

  .login-title p {
    font-family: PingFangSC-Regular;
    font-size: 18px;
    color: #fff;
    letter-spacing: .29px;
    padding-top: 10px;
    padding-bottom: 50px;
  }

  .login_box {
    width: 400px;
    height: auto;
    background: #fff;
    box-shadow: 0 2px 4px 0 rgba(0, 0, 0, .5);
    border-radius: 4px;
    margin: 0 auto;
    padding-bottom: 40px;
  }

  .login_box .title {
    font-size: 20px;
    color: #9b9b9b;
    letter-spacing: .32px;
    border-bottom: 1px solid #e6e6e6;
    display: flex;
    justify-content: space-around;
    padding: 50px 60px 0 60px;
    margin-bottom: 20px;
    cursor: pointer;
  }

  .login_box .title .current {
    color: #4a4a4a;
    border-bottom: 2px solid #84cc39;
  }

  .inp {
    width: 350px;
    margin: 0 auto;
    display: none;
  }

  .show {
    display: block;
  }

  .inp input {
    border: 0;
    outline: 0;
    width: 100%;
    height: 45px;
    border-radius: 4px;
    border: 1px solid #d9d9d9;
    text-indent: 20px;
    font-size: 14px;
    background: #fff !important;
  }

  .inp input.user {
    margin-bottom: 16px;
  }

  .inp .rember {
    display: flex;
    justify-content: space-between;
    align-items: center;
    position: relative;
    margin-top: 10px;
  }

  .inp .rember p:first-of-type {
    font-size: 12px;
    color: #4a4a4a;
    letter-spacing: .19px;
    margin-left: 22px;
    display: -ms-flexbox;
    display: flex;
    -ms-flex-align: center;
    align-items: center;
    /*position: relative;*/
  }

  .inp .rember p:nth-of-type(2) {
    font-size: 14px;
    color: #9b9b9b;
    letter-spacing: .19px;
    cursor: pointer;
  }

  .inp .rember input {
    outline: 0;
    width: 30px;
    height: 45px;
    border-radius: 4px;
    border: 1px solid #d9d9d9;
    text-indent: 20px;
    font-size: 14px;
    background: #fff !important;
  }

  .inp .rember p span {
    display: inline-block;
    font-size: 12px;
    width: 100px;
    /*position: absolute;*/
    /*left: 20px;*/

  }

  #geetest {
    margin-top: 20px;
  }

  .login_btn {
    width: 100%;
    height: 45px;
    background: #84cc39;
    border-radius: 5px;
    font-size: 16px;
    color: #fff;
    letter-spacing: .26px;
    margin-top: 30px;
  }

  .inp .go_login {
    text-align: center;
    font-size: 14px;
    color: #9b9b9b;
    letter-spacing: .26px;
    padding-top: 20px;
  }

  .inp .go_login span {
    color: #84cc39;
    cursor: pointer;
  }

</style>
验证成功后:
服务端可能会报错:
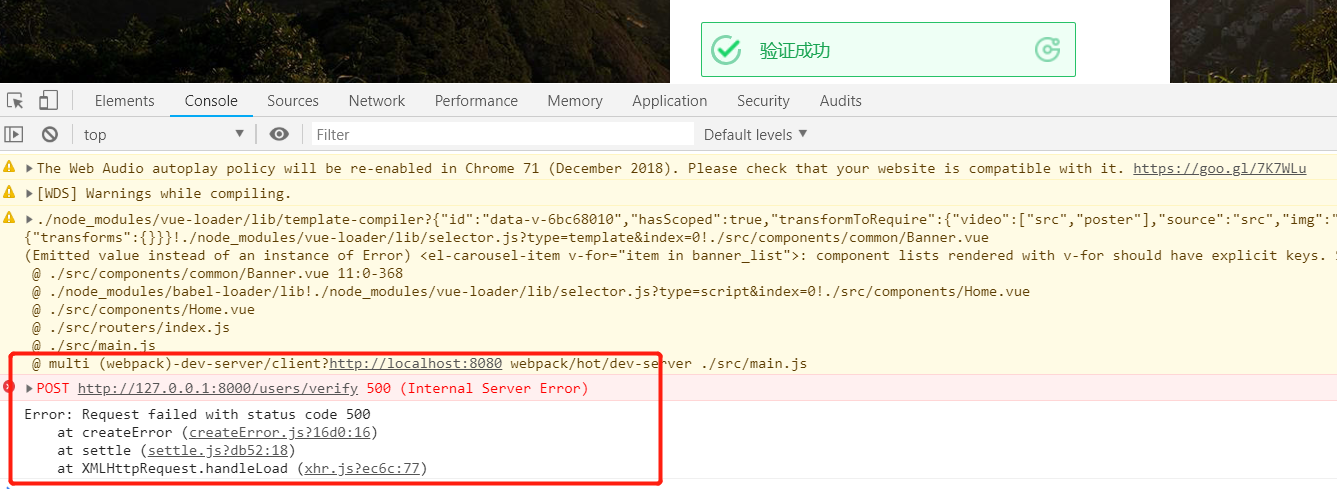
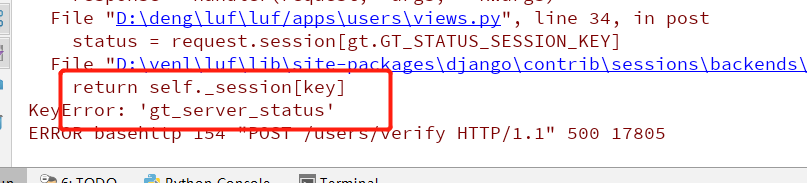
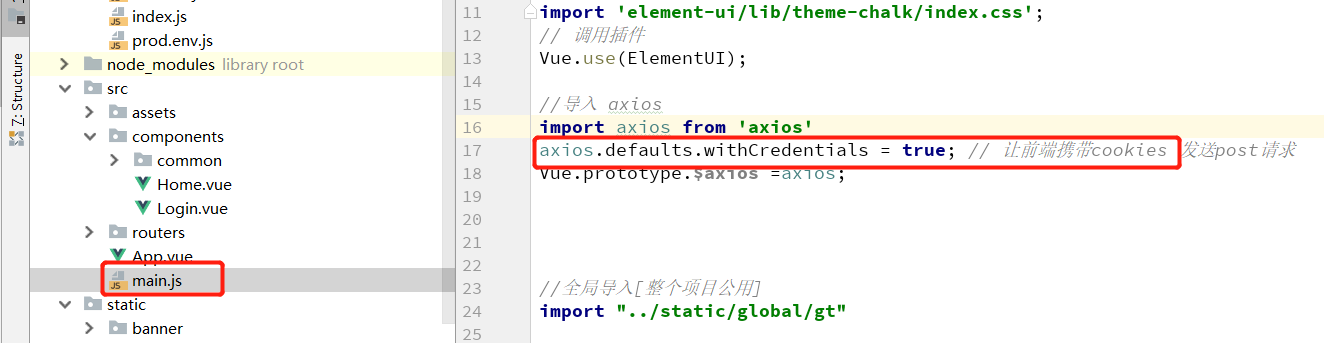
报错的原因是 ajax 发送post 的请求,前端需要携带cookies 。所以前端项目main.js文件中需要配置:
import axios from 'axios'
axios.defaults.withCredentials = true; // 让前端携带cookies 发送post请求
前端显示注册页面并调整首页头部和登陆页面的注册按钮的链接。
前端
1.注册页面Register,主要是通过登录页面进行改成而成。
<template>
    <div class="box">
        <img src="https://www.luffycity.com/static/img/Loginbg.3377d0c.jpg" alt="">
        <div class="register">
            <div class="register_box">
        <div class="register-title">注册路飞学城</div>
                <div class="inp">
                    <input v-model = "mobile" type="text" placeholder="手机号码" class="user">
                    <div id="geetest"></div>
                    <input v-model = "sms" type="text" placeholder="输入验证码" class="user">
                    <button class="register_btn" >注册</button>
                    <p class="go_login" >已有账号 <router-link to="/login">直接登录</router-link></p>
                </div>
            </div>
        </div>
    </div>
</template>

<script>
export default {
  name: 'Register',
  data(){
    return {
        sms:"",
        mobile:"",
        validateResult:false,
    }
  },
  created(){
  },
  methods:{},

};
</script>

<style scoped>
.box{
    width: 100%;
  height: 100%;
    position: relative;
  overflow: hidden;
}
.box img{
    width: 100%;
  min-height: 100%;
}
.box .register {
    position: absolute;
    width: 500px;
    height: 400px;
    top: 0;
    left: 0;
  margin: auto;
  right: 0;
  bottom: 0;
  top: -338px;
}
.register .register-title{
    width: 100%;
    font-size: 24px;
    text-align: center;
    padding-top: 30px;
    padding-bottom: 30px;
    color: #4a4a4a;
    letter-spacing: .39px;
}
.register-title img{
    width: 190px;
    height: auto;
}
.register-title p{
    font-family: PingFangSC-Regular;
    font-size: 18px;
    color: #fff;
    letter-spacing: .29px;
    padding-top: 10px;
    padding-bottom: 50px;
}
.register_box{
    width: 400px;
    height: auto;
    background: #fff;
    box-shadow: 0 2px 4px 0 rgba(0,0,0,.5);
    border-radius: 4px;
    margin: 0 auto;
    padding-bottom: 40px;
}
.register_box .title{
    font-size: 20px;
    color: #9b9b9b;
    letter-spacing: .32px;
    border-bottom: 1px solid #e6e6e6;
     display: flex;
        justify-content: space-around;
        padding: 50px 60px 0 60px;
        margin-bottom: 20px;
        cursor: pointer;
}
.register_box .title span:nth-of-type(1){
    color: #4a4a4a;
        border-bottom: 2px solid #84cc39;
}

.inp{
    width: 350px;
    margin: 0 auto;
}
.inp input{
    border: 0;
    outline: 0;
    width: 100%;
    height: 45px;
    border-radius: 4px;
    border: 1px solid #d9d9d9;
    text-indent: 20px;
    font-size: 14px;
    background: #fff !important;
}
.inp input.user{
    margin-bottom: 16px;
}
.inp .rember{
     display: flex;
    justify-content: space-between;
    align-items: center;
    position: relative;
    margin-top: 10px;
}
.inp .rember p:first-of-type{
    font-size: 12px;
    color: #4a4a4a;
    letter-spacing: .19px;
    margin-left: 22px;
    display: -ms-flexbox;
    display: flex;
    -ms-flex-align: center;
    align-items: center;
    /*position: relative;*/
}
.inp .rember p:nth-of-type(2){
    font-size: 14px;
    color: #9b9b9b;
    letter-spacing: .19px;
    cursor: pointer;
}

.inp .rember input{
    outline: 0;
    width: 30px;
    height: 45px;
    border-radius: 4px;
    border: 1px solid #d9d9d9;
    text-indent: 20px;
    font-size: 14px;
    background: #fff !important;
}

.inp .rember p span{
    display: inline-block;
  font-size: 12px;
  width: 100px;
  /*position: absolute;*/
/*left: 20px;*/

}
#geetest{
    margin-top: 20px;
}
.register_btn{
     width: 100%;
    height: 45px;
    background: #84cc39;
    border-radius: 5px;
    font-size: 16px;
    color: #fff;
    letter-spacing: .26px;
    margin-top: 30px;
}
.inp .go_login{
    text-align: center;
    font-size: 14px;
    color: #9b9b9b;
    letter-spacing: .26px;
    padding-top: 20px;
}
.inp .go_login span{
    color: #84cc39;
    cursor: pointer;
}
</style>
2. 注册路由
import Register from "../components/Register"

// 配置路由列表
export default new Router({
  mode:"history",
  routes:[
    // 路由列表
    ...
    {
      name:"Register",
      path: "/register",
      component:Register,
    }
  ]
})
3.修改首页头部的连接:
# Header.vue
<span class="header-register"><router-link to="/register">注册</router-link></span>
#Login.vue
<p class="go_login" >没有账号 <router-link to="/register">立即注册</router-link></p>
接下来,把注册过程中一些注册信息(例如:短信验证码)和session缓存到redis数据库中。
1.安装django-redis。
pip install django-redis
2.在settings.py配置中添加一下代码:
# 设置redis缓存
CACHES = {
    # 默认缓存
    "default": {
        "BACKEND": "django_redis.cache.RedisCache",
        # 项目上线时,需要调整这里的路径
        "LOCATION": "redis://127.0.0.1:6379/0",

        "OPTIONS": {
            "CLIENT_CLASS": "django_redis.client.DefaultClient",
        }
    },
    # 提供给xadmin或者admin的session存储
    "session": {
        "BACKEND": "django_redis.cache.RedisCache",
        "LOCATION": "redis://127.0.0.1:6379/1",
        "OPTIONS": {
            "CLIENT_CLASS": "django_redis.client.DefaultClient",
        }
    },
    # 提供存储短信验证码
    "sms_code":{
        "BACKEND": "django_redis.cache.RedisCache",
        "LOCATION": "redis://127.0.0.1:6379/2",
        "OPTIONS": {
            "CLIENT_CLASS": "django_redis.client.DefaultClient",
        }
    }
}

# 设置xadmin用户登录时,登录信息session保存到redis
SESSION_ENGINE = "django.contrib.sessions.backends.cache"
SESSION_CACHE_ALIAS = "session"
关于django-redis 的使用,说明文档可见http://django-redis-chs.readthedocs.io/zh_CN/latest/
django-redis提供了get_redis_connection的方法,通过调用get_redis_connection方法传递redis的配置名称可获取到redis的连接对象,
通过redis连接对象可以执行redis命令
from django_redis import get_redis_connection
// 链接redis数据库
redis_conn = get_redis_connection("default")
ACCOUNT SID:8aaf0708697b6beb01699f4442911776
AUTH TOKEN : b4dea244f43a4e0f90e557f0a99c70fa
AppID(默认):8aaf0708697b6beb01699f4442e3177c
Rest URL(生产): app.cloopen.com:8883         [项目上线时使用真实短信发送服务器]
Rest URL(开发): sandboxapp.cloopen.com:8883  [项目开发时使用沙箱短信发送服务器]
1. 下载

下载云通信 官方提供的包, 将软件包存放在项目lib文件夹中,并对其中的sms.py 进行相应的配置

后端短信验证码的实现:
1.后端视图接口:
知识点:短信验证码
1. 使用云通讯 短信接口
2. 后端是视图 :
redis 的使用 以及redis 存多个数据时使用到了pipeline 管道
视图判断逻辑:
1.是否该手机号已经注册过,通过查询字符串的方式 get 方法中 mobile = request.query_params.get('mobile')
2. 判断发送请求, 在一分钟内是否多次发送短信请求 从redis 中查数据
3. 如何手机号是第一次注册, 后端生成随机码,sms_code = '%04d'%random.randint(0,9999),调用云通讯接口给手机发送短信。
4. 如果调用接口发送短信成功 , 那么就将信息存入redis 数据库,需要存多个值,就可以用管道。redis=get_redis_connection('sms_code')
1.user/views.py 中:
class SMSCodeAPIView(APIView):
    '''
    短信验证
    '''
    def get(self,request):

        # 1 生成短信验证码
        #1 通过查询字符串获取手机号
        mobile = request.query_params.get('mobile')
        # 2 发送短信之前验证一下手机号
        # 校验手机号是否已经被注册过
        try:
            User.objects.get(mobile=mobile)
            return Response({'message':'当前手机号已经被注册过'},status=status.HTTP_400_BAD_REQUEST)

        except:
            pass
        redis=get_redis_connection('sms_code')
        # 判断是否连续重复发送了短信
        if redis.get('times_%s'%mobile):
            return Response({'message':'当前手机号已经在一分钟之后发过信息了',},status=status.HTTP_400_BAD_REQUEST)
        # 使用手机号发送短信验证码
        # 生成一个短信验证码
        sms_code = '%04d'%random.randint(0,9999)
        ccp = CCP()
        result = ccp.send_template_sms(mobile,[sms_code,'5分钟有效'],1)

        if result==0: # result -1 表示请求失败
            # 发送短信成功,保存验证码到redis数据库
            # 开启管道操作
            p1 = redis.pipeline()
            # 在管道中执行多条命令
            p1.multi()
            # setex(变量名,有效期[秒],值)
            SMS_EXPIRE_TIME = 5*60 # 短信验证码的有效期
            SMS_TIMES = 60 # 短信发送的间隔时间
            # 把原来立即执行的命令放置在管道中
            p1.setex('sms_%s'%mobile,SMS_EXPIRE_TIME,SMS_TIMES)
            p1.setex('times_%s'%mobile,SMS_TIMES,1)

            #统一执行管道中的命令
            p1.execute()
            #  响应数据给客户端
        return Response({'message':result},status=status.HTTP_200_OK)
2. users.py 子路由中:
from django.urls import path

# jwt 内部实现的登录视图
from rest_framework_jwt.views import obtain_jwt_token
from . import views
urlpatterns=[
    path(r'login',obtain_jwt_token,name='login'),
    path(r'user',views.UserAPIView.as_view()),
    path(r'code',views.SMSCodeAPIView.as_view()),
]
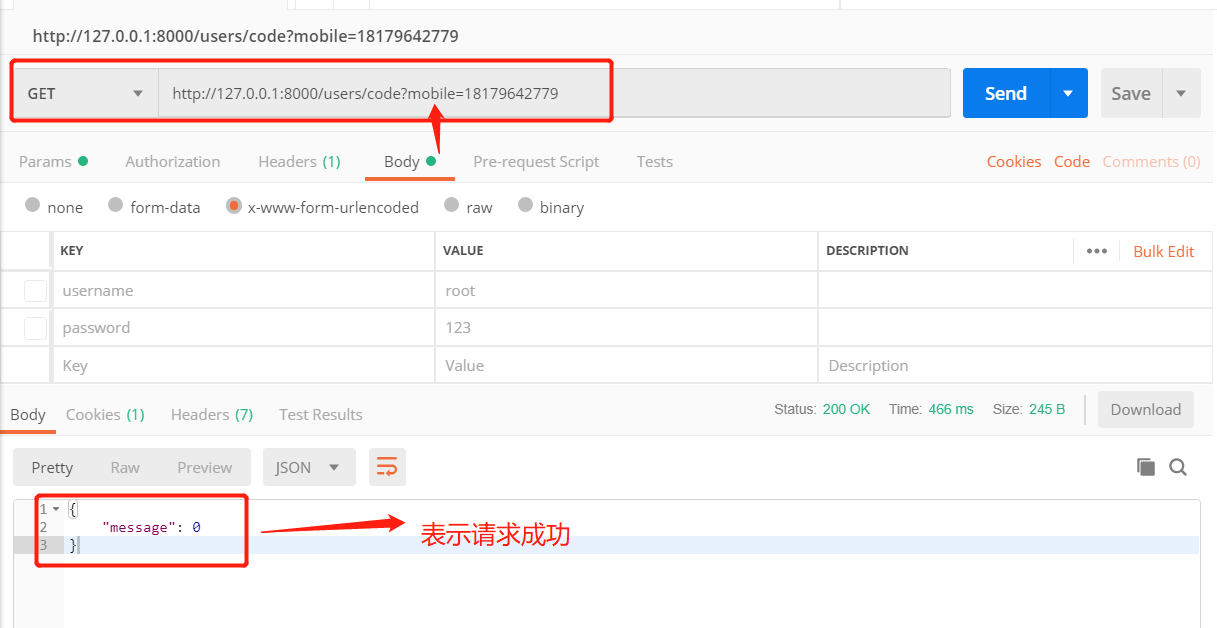
3. postman进行访问
访问地址:http://127.0.0.1:8000/users/code?mobile=18179642779
手机收到短信:


 浙公网安备 33010602011771号