
Python下操作Memcache/Redis/RabbitMQ说明
一、Memcache
Memcache是一套分布式的高速缓存系统,由LiveJournal的Brad Fitzpatrick开发,但目前被许多网站使用以提升网站的访问速度,尤其对于一些大型的、需要频繁访问数据库的网站访问速度提升效果十分显著。
MemCache的工作流程如下:
先检查客户端请求数据是否在memcached中,如有,直接把请求数据返回,不再对数据库进行任何操作;如果请求的数据不在memcached中,就去查数据库,把从数据库中获取的数据返回给客户端,同时把数据缓存一份到memcached中(memcached客户端不负责,需要程序明确实现);每次更新数据库的同时更新memcached中的数据,保证一致性;当分配给memcached内存空间用完之后,会使用LRU(Least Recently Used,最近最少使用)策略加上到期失效策略,失效数据首先被替换,然后再替换掉最近未使用的数据。
Memcache是一个高性能的分布式的内存对象缓存系统,通过在内存里维护一个统一的巨大的hash表,它能够用来存储各种格式的数据,包括图像、视频、文件以及数据库检索的结果等。简单的说就是将数据调用到内存中,然后从内存中读取,从而大大提高读取速度。
Memcached是以守护程序(监听)方式运行于一个或多个服务器中,随时会接收客户端的连接和操作,特性如下:
- 在Memcached中可以保存的item数据量是没有限制的,只要内存足够 。
- Memcached单进程在32位系统中最大使用内存为2G,若在64位系统则没有限制,这是由于32位系统限制单进程最多可使用2G内存,要使用更多内存,可以分多个端口开启多个 Memcached进程 ,
- 最大30天的数据过期时间,设置为永久的也会在这个时间过期,常量REALTIME_MAXDELTA
- 60*60*24*30控制
- 最大键长为250字节,大于该长度无法存储,常量KEY_MAX_LENGTH 250控制
- 单个item最大数据是1MB,超过1MB数据不予存储,常量POWER_BLOCK 1048576进行控制,
- 它是默认的slab大小
- 最大同时连接数是200,通过 conn_init()中的freetotal进行控制,最大软连接数是1024,通过 settings.maxconns=1024 进行控制
- 跟空间占用相关的参数:settings.factor=1.25, settings.chunk_size=48, 影响slab的数据占用和步进方式
memcached是一种无阻塞的socket通信方式服务,基于libevent库,由于无阻塞通信,对内存读写速度非常之快。
memcached分服务器端和客户端,可以配置多个服务器端和客户端,应用于分布式的服务非常广泛。
memcached作为小规模的数据分布式平台是十分有效果的。
memcached是键值一一对应,key默认最大不能超过128个字 节,value默认大小是1M,也就是一个slabs,如果要存2M的值(连续的),不能用两个slabs,因为两个slabs不是连续的,无法在内存中 存储,故需要修改slabs的大小,多个key和value进行存储时,即使这个slabs没有利用完,那么也不会存放别的数据。
memcached已经可以支持C/C++、Perl、PHP、Python、Ruby、Java、C#、Postgres、Chicken Scheme、Lua、MySQL和Protocol等语言客户端。
Memcache的安装
[root@linux-node1 ~]#  yum install libevent-devel -y
[root@linux-node1 ~]#  yum install memcached -y
Memcache的 启动
[root@linux-node1 ~]# memcached -d -m 10 -u root -l 192.168.56.11 -p 11211 -c 256 -P /tmp/memcached.pid
[root@linux-node1 ~]# netstat -antlp|grep 11211
tcp        0      0 192.168.56.11:11211     0.0.0.0:*               LISTEN      2251/memcached

参数说明
-d 是启动一个守护进程
-m 是分配给Memcache使用的内存数量,单位是MB
-u 是运行Memcache的用户
-l 是监听的服务器IP地址
-p 是设置Memcache监听的端口,最好是1024以上的端口
-c 选项是最大运行的并发连接数,默认是1024,按照你服务器的负载量来设定
-P 是设置保存Memcache的pid文件
使用python操作Memcached
安装API
[root@linux-node1 ~]#  yum install -y python-memcached
[root@linux-node1 ~]# python
Python 2.7.5 (default, Jun 24 2015, 00:41:19)
[GCC 4.8.3 20140911 (Red Hat 4.8.3-9)] on linux2
Type "help", "copyright", "credits" or "license" for more information.
>>> import memcache
>>> quit()
1)Memcache的第一次
[root@linux-node1 ~]# python
Python 2.7.5 (default, Jun 24 2015, 00:41:19)
[GCC 4.8.3 20140911 (Red Hat 4.8.3-9)] on linux2
Type "help", "copyright", "credits" or "license" for more information.
>>> import memcache
>>> mc =memcache.Client(['192.168.56.11:11211'],debug=True)
>>> mc.set("foo","bar")
True
>>> ret = mc.get('foo')
>>> print ret
温馨提示:上面的debug=True;是表示运行出现错误的时候,显示错误信息,上线后,移除该参数。
2)Memcache和集群是一对好基友
python-memcached模块原生支持集群的操作,其原理是在内存维护一个主机列表
#!/usr/bin/env python
# coding:utf-8
import memcache

mc = memcache.Client([('192.168.56.11',1),('192.168.56.12',2)],debug=True)
# 主机列表:li = [192.168.56.11:11211,192.168.56.12:11211,192.168.56.13:11211,]

mc.set("foo","234")
# 1:将"foo"字符串转换成数字
# 2:将数字和主机列表长度求余数
# 3:li[余数],可以得到主机和IP
# 4:连接主机ip 将foo = 234 保存到mem上

ret = mc.get('foo')
print ret
3)add
添加一条键值对,如果已经存在的key,重复执行add操作异常。
#!/usr/bin/env python
# -*- coding:utf-8 -*-
import memcache

mc = memcache.Client(['192.168.56.11:11211'],debug=True)
mc.add('k1','v1')
多次执行会报错
[root@linux-node1 test]# python 1.py
[root@linux-node1 test]# python 1.py
MemCached: while expecting 'STORED', got unexpected response 'NOT_STORED'
4)replace
修改某个key的值,如果key值不存在,则异常
#!/usr/bin/env python
# -*- coding:utf-8 -*-
import memcache

mc = memcache.Client(['192.168.56.11:11211'],debug=True)
# 如果存在k1,则替换成功;
mc.replace('k1','v1v1v1')
不存在则报错
[root@linux-node1 test]# cat 2.py
#!/usr/bin/env python
# -*- coding:utf-8 -*-
import memcache

mc = memcache.Client(['192.168.56.11:11211'],debug=True)
# 如果存在k1,则替换成功;
mc.replace('k1k1','v1v1v1')

[root@linux-node1 test]# python 2.py
MemCached: while expecting 'STORED', got unexpected response 'NOT_STORED'
5)set和set_multi
set 设置一个键值对,如果key不存在,则创建,如果key存在,则修改
set_multi 设置多个键值对,如果key不存在,则创建,如果key存在,则修改
[root@linux-node1 test]# cat 3.py
#!/usr/bin/env python
# -*- coding:utf-8 -*-
import memcache

mc = memcache.Client(['192.168.56.11:11211'],debug=True)
mc.set('key1','ccccc')
# 一个键值对

mc.set_multi({'key2': 'ggggg','key3': 'tttt'})

[root@linux-node1 test]# python 3.py
6)delete和delete_multi
delete 在Memcached中删除指定的一个键值对
delete_multi 在Memcached中删除指定的多个键值对
[root@linux-node1 test]# cat 4.py
#!/usr/bin/env python
# -*- coding:utf-8 -*-
import memcache

mc = memcache.Client(['192.168.56.11:11211'],debug=True)
mc.delete('key1')
# 一个键值对

mc.delete_multi(['key2','key3'])

[root@linux-node1 test]# python 4.py
7)get和get_multi
get 获取一个键值对
get_multi 取多一个键值对
#!/usr/bin/env python
# -*- coding:utf-8 -*-
import memcache

mc = memcache.Client(['192.168.56.11:11211], debug=True)

val = mc.get('key1')
item_dict = mc.get_multi(["key2", "key3"])
8)append和prepend
append 修改指定key的值,在该值 后面 追加内容
prepend 修改指定key的值,在该值 前面 插入内容
[root@linux-node1 test]# cat 5.py
#!/usr/bin/env python
# -*- coding:utf-8 -*-
import memcache

mc = memcache.Client(['192.168.56.11:11211'],debug=True)
# 假设k1 = v1

mc.append('k1','after')
# 在v1的后面加after

mc.prepend('k1','before')
# 在v1的前面加before
9)decr和incr
incr 自增,将Memcached中的某一个值增加 N ( N默认为1 )
decr 自减,将Memcached中的某一个值减少 N ( N默认为1 )
#!/usr/bin/env python
# coding:utf-8
import memcache

mc = memcache.Client(['192.168.56.11',1],debug=True)

mc.set('k1','123')

# 默认变化的值为1
mc.incr('k1',10)
# k1的值会变成133

mc.decr('k1',23)
# k1的值会变成110
10)如果用终端,同时操作一组数据的话,会出现非正常数据,使用gets和cas来解决
#!/usr/bin/env python
# coding:utf-8
import memcache

mc = memcache.Client(['192.168.56.11',1],debug=True)
# 假设k1=1111
mc.gets('k1')
# 此时A用户gets了数据。
# 进行了减法操作
# 来了B用户,也对k1进行了操作,这时候,执行下面的操作就会报错
mc.cas('product_count', "1110")
解析:
本质上每次执行gets时,会从memcache中获取一个自增的数字,通过cas去修改gets的值时,会携带之前获取的自增值和memcache中的自增值进行比较,如果相等,则可以提交,如果不想等,那表示在gets和cas执行之间,又有其他人执行了gets(获取了缓冲的指定值), 如此一来有可能出现非正常数据,则不允许修改。
二、Redis
简介:
Redis是一个key-value存储系统。和Memcached类似,它支持存储的value类型相对更多,包括string(字符串)、list(链表)、set(集合)、zset(sorted set --有序集合)和hash(哈希类型)。这些数据类型都支持push/pop、add/remove及取交集并集和差集及更丰富的操作,而且这些操作都是原子性的。在此基础上,redis支持各种不同方式的排序。与memcached一样,为了保证效率,数据都是缓存在内存中。区别的是redis会周期性的把更新的数据写入磁盘或者把修改操作写入追加的记录文件,并且在此基础上实现了master-slave(主从)同步。
Redis支持主从同步。数据可以从主服务器向任意数量的从服务器上同步,从服务器可以是关联其他从服务器的主服务器。这使得Redis可执行单层树复制。存盘可以有意无意的对数据进行写操作。由于完全实现了发布/订阅机制,使得从数据库在任何地方同步树时,可订阅一个频道并接收主服务器完整的消息发布记录。同步对读取操作的可扩展性和数据冗余很有帮助。
Redis与memcache的比较
Redis 是一个高性能的key-value数据库。 redis的出现,很大程度补偿了memcached这类key/value存储的不足,在部 分场合可以对关系数据库起到很好的补充作用。它提供了Java,C/C++,C#,PHP,JavaScript,Perl,Object-C,Python,Ruby,Erlang等客户端,使用很方便。
数据模型:
Redis的外围由一个键、值映射的字典构成。与其他非关系型数据库主要不同在于:Redis中值的类型
不仅限于字符串,还支持如下抽象数据类型:
- 字符串列表
- 无序不重复的字符串集合
- 有序不重复的字符串集合
- 键、值都为字符串的哈希表
- 值的类型决定了值本身支持的操作。Redis支持不同无序、有序的列表,无序、有序的集合间的交集、并集等高级服务器端原子操作。
数据结构:
redis提供五种数据类型:string,hash,list,set及zset(sorted set)。
存储:
- redis使用了两种文件格式:全量数据和增量请求。
- 全量数据格式是把内存中的数据写入磁盘,便于下次读取文件进行加载;
- 增量请求文件则是把内存中的数据序列化为操作请求,用于读取文件进行replay得到数据,序列化的操作包括SET、RPUSH、SADD、ZADD。
- redis的存储分为内存存储、磁盘存储和log文件三部分,配置文件中有三个参数对其进行配置。
- save seconds updates,save配置,指出在多长时间内,有多少次更新操作,就将数据同步到数据文件。这个可以多个条件配合,比如默认配置文件中的设置,就设置了三个条件。
- appendonly yes/no ,appendonly配置,指出是否在每次更新操作后进行日志记录,如果不开启,可能会在断电时导致一段时间内的数据丢失。因为redis本身同步数据文件是按上面的save条件来同步的,所以有的数据会在一段时间内只存在于内存中。
- appendfsync no/always/everysec ,appendfsync配置,no表示等操作系统进行数据缓存同步到磁盘,always表示每次更新操作后手动调用fsync()将数据写到磁盘,everysec表示每秒同步一次。
安装启动:
直接yum安装:
[root@linux-node1 ~]#  yum -y install redis
[root@linux-node1 ~]# systemctl start redis
[root@linux-node1 ~]# ps -ef |grep redis
redis     16359      1  0 16:55 ?        00:00:00 /usr/bin/redis-server 127.0.0.1:6379
root      16363  16335  0 16:56 pts/0    00:00:00 grep --color=auto redis
启动客户端:
[root@linux-node1 ~]# redis-cli
127.0.0.1:6379> set foo bar
OK
127.0.0.1:6379> get foo
"bar"
使用python操作redis
首先安装组件:
[root@linux-node1 ~]# yum -y install python-pip
[root@linux-node1 ~]# pip install redis
常用操作
1)操作模式
redis-py提供两个类Redis和StictRedis用于实现Redis命令,StrictRedis用于实现大部分官方的功能,并使用官方的语法和命令,Redis是StricRedis的子类,用于向后兼容旧版本的redis-py。
[root@linux-node1 test]# cat 6.py
#!/usr/bin/env python
# -*- coding:utf-8 -*-
import redis
r = redis.Redis(host='127.0.0.1',port=6379)
r.set('foo','bar')
print r.get('foo')
[root@linux-node1 test]# python 6.py
bar
2)连接池
redis-py使用connection pool来管理对一个redis server的所有连接,避免每次建立、释放连接的开销。默认,每个Redis实例都会维护一个自己的连接池。可以直接建立一个连接池,然后作为参数Redis,这样就可以实现多个Redis实例共享一个连接池。
[root@linux-node1 test]# cat 6.py
#!/usr/bin/env python
# -*- coding:utf-8 -*-
import redis
pool = redis.ConnectionPool(host='127.0.0.1',port=6379)
r=redis.Redis(connection_pool=pool)
r.set('foo','bar')
print r.get('foo')
[root@linux-node1 test]# python 6.py
bar
3)管道
redis-py默认在执行每次请求都会创建(连接池申请连接)和断开(归还连接池)一次连接操作,如果想要在一次请求中指定多个命令,则可以使用pipline实现一次请求指定多个命令,并且默认情况下一次pipline 是原子性操作。
#!/usr/bin/env python
# -*- coding:utf-8 -*-
import redis
pool = redis.ConnectionPool(host='127.0.0.1',port=6379)
r=redis.Redis(connection_pool=pool)

#pipe = r.pipeline(transaction=False)
pipe = r.pipeline(transaction=True)
r.set('foo','bar')
r.set('foo111','bar111')
ret = pipe.execute()
4)发布订阅
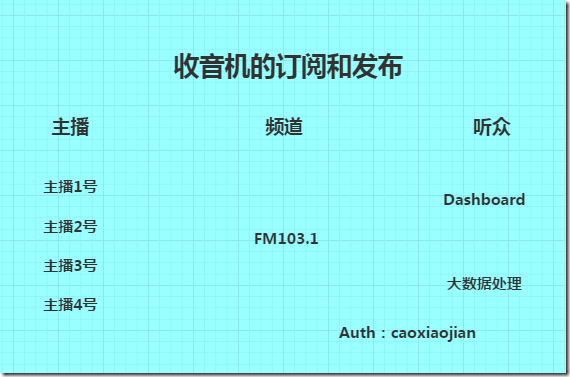
频道:
#!/usr/bin/env python
# -*- coding:utf-8 -*-
import redis
class RedisHelper:

    def __init__(self):
        self.__conn = redis.Redis(host='10.211.55.4')
        self.chan_sub = 'fm104.5'
        self.chan_pub = 'fm104.5'

    def public(self, msg):
        self.__conn.publish(self.chan_pub, msg)
        return True

    def subscribe(self):
        pub = self.__conn.pubsub()
        pub.subscribe(self.chan_sub)
        pub.parse_response()
        return pub
订阅者
#!/usr/bin/env python
# -*- coding:utf-8 -*-
from monitor.RedisHelper import RedisHelper
obj = RedisHelper()
redis_sub = obj.subscribe()

while True:
    msg= redis_sub.parse_response()
    print msg
发布者
#!/usr/bin/env python
# -*- coding:utf-8 -*-

from monitor.RedisHelper import RedisHelpe
obj = RedisHelper()
obj.public('hello')
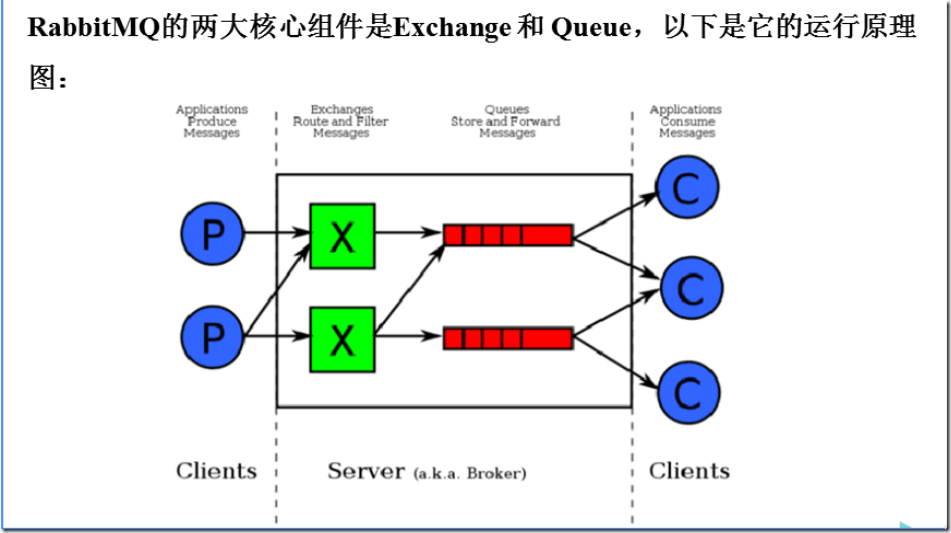
三、RabbitMQ
RabbitMQ是一个在AMQP基础上完整的,可复用的企业消息系统。他遵循Mozilla Public License开源协议。
MQ全称为Message Queue, 消息队列(MQ)是一种应用程序对应用程序的通信方法。应用程序通过读写出入队列的消息(针对应用程序的数据)来通信,而无需专用连接来链接它们。消 息传递指的是程序之间通过在消息中发送数据进行通信,而不是通过直接调用彼此来通信,直接调用通常是用于诸如远程过程调用的技术。排队指的是应用程序通过 队列来通信。队列的使用除去了接收和发送应用程序同时执行的要求。
RabbitMQ的安装
### 安装配置epel源,如果你是centos7,请换epel源
   $ rpm -ivh http://dl.fedoraproject.org/pub/epel/6/i386/epel-release-6-8.noarch.rpm
### 安装erlang
   $ yum -y install erlang
### 安装RabbitMQ
   $ yum -y install rabbitmq-server
### 启动
[root@linux-node1 test]# /usr/sbin/rabbitmq-server start

[root@linux-node1 test]# ps -ef |grep rabbitmq-server
root      17096  16335  0 18:36 pts/0    00:00:00 /bin/sh /usr/sbin/rabbitmq-server start
root      17105  17096  0 18:36 pts/0    00:00:00 su rabbitmq -s /bin/sh -c /usr/lib/rabbitmq/bin/rabbitmq-server  "start"
root      17181  16510  0 18:36 pts/3    00:00:00 grep --color=auto rabbitmq-server
安装API
[root@linux-node1 test]# pip install pika
使用API操作RabbitMQ
基于Queue实现生产者消费者模型
#!/usr/bin/env python
# -*- coding:utf-8 -*-
import Queue
import threading


message = Queue.Queue(10)


def producer(i):
    while True:
        message.put(i)


def consumer(i):
    while True:
        msg = message.get()


for i in range(12):
    t = threading.Thread(target=producer, args=(i,))
    t.start()

for i in range(10):
    t = threading.Thread(target=consumer, args=(i,))
    t.start()
对于RabbitMQ来说,生产和消费不再针对内存里的一个Queue对象,而是某台服务器上的RabbitMQ Server实现的消息队列。
生产者:
#!/usr/bin/env python
# coding:utf-8
import pika
# 创建一个连接
connection = pika.BlockingConnection(pika.ConnectionParameters(host='127.0.0.1'))
# 打开一个通道
channel = connection.channel()
# 队列声明叫hello
channel.queue_declare(queue='hello')
# 向队列中插入数据,往hello对队列中插入hello world
channel.basic_publish(exchange='',
                      routing_key='hello',
                      body='Hello World!')
print(" [x] Sent 'Hello World!'")
connection.close()
消费者:
#!/usr/bin/env python
# coding:utf-8
import pika
# 创建一个连接
connection = pika.BlockingConnection(pika.ConnectionParameters(host='127.0.0.1'))
# 打开一个通道,创建频道
channel = connection.channel()
# 队列声明叫hello
channel.queue_declare(queue='hello')
def callback(ch, method, properties, body):
    print(" [x] Received %r" % body)
# 消费队列中的内容,同时执行callback函数,callback函数中的body就是拿取到的内容
channel.basic_consume(callback,
                      queue='hello',
                      no_ack=True)      # 出现断开的情况,数据就会丢失;这种方式发布者和听众是没有相互应答的
print(' [*] Waiting for messages. To exit press CTRL+C')
channel.start_consuming()
1)acknowledgment 消息不丢失(消费者失联)
no-ack = False,如果生产者遇到情况(its channel is closed, connection is closed, or TCP connection is lost)挂掉了,那么,RabbitMQ会重新将该任务添加到队列中。在消费者中操作
import pika

connection = pika.BlockingConnection(pika.ConnectionParameters(host='127.0.0.1'))
channel = connection.channel()

channel.queue_declare(queue='hello')

def callback(ch, method, properties, body):
    print(" [x] Received %r" % body)
    import time
    time.sleep(10)
    print 'ok'
    ch.basic_ack(delivery_tag = method.delivery_tag)

channel.basic_consume(callback,
                      queue='hello',
                      no_ack=False)
# 这里使用False

print(' [*] Waiting for messages. To exit press CTRL+C')
channel.start_consuming()
2)durable消息不丢失
如果是生产者挂掉了呢,你说你咋整?消息队列可以做持久化,哈哈哈
生产者
#!/usr/bin/env python
# coding:utf-8
import pika

connection = pika.BlockingConnection(pika.ConnectionParameters(host='127.0.0.1'))
channel = connection.channel()

# 声明这个消息队列的时候就要使用durable来声明持久化
channel.queue_declare(queue='hello', durable=True)

channel.basic_publish(exchange='',
                      routing_key='hello',
                      body='Hello World!',
                      properties=pika.BasicProperties(
                          delivery_mode=2, # make message persistent
                      ))    # 指定消息的时候,也是要持久化
print(" [x] Sent 'Hello World!'")
connection.close()
消费者
#!/usr/bin/env python
# coding:utf-8
import pika

connection = pika.BlockingConnection(pika.ConnectionParameters(host='127.0.0.1'))
channel = connection.channel()

# 这个可有可无
channel.queue_declare(queue='hello', durable=True)


def callback(ch, method, properties, body):
    print(" [x] Received %r" % body)
    import time
    time.sleep(10)
    print 'ok'
    ch.basic_ack(delivery_tag = method.delivery_tag)

channel.basic_consume(callback,
                      queue='hello',
                      no_ack=False)

print(' [*] Waiting for messages. To exit press CTRL+C')
channel.start_consuming()
已经存在的消息队列,无法进行持久化,只能重新生成队列才行。
3)消息获取顺序
默认消息队列里的数据是按照顺序被消费者拿走,例如:消费者1 去队列中获取 奇数 序列的任务,消费者1去队列中获取 偶数 序列的任务。
channel.basic_qos(prefetch_count=1) 表示谁来谁取,不再按照奇偶数排列。这个需要在消费者上来操作。
#!/usr/bin/env python
# coding:utf-8
import pika
connection = pika.BlockingConnection(pika.ConnectionParameters(host='127.0.0.1'))
channel = connection.channel()
channel.queue_declare(queue='hello')

def callback(ch, method, properties, body):
    print(" [x] Received %r" % body)
    import time
    time.sleep(10)
    print 'ok'
    ch.basic_ack(delivery_tag = method.delivery_tag)
# 谁来谁取
channel.basic_qos(prefetch_count=1)

channel.basic_consume(callback,
                      queue='hello',
                      no_ack=False)

print(' [*] Waiting for messages. To exit press CTRL+C')
channel.start_consuming()
4)发布订阅
发布订阅和简单的消息队列区别在于,发布订阅会将消息发送给所有的订阅者,而消息队列中的数据被消费一次便消失。所以,RabbitMQ实现发布和订阅时,会为每一个订阅者创建一个队列,而发布者发布消息时,会将消息放置在所有相关队列中。
exchange type = fanout 表示可以给多个队列发数据,可以理解为广播
发布者
#!/usr/bin/env python
# coding:utf-8
import pika
import sys

connection = pika.BlockingConnection(pika.ConnectionParameters(
        host=((‘
127.0.0.1
'))
channel = connection.channel()

channel.exchange_declare(exchange='logs',  # logs随便起名字
                         type='fanout') # 可以给多个队列发数据

message = ' '.join(sys.argv[1:]) or "info: Hello World!"
channel.basic_publish(exchange='logs',
                      routing_key='',
                      body=message)
print(" [x] Sent %r" % message)
connection.close()
订阅者一
#!/usr/bin/env python
# coding:utf-8
import pika

connection = pika.BlockingConnection(pika.ConnectionParameters(
        host='127.0.0.1'))
channel = connection.channel()
# 定义声明,为logs
channel.exchange_declare(exchange='logs',
                         type='fanout')

result = channel.queue_declare(exclusive=True)
queue_name = result.method.queue
# 生成了一个随机名称

# 让队列和exchange进行绑定,以后生产者发送来数据,exchange就会往queue中转发数据
channel.queue_bind(exchange='logs',
                   queue=queue_name)

print(' [*] Waiting for logs. To exit press CTRL+C')

def callback(ch, method, properties, body):
    print(" [x] %r" % body)

# 一直去取数据
channel.basic_consume(callback,
                      queue=queue_name,
                      no_ack=True)

channel.start_consuming()
订阅者二
#!/usr/bin/env python
# coding:utf-8
import pika

connection = pika.BlockingConnection(pika.ConnectionParameters(
        host='127.0.0.1'))
channel = connection.channel()
# 定义声明,为logs
channel.exchange_declare(exchange='logs',
                         type='fanout')

result = channel.queue_declare(exclusive=True)
queue_name = result.method.queue
# 生成了一个随机名称

# 让队列和exchange进行绑定,以后生产者发送来数据,exchange就会往queue中转发数据
channel.queue_bind(exchange='logs',
                   queue=queue_name)

print(' [*] Waiting for logs. To exit press CTRL+C')

def callback(ch, method, properties, body):
    print(" [x] %r" % body)

# 一直去取数据
channel.basic_consume(callback,
                      queue=queue_name,
                      no_ack=True)

channel.start_consuming()
可以同时使用两个来测试,同时都能接收到数据
5)关键字发送
exchange type = direct
之前事例,发送消息时明确指定某个队列并向其中发送消息,RabbitMQ还支持根据关键字发送,即:队列绑定关键字,发送者将数据根据关键字发送到消息exchange,exchange根据 关键字 判定应该将数据发送至指定队列。
订阅者一:
#!/usr/bin/env python
# coding:utf-8
import pika
import sys

connection = pika.BlockingConnection(pika.ConnectionParameters(
        host='127.0.0.1'))
channel = connection.channel()

channel.exchange_declare(exchange='direct_logs',
                         type='direct')

result = channel.queue_declare(exclusive=True)
queue_name = result.method.queue

channel.queue_bind(exchange='direct_logs',
                   queue=queue_name,
                   routing_key='aaa')

channel.queue_bind(exchange='direct_logs', queue=queue_name, routing_key='bbb')

print(' [*] Waiting for logs. To exit press CTRL+C')

def callback(ch, method, properties, body):
    print(" [x] %r:%r" % (method.routing_key, body))

channel.basic_consume(callback,
                      queue=queue_name,
                      no_ack=True)

channel.start_consuming()
订阅者二
#!/usr/bin/env python
# coding:utf-8
import pika
import sys

connection = pika.BlockingConnection(pika.ConnectionParameters(
        host='127.0.0.1'))
channel = connection.channel()

channel.exchange_declare(exchange='direct_logs',
                         type='direct')

result = channel.queue_declare(exclusive=True)
queue_name = result.method.queue

channel.queue_bind(exchange='direct_logs',
                   queue=queue_name,
                   routing_key='bbb')
channel.queue_bind(exchange='direct_logs', queue=queue_name, routing_key='ccc')
print(' [*] Waiting for logs. To exit press CTRL+C')

def callback(ch, method, properties, body):
    print(" [x] %r:%r" % (method.routing_key, body))

channel.basic_consume(callback,
                      queue=queue_name,
                      no_ack=True)

channel.start_consuming()
生产者
#!/usr/bin/env python
# coding:utf-8
import pika
import sys

connection = pika.BlockingConnection(pika.ConnectionParameters(
        host='127.0.0.1'))
channel = connection.channel()

channel.exchange_declare(exchange='direct_logs',
                         type='direct')

message = 'Hello World!'
channel.basic_publish(exchange='direct_logs',
                      routing_key='ccc',    # 指定订阅者的队列关键字是ccc
                      body=message)
print(" [x] Sent %r" % (message))
此时,只有订阅者二符合,会有数据收到
6)模糊匹配
exchange type = topic
在topic类型下,可以让队列绑定几个模糊的关键字,之后发送者将数据发送到exchange,exchange将传入”路由值“和 ”关键字“进行匹配,匹配成功,则将数据发送到指定队列。
# 表示可以匹配 0 个 或 多个 单词
* 表示只能匹配 一个 单词
订阅者1
#!/usr/bin/env python
# coding:utf-8
import pika
import sys

connection = pika.BlockingConnection(pika.ConnectionParameters(
        host='127.0.0.1'))
channel = connection.channel()

channel.exchange_declare(exchange='topic_logs',
                         type='topic')

result = channel.queue_declare(exclusive=True)
queue_name = result.method.queue

channel.queue_bind(exchange='topic_logs',
                   queue=queue_name,
                   routing_key='cgt.*')

print(' [*] Waiting for logs. To exit press CTRL+C')

def callback(ch, method, properties, body):
    print(" [x] %r:%r" % (method.routing_key, body))

channel.basic_consume(callback,
                      queue=queue_name,
                      no_ack=True)

channel.start_consuming()
订阅者2
#!/usr/bin/env python
# coding:utf-8
import pika
import sys

connection = pika.BlockingConnection(pika.ConnectionParameters(
        host='127.0.0.1'))
channel = connection.channel()

channel.exchange_declare(exchange='topic_logs',
                         type='topic')

result = channel.queue_declare(exclusive=True)
queue_name = result.method.queue

channel.queue_bind(exchange='topic_logs',
                   queue=queue_name,
                   routing_key='cgt.#')

print(' [*] Waiting for logs. To exit press CTRL+C')

def callback(ch, method, properties, body):
    print(" [x] %r:%r" % (method.routing_key, body))

channel.basic_consume(callback,
                      queue=queue_name,
                      no_ack=True)

channel.start_consuming()
生产者
#!/usr/bin/env python
# coding:utf-8
import pika
import sys

connection = pika.BlockingConnection(pika.ConnectionParameters(
        host='127.0.0.1'))
channel = connection.channel()

channel.exchange_declare(exchange='topic_logs',
                         type='topic')

message = 'Hello World!'
channel.basic_publish(exchange='topic_logs',
                      routing_key='cgt.caoxiaojian.com',
                      body=message)
print(" [x] Sent %r:%r" % (message))
connection.close()
这样测试,只有订阅者2收到,因为他是#

 浙公网安备 33010602011771号