C++学习 3 结构体
结构体基本概念:
结构体属于用户自定义的数据类型,允许用户存储不同的数据类型;
结构体定义和使用:
语法:struct 结构体名 { 结构体成员列表 };
通过结构体创建变量名的方式有三种:
1、struct 结构体名 变量名
2、struct 结构体名 变量名 = { 成员1值,成员2值...}
3、定义结构体时顺便创建变量
实例:
#include<iostream>
#include<string>
using namespace std;

//1、创建学生数据类型  :  学生包括(姓名、年龄、分数)

struct Student
{
    //成员列表
    string name;  //姓名
    int age;      //年龄
    int score;    //分数
}s3;  //顺便创建结构体变量


//2、通过学生类型创建具体学生

int main()
{

//2.1 struct Student s1
    //struct 关键字 在C++中可以省略 相当于下行
    Student s1;//struct Student s1;
    //给s1赋值
    s1.name = "张三";
    s1.age = 18;
    s1.score = 100;

    cout << "姓名:" << s1.name << "  " << "年龄:" << s1.age << "  " << "分数:" << s1.score << endl;

//2.2 struct Student s2 = {...}

    struct Student s2 = { "李四",19,80 };
    cout << "姓名:" << s2.name << "  " << "年龄:" << s2.age << "  " << "分数:" << s2.score << endl;

//2.3 在定义结构体时顺便创建变量
    s3.name = "王五";
    s3.age = 30;
    s3.score = 60;
    cout << "姓名:" << s3.name << "  " << "年龄:" << s3.age << "  " << "分数:" << s3.score << endl;

    system("pause");
    return 0;
}
结构体数组:
作用:将自定义的结构体放入到数组中方便维护;
语法:struct 结构体名 数组名{元素个数} = { { },{ },......{ } }
实例:
#include<iostream>
#include<string>
using namespace std;

//结构体数组
//1、定义结构体

struct Student
{
    string name;  //姓名
    int age;      //年龄
    int score;    //分数
};

int main()
{
//2、创建结构体数组
    struct Student stuArray[3] =
    {
        {"张三",18,100},
        {"李四",28,99},
        {"王五",38,66}
    };
//3、给结构体数组中的元素赋值
    stuArray[2].name = "赵六";    //将王五的信息改成赵六的
    stuArray[2].age = 80;
    stuArray[2].score = 60;
//4、遍历结构体数组
    for (int i = 0; i < 3; i++)
    {
        cout << "姓名:" << stuArray[i].name << "  "
             << "年龄:" << stuArray[i].age <<"  "
             << "分数:" << stuArray[i].score << endl;
    }
    system("pause");
    return 0;
}
结构体指针
作用:通过指针访问结构体中的成员;利用操作符 -> 可以通过结构体指针访问结构体属性。
实例:
#include<iostream>
#include<string>
using namespace std;

//结构体指针
//1、定义学生结构体

struct Student
{
    string name;  //姓名
    int age;      //年龄
    int score;    //分数
};

int main()
{
//2、创建学生结构体变量
    //struct Student s = {"张三",18,100};  //struct可以省略
    Student s = {"张三",18,100};

//3、通过指针指向结构体变量
    //int * p = &s;   ->!!! 错误!!! <-  因为上行代码指定s是Student类型的,所以不能返回int型的数据,而应该返回Student型,即不能用int型的指针指向s;

    //struct Student * p = &s;      //struct可以省略
    Student * p = &s;

//4、通过指针访问结构体中的数据
    cout << "姓名:" << p->name <<"  " << "年龄:" << p->age <<"  " << "分数" << p->score <<endl;

    system("pause");
    return 0;
}
结构体嵌套结构体
作用:结构体中的成员可以是另一个结构体
例如:每个老师辅导一个学员,一个老师的结构体中,记录一个学生的结构体
实例:
#include<iostream>
#include<string>
using namespace std;

//结构体嵌套结构体

//定义学生结构体
struct Student
{
    string name;    //姓名
    int age;        //年龄
    int score;        //分数
};

//定义老师结构体
struct Teacher
{
    int id;                  //教职工编号
    string name;          //姓名
    int age;              //年龄
    struct Student stu;   //所带的学生
};

int main()
{
    Teacher t;
    t.id = 10000;
    t.name = "老王";
    t.age = 50;
    t.stu.name = "小王";
    t.stu.age = 20;
    t.stu.score = 60;

    cout << "老师姓名:" << t.name <<"  " << "老师编号:" << t.id << "  " << "老师年龄:" << t.age << "  "
         << "老师辅导的学生姓名:" << t.stu.name << "  " << "学生分数:" << t.stu.score << "  " << "学生年龄:" << t.stu.age << endl;

    system("pause");
    return 0;
}
结构体做函数参数
作用:将结构体作为参数向函数中传递
传递的方式有两种:1、值传递;2、地址传递;
实例:
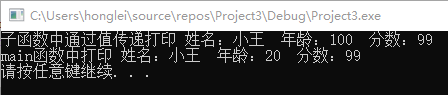
#include<iostream>
#include<string>
using namespace std;

//结构体做函数参数

//定义学生结构体
struct Student
{
    string name;    //姓名
    int age;        //年龄
    int score;        //分数
};

//1、值传递
void printStudent1(struct Student s)
{
    cout << "子函数中通过值传递打印 姓名:" << s.name <<"  " << "年龄:" << s.age <<"  " << "分数:" << s.score << endl;
}
//2、地址传递
void printStudent2(struct Student * p)
{
    cout << "子函数中通过地址传递打印 姓名:" << p->name << "  " << "年龄:" << p->age << "  " << "分数:" << p->score << endl;
}
int main()
{
//将学生传入到一个参数中,打印学生身上的所有信息
    struct Student s;
    s.name = "小王";
    s.age = 20;
    s.score = 99;

    //cout << "main函数中打印 姓名:" << s.name <<"  " << "年龄:" << s.age <<"  " << "分数:" << s.score << endl;
    //printStudent1(s);
    printStudent2(&s);
    system("pause");
    return 0;
}
值传递和地址传递区别:
值传递:
void printStudent1(struct Student s)
{
    s.age = 100;
    cout << "子函数中通过值传递打印 姓名:" << s.name <<"  " << "年龄:" << s.age <<"  " << "分数:" << s.score << endl;
}
int main()
{
    struct Student s;
    s.name = "小王";
    s.age = 20;
    s.score = 99;

    printStudent1(s);
    //printStudent2(&s);
    cout << "main函数中打印 姓名:" << s.name <<"  " << "年龄:" << s.age <<"  " << "分数:" << s.score << endl;

    system("pause");
    return 0;
}
打印结果如下:
值传递中,形参( )发生任何的改变,都不会修饰实参(
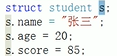 ),即形参的值发生改变,实参的值不会随着形参的值发生改变。
地址传递:
void printStudent2(struct Student * p)
{
    p->age = 100;
    cout << "子函数中通过地址传递打印 姓名:" << p->name << "  " << "年龄:" << p->age << "  " << "分数:" << p->score << endl;
}
int main()
{
//将学生传入到一个参数中,打印学生身上的所有信息
    struct Student s;
    s.name = "小王";
    s.age = 20;
    s.score = 99;

    //printStudent1(s);
    printStudent2(&s);
    cout << "main函数中打印 姓名:" << s.name <<"  " << "年龄:" << s.age <<"  " << "分数:" << s.score << endl;

    system("pause");
    return 0;
}
打印结果为
地址传递的形参(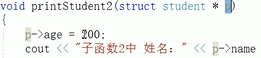 )会修饰实参(
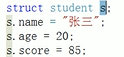 );即形参值发生改变,实参也会随着改变。
结构体中const使用场景
作用:用const来防止误操作
实例:
#include<iostream>
#include<string>
using namespace std;

//const使用场景

struct Student
{
    string name;    //姓名
    int age;        //年龄
    int score;        //分数
};

//void printStudents(Student s)        //值传递会把形参的所有值(本例中的姓名、年龄、分数)复制一份,再传给实参,这样导致内存开销太大
//void printStudents(Student *s)       //将函数中的形参改为指针,可以减少内存空间的使用,减小内存开销,而不会像值传递一样复制一个新的副本出来     //加入const 就不能修改参数值了,只能读取 避免以后因为代码量太大而不小心误操作改值
void printStudents(const Student* s)   //加入const 就不能修改了,只能读取 避免以后因为代码量太大而不小心误操作改值
{
    /*
    //s.age = 150;
    //cout << "姓名:" << s.name << "  " << "年龄:" << s.age << "  " << "分数:" << s.score << endl;
    */

    // s->age = 150;   //加入const 就不能修改参数了,否则运行会报错:表达式必须是可修改的左值!以此用来限定用户误操作
    cout << "姓名:" << s->name << "  " << "年龄:" << s->age << "  " << "分数:" << s->score << endl;
}
int main()
{
//创建结构体变量
    struct Student s = { "张三",20,90 };

    //通过函数打印结构体变量信息
    //printStudents(s);    //值传递内存开销太大
    printStudents(&s);     //采用地址传递,每次只占用4个字节(指针内存大小为4字节),减小内存开销

    cout << "张三的年龄为:" << s.age << endl;

    system("pause");
    return 0;
}

 浙公网安备 33010602011771号