android热加载随记
在我们日常的开发过程中,程序难免会出现BUG,一般有集中处理方式,发布新版本APP让用户来升级,或者打补丁来修复bug
前者本文在这里不错讨论,打补丁升级又分为两种一种是需要重启应用,一种是不需要。不需要的也可以叫他热加载。
首先使用热加载需要了解一些基本常识
1、什么是dex
Dex是Dalvik VM executes的全称,和windows上的exe很像,你项目的源码java文件已被编译成了.dex.
在用ide开发的时候编译发布构建工具(ant,gradle)会调用(aapt)将DEX文件,资源文件以及AndroidManifest.xml文件组合成一个应用程序包(APK)
2、安装apk的过程是怎么样的
复制APK安装包到data/app目录下,解压并扫描安装包,把dex文件(Dalvik字节码)保存到dalvik-cache目录,并data/data目录下创建对应的应用数据目
ODEX是安卓上的应用程序apk中提取出来的可运行文件,即将APK中的classes.dex文件通过dex优化过程将其优化生成一个.dex文件单独存放,原APK中的classes.dex文件会保留
这样做可以加快软件的启动速度,预先提取,减少对RAM的占用,因为没有odex的话,系统要从apk包中提取dex再运行
3、app怎么运行的

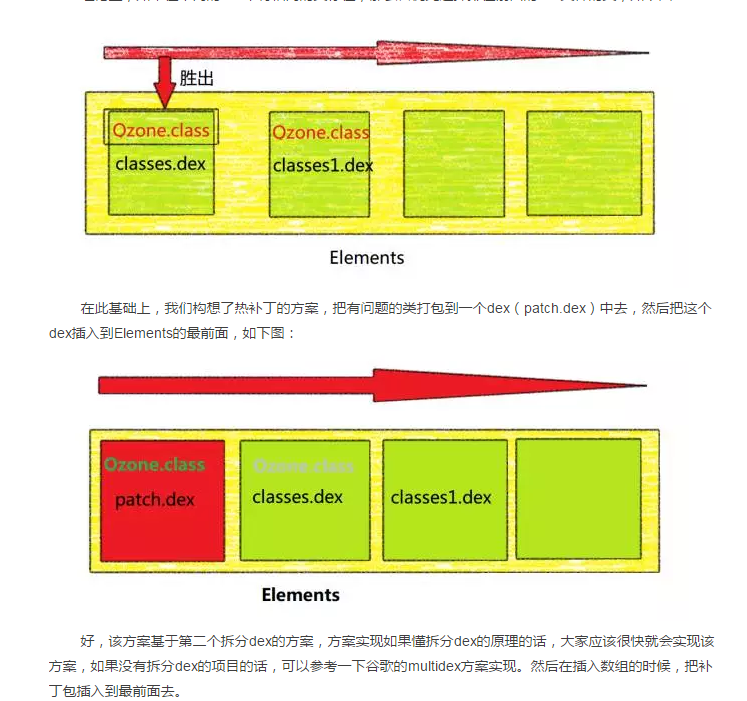
简单的概括一下,就是把多个dex文件塞入到app的classloader之中,但是android dex拆包方案中的类是没有重复的,如果classes.dex和classes1.dex中有重复的类,当用到这个重复的类的时候,系统会选择哪个类进行加载呢?
来看看代码
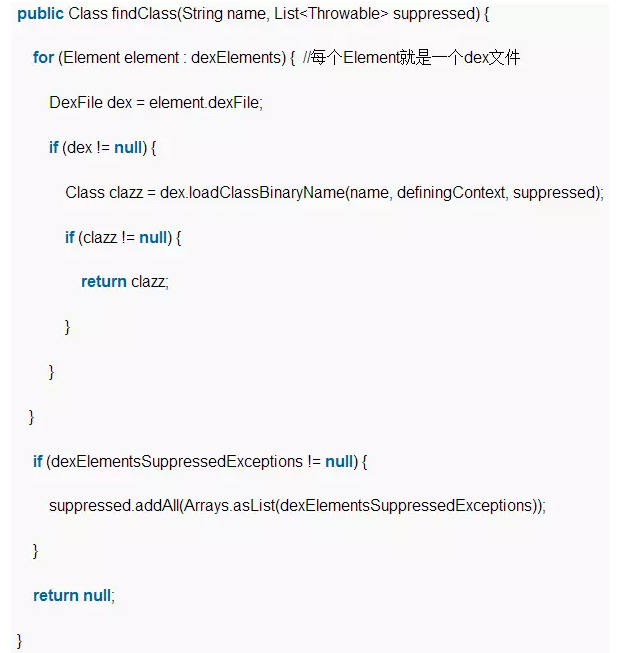
一个ClassLoader可以包含多个dex文件,每个dex文件是一个Element,多个dex文件排列成一个有序的数组dexElements,当找类的时候,会按顺序遍历dex文件,然后从当前遍历的dex文件中找类,如果找类则返回,如果找不到从下一个dex文件继续查找。
理论上,如果在不同的dex中有相同的类存在,那么会优先选择排在前面的dex文件的类,如下图
以上就大致清楚了要做到热加载我们该怎么处理了
下面我们处理一个简单逻辑,用Toast 显示一个 除数为零的 模拟bug
接着我们创建一个application
package com.example.andfix;

import android.app.Application;

public class App extends Application{
    private static Application _app;
    public static Application get()
    {
        return _app;
    }
    @Override
    public void onCreate() {
        _app=this;
        super.onCreate();
    }


}
在建立一个Activity
package com.example.andfix;


import java.io.File;
import java.io.IOException;

import android.app.Activity;
import android.content.Context;
import android.os.Build;
import android.os.Bundle;
import android.os.Environment;
import android.view.View;
import android.view.View.OnClickListener;
import android.widget.Button;
import android.widget.Toast;

import com.example.andfix.tools.CalcNum;

public class MainActivity extends Activity {

    Button btnfix;
    Button btntest;
    @Override
    protected void onCreate(Bundle savedInstanceState) {
        super.onCreate(savedInstanceState);
        setContentView(R.layout.activity_main);
        btnfix=(Button)findViewById(R.id.btnfix);
        btntest=(Button)findViewById(R.id.btntest);

        btntest.setOnClickListener(new OnClickListener() {

            @Override
            public void onClick(View arg0) {
                new CalcNum(getApplicationContext());
            }
        });
        btnfix.setOnClickListener(new OnClickListener() {

            @Override
            public void onClick(View arg0) {
                fix();
            }
        });
    }

    private void fix()
    {
        inject();
    }


    public void inject() {
        String sourceFile = Environment.getExternalStorageDirectory().getAbsolutePath() + File.separator
                + "classes2.dex";


        String targetFile = this.getDir("odex", Context.MODE_PRIVATE).getAbsolutePath() + File.separator
                + "classes2.dex";

        try {

            FileUtils.copyFile(sourceFile, targetFile);

            FixDexUtils.loadFixDex(this.getApplication());

        } catch (IOException e) {
            e.printStackTrace();
        }


    }


}
一个工具类
package com.example.andfix;

import java.io.File;
import java.io.FileInputStream;
import java.io.FileOutputStream;
import java.io.IOException;
import java.io.InputStream;
import java.io.OutputStream;

public class FileUtils {
    public static void copyFile(String sourceFile, String targetFile) throws IOException {

        InputStream is = new FileInputStream(sourceFile);

        File outFile = new File(targetFile);

        if(outFile.exists()){
            outFile.delete();
        }

        OutputStream os = new FileOutputStream(targetFile);

        int len = 0;

        byte[] buffer = new byte[1024];

        while ((len = is.read(buffer)) != -1) {
            os.write(buffer, 0, len);
        }

        os.close();
        is.close();

    }
}
一个热修复逻辑
package com.example.andfix;

import java.io.File;
import java.lang.reflect.Array;
import java.lang.reflect.Field;
import java.util.HashSet;

import dalvik.system.DexClassLoader;
import dalvik.system.PathClassLoader;

import android.content.Context;

public class FixDexUtils {
    private static HashSet<File> loadedDex = new HashSet<File>();

    static {
        loadedDex.clear();
    }


    public static void loadFixDex(Context context) {
        // 获取到系统的odex 目录
        File fileDir = context.getDir("odex", Context.MODE_PRIVATE);
        File[] listFiles = fileDir.listFiles();

        for (File file : listFiles) {
            if (file.getName().endsWith(".dex")) {
                // 存储该目录下的.dex文件(补丁)
                loadedDex.add(file);
            }
        }

        doDexInject(context, fileDir);

    }

    private static void doDexInject(Context context, File fileDir) {
        // .dex 的加载需要一个临时目录
        String optimizeDir = fileDir.getAbsolutePath() + File.separator + "opt_dex";
        File fopt = new File(optimizeDir);
        if (!fopt.exists())
            fopt.mkdirs();
        // 根据.dex 文件创建对应的DexClassLoader 类
        for (File file : loadedDex) {
            DexClassLoader classLoader = new DexClassLoader(file.getAbsolutePath(), fopt.getAbsolutePath(), null,
                    context.getClassLoader());
            //注入
            inject(classLoader, context);

        }
    }

    private static void inject(DexClassLoader classLoader, Context context) {

        // 获取到系统的DexClassLoader 类
        PathClassLoader pathLoader = (PathClassLoader) context.getClassLoader();
        try {
            // 分别获取到补丁的dexElements和系统的dexElements
            Object dexElements = combineArray(getDexElements(getPathList(classLoader)),
                    getDexElements(getPathList(pathLoader)));
            // 获取到系统的pathList 对象
            Object pathList = getPathList(pathLoader);
            // 设置系统的dexElements 的值
            setField(pathList, pathList.getClass(), "dexElements", dexElements);
        } catch (Exception e) {
            e.printStackTrace();
        }
    }

    /**
     * 通过反射设置字段值
     */
    private static void setField(Object obj, Class<?> cl, String field, Object value)
            throws NoSuchFieldException, IllegalArgumentException, IllegalAccessException {

        Field localField = cl.getDeclaredField(field);
        localField.setAccessible(true);
        localField.set(obj, value);
    }

    /**
     * 通过反射获取 BaseDexClassLoader中的PathList对象
     */
    private static Object getPathList(Object baseDexClassLoader)
            throws IllegalArgumentException, NoSuchFieldException, IllegalAccessException, ClassNotFoundException {
        return getField(baseDexClassLoader, Class.forName("dalvik.system.BaseDexClassLoader"), "pathList");
    }

    /**
     * 通过反射获取指定字段的值
     */
    private static Object getField(Object obj, Class<?> cl, String field)
            throws NoSuchFieldException, IllegalArgumentException, IllegalAccessException {
        Field localField = cl.getDeclaredField(field);
        localField.setAccessible(true);
        return localField.get(obj);
    }

    /**
     * 通过反射获取DexPathList中dexElements
     */
    private static Object getDexElements(Object paramObject)
            throws IllegalArgumentException, NoSuchFieldException, IllegalAccessException {
        return getField(paramObject, paramObject.getClass(), "dexElements");
    }

    /**
     * 合并两个数组
     * @param arrayLhs
     * @param arrayRhs
     * @return
     */
    private static Object combineArray(Object arrayLhs, Object arrayRhs) {
        Class<?> localClass = arrayLhs.getClass().getComponentType();
        int i = Array.getLength(arrayLhs);
        int j = i + Array.getLength(arrayRhs);
        Object result = Array.newInstance(localClass, j);
        for (int k = 0; k < j; ++k) {
            if (k < i) {
                Array.set(result, k, Array.get(arrayLhs, k));
            } else {
                Array.set(result, k, Array.get(arrayRhs, k - i));
            }
        }
        return result;
    }
}
这样就可以实现热修复了 此过程是在eclipse 上完成的
通过ant构建
<?xml version="1.0" encoding="UTF-8"?>
<!-- project项目标签 -->
<project
    name="MultiDex"
    default="release" >

    <!-- 项目编译环境配置 -->

    <property
        name="sdk-folder"
        value="D:\Android\SDK" />


    <property
        name="platform-folder"
        value="${sdk-folder}\platforms\android-20" />

    <property
        name="platform-tools-folder"
        value="${sdk-folder}\build-tools\20.0.0" />

    <property
        name="jdk-folder"
        value="C:\Program Files\Java\jdk1.8.0_77" />

    <property
        name="android-jar"
        value="${platform-folder}\android.jar" />

    <property
        name="tools.aapt"
        value="${platform-tools-folder}/aapt.exe" />

    <property
        name="tools.javac"
        value="${jdk-folder}\bin\javac.exe" />

    <property
        name="tools.dx"
        value="${platform-tools-folder}\dx.bat" />

    <property
        name="tools.apkbuilder"
        value="${sdk-folder}\tools\apkbuilder.bat" />

    <property
        name="tools.jarsigner"
        value="${jdk-folder}\bin\jarsigner.exe" />

    <!-- 项目输入目录配置 -->

    <property
        name="project-dir"
        value="." />

    <property
        name="assets"
        value="${project-dir}\assets" />

    <property
        name="res"
        value="${project-dir}\res" />

    <property
        name="src"
        value="${project-dir}\src" />

    <property
        name="libs"
        value="${project-dir}\libs" />

    <!-- 项目输出目录配置 -->

    <property
        name="bin"
        value="${project-dir}\bin" />

    <property
        name="gen"
        value="${project-dir}\gen" />

    <property
        name="manifest"
        value="${project-dir}\AndroidManifest.xml" />
    <!-- 生成文件放置地方 -->

    <property
        name="java-file-gen"
        value="${gen}\com\example\andfix\*.java" />

    <property
        name="java-file-src"
        value="${src}\com\example\andfix\*.java" />

    <property
        name="main-dex-name"
        value="${bin}\classes.dex" />

    <property
        name="sub-dex-name"
        value="${bin}\classes2.dex" />

    <property
        name="package-temp-name"
        value="${bin}\${ant.project.name}.arsc" />
    <!-- 未签名包 -->

    <property
        name="unsigned-apk-name"
        value="${ant.project.name}_unsigned.apk" />

    <property
        name="unsigned-apk-path"
        value="${bin}\${unsigned-apk-name}" />
    <!-- 签名包 -->

    <property
        name="signed-apk-name"
        value="${ant.project.name}.apk" />

    <property
        name="signed-apk-path"
        value="${bin}\${signed-apk-name}" />
    <!-- 密钥 -->

    <property
        name="keystore-name"
        value="${project-dir}\rearviewkey.keystore" />

    <property
        name="keystore-alias"
        value="rearview" />

    <property
        name="main-dex-rule"
        value="${project-dir}\main-dex-rule.txt" />

    <taskdef resource="net/sf/antcontrib/antlib.xml" >
        <classpath>
            <pathelement location="I:\ant-contrib.jar"/>
        </classpath>
    </taskdef>

    <!-- 初始化target -->

    <target name="init" >

        <echo message="init..." />

        <delete includeemptydirs="true" >

            <fileset dir="${bin}" >

                <include name="**/*" >
                </include>
            </fileset>
        </delete>

        <mkdir dir="${bin}" />
    </target>

    <!-- 生成R.java类文件 -->

    <target
        name="gen-R"
        depends="init" >

        <echo message="Generating R.java from the resources." />

        <exec
            executable="${tools.aapt}"
            failonerror="true" >

            <!-- package表示打包 -->

            <arg value="package" />

            <arg value="-f" />

            <arg value="-m" />

            <arg value="-J" />

            <arg value="${gen}" />

            <arg value="-S" />

            <arg value="${res}" />

            <arg value="-M" />

            <arg value="${manifest}" />

            <arg value="-I" />

            <arg value="${android-jar}" />
        </exec>
    </target>

    <!-- 编译源文件生成对应的class文件 -->

    <target
        name="compile"
        depends="gen-R" >

        <echo message="compile..." />

        <javac
            bootclasspath="${android-jar}"
            destdir="${bin}"
            compiler="javac1.8"
            encoding="utf-8"
            includeantruntime="false"
            listfiles="true"
            target="1.6">

            <src path="${project-dir}" />

            <classpath>

                <!-- 引入第三方jar包所需要引用,用于辅助编译,并没有将jar打包进去。 -->

                <fileset
                    dir="${libs}"
                    includes="*.jar" />
            </classpath>
        </javac>
    </target>

    <!-- 构建多分包dex文件 -->

    <target
        name="multi-dex"
        depends="compile" >

        <echo message="Generate multi-dex..." />

        <exec
            executable="${tools.dx}"
            failonerror="true" >
            <arg value="--dex" />
            <arg value="--multi-dex" />
            <!-- 多分包命令,每个包最大的方法数为10000 -->
            <arg value="--set-max-idx-number=10000" />
            <arg value="--main-dex-list" />
            <!-- 主包包含class文件列表 -->
            <arg value="${main-dex-rule}" />
            <arg value="--minimal-main-dex" />
            <arg value="--output=${bin}" />
            <!-- 把bin下所有class打包 -->
            <arg value="${bin}" />
            <!-- 把libs下所有jar打包 -->
            <!-- <arg value="${libs}" /> -->
        </exec>
    </target>

    <!-- 打包资源文件(包括res、assets、AndroidManifest.xml) -->

    <target
        name="package"
        depends="multi-dex" >

        <echo message="package-res-and-assets..." />

        <exec
            executable="${tools.aapt}"
            failonerror="true" >

            <arg value="package" />

            <arg value="-f" />

            <arg value="-S" />

            <arg value="${res}" />

            <arg value="-A" />

            <arg value="${assets}" />

            <arg value="-M" />

            <arg value="${manifest}" />

            <arg value="-I" />

            <arg value="${android-jar}" />

            <arg value="-F" />
            <!-- 放到临时目录中 -->

            <arg value="${package-temp-name}" />
        </exec>
    </target>
    <!-- 对临时目录进行打包 -->

    <target
        name="build-unsigned-apk"
        depends="package" >

        <echo message="Build-unsigned-apk" />

        <java
            classname="com.android.sdklib.build.ApkBuilderMain"
            classpath="${sdk-folder}/tools/lib/sdklib.jar" >

            <!-- 输出路径 -->

            <arg value="${unsigned-apk-path}" />

            <arg value="-u" />

            <arg value="-z" />

            <arg value="${package-temp-name}" />

            <arg value="-f" />

            <arg value="${main-dex-name}" />

            <arg value="-rf" />

            <arg value="${src}" />

            <arg value="-rj" />

            <arg value="${libs}" />
        </java>
    </target>

    <!-- 拷贝文件到apk项目的根目录下 -->

    <target
        name="copy_dex"
        depends="build-unsigned-apk" >

        <echo message="copy dex..." />

        <copy todir="${project-dir}" >

            <fileset dir="${bin}" >

                <include name="classes*.dex" />
            </fileset>
        </copy>
    </target>

    <!-- 循环遍历bin目录下的所有dex文件 -->
    <target
        name="add-subdex-toapk"
        depends="copy_dex" >

        <echo message="Add subdex to apk..." />

        <foreach
            param="dir.name"
            target="aapt-add-dex" >

            <path>

                <fileset
                    dir="${bin}"
                    includes="classes*.dex" />
            </path>
        </foreach>
    </target>

    <!-- 使用aapt命令添加dex文件 -->

    <target name="aapt-add-dex" >
        <echo message="${dir.name}" />
        <echo message="执行了app" />
        <!-- 使用正则表达式获取classes的文件名 -->
        <propertyregex
            casesensitive="false"
            input="${dir.name}"
            property="dexfile"
            regexp="classes(.*).dex"
            select="\0" />
        <if>
            <equals
                arg1="${dexfile}"
                arg2="classes.dex" />
            <then>
                <echo>
                   ${dexfile} is not handle
                </echo>
            </then>
            <else>
                <echo>
                    ${dexfile} is handle
                </echo>
                <exec
                    executable="${tools.aapt}"
                    failonerror="true" >
                    <arg value="add" />
                    <arg value="${unsigned-apk-path}" />
                    <arg value="${dexfile}" />
                </exec>
            </else>
        </if>
        <delete file="${project-dir}\${dexfile}" />
    </target>

    <!-- 生成签名的apk -->
    <target
        name="sign-apk"
        depends="add-subdex-toapk" >

        <echo message="Sign apk..." />

        <exec
            executable="${tools.jarsigner}"
            failonerror="true" >
            <!-- keystore -->
            <arg value="-keystore" />
            <arg value="${keystore-name}" />
            <!-- 秘钥 -->
            <arg value="-storepass" />
            <arg value="111111" />
            <!-- 秘钥口令 -->
            <arg value="-keypass" />
            <arg value="111111" />
            <arg value="-signedjar" />
            <!-- 签名的apk -->
            <arg value="${signed-apk-path}" />
            <!-- 未签名的apk -->
            <arg value="${unsigned-apk-path}" />
            <!-- 别名 -->
            <arg value="${keystore-alias}" />
        </exec>
    </target>

    <!-- 签名发布 -->

    <target
        name="release"
        depends="sign-apk" >

        <delete file="${package-temp-name}" />

        <delete file="${unsigned-apk-path}" />

        <echo>
            APK is released.path:${signed-apk-path}
        </echo>
    </target>

</project>
主dex文件包含的类说明
com/example/andfix/MainActivity.class
com/example/andfix/App.class
com/example/andfix/FileUtils.class
com/example/andfix/FixDexUtils.class
文档结构如下

实现过程中也有很多坑
比如:
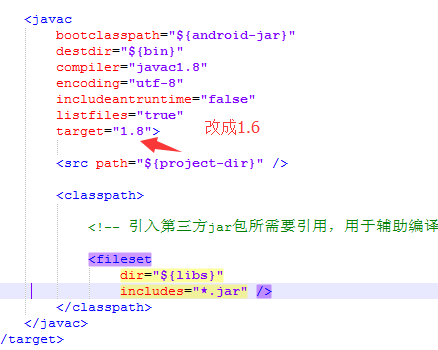
com.android.dx.cf.iface.ParseException: bad class file magic (cafebabe) or version (0034.0000)
解决方法就是降低你的编译版本(jdk)
如果你在过程中遇到其他问题,不要怕麻烦一点一点采坑。走过来就是一种收获
当然本文只是描述热加载的过程和原理
ps:现在这样的框架也有很多
1.DroidPlugin
用途:动态加载

使用案例:360手机助手

GitHub地址:https://github.com/Qihoo360/DroidPlugin

ppt介绍:https://github.com/Qihoo360/DroidPlugin/tree/master/DOC

Demo:https://github.com/SpikeKing/wcl-plugin-test-app

详解:

http://blog.csdn.net/yzzst/article/details/48093567

http://v2ex.com/t/216494


2.AndFix
用途:热修复

GitHub地址:https://github.com/alibaba/AndFix

讲解:

http://blog.csdn.net/yzzst/article/details/48465031

http://blog.csdn.net/qxs965266509/article/details/49816007

http://blog.csdn.net/yaya_soft/article/details/50460102

3.dexposed
用途:热修复

GitHub地址:https://github.com/alibaba/dexposed

讲解:

http://blog.csdn.net/yzzst/article/details/47954479

http://blog.csdn.net/yzzst/article/details/47659987

http://www.jianshu.com/p/14edcb444c51

4.Small
用途:动态加载

GitHub地址:https://github.com/wequick/Small

Demo:https://github.com/cayden/MySmall

5. DynamicAPK
用途:动态加载、热修复

案例:携程

GitHub地址:https://github.com/CtripMobile/DynamicAPK

详解:http://www.infoq.com/cn/articles/ctrip-android-dynamic-loading

6.ClassPatch
用途:热修复

GitHub地址:https://github.com/Jarlene/ClassPatch

详解:http://blog.csdn.net/xwl198937/article/details/49801975

7.ACDD
用途:动态加载

GitHub地址:https://github.com/bunnyblue/ACDD

8.HotFix
用途:热修复

GitHub地址:https://github.com/dodola/HotFix

该项目是基于QQ空间终端开发团队的技术文章实现的

9.Nuwa
用途:热修复

GitHub地址:https://github.com/jasonross/Nuwa

详解:http://www.jianshu.com/p/72c17fb76f21/comments/1280046

10.DroidFix
用途:热修复

GitHub地址:https://github.com/bunnyblue/DroidFix

详解:http://bunnyblue.github.io/DroidFix/

11.AndroidDynamicLoader
用途:动态加载

GitHub地址:https://github.com/mmin18/AndroidDynamicLoader

Demo:https://github.com/mmin18/AndroidDynamicLoader/raw/master/host.apk

 浙公网安备 33010602011771号