EasyCode实现数据库到Swagger全自动化
## 简介
EasyCode是基于IntelliJ IDEA开发的代码生成插件,通过自定义生成模板可以完成定制化的 Mapper Service Controller 生成,结合数据库 Comment还可以实现从数据库到 Swagger 的一键配置,非常的强大与方便,项目地址:EasyCode--码云 这里推荐大家使用
安装
和一般的Idea插件安装方式一样,点击 File -> Setting -> Plugins 搜索 EasyCode 点击 Install 安装即可,安装之后需要重启,当然如果是Idea最新的2019.3版本支持插件热安装就不需要重启了。

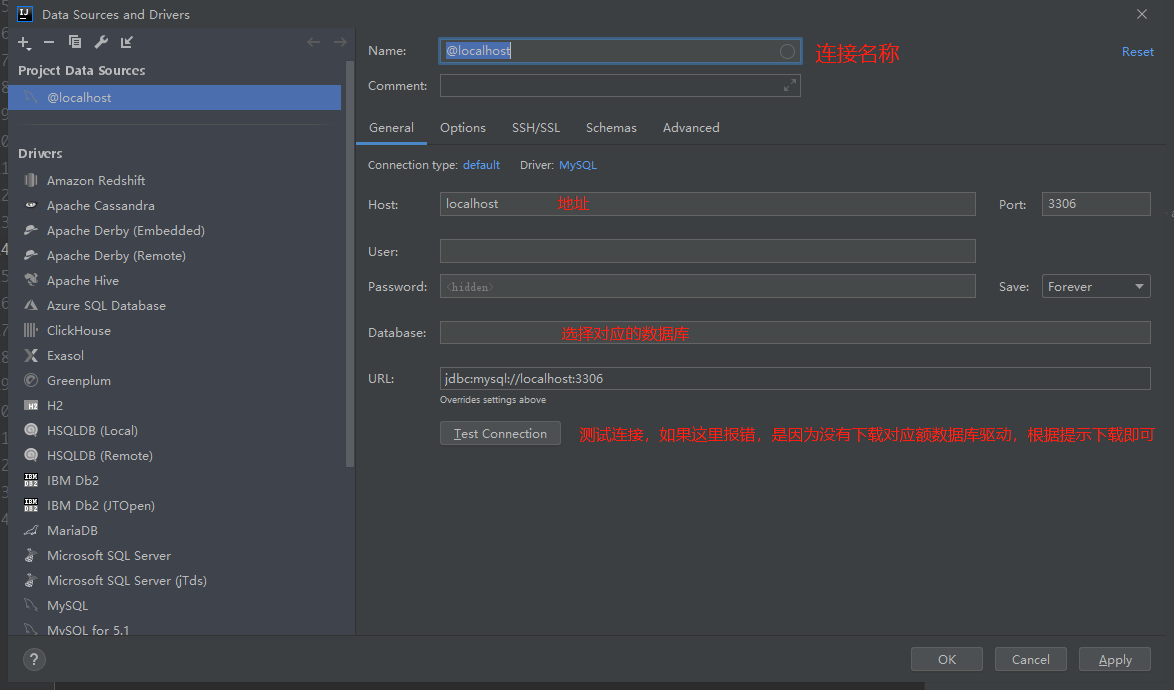
连接数据库
安装之后需要使用Idea连接数据库,在Idea的右侧有个DataBase选项卡,点击之后选择对应的数据库。这边我使用的是 Mysql 数据库

配置好连接名称,连接路径,账号密码和数据库测试连接,测试通过后点击OK,就可以成功的连接到数据库,这里Idea的数据库图形化界面做的也挺好的。
配置EasyCode的模板
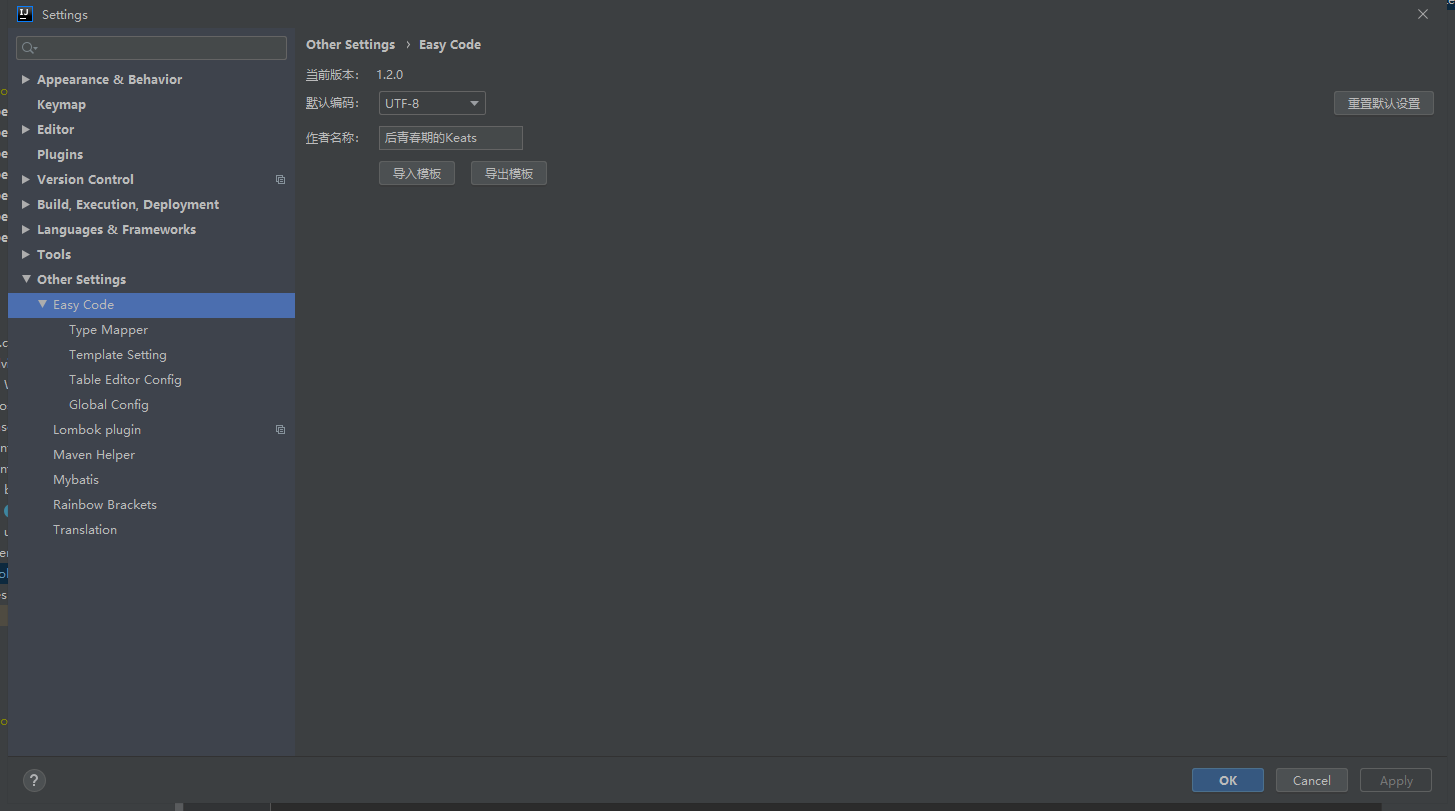
1. 配置作者名称
同样是 File -> Settings -> other Settings 选择 EasyCode 或者直接搜索 EasyCode 进行编辑,首先键入作者名称,这样在生成的类上面就会加上你的名字,时间等信息。
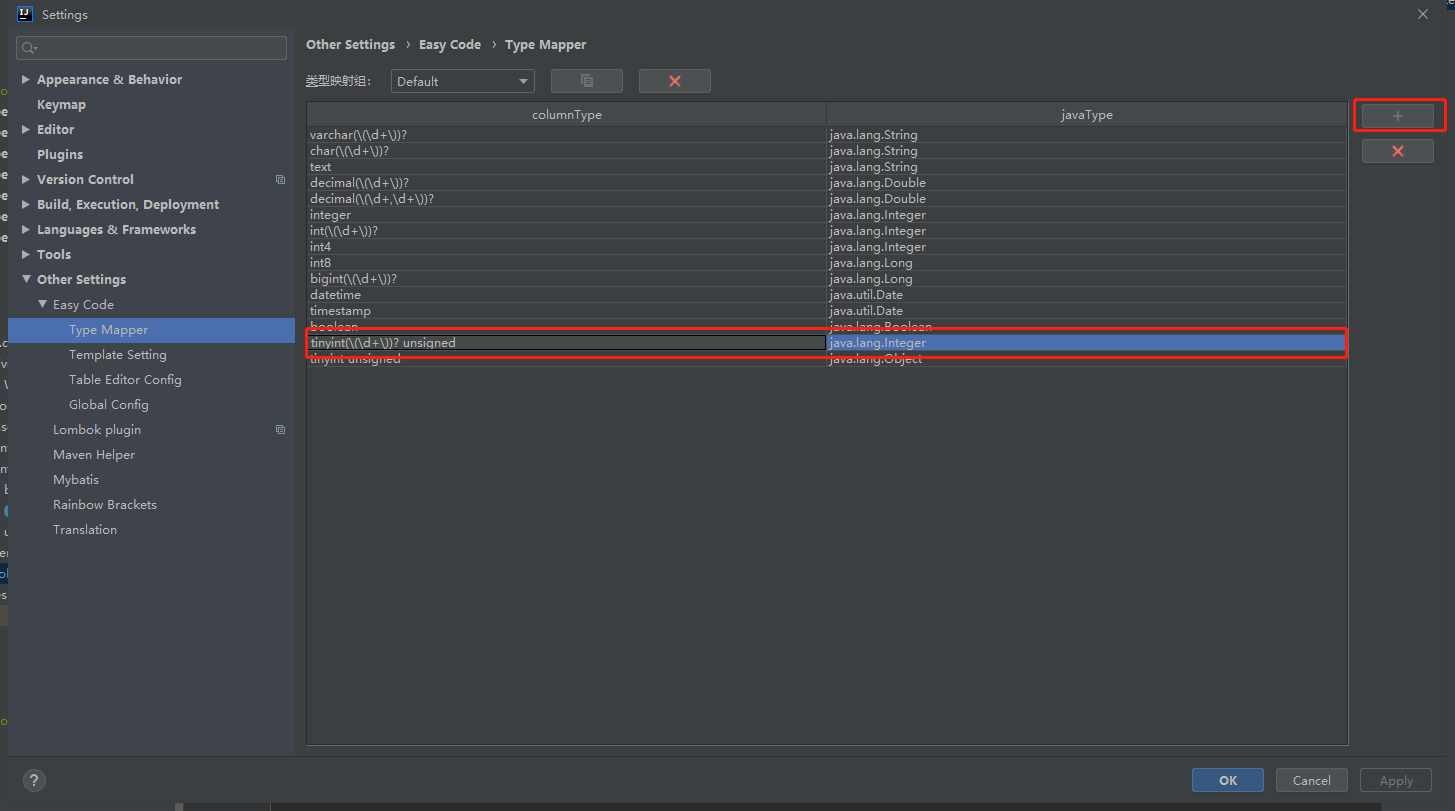
2. Type Manager 映射类型管理
此页面是用来建立数据库字段类型与Java变量类型关系的,其中已经预先定义好了很多对应关系,但对于 tinyint((\d+))? unsigned (无符号的byte)类型却没有进行预定义,如果不进行手动配置,在进行逆向生成的时候会将其映射成 Java Object 类型,所以需要我们进行手动的添加关联关系
3. Template Setting 模板设置
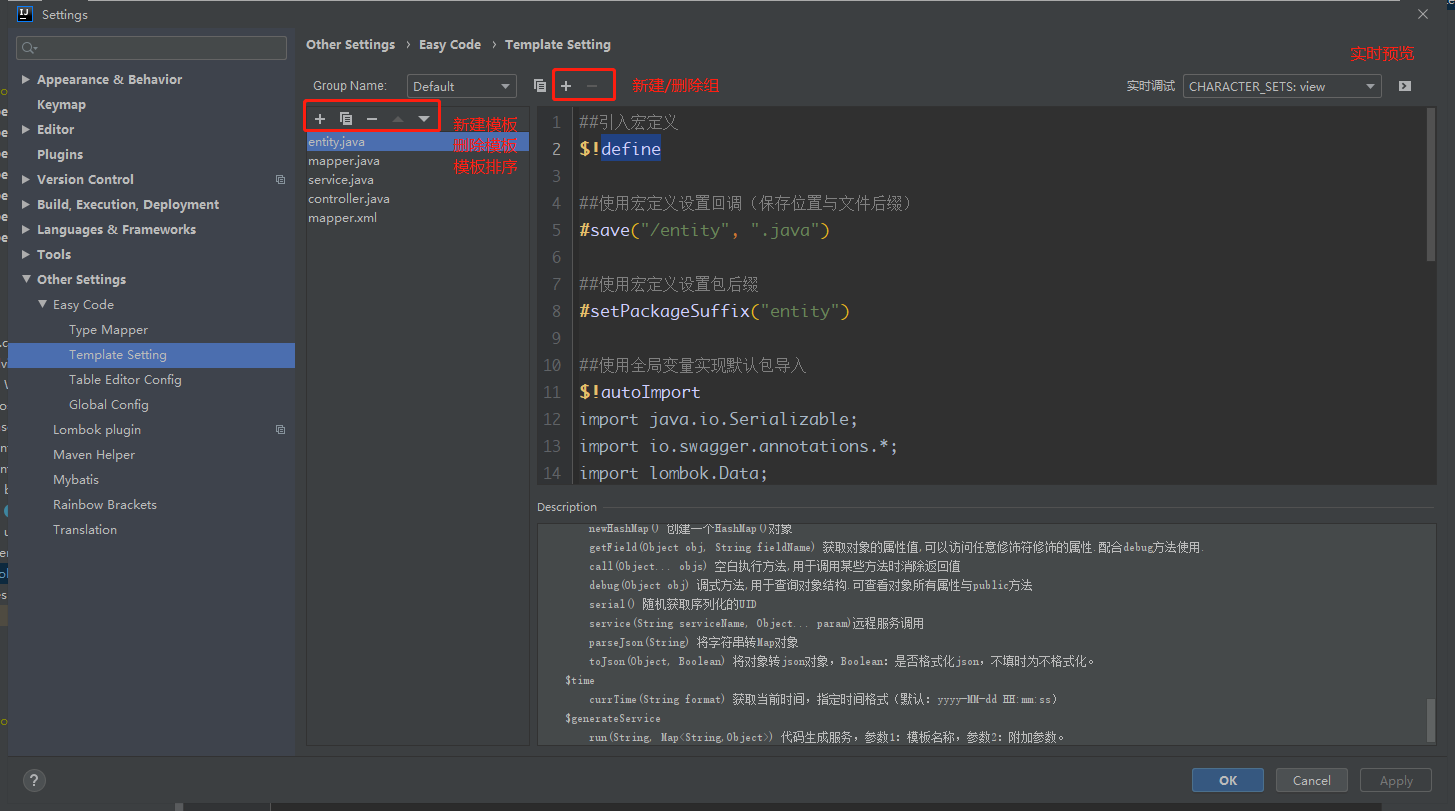
这个页面就是我们主要需要配置的页面了,我们可以自己新建一个模板组,也可以直接在原来模板文件的基础上进行修改。这里我已经对原有的模板进行了自定义的修改,保留了 entity.java mapper.java mapper.xml service.java controller.java 去掉了原有的 dao serviceImpl.具体的模板内容如下,需要的朋友可以直接复制修改。
当然也可以点击配置作者名称页面的导入模板按钮,输入对应的 Token 进行一键替换由于token只能保持6个小时,所以我就不在这里贴上了。
entity.java
实体类模板改动如下
- 删除了原本的 Getter/Setter 采用 lombok 的 @Data 注解替换之
- 类添加 @ApiModel("$tableInfo.comment") 注解,读取 Mysql 中表的注释作为类在Swagger中的解释
- 字段添加 @ApiModelProperty("$column.comment") 注解,读取 Mysql 中字段的注释作为对应参数在Swagger中的注释
##引入宏定义
$!define

##使用宏定义设置回调(保存位置与文件后缀)
#save("/entity", ".java")

##使用宏定义设置包后缀
#setPackageSuffix("entity")

##使用全局变量实现默认包导入
$!autoImport
import java.io.Serializable;
import io.swagger.annotations.*;
import lombok.Data;

##使用宏定义实现类注释信息
#tableComment("实体类")
@Data
@ApiModel("$tableInfo.comment")
public class $!{tableInfo.name} implements Serializable {
    private static final long serialVersionUID = $!tool.serial();
#foreach($column in $tableInfo.fullColumn)
    #if(${column.comment})/**
    * ${column.comment}
    */#end

    @ApiModelProperty("$column.comment")
    private $!{tool.getClsNameByFullName($column.type)} $!{column.name};

#end
}
mapper.java
Mapper接口改动如下
- 添加 @Mapper @Repository 注解
##定义初始变量
#set($tableName = $tool.append($tableInfo.name, "Mapper"))
##设置回调
$!callback.setFileName($tool.append($tableName, ".java"))
$!callback.setSavePath($tool.append($tableInfo.savePath, "/mapper"))

##拿到主键
#if(!$tableInfo.pkColumn.isEmpty())
    #set($pk = $tableInfo.pkColumn.get(0))
#end

#if($tableInfo.savePackageName)package $!{tableInfo.savePackageName}.#{end}mapper;

import $!{tableInfo.savePackageName}.entity.$!{tableInfo.name};
import org.apache.ibatis.annotations.Mapper;
import org.apache.ibatis.annotations.Param;
import org.springframework.stereotype.Repository;
import java.util.List;

/**
 * $!{tableInfo.comment}($!{tableInfo.name})表数据库访问层
 *
 * @author $!author
 * @since $!time.currTime()
 */
@Mapper
@Repository
public interface $!{tableName} {

    /**
     * 通过ID查询单条数据
     *
     * @param $!pk.name 主键
     * @return 实例对象
     */
    $!{tableInfo.name} queryById($!pk.shortType $!pk.name);

    /**
     * 查询指定行数据
     *
     * @param offset 查询起始位置
     * @param limit 查询条数
     * @return 对象列表
     */
    List<$!{tableInfo.name}> queryAllByLimit(@Param("offset") int offset, @Param("limit") int limit);


    /**
     * 通过实体作为筛选条件查询
     *
     * @param $!tool.firstLowerCase($!{tableInfo.name}) 实例对象
     * @return 对象列表
     */
    List<$!{tableInfo.name}> queryAll($!{tableInfo.name} $!tool.firstLowerCase($!{tableInfo.name}));

    /**
     * 新增数据
     *
     * @param $!tool.firstLowerCase($!{tableInfo.name}) 实例对象
     * @return 影响行数
     */
    int insert($!{tableInfo.name} $!tool.firstLowerCase($!{tableInfo.name}));

    /**
     * 修改数据
     *
     * @param $!tool.firstLowerCase($!{tableInfo.name}) 实例对象
     * @return 影响行数
     */
    int update($!{tableInfo.name} $!tool.firstLowerCase($!{tableInfo.name}));

    /**
     * 通过主键删除数据
     *
     * @param $!pk.name 主键
     * @return 影响行数
     */
    int deleteById($!pk.shortType $!pk.name);

}
mapper.xml
##引入mybatis支持
$!mybatisSupport

##设置保存名称与保存位置
$!callback.setFileName($tool.append($!{tableInfo.name}, "Mapper.xml"))
$!callback.setSavePath($tool.append($modulePath, "/src/main/resources/mapper"))

##拿到主键
#if(!$tableInfo.pkColumn.isEmpty())
    #set($pk = $tableInfo.pkColumn.get(0))
#end

<?xml version="1.0" encoding="UTF-8"?>
<!DOCTYPE mapper PUBLIC "-//mybatis.org//DTD Mapper 3.0//EN" "http://mybatis.org/dtd/mybatis-3-mapper.dtd">
<mapper namespace="$!{tableInfo.savePackageName}.mapper.$!{tableInfo.name}Mapper">

    <resultMap type="$!{tableInfo.savePackageName}.entity.$!{tableInfo.name}" id="$!{tableInfo.name}Map">
#foreach($column in $tableInfo.fullColumn)
        <result property="$!column.name" column="$!column.obj.name" jdbcType="$!column.ext.jdbcType"/>
#end
    </resultMap>

    <!--查询单个-->
    <select id="queryById" resultMap="$!{tableInfo.name}Map">
        select
          #allSqlColumn()

        from $!{tableInfo.obj.parent.name}.$!tableInfo.obj.name
        where $!pk.obj.name = #{$!pk.name}
    </select>

    <!--查询指定行数据-->
    <select id="queryAllByLimit" resultMap="$!{tableInfo.name}Map">
        select
          #allSqlColumn()

        from $!{tableInfo.obj.parent.name}.$!tableInfo.obj.name
        limit #{offset}, #{limit}
    </select>

    <!--通过实体作为筛选条件查询-->
    <select id="queryAll" resultMap="$!{tableInfo.name}Map">
        select
          #allSqlColumn()

        from $!{tableInfo.obj.parent.name}.$!tableInfo.obj.name
        <where>
#foreach($column in $tableInfo.fullColumn)
            <if test="$!column.name != null#if($column.type.equals("java.lang.String")) and $!column.name != ''#end">
                and $!column.obj.name = #{$!column.name}
            </if>
#end
        </where>
    </select>

    <!--新增所有列-->
    <insert id="insert" keyProperty="$!pk.name" useGeneratedKeys="true">
        insert into $!{tableInfo.obj.parent.name}.$!{tableInfo.obj.name}(#foreach($column in $tableInfo.otherColumn)$!column.obj.name#if($velocityHasNext), #end#end)
        values (#foreach($column in $tableInfo.otherColumn)#{$!{column.name}}#if($velocityHasNext), #end#end)
    </insert>

    <!--通过主键修改数据-->
    <update id="update">
        update $!{tableInfo.obj.parent.name}.$!{tableInfo.obj.name}
        <set>
#foreach($column in $tableInfo.otherColumn)
            <if test="$!column.name != null#if($column.type.equals("java.lang.String")) and $!column.name != ''#end">
                $!column.obj.name = #{$!column.name},
            </if>
#end
        </set>
        where $!pk.obj.name = #{$!pk.name}
    </update>

    <!--通过主键删除-->
    <delete id="deleteById">
        delete from $!{tableInfo.obj.parent.name}.$!{tableInfo.obj.name} where $!pk.obj.name = #{$!pk.name}
    </delete>

</mapper>
service.java
服务方法改动如下,这里我省略了 service 接口,而直接生成实现类。如果习惯于接口+实现类的使用方法可以保留接口和实现类,将@Servcie注解添加到接口上, Controller中继续注入接口
##定义初始变量
#set($tableName = $tool.append($tableInfo.name, "Service"))
##设置回调
$!callback.setFileName($tool.append($tableName, ".java"))
$!callback.setSavePath($tool.append($tableInfo.savePath, "/service"))

##拿到主键
#if(!$tableInfo.pkColumn.isEmpty())
    #set($pk = $tableInfo.pkColumn.get(0))
#end

#if($tableInfo.savePackageName)package $!{tableInfo.savePackageName}.#{end}service;

import $!{tableInfo.savePackageName}.entity.$!{tableInfo.name};
import $!{tableInfo.savePackageName}.mapper.$!{tableInfo.name}Mapper;
import org.springframework.stereotype.Service;
import org.springframework.beans.factory.annotation.Autowired;
import java.util.List;

/**
 * $!{tableInfo.comment}($!{tableInfo.name})表服务实现类
 *
 * @author $!author
 * @since $!time.currTime()
 */
@Service("$!tool.firstLowerCase($!{tableInfo.name})Service")
public class $!{tableName} {
    @Autowired
    private $!{tableInfo.name}Mapper $!tool.firstLowerCase($!{tableInfo.name})Mapper;

    /**
     * 通过ID查询单条数据
     *
     * @param $!pk.name 主键
     * @return 实例对象
     */
    public $!{tableInfo.name} queryById($!pk.shortType $!pk.name) {
        return this.$!{tool.firstLowerCase($!{tableInfo.name})}Mapper.queryById($!pk.name);
    }

    /**
     * 查询多条数据
     *
     * @param offset 查询起始位置
     * @param limit 查询条数
     * @return 对象列表
     */
    public List<$!{tableInfo.name}> queryAllByLimit(int offset, int limit) {
        return this.$!{tool.firstLowerCase($!{tableInfo.name})}Mapper.queryAllByLimit(offset, limit);
    }

    /**
     * 新增数据
     *
     * @param $!tool.firstLowerCase($!{tableInfo.name}) 实例对象
     * @return 实例对象
     */
    public $!{tableInfo.name} insert($!{tableInfo.name} $!tool.firstLowerCase($!{tableInfo.name})) {
        this.$!{tool.firstLowerCase($!{tableInfo.name})}Mapper.insert($!tool.firstLowerCase($!{tableInfo.name}));
        return $!tool.firstLowerCase($!{tableInfo.name});
    }

    /**
     * 修改数据
     *
     * @param $!tool.firstLowerCase($!{tableInfo.name}) 实例对象
     * @return 实例对象
     */
    public $!{tableInfo.name} update($!{tableInfo.name} $!tool.firstLowerCase($!{tableInfo.name})) {
        this.$!{tool.firstLowerCase($!{tableInfo.name})}Mapper.update($!tool.firstLowerCase($!{tableInfo.name}));
        return this.queryById($!{tool.firstLowerCase($!{tableInfo.name})}.get$!tool.firstUpperCase($pk.name)());
    }

    /**
     * 通过主键删除数据
     *
     * @param $!pk.name 主键
     * @return 是否成功
     */
    public boolean deleteById($!pk.shortType $!pk.name) {
        return this.$!{tool.firstLowerCase($!{tableInfo.name})}Mapper.deleteById($!pk.name) > 0;
    }
}
controller.java
控制层主要做了如下改动,
- 类上添加 @Api(tags = "$!{tableInfo.comment}($!{tableInfo.name})") 以在 Swagger 中显示表注释
- selectOne 方法添加 @ApiOperation(value = "根据id查询 $!{tableInfo.comment}")
- 修改接口为 RestFul 格式调用,并添加对应的注解
##定义初始变量
#set($tableName = $tool.append($tableInfo.name, "Controller"))
##设置回调
$!callback.setFileName($tool.append($tableName, ".java"))
$!callback.setSavePath($tool.append($tableInfo.savePath, "/controller"))
##拿到主键
#if(!$tableInfo.pkColumn.isEmpty())
    #set($pk = $tableInfo.pkColumn.get(0))
#end

#if($tableInfo.savePackageName)package $!{tableInfo.savePackageName}.#{end}controller;

import $!{tableInfo.savePackageName}.entity.$!{tableInfo.name};
import $!{tableInfo.savePackageName}.service.$!{tableInfo.name}Service;
import org.springframework.web.bind.annotation.*;
import io.swagger.annotations.Api;
import io.swagger.annotations.ApiOperation;
import io.swagger.annotations.ApiParam;
import org.springframework.beans.factory.annotation.Autowired;

/**
 * $!{tableInfo.comment}($!{tableInfo.name})表控制层
 *
 * @author $!author
 * @since $!time.currTime()
 */
@Api(tags = "$!{tableInfo.comment}($!{tableInfo.name})")
@RestController
@RequestMapping("$!tool.firstLowerCase($tableInfo.name)")
public class $!{tableName} {
    /**
     * 服务对象
     */
    @Autowired
    private $!{tableInfo.name}Service $!tool.firstLowerCase($tableInfo.name)Service;

    /**
     * 通过主键查询单条数据
     *
     * @param id 主键
     * @return 单条数据
     */
    @ApiOperation(value = "根据id查询 $!{tableInfo.comment}")
    @GetMapping("selectOne/{id}")
    public $!{tableInfo.name} selectOne(@ApiParam(value = "$!pk.comment ID") @PathVariable("id") $!pk.shortType id) {
        return this.$!{tool.firstLowerCase($tableInfo.name)}Service.queryById(id);
    }

}
说明
说明文档:
属性
$author 设置中的作者 java.lang.String
$encode 设置的编码 java.lang.String
$modulePath 选中的module路径 java.lang.String
$projectPath 项目绝对路径 java.lang.String
对象
$tableInfo 表对象
obj 表原始对象 com.intellij.database.model.DasTable
name 表名(转换后的首字母大写)java.lang.String
comment 表注释 java.lang.String
fullColumn 所有列 java.util.List
pkColumn 主键列 java.util.List
otherColumn 其他列 java.util.List
savePackageName 保存的包名 java.lang.String
savePath 保存路径 java.lang.String
saveModelName 保存的model名称 java.lang.String
columnInfo 列对象
obj 列原始对象 com.intellij.database.model.DasColumn
name 列名(首字母小写) java.lang.String
comment 列注释 java.lang.String
type 列类型(类型全名) java.lang.String
shortType 列类型(短类型) java.lang.String
custom 是否附加列 java.lang.Boolean
ext 附加字段(Map类型) java.lang.Map<java.lang.String, java.lang.Object>
$tableInfoList java.util.List
$importList 所有需要导入的包集合 java.util.Set<java.lang.String>
回调
&callback setFileName(String) 设置文件储存名字
setSavePath(String) 设置文件储存路径,默认使用选中路径
工具
$tool
firstUpperCase(String name) 首字母大写方法
firstLowerCase(String name) 首字母小写方法
getClsNameByFullName(String fullName) 通过包全名获取类名
getJavaName(String name) 将下划线分割字符串转驼峰命名(属性名)
getClassName(String name) 将下划线分割字符串转驼峰命名(类名)
append(Object... objs) 多个数据进行拼接
newHashSet(Object... objs) 创建一个HashSet对象
newArrayList(Object... objs) 创建一个ArrayList对象
newLinkedHashMap() 创建一个LinkedHashMap()对象
newHashMap() 创建一个HashMap()对象
getField(Object obj, String fieldName) 获取对象的属性值,可以访问任意修饰符修饰的属性.配合debug方法使用.
call(Object... objs) 空白执行方法,用于调用某些方法时消除返回值
debug(Object obj) 调式方法,用于查询对象结构.可查看对象所有属性与public方法
serial() 随机获取序列化的UID
service(String serviceName, Object... param)远程服务调用
parseJson(String) 将字符串转Map对象
toJson(Object, Boolean) 将对象转json对象,Boolean:是否格式化json,不填时为不格式化。
$time
currTime(String format) 获取当前时间,指定时间格式(默认:yyyy-MM-dd HH:mm:ss)
$generateService
run(String, Map<String,Object>) 代码生成服务,参数1:模板名称,参数2:附加参数。
4. 一键生成
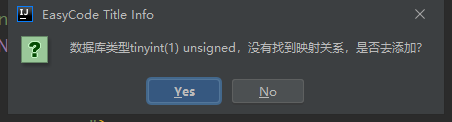
点击Idea右边的DataBase选项卡,选择刚刚连接的数据库,选好对应的表格,点击右键选择 EasyCode -> Generate Code, 如果出现下面的提示,就复制类型后面的字段,到第2步进行配置
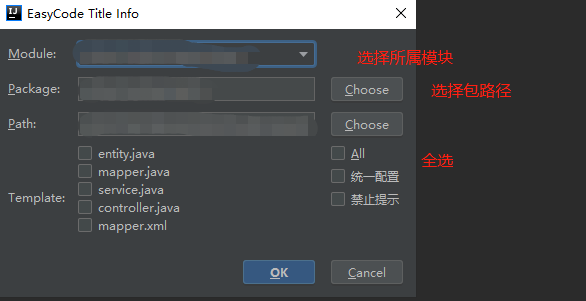
配置完成后重新点击 Generate Code 会出现如下的配置框,选好路径后点击OK,就会生成对应的代码。
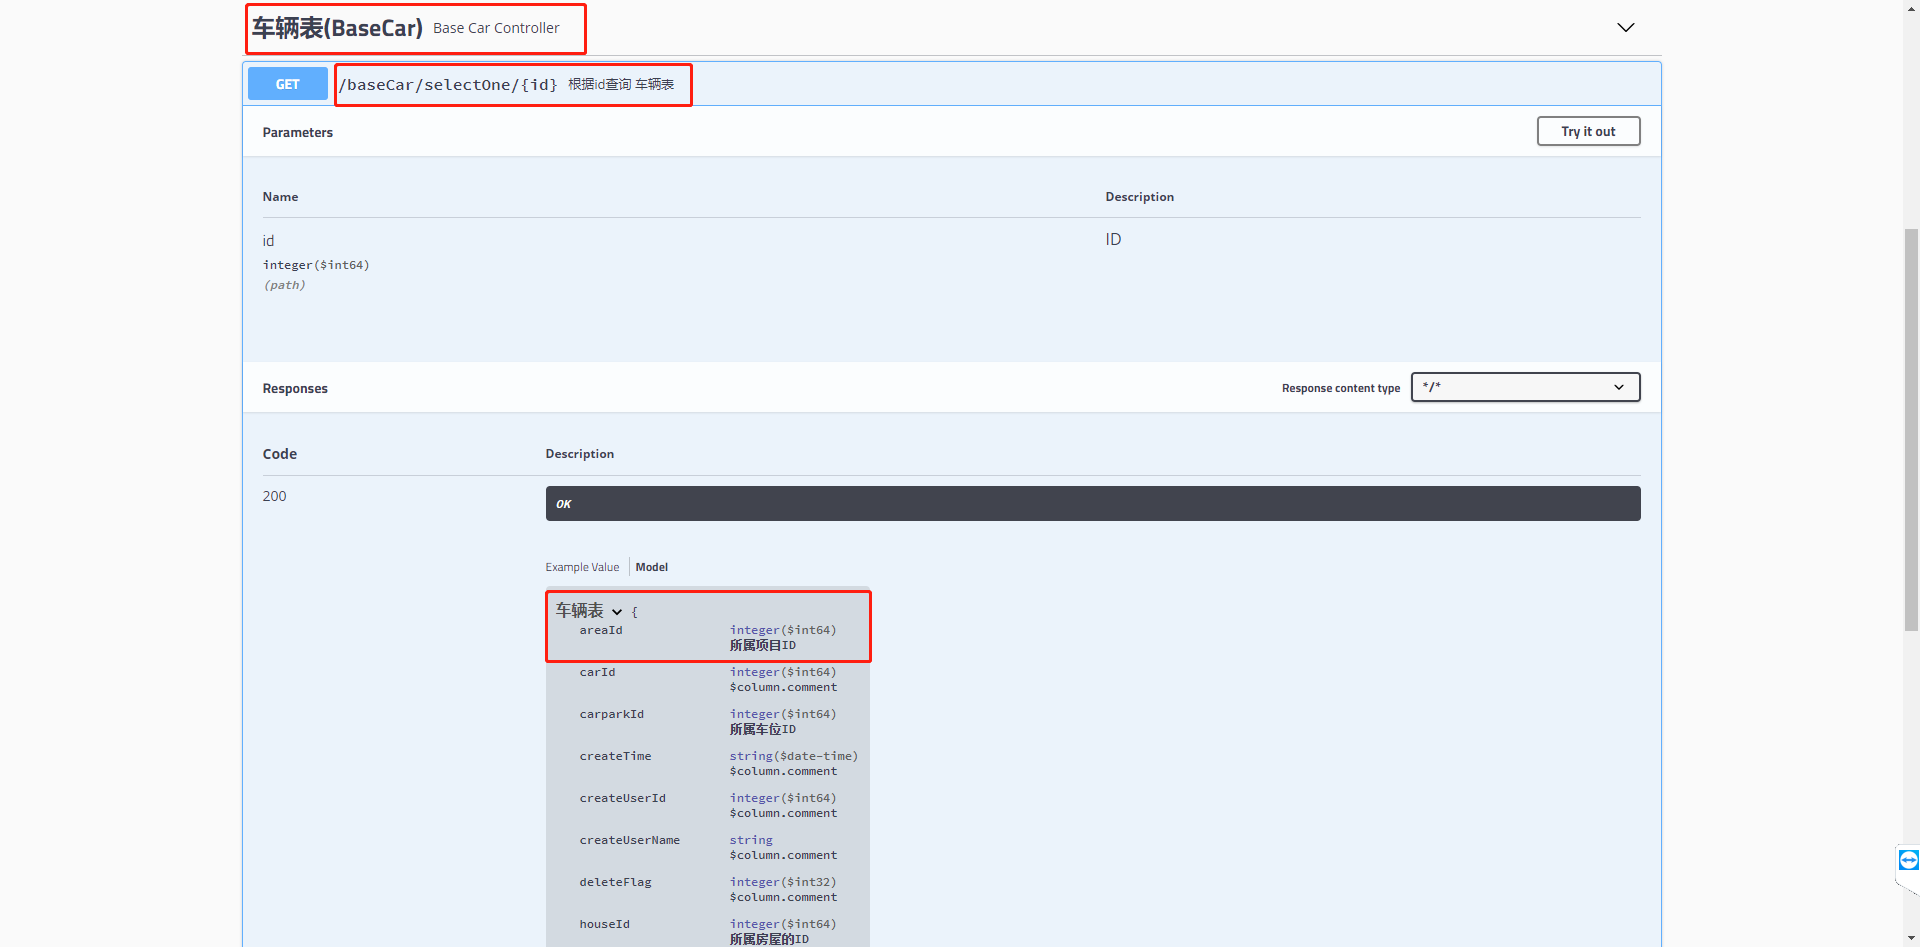
之后启动项目,访问Swagger路径就可以看到对应的配置已经完全自动化生成。这样我们只需要在创建表的时候对字段进行注释,就可以实现 Entity中和前后端交互时的自动化注释。非常方便
我是 Keats @后青春期的Keats ,一个热爱技术的程序员,鉴于技术有限,如果本文有什么纰漏或者兄台还有其他更好的建议/实现方式,欢迎留言评论,谢谢您!

 浙公网安备 33010602011771号