

DOM – Web Components
前言
Web Components 已经诞生很多年了,但在真实项目中,鲜少有人会直接使用它。
我们更多是透过像 Angular、React、Vue 这样的框架,间接接触到 Web Components 的概念。
不过如果想深入理解这些框架,追本溯源地了解原生 Web Components,其实是条很不错的路线。
本篇就来一起探索 Web Components 吧 🚀
参考
YouTube – Web Components Crash Course
Web Components 基础入门-Web Components概念详解(上)
介绍
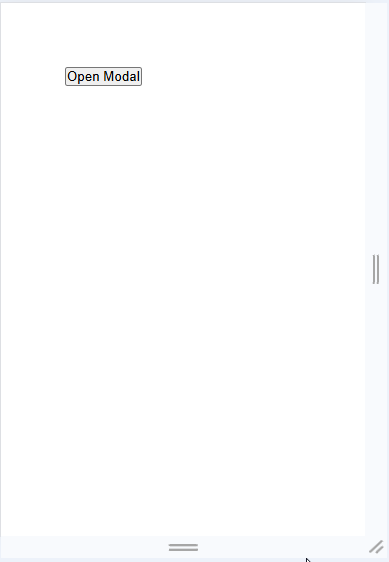
这是一个 model 体验。
点击 open modal button,会弹出一个灰色的遮照层 (overlay & backdrop)。
中间有一个卡片 (card),卡片里有 title 和 description。
overlay 下方有一个 close modal button,点击后 overlay 就消失了。
如果我们要实现这样一个 model 体验,需要写很多代码 (完整代码可以看这篇):
-
HTML (elements)
div.overlay,div.card,button.close等等 -
Styles
overlay 灰色,card 定位剧中,close button 定位在 overlay 中下方等等
-
Scripts
open close button 点击事件
点击后要改变 overlay 的 styles (显示 & 隐藏)
代码多倒不是问题,但代码零散、不能封装和复用,那就是问题了。
我们看看理想中的封装长什么样子:

这是一个视频播放器。
如果我们要实现它,也需要三剑客:
-
elements (如 button)
-
styles (如 button position)
-
scripts (如 click event)
但浏览器替我们实现和封装了它,所以我们只需要写几个简单的 elements 就可以了
<video width="400" controls>
  <source src="mov_bbb.mp4" type="video/mp4">
</video>
浏览器把 video 的具体实现 (elements、styles、scripts) 都封装了起来,只对外暴露一个 video element。
那我们可不可以像浏览器这样,也把 modal 的具体实现 (elements、styles、scripts) 都封装起来变成 modal element?
像这样:
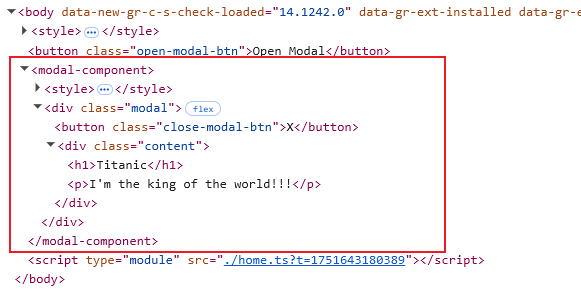
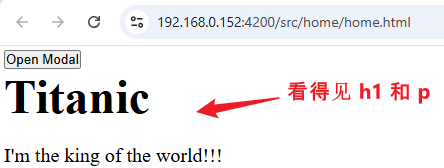
<button class="open-modal-btn">Open Modal</button>

<modal-component>
  <h1>Titanic</h1>
  <p>I'm the king of the world!!!</p>
</modal-component>
当然可以!这就是本篇要介绍的 Web Components。
Web Components 是一个专门用来封装 elements、styles、scripts 的技术。
Custom Elements
Web Components 是由几项技术组成的,其中一项便是 Custom Elements。
What if...?
我们先幻想一下,如果 modal 是原生的,我们会如何使用它?
HTML
<style>
  modal-component h1 {
    margin-bottom: 16px;
    font-size: 48px;
  }

  modal-component p {
    font-size: 20px;
    line-height: 1.5;
  }
</style>

<button class="open-modal-btn">Open Modal</button>

<!-- 为了和原生 element 做区别,特意加了 '-component' 后缀 -->
<modal-component>
  <h1>Titanic</h1>
  <p>I'm the king of the world!!!</p>
</modal-component>
和 video 差不多,写几行 elements 就够了
<video width="400" controls>
  <source src="mov_bbb.mp4" type="video/mp4">
</video>
Scripts
const modal: HTMLModalElement = document.querySelector('modal-component')!;

const openModalBtn = document.querySelector('.open-modal-btn')!;
openModalBtn.addEventListener('click', () => modal.show()); // 透过 modal 对象的 show 方法显示 modal
也和 video 差不多,query 它出来,调用方法操控它。
const video: HTMLVideoElement = document.querySelector('video')!;
await video.play(); // 透过 video 对象的 play 方法播放 video
How element works?
如果我们按上面的假设去执行,肯定不会有效果。
因为浏览器既不认识 <modal-component> tag,也没有 HTMLModalElement 类。
浏览器的工作机制是这样:解析 HTML → 遇到 video → 实例化 HTMLVideoElement → 以此类推,完成 DOM tree。
接着我们从 DOM tree 里把 video query 出来,修改它的属性或调用它的方法来操控它。
按照这套机制,我们需要告知浏览器,在解析到 <modal-component> 时,需要去实例化 HTMLModalElement对象。
如何告知呢?-- 透过 Custom Elements 技术。
Define custom element
// 定义 HTMLModalElement 类
class HTMLModalElement extends HTMLElement {
  show() {}
}

// 把 <modal-component> tag 和 HTMLModalElement 关联起来,告知浏览器
window.customElements.define('modal-component', HTMLModalElement);

// query modal 对象
const modal = document.querySelector('modal-component');
// 查看 modal 对象是不是 HTMLModalElement 的实例
console.log(modal instanceof HTMLModalElement); // true
定义 class HTMLModalElement 后,透过 window.customElements.define 方法,将 <modal-component> 和 HTMLModalElement 关联起来,告知浏览器。
这样一来,浏览器就会把 <modal-component> 实例化为 HTMLModalElement。
接着,我们就可以 query modal 对象,并对它进行操控。
细节补充:
在我们还没有 window.customElements.define之前,浏览器不认识 <modal-component>。
<modal-component> 会被实例化为普通的 HTMLElement 对象。
const modal = document.querySelector('modal-component');
console.log(modal instanceof HTMLElement);      // true
console.log(modal instanceof HTMLModalElement); // false
直到我们 window.customElements.define 之后,modal 对象才会转换成 HTMLModalElement。
const modal = document.querySelector('modal-component');
console.log(modal instanceof HTMLModalElement); // false

window.customElements.define('modal-component', HTMLModalElement);

console.log(modal instanceof HTMLModalElement); // true
注:modal 对象还是同一个 reference 哦,它只是被 "转换" 了而已。这个 "转换" 不是简单的修改 __proto__ 而已哦,我们模拟不来,只有浏览器才做的到。
封装 elements, styles, scripts
上面我们定义的 class HTMLModalElement 是空的,因此即便浏览器实例化了它,也对最终的渲染毫无影响。
我们需要把 modal 的具体实现 (elements、styles、scripts) 通通写入到 HTMLModalElement 里。
写到哪呢?
lifecycle の constructor, connectedCallback & disconnectedCallback
我们了解一下 custom element 的 lifecycle 就知道该写在哪里了。
有两种方式能让浏览器实例化 custom element:
<modal-component>就是上面我们使用的方式,写在 HTML,等浏览器解析到的时候就会实例化
-
document.createElement
const modal = document.createElement('modal-component'); // 先创建
document.body.appendChild(modal); // 后插入 DOM tree
先实例化 modal,然后才插入到 DOM tree 里。
当浏览器创建 custom element 时,第一步是实例化它,因此 constructor 会最先被执行。
接着就等待 custom element 被插入 DOM tree,每当插入时,connectedCallback 会被执行。
而每当 custom element 被 remove from DOM tree 时,disconnectedCallback会被执行。
class HTMLModalElement extends HTMLElement {
  constructor() {
    // 当 const model document.createElement('modal-component') 时执行
  }

  connectedCallback() {
    // 每当 document.body.appendChild(modal) 时执行
  }

  disconnectedCallback() {
    // 每当 modal.remove() 时执行
  }
}
提醒:custom element 被插入 DOM tree 或 remove from DOM tree,是可能反复发生的,因此 connectedCallback 和 disconnectedCallback 也可能会调用多次。
有两个地方可以让我们写:
-
在
constructor里创建 internal elements、styles、scripts。 -
在
connectedCallback里创建 internal elements、styles、scripts。
constructor 的特性:
-
constructor执行时,custom element 还没插入 DOM tree。 -
constructor只会执行一次,即便 custom element 被 remove and reinsert to DOM tree,也只会执行一次。
connectedCallback 的特性:
-
connectedCallback执行时,custom element 已经插入 DOM tree。 -
每当 custom element 被插入 DOM tree 都会执行
那究竟是写在 constructor 比较合适,还是写在 connectedCallback 呢?
没有一定的标准,就依照它们的特性,自行判断。
完整代码
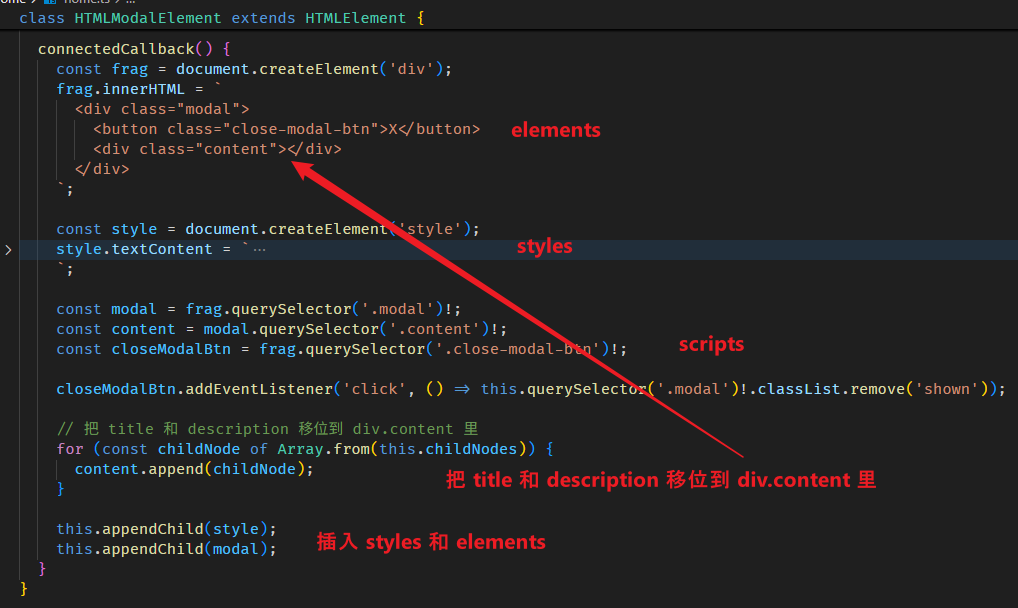
class HTMLModalElement extends HTMLElement {
  show() {
    this.querySelector('.modal')!.classList.add('shown');
  }

  connectedCallback() {
    const style = document.createElement('style');
    style.textContent = `
      .modal {
        visibility: hidden;

        position: fixed;
        inset: 0;
        background-color: hsl(0deg 0% 0% / 20%);

        display: flex;
        justify-content: center;
        align-items: center;
      }

      .modal .close-modal-btn {
        position: absolute;
        left: 50%;
        transform: translateX(-50%);
        bottom: 64px;

        border-radius: 999px;
        border: 0;

        background-color: black;
        color: white;

        width: 64px;
        height: 64px;

        padding: 12px;
        font-size: 32px;

        cursor: pointer;
      }

      .modal .content {
        padding: 32px 48px;

        background-color: white;
        box-shadow: 0 2px 4px hsl(0deg 0% 0% / 20%);
      }

      .modal.shown {
        visibility: unset;
      }
    `;

    const frag = document.createElement('div');
    frag.innerHTML = `
      <div class="modal">
        <button class="close-modal-btn">X</button>
        <div class="content"></div>
      </div>
    `;

    const modal = frag.querySelector('.modal')!;
    const content = modal.querySelector('.content')!;
    const closeModalBtn = frag.querySelector('.close-modal-btn')!;

    closeModalBtn.addEventListener('click', () => this.querySelector('.modal')!.classList.remove('shown'));

    // 把 title 和 description 移位到 div.content 里
    for (const childNode of Array.from(this.childNodes)) {
      content.append(childNode);
    }

    this.appendChild(style);
    this.appendChild(modal);
  }
}

window.customElements.define('modal-component', HTMLModalElement);

const modal: HTMLModalElement = document.querySelector('modal-component')!;

const openModalBtn = document.querySelector('.open-modal-btn')!;
openModalBtn.addEventListener('click', () => modal.show());
代码结构与重点:
大功告成!
最终的 HTML 结构
提醒:上面只是简单实现,没有兼顾 custom element 被 remove and re-insert to DOM tree 的场景。
:not(:defined) selector
在 JavaScript 还没有执行之前,custom element 的内容会直接被看见
这样不好。
我们可以用 CSS 把 custom element 先隐藏起来,等 JavaScript define 了以后才显示,像这样:
<style>
  :not(:defined) {
    display: none;
  }
</style>
Custome Elements 的不足
虽然我们成功封装了 modal 的 elements、styles、scripts,但它有一个大问题 -- 没有隔离性。
modal 的具体实现 (elements、styles、scripts) 本应被隔离,就像 video 那样:
-
DOM query 隔离 -- 我们无法从外面 query 到
video的具体实现 elements (如 play button)。 -
CSS Styles 隔离 -- 外面的 styles 不会渗透进
video里面影响设计,同样地,里面的 styles 也不会跑出来。
可我们的现状是:里面的 styles 会影响到外面 (因为 CSS 是影响全局的),外面的 styles 也会渗透进里面。
没有隔离会导致 modal 即便封装了也很难使用,一不小心,里面和外面就会 "打架",相互影响。
除此之外,在实现隔离性的同时,我们还得兼顾 Custom Elements 的灵活性。
"封装" 并不是指把一个东西封得死死地,而是在封装的同时,向外曝露灵活性。
比如说,函数是封装,参数则是它的灵活性。
以上面的 modal 为例,h1 和 p 是没有被封装的:外面决定了它们的 styles,里面决定了它们的渲染位置。这就是灵活性。
因此,在实现隔离性的时候,h1 和 p 就需要特殊处理,因为它们的 styles 是外面负责,但最终渲染的位置却是在里面。
要解决上述问题,我们需要引入另一项技术 -- Shadow DOM。
这个我们留下一 part 再讲,先把 Custom Elements 的部分讲解完。
Custom Elements 详解
上面我们已经了解到了 Custom Elements 的大体使用流程,这里再补充一些细节。
Attribute 和 Property 的关系
<input required>
required 是 attribute
const input = document.querySelector('input')!;
console.log(input.hasAttribute('required')); // true
console.log(input.getAttribute('required')); // '' (empty string)
attribute 可以有,也可以没有,它的 value 一定是 string 类型。
console.log(input.required); // trueinput.required 是 property。
required property 一定会有,它的类型是 boolean。
required attribute 和 required property 是互相关联的。
当没有 required attribute 时,requried property 是 false。
当有 required attribute 时 (无论是什么 value),required property 一定是 true。
const input = document.querySelector('input')!;
console.log(input.required);                 // true
input.removeAttribute('required');           // remove attribute will effect property
console.log(input.required);                 // false
input.required = true;                       // edit property also will effect attribute
console.log(input.hasAttribute('required')); // true
attributeChangedCallback & observedAttributes
for Custom Elements,我们也需要去兼顾 attribute 和 property。
以相同的 required 为例子:
class MyComponent extends HTMLElement {
  // 一个 required getter setter for "property sync to attribute"
  private _required = false;
  get required(): boolean {
    return this._required;
  }
  set required(required: boolean) {
    if (required === this._required) return;
    this._required = required;
    // property sync to attribute
    required ? this.setAttribute('required', '') : this.removeAttribute('required');
    this.render(); // 每当 property 变更就渲染
  }

  // 每当 attribute change 就会执行
  attributeChangedCallback(attributeName: string, _oldValue: string | null, newValue: string | null) {
    // 判断当前变更的是 required attribute
    if (attributeName === 'required') {
      // attribute sync to property (null 就表示没有 attribute)
      this.required = newValue === null ? false : true;
    }
  }

  // 指定监听 required attribute 的变更,没有指定的话, by default 是不会监听的
  static get observedAttributes() {
    return ['required'];
  }

  private connected = false; // 是否在 DOM tree 里

  // 当 custom element 插入 DOM tree 时会执行
  connectedCallback() {
    this.connected = true;
    this.render(); // 渲染
  }

  disconnectedCallback() {
    this.connected = false;
  }

  private firstRender = true;
  private render() {
    // 没有在 DOM tree 就不需要渲染
    if (!this.connected) return;

    if (this.firstRender) {
      this.firstRender = false;
      // 创建 elements、styles、scripts (first render 需要创建,之后就 update 可以了)
    }

    // 依据当前 property 更新 elements、styles、scripts
  }
}
几个关键点:
-
attribute 和 property 需要同步
当 attribute 变更时,要去同步 property。
当 property 变更时,也要去同步 attribute。
-
custom element 的渲染依赖 property,所以每当 property 变更也要重新渲染。
-
如果 custom element 不在 DOM tree 里则不需要渲染
当 custom element 插入到 DOM tree 则需要渲染
-
attributeChangedCallback 会比 connectedCallback 早被调用 (first load 的时候)
-
custom element 插入和离开 DOM tree 是可能反复发生的。
当 custom element 第一次插入 DOM tree 我们创建 internal elements、styles、scripts。
当 custom element 离开 DOM tree,我们通常会保留 internal elements (当然,你想清除减少内存占用也是可以)。
当 custom element 再次插入 DOM tree,由于我们没有删除 internal elements 所以它不需要重新再创建。因此上面代码中才有 firstRender 的概念。
总结
站在一个底层的视角,div + CSS styles + JS scripts + DOM API = whatever。
我们可以用这套组合实现任何东西。
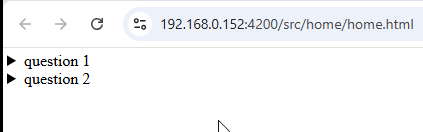
<details> + <summary> = Accordion
<details>
  <summary>question 1</summary>
  answer 1
</details>

<details>
  <summary>question 2</summary>
  answer 2
</details>
效果
<details> 和 <summary> 是浏览器原生的 elements。
它们自带设计 (如 arrow) 和交互体验 (如 expand & collapse)。
我们可以这样理解:<details> 和 <summary> 的底层其实还是那套 div + CSS styles + JS scripts + DOM API,只不过被封装了而已。
而 Custom Elements 正是那个封装技术,它让我们也能像浏览器那样,把 div + CSS styles + JS scripts + DOM API 封装成自定义元素 (或者叫组件)。
Shadow DOM
上一 part 我们有提到 Custom Elements 有一个致命伤 -- 没有隔离性。
而 Shadow DOM 主要的作用正是 "隔离"。
-
隔离 CSS Styles
-
隔离 DOM query
注:虽然 Shadow DOM 总是和 Custom Elements 联手完成 Web Components,但它其实是一项独立的技术。
Setup Shadow DOM
我们先做一个简简单单的 Shadow DOM 出来看看 (without Custom Elements)
<div class="card"></div>
这是一个普普通通的 div。
我们给它加上 Shadow DOM (任何 element 都可以加上 Shadow DOM)
const card = document.querySelector('.card')!; // query div.card

card.attachShadow({ mode: 'open' }); // attach shadow (隔离层)
效果

div.card 是被我们 Shadow DOM 的 element,它被称为 Shadow DOM 的 host (宿主)。
host element (也就是 div.card) 内会多出一个 #shadow-root,它是一个 document fragment,只有透过 DevTools 才看得见。
隔离 CSS Styles
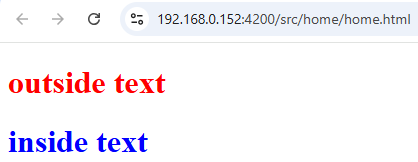
我们插入一些 elements 和 styles,看看 Shadow DOM 的隔离 Styles 效果。
const card = document.querySelector('.card')!; // query div.card
// 创建 outside style
const outsideStyle = document.createElement('style');
outsideStyle.textContent = 'h1 { color: red }';
// 创建 outside text
const outsideText = document.createElement('h1');
outsideText.textContent = 'outside text';
// 把 outside style 和 text 插入到 body
document.body.insertBefore(outsideStyle, card);
document.body.insertBefore(outsideText, card);
// 创建 inside style
const insideStyle = document.createElement('style');
insideStyle.textContent = 'h1 { color: blue }';
// 创建 inside text
const insideText = document.createElement('h1');
insideText.textContent = 'inside text';
// attachShadow 会返回 shadow root document fragment
const shadowRoot = card.attachShadow({ mode: 'open' });
// 把 inside style 和 text 插入到 shadow root
shadowRoot.appendChild(insideStyle);
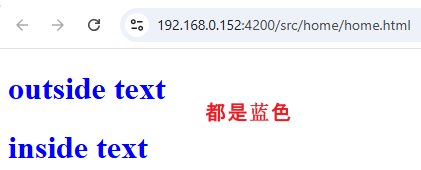
shadowRoot.appendChild(insideText);效果
HTML 结构
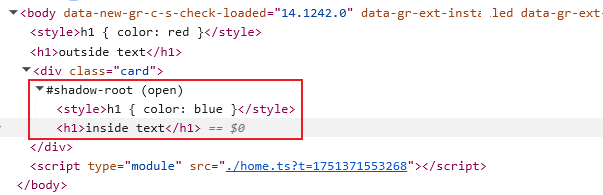
红框是 shadow root,它是一个隔离层。
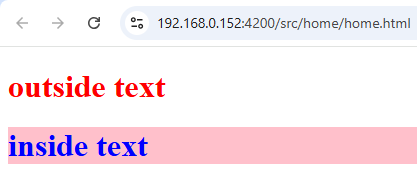
外面的 style 影响不到里面的 h1 (inside text),里面的 style 也影响不到外面的 h1 (outside text)。
因此 outside text 是红色,inside text 则是蓝色。
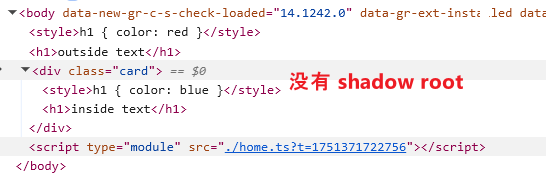
如果没有 Shadow DOM,inside text 和 outside text 都会是蓝色。
const card = document.querySelector('.card')!; // query div.card

// 创建 outside style
const outsideStyle = document.createElement('style');
outsideStyle.textContent = 'h1 { color: red }';

// 创建 outside text
const outsideText = document.createElement('h1');
outsideText.textContent = 'outside text';

// 把 outside style 和 text 插入到 body
document.body.insertBefore(outsideStyle, card);
document.body.insertBefore(outsideText, card);

// 创建 inside style
const insideStyle = document.createElement('style');
insideStyle.textContent = 'h1 { color: blue }';

// 创建 inside text
const insideText = document.createElement('h1');
insideText.textContent = 'inside text';

// 把 inside style 和 text 插入到 div.card
card.appendChild(insideStyle);
card.appendChild(insideText);
HTML 结构
效果
隔离 DOM Query
隔离 Styles 我们见识过了,现在来看看隔离 DOM query。
console.log(document.querySelectorAll('h1').length); // 1从 document 往下 query h1 element,结果只 query 到一个 h1。
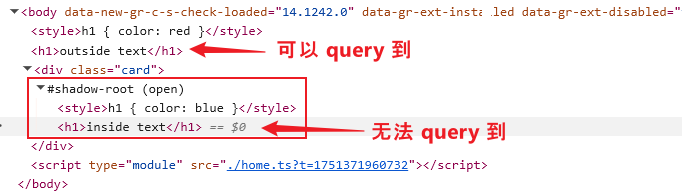
因为 inside 的 h1 被 shadow root 隔离了。
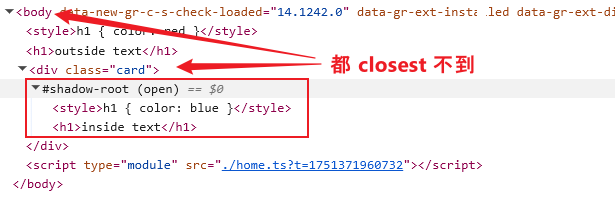
同样的,从 shadow root 里面往上 query,也无法拿到 shadow root 以外的 element。
console.log(insideText.closest('body')); // null
console.log(insideText.closest('.card')); // null
注:连 host element 也 closest 不到哦。
突破 CSS Styles 隔离
by default,outside inside 是隔离的,但是有一些 by pass 的 way。
:host selector
const insideStyle = document.createElement('style');
insideStyle.textContent = `
  h1 { color: blue }

  :host {
    background-color: pink;
  }
`;
在 inside style 加上 :host selector
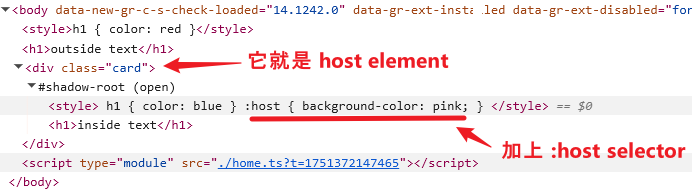
效果
host element 多了 background-color: pink;
inside style 最多只能影响到 host element,再外面就绝对影响不到了。
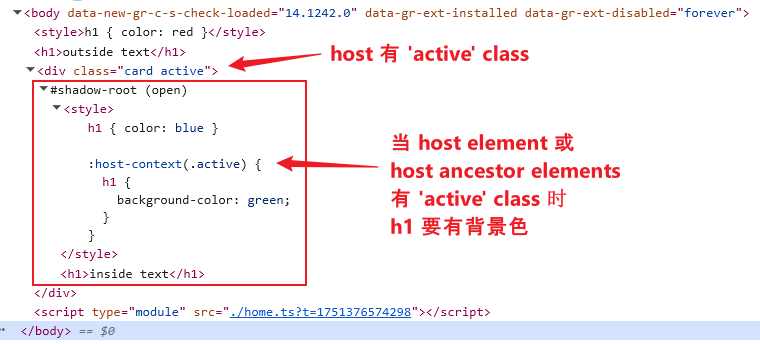
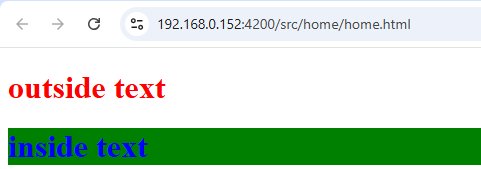
:host-context selector
:host 是让 shadow root 里面可以影响到外面,但仅于影响到 host element 而已。
:host-context 是让外面可以影响到里面,但前提是里面先预设好逻辑,而且外面也只能在预设的范围内做选择。
const insideStyle = document.createElement('style');
insideStyle.textContent = `
  h1 { color: blue }

  :host-context(.active) {
    h1 {
      background-color: green;
    }
  }
`;
当 host element 或者 host 的 ancestor elements (e.g. body) 任何一个包含 'active' class 时,shadow root 里面的 h1 就会有 background-color: green。
card.classList.add('active'); // 添加 'active' class 到 host element (div.card)
document.body.classList.add('active'); // 或者添加到 body 也可以 (只要是 host 或 host 的 ancestor elements 都行)
HTML 结构
效果
注:Firefox 和 Safari 都不支持 :host-context 哦。
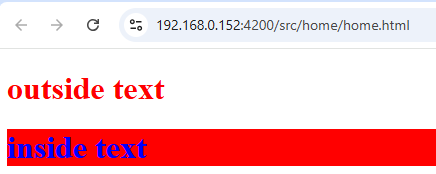
:host use as :host-content
由于 :host-content 的支持度不高,因此在真实项目中会使用 :host 来替代。
:host-context(.active) h1 {
  background-color: green;
}

:host(.active) h1 {
  background-color: green;
}
这两个写法几乎是等价的。
唯一的区别是,:host 只针对 host element,而 :host-content 还扩及到 host ancestor elements。
CSS variables
Shadow DOM 隔离不了 CSS variables。
因此,CSS variables 也是 by pass Shadow DOM 隔离的其中一种方法。
const insideStyle = document.createElement('style');
insideStyle.textContent = `
  h1 {
    color: blue;
    background-color: var(--text-color);
  }
`;

card.style.setProperty('--text-color', 'red');
效果
::part selector
::part 的作用是对外曝露指定的 element,让外面可以 styling 它。
const insideText = document.createElement('h1');
insideText.textContent = 'inside text';
insideText.part = 'inside-text'; // 给要对外曝露的 element 一个 part 属性
给 inside text 一个 part attribute,表示对外曝露。
接着外面的 style 可以透过 ::part 选择这个 element 做 styling。
outsideStyle.textContent = `
  h1 { color: red }

  ::part(inside-text) {
    color: red !important;
  }
`;
总结
:host 里面影响外面
:host-content 里面预设让外面影响
:host use as :host-content 里面预设让外面影响
CSS variable 里面曝露 style 属性,让外面填 value 进来
::part 里面曝露 element,让外面 styling 这个 element。
突破 DOM query 隔离
往下 query
shadow root 外面无法 query 到 shadow root 里面的 elements。
但我们可以透过 host element 获取到它的 shadow root 再由 shadow root 往内 query。
card.attachShadow({ mode: 'open' });
card.shadowRoot!.querySelector('h1');
如果有多层嵌套,那就一层一层往内 query,虽然很繁琐,但这是唯一的方法了。
mode: 'open' | 'closed'
若想透过 host element 获取到它的 shadow root,那在 attachShadow 的时候必须配置 mode: 'open'。
只有在 mode: 'open' 的情况下,hostElement.shadowRoot 才有 value。
mode: 'closed' 的话,hostElement.shadowRoot 会是 null。
const shadowRoot = card.attachShadow({ mode: 'closed' }); // attachShadow 会返回 shadow root

console.log(card.shadowRoot === null); // 由于 mode: 'closed',因此 shadowRoot 是 null

shadowRoot.querySelector('h1'); // 透过 attachShadow 返回的 shadow root 做 query 也行
往上 query (e.g. closest)
shadow root 里面无法 closest 到 shadow root 外面的 elements。
我们唯一能做的就是透过 parentNode 以及 shadowRoot.host 一层一层往上 query。
let loopElement: Element | null = insideText;
while (true) {
// shadow root 可以透过 host 属性值访问到 host element
loopElement = loopElement.parentNode instanceof ShadowRoot ? loopElement.parentNode.host : loopElement.parentElement;
if (loopElement === null || loopElement.matches('body')) break;
}
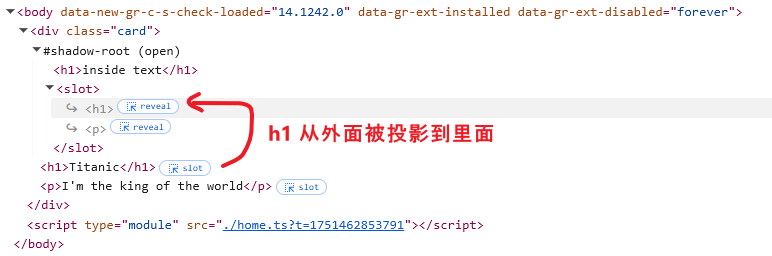
console.log(loopElement); // body elementslot (a.k.a projection, translude)
除了 "隔离",Shadow DOM 还有一个特性:slot (a.k.a projection, transclude)
<div class="card">
  <h1>Titanic</h1>
  <p>I'm the king of the world</p>
</div>
一个 div,里面有 h1 和 p。
效果

我们给 div.card 加上 Shadow DOM。
const card = document.querySelector<HTMLElement>('.card')!;
card.attachShadow({ mode: 'open' });
效果
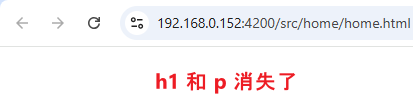
div.card 里面的 h1 和 p 消失了!
没错,这就是 slot 的特性。
如果我们查看 HTML 结构

会发现 h1 和 p 其实还在那,并没有消失,它们只是没有被浏览器渲染出来而已。
透过 DOM query 也可以找到 h1 和 p。
console.log(card.children); // [h1, p]project to <slot>
不了解 Shadow DOM 特性的人,第一直觉通常是:div.card 的内容理应被放进 shadow root 里。
但 Shadow DOM 的机制并不是这样的。
shadow root 的内容只能靠 DOM API 插入,像这个:
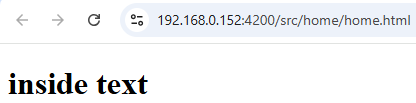
const card = document.querySelector<HTMLElement>('.card')!;
const shadowRoot = card.attachShadow({ mode: 'open' });

// create h1
const h1 = document.createElement('h1');
h1.textContent = 'inside text';

// 把 h1 插入到 shadow root 里
shadowRoot.appendChild(h1);
效果
而 div.card 内容则可用作于 "投影" (projection) 效果。
我们来看看 "投影" 具体怎样 working:
// 创建 slot element
const slot = document.createElement('slot');

// 把 slot 插入到 shadow root 里
shadowRoot.appendChild(slot);
效果
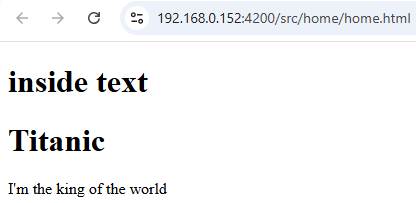
h1 和 p 出现了。
HTML 结构
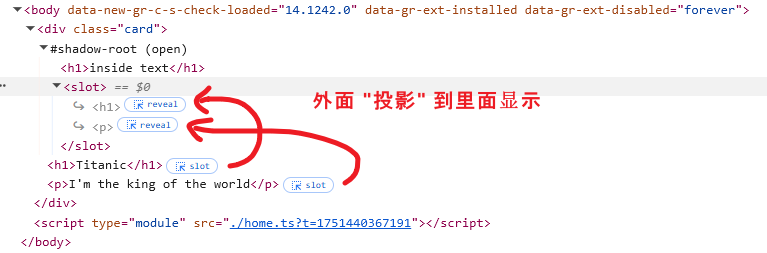
h1 和 p element 没有被 cut and paste 到 shadow root 里面,它们仍然在外面。
但是,h1 和 p 却被渲染到了 <slot> 的位置 (inside text 下方),这就是所谓的 "投影" (project)。
multiple <slot>
shadow root 里面可以放 multiple <slot>
const card = document.querySelector<HTMLElement>('.card')!;
const shadowRoot = card.attachShadow({ mode: 'open' });
// create h1
const h1 = document.createElement('h1');
h1.textContent = 'inside text';
// 把 h1 插入到 shadow root 里
shadowRoot.appendChild(h1);
// 创建 slot element 一号
const slot1 = document.createElement('slot');
slot1.name = 'slot-1'; // 命名为一号
// 把 slot 插入到 inside text 之前
shadowRoot.insertBefore(slot1, h1);
// 创建 slot element 二号
const slot2 = document.createElement('slot');
slot2.name = 'slot-2'; // 命名为一号
// 把 slot 插入到 inside text 之后
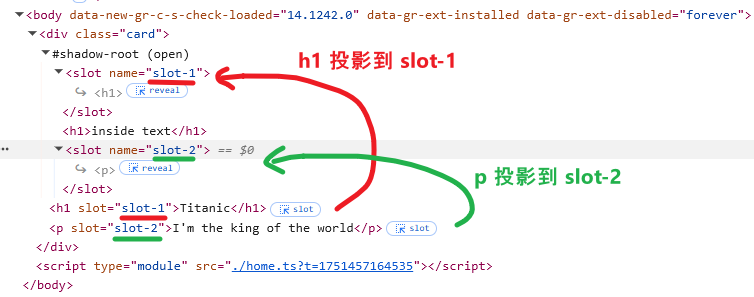
shadowRoot.appendChild(slot2);注:每个 <slot> 要设定名字哦。
接着,h1 和 p 要指定 project 的位置
<div class="card">
  <h1 slot="slot-1">Titanic</h1>
  <p slot="slot-2">I'm the king of the world</p>
</div>
透过给 h1 和 p 设置 slot attribute。
h1 投影到 slot-1 (inside text 之前)
p 投影到 slot-2 (inside text 之后)
效果
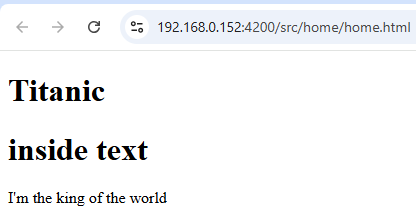
HTML 结构
slot の styles
继续上面的例子。
h1 和 p 在外面 (outside shadow root),但渲染出来却是在里面。
那如果我们想给 h1 和 p styling,这个 style 是要写在外面还是里面?
const card = document.querySelector<HTMLElement>('.card')!;
const shadowRoot = card.attachShadow({ mode: 'open' });

// 创建 inside style
const insideStyle = document.createElement('style');
insideStyle.textContent = 'h1 { color: red; }';

// 把 inside style 插入到 shadow root 里
shadowRoot.appendChild(insideStyle);

// 创建 slot element
const slot = document.createElement('slot');

// 把 slot 插入到 shadow root 里
shadowRoot.appendChild(slot);

// 创建 outside style
const outsideStyle = document.createElement('style');
outsideStyle.textContent = 'h1 { color: blue; }';

// 把 outside style 插入 body
document.body.insertBefore(outsideStyle, card);
HTML 结构
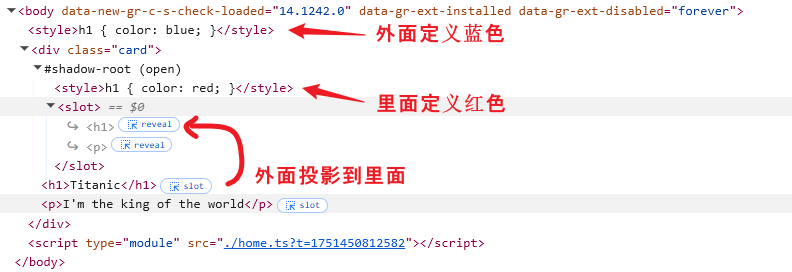
效果
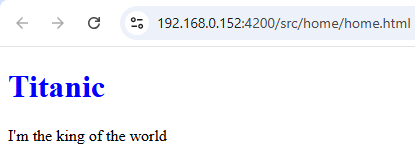
最终 h1 是蓝色,外面的 style 获胜。
也就是说,这些要从外面 project 进去的内容,它们的 style 是由外面负责的。
element 在外面、style 也在外面、只是最终被 "投影" 到了里面指定的位置。
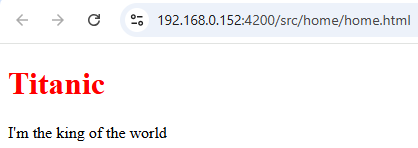
::slotted selector
如果 shadow root 里面想强行 styling projected / slotted element (h1, p),可以透过 ::slotted selector。
insideStyle.textContent = `
  slot::slotted(h1) {
    color: red !important;
  }
`;
HTML 结构
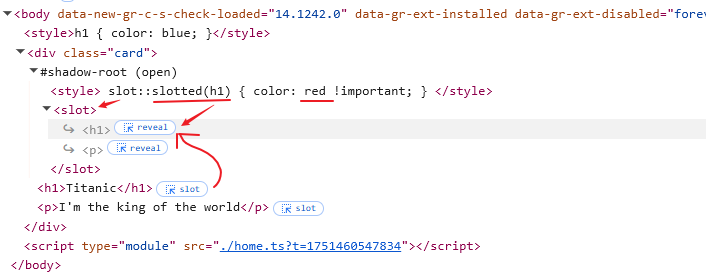
效果
如果是 multiple slot,那 selector 加上 name attirbute 就可以了
insideStyle.textContent = `
   slot[name="slot-1"]::slotted(h1) {
     color: red !important;
   }
`;
slot の DOM query
从 element 结构的角度看,h1 始终是在 shadow root 外面。
从渲染的角度看,h1 是在 shadow root 里面,inside text 的下面。
如果我们从 body 往下 query h1,可以拿到 'Titanic',因为它在 shadow root 外面;但拿不到 'inside text',因为它在 shadow root 里面。
反之,如果我们从 shadow root 往下 query h1,可以拿到 'inside text',但拿不到 'Titanic'。
那我们有没有办法在 shadow root 里面 query 到 slot 的 slotted elements 呢?比如 h1 'Titatic'。
有!透过
console.log(slot.assignedElements()); // [h1, p]
console.log(slot.assignedNodes());    // [text, h1, text, p, text] 注:text 是 \n
assignedElements 或 assignedNodes 可以获取到所有 project 进来的内容。
总结
Shadow DOM 有三个特性:隔离 Styles、隔离 DOM query,以及 slot 投影。
它的隔离特性很好的弥补了 Custom Elements 的缺失 -- 隔离性。
slot 投影也能帮助 Custom Elements 实现灵活性。
Custom Elements + Shadow DOM = 完整的 Web Components。
modal 例子
我们添加 Shadow DOM 到上面的 modal 组件里:
class HTMLModalElement extends HTMLElement {
  private readonly _shadowRoot: ShadowRoot;

  constructor() {
    super();
    this._shadowRoot = this.attachShadow({ mode: 'closed' });
  }

  private _shown = false;
  get shown() {
    return this._shown;
  }
  set shown(shown: boolean) {
    if (shown === this._shown) return;
    this._shown = shown;
    shown ? this.setAttribute('shown', '') : this.removeAttribute('shown');
    this.render();
  }

  connectedCallback() {
    this.connected = true;
    this.render();
  }

  disconnectedCallback() {
    this.connected = false;
  }

  private connected = false;
  private firstRender = true;

  private render() {
    if (!this.connected) return;

    if (this.firstRender) {
      this.firstRender = false;

      const style = document.createElement('style');
      style.textContent = `
        .modal {
          visibility: hidden;

          position: fixed;
          inset: 0;
          background-color: hsl(0deg 0% 0% / 20%);

          display: flex;
          justify-content: center;
          align-items: center;
        }

        .modal .close-modal-btn {
          position: absolute;
          left: 50%;
          transform: translateX(-50%);
          bottom: 64px;

          border-radius: 999px;
          border: 0;

          background-color: black;
          color: white;

          width: 64px;
          height: 64px;

          padding: 12px;
          font-size: 32px;

          cursor: pointer;
        }

        .modal .content {
          padding: 32px 48px;

          background-color: white;
          box-shadow: 0 2px 4px hsl(0deg 0% 0% / 20%);
        }

        :host([shown]) .modal {
          visibility: unset;
        }
     `;

      const frag = document.createElement('div');
      frag.innerHTML = `
        <div class="modal">
          <button class="close-modal-btn">X</button>
          <div class="content">
            <slot></slot>
          </div>
        </div>
      `;

      const modal = frag.querySelector('.modal')!;
      const closeModalBtn = frag.querySelector('.close-modal-btn')!;

      closeModalBtn.addEventListener('click', () => (this.shown = false));

      this._shadowRoot.appendChild(style);
      this._shadowRoot.appendChild(modal);
    }
  }

  attributeChangedCallback(attributeName: string, _oldValue: string | null, newValue: string | null) {
    if (attributeName === 'shown') {
      this.shown = newValue === null ? false : true;
    }
  }

  static get observedAttributes() {
    return ['shown'];
  }
}

window.customElements.define('modal-component', HTMLModalElement);

const modal: HTMLModalElement = document.querySelector('modal-component')!;

const openModalBtn = document.querySelector('.open-modal-btn')!;
openModalBtn.addEventListener('click', () => (modal.shown = true));
HTML Templates
有了 Custom Elements + Shadow DOM,我们已经可以完整地封装出组件 (Web Components) 了。
不过,目前的代码有一个小问题。
由于 Custom Elements 是靠 JavaScript 实现的,上面例子中 internal elements 和 styles 都是用 JavaScript 写的 (raw HTML & CSS)。
这对开发不友好,因为 IDE 无法提示错误,也没有 highlight 和 format。
如果我们可以用回 .html 和 .css 来写 internal elements 和 styles,那就更理想了。
这时,我们可以引入另一项技术 -- HTML Templates,来完善它。
那么,HTML Templates 是什么呢?我们一步一步来讲解 🚀。
dynamic elements by DOM API
从前,我们要做动态内容输出,会这样写:
const title = 'Titanic';
const description = `I'm the king of the world`;

const card = document.createElement('div'); // 创建 div.card
card.classList.add('card');

const h1 = document.createElement('h1'); // 创建 h1
h1.textContent = title;

const p = document.createElement('p'); // 创建 p
p.textContent = description;

card.appendChild(h1); // 把 h1 插入到 div.card
card.appendChild(p); // 把 p 插入到 div.card

document.body.appendChild(card); // 把 div.card 插入到 body
流程:创建 elements > 组织 elements 结构 > 插入到 document 里。
代码量多、可读性差,尤其是 elements 的结构完全看不出来,不合格😵💫。
dynamic elements by Raw HTML
若想提高可读性、减少代码量,可以改用 string 拼接的方式
const title = 'Titanic';
const description = `I'm the king of the world`;

const frag = document.createElement('div');
frag.innerHTML = `
  <div class="card">
    <h1>${title}</h1>
    <p>${description}</p>
  </div>
`;

document.body.appendChild(frag.firstElementChild!);
结构是表现出来了,但 string 拼接会有 XSS (Cross-site Scripting) 安全隐患。
而且,在 JavaScript 代码里头写 HTML,IDE 也不支持语法检查,写错了不容易发现。
因此,string 拼接也不是好主意😵💫。
dynamic elements by HTML Templates polyfill
在 JavaScript 写 HTML 不行,那就挪去 .html 呗。
<div class="template" style="display: none;">
  <div class="card">
    <h1> 动态内容 </h1>
    <p> 动态内容 </p>
  </div>
</div>
div.card 是 dynamic elements,为了不让它被浏览器渲染出来,我们需要给它 wrap 上一层 div 并且设置 style: display: none。
Scripts
const title = 'Titanic';
const description = `I'm the king of the world`;

const template = document.querySelector('.template')!; // query template

// clone template content to fragment
// 注:template 本身不需要哦,因为它只是 wrapper,用来阻止浏览器渲染 dynamic elements 而已。
const frag = document.createDocumentFragment();
for (const childNode of template.childNodes) {
  frag.append(childNode.cloneNode(true));
}

// fill in title
const h1 = frag.querySelector('h1')!;
h1.textContent = title;

// fill in description
const p = frag.querySelector('p')!;
p.textContent = description;

document.body.appendChild(frag); // append to body
虽然还是有些许的 DOM API 操作,但整体代码算是及格的。
-
看得到整体 HTML 结构
-
没有 XSS 隐患
-
IDE 友好
哎哟,不错哦👍!
dynamic elements by HTML Templates
HTML Templates 其实就是把上一种实现方式内置化了而已。
<template>
  <div class="card">
    <h1> 动态内容 </h1>
    <p> 动态内容 </p>
  </div>
</template>
<template> 不会被浏览器渲染。
const title = 'Titanic';
const description = `I'm the king of the world`;

const template = document.querySelector('template')!; // query template

// 简化了 clone 的代码
const frag = template.content.cloneNode(true) as DocumentFragment;

// fill in title
const h1 = frag.querySelector('h1')!;
h1.textContent = title;

// fill in description
const p = frag.querySelector('p')!;
p.textContent = description;

document.body.appendChild(frag); // append to body
clone template content 被简化了,其它地方都一样。
modal 例子
modal.html
<template>
  <button class="close-modal-btn">X</button>
  <div class="content">
    <slot></slot>
  </div>
</template>
modal.css
:host {
  visibility: hidden;

  position: fixed;
  inset: 0;
  background-color: hsl(0deg 0% 0% / 20%);

  display: flex;
  justify-content: center;
  align-items: center;
}

:host([shown]) {
  visibility: unset;
}

.close-modal-btn {
  position: absolute;
  left: 50%;
  transform: translateX(-50%);
  bottom: 64px;

  border-radius: 999px;
  border: 0;

  background-color: black;
  color: white;

  width: 64px;
  height: 64px;

  padding: 12px;
  font-size: 32px;

  cursor: pointer;
}

.content {
  padding: 32px 48px;

  background-color: white;
  box-shadow: 0 2px 4px hsl(0deg 0% 0% / 20%);
}
modal.ts
let templatePromise: Promise<HTMLTemplateElement> | undefined;

function getTemplateAsync(): Promise<HTMLTemplateElement> {
  if (templatePromise) return templatePromise;
  return (templatePromise = fetchTemplateAsync());

  async function fetchTemplateAsync(): Promise<HTMLTemplateElement> {
    const response = await fetch('/src/home/modal.html', {
      headers: {
        Accept: 'text/html; charset=UTF-8',
      },
    });
    const rawHtml = await response.text();
    const domParser = new DOMParser();
    const templateDocument = domParser.parseFromString(rawHtml, 'text/html');
    const template = templateDocument.querySelector('template')!;
    return template;
  }
}

let stylePromise: Promise<HTMLStyleElement> | undefined;
function getStyleAsync(): Promise<HTMLStyleElement> {
  if (stylePromise) return stylePromise;
  return (stylePromise = fetchStyleAsync());

  async function fetchStyleAsync(): Promise<HTMLStyleElement> {
    const response = await fetch('/src/home/modal.css', {
      headers: {
        Accept: 'text/css',
      },
    });
    const rawCss = await response.text();
    const style = document.createElement('style');
    style.textContent = rawCss;
    return style;
  }
}

export class HTMLModalElement extends HTMLElement {
  private readonly _shadowRoot: ShadowRoot;

  constructor() {
    super();
    this._shadowRoot = this.attachShadow({ mode: 'closed' });
  }

  private _shown = false;
  get shown() {
    return this._shown;
  }
  set shown(shown) {
    if (shown === this._shown) return;
    this._shown = shown;
    shown ? this.setAttribute('shown', '') : this.removeAttribute('shown');
    this.renderAsync().catch(error => console.log(error));
  }

  async connectedCallback() {
    this.connected = true;
    await this.renderAsync();
  }

  disconnectedCallback() {
    this.connected = false;
  }

  private connected = false;
  private firstRender = true;
  private rendering = false;

  private async renderAsync() {
    if (!this.connected) return;
    if (this.rendering) return;

    this.rendering = true;

    if (this.firstRender) {
      this.firstRender = false;

      const [template, style] = await Promise.all([getTemplateAsync(), getStyleAsync()]);
      const templateContent = template.content.cloneNode(true) as DocumentFragment;

      const closeModalBtn = templateContent.querySelector('.close-modal-btn')!;
      closeModalBtn.addEventListener('click', () => (this.shown = false));

      const frag = document.createDocumentFragment();
      frag.appendChild(style);
      frag.appendChild(templateContent);
      this._shadowRoot.appendChild(frag);
    }

    this.rendering = false;
  }

  attributeChangedCallback(attributeName: string, _oldValue: string | null, newValue: string | null) {
    if (attributeName === 'shown') {
      this.shown = newValue === null ? false : true;
    }
  }

  static get observedAttributes() {
    return ['shown'];
  }
}

export function defineModalComponent() {
  if (!window.customElements.get('modal-component')) {
    customElements.define('modal-component', HTMLModalElement);
  }
}
透过 ajax 去把 .html 和 .css 抓下来。
home.ts
import { defineModalComponent, type HTMLModalElement } from './modal';

defineModalComponent();

const modal = document.querySelector<HTMLModalElement>('modal-component')!;

const openModalBtn = document.querySelector('.open-modal-btn')!;
openModalBtn.addEventListener('click', () => (modal.shown = true));
home.html
<style>
  modal-component h1 {
    margin-bottom: 16px;
    font-size: 48px;
  }

  modal-component p {
    font-size: 20px;
    line-height: 1.5;
  }

  :not(:defined) {
    display: none;
  }
</style>

<button class="open-modal-btn">Open Modal</button>

<modal-component>
  <h1>Titanic</h1>
  <p>I'm the king of the world!!!</p>
</modal-component>
题外话:Convert DocumentFragment to Raw HTML
template.content 是 DocumentFragment,如果想把它 convert 成 raw html 可以这样做:
参考: Converting Range or DocumentFragment to string
-
创建一个 div 把 frag 丢进去,然后 .innerHTML 取出来。
const div = document.createElement("div"); div.appendChild(templateContent); console.log("rawHtml", div.innerHTML); -
const serializer = new XMLSerializer();
const rawHtml = serializer.serializeToString(templateContent);
console.log("rawHtml", rawHtml);
总结
严格来讲 HTML Templates 并不是什么了不起的技术,即便没有它,我们自己 wrap 一层 div配上 display:none 充当 template 也是可以用的。
而且它和 Web Components 也没有那么直接的关系。
但无论如何,使用它确实会更方便,更明确意图,所以还是建议大家多多使用。
扩展原生 element
上面我们看到的例子都是创建全新的 custom element。
这里补上一个扩展原生 element 的例子。
一个扩展的 custom input class
class HTMLMyInputElement extends HTMLInputElement {}define
window.customElements.define('my-input', HTMLMyInputElement, { extends: 'input' });多了一个 options { extends: 'input' } 表示这是要扩展原生 element。
HTML
<input is="my-input">
多了一个 is attribute,value 依据 define 的 name。
动态创建
const myInput = document.createElement('input', { is: 'my-input' });多了一个 options { is: 'my-input' }。
注:extends 只能用于原生 element,我们做的 custom element 是不能再 extends 的了。
题外话:
<input is="my-input" required>

class HTMLMyInputElement extends HTMLInputElement {
  constructor() {
    super();
    console.log(this.required); // true
  }
}
看来原生的 input 在 constructor 阶段就已经做了 required property 的映射 (attribute to property)。
Counter Component 例子
这里再给一个简单的参考例子

counter.html
<template>
  <button class="minus">-</button>
  <span class="number">0</span>
  <button class="plus">+</button>
</template>
counter.css
:host {
  display: flex;
  gap: 16px;
}

.minus,
.plus {
  width: 64px;
  height: 64px;
}

.number {
  width: 128px;
  height: 64px;
  border: 1px solid gray;
  font-size: 36px;
  display: grid;
  place-items: center;
}
counter.ts
let templatePromise: Promise<HTMLTemplateElement> | undefined;
function getTemplateAsync(): Promise<HTMLTemplateElement> {
  if (templatePromise) return templatePromise;
  return (templatePromise = fetchTemplateAsync());

  async function fetchTemplateAsync(): Promise<HTMLTemplateElement> {
    const response = await fetch('/src/home/counter.html', {
      headers: {
        Accept: 'text/html; charset=UTF-8',
      },
    });
    const rawHtml = await response.text();
    const domParser = new DOMParser();
    const templateDocument = domParser.parseFromString(rawHtml, 'text/html');
    const template = templateDocument.querySelector('template')!;
    return template;
  }
}

let stylePromise: Promise<HTMLStyleElement> | undefined;
function getStyleAsync(): Promise<HTMLStyleElement> {
  if (stylePromise) return stylePromise;
  return (stylePromise = fetchStyleAsync());

  async function fetchStyleAsync(): Promise<HTMLStyleElement> {
    const response = await fetch('/src/home/counter.css', {
      headers: {
        Accept: 'text/css',
      },
    });
    const rawCss = await response.text();
    const style = document.createElement('style');
    style.textContent = rawCss;
    return style;
  }
}

export const numberChangeEventName = 'numberchange';
interface NumberChangeEventDetail {
  oldNumber: number;
  newNumber: number;
}
export class NumberChangeEvent extends CustomEvent<NumberChangeEventDetail> {
  constructor(eventInitDict: EventInit & { detail: NumberChangeEventDetail }) {
    super(numberChangeEventName, { bubbles: true, ...eventInitDict });
  }
}
declare global {
  interface HTMLElement {
    addEventListener<K extends typeof numberChangeEventName>(
      type: K,
      listener: (this: HTMLElement, ev: NumberChangeEvent) => void,
      options?: boolean | AddEventListenerOptions,
    ): void;
  }
}

export class HTMLCounterElement extends HTMLElement {
  private readonly _shadowRoot: ShadowRoot;

  constructor() {
    super();
    this._shadowRoot = this.attachShadow({ mode: 'closed' });
  }

  private _number = 0;
  get number() {
    return this._number;
  }
  set number(number) {
    if (number === this._number) return;
    this._number = number;
    this.setAttribute('number', number.toString());
    this.renderAsync().catch(error => console.log(error));
  }

  async connectedCallback() {
    this.connected = true;
    await this.renderAsync();
  }

  private async renderAsync() {
    if (!this.connected) return;
    if (this.rendering) return;
    this.rendering = true;

    if (this.firstRender) {
      this.firstRender = false;

      const [template, style] = await Promise.all([getTemplateAsync(), getStyleAsync()]);
      const templateContent = template.content.cloneNode(true) as DocumentFragment;

      const minus = templateContent.querySelector('.minus')!;
      const plus = templateContent.querySelector('.plus')!;

      for (const button of [minus, plus]) {
        button.addEventListener('click', () => {
          const oldNumber = this.number;
          const newNumber = button === minus ? this.number - 1 : this.number + 1;
          this.number = newNumber;

          this.dispatchEvent(
            new NumberChangeEvent({
              detail: { oldNumber, newNumber },
            }),
          );
        });
      }

      const frag = document.createDocumentFragment();
      frag.appendChild(style);
      frag.appendChild(templateContent);
      this._shadowRoot.appendChild(frag);
    }

    this._shadowRoot.querySelector('.number')!.textContent = this.number.toString();
    this.rendering = false;
  }

  disconnectedCallback() {
    this.connected = false;
  }

  private connected = false;
  private firstRender = true;
  private rendering = false;

  attributeChangedCallback(attributeName: string, _oldValue: string | null, newValue: string | null) {
    if (attributeName === 'number') {
      this.number = newValue === null ? 0 : +newValue;
    }
  }

  static get observedAttributes() {
    return ['number'];
  }
}

export function defineCounterComponent() {
  if (!window.customElements.get('counter-component')) {
    customElements.define('counter-component', HTMLCounterElement);
  }
}
home.html
<counter-component></counter-component>
home.ts
import { defineCounterComponent, type HTMLCounterElement } from './counter';

defineCounterComponent();

const counter = document.querySelector<HTMLCounterElement>('counter-component')!;
counter.addEventListener('numberchange', ({ detail: { oldNumber, newNumber } }) => console.log([oldNumber, newNumber]));

 浙公网安备 33010602011771号