

CSS – Icon
前言
Icon 并不容易搞. 市场有许多平台支持 Icon, 有些收费有些免费. 有些 icon 很丰富, 有些很缺失.
尤其是在做网站的时候寻找 icon 是一个挺累的事情. 这篇就来聊聊 icon.
各大平台
Google 出的, 免费, 缺点是少, 它有 Font, SVG, PNG.
2. fontawesome
这个算是鼻祖吧. v4 是完全免费的, v5 后开始部分收费了.
支持 Font, SVG, PNG.
3. SVG Repo
这个不错, 可以找到蛮多 icon 而且免费. 但只有 SVG.
4. ICONS8
它是 LUNACY 公司的 product, 和 SVG Repo 一样 icon 挺多的, SVG 单个下载是免费的, collection 功能就收费.
5. Flaticon
以前没有收费时, 它是最好的 (Font, SVG, PNG),但现在收费了. 没有付费只能下载 PNG...
6. ionicons
Ionic Framework 的其中一个 product. 免费的, 但它和 Material Icons 一样的少. 用它倒不如用 Material Icons.
有 Font 和 SVG
Font vs SVG
有 2 种方式可以使用 icon, 一种是 Font, 一种是 SVG. 来对比一下呗.
参考: Material Design Icons: Font vs SVG. And how to use SVG Sprites in Angular?
1. implement
Font 比 SVG 容易 implment 许多 (除非你只需要一个 SVG icon 就还好, 超过一个 SVG 就不容易了)
2. change color
Font 直接换就可以了, SVG 需要用 online tool BOXY SVG, 或者修改 svg fill, 比较麻烦.
3. bundle size
Font 一定要那么大, SVG 是按需, 所以 SVG 通常小许多. 但需要搞一套 Gulp sprite sheet 维护 (增加了架构的复杂度)
4. 歪掉
Font 在小尺寸可能会歪掉, SVG 没有这种问题, 这个是 material icon 的例子:

建议: 如果是做 Web App, 通常就使用 font way, 方便. 如果只是想用小部分的 icon, 那么可以用 SVG, 不比引入 CSS / JS.
Font 和 SVG 的引入形式
Font 形式是, 加载 CSS Link / JS Script 库. 通过 font-family, size, color 来调用 icon.
element 通常使用 <i> 或者 span.
SVG 形式是, 下载 SVG > 优化 SVG > 合并多个 SVG to 1 个 SVG sprite sheet file.
用 ajax 加载 SVG sprite and append to HTML, 通过 svg element + #id 选用.
SVG 工程比较大, 虽然可以借助自动化工具, 但是 setup 也是挺复杂的.
开发 Web App 的话建议使用库就好, 如果要用 SVG, 性能不在意的话就直接 1 个 1 个 img 请求 .svg 就好了.
非要搞 sprite 的话, 就用一些 gulp/webpack/online tools 做打包.
Material Icons - Google Fonts
它是免费的, Font, SVG 都有, 缺点就是太少了. 用来做 App 还行, 做网站的话, 很多 icon 找不到.

它有 5 大种类, default 是 Filled 也叫 baseline.
使用方式: Material Icons Guide (其它平台的使用方式也差不多的)
Font Way
导入 CSS link (有些平台是用 JS)
<link
  href="https://fonts.googleapis.com/icon?family=Material+Icons"
  rel="stylesheet"
/>
<link
  href="https://fonts.googleapis.com/css2?family=Material+Icons+Outlined"
  rel="stylesheet"
/>
用 span 或 i 写上 icon name 就可以了. 如果要调整颜色和尺寸, 直接调 CSS font 的属性即可.
<span class="material-icons" style="color: red; font-size: 40px">face</span>
<i class="material-icons-outlined">face</i>
效果

Font Way Self Hosting
上面是直接连去 Google CDN, 如果想自己 host 也是可以.
去这里下载.

@font-face
@font-face {
  font-family: "Material Icons";
  font-style: normal;
  font-weight: 400;
  src: url(MaterialIcons-Regular.ttf);
}

@font-face {
  font-family: "Material Icons Outlined";
  font-style: normal;
  font-weight: 400;
  src: url(MaterialIconsOutlined-Regular.otf);
}
CSS class


.material-icons {
  font-family: "Material Icons";
  font-weight: normal;
  font-style: normal;
  font-size: 24px; /* Preferred icon size */
  display: inline-block;
  line-height: 1;
  text-transform: none;
  letter-spacing: normal;
  word-wrap: normal;
  white-space: nowrap;
  direction: ltr;

  /* Support for all WebKit browsers. */
  -webkit-font-smoothing: antialiased;
  /* Support for Safari and Chrome. */
  text-rendering: optimizeLegibility;

  /* Support for Firefox. */
  -moz-osx-font-smoothing: grayscale;

  /* Support for IE. */
  font-feature-settings: "liga";
}

.material-icons-outlined {
  font-family: "Material Icons Outlined";
  font-weight: normal;
  font-style: normal;
  font-size: 24px; /* Preferred icon size */
  display: inline-block;
  line-height: 1;
  text-transform: none;
  letter-spacing: normal;
  word-wrap: normal;
  white-space: nowrap;
  direction: ltr;

  /* Support for all WebKit browsers. */
  -webkit-font-smoothing: antialiased;
  /* Support for Safari and Chrome. */
  text-rendering: optimizeLegibility;

  /* Support for Firefox. */
  -moz-osx-font-smoothing: grayscale;

  /* Support for IE. */
  font-feature-settings: "liga";
}
由于它只是 CSS, 如果用 webpack 的话也可以使用 postcss-font-magician 等工具, 参考: google fonts + webpack
SVG Way
如果不想引用整个 CSS link 库, 也可以使用 SVG 手法.
去官网就可以下载了, 当使用多张 SVG 时, Google 建议使用 sprite sheets 把它们合并.

我先讲一下 SVG 会遇到的问题. 由于它是图片, 只可以调整尺寸, 不能直接调颜色. 而官网下载的 SVG 只能是黑色和白色.
调颜色有 2 种方法
1. 修改 fill 属性值, 参考: How to change the color of an svg element?

2. 使用 online tool BOXY SVG, 免费的注册账号就可以用了.
通过 img 导入即可
<img src="./home_black_24dp.svg" />
Why I don't chose material
2 个问题
一, 上面有提到的, 当 size 太小的时候会不精准.
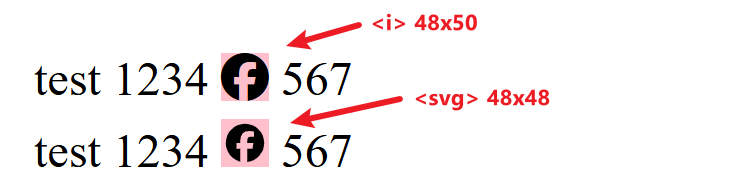
二, 它会有 extra 的 padding

fontawesome 可以选择要不要 extra padding
Full SVG 是包含 padding 的正方形比例,SVG 则是没有 padding 刚刚好的比例。
如果我们选了没有 padding 的 svg,后来想自己加也可以
<svg class="icon" style="width: 250px; height: 250px; object-fit: contain;" viewBox="0 0 50 20">
  <rect x="0" y="0" width="50" height="20" fill="red" />
</svg>
设置 width height 和 object-fit: contain 即可。
SVG Sprite Sheet
参考: How to create and use an SVG Sprite
一个 SVG file 长这样

一个 SVG Sprite Sheet file 长这样

通过 symbol 把多个 SVG file 放在一个 SVG file 里面, 然后用 id 作为识别.
调用时用 svg 标签配上 URL + hash 描点 id 就可以了.
<svg style="width: 48px; height: 48px">
  <use xlink:href="sprite.svg#hot-svgrepo-com" />
</svg>
<svg style="width: 48px; height: 48px">
  <use xlink:href="sprite.svg#air-conditioner-svgrepo-com" />
</svg>
或者在页面某个地方(上下都可以) 放入 sprite sheet svg element
然后调用时直接放 hash 即可. 不需要 URL. (建议使用 ajax 去加载 sprite.svg 据说可缓存, 然后 inner html 参考: How to create and use an SVG Sprite)
<svg style="color: blue">
  <use xlink:href="#google"></use>
</svg>
调颜色

调用
<svg style="color: blue">
  <use xlink:href="sprite.svg#google"></use>
</svg>
xmlns="http://www.w3.org/2000/svg" 的作用
sprite file 里面的 symbol 可以不需要放,但作为一个独立的 svg 使用,一定要加上 xmlns 否则 img src="icon.svg" 会链接不上。
SVG 工程化 / 工具
参考: How to create and use an SVG Sprite
流程大概是这样:
下载多个 SVG file.
对每个 SVG file 做优化 (去除 comment 等等)
把所有 SVG combine to 1 个 SVG sprite sheet.
各种工具介绍
svgsprit.es online tool for spirte sheet
svgo Node.js SVG 优化
svg-sprite Node.js SVG sprite + 优化(基于 svgo)
gulp-svg-sprite Gulp 封装 svg-sprite
svgo-loader Webpack loader for SVG 优化 (基于 svgo)
svg-sprite-loader Webpack loader for sprite (没有优化哦, 要优化就和 svgo-loader 一起用)
svg-sprite-generator 视频介绍的, 适合不懂 coding 的 designer 使用, 它好像是 folk SmartIcons 的.
svgo 使用
参考:
全局安装
npm -g install svgo
优化 files
svgo one.svg two.svg -o one.min.svg two.min.svg
优化 folder
svgo -f ./path/to/folder/with/svg/files -o ./path/to/folder/with/svg/output
config 用默认的就可以了, 或者用视频里的 svgo-config.json
默认 config 名字 svgo.config.js
{
  plugins: [
    {
      cleanupAttrs: true,
    },
    {
      removeDoctype: true,
    },
    {
      removeXMLProcInst: true,
    },
    {
      removeComments: true,
    },
    {
      removeMetadata: true,
    },
    {
      removeTitle: true,
    },
    {
      removeDesc: true,
    },
    {
      removeUselessDefs: true,
    },
    {
      removeEditorsNSData: true,
    },
    {
      removeEmptyAttrs: true,
    },
    {
      removeHiddenElems: true,
    },
    {
      removeEmptyText: true,
    },
    {
      removeEmptyContainers: true,
    },
    {
      removeViewBox: false,
    },
    {
      cleanUpEnableBackground: true,
    },
    {
      convertStyleToAttrs: true,
    },
    {
      convertColors: true,
    },
    {
      convertPathData: true,
    },
    {
      convertTransform: true,
    },
    {
      removeUnknownsAndDefaults: true,
    },
    {
      removeNonInheritableGroupAttrs: true,
    },
    {
      removeUselessStrokeAndFill: true,
    },
    {
      removeUnusedNS: true,
    },
    {
      cleanupIDs: true,
    },
    {
      cleanupNumericValues: true,
    },
    {
      moveElemsAttrsToGroup: true,
    },
    {
      moveGroupAttrsToElems: true,
    },
    {
      collapseGroups: true,
    },
    {
      removeRasterImages: false,
    },
    {
      mergePaths: true,
    },
    {
      convertShapeToPath: true,
    },
    {
      sortAttrs: true,
    },
    {
      transformsWithOnePath: false,
    },
    {
      removeDimensions: true,
    },
    {
      removeAttrs: { attrs: "(stroke|fill)" },
    },
  ];
}
指定 config path
svgo one.svg -o one.min.svg --config ./path/myconfig.js
svg-sprite-loader 使用
svg-sprite-loader 这个工具可以做到通过 js import svg, 然后自动生成 sprite 然后 append to html (通过 JS)
有 2 个缺点
第一是 svg sprite 不能 cache, 因为它不是 .svg file 而是通过 js append 的. (它有 config 可以调生成 .svg file)
第二是它用 js import 来管理. 我理想中的应该是扫描 html 看有用到那个, 然后生成在 append .svg file 丫
参考:
Generating an SVG Sprite Sheet with Webpack
Creating SVG sprites with Webpack using svg-sprite-loader
安装
yarn add svgo-loader --dev
yarn add svg-sprite-loader --dev
webpack.config

添加多一个 loader for svg. 可以特别指定路径. 之前 svg 是用 build-in 的 asset/resource 那个就拿掉.
注: extract: true 是做一个 .svg file 出来 (要 ajax 才会这样做), 如果只是 dev mode 就 set false 可以了, 它会自动 append svg sprite to html 的.
添加 plugin

在 ts import
import dada from '../fonts/svg-icon/google.svg'; // import 1

function requireAll(r: __WebpackModuleApi.RequireContext): void { // import by folder
  r.keys().forEach(r);
}
requireAll(require.context('/src/fonts/svg-icon', true, /\.svg$/));
import svg 需要 type declaration, custom.d.ts
declare module '*.svg' {
  const content: unknown;
  export default content;
}
require.context 需要 @types/webpack-env
调用
<svg>
  <use xlink:href="#google"></use>
</svg>
当 js dom ready 后, 它就会把所有 import 的 svg 变成 sprite 然后 append svg to html. 这样上面的调用就有效了.
如果是用 extract 的话, 它就不会自动去 append svg sprite 了哦 (我也不知道为什么, 但教程的做法是用 ajax 去加载做 cache)
gulp-svg-sprite 使用
参考: gulp-svg-sprite
npm install -g gulp
yarn add gulp --dev
yarn add gulp-svg-sprite --dev
gulpfile.js
const gulp = require('gulp');
const svgSprite = require('gulp-svg-sprite');

const config = {
  mode: {
    symbol: true,
  },
};

gulp.task('svgIcon', () => {
  return gulp
    .src('src/fonts/svg-icon/*.svg')
    .pipe(svgSprite(config))
    .pipe(gulp.dest('src/fonts/svg-icon-sprite'));
});
运行
gulp svgIcon
它出来的 folder 结构我不是很喜欢 (一定会有 symbol\svg), 但没有找到 config 可以调

调用
<svg style="width: 48px; height: 48px">
  <use xlink:href="../fonts/svg-icon-sprite/symbol/svg/sprite.symbol.svg#google" />
</svg>
如果想用 CSS background image 的话, 它也是支持的, 但我没有研究

当 svg-sprite 遇上 gradients
会坏掉. 参考 Github Issue – linear / radial gradients
倒不是插件的问题, 本来 svg sprite + gradients 就有诸多问题. 需要特别处理的.
参考:
Stack Overflow – SVG <use> ignores Gradient styling
总之挺麻烦的, 我果断选择放弃 gradients 效果. 像下面这样

左边是正牌有 gradients 的 facebook logo, 右边是冒牌的.
我目前的做法
下载 SVG, 把 width 去掉, 把颜色调成 currentColor, 丢进一个 folder 然后用 gulp-svg-sprite 做优化和 sprite.
使用的时候是这样
<svg class="icon">
  <use xlink:href="<%= require('../../src/icons/svg-sprite/sprite.svg') %>#menu" />
</svg>
CSS
svg.icon {
  /* let icon control by font-size instead of width/height */
  width: 1em;
  height: 1em;
}
Font Awesome
它有免费/付费版本. 到官网申请.
导入它的 script 放在 head, 它不是 CSS link 哦, 但建议放到 head 不加 defer, 当 CSS 用
<script
  src="https://kit.fontawesome.com/{your id}.js"
  crossorigin="anonymous"
></script>
your.id 去这里拿

调用
<i class="fa fa-apple"></i>
<i class="fa fa-2"></i>
<i class="fa fa-bell"></i>

<i class="fab fa-apple"></i>
<i class="fas fa-2"></i>
<i class="far fa-bell"></i>

<i class="fa-brands fa-apple"></i>
<i class="fa-solid fa-2"></i>
<i class="fa-regular fa-bell"></i>
3 种写法它都能接受, 但是 6.0 官网给的 example 是 fa-brands 所以推荐照这个做吧.
付费 / 收费:

通过 CSS font 来使用, 比如伪元素 (pseudo-element)
::marker {
  color: red;
  font: var(--fa-font-solid);
  content: "\f00d";
}
通过 CSS variable 设置 font, content 就是 icon 的 code, 这个是 version 6.0 版本的写法,

它也是可以 download SVG 哦

通过 Yarn + Sass / JS
参考:
Using webpack 5 with Font Awesome 5
How to make Font awesome 5 work with webpack
install
yarn add @fortawesome/fontawesome-free
import Sass
$fa-font-path: '~@fortawesome/fontawesome-free/webfonts';
@import '~@fortawesome/fontawesome-free/scss/fontawesome.scss';
@import '~@fortawesome/fontawesome-free/scss/solid.scss';
@import '~@fortawesome/fontawesome-free/scss/regular.scss';
@import '~@fortawesome/fontawesome-free/scss/brands.scss';
import JS
import '@fortawesome/fontawesome-free/js/fontawesome'
import '@fortawesome/fontawesome-free/js/solid'
Sass / JS 选其中一个就可以了.
使用
<i class="fa-brands fa-apple" style="font-size: 48px; color: red"></i>
局势
Icon 第一步是要先找到. 像 Material Icons, ionicons 这类 for App 的, icon 量很少. 不适合做网站.
fontawesome, flaticon, icons8 这些就很多选择, 但是大部分都收费.
所以挺麻烦的. 比较中和的方法就是用一个免费的大库, 如果找不到 icon 就去各大平台找, 然后用 SVG 方式引入.
这个方法比较适合做 Web App, 做网站你要舒服建议就付费吧, 不然挺累的.
我现在的步骤是这样的:
SVG way:
1. 找 icon (经常是这里找 SVG Repo)
2. 调颜色 (用这个 online tool BOXY SVG 或者改 fill=currentColor)
3. 做优化和 sprite sheet (用 gulp-svg-sprite, 它会自动去掉 dimension 哦)
4. <svg> 调用, set color, width, height (或者用 width/height: em 然后 set font-size)
Font way:
1. npm 下载库, 或者官网下载 woff2
2. import 或者 @font-face
3. 使用
Font Awesome icon 和 text vertical align 的问题
参考: stackoverflow – How to center text vertically with a large font-awesome icon?

注意看 icon 和 text 并没有在一条中间线上. 虽然它们的 font-size 一样, 但是 line-height 却不一样.
span 有 standard line-height 1.2 左右, 而 icon 没有 (或者说是 line-height: 1), 所以 icon 比较小. icon 底下蓝色就是没有 cover 到的地方.
解决方法就是把 span 调成 line-height: 1. 一定要 1 因为 1 大概就是没有的意思. 如果调 1.2, 1.5. 那么不同字体还是会产生区别.
还有一种情况是 font-size 不一样, icon 4rem, text 3rem, 调整 vertical-align: text-bottom 的效果如下

总之就是那几招, line-height, align-items, vertical-align.
Icon 比 text 大

当 icon 比字大, 没有做任何处理时长这样.
flex 居中
.box {
  max-width: 256px;
  display: flex;
  gap: 1rem;
  align-items: center;

  h1 {
    font-size: 2rem;
  }

  .icon {
    font-size: 3rem;
  }
}
居中后长这样

这里有个问题. 当字有 multi line 时, 这个居中就不好看了

解决方法是在 text 上加一个 wrapper
<div class="box">
  <i class="icon fa-solid fa-user"></i>
  <div class="wrapper">
    <h1>Hello World</h1>
  </div>
</div>
CSS
.box {
  max-width: 256px;
  display: flex;
  gap: 1rem;
  // align-items: center; 不要了

  .wrapper {
    display: flex;
    align-items: center;
    h1 {
      font-size: 2rem;
    }
  }

  .icon {
    font-size: 3rem;
  }
}
效果

这一招只能用在 Icon 比 text 大的情况
text 比 icon 大

这个更麻烦一点, 因为要让 icon 在第一行的字中间, 唯一的办法就是依据 font-size + line-height 算出高度.
.container {
  display: grid;
  grid-template-columns: max-content auto;
  align-items: flex-start;
  gap: 24px;
  --line-height: calc(55 / 48);

  i {
    font-size: 32px;
    min-height: calc(56px * var(--line-height));
    display: flex;
    align-items: center;
    background-color: pink;
  }
  h3 {
    font-size: 56px;
    font-weight: 500;
  }
}
Font Awesome Icon Button & line-height
Icon Button 很常见, 比如 Material 的 Icon Buttons
长这样

HTML 结构
<button class="expand-btn">
  <i class="fa-solid fa-caret-down"></i>
</button>
Font Awesome 的 icon 它的 line-height 是 1 (上面有提到了). 如果我们 wrap 一层 button 之后会发现它的高度变大了.
原因是 button 默认的 line-heght 是 normal, 游览器默认通常是 1.2 左右 (depend on 字体).

第一个是 Font Awesome 的 icon
第二个是 button wrap icon, 在没有 setting line-height 的情况下, 它高出了许多 (粉红色是 button 的高度)
第三个是 button wrap icon, setting 了 line-height = 1, 高度变小了, 但还是比 Font Awesome 多出了 0.4px.
这个是因为不同的字体 line-height 不同, 哪怕值都是 1 但是出来效果不一样. (你可以换一换字体试试, 会发现有些字体可能多出 0.6px)
但微差不要紧啦. 像素眼咩.
Font Awesome Icon 宽度高度不一致
HTML
<div class="container">
  <div class="item">
    <i class="fa-brands fa-whatsapp"></i>
    <p>Lorem ipsum dolor sit.</p>
  </div>
  <div class="item">
    <i class="fa-solid fa-envelope"></i>
    <p>Lorem ipsum dolor sit.</p>
  </div>
  <div class="item">
    <i class="fa-solid fa-location-dot"></i>
    <p>Lorem ipsum dolor sit.</p>
  </div>
</div>
CSS
.container {
  display: flex;
  flex-direction: column;
  gap: 2px;

  .item {
    display: flex;
    align-items: center;
    gap: 0.5rem;
    font-size: 3rem;

    i {
      background-color: pink;
    }
    p {
      border-left: 2px solid red;
    }
  }
}
效果

看红色线, 3 行字体是不对齐的. 因为 icon 的 width 不同. 高度也不相同.
解决方法有 2 个, 第一是用 display: grid 我不推荐. 第二是给 icon set width height 然后居中它的伪元素.
i {
  background-color: pink;
  width: 1em;
  height: 1em;
  display: flex;
  justify-content: center;
  align-items: center;
}
效果

官方也有一个 best practice 叫 Fixed Width Icons
查看代码
<div style="font-size: 2rem;">
  <div><i class="fa-solid fa-skating" style="background:DodgerBlue"></i> Skating</div>
  <div><i class="fa-solid fa-skiing" style="background:SkyBlue"></i> Skiing</div>
  <div><i class="fa-solid fa-skiing-nordic" style="background:DodgerBlue"></i> Nordic Skiing</div>
  <div><i class="fa-solid fa-snowboarding" style="background:SkyBlue"></i> Snowboarding</div>
  <div><i class="fa-solid fa-snowplow" style="background:DodgerBlue"></i> Snowplow</div>
</div>
效果

都是不平的。
加上 class fa-fw,fw 是 fixed width 的缩写

效果

平了。原理是这样的
我们一般上用 font-size 来控制 icon 大小。比如 font-size: 24px。
icon 的 height 是 1em。所以高度是依据 font-size 的。
icon 的 width 则是依据 icon 本身的比例 aspect ratio。每个 icon 比例不一定一样所以高度一致,但是宽度不一致。
fixed-width 是把 width 变成 1.25em。所以所有 icon 都变成了固定的比例。也就平了。
为什么不是 1em 而是 1.25em 呢?我也不清楚,估计是因为有些 icon 是长方形的,如果 1:1 正方形会展现不完,所有就定了 1.25em。
<svg> 和 <i> vertical-align 的区别
查看代码 <div class="container">
<p>
<span>Hello</span>
<svg class="icon" viewBox="0 0 576 512">
<use xlink:href="../../src/icons/svg-icon-sprite/symbol/svg/sprite.symbol.svg#solid-star" />
</svg>
<i class="fa-solid fa-star"></i>
<i class="fa-solid fa-star"></i>
<i class="fa-solid fa-star"></i>
<i class="fa-solid fa-star"></i>
<i class="fa-solid fa-star"></i>
</p>
<p>
<span>Hello</span>
<i class="fa-solid fa-star"></i>
<svg class="icon" viewBox="0 0 576 512">
<use xlink:href="../../src/icons/svg-icon-sprite/symbol/svg/sprite.symbol.svg#solid-star" />
</svg>
<svg class="icon" viewBox="0 0 576 512">
<use xlink:href="../../src/icons/svg-icon-sprite/symbol/svg/sprite.symbol.svg#solid-star" />
</svg>
<svg class="icon" viewBox="0 0 576 512">
<use xlink:href="../../src/icons/svg-icon-sprite/symbol/svg/sprite.symbol.svg#solid-star" />
</svg>
<svg class="icon" viewBox="0 0 576 512">
<use xlink:href="../../src/icons/svg-icon-sprite/symbol/svg/sprite.symbol.svg#solid-star" />
</svg>
<svg class="icon" viewBox="0 0 576 512">
<use xlink:href="../../src/icons/svg-icon-sprite/symbol/svg/sprite.symbol.svg#solid-star" />
</svg>
</p>
</div>效果

第一个 icon 我特别做了对调。可以看到 <svg> 和 <i> 的 vertical-align 是不同的。
<i> 的 vertical-align 是 text-top
<svg> 的 vertical-align 是 top
SVG Icon Button Align Center

左边是 fontawesome <i>, 右边是 <svg>
<div class="button-list">
  <button class="btn-i">
    <i class="fa-solid fa-arrow-up"></i>
  </button>
  <button class="btn-svg">
    <svg>
      <use xlink:href="<%= require('../../src/module/icons/svg-icon-sprite/symbol/svg/sprite.symbol.svg') %>#solid-arrow-up" />
    </svg>
  </button>
</div>
svg 我是下载 fontawesome 然后用 sprite 做的.
without style 的 svg 会长这样

完全跑位了. 这个是 svg 常见的问题, 参考: Medium – Align SVG Icons to Text and Say Goodbye to Font Icons
解决方法是给 svg style
svg {
  width: 1em;
  height: 1em;
  top: 0.125em;
  position: relative;
}
或者给 button display flex
.btn-svg {
  display: flex;
  align-items: center;
  justify-content: center;
  svg {
    width: 1em;
    height: 1em;
  }
}
我觉得 2 个方案都可以接受, 第二个比较安稳, 只是它涉及 parent element, 这点倒不是很好.
Sprite SVG viewbox aspect ratio 的问题
<i class="fa-solid fa-angle-right"></i>

<svg height="1em" fill="currentColor" xmlns="http://www.w3.org/2000/svg" viewBox="0 0 320 512">
  <path d="M278.6 233.4c12.5 12.5 12.5 32.8 0 45.3l-160 160c-12.5 12.5-32.8 12.5-45.3 0s-12.5-32.8 0-45.3L210.7 256 73.4 118.6c-12.5-12.5-12.5-32.8 0-45.3s32.8-12.5 45.3 0l160 160z" />
</svg>
<i> 是 fontawesome, svg 也来自 fontawesome 下载.
height="1em" 表示用 font-size 来控制. 配上 viewBox 作为 icon 的比例. 最终出来的效果和 <i> 是一致的

但是呢, 一旦我们做 sprite 以后, 比例就消失了
<svg height="1em">
  <use xlink:href="../icons/svg-sprite/sprite.symbol.svg#solid-angle-right" />
</svg>
效果

width 是 300, 那是 svg default 的 width.
怎么解决呢? ChatGPT 给出的答案是用 preserveAspectRatio, 但后来读了 张鑫旭 – 理解SVG viewport,viewBox,preserveAspectRatio缩放
preserveAspectRatio 不是那样用的. 最好看了 Stack Overflow – Should SVG `viewbox` be defined once in `symbol`, or each time an SVG is `used`?
应该是没有什么好方法. 只能把 viewBox 写到 svg 上.
<svg height="1em" viewBox="0 0 320 512">
  <use xlink:href="../icons/svg-sprite/sprite.symbol.svg#solid-angle-right" />
</svg>
显然这个方法在管理上是扣很多分的...但目前只能这样先了...
效果

注意: 外面的 viewBox x,y 一定要是 0 0, width 和 height 只是比例 48 48 和 1 1 是等价的.
Flex Shrink 和 Svg Icon 小提醒

icon 配字的设计很常见. 在使用 fontawesome 时, 由于它使用 font-size 来控制大小, 所以不受 flex shrink 影响.
但如果我们换成 SVG 就不同了, SVG 用 width 来控制大小. 所以会收 flex shrink 影响. 记得要加上 flex-shrink : 0; 哦
Modify SVG
fontawesome 下载的 SVG icon 是有 padding 的
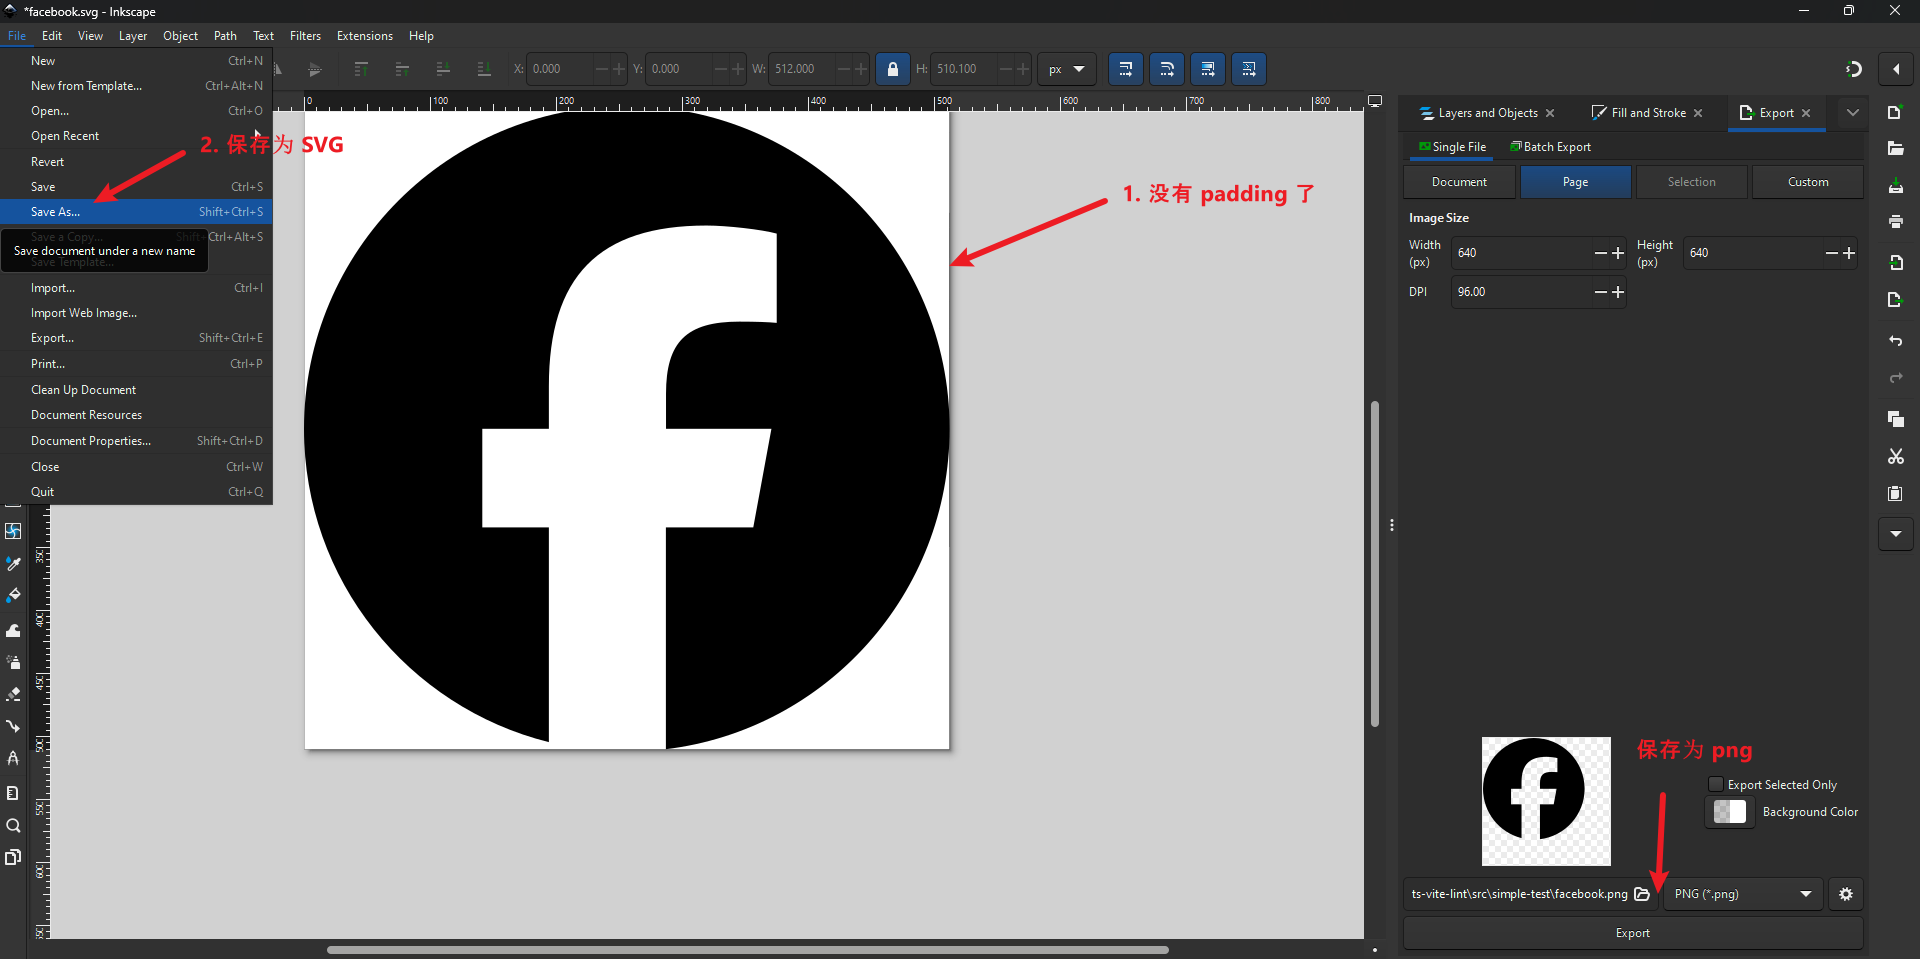
如果我们想把 padding 去掉,可以使用这个免费开源工具:inkscape
下载安装后,打开
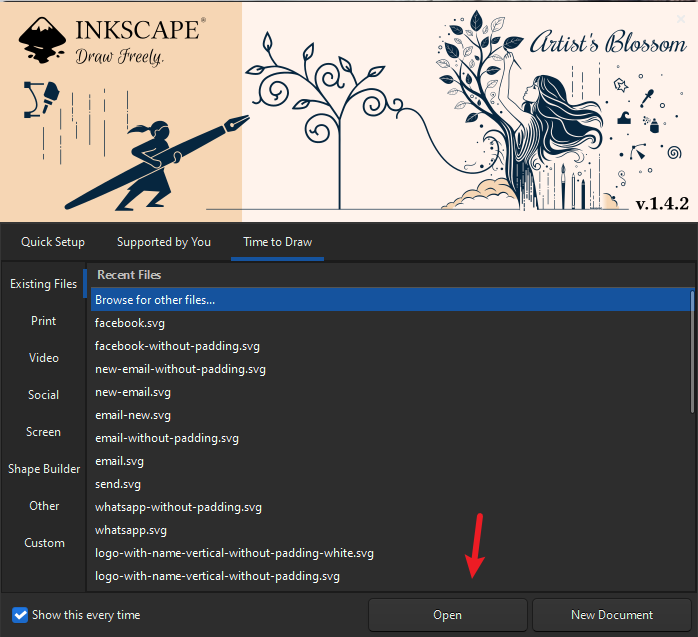
Open browse 我们要修改的 SVG
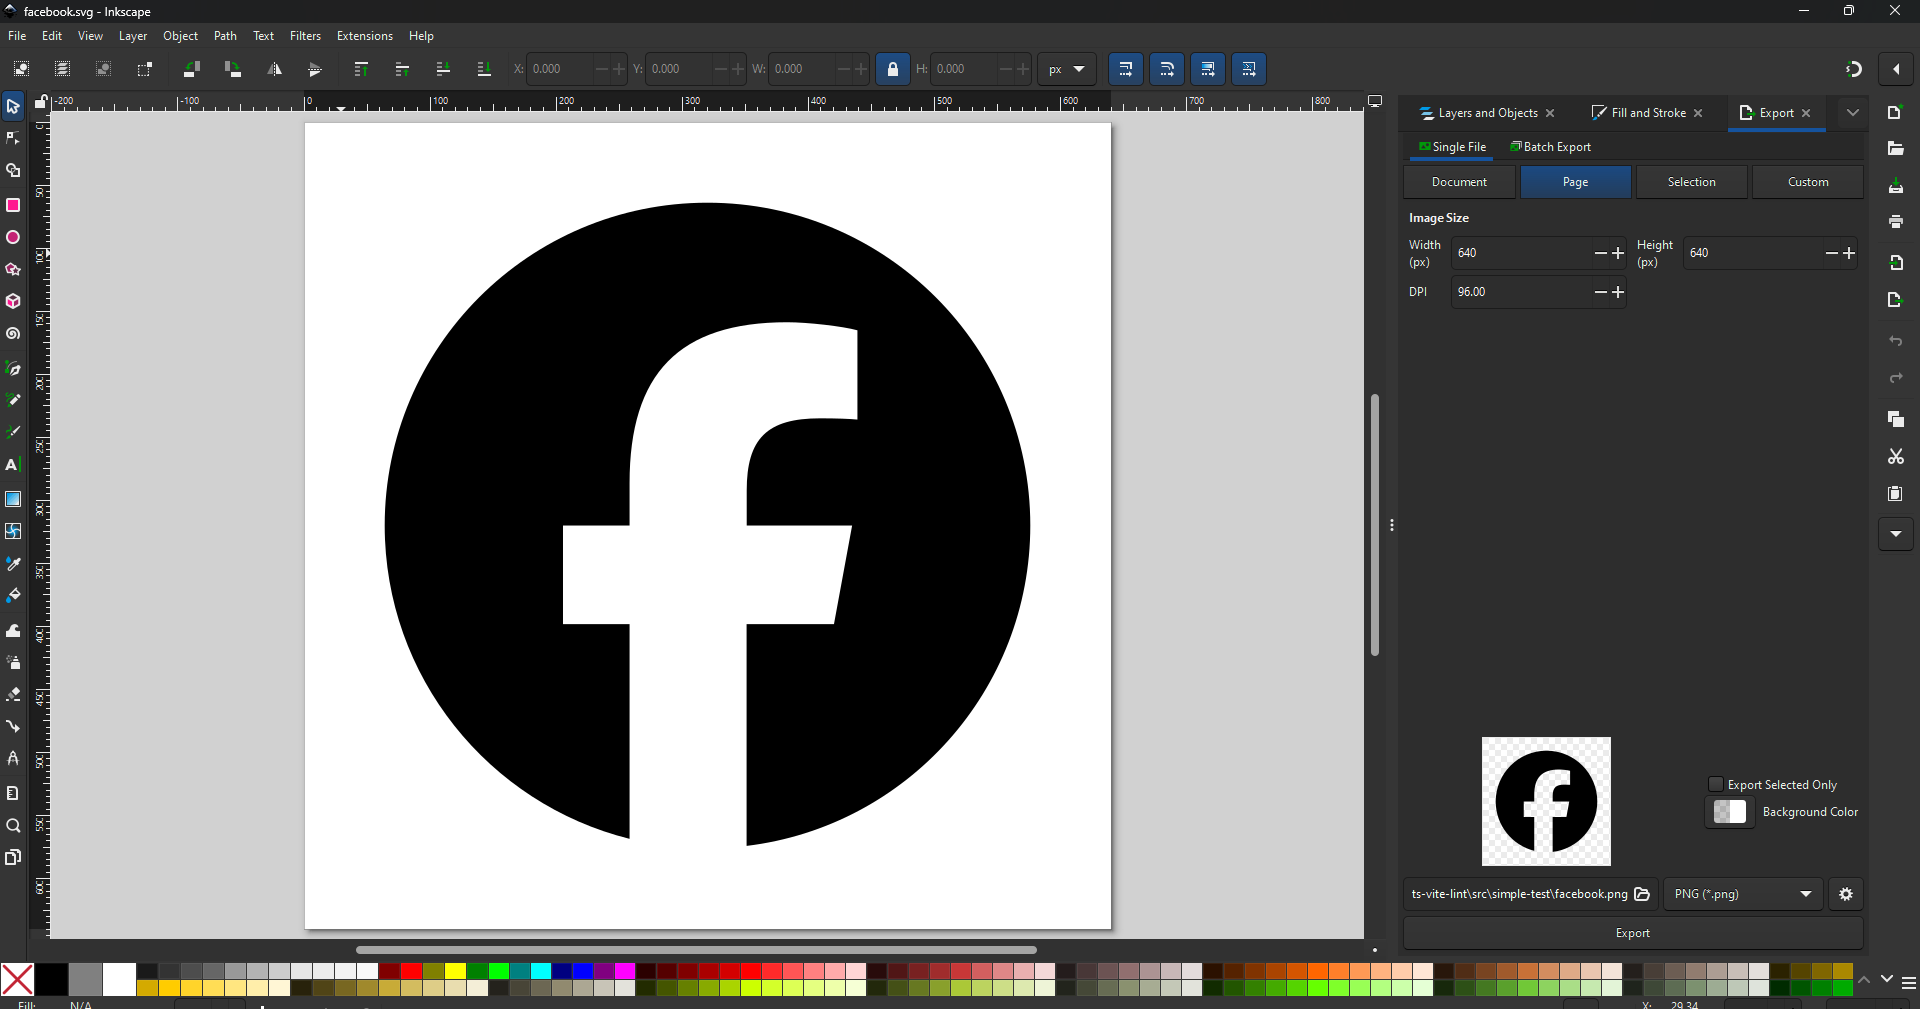
icon 周围白色的就是 padding。
接着,select 整个 icon,然后调 x,y 坐标,设置为 0,0 也就是定位到左上角
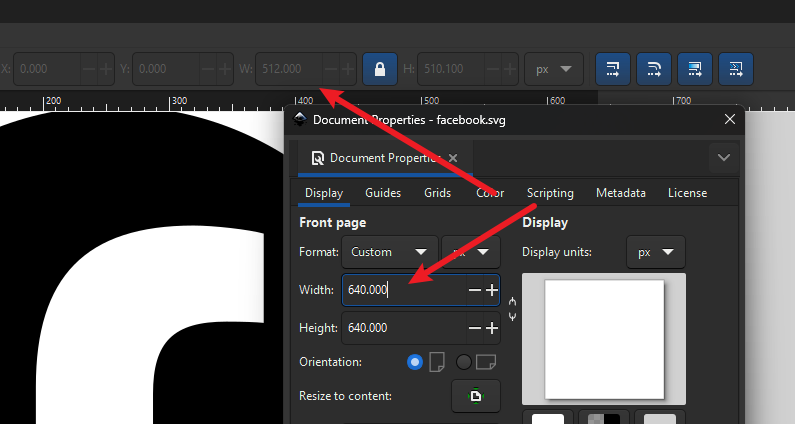
然后在白色区域 right click,选择 Document Properties,这里可以调 frame 的 dimension
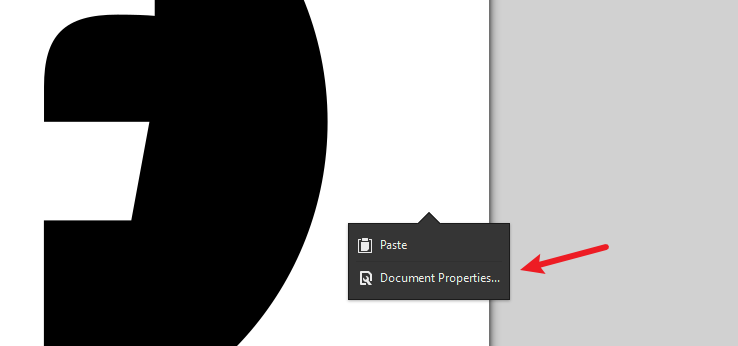
把 frame dimension 调到和 icon 大小一模一样,这样就周围没有 padding 了
原本是 640x640 改成 512x510.1。
最后就是保存,可以存 SVG,也可以换成图片 e.g. PNG
它保存的 SVG 文件内容会有一些垃圾信息,可以透过 svg-cleaner 做清除,最后要确保有 viewBox="0 0 512 510.1" 就可以了。

 浙公网安备 33010602011771号