
go搭建简单grpc服务(登录服务)1
开发环境
window10系统
vscode 1.69.2
golang 1.18.3
项目介绍
通过grpc搭建一个简单的登录服务,并实现多种客户端样例代码。
项目地址:https://github.com/kalaGN/usermservice
数据库结构
CREATE TABLE `bz_account` (
  `accountid` int(10) NOT NULL AUTO_INCREMENT COMMENT '自增账号编号',
  `username` varchar(32) COLLATE utf8_unicode_ci NOT NULL COMMENT '用户名',
  `password` varchar(32) COLLATE utf8_unicode_ci NOT NULL COMMENT '密码',
  `corpid` int(10) NOT NULL COMMENT '企业编号',
  `createTime` datetime NOT NULL DEFAULT '0000-00-00 00:00:00',
  `lastLogin` datetime NOT NULL DEFAULT '0000-00-00 00:00:00',
  `isdelete` tinyint(4) NOT NULL DEFAULT '0' COMMENT '待定',
  PRIMARY KEY (`accountid`) USING BTREE
) ENGINE=MyISAM AUTO_INCREMENT=1 DEFAULT CHARSET=utf8 COLLATE=utf8_unicode_ci ROW_FORMAT=DYNAMIC COMMENT='账号表';
INSERT INTO `test`.`bz_account`(`accountid`, `username`, `password`, `corpid`, `createTime`, `lastLogin`, `isdelete`) VALUES (1, 'afei', 'e10adc3949ba59abbe56e057f20f883e', 1, '0000-00-00 00:00:00', '0000-00-00 00:00:00', 0);
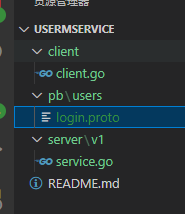
代码目录
实现步骤
-
初始化工程
echo "# usermservice" >> README.md
git init
git add README.md
git commit -m "first commit"
git branch -M "main"
git remote add origin https://github.com/kalaGN/usermservice.git
git push -u origin "main"
增加.gitignore文件
-
编写proto文件
打开pb\users\login.proto文件填入如下内容
syntax = "proto3";

package login;

message Request{
    string name = 1;
    string pwd = 2;
    string sign =3;
}

message Response{
    string code = 1;
    string msg = 2;
    string data =3;
    string token =4;
}

service LoginService{
    rpc Login(Request) returns (Response){}
}
执行如下命令:
protoc --proto_path=./pb/users/ ./pb/users/*.proto --go-grpc_out=./pb/users/
报错
protoc-gen-go-grpc: unable to determine Go import path for "login.proto"
Please specify either:
• a "go_package" option in the .proto source file, or
• a "M" argument on the command line.
See https://developers.google.com/protocol-buffers/docs/reference/go-generated#package for more information.
--go-grpc_out: protoc-gen-go-grpc: Plugin failed with status code 1.
package login; 下增加一行代码
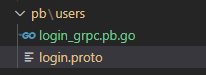
再次执行命令,生成pb\users\login_grpc.pb.go文件如下。
再执行如下命令
protoc --proto_path=./pb/users/ ./pb/users/*.proto --go_out=./pb/users/
生成pb/users/login.pb.go 文件
提交代码
git commit -m "pb and gen"
git push -u origin "main"
-
服务端代码
进入 server/v1/目录
新建文件server.go,输入如下内容
package main

import (
	"context"
	"fmt"
	"login"
	"net"

	"google.golang.org/grpc"
)

type LoginService struct {
}

func (s *LoginService) Login(ctx context.Context, req *login.Request) (*login.Response, error) {
	fmt.Printf("req name:%s, pwd:%s\n", req.Name, req.Pwd)

	return &login.Response{
		Code:  "1",
		Msg:   "login success",
		Data:  "ok",
		Token: "ttt",
	}, nil
}

func main() {
	l, err := net.Listen("tcp", ":8889")

	if err != nil {
		panic(err)
	}

	fmt.Println("listen on 127.0.0.1:8889")

	grpcServer := grpc.NewServer()

	loginService := LoginService{}
	login.RegisterLoginServiceServer(grpcServer, &loginService)

	err = grpcServer.Serve(l)

	if err != nil {
		println(err)
	}

}
在同级目录初始化module
go mod init server
go mod tidy
执行完成后go.mod go.sum生成。go.mod 文件如下
module server

go 1.18

require google.golang.org/grpc v1.48.0

require (
	github.com/golang/protobuf v1.5.2 // indirect
	golang.org/x/net v0.0.0-20201021035429-f5854403a974 // indirect
	golang.org/x/sys v0.0.0-20210119212857-b64e53b001e4 // indirect
	golang.org/x/text v0.3.3 // indirect
	google.golang.org/genproto v0.0.0-20200526211855-cb27e3aa2013 // indirect
	google.golang.org/protobuf v1.27.1 // indirect
)
在go.mod 后面增加引入本地包方法:
require login v0.0.0

replace login => ../../pb/users
再执行 go mod tidy
运行 go run server.go

说明启动成功。
-
客户端代码(go)
进入目录 client 新建 client.go,内容如下:
package main

import (
	"context"
	"flag"
	"fmt"
	"login"
	"time"

	"google.golang.org/grpc"
)

//初始化测试数据
var (
	dest = flag.String("dest", ":8889", "The server address in the format of host:port")
	name = flag.String("name", "afei", "The name is login account name")
	pwd  = flag.String("pwd", "123456", "The passwd is the login account password to login")
	sign = flag.String("sign", "sign123123123", "The cmd is the login cmd")
)

func printLogin(client login.LoginServiceClient, req *login.Request) {
	fmt.Printf("Client: Request sign:%s, name:%s, pwd:%s\n", req.Sign, req.Name, req.Pwd)

	ctx, cancel := context.WithTimeout(context.Background(), 10*time.Second)
	defer cancel()

	response, err := client.Login(ctx, req)
	if err != nil {
		fmt.Printf("%v\n", err)
		return
	}

	fmt.Println(response)
}

func main() {
	flag.Parse()
	conn, err := grpc.Dial(*dest, grpc.WithInsecure())
	if err != nil {
		fmt.Printf("failed to Dial")
	}
	defer conn.Close()

	client := login.NewLoginServiceClient(conn)

	printLogin(client, &login.Request{
		Name: *name,
		Pwd:  *pwd,
		Sign: *sign,
	})

}
同理 需要初始化modele 并加入本地包login
启动客户端:
go run client.go
出现如下输出说明通信成功

-
增加配置文件config.ini
通过以上步骤,只是将最简单的通讯样例调试通了。接下来向生产可用改造。
首先我们应该引入配置文件。一些跟环境有关和资源(数据库,缓存)有关的配置放入配置文件方便修改。
我们在server 下建立pkg文件夹,新增config.go文件并输入如下内容:
package config

import (
	"fmt"

	"github.com/tietang/props/ini"
)

// ConfigFunc 动态加载配置信息
type ConfigFunc func() map[string]interface{}

// ConfigFuncs 先加载到此数组,loadConfig 再动态生成配置信息
var ConfigFuncs map[string]ConfigFunc

func LoadPort() (string, error) {
	file := "../v1/config.ini"
	conf := ini.NewIniFileConfigSource(file)
	return conf.Get("production.server.port")
}

func GetProduction() {
	file := "./config.ini"
	conf := ini.NewIniFileConfigSource(file)
	fmt.Println(conf.Get("production"))
}
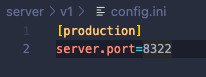
此包只是读取 server/v1/config.ini 文件 然后返回 [production] 下的server.port,配置文件内容如下
并在pkg/config下初始化模块
go mod init config

go mod tidy
修改server.go 中启动端口的地方 左侧是修改前,右侧是修改后

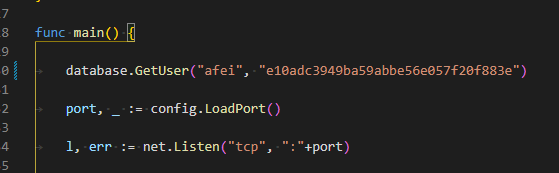
	port, _ := config.LoadPort()

	l, err := net.Listen("tcp", ":"+port)

	if err != nil {
		panic(err)
	}

	fmt.Println("listen on 127.0.0.1:" + port)
提交到github
-
增加gorm使用database
新建文件夹pkg/database,新建文件database.go,先定义字段并写一个简单的查询方法GetUser()。
package database

import (
	"fmt"
	"pkg/config"

	"gorm.io/driver/mysql"
	"gorm.io/gorm"
)

func Conn() (db *gorm.DB, er error) {

	// 参考 https://github.com/go-sql-driver/mysql#dsn-data-source-name 获取详情
	dsn := config.GetDatabaseDsn()
	db, err := gorm.Open(mysql.Open(dsn), &gorm.Config{})
	fmt.Printf("Conn db=%v, err=%v\n", db, err)
	er = err
	return db, er
}

type Account struct {
	Accountid  string `json:accountid`
	Username   string `json:username` //用户名',
	Password   string `json:password` //密码',
	Corpid     int    `json:corpid`   //企业编号',
	CreateTime string `gorm:"type:datetime" json:"createTime"`
	LastLogin  string `json:lastLogin`
	Isdelete   string `json:isdelete`
}

func GetUser(name string, pwd string) {

	db, err1 := Conn()
	if err1 != nil {
		fmt.Println(err1.Error())
	}
	account := new(Account)
	res := db.Where("username=?", name).Where("password=?", pwd).First(account)

	fmt.Println(res.Error)        //判断返回值的错误
	fmt.Println(res.RowsAffected) //查看返回条数
	fmt.Println("查询到的对象为", *account)
	fmt.Println("查询到的对象为", account) //相对于上面
}
在pkg/database下初始化模块database
go mod init database

go mod tidy
应为这里的数据库连接方法 config.GetDatabaseDsn() 是在/pkg/config/config.go 中定义,所以在config.go文件末尾增加方法
// root:pwd@tcp(ip:3306)/test
func GetDatabaseDsn() string {
	file := "../v1/config.ini"
	conf := ini.NewIniFileConfigSource(file)
	users, _ := conf.Get("production.database.user")
	passwd, _ := conf.Get("production.database.password")
	host, _ := conf.Get("production.database.host")
	port, _ := conf.Get("production.database.port")
	db, _ := conf.Get("production.database.dbname")
	return users + ":" + passwd + "@tcp(" + host + ":" + port + ")/" + db + "?charset=utf8mb4&parseTime=True&loc=Local"
}
在 /server/v1/config.ini中增加数据库有关配置项(需要改成自己的数据库连接信息)
database.host=127.0.0.1
database.port=3306
database.user=root
database.password=afei
database.dbname=test
同理 database.go 引用了本地的pkg/config包,所以要在database 下go.mod中增加本地包导入规则
require pkg/config v0.0.0

replace pkg/config => ../config
执行
go mod tidy
我们在/server/v1/server.go main函数中测试一下GetUser()方法
database.GetUser("afei", "e10adc3949ba59abbe56e057f20f883e")
运行


 浙公网安备 33010602011771号