阳哥讲面试题(二)队列,线程池
一、概述
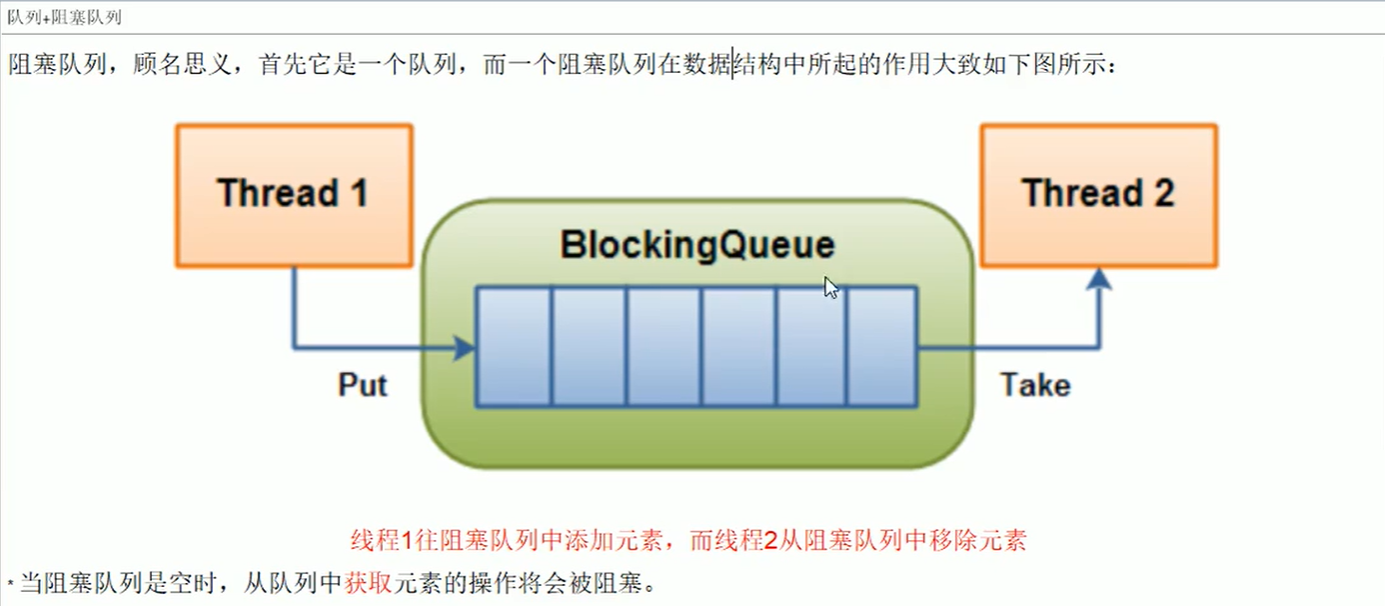


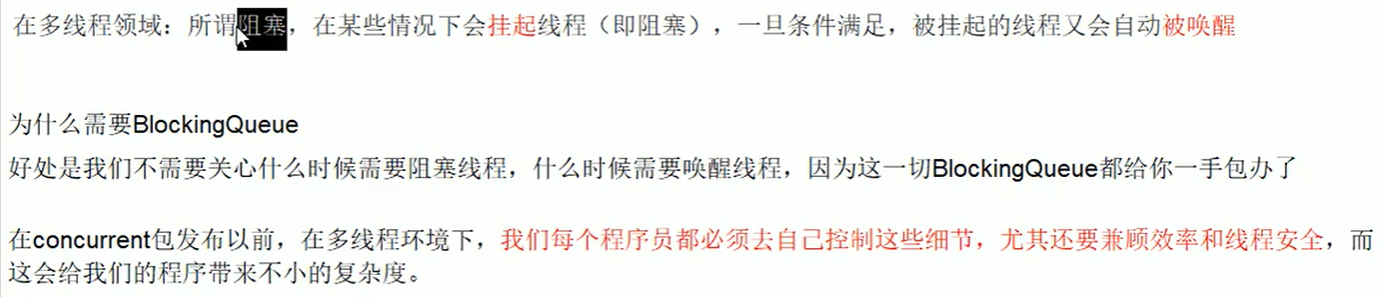
二、为什么用,有什么好处

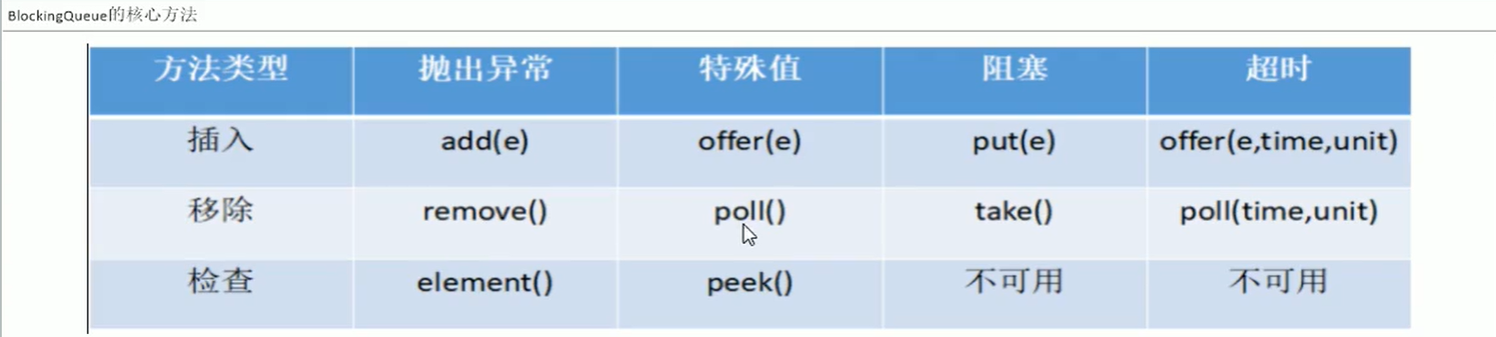
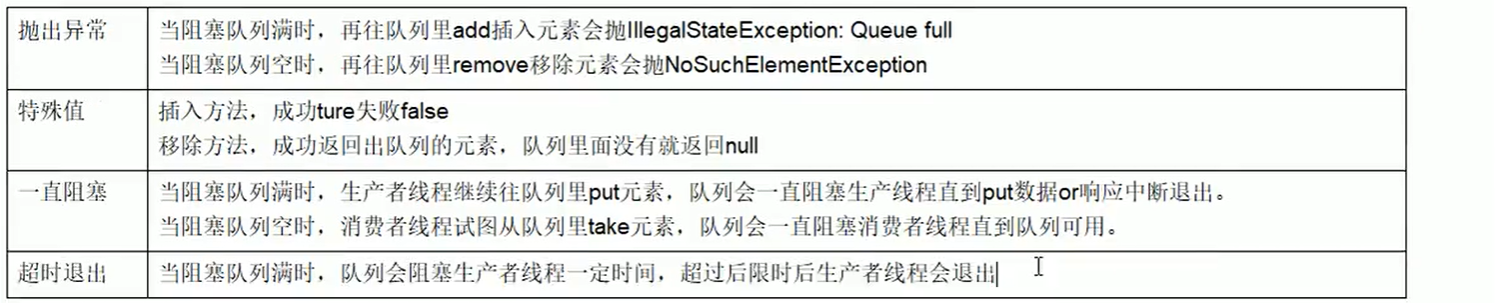
三、BlockingQueue的核心方法
四、SynchronousQueue队列
理论

实操
public class SynchronousQueueDemo {

	public static void main(String[] args) {

		BlockingQueue<String> blockingQueue = new SynchronousQueue<>();
		new Thread(() -> {
			try {
				System.out.println(Thread.currentThread().getName() + "\t put 1");
				blockingQueue.put("1");

				System.out.println(Thread.currentThread().getName() + "\t put 2");
				blockingQueue.put("2");

				System.out.println(Thread.currentThread().getName() + "\t put 3");
				blockingQueue.put("3");

			} catch (Exception e) {
				e.printStackTrace();
			}
		},"线程1").start();

		new Thread(() -> {
			try {
				TimeUnit.SECONDS.sleep(5);
				System.out.println(Thread.currentThread().getName() + "\t get " + blockingQueue.take());

				TimeUnit.SECONDS.sleep(5);
				System.out.println(Thread.currentThread().getName() + "\t get " + blockingQueue.take());

				TimeUnit.SECONDS.sleep(5);
				System.out.println(Thread.currentThread().getName() + "\t get " + blockingQueue.take());

			} catch (Exception e) {
				e.printStackTrace();
			}
		},"线程2").start();
	}
}
首先put1,因为该队列只能存放一个元素,所以后边的put2和put3只能等待;5s后,take1,取出元素,队列为空,然后put2,以此类推。
- 输出:
线程1	 put 1
线程2	 get 1
线程1	 put 2
线程2	 get 2
线程1	 put 3
线程2	 get 3
五、线程通信之生产者与消费者
传统版
/**
 * TODO 一个初始值为0的变量,两个线程对其交替操作,一个加1,一个减1,来五轮。
 *
 * @author kakaluote
 * @date 2021年6月30日 下午4:23:33
 *
 * 1、线程 操纵 资源类
 * 2、判断 干活 唤醒通知
 * 3、严防多线程下的虚假唤醒
 *
 *  深 透 明 细
 */
public class ProConsu_TraditionDemo {

	public static void main(String[] args) {
		ShareData shareData = new ShareData();
		new Thread(() -> {
			for (int i = 1; i <= 5; i++) {
				try {
					shareData.increment();
				} catch (Exception e) {

				}
			}
		},"线程1").start();
		new Thread(() -> {
			for (int i = 1; i <= 5; i++) {
				try {
					shareData.decrement();
				} catch (Exception e) {

				}
			}
		},"线程2").start();
	}
}

//资源类
class ShareData{
	private int number = 0;
	private Lock lock = new ReentrantLock();
	private Condition condition = lock.newCondition();

	public void increment() throws Exception{
		lock.lock();
		try{
			//1 判断
			while(number != 0){
				//等待,不能生产
				condition.await();
			}
			//2、干活
			number ++;
			System.out.println(Thread.currentThread().getName() + "\t生产\t" + number);
			//3、通知唤醒
			condition.signalAll();
		}catch(Exception e){

		}finally{
			lock.unlock();
		}
	}

	public void decrement() throws Exception{
		lock.lock();
		try{
			//1 判断
			while(number == 0){
				//等待,不能消费
				condition.await();
			}
			//2、干活
			number --;
			System.out.println(Thread.currentThread().getName() + "\t消费\t" + number);
			//3、通知唤醒
			condition.signalAll();
		}catch(Exception e){

		}finally{
			lock.unlock();
		}
	}
}
输出
线程1	生产	1
线程2	消费	0
线程1	生产	1
线程2	消费	0
线程1	生产	1
线程2	消费	0
线程1	生产	1
线程2	消费	0
线程1	生产	1
线程2	消费	0
阻塞队列版
public class ProdConsumer_BlockQueueDemo {

	public static void main(String[] args) {

		MyResource myResource = new MyResource(new ArrayBlockingQueue<String>(10));
		new Thread(() -> {
			System.out.println(Thread.currentThread().getName() + "\t 启动成功");
			try {
				myResource.myProd();
			} catch (Exception e) {
				// TODO Auto-generated catch block
				e.printStackTrace();
			}
		},"生产者").start();
		new Thread(() -> {
			System.out.println(Thread.currentThread().getName() + "\t 启动成功");
			System.out.println();
			try {
				myResource.myConsumer();
			} catch (Exception e) {
				// TODO Auto-generated catch block
				e.printStackTrace();
			}
		},"消费者").start();


		try {
			TimeUnit.SECONDS.sleep(5);
		} catch (InterruptedException e) {
			// TODO Auto-generated catch block
			e.printStackTrace();
		}

		System.out.println();

		System.out.println("5s时间到,大老板" + Thread.currentThread().getName() + "叫停,活动结束");
		myResource.stop();
	}
}

class MyResource{

	private volatile boolean FLAG = true;//默认开启,进行生产+消费
	private AtomicInteger atomicInteger = new AtomicInteger();

	BlockingQueue<String> blockingQueue = null;

	public MyResource(BlockingQueue<String> blockingQueue) {
		this.blockingQueue = blockingQueue;
		System.out.println(blockingQueue.getClass().getName());
	}

	public void myProd() throws Exception{
		String data = null;
		boolean retValue;
		while(FLAG) {
			//++i
			data = atomicInteger.incrementAndGet() + "";
			retValue = blockingQueue.offer(data,2L,TimeUnit.SECONDS);
			if(retValue) {
				System.out.println(Thread.currentThread().getName() + "\t插入队列" + data + "成功!");
			}else {
				System.out.println(Thread.currentThread().getName() + "\t插入队列" + data + "失败!");
			}
			TimeUnit.SECONDS.sleep(1);
		}
		System.out.println(Thread.currentThread().getName() + "\t 大老板说:FLAG=false,生产结束!");
	}

	public void myConsumer()throws Exception{
		String result = null;
		while(FLAG) {
			result = blockingQueue.poll(2L,TimeUnit.SECONDS);
			if(null == result || result.equalsIgnoreCase("")) {
				FLAG = false;
				System.out.println(Thread.currentThread().getName() + "\t 超过2s没有取到,消费退出。");
				return;
			}
			System.out.println(Thread.currentThread().getName() + "\t消费队列" + result + "成功!");
		}
	}

	public void stop(){
		this.FLAG = false;
	}
}
输出:
java.util.concurrent.ArrayBlockingQueue
生产者	 启动成功
消费者	 启动成功

生产者	插入队列1成功!
消费者	消费队列1成功!
生产者	插入队列2成功!
消费者	消费队列2成功!
生产者	插入队列3成功!
消费者	消费队列3成功!
生产者	插入队列4成功!
消费者	消费队列4成功!
生产者	插入队列5成功!
消费者	消费队列5成功!

5s时间到,大老板main叫停,活动结束
生产者	 大老板说:FLAG=false,生产结束!
消费者	 超过2s没有取到,消费退出。
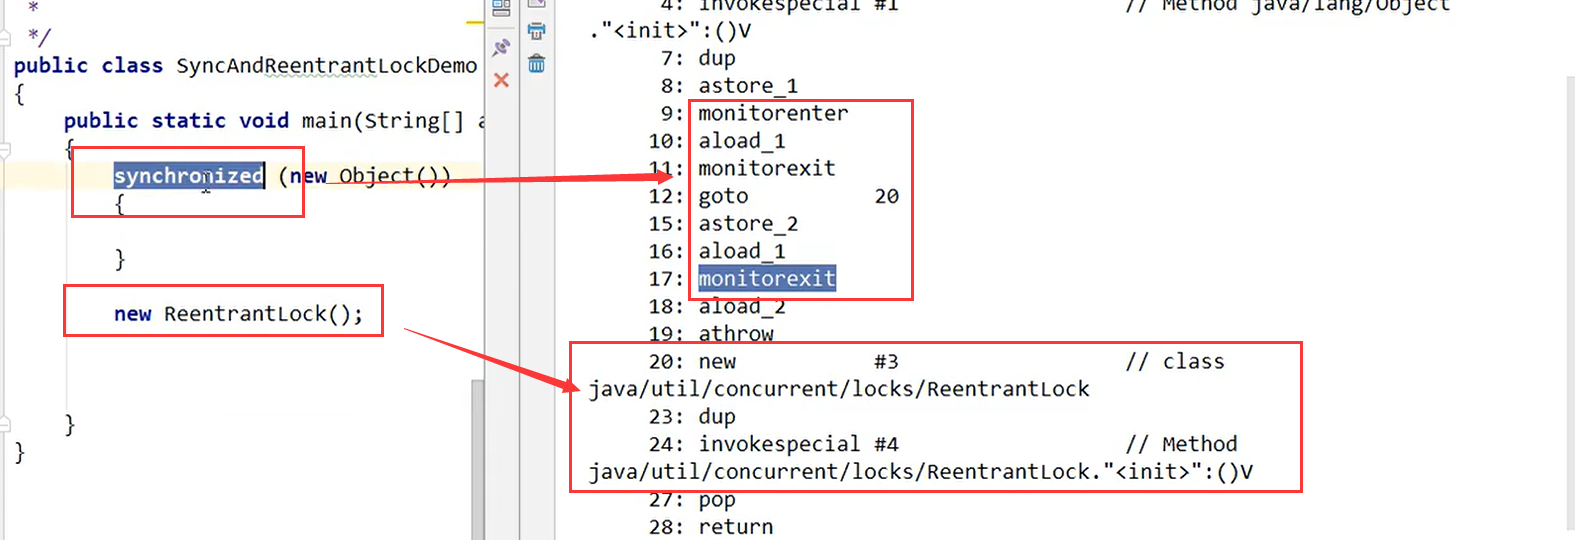
六、synchronized和lock的区别


/**
 * TODO 多线程之间按顺序调用,实现A->B->C三个线程启动,要求如下:
 * AA打印5次,BB打印10次,CC打印15次
 * 紧接着
 * AA打印5次,BB打印10次,CC打印15次
 * ...
 * 来10轮
 * @author kakaluote
 * @date 2021年7月1日 上午10:52:33
 */
public class SyncAndReentrantLockDemo {

	public static void main(String[] args) {

		ShareResource shareResource = new ShareResource();

		new Thread(() -> {
			for (int i = 1; i <= 10; i++) {
				shareResource.print5();
			}
		},"线程A").start();
		new Thread(() -> {
			for (int i = 1; i <= 10; i++) {
				shareResource.print10();
			}
		},"线程B").start();
		new Thread(() -> {
			for (int i = 1; i <= 10; i++) {
				shareResource.print15();
			}
		},"线程C").start();
	}
}

class ShareResource{
	private int number = 1;//a,1;b,2;c,3
	private Lock lock = new ReentrantLock();
	private Condition c1 = lock.newCondition();
	private Condition c2 = lock.newCondition();
	private Condition c3 = lock.newCondition();

	public void print5(){
		lock.lock();
		try{
			while(number != 1){
				c1.await();
			}
			for (int i = 1; i <= 5; i++) {
				System.out.println(Thread.currentThread().getName() + "\t" + i);
			}
			number = 2;
			c2.signal();
		}catch(Exception e){

		}finally{
			lock.unlock();
		}
	}

	public void print10(){
		lock.lock();
		try{
			while(number != 2){
				c2.await();
			}
			for (int i = 1; i <= 10; i++) {
				System.out.println(Thread.currentThread().getName() + "\t" + i);
			}
			number = 3;
			c3.signal();
		}catch(Exception e){

		}finally{
			lock.unlock();
		}
	}

	public void print15(){
		lock.lock();
		try{
			while(number != 3){
				c3.await();
			}
			for (int i = 1; i <= 15; i++) {
				System.out.println(Thread.currentThread().getName() + "\t" + i);
			}
			number = 1;
			c1.signal();
		}catch(Exception e){

		}finally{
			lock.unlock();
		}
	}
}
七、Callable接口
demo (创建线程的第三种方式)
public class CallableDemo {

	public static void main(String[] args) {

		//同一个FutureTask,多个线程同时启动,call方法只会执行一次
		FutureTask<Integer> task = new FutureTask<Integer>(new MyThread());
		new Thread(task,"AAA").start();
		new Thread(task,"BBB").start();

		//可以通过此方式判断任务是否执行完
		while(task.isDone()){

		}
		try {
			//get每次最好放在最后,因为他会阻塞后边的线程
			Integer integer = task.get();
			System.out.println(integer);
		} catch (Exception e) {
			// TODO Auto-generated catch block
			e.printStackTrace();
		}
	}
}
class MyThread implements Callable<Integer>{

	@Override
	public Integer call() throws Exception {
		System.out.println(Thread.currentThread().getName() + " :Callable");
		return 777;
	}
}
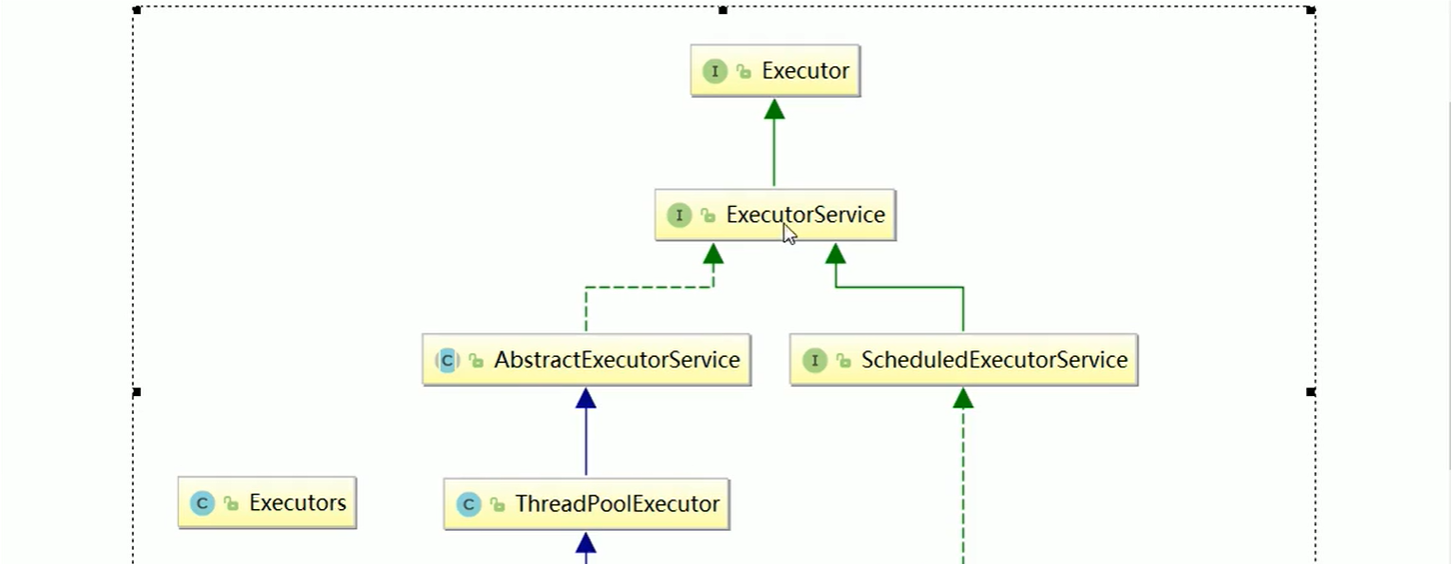
八、线程池
为什么用?优势?

线程池如何使用?
架构说明


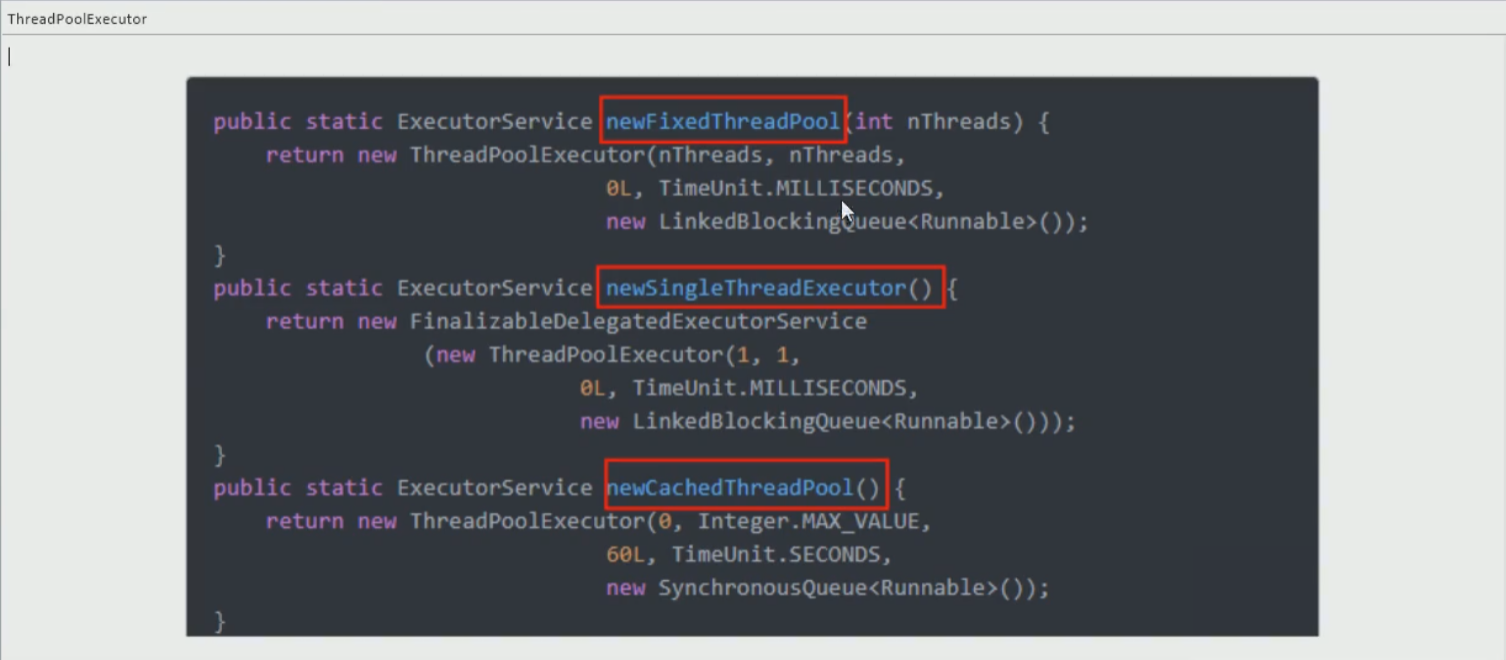
编码实现(三大常用线程池)
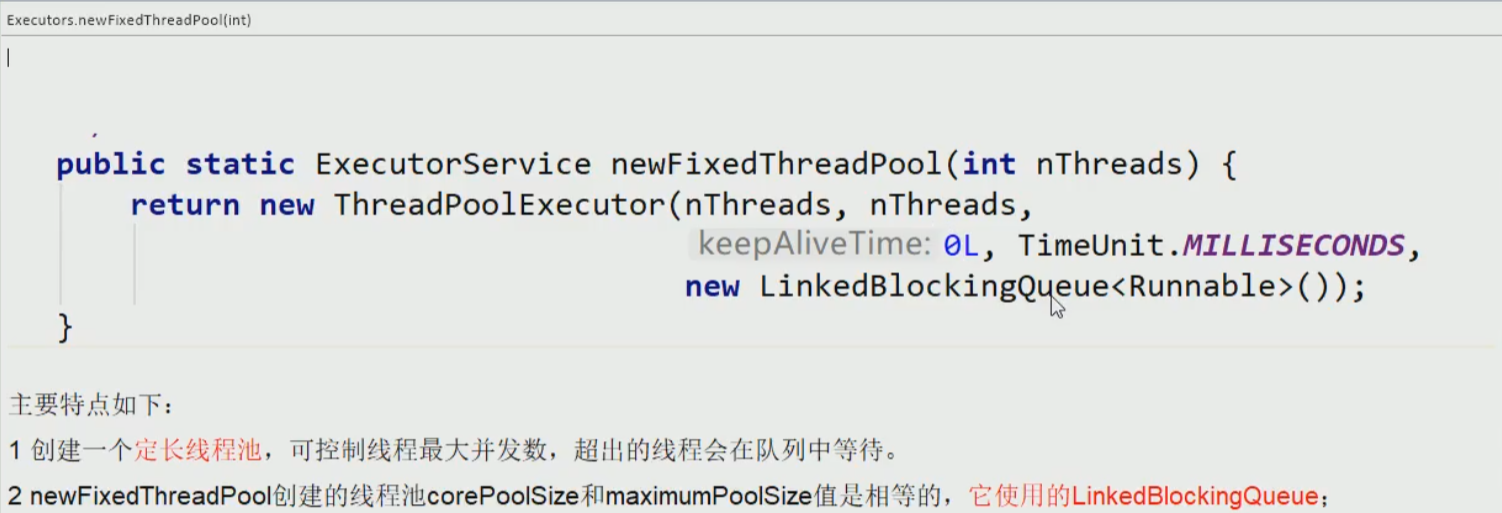
- Executors.newFixedThreadPool(5)
//模拟银行的五个窗口(1池五个处理线程)
ExecutorService threadPool = Executors.newFixedThreadPool(1);
try {
	//模拟10个用户来办理业务,每个用户就是一个来自外部的请求线程
	for (int i = 1; i < 10; i++) {
		threadPool.execute(() -> {
			System.out.println(Thread.currentThread().getName() + "\t 办理业务");
		});
	}
}catch(Exception e) {

}finally {
	threadPool.shutdown();
}
输出:
pool-1-thread-1	 办理业务
pool-1-thread-4	 办理业务
pool-1-thread-3	 办理业务
pool-1-thread-2	 办理业务
pool-1-thread-3	 办理业务
pool-1-thread-4	 办理业务
pool-1-thread-1	 办理业务
pool-1-thread-5	 办理业务
pool-1-thread-2	 办理业务
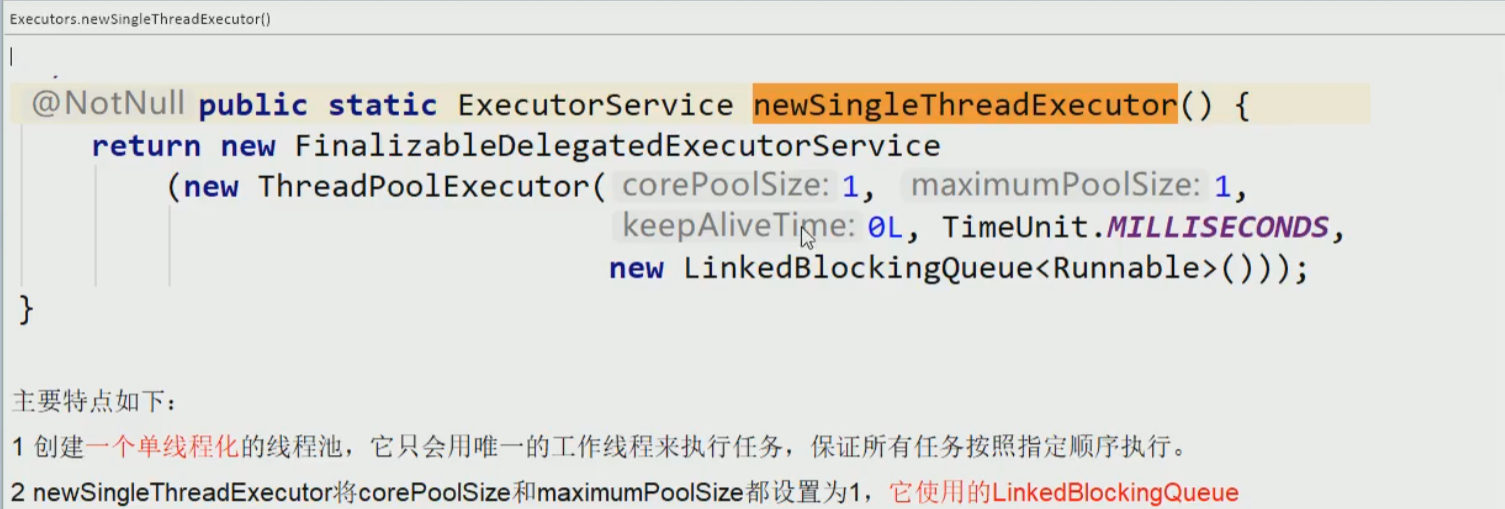
- Executors.newSingleThreadExecutor()
ExecutorService threadPool = Executors.newSingleThreadExecutor();
try {
	//模拟10个用户来办理业务,每个用户就是一个来自外部的请求线程
	for (int i = 1; i < 10; i++) {
		threadPool.execute(() -> {
			System.out.println(Thread.currentThread().getName() + "\t 办理业务");
		});
	}
}catch(Exception e) {

}finally {
	threadPool.shutdown();
}
输出:
pool-1-thread-1	 办理业务
pool-1-thread-1	 办理业务
pool-1-thread-1	 办理业务
pool-1-thread-1	 办理业务
pool-1-thread-1	 办理业务
pool-1-thread-1	 办理业务
pool-1-thread-1	 办理业务
pool-1-thread-1	 办理业务
pool-1-thread-1	 办理业务
- Executors.newCachedThreadPool()
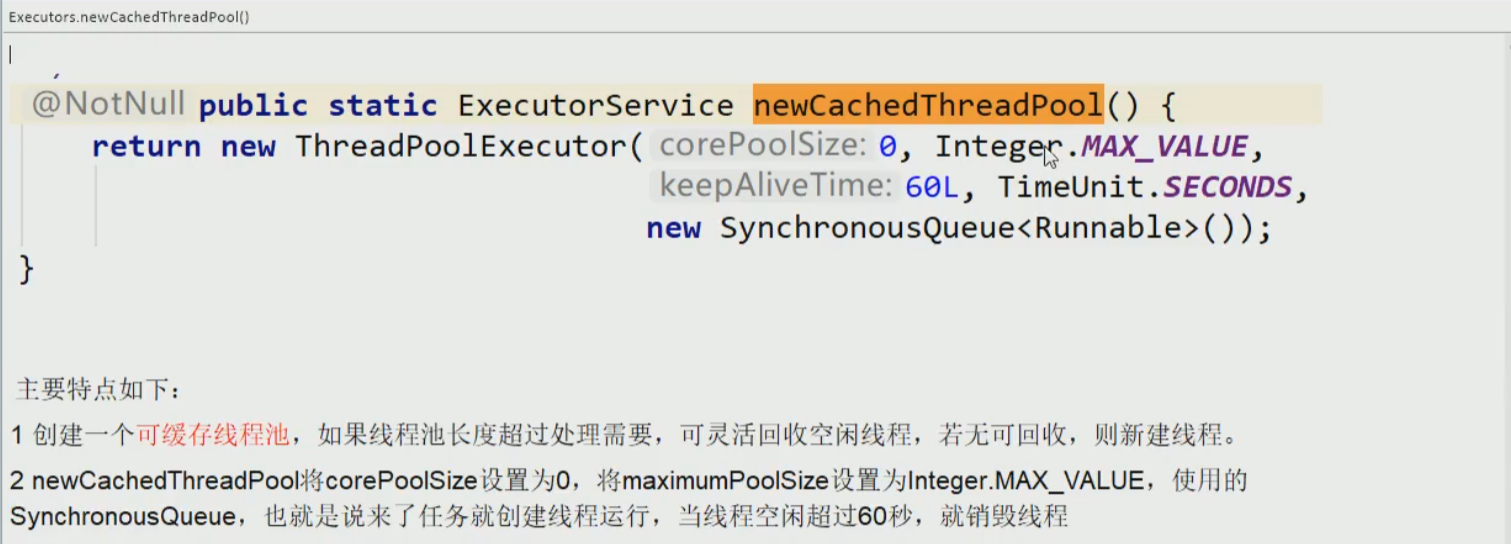
ExecutorService threadPool = Executors.newCachedThreadPool();
try {
	//模拟10个用户来办理业务,每个用户就是一个来自外部的请求线程
	for (int i = 1; i < 10; i++) {
		threadPool.execute(() -> {
			System.out.println(Thread.currentThread().getName() + "\t 办理业务");
		});
	}
}catch(Exception e) {

}finally {
	threadPool.shutdown();
}
输出:
pool-1-thread-3	 办理业务
pool-1-thread-6	 办理业务
pool-1-thread-1	 办理业务
pool-1-thread-4	 办理业务
pool-1-thread-2	 办理业务
pool-1-thread-7	 办理业务
pool-1-thread-5	 办理业务
pool-1-thread-8	 办理业务
pool-1-thread-9	 办理业务
线程池的重要参数介绍(7大参数)
7大参数
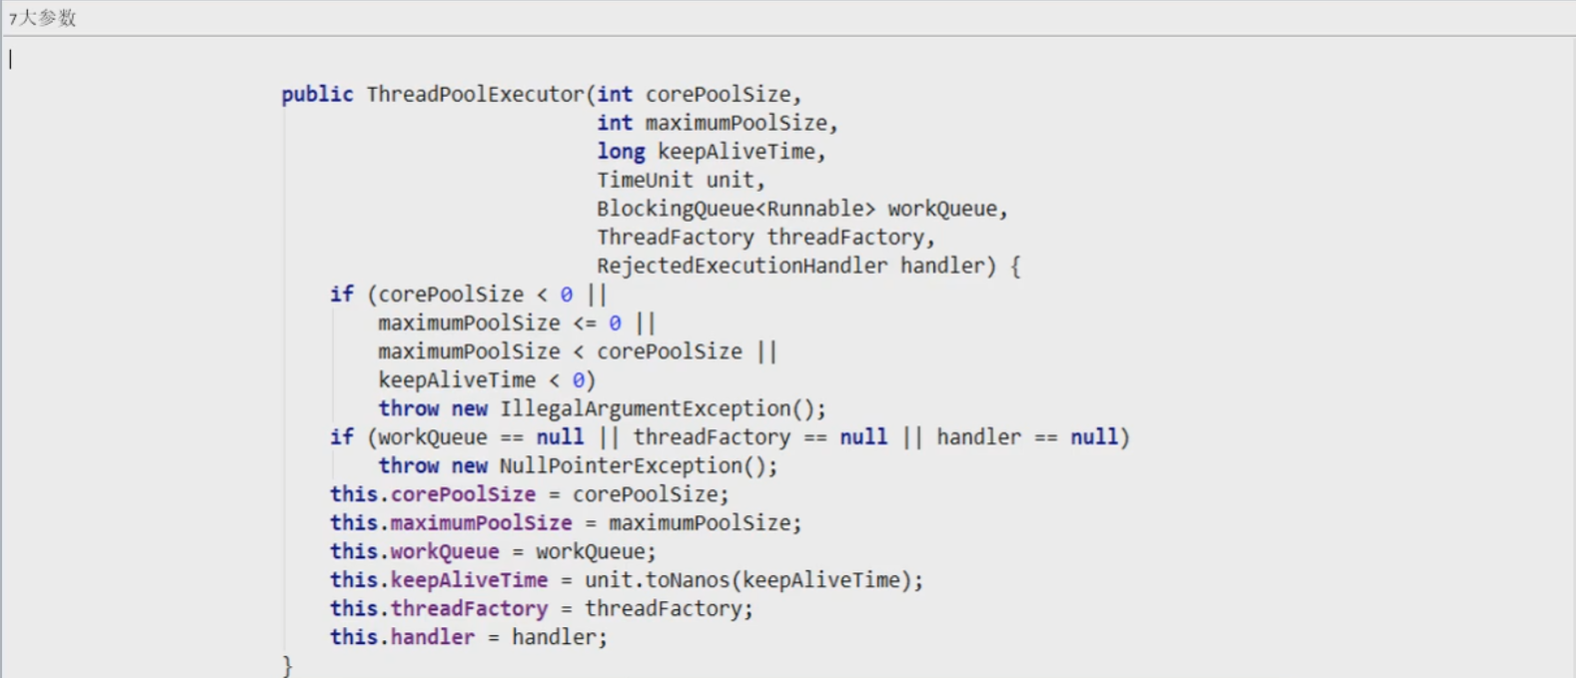
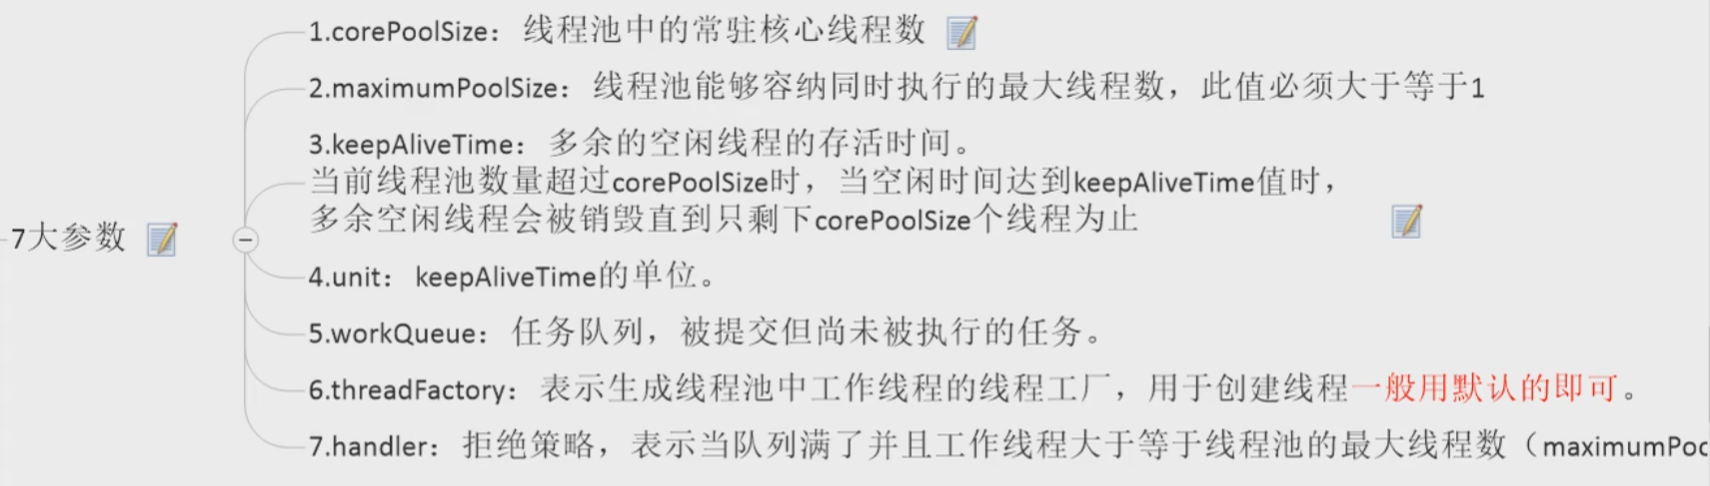

- corePoolSize

- keepAliveTime

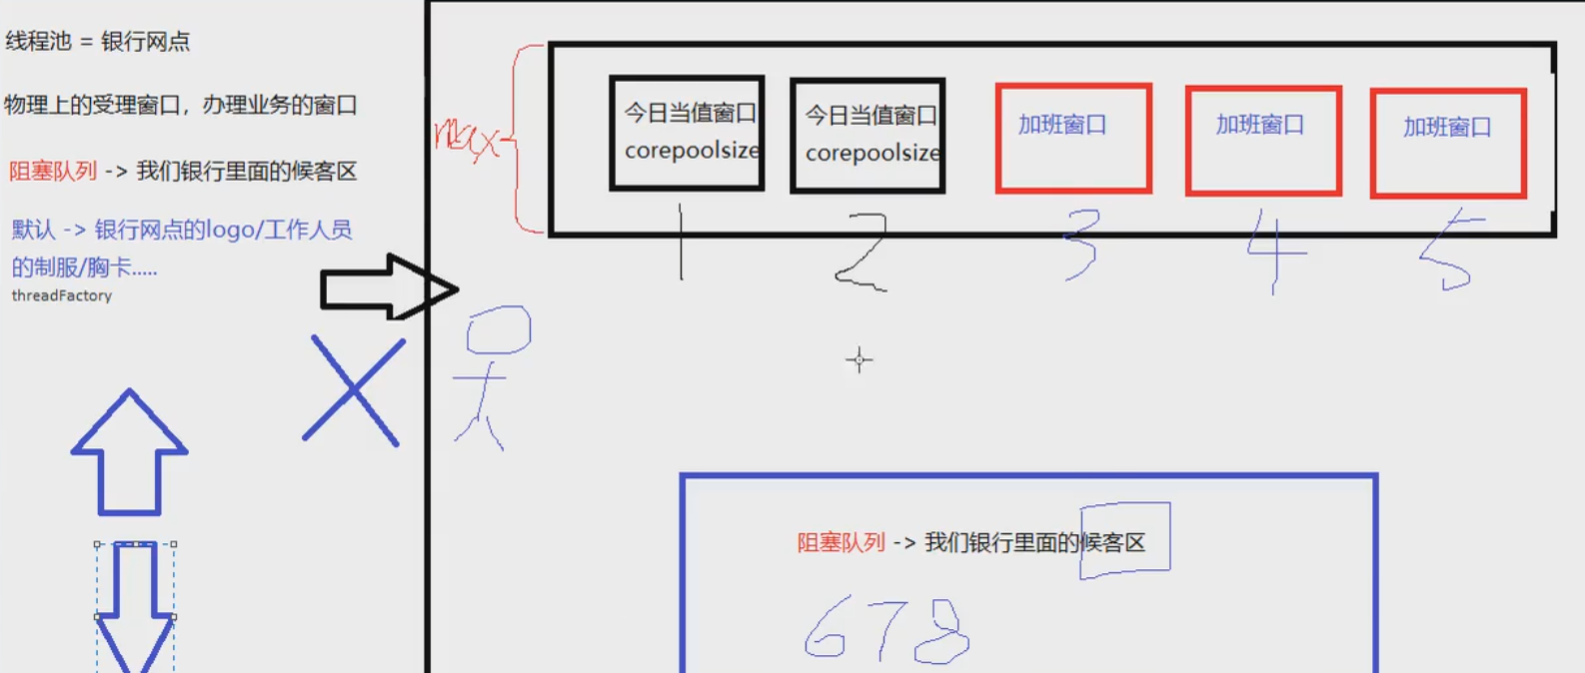
线程池的底层工作原理


生产上合理设置线程池参数
线程池的拒绝策略
- 是什么

- JDK内置的拒绝策略


- 四种拒绝策略都实现了 RejectedExecutionHandler
不能用固定,单个,可缓存的线程池创建
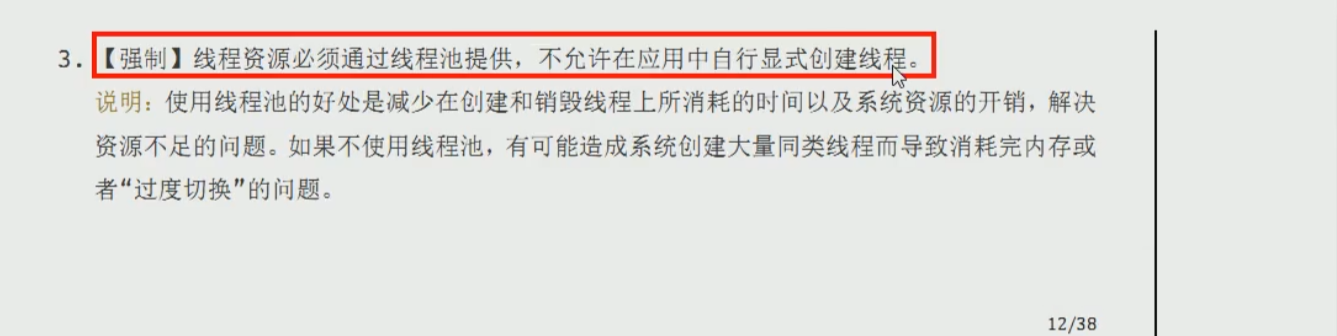
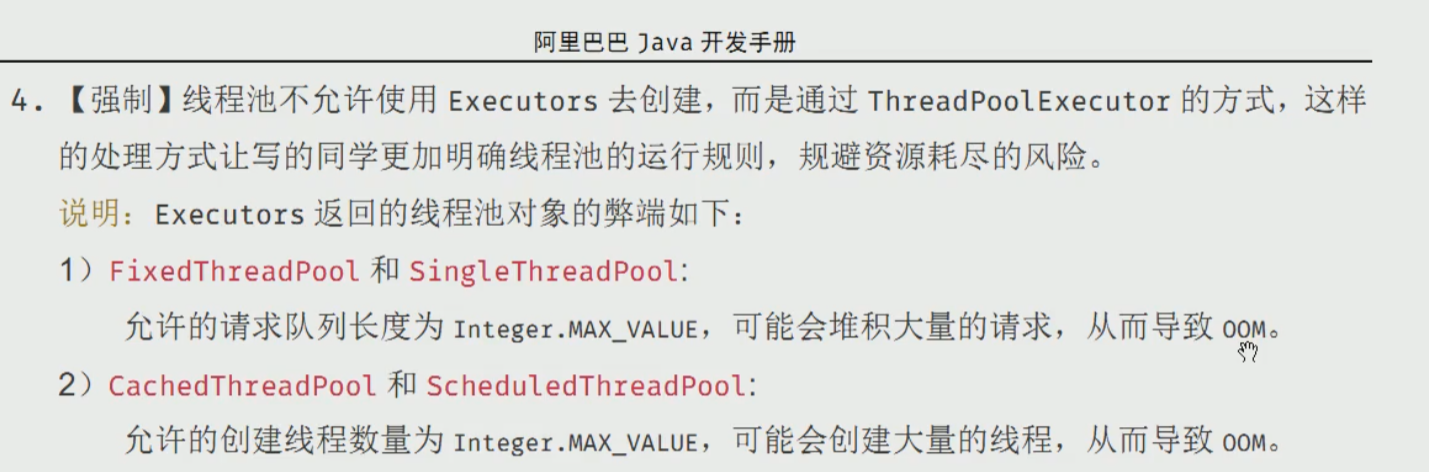
工作中使用线程池,自定义
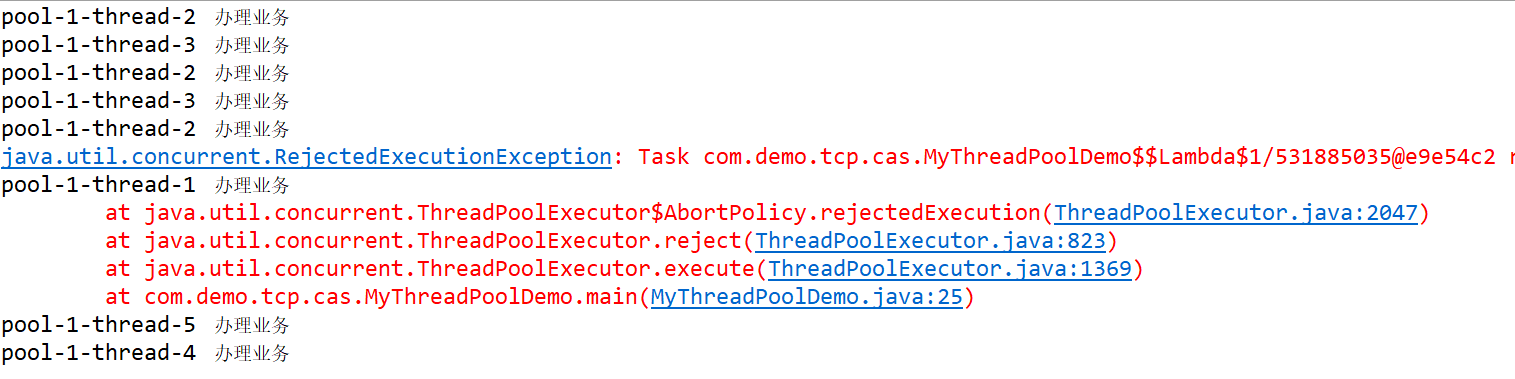
- ThreadPoolExecutor.AbortPolicy(),直接抛出异常
ExecutorService threadPool = new ThreadPoolExecutor(2, 5, 1L,
		TimeUnit.SECONDS, new LinkedBlockingQueue<Runnable>(3),Executors.defaultThreadFactory(),
		new ThreadPoolExecutor.AbortPolicy());
try {
	//模拟10个用户来办理业务,每个用户就是一个来自外部的请求线程
	for (int i = 1; i < 10; i++) {
		threadPool.execute(() -> {
			System.out.println(Thread.currentThread().getName() + "\t 办理业务");
		});
	}
}catch(Exception e) {
	e.printStackTrace();
}finally {
	threadPool.shutdown();
}
- ThreadPoolExecutor.CallerRunsPolicy(),将某些任务回退到调用者

- ThreadPoolExecutor.DiscardPolicy(),直接丢弃(只能完成max+队列个数)

- ThreadPoolExecutor.DiscardOldestPolicy(),抛弃等待最久的

合理配置线程池(针对的是maxPoolSize)
cpu核数:Runtime.getRuntime().availableProcessors()
如果是CPU密集型
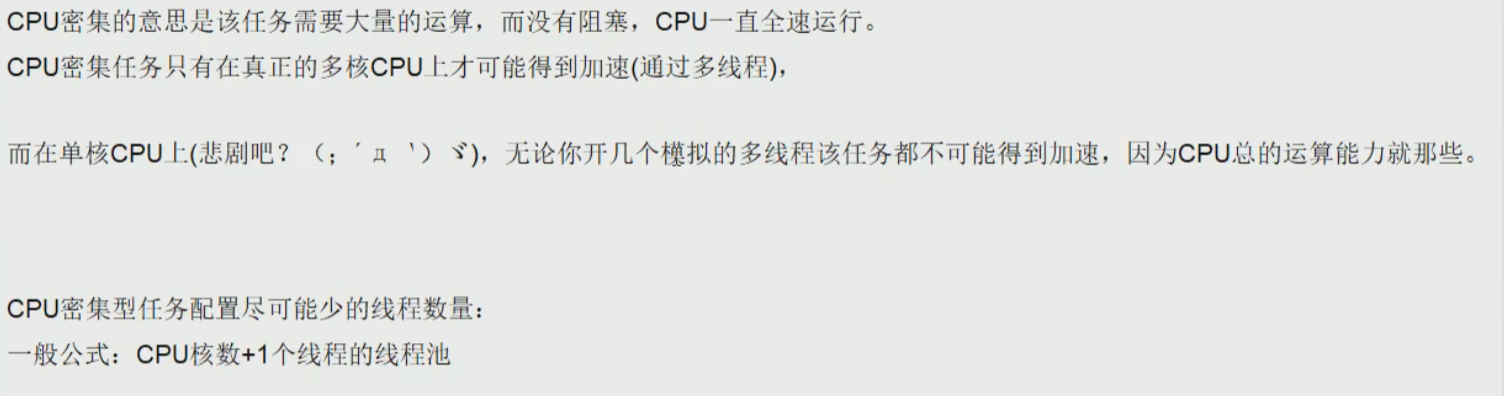
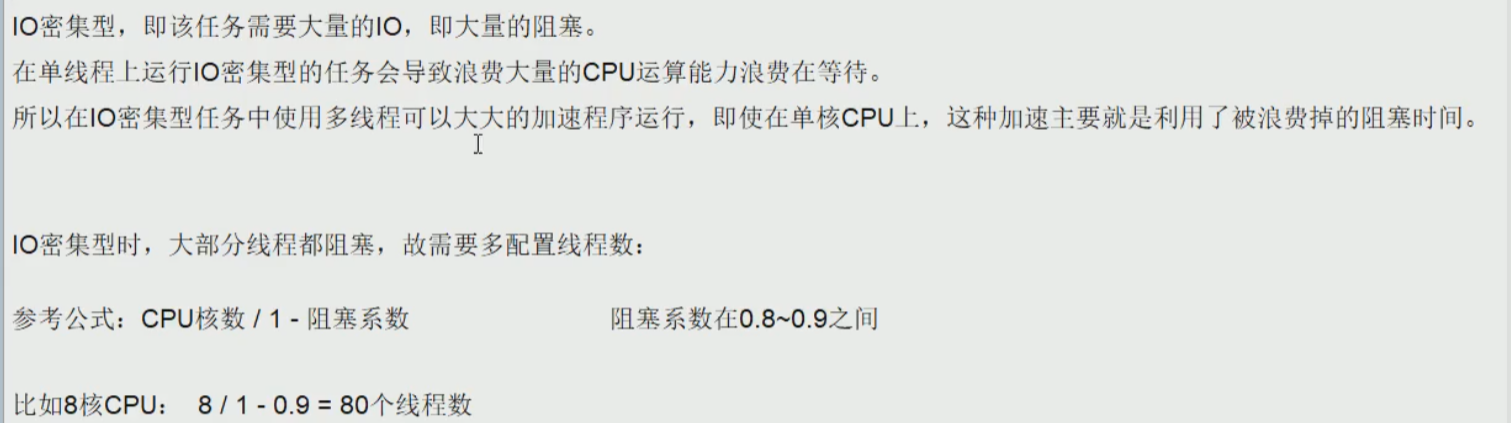
如果是IO密集型(有两种情况)
- 1

- 2
九、死锁编码以及定位分析
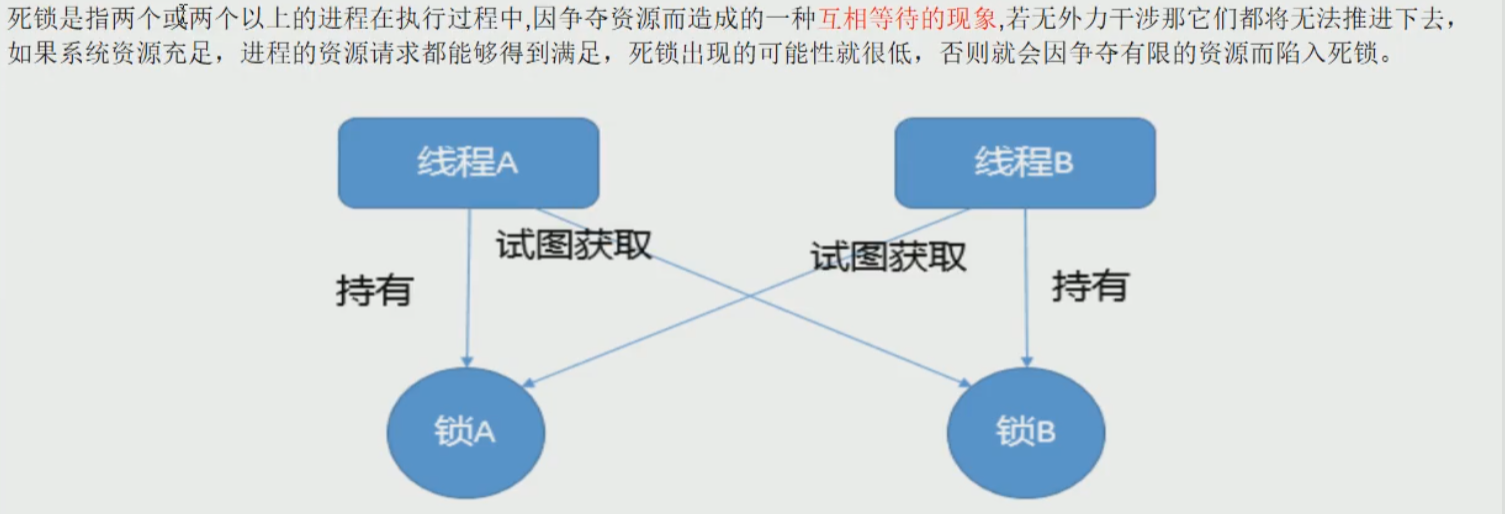
是什么
产生死锁的原因

代码
public class DeadLockDemo {

	public static void main(String[] args) {
		String lockA = "lock1";
		String lockB = "lock2";

		new Thread(new HoldLockThread(lockA,lockB),"Thread_AAA").start();
		new Thread(new HoldLockThread(lockB,lockA),"Thread_BBB").start();
	}
}

class HoldLockThread implements Runnable{

	private String lockA;
	private String lockB;

	public HoldLockThread(String lockA, String lockB) {
		this.lockA = lockA;
		this.lockB = lockB;
	}

	@Override
	public void run() {

		synchronized (lockA) {
			System.out.println(Thread.currentThread().getName() + "\t 自己持有:" + lockA + "\t 尝试获得:" + lockB);
			try {
				TimeUnit.SECONDS.sleep(2);
			} catch (InterruptedException e) {
				e.printStackTrace();
			}
			synchronized (lockB) {

			}
		}
	}
}
输出:

解决
定位死锁


 浙公网安备 33010602011771号