


sprigboot--组合 swagger
maven 依赖
 <dependency>
            <groupId>io.springfox</groupId>
            <artifactId>springfox-swagger2</artifactId>
            <version>2.9.2</version>
</dependency>

<dependency>
            <groupId>io.springfox</groupId>
            <artifactId>springfox-swagger-ui</artifactId>
            <version>2.9.2</version>
</dependency>
添加swagger配置文件
package com.config;

import org.springframework.context.annotation.Configuration;
import springfox.documentation.swagger2.annotations.EnableSwagger2;

//配置到springboot
@Configuration
//开启swagger---页面地址 /swagger-ui.html
@EnableSwagger2
public class SwaggerConfig {
}

----------------------------------------------------以上swagger就启动起来了--------------------------------------------------------------------
配置swagger
1、配置网页展示的信息
package com.config;
import org.springframework.context.annotation.Bean;
import org.springframework.context.annotation.Configuration;
import springfox.documentation.service.ApiInfo;
import springfox.documentation.service.Contact;
import springfox.documentation.spi.DocumentationType;
import springfox.documentation.spring.web.plugins.Docket;
import springfox.documentation.swagger2.annotations.EnableSwagger2;
import java.util.ArrayList;
//配置到springboot
@Configuration
//开启swagger---页面地址 /swagger-ui.html
@EnableSwagger2
public class SwaggerConfig {
//配置了Swagger 的Docket的bean实例
@Bean
public Docket docket(){
return new Docket(DocumentationType.SWAGGER_2)
.apiInfo(apiInfo());
}
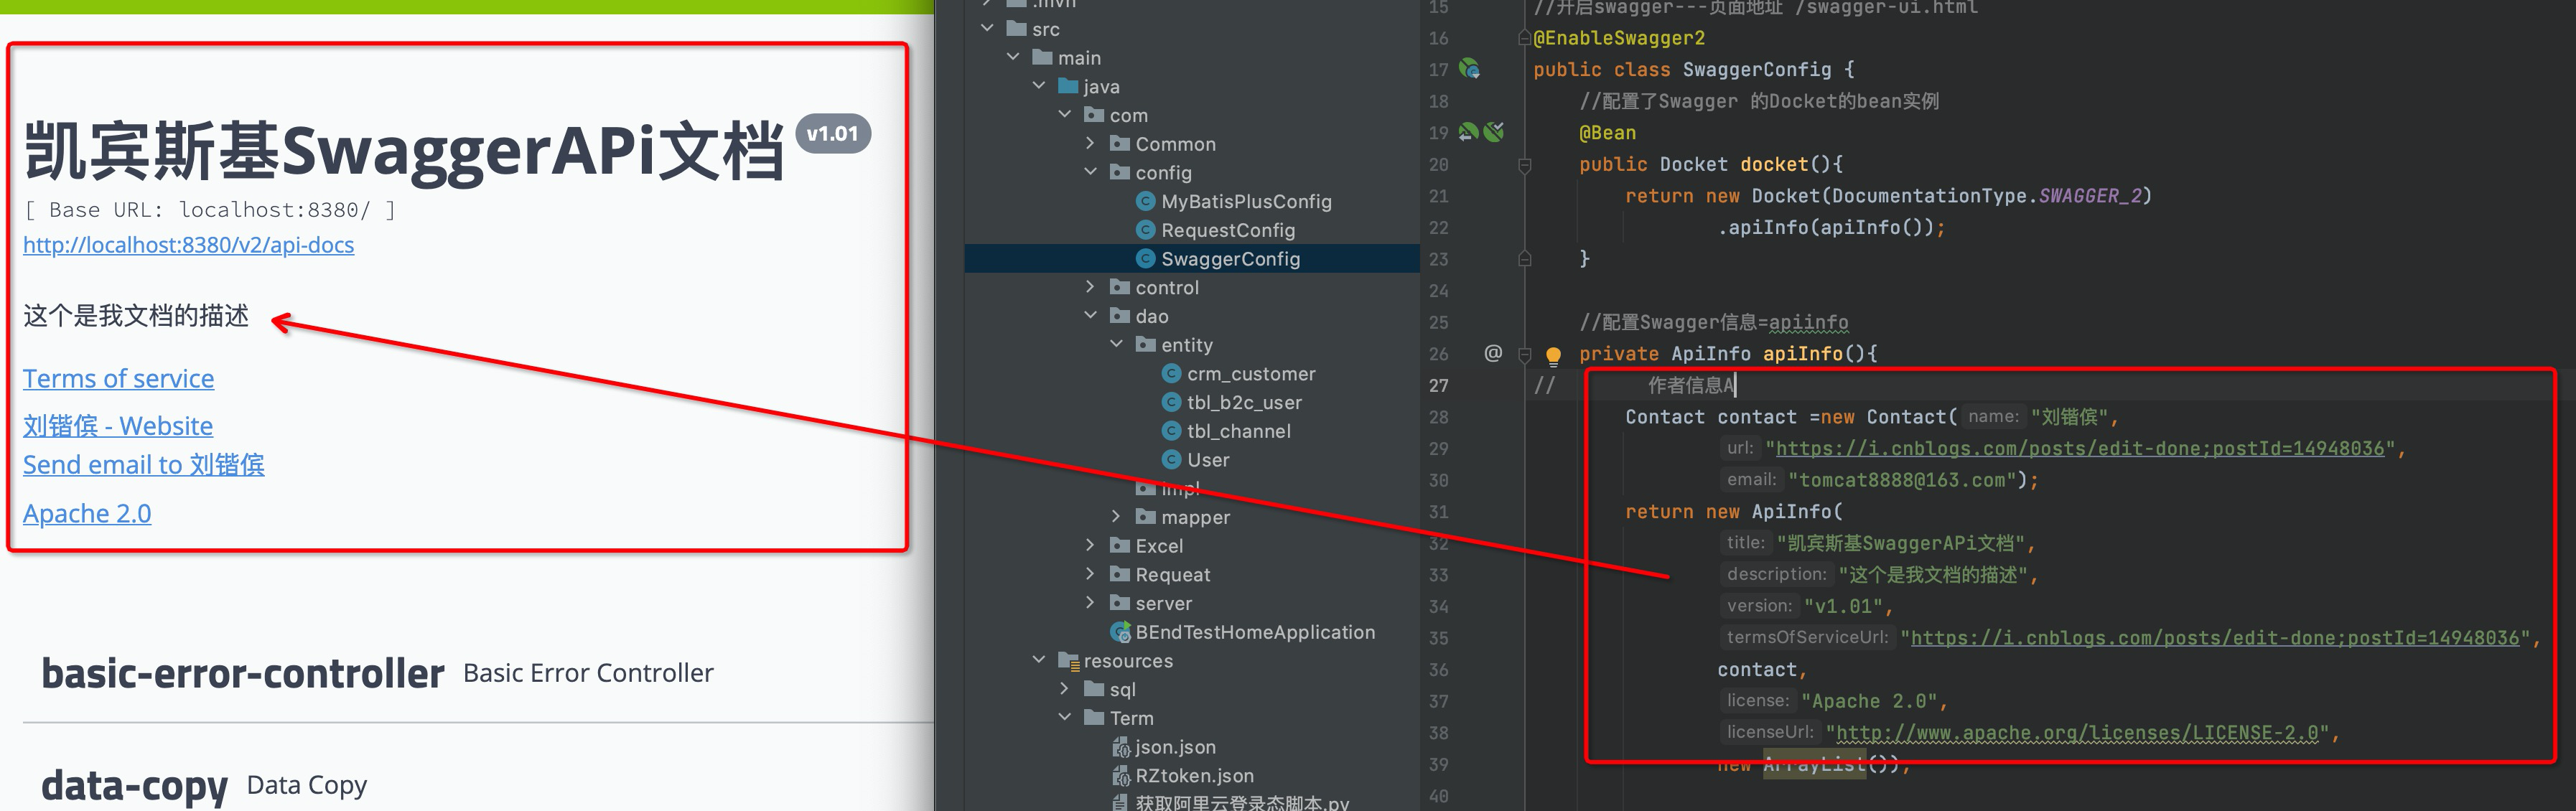
//配置Swagger信息=apiinfo
private ApiInfo apiInfo(){
// 作者信息A
Contact contact =new Contact("刘锴傧https://www.cnblogs.com/kaibindirver/p/15025758.html",
"https://i.cnblogs.com/posts/edit-done;postId=14948036",
"tomcat8888@163.com");
return new ApiInfo(
"凯宾斯基SwaggerAPi文档",
"这个是我文档的描述",
"v1.01",
"https://i.cnblogs.com/posts/edit-done;postId=14948036",
contact,
"Apache 2.0",
"http://www.apache.org/licenses/LICENSE-2.0",
new ArrayList());
}
}
2、配置扫描接口-和判断当前环境 是否开启 swagger网站访问
设置2个不同环境的配置文件见: https://www.cnblogs.com/kaibindirver/p/15025758.html
package com.config;

import org.springframework.context.annotation.Bean;
import org.springframework.context.annotation.Configuration;
import org.springframework.core.env.Environment;
import org.springframework.core.env.Profiles;
import springfox.documentation.builders.RequestHandlerSelectors;
import springfox.documentation.service.ApiInfo;
import springfox.documentation.service.Contact;
import springfox.documentation.spi.DocumentationType;
import springfox.documentation.spring.web.plugins.Docket;
import springfox.documentation.swagger2.annotations.EnableSwagger2;

import java.util.ArrayList;

//配置到springboot
@Configuration
//开启swagger---页面地址 /swagger-ui.html
@EnableSwagger2
public class SwaggerConfig {
    //配置了Swagger 的Docket的bean实例
    @Bean
    public Docket docket(Environment environment){

//        设置要显示的Swagger环境
        Profiles profiles= Profiles.of("dev","test");
//获取当前的环境
        boolean flag = environment.acceptsProfiles(profiles);

        return new Docket(DocumentationType.SWAGGER_2)
                .apiInfo(apiInfo())
                //控制是否开启swagger 设置为false 浏览器就无法访问
                .enable(flag)
                .select()
//        RequestHandlerSelectors配置要扫描接口的方式,下面是扫描包
                .apis(RequestHandlerSelectors.basePackage("com.control"))
                //        none()不扫描,打开swagger是空的
//                .apis(RequestHandlerSelectors.none())
                //只扫描/kai开头的接口
//                .paths(PathSelectors.ant("/kai/**"))
                .build();
    }

    //配置Swagger信息=apiinfo
    private ApiInfo apiInfo(){
//        作者信息A
        Contact contact =new Contact("刘锴傧",
                "https://i.cnblogs.com/posts/edit-done;postId=14948036",
                "tomcat8888@163.com");
        return new ApiInfo(
                "凯宾斯基SwaggerAPi文档",
                "这个是我文档的描述",
                "v1.01",
                "https://i.cnblogs.com/posts/edit-done;postId=14948036",
                contact,
                "Apache 2.0",
                "http://www.apache.org/licenses/LICENSE-2.0",
                new ArrayList());

    }
}
设置分组 的方法 加多一个bean
package com.config;

import org.springframework.context.annotation.Bean;
import org.springframework.context.annotation.Configuration;
import org.springframework.core.env.Environment;
import org.springframework.core.env.Profiles;
import springfox.documentation.builders.RequestHandlerSelectors;
import springfox.documentation.service.ApiInfo;
import springfox.documentation.service.Contact;
import springfox.documentation.spi.DocumentationType;
import springfox.documentation.spring.web.plugins.Docket;
import springfox.documentation.swagger2.annotations.EnableSwagger2;

import java.util.ArrayList;

//配置到springboot
@Configuration
//开启swagger---页面地址 /swagger-ui.html
@EnableSwagger2
public class SwaggerConfig {

    //配置了Swagger 的Docket的bean实例
    @Bean
    public Docket docket(Environment environment){

//        设置要显示的Swagger环境
        Profiles profiles= Profiles.of("dev","test");
        boolean flag = environment.acceptsProfiles(profiles);

        return new Docket(DocumentationType.SWAGGER_2)
                .apiInfo(apiInfo())
//                设置分组
                .groupName("分组-01")
                //控制是否开启swagger 设置为false 浏览器就无法访问
                .enable(flag)
                .select()
//        RequestHandlerSelectors配置要扫描接口的方式,下面是扫描包
                .apis(RequestHandlerSelectors.basePackage("com.control"))
                //        none()不扫描,打开swagger是空的
//                .apis(RequestHandlerSelectors.none())
                //只扫描/kai开头的接口
//                .paths(PathSelectors.ant("/kai/**"))
                .build();
    }


    //下面是再创建多一个相同的函数,实现接口分组
    @Bean
    public Docket docket2(Environment environment){

//        设置要显示的Swagger环境
        Profiles profiles= Profiles.of("dev","test");
        boolean flag = environment.acceptsProfiles(profiles);

        return new Docket(DocumentationType.SWAGGER_2)
                .apiInfo(apiInfo())
//                设置分组
                .groupName("分组-02")
                .enable(flag)
                .select()
                .apis(RequestHandlerSelectors.basePackage("com.control"))
                .build();
    }

    //配置Swagger信息=apiinfo
    private ApiInfo apiInfo(){
//        作者信息A
        Contact contact =new Contact("刘锴傧",
                "https://i.cnblogs.com/posts/edit-done;postId=14948036",
                "tomcat8888@163.com");
        return new ApiInfo(
                "凯宾斯基SwaggerAPi文档",
                "这个是我文档的描述",
                "v1.01",
                "https://i.cnblogs.com/posts/edit-done;postId=14948036",
                contact,
                "Apache 2.0",
                "http://www.apache.org/licenses/LICENSE-2.0",
                new ArrayList());

    }
}
给接口的请求参数 和 接口命名
给返回的实体类或post接受映射的实体类命名
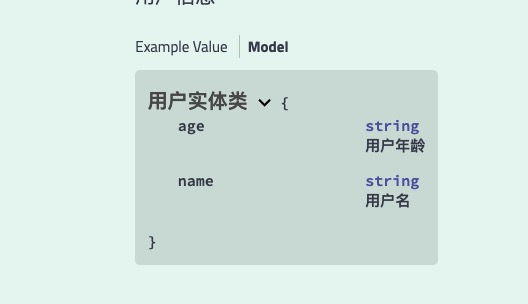
package com.dao.entity;

import io.swagger.annotations.Api;
import io.swagger.annotations.ApiModel;
import io.swagger.annotations.ApiModelProperty;
import lombok.AllArgsConstructor;
import lombok.Data;
import lombok.NoArgsConstructor;
import lombok.ToString;

@NoArgsConstructor
@AllArgsConstructor
@ToString
@Data //注意要有get、set方法
@ApiModel("用户实体类")
public class User {
    @ApiModelProperty("用户名")
    private String name;
    @ApiModelProperty("用户年龄")
    private String age;
}
给接口命名
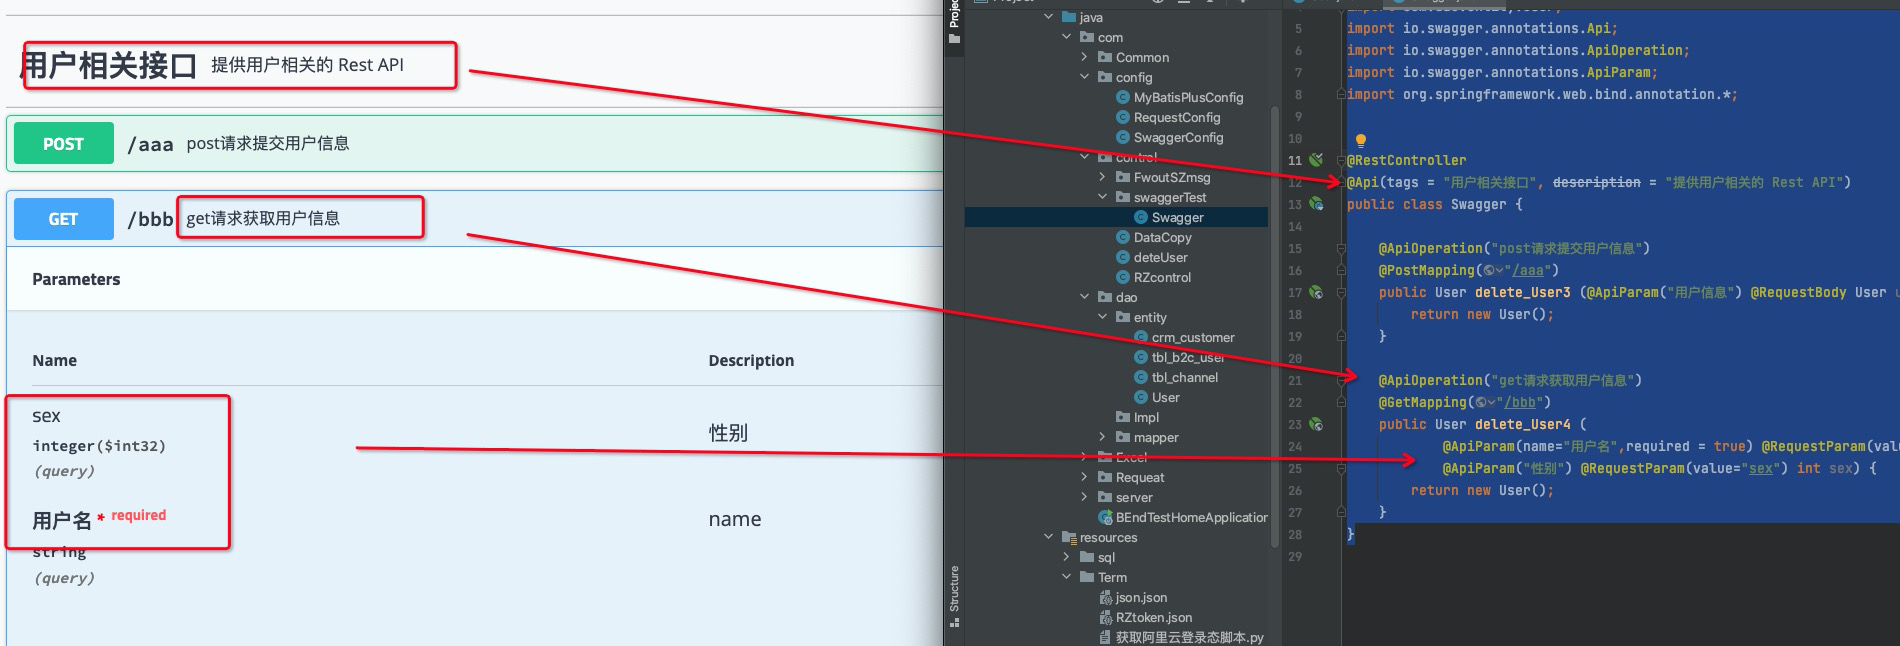
import com.dao.entity.User;
import io.swagger.annotations.Api;
import io.swagger.annotations.ApiOperation;
import io.swagger.annotations.ApiParam;
import org.springframework.web.bind.annotation.*;


@RestController
@Api(tags = "用户相关接口", description = "提供用户相关的 Rest API")
public class Swagger {

    @ApiOperation("post请求提交用户信息")
    @PostMapping("/aaa")
    public User delete_User3 (@ApiParam("用户信息") @RequestBody User user) {
        return new User();
    }

    @ApiOperation("get请求获取用户信息")
    @GetMapping("/bbb")
    public User delete_User4 (
            @ApiParam(name="用户名",required = true) @RequestParam(value="name") String name,
            @ApiParam("性别") @RequestParam(value="sex") int sex) {
        return new User();
    }
}
可以参考下 : https://blog.csdn.net/zhongzk69/article/details/94987568 (里面有统一配置400 500 的接口响应)
以上看得是狂神的: https://www.bilibili.com/video/BV1Y441197Lw?from=search&seid=17321077544629926329

 浙公网安备 33010602011771号