在开始介绍 scrapy 的去重之前,先想想我们是怎么对 requests 对去重的。
requests 只是下载器,本身并没有提供去重功能。所以我们需要自己去做。
很典型的做法是事先定义一个去重队列,判断抓取的 url 是否在其中,如
crawled_urls = set()

def check_url(url):
 if url not in crawled_urls:
     return True
 return False
此时的集合是保存在内存中的,随着爬虫抓取内容变多,该集合会越来越大,有什么办法呢?
接着往下看,你会知道的
scrapy 的去重
scrapy 对 request 不做去重很简单,只需要在 request 对象中设置
dont_filter为 True,如yield Request('https://www.baidu.com/?w=python',dont_filter=True)看看源码是如何做的
_fingerprint_cache = weakref.WeakKeyDictionary()
def request_fingerprint(request, include_headers=None):
 if include_headers:
     include_headers = tuple(to_bytes(h.lower())
                              for h in sorted(include_headers))
 cache = _fingerprint_cache.setdefault(request, {})
 if include_headers not in cache:
     fp = hashlib.sha1()
     fp.update(to_bytes(request.method))
     fp.update(to_bytes(canonicalize_url(request.url)))
     fp.update(request.body or b'')
     if include_headers:
         for hdr in include_headers:
             if hdr in request.headers:
                 fp.update(hdr)
                 for v in request.headers.getlist(hdr):
                     fp.update(v)
     cache[include_headers] = fp.hexdigest()
 return cache[include_headers]
翻译
返回请求指纹

请求指纹是唯一标识请求指向的资源的哈希。 例如,请使用以下两个网址:

http://www.example.com/query?id=111&cat=222
http://www.example.com/query?cat=222&id=111

即使这两个不同的 URL 都指向相同的资源并且是等价的(即,它们应该返回相同的响应)

另一个例子是用于存储会话 ID 的 cookie。 假设以下页面仅可供经过身份验证的用户访问:

http://www.example.com/members/offers.html

许多网站使用 cookie 来存储会话 ID,这会随机添加字段到 HTTP 请求,因此在计算时应该被忽略指纹。

因此,计算时默认会忽略 request headers。 如果要包含特定 headers,请使用 include_headers 参数,它是要计算 Request headers 的列表
其实就是说:scrapy 使用 sha1 算法,对每一个 request 对象加密,生成 40 位十六进制数
我们看源码,重点是以下三行
     fp = hashlib.sha1()
     fp.update(to_bytes(request.method))
     fp.update(to_bytes(canonicalize_url(request.url)))
     fp.update(request.body or b'')
如果没有自定义 headers,只计算 method、url、和二进制 body,我们来计算下,代码
print(request_fingerprint(scrapy.Request('http://www.example.com/query?id=111&cat=222')))
print(request_fingerprint(scrapy.Request('http://www.example.com/query?cat=222&id=111')))
print(request_fingerprint(scrapy.Request('http://www.example.com/query')))
输出
fad8cefa4d6198af8cb1dcf46add2941b4d32d78
fad8cefa4d6198af8cb1dcf46add2941b4d32d78
b64c43a23f5e8b99e19990ce07b75c295165a923
可以看到第一条和第二条的密码是一样的,是因为调用了
canonicalize_url方法scrapy 的去重默认会保存到内存中,如果任务重启,会导致内存中所有去重队列消失
scrapy-redis 去重
scrapy-redis 重写了 scrapy 的调度器和去重队列,所以需要在 settings 中修改如下两列
# Enables scheduling storing requests queue in redis.
SCHEDULER = "scrapy_redis.scheduler.Scheduler"

# Ensure all spiders share same duplicates filter through redis.
DUPEFILTER_CLASS = "scrapy_redis.dupefilter.RFPDupeFilter"
一般我们会在 redis 中看到这两个,分别是去重队列和种子链接
源码
 def request_seen(self, request):
     """Returns True if request was already seen.
     Parameters
     ----------
     request : scrapy.http.Request
     Returns
     -------
     bool
     """
     fp = self.request_fingerprint(request)
     # This returns the number of values added, zero if already exists.
     added = self.server.sadd(self.key, fp)
     return added == 0

 def request_fingerprint(self, request):
     """Returns a fingerprint for a given request.
     Parameters
     ----------
     request : scrapy.http.Request
     Returns
     -------
     str
     """
     return request_fingerprint(request)
首先拿到 scrapy.http.Request 会先调用 self.request_fingerprint 去计算,也就是 scrapy 的 sha1 算法去加密,然后会向 redis 中添加该指纹。
该函数的作用是:计算该请求指纹,添加到 redis 的去重队列,如果已经存在该指纹,返回 True。
我们可以看到,只要有在 settings 中添加
DUPEFILTER_CLASS = "scrapy_redis.dupefilter.RFPDupeFilter",就会在 redis 中新加一列去重队列,说下这样做的优劣势:
- 优点:将内存中的去重队列序列化到 redis 中,就算爬虫重启或者关闭,也可以再次使用,你可以使用 SCHEDULER_PERSIST 来调整缓存
- 缺点:如果你需要去重的指纹过大,redis 占用空间过大。8GB=8589934592Bytes,平均一个去重指纹 40Bytes,约可以存储 214,748,000 个(2 亿)。所以在做关系网络爬虫中,序列化到 redis 中可能并不是很好,保存在内存中也不好,所以就产生了布隆过滤器。
自定义过滤
如果想自定义 Filter,可以通过继承,重写 request_seen
from scrapy.dupefilter import RFPDupeFilter
class SeenURLFilter(RFPDupeFilter):
      """A dupe filter that considers the URL"""
      def __init__(self, path=None):
        self.urls_seen = set()
        RFPDupeFilter.__init__(self, path)
      def request_seen(self, request):
        if request.url in self.urls_seen:
              return True
        else:
              self.urls_seen.add(request.url)


# 修改settings设置
DUPEFILTER_CLASS ='scraper.custom_filters.SeenURLFilter'
布隆过滤器
bloomfilter:是一个通过多哈希函数映射到一张表的数据结构,能够快速的判断一个元素在一个集合内是否存在,具有很好的空间和时间效率。(典型例子,爬虫 url 去重)
原理:
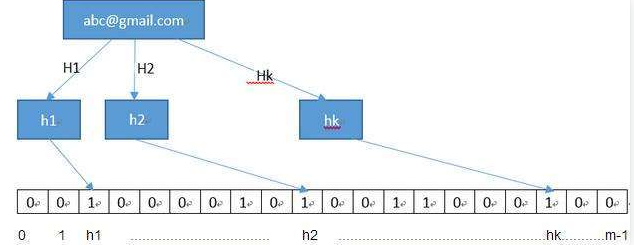
BloomFilter 会开辟一个m位的bitArray(位数组),开始所有数据全部置 0 。当一个元素过来时,能过多个哈希函数(h1,h2,h3....)计算不同的在哈希值,并通过哈希值找到对应的bitArray下标处,将里面的值 0 置为 1 。在验证的时候只需要验证这些比特位是否都是 1 即可,如果其中有一个为 0,那么元素一定不在集合里,如果全为 1,则很可能在集合里。(因为可能会有其它的元素也映射到相应的比特位上)
另外说明一下,当来查找对应的值时,同样通过哈希函数求值,再去寻找数组的下标,如果所有下标都为1时,元素存在。当然也存在错误率。(如:当数组全部为1时,那么查找什么都是存在的),但是这个错误率的大小,取决于数组的位数和哈希函数的个数。
python 中使用布隆过滤器
#python3.6 安装
#需要先安装bitarray
pip3 install bitarray-0.8.1-cp36-cp36m-win_amd64.whl(pybloom_live依赖这个包,需要先安装)
#下载地址:https://www.lfd.uci.edu/~gohlke/pythonlibs/
pip3 install pybloom_live
示例一
#ScalableBloomFilter 可以自动扩容
from pybloom_live import ScalableBloomFilter

bloom = ScalableBloomFilter(initial_capacity=100, error_rate=0.001, mode=ScalableBloomFilter.LARGE_SET_GROWTH)

url = "www.cnblogs.com"
url2 = "www.liuqingzheng.top"

bloom.add(url)

print(url in bloom)
print(url2 in bloom)
示例二
#BloomFilter 是定长的
from pybloom_live import BloomFilter

bf = BloomFilter(capacity=1000)
url='www.baidu.com'
bf.add(url)

print(url in bf)
print("www.liuqingzheng.top" in bf)
用了 布隆过滤器 后,就可以判断 url 是否爬过,从而可以实现增量式爬取
布隆过滤器的结果是存在内存中的,后期可以存进 redis 中
 posted on

 浙公网安备 33010602011771号