3,elasticsearch的基本使用
1,es和关系数据库的对比

GET: 用来获取资源
POST: 用来创建资源,也可以更新资源
PUT: 用来更新资源
DELETE: 用来删除资源
CURL 访问默认用的是GET方法。
2,索引初始化
[root@centos7 ~]#curl -X PUT 'http://192.168.0.11:9200/library' -H 'content-Type:application/json' -d '{
"settings":{
"index":{
"number_of_shards":5,
"number_of_replicas":1
}
}
}'
#创建索引之前可以对索引做初始化操作
#指定分片数量 "number_of_shards":5
#指定副本数量 "number_of_replicas":1
# 上面的number_of_replicas还可以换成:
# blocks.read: 设置为true,则禁止读操作
# blocks.write: 设置为true,则禁止写操作
# blocks.metadata: 设置为true,则禁止metadata操作
3,可以通过GET 带上参数_settings 可以获得该索引详细的配置信息
[root@centos7 ~]# curl -X GET 'http://192.168.0.11:9200/library/_settings'|python -m json.tool
% Total % Received % Xferd Average Speed Time Time Time Current
Dload Upload Total Spent Left Speed
100 206 100 206 0 0 33161 0 --:--:-- --:--:-- --:--:-- 41200
{
"library": {
"settings": {
"index": {
"creation_date": "1588333850757",
"number_of_replicas": "1",
"number_of_shards": "5",
"provided_name": "library",
"uuid": "U247czvzT4ujmlVHmrE5Lw",
"version": {
"created": "6070199"
}
}
}
}
}
[root@centos7 ~]#
4,同时获取多个索引的信息
[root@centos7 ~]#curl -X GET 'http://192.168.0.11:9200/library,library2/_settings'
5,获取所有索引的信息
[root@centos7 ~]#curl -X GET 'http://192.168.0.11:9200/_all/_settings'
6,新建索引
[root@centos7 ~]# curl -XPUT 192.168.0.11:9200/index01
7,查看索引的信息
[root@centos7 ~]# curl -XGET 192.168.0.11:9200/index01/_settings|python -m json.tool
8,删除索引
[root@centos7 ~]# curl -XDELETE 192.168.0.11:9200/index01|python -m json.tool
9,打开关闭索引
[root@centos7 ~]# curl -XPOST http://192.168.0.11:9200/library/_close
[root@centos7 ~]# curl -XPOST http://192.168.0.11:9200/library/_open
10,新建文档
[root@centos7 ~]#curl -XPUT -H 'content-Type:application/json' -d '{"id":1,"title":"什么是ES","content":"ES 是数据库"}' http://192.168.0.11:9200/index01/article/1
11,获取文档
[root@centos7 ~]# curl -XGET http://192.168.0.11:9200/index01/article/1
12,删除文档
[root@centos7 ~]# curl -XDELETE http://192.168.0.11:9200/index01/article/1
[root@centos7 ~]# curl -XDELETE http://192.168.0.11:9200/index01/article/1
13,插入数据时指定Id使用PUT操作
[root@centos7 ~]# curl -X PUT http://192.168.0.11/index01/article/1
14,自动生成Id使用POST操作
[root@centos7 ~]# curl -X POST http://192.168.0.11/index01/article
15,通过_source 获取指定的字段
GET http://192.168.0.11:9200/2?_source=title
GET http://192.168.0.11:9200/2?_source=title, content
GET http://192.168.0.11:9200/2?_source=title
source 什么都不写的话,就获取所有的内容。
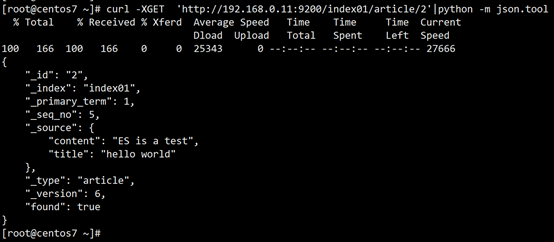
16,更新同一个ID下的文档,可以通过覆盖的方式更新PUT
[root@centos7 ~]# curl -XPUT -H 'content-Type:application/json' http://192.168.0.11:9200/index01/article/2 -d '{ "content": "ES is a test","title": "hello world"}'
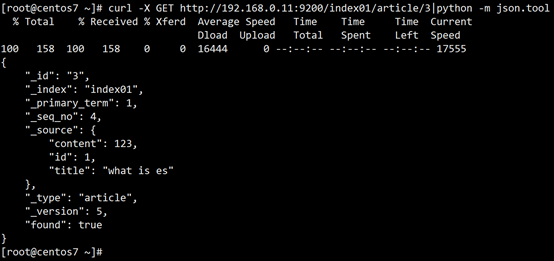
17,或者通过_update API的方式单独更新你想要的字段
[root@centos7 ~]# curl -XPOST -H 'content-Type:application/json' 'http://192.168.0.11:9200/index01/article/3/_update' -d '{ "doc": {"content":123} }'
{"_index":"index01","_type":"article","_id":"3","_version":3,"result":"updated","_shards":{"total":2,"successful":1,"failed":0},"_seq_no":2,"_primary_term":1}
[root@centos7 ~]#
[root@centos7 ~]#
18, _mget进行查询操作
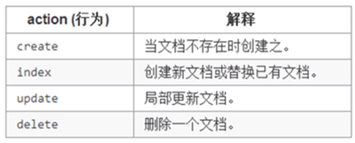
19, _bulk 批量操作API,实现多个文档的create,index,update或者delete
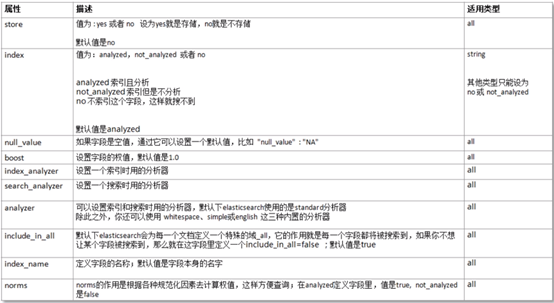
20, Mapping可以定义的属性:

 浙公网安备 33010602011771号