
UE3 shader
编写着色器
Unity 中的着色器可以用三种不同的方式编写:
表面着色器
如果着色器需要受到光照和阴影的影响,则表面着色器是您的最佳选择。表面着色器以简洁的方式使编写复杂的着色器变得容易 - 这是与 Unity 光照管线进行交互的更高级别抽象。大多数表面着色器自动支持前向和延迟光照。您可以用几行 Cg/HLSL 编写表面着色器,随后就能在此基础上自动生成更多代码。
如果您的着色器与光照没有任何关联,请不要使用表面着色器。对于后期处理效果或许多特殊效果着色器,表面着色器是次优选项,因为它们会无缘无故进行大量光照计算。
顶点和片元着色器
如果您的着色器不需要与光照交互,或者如果您需要无法由表面着色器处理的非常奇特的效果,则需要使用顶点和片元着色器。以这种方式编写的着色器程序是创建所需效果的最灵活方法(甚至表面着色器也会自动转换为一堆顶点和片元着色器),但这需要付出代价:必须编写更多的代码并且更难以让它与光照互动。这些着色器也是以 Cg/HLSL 编写。
固定函数着色器
固定函数着色器是传统的着色器语法,用于非常简单的效果。建议编写可编程的着色器,因为这样可以提供更大的灵活性。固定函数着色器完全用一种名为 ShaderLab 的语言编写,此语言类似于 Microsoft 的 .FX 文件或 NVIDIA 的 CgFX。在内部,所有固定函数着色器在导入着色器时转换为顶点和片元着色器。
ShaderLab
无论您选择哪种类型的着色器,实际的着色器代码始终包含在用于组织着色器结构的 ShaderLab 中。如下所示:
Shader "MyShader"
{
    Properties
    {
        _MyTexture ("My Texture", 2D) = "white" { }
        // 此处还放置颜色或矢量等其他属性
    }
    SubShader
    {
        // 此处放置
        // - 表面着色器或
        // - 顶点和片元着色器或
        // - 固定函数着色器
    }
    SubShader
    {
        // 此处放置上述 SubShader 更简单的 "fallback" 版本
        // 此版本能够在较旧的显卡上运行
    }
}
ShaderLab语法
语法结构
Shader "<name>"
{
    <optional: Material properties>
    <One or more SubShader definitions>
    <optional: custom editor>
    <optional: fallback>
}
示例:
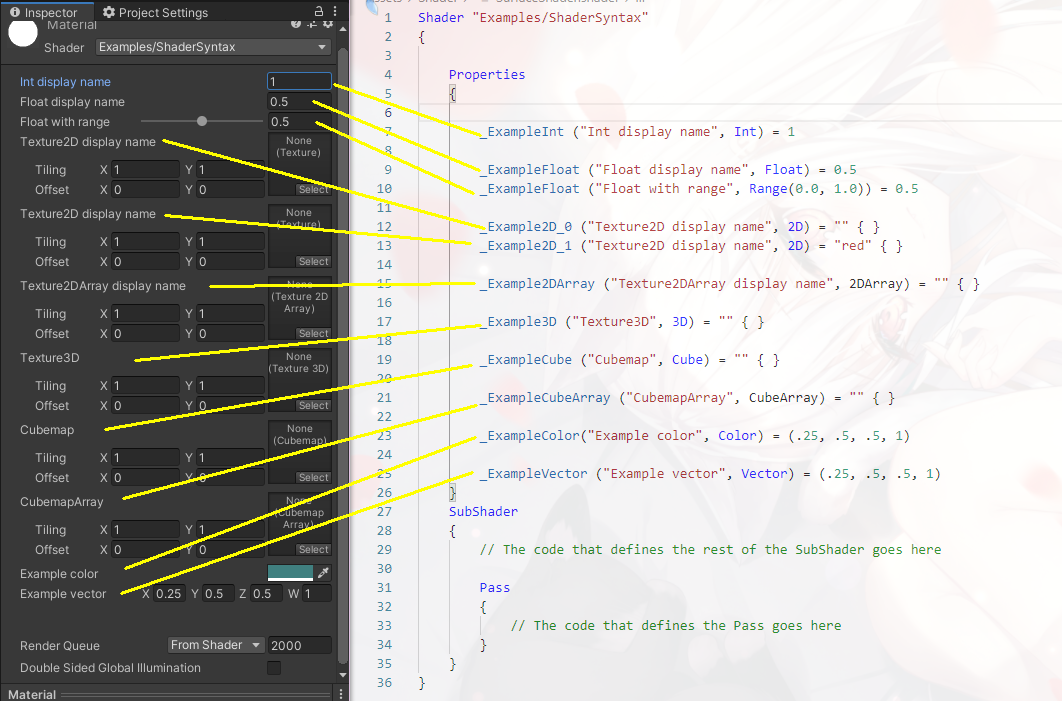
Shader "Examples/ShaderSyntax"
{
    CustomEditor = "ExampleCustomEditor"

    Properties
    {
        // Material property declarations go here
    }
    SubShader
    {
        // The code that defines the rest of the SubShader goes here

        Pass
        {
           // The code that defines the Pass goes here
        }
    }

    Fallback "ExampleFallbackShader"
}
Material Properties
在ShaderLab代码中,可以定义材质特性。材料属性是Unity作为材料资产的一部分存储的属性。
如果使用材质属性:通过调用材质上的函数(如material.SetFloat),可以获取或设置着色器对象中变量的值。
语法结构
[optional: attribute] name("display text in Inspector", type name) = default value
示例:
Shader "Examples/MaterialPropertyShaderLab"
{
    Properties
    {
        // Change this value in the Material Inspector to affect the value of the Offset command
        _OffsetUnitScale ("Offset unit scale", Integer) = 1
    }
    SubShader
    {
        // The code that defines the rest of the SubShader goes here

        Pass
        {
            Offset 0, [_OffsetUnitScale]

           // The code that defines the rest of the Pass goes here
        }
    }
}
材质类型
| 类型 | Example syntax | Comment |
|---|---|---|
| Integer | _ExampleName ("Integer display name", Integer) = 1 |
此类型由实整数支持(与下面描述的传统Int类型不同,后者由浮点支持)。如果要使用整数,请使用此值而不是Int。 |
| Int (legacy) | _ExampleName ("Int display name", Int) = 1 |
Note: 注意:这种遗留类型由浮点数支持,而不是整数。仅出于向后兼容性原因才支持它。请改用 Integer 类型。 |
| Float |
_ExampleName ("Float display name", Float) = 0.5_ExampleName ("Float with range", Range(0.0, 1.0) = 0.5
|
范围滑块的最大值和最小值包括在内。 |
| Texture2D |
_ExampleName ("Texture2D display name", 2D) = "" {}_ExampleName ("Texture2D display name", 2D) = "red" {}
|
将以下值放在默认值字符串中以使用 Unity 的内置纹理之一:“白色”(RGBA:1,1,1,1),“黑色”(RGBA:0,0,0,1),“灰色”(RGBA:0.5,0.5,0.5,1),“凹凸”(RGBA:0.5,0.5,1,0.5)或“红色”(RGBA:1,0,0,1)。如果您将字符串留空或输入无效值,则默认为“灰色”。 Note: 这些默认纹理在检查器中不可见。 |
| Texture2DArray | _ExampleName ("Texture2DArray display name", 2DArray) = "" {} |
For more information, see Texture arrays. |
| Texture3D | _ExampleName ("Texture3D", 3D) = "" {} |
默认值为“灰色”(RGBA:0.5,0.5,0.5,1)纹理。 |
| Cubemap | _ExampleName ("Cubemap", Cube) = "" {} |
默认值为“灰色”(RGBA:0.5,0.5,0.5,1)纹理。 |
| CubemapArray | _ExampleName ("CubemapArray", CubeArray) = "" {} |
See Cubemap arrays. |
| Color | _ExampleName("Example color", Color) = (.25, .5, .5, 1) |
这映射到着色器代码中的 float4。 材质检查器显示一个颜色选择器。如果您更愿意将值编辑为四个单独的浮点数,请使用 Vector 类型。 |
| Vector | _ExampleName ("Example vector", Vector) = (.25, .5, .5, 1) |
这映射到着色器代码中的 float4。 材质检查器显示四个单独的浮点字段。如果您更愿意使用颜色选择器编辑值,请使用颜色类型。 |
在Inspector面板对应显示
材质属性
| 属性 | 功能 |
|---|---|
[Gamma] |
指示浮点或向量属性使用sRGB值,这意味着如果项目中的颜色空间需要此属性,则必须将其与其他sRGB值一起转换。 |
[HDR] |
指示纹理或颜色属性使用高动态范围(HDR)值。 对于纹理属性,如果分配了 LDR 纹理,Unity 编辑器会显示警告。对于颜色属性,Unity Editor 使用 HDR 颜色选择器来编辑该值。 |
[HideInInspector] |
告诉 Unity 编辑器在检查器中隐藏此属性。 |
[MainTexture] |
设置材质的主纹理,您可以使用 Material.mainTexture 访问它。 默认情况下,Unity 将属性名称为 _MainTex 的纹理视为主纹理。如果您的纹理具有不同的属性名称,但您希望 Unity 将其视为主纹理,请使用此属性。 如果多次使用此属性,Unity 将使用第一个属性并忽略后续属性。 Note: 当您使用此属性设置主纹理时,当您使用纹理流调试视图模式或自定义调试工具时,该纹理在游戏视图中不可见。 |
[MainColor] |
设置材质的主要颜色,您可以使用 Material.color 访问该颜色。 默认情况下,Unity 将属性名称为 _Color 的颜色视为主要颜色。如果您的颜色具有不同的属性名称,但您希望 Unity 将其视为主要颜色,请使用此属性。如果多次使用此属性,Unity 将使用第一个属性并忽略后续属性。 |
[NoScaleOffset] |
告诉 Unity 编辑器隐藏此纹理属性的*铺和偏移字段。 |
[Normal] |
表示纹理属性需要法线贴图。 如果您分配了不兼容的纹理,Unity 编辑器会显示警告。 |
[PerRendererData] |
指示纹理属性将以 MaterialPropertyBlock 的形式来自每个渲染器的数据。 材质检查器将这些属性显示为只读。 |
ShaderLab: Fallback
语法结构
| Signature | 功能 |
|---|---|
Fallback "<name>" |
如果找不到兼容的 SubShader,请使用命名的 Shader 对象。 |
Fallback Off |
不要使用后备着色器对象代替这个对象。如果未找到兼容的 SubShader,则显示错误材质。 |
示例:
Shader "Examples/ExampleFallback"
{
    SubShader
    {
        // Code that defines the SubShader goes here.

        Pass
        {
              // Code that defines the Pass goes here.
        }
    }

    Fallback "ExampleOtherShader"
}
ShaderLab:CustomEditor
可为着色器定义一个 CustomEditor。如果执行了此操作,Unity 将查找具有此名称并能扩展 ShaderGUI 的类。如果找到,则使用此着色器的所有材质都将使用此 ShaderGUI。
语法
CustomEditor "name"
ShaderLab: SubShader
着色器对象包含一个或多个子着色器。子着色器允许您为不同的硬件、渲染管道和运行时设置定义不同的GPU设置和着色器程序。
| Signature | 功能 |
|---|---|
SubShader{<optional: LOD><optional: tags><optional: commands><One or more Pass definitions>}
|
定义一个 SubShader。 您可以在一个 SubShader 中定义任意数量的 Pass。 |
示例:
Shader "Examples/SinglePass"
{
    SubShader
    {
        Tags { "ExampleSubShaderTagKey" = "ExampleSubShaderTagValue" }
        LOD 100

         // ShaderLab commands that apply to the whole SubShader go here.

        Pass
        {
              Name "ExamplePassName"
              Tags { "ExamplePassTagKey" = "ExamplePassTagValue" }

              // ShaderLab commands that apply to this Pass go here.

              // HLSL code goes here.
        }
    }
}
ShaderLab:标签
语法
| Signature | 功能 |
|---|---|
| Tags { “[name1]” = “[value1]” “[name2]” = “[value2]”} | 将给定的标签应用到 SubShader。您可以定义任意数量的标签。 |
| tags | value | |
|---|---|---|
| RenderPipeline “RenderPipeline” = “[name]” |
UniversalRenderPipeline | 此 SubShader 仅与 URP 兼容。 |
| HighDefinitionRenderPipeline | 此 SubShader 仅与 HDRP 兼容。 | |
| (any other value, or not declared) | 此 SubShader 与 URP 或 HDRP 不兼容。 | |
| Queue “Queue” = “[queue name]” “Queue” = “[queue name] + [offset]” |
Background | 指定背景渲染队列。 |
| Geometry | 指定几何渲染队列。 | |
| AlphaTest | 指定 AlphaTest 渲染队列。 | |
| Transparent | 指定透明渲染队列。 | |
| Overlay | 指定叠加渲染队列。 | |
| “Queue” = “[queue name] + [integer]” | ||
| “RenderType” “RenderType” = “[renderType]” |
Opaque | 大部分着色器(法线、自发光、反射和地形着色器)。 |
| Transparent | 大部分半透明着色器(透明、粒子、字体和地形附加通道着色器)。 | |
| TransparentCutout | 遮罩透明度着色器(透明镂空、两个通道植被着色器)。 | |
| Overlay | 光环、光晕着色器。 | |
| TreeOpaque | 地形引擎树皮。 | |
| Background | 天空盒着色器。 | |
| TreeTransparentCutout | 地形引擎树叶。 | |
| TreeBillboard | 地形引擎公告牌树。 | |
| Grass | 地形引擎草。 | |
| GrassBillboard | 地形引擎公告牌草。 | |
| DisableBatching “DisableBatching” = “[state]” |
True | Unity 阻止对使用此 SubShader 的几何体进行动态批处理。 |
| False | Unity 不会阻止使用此 SubShader 的几何体的动态批处理。这是默认值。 | |
| LODFading | 对于属于 LODGroup 且淡入淡出模式值不为 None 的所有几何体,Unity 会阻止对其进行动态批处理。否则,Unity 不会阻止动态批处理。 | |
| ForceNoShadowCasting “ForceNoShadowCasting” = “[state]” |
True | Unity 阻止此 SubShader 中的几何体投射阴影。 在内置渲染管线中,使用 Forward、Legacy Vertex Lit 或 Legacy Deferred 渲染路径,Unity 还会阻止此 SubShader 中的几何体接收阴影。 在 HDRP 中,这不会阻止几何体投射接触阴影。 |
| False | Unity 不会阻止此 SubShader 中的几何体投射或接收阴影。这是默认值。 | |
| IgnoreProjector “IgnoreProjector” = “[state]” |
True | Unity在渲染此几何体时忽略投影。 |
| False | Unity 在渲染此几何体时不会忽略投影。这是默认值。 | |
| PreviewType “PreviewType” = “[shape]” |
Sphere | 在球体上显示材质。这是默认值。 |
| Plane | 在*面上显示材料。 | |
| Skybox | 在天空盒上显示材质。 | |
| PreviewType SubShader Tag 告诉 Unity Editor 如何在 Material Inspector 中显示使用这个 SubShader 的材质。 | ||
| CanUseSpriteAtlas “CanUseSpritAtlast” = “[state]” |
True | 使用此 SubShader 的 Sprite 与 Legacy Sprite Packer 兼容。这是默认值。 |
| False | 使用此 SubShader 的 Sprite 与 Legacy Sprite Packer 不兼容。 当 CanUseSpriteAtlas 值为 False 的 SubShader 与具有 Legacy Sprite Packer 包装标签的 Sprite 一起使用时,Unity 在检查器中显示错误消息。 |
|
| 在使用 Legacy Sprite Packer 的项目中使用此 SubShader 标记来警告用户您的着色器依赖于原始纹理坐标,因此他们不应将其纹理打包到地图集中。 | ||
ShaderLab:LOD
您可以为 SubShader 分配 LOD 值。该值表明它对计算的要求有多高。
Unity 内置着色器的 LOD 值
| LOD value | Shader name |
|---|---|
| 100 | Unlit/Texture Unlit/Color Unlit/Transparent Unlit/Transparent Cutout |
| 300 | Standard Standard (Specular Setup) Autodesk Interactive |
旧版着色器的 LOD 值
| LOD value | Shader name |
|---|---|
| 100 | 顶点光照 (VertexLit) |
| 150 | 贴花 (Decal) 反光顶点光照 (Reflective VertexLit) |
| 200 | 漫射 (Diffuse) |
| 250 | 漫射细节 (Diffuse Detail) 反光凹凸无光照 (Reflective Bumped Unlit) 反光凹凸顶点光照 (Reflective Bumped VertexLit) |
| 300 | 凹凸 (Bumped) 镜面反射 (Specular) |
| 400 | 凹凸镜面反射 (Bumped Specular) |
| 500 | 视差 (Parallax) |
| 600 | 视差镜面反射 (Parallax Specular) |
ShaderLab: assigning tags to a Pass
语法
| Signature | 功能 |
|---|---|
Tags {"<name1>" = "<value1>" "<name2>" = "<value2>"} |
将给定的标签应用于 Pass。 您可以定义任意数量的标签。 |
LightMode tag valid values
| Signature | 功能 |
|---|---|
| “LightMode” = “[value]” | 设置此 Pass 的 LightMode 值。 |
| 值 | 功能 |
|---|---|
Always |
始终呈现;不应用任何照明。这是默认值。 |
ForwardBase |
用于正向渲染;应用环境光、主定向光、顶点/SH 光和光照贴图。 |
ForwardAdd |
用于正向渲染;应用附加的每像素灯光,每盏灯一个通道。 |
Deferred |
用于延迟着色;呈现 g 缓冲区。 |
ShadowCaster |
将对象深度渲染到阴影贴图或深度纹理中。 |
MotionVectors |
用于计算每个对象的运动向量。 |
PrepassBase |
用于传统的延迟照明;渲染法线和镜面反射指数。 |
PrepassFinal |
用于传统的延迟照明;通过结合纹理、照明和发射来渲染最终颜色。 |
ShadowCaster |
将对象深度渲染到阴影贴图或深度纹理中。 |
Vertex |
当对象未进行光照贴图时,在旧版顶点光照渲染中使用;应用所有顶点光源。 |
VertexLMRGBM |
当对象被光照贴图时,在旧的顶点光照渲染中使用,在光照贴图是 RGBM 编码的*台(PC 和控制台)上使用。 |
VertexLM |
当对象进行光照贴图时,用于传统顶点光照渲染,以及光照贴图采用双 LDR 编码的*台(移动*台)。 |
Meta |
在常规渲染期间不使用此通道,仅用于光照贴图烘焙或实时全局照明。有关更多信息,请参阅光照贴图和 Meta Pass 标签。. |
ShaderLab: Commands
ShaderLab:Category
使用 Category 块对设置渲染状态的命令进行分组,以便您可以“继承”块内的分组渲染状态。
例如,您的 Shader 对象可能有多个 SubShader,每个都需要将混合设置为加法。您可以使用 Category 块:
Shader "example" {
Category {
    Blend One One
    SubShader {
        // ...
    }
    SubShader {
        // ...
    }
    // ...
}
}
ShaderLab: AlphaToMask
在 GPU 上启用或禁用 alpha-to-coverage 模式。
Alpha-to-coverage 模式可以减少将多样本抗锯齿 (MSAA) 与使用 Alpha 测试的着色器(例如植被着色器)一起使用时出现的过度锯齿。为此,它会根据片段着色器结果输出中的 alpha 值按比例修改多样本覆盖掩码。
此命令更改渲染状态。在 Pass 块中使用它来设置该 Pass 的渲染状态,或者在 SubShader 块中使用它来设置该 SubShader 中所有 Pass 的渲染状态。
| 参数 | 值 | 功能 |
|---|---|---|
| state | On |
启用 alpha-to-coverage 模式。 |
Off |
禁用 alpha-to-coverage 模式。 |
示例
Shader "Examples/CommandExample"
{
    SubShader
    {
         // The rest of the code that defines the SubShader goes here.

        Pass
        {
              // Enable alpha-to-coverage mode for this Pass
              AlphaToMask On

              // The rest of the code that defines the Pass goes here.
        }
    }
}
ShaderLab : Blend
确定 GPU 如何将片段着色器的输出与渲染目标相结合。
此命令更改渲染状态。在 Pass 块中使用它来设置该 Pass 的渲染状态,或者在 SubShader 块中使用它来设置该 SubShader 中所有 Pass 的渲染状态。
混合方程为:
finalValue = sourceFactor * sourceValue operation destinationFactor * destinationValue
- finalValue 是 GPU 写入目标缓冲区的值。
- sourceFactor 在 Blend 命令中定义。
- sourceValue 是片段着色器输出的值。
- operation 是混合操作。
- destinationFactor 在 Blend 命令中定义。
- destinationValue 是目标缓冲区中已有的值。
| Signature | 示例语法 | 功能 |
|---|---|---|
Blend <state> |
Blend Off |
禁用默认渲染目标的混合。这是默认值。 |
Blend <render target> <state> |
Blend 1 Off |
如上所述,但对于给定的渲染目标。 |
Blend <source factor> <destination factor> |
Blend One Zero |
为默认渲染目标启用混合。设置 RGBA 值的混合因子。 |
Blend <render target> <source factor> <destination factor> |
Blend 1 One Zero |
同上,但对于给定的渲染目标 |
Blend <source factor RGB> <destination factor RGB>, <source factor alpha> <destination factor alpha> |
Blend One Zero, Zero One |
启用混合默认渲染目标。为 RGB 和 alpha 值设置单独的混合因子 |
Blend <render target> <source factor RGB> <destination factor RGB>, <source factor alpha> <destination factor alpha> |
Blend 1 One Zero, Zero One |
如上所述,但对于给定的渲染目标。 |
| 参数 | 值 | 功能 |
|---|---|---|
| render target | Integer, range 0 through 7 | 渲染目标索引。 |
| state | Off |
禁用混合。 |
| factor | One |
此输入的值为 1。使用它来使用源或目标颜色的值。 |
Zero |
此输入的值为零。使用它来删除源值或目标值。 | |
SrcColor |
GPU 将此输入的值乘以源颜色值。 | |
SrcAlpha |
GPU 将此输入的值乘以源 alpha 值。 | |
DstColor |
GPU 将此输入的值乘以帧缓冲区源颜色值。 | |
DstAlpha |
GPU 将此输入的值乘以帧缓冲区源 alpha 值。 | |
OneMinusSrcColor |
GPU 将此输入的值乘以(1 - 源颜色)。 | |
OneMinusSrcAlpha |
GPU 将此输入的值乘以 (1 - 源 alpha)。 | |
OneMinusDstColor |
GPU 将此输入的值乘以 (1 - 目标颜色)。 | |
OneMinusDstAlpha |
GPU 将此输入的值乘以 (1 - 目标 alpha)。 |
ShaderLab : BlendOp
指定 Blend 命令使用的混合操作。要使该命令生效,在同一个 Pass 块(如果该命令在 Pass 块中)或 SubShader 块(如果该命令在 SubShader 块中)中还必须有一个 Blend 命令。
此命令更改渲染状态。在 Pass 块中使用它来设置该 Pass 的渲染状态,或者在 SubShader 块中使用它来设置该 SubShader 中所有 Pass 的渲染状态。
| Signature | 示例语法 | 功能 |
|---|---|---|
BlendOp <operation> |
BlendOp Sub |
设置混合命令使用的混合操作。 |
| 参数 | 值 | 功能 |
|---|---|---|
| operation | Add |
将源和目标相加。 |
Sub |
从源减去目标。 | |
RevSub |
从目标减去源。 | |
Min |
Use the smaller of source and destination. (See note 1) | |
Max |
Use the larger of source and destination. (See note 1) | |
LogicalClear |
Logical operation: Clear (0) (See note 2) |
|
LogicalSet |
Logical operation: Set (1) (See note 2) |
|
LogicalCopy |
Logical operation: Copy (s) (See note 2) |
|
LogicalCopyInverted |
Logical operation: Copy inverted (!s) 2 |
|
LogicalNoop |
Logical operation: Noop (d) (See note 2) |
|
LogicalInvert |
Logical operation: Invert (!d) (See note 2) |
|
LogicalAnd |
Logical operation: And (s & d) (See note 2) |
|
LogicalNand |
Logical operation: Nand !(s & d) (See note 2) |
|
LogicalOr |
Logical operation: Or (s | d) (See note 2) |
|
LogicalNor |
Logical operation: Nor !(s | d) (See note 2) |
|
LogicalXor |
Logical operation: Xor (s ^ d) (See note 2) |
|
LogicalEquiv |
Logical operation: Equivalence !(s ^ d) (See note 2) |
|
LogicalAndReverse |
Logical operation: Reverse And (s & !d) (See note 2) |
|
LogicalAndInverted |
Logical operation: Inverted And (!s & d) (See note 2) |
|
LogicalOrReverse |
Logical operation: Reverse Or (s | !d) (See note 2) |
|
LogicalOrInverted |
Logical operation: Inverted Or (!s | d) (See note 2) |
|
Multiply |
Advanced OpenGL blending operation: Multiply (See note 3) |
|
Screen |
Advanced OpenGL blending operation: Screen (See note 3) |
|
Overlay |
Advanced OpenGL blending operation: Overlay (See note 3) |
|
Darken |
Advanced OpenGL blending operation: Darken (See note 3) |
|
Lighten |
Advanced OpenGL blending operation: Lighten (See note 3) |
|
ColorDodge |
Advanced OpenGL blending operation: ColorDodge (See note 3) |
|
ColorBurn |
Advanced OpenGL blending operation: ColorBurn (See note 3) |
|
HardLight |
Advanced OpenGL blending operation: HardLight (See note 3) |
|
SoftLight |
Advanced OpenGL blending operation: SoftLight (See note 3) |
|
Difference |
Advanced OpenGL blending operation: Difference (See note 3) |
|
Exclusion |
Advanced OpenGL blending operation: Exclusion (See note 3) |
|
HSLHue |
Advanced OpenGL blending operation: HSLHue (See note 3) |
|
HSLSaturation |
Advanced OpenGL blending operation: HSLSaturation (See note 3) |
|
HSLColor |
Advanced OpenGL blending operation: HSLColor (See note 3) |
|
HSLLuminosity |
Advanced OpenGL blending operation: HSLLuminosity (See note 3) |
示例
Shader "Examples/CommandExample"
{
    SubShader
    {
         // The rest of the code that defines the SubShader goes here.

        Pass
        {
             // Enable subtractive blending for this Pass
             Blend SrcAlpha One
             BlendOp RevSub

              // The rest of the code that defines the Pass goes here.
        }
    }
}
ShaderLab: ColorMask
设置颜色通道写入遮罩,以防止 GPU 写入渲染目标中的通道。
此命令更改渲染状态。在 Pass 块中使用它来设置该 Pass 的渲染状态,或者在 SubShader 块中使用它来设置该 SubShader 中所有 Pass 的渲染状态。
| Signature | 示例语法 | 功能 |
|---|---|---|
ColorMask <channels> |
ColorMask RGB |
写入默认渲染目标的给定通道。 |
ColorMask <channels> <render target> |
ColorMask RGB 2 |
如上所述,但对于给定的渲染目标。 |
| 参数 | 值 | 功能 |
|---|---|---|
| render target | 整数,0 到 7。 | 渲染目标索引。 |
| channels | 0 |
启用对 R、G、B 和 A 通道的彩色写入。 |
R |
启用对红色通道的颜色写入。 | |
G |
启用对绿色通道的颜色写入。 | |
B |
启用对蓝色通道的颜色写入。 | |
A |
启用颜色写入 Alpha 通道。 | |
| R、G、B 和 A 的任意组合,没有空格。例如:RB | 启用对给定通道的颜色写入。 |
示例
Shader "Examples/CommandExample"
{
    SubShader
    {
         // The rest of the code that defines the SubShader goes here.

        Pass
        {
              // Enable writing only to the RGB channels for this Pass, which disables writing to the alpha channel
              ColorMask RGB

              // The rest of the code that defines the Pass goes here.
        }
    }
}
ShaderLab : Conservative
启用或禁用保守光栅化。
光栅化是一种渲染技术,通过确定哪些像素被三角形覆盖,将矢量数据(三角形投影)转换为像素数据(渲染目标)。通常情况下,GPU通过对像素内的点进行采样,判断是否被三角形覆盖来决定是否对像素进行光栅化;如果覆盖范围足够,则 GPU 确定该像素已被覆盖。保守光栅化是指 GPU 对被三角形部分覆盖的像素进行光栅化,而不管覆盖范围如何。这在需要确定性时很有用,例如在执行遮挡剔除、GPU 上的碰撞检测或可见性检测时。
此命令更改渲染状态。在 Pass 块中使用它来设置该 Pass 的渲染状态,或者在 SubShader 块中使用它来设置该 SubShader 中所有 Pass 的渲染状态。
| Signature | 示例语法 | 功能 |
|---|---|---|
Conservative <enabled> |
Conservative True |
启用或禁用保守光栅化。 需要 DX 11.3+ 或 GL_NV_conservative_raster。 |
| 参数 | 值 | 功能 |
|---|---|---|
| enabled | True |
启用光栅化。 |
False |
禁用光栅化。 |
示例
Shader "Examples/CommandExample"
{
    SubShader
    {
         // The rest of the code that defines the SubShader goes here.

        Pass
        {
              // Enable conservative rasterization for this Pass.
              Conservative True

              // The rest of the code that defines the Pass goes here.
        }
    }
}
ShaderLab: Cull
根据它们相对于相机的方向设置 GPU 应该剔除的多边形。
剔除是确定不画什么的过程。剔除提高了渲染效率,因为不会浪费 GPU 时间来绘制在最终图像中不可见的东西。
默认情况下,GPU 执行背面剔除;这意味着它不会绘制背对观察者的多边形。一般来说,减少渲染工作量越多越好;因此,您应该仅在必要时更改此设置。
此命令更改渲染状态。在 Pass 块中使用它来设置该 Pass 的渲染状态,或者在 SubShader 块中使用它来设置该 SubShader 中所有 Pass 的渲染状态。
| Signature | 示例语法 | 功能 |
|---|---|---|
Cull <state> |
Cull Back |
根据它们相对于相机的方向设置 GPU 应该剔除的多边形。 |
| 参数 | 值 | 功能 |
|---|---|---|
| state | Back |
剔除远离相机的多边形。这称为背面剔除。 这是默认值。 |
Front |
剔除面向相机的多边形。这称为正面剔除。 使用它来翻转几何体。 |
|
Off |
不要根据面的方向剔除多边形。 将此用于特殊效果,例如透明物体或双面墙。 |
示例
Shader "Examples/CommandExample"
{
    SubShader
    {
         // The rest of the code that defines the SubShader goes here.

        Pass
        {
              // Disable culling for this Pass.
              // You would typically do this for special effects, such as transparent objects or double-sided walls.
              Cull Off

              // The rest of the code that defines the Pass goes here.
        }
    }
}
ShaderLab: Offset
在 GPU 上设置深度偏差。
深度偏差,也称为深度偏移,是 GPU 上的一项设置,用于确定绘制几何图形的深度。调整深度偏差以强制 GPU 在具有相同深度的其他几何体之上绘制几何体。这可以帮助您避免不需要的视觉效果,例如 z-fighting 和阴影粉刺。
此命令更改渲染状态。在 Pass 块中使用它来设置该 Pass 的渲染状态,或者在 SubShader 块中使用它来设置该 SubShader 中所有 Pass 的渲染状态。
| Signature | 示例语法 | 功能 |
|---|---|---|
Offset <factor>, <units> |
Offset 1, 1 |
根据给定的值,绘制离相机更*或更远的几何体。 |
| 参数 | 值 | 功能 |
|---|---|---|
| factor | Float, range –1 through 1. | 缩放最大 Z 斜率,也称为深度斜率,以生成每个多边形的可变深度偏移。 不*行于*剪裁*面和远剪裁*面的多边形具有 Z 斜率。调整此值以避免此类多边形上出现视觉伪影。 |
| units | Float, range –1 through 1. | 缩放最小可解析深度缓冲区值,以产生恒定的深度偏移。最小深度可解析深度缓冲值(一个单位)因设备而异。 负值意味着 GPU 将多边形绘制得更靠*相机。正值意味着 GPU 将多边形绘制得离相机更远。 |
示例
Shader "Examples/CommandExample"
{
    SubShader
    {
         // The rest of the code that defines the SubShader goes here.

        Pass
        {
              // Sets the depth offset for this geometry so that the GPU draws this geometry closer to the camera
              // You would typically do this to avoid z-fighting
              Offset -1, -1

              // The rest of the code that defines the Pass goes here.
        }
    }
}
ShaderLab: Stencil
配置与 GPU 上的模板缓冲区相关的设置。
模板缓冲区为帧缓冲区中的每个像素存储一个 8 位整数值。在为给定像素执行片段着色器之前,GPU 可以将模板缓冲区中的当前值与给定参考值进行比较。这称为模板测试。如果模板测试通过,GPU 将执行深度测试。如果模板测试失败,GPU 将跳过该像素的其余处理。这意味着您可以使用模板缓冲区作为掩码来告诉 GPU 绘制哪些像素,丢弃哪些像素。
此命令更改渲染状态。在 Pass 块中使用它来设置该 Pass 的渲染状态,或者在 SubShader 块中使用它来设置该 SubShader 中所有 Pass 的渲染状态。
模板测试方程为:
(ref & readMask) comparisonFunction (stencilBufferValue & readMask)
| Signature | 示例语法 | 功能 |
|---|---|---|
Stencil{Ref <ref>ReadMask <readMask>WriteMask <writeMask>Comp <comparisonOperation>Pass <passOperation>Fail <failOperation>ZFail <zFailOperation>CompBack <comparisonOperationBack>PassBack <passOperationBack>FailBack <failOperationBack>ZFailBack <zFailOperationBack>CompFront <comparisonOperationFront>PassFront <passOperationFront>FailFront <failOperationFront>ZFailFront <zFailOperationFront>}请注意,所有参数都是可选的。 |
Stencil{Ref 2Comp equalPass keepZFail decrWrap}
|
根据给定的参数配置模板缓冲区。 |
| 参数 | 值 | 功能 |
|---|---|---|
| ref | An integer. Range 0 through 255. Default is 0. | The reference value. The GPU compares the current contents of the stencil buffer against this value, using the operation defined in comparisonOperation. This value is masked with readMask or writeMask, depending on whether a read or a write operation is occurring. The GPU can also write this value to the stencil buffer, if Pass, Fail or ZFail have a value of Replace. |
| readMask | An integer. Range 0 through 255. Default is 255. | The GPU uses this value as a mask when it performs the stencil test. See above for the stencil test equation. |
| writeMask | An integer. Range 0 through 255. Default is 255. | The GPU uses this value as a mask when it writes to the stencil buffer. Note that, like other masks, it specifies which bits are included in the operation. For example, a value of 0 means that no bits are included in the write operation, not that the stencil buffer receives a value of 0. |
| comparisonOperation | A comparison operation. Default is Always. | The operation that the GPU performs for the stencil test for all pixels. This defines the operation for all pixels, regardless of facing. If this is defined in addition to comparisonOperationBack and comparisonOperationFront, this value overrides them. |
| passOperation | A stencil operation. Default is Keep. | The operation that the GPU performs on the stencil buffer when a pixel pases both the stencil test and the depth test. This defines the operation for all pixels, regardless of facing. If this is defined in addition to passOperationBack and passOperationFront, this value overrides them. |
| failOperation | A stencil operation. Default is Keep. | The operation that the GPU performs on the stencil buffer when a pixel fails the stencil test. This defines the operation for all pixels, regardless of facing. If this is defined in addition to failOperationBack and failOperationFront, this value overrides them. |
| zFailOperation | A stencil operation.Default is Keep. | The operation that the GPU performs on the stencil buffer when a pixel passes the stencil test, but fails the depth test. This defines the operation for all pixels, regardless of facing. If this is defined in addition to zFailOperation and zFailOperation, this value overrides them. |
| comparisonOperationBack | for valid values. Default is Always. | The operation that the GPU performs for the stencil test. This defines the operation for back-facing pixels only. If comparisonOperation is defined, that value overrides this one. |
| passOperationBack | A stencil operation.Default is Keep. | The operation that the GPU performs on the stencil buffer when a pixel pases both the stencil test and the depth test. This defines the operation for back-facing pixels only. If passOperation is defined, that value overrides this one. |
| failOperationBack | A stencil operation. Default is Keep. | The operation that the GPU performs on the stencil buffer when a pixel fails the stencil test. This defines the operation for back-facing pixels only. If failOperation is defined, that value overrides this one. |
| zFailOperationBack | A stencil operation. Default is Keep. | The operation that the GPU performs on the stencil buffer when a pixel passes the stencil test, but fails the depth test. This defines the operation for back-facing pixels only. If zFailOperation is defined, that value overrides this one. |
| comparisonOperationFront | A comparison operation. Default is Always. | The operation that the GPU performs for the stencil test. This defines the operation for front-facing pixels only. If comparisonOperation is defined, that value overrides this one. |
| passOperationFront | A stencil operation. Default is Keep. | The operation that the GPU performs on the stencil buffer when a pixel pases both the stencil test and the depth test. This defines the operation for front-facing pixels only. If passOperation is defined, that value overrides this one. |
| failOperationFront | A stencil operation.Default is Keep. | The operation that the GPU performs on the stencil buffer when a pixel fails the stencil test. This defines the operation for front-facing pixels only. If failOperation is defined, that value overrides this one. |
| zFailOperationFront | A stencil operation.Default is Keep. | The operation that the GPU performs on the stencil buffer when a pixel passes the stencil test, but fails the depth test. This defines the operation for front-facing pixels only. If zFailOperation is defined, that value overrides this one. |
Comparison operation values
| 值 | Corresponding integer value in Rendering.CompareFunction enum | 功能 |
|---|---|---|
Never |
1 | 从不渲染像素。 |
Less |
2 | 当它们的参考值小于模板缓冲区中的当前值时渲染像素。 |
Equal |
3 | 当它们的参考值等于模板缓冲区中的当前值时渲染像素。 |
LEqual |
4 | 当像素的参考值小于或等于模板缓冲区中的当前值时渲染像素。 |
Greater |
5 | 当它们的参考值大于模板缓冲区中的当前值时渲染像素 |
NotEqual |
6 | 当像素的参考值与模板缓冲区中的当前值不同时渲染像素。 |
GEqual |
7 | 当像素的参考值大于或等于模板缓冲区中的当前值时渲染像素。 |
Always |
8 | 始终渲染像素。 |
Stencil operation values
| 值 | Corresponding integer value in Rendering.StencilOp enum | 功能 |
|---|---|---|
Keep |
0 | 保留模板缓冲区的当前内容。 |
Zero |
1 | 将 0 写入模板缓冲区。 |
Replace |
2 | 将参考值写入缓冲区。 |
IncrSat |
3 | 递增缓冲区中的当前值。如果该值已经是 255,则保持为 255。 |
DecrSat |
4 | 递减缓冲区中的当前值。如果该值已经是 0,则保持为 0。 |
Invert |
5 | Negate all the bits of the current value in the buffer. |
IncrWrap |
7 | 递增缓冲区中的当前值。如果该值已经是 255,则变为 0。 |
DecrWrap |
8 | 递减缓冲区中的当前值。如果该值已经是 0,则变为 255。 |
示例
Shader "Examples/CommandExample"
{
    SubShader
    {
         // The rest of the code that defines the SubShader goes here.

        Pass
        {
             // All pixels in this Pass will pass the stencil test and write a value of 2 to the stencil buffer
             // You would typically do this if you wanted to prevent subsequent shaders from drawing to this area of the render target or restrict them to render to this area only
             Stencil
             {
                 Ref 2
                 Comp Always
                 Pass Replace
             }

             // The rest of the code that defines the Pass goes here.
        }
    }
}
ShaderLab: UsePass
UsePass 命令从另一个 Shader 对象插入一个命名的 Pass。您可以使用此命令来减少着色器源文件中的代码重复。
示例
此示例代码创建了一个名为 NamedPass 的 Shader 对象,其中包含一个名为 ExampleNamedPass 的 Pass。
Shader "Examples/ContainsNamedPass"
{
    SubShader
    {
        Pass
        {
              Name "ExampleNamedPass"

              // The rest of the Pass contents go here.
        }
    }
}
此示例代码创建一个名为 UseNamedPass 的 Shader 对象,该对象使用上述示例代码中的命名 Pass。
Shader "Examples/UsesNamedPass"
{
    SubShader
    {
        UsePass "Examples/ContainsNamedPass/EXAMPLENAMEDPASS"
    }
}
ShaderLab: GrabPass
GrabPass 是一个创建特殊类型 Pass 的命令,它将帧缓冲区的内容抓取到纹理中。此纹理可用于后续通道以实现基于图像的高级效果。
此命令可以显着增加 CPU 和 GPU 帧时间。除了快速原型制作之外,您通常应该避免使用此命令,并尝试通过其他方式实现您的效果。如果你确实使用了这个命令,尽量减少屏幕抓取操作的次数;通过减少使用此命令,或使用将屏幕抓取到命名纹理的签名(如果适用)。
在 SubShader 块中使用此命令。
GrabPass 仅适用于帧缓冲区。您不能使用此命令来获取其他渲染目标、深度缓冲区等的内容。
| Signature | 功能 |
|---|---|
GrabPass { } |
将帧缓冲区内容抓取到一个纹理中,您可以在同一个 SubShader 中的后续通道中使用该纹理。 使用名称 _GrabTexture 引用纹理。_GrabTexture. 当您使用此签名时,Unity 每次渲染包含此命令的批处理时都会抓取屏幕。这意味着 Unity 可以每帧多次抓取屏幕:每批次一次。 |
GrabPass { "ExampleTextureName" } |
将帧缓冲区内容抓取到一个纹理中,您可以在同一帧的后续通道中跨多个子着色器访问该纹理。 使用给定的名称引用纹理。 当您使用此签名时,Unity 会在渲染批处理的帧中第一次抓取屏幕,该批处理包含具有给定纹理名称的此命令。 |
示例
Shader "GrabPassInvert"
{
    SubShader
    {
        // Draw after all opaque geometry
        Tags { "Queue" = "Transparent" }

        // Grab the screen behind the object into _BackgroundTexture
        GrabPass
        {
            "_BackgroundTexture"
        }

        // Render the object with the texture generated above, and invert the colors
        Pass
        {
            CGPROGRAM
            #pragma vertex vert
            #pragma fragment frag
            #include "UnityCG.cginc"

            struct v2f
            {
                float4 grabPos : TEXCOORD0;
                float4 pos : SV_POSITION;
            };

            v2f vert(appdata_base v) {
                v2f o;
                // use UnityObjectToClipPos from UnityCG.cginc to calculate
                // the clip-space of the vertex
                o.pos = UnityObjectToClipPos(v.vertex);

                // use ComputeGrabScreenPos function from UnityCG.cginc
                // to get the correct texture coordinate
                o.grabPos = ComputeGrabScreenPos(o.pos);
                return o;
            }

            sampler2D _BackgroundTexture;

            half4 frag(v2f i) : SV_Target
            {
                half4 bgcolor = tex2Dproj(_BackgroundTexture, i.grabPos);
                return 1 - bgcolor;
            }
            ENDCG
        }

    }
}
ShaderLab: ZClip
设置 GPU 的深度剪辑模式,该模式决定了 GPU 如何处理**面和远*面之外的片段。
此命令更改渲染状态。在 Pass 块中使用它来设置该 Pass 的渲染状态,或者在 SubShader 块中使用它来设置该 SubShader 中所有 Pass 的渲染状态。
| Signature | 示例语法 | 功能 |
|---|---|---|
| ZClip [enabled] | ZClip True | 设置深度剪辑模式。 |
| 参数 | 值 | 功能 |
|---|---|---|
| enabled | True | 将深度剪辑模式设置为剪辑。 这是默认设置。 |
| False | 将深度剪辑模式设置为钳位。 比**面更*的碎片正好在**面,而比远*面更远的碎片正好在远*面。 |
示例
Shader "Examples/CommandExample"
{
    SubShader
    {
         // The rest of the code that defines the SubShader goes here.

        Pass
        {
              // Sets the GPU's depth clip mode to clamp for this Pass
              // You would typically do this if you are rendering stencil shadows
              ZClip False

              // The rest of the code that defines the Pass goes here.
        }
    }
}
ShaderLab: ZTest
设置几何图形通过或未通过深度测试的条件。
深度测试允许具有“Early-Z”功能的 GPU 在管道早期拒绝几何图形,并确保几何图形的正确排序。您可以改变深度测试的条件来实现物体遮挡等视觉效果。
此命令更改渲染状态。在 Pass 块中使用它来设置该 Pass 的渲染状态,或者在 SubShader 块中使用它来设置该 SubShader 中所有 Pass 的渲染状态。
| Signature | 示例语法 | 功能 |
|---|---|---|
| ZTest [operation] | ZTest Less | 设置几何图形通过或失败深度测试的条件。 |
| 参数 | 值 | 功能 |
|---|---|---|
| operation | Less | 绘制位于现有几何体前面的几何体。不要绘制与现有几何体处于相同距离或后面的几何体。 |
| LEqual | 绘制在现有几何体前面或相同距离的几何体。不要绘制位于现有几何体后面的几何体。 这是默认值。 |
|
| Equal | 绘制与现有几何体距离相同的几何体。不要绘制位于现有几何图形前面或后面的几何图形。 | |
| GEqual | 绘制在现有几何体后面或相同距离的几何体。不要绘制位于现有几何体前面的几何体。 | |
| Greater | 绘制位于现有几何体后面的几何体。不要绘制与现有几何体等距或位于现有几何体之前的几何体。 | |
| NotEqual | 绘制与现有几何体距离不同的几何体。不要绘制与现有几何体距离相同的几何体。 | |
| Always | 不进行深度测试。绘制所有几何图形,无论距离如何。 |
示例
Shader "Examples/CommandExample"
{
    SubShader
    {
         // The rest of the code that defines the SubShader goes here.

        Pass
        {
              // Sets the depth test operation to Equal for all pixels in this Pass
              // You would typically do this if you want to render the geometry exactly where already rendered geometry is
              ZTest Equal

              // The rest of the code that defines the Pass goes here.
        }
    }
}
ShaderLab: ZWrite
设置在渲染期间是否更新深度缓冲区内容。通常,ZWrite 对不透明对象启用,对半透明对象禁用。
禁用 ZWrite 会导致不正确的深度排序。在这种情况下,您需要在 CPU 上对几何图形进行排序
此命令更改渲染状态。在 Pass 块中使用它来设置该 Pass 的渲染状态,或者在 SubShader 块中使用它来设置该 SubShader 中所有 Pass 的渲染状态。
| Signature | 示例语法 | 功能 |
|---|---|---|
| ZWrite [state] | ZWrite Off | 启用或禁用写入深度缓冲区。 |
| 参数 | 值 | 功能 |
|---|---|---|
| 状态 | On | 启用写入深度缓冲区。 |
| Off | 禁用写入深度缓冲区。 |
示例
Shader "Examples/CommandExample"
{
    SubShader
    {
         // The rest of the code that defines the SubShader goes here.

        Pass
        {
              // Disables writing to the depth buffer for this Pass
              ZWrite Off

              // The rest of the code that defines the Pass goes here.
        }
    }
}
ShaderLab: legacy fog
注意:此页面上的 ShaderLab 功能是旧的,仅用于向后兼容。如果您的着色器源文件包含 HLSL 代码,Unity 将完全忽略这些命令。如果您的着色器源文件不包含 HLSL 代码,Unity 会在导入时将这些命令编译为常规着色器程序。
在使用传统固定功能样式命令编写的着色器中,使用 Fog 命令启用或禁用 Unity 的内置雾。
雾化根据与相机的距离将生成的像素的颜色向下混合到给定的颜色。雾化不会修改混合像素的 alpha 值,只会修改其 RGB 分量。
| 参数 | 值 | 功能 |
|---|---|---|
| Mode | Off |
不要对这个 Pass 应用内置雾。 |
Global |
根据项目设置,将内置雾应用于此通道。 请注意,如果在项目设置中禁用了雾,Unity 将不会将其应用于此 Pass。 |
示例
Shader "Examples/FogExample"
{
    SubShader
    {
         // The rest of the code that defines the SubShader goes here.

        Pass
        {
              Fog Off

              // The rest of the code that defines the Pass goes here.
        }
    }
}
ShaderLab: legacy lighting
注意:此页面上的 ShaderLab 功能是旧的,仅用于向后兼容。如果您的着色器源文件包含 HLSL 代码,Unity 将完全忽略这些命令。如果您的着色器源文件不包含 HLSL 代码,Unity 会在导入时将这些命令编译为常规着色器程序。
材质和光照参数用于控制内置顶点光照。顶点光照是为每个顶点计算的标准 Direct3D/OpenGL 光照模型。Lighting on 可开启光照。光照将受到 Material 代码块、ColorMaterial 命令和 SeparateSpecular 命令的影响。
对于任何渲染的几何体来说,第一个要计算的效果就是“顶点着色和光照”。它在顶点级别上运行,并计算在应用纹理之前使用的基色。
语法
顶级命令控制是否使用固定函数光照,以及一些配置选项。主要设置位于 Material 代码块中,下面进行了详细介绍。
颜色
Color color
将对象设置为纯色。颜色是用圆括号括起的四个 RGBA 值,或者是用方括号括起的颜色属性名称。
Material
Material {Material 代码块}
Material 代码块用于定义对象的材质属性。
Lighting
Lighting On | Off
要使 Material 代码块中定义的设置生效,必须使用 Lighting On 命令启用光照。如果关闭光照,则直接从 Color 命令获取颜色。
SeparateSpecular
SeparateSpecular On | Off
此命令将镜面反射光照添加到着色器通道的末尾,因此镜面反射光照不受纹理影响。仅当使用 Lighting On 时才有效。
ColorMaterial
ColorMaterial AmbientAndDiffuse | Emission
使用每顶点颜色代替材质中设置的颜色。AmbientAndDiffuse 将替换材质的 Ambient 值和 Diffuse 值;Emission 将替换材质的 Emission 值。
Material 代码块
此代码块包含有关材质如何对光线做出反应的设置。可省略这些属性中的任何一个,在这种情况下它们默认为黑色(即没有效果)。
漫射颜色 (Diffuse color):漫射颜色分量。这是对象的基色。
环境颜色 (Ambient color):环境颜色分量。这是 Lighting 窗口中设置的环境光产生的对象光照颜色。
镜面反射颜色 (Specular color):对象的镜面高光颜色。
光泽度数字 (Shininess number):高光的清晰度,介于 0 到 1 之间。如果为 0,您会看到一个巨大的高光,看起来很像漫射光照;如果为 1,您会看到一个微小的斑点。
发光颜色 (Emission color):任何光源均未照射到对象时的对象颜色。
照射到对象的光源的完整颜色为:
环境光 * Lighting 窗口中的 Ambient Intensity 设置 + (光源颜色 * 漫射 + 光源颜色 * 镜面反射) + 发光
对于照射对象的所有光源,重复该等式的光源部分(圆括号内)。
示例
始终以纯红色渲染对象:
Shader "Solid Red" {
    SubShader {
        Pass { Color (1,0,0,0) }
    }
}
将对象着色为白色并应用顶点光照的基本着色器:
Shader "VertexLit White" {
    SubShader {
        Pass {
            Material {
                Diffuse (1,1,1,1)
                Ambient (1,1,1,1)
            }
            Lighting On
        }
    }
}
以下是一种扩展版本,可将材质颜色添加为材质检视面板 (Material Inspector) 中的可见属性:
Shader "VertexLit Simple" {
    Properties {
        _Color ("Main Color", COLOR) = (1,1,1,1)
    }
    SubShader {
        Pass {
            Material {
                Diffuse [_Color]
                Ambient [_Color]
            }
            Lighting On
        }
    }
}
最后是一个完整的顶点光照着色器:
Shader "VertexLit" {
    Properties {
        _Color ("Main Color", Color) = (1,1,1,0)
        _SpecColor ("Spec Color", Color) = (1,1,1,1)
        _Emission ("Emmisive Color", Color) = (0,0,0,0)
        _Shininess ("Shininess", Range (0.01, 1)) = 0.7
        _MainTex ("Base (RGB)", 2D) = "white" {}
    }
    SubShader {
        Pass {
            Material {
                Diffuse [_Color]
                Ambient [_Color]
                Shininess [_Shininess]
                Specular [_SpecColor]
                Emission [_Emission]
            }
            Lighting On
            SeparateSpecular On
            SetTexture [_MainTex] {
                Combine texture * primary DOUBLE, texture * primary
            }
        }
    }
}
ShaderLab: legacy alpha testing
注意:此页面上的 ShaderLab 功能是旧的,仅用于向后兼容。如果您的着色器源文件包含 HLSL 代码,Unity 将完全忽略这些命令。如果您的着色器源文件不包含 HLSL 代码,Unity 会在导入时将这些命令编译为常规着色器程序。
在计算出最终输出颜色之后,颜色可选择性地将其 Alpha 值与固定值进行比较。如果测试失败,则不会将像素写入显示屏。
语法
AlphaTest Off
渲染所有像素(默认值),或者…
AlphaTest comparison AlphaValue
设置 Alpha 测试以仅渲染 Alpha 值在特定范围内的像素。
Comparison
Comparison 是以下词语之一:
| Greater | 仅渲染 Alpha 大于 AlphaValue 的像素。 |
| GEqual | 仅渲染 Alpha 大于或等于 AlphaValue 的像素。 |
| Less | 仅渲染 Alpha 值小于 AlphaValue 的像素。 |
| LEqual | 仅渲染 Alpha 值小于或等于 AlphaValue 的像素。 |
| Equal | 仅渲染 Alpha 值等于 AlphaValue 的像素。 |
| NotEqual | 仅渲染 Alpha 值不等于 AlphaValue 的像素。 |
| Always | 渲染所有像素。这在功能上等同于 AlphaTest Off。 |
| Never | 不渲染任何像素。 |
ShaderLab: legacy texture combining
注意:此页面上的 ShaderLab 功能是旧的,仅用于向后兼容。如果您的着色器源文件包含 HLSL 代码,Unity 将完全忽略这些命令。如果您的着色器源文件不包含 HLSL 代码,Unity 会在导入时将这些命令编译为常规着色器程序。
在计算基本顶点光照之后将应用纹理。在 ShaderLab 中使用 SetTexture 命令来完成此操作。
可在固定函数纹理中实现旧式组合器效果。您可以在一个通道中包含多个 SetTexture 命令;所有纹理都按顺序应用,就像绘画程序中的图层一样。SetTexture 命令必须放在 Pass 的末尾。
语法
SetTexture [TextureName] {Texture Block}
分配纹理。TextureName 必须定义为纹理属性。在 TextureBlock 中定义如何应用纹理。
纹理代码块控制着应用纹理的方式。在纹理代码块内部,最多可以有两条命令:combine 和 constantColor。
纹理代码块 combine 命令
combine src1 * _src2_:将 src1 和 src2 相乘。结果将比任一个输入更暗。
combine src1 + _src2_:将 src1 与 src2 相加。结果将比任一个输入更亮。
combine src1 - _src2_:从 src1 减去 src2。
combine src1 lerp (src2) _src3_:使用 src2 的 Alpha 在 src3 和 src1 之间插值。请注意,插值方向是相反的:当 Alpha 为 1 时使用 src1,而当 Alpha 为 0 时使用 src3。
combine src1 * src2 + _src3_:将 src1 与 src2 的 Alpha 分量相乘,然后加 src3。
所有 src 属性均可为 previous、constant、primary 或 texture 之一。
- Previous 表示上一个 SetTexture 的结果。
- Primary 表示光照计算产生的颜色或者是顶点颜色(如果已绑定)。
- Texture 表示由 SetTexture 中 TextureName 指定的纹理的颜色(请参阅上文)。
- Constant 表示 ConstantColor 中指定的颜色。
修饰符:
- 上面指定的公式可以选择性地跟随关键字 Double 或 Quad,作用是让生成的颜色在亮度上乘以 2 或乘以 4。
- 除了 lerp 参数之外,所有 src 属性都可以选择以 one - 开头,作用是对生成的颜色取非。
- 所有 src 属性都可以后跟 alpha,作用是仅采用 Alpha 通道。
- 纹理代码块 constantColor 命令
- ConstantColor color:定义可在 combine 命令中使用的恒定颜色。
ShaderLab: legacy vertex data channel mapping
注意:此页面上的 ShaderLab 功能是旧的,仅用于向后兼容。如果您的着色器源文件包含 HLSL 代码,Unity 将完全忽略这些命令。如果您的着色器源文件不包含 HLSL 代码,Unity 会在导入时将这些命令编译为常规着色器程序。
概述
The BindChannelsBindChannels 命令允许您指定顶点数据如何映射到图形硬件。默认情况下,Unity 会为您计算绑定,但在某些情况下,您希望使用自定义绑定。
例如,您可能会映射要在第一个纹理阶段中使用的主 UV 集,并映射要在第二个纹理阶段中使用的辅助 UV 集;或者告知硬件应将顶点颜色考虑在内。
语法
BindChannels { Bind "source", target }
指定顶点数据 source 映射到硬件 target。
Source 可以是下列值之一:
- Vertex:顶点位置
- Normal:顶点法线
- Tangent:顶点切线
- Texcoord:主 UV 坐标
- Texcoord1:辅助 UV 坐标
- Color:每顶点颜色
Target 可以是下列值之一:
- Vertex:顶点位置
- Normal:顶点法线
- Tangent:顶点切线
- Texcoord0、Texcoord1 等等:相应纹理阶段的纹理坐标
- Texcoord:所有纹理阶段的纹理坐标
- Color:顶点颜色
详细信息
Unity 对于哪些源 (source) 可以映射到哪些目标 (target) 设置了一些限制。Vertex、Normal、Tangent 和 Color 的源和目标必须匹配。网格中的纹理坐标(Texcoord 和 Texcoord1__)可以映射到纹理坐标目标(对于所有纹理阶段来说,是 Texcoord__;对于某个特定阶段来说,是 TexcoordN)。
BindChannels 有两个典型用例:
将顶点颜色考虑在内的着色器。
使用两个 UV 集的着色器。
示例
// 将第一个 UV 集映射到第一个纹理阶段
// 并将第二个 UV 集映射到第二个纹理阶段
BindChannels {
   Bind "Vertex", vertex
   Bind "texcoord", texcoord0
   Bind "texcoord1", texcoord1
}
// 将第一个 UV 集映射到所有纹理阶段
// 并使用顶点颜色
BindChannels {
   Bind "Vertex", vertex
   Bind "texcoord", texcoord
   Bind "Color", color
}

 浙公网安备 33010602011771号