RTThread 重定义rt_hw_console_output函数
在学习单片机时,我们会经常使用printf函数进行信息输出,方便调试程序,而学习RT-Thread时也会经常使用rt_kprintf函数进行信息输出,所以在移植完RT-Thread时,我们首先需要定义rt_hw_console_output使得rt_kprintf函数能正常运行
一、初始化UART
rt_kprintf函数最终都是通过串口进行日志打印的,所以在使用之前需要对uart外设进行初始化。下面是STM32F10x的初始化程序:
void USART1_Config(void)
{
	GPIO_InitTypeDef GPIO_InitStructure;
	USART_InitTypeDef USART_InitStructure;

	/* 使能 USART1 时钟*/
	RCC_APB2PeriphClockCmd(RCC_APB2Periph_USART1 | RCC_APB2Periph_GPIOA, ENABLE);

	/* USART1 使用IO端口配置 */
	GPIO_InitStructure.GPIO_Pin = GPIO_Pin_9;
	GPIO_InitStructure.GPIO_Mode = GPIO_Mode_AF_PP; //复用推挽输出
	GPIO_InitStructure.GPIO_Speed = GPIO_Speed_50MHz;
	GPIO_Init(GPIOA, &GPIO_InitStructure);

	GPIO_InitStructure.GPIO_Pin = GPIO_Pin_10;
	GPIO_InitStructure.GPIO_Mode = GPIO_Mode_IN_FLOATING;	//浮空输入
	GPIO_Init(GPIOA, &GPIO_InitStructure);   //初始化GPIOA

	/* USART1 工作模式配置 */
	USART_InitStructure.USART_BaudRate = 115200;	//波特率设置:115200
	USART_InitStructure.USART_WordLength = USART_WordLength_8b;	//数据位数设置:8位
	USART_InitStructure.USART_StopBits = USART_StopBits_1; 	//停止位设置:1位
	USART_InitStructure.USART_Parity = USART_Parity_No ;  //是否奇偶校验:无
	USART_InitStructure.USART_HardwareFlowControl = USART_HardwareFlowControl_None;	//硬件流控制模式设置:没有使能
	USART_InitStructure.USART_Mode = USART_Mode_Rx | USART_Mode_Tx;//接收与发送都使能

	USART_Init(USART1, &USART_InitStructure);  //初始化USART1
	USART_Cmd(USART1, ENABLE);// USART1使能

}
注意:需要在board.c文件中的rt_hw_board_init()函数中进行初始化程序的调用,因为在完成RT-Thread的启动后(也就是在main函数运行之前)会打印相应的启动信息,如果放在mian函数中进行串口的初始化,会使程序跑飞。
二、rt_kprintf输出的两种方式
rt_kprintf()支持两种方式的输出,一种是当使用设备驱动时,将设备将作为控制台;另外一种是当没有使用设备驱动时,系统通过rt_hw_console_output()函数处理rt_kprintf()输出的设备。从下面的代码可以看出两种输出方式的使用
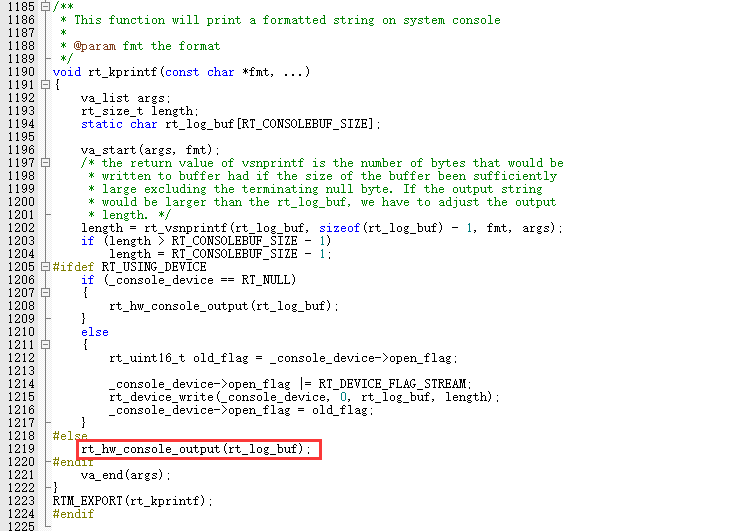
注意:想要使用控制台时(或者rt_kprintf()时),需要使能RT_USING_CONSOLE,使能方式是在rtconfig.h文件中添加如下代码
#ifdef RT_USING_CONSOLE
三、自定义 rt_hw_console_output()
rt_hw_console_output()在哪里实现都是可以的,我是在自己编写的drv_usart.c文件中实现的,程序如下所示:
#ifdef RT_USING_CONSOLE
void rt_hw_console_output( const char *str )
{

    /* 进入临界段 */
    rt_enter_critical();
    /* 直到字符串结束 */
	while ( *str != '\0' )
	{
		// 换行
		if ( *str == '\n')
		{
			USART_SendData(DEBUG_USARTx, '\r');
			while(USART_GetFlagStatus(DEBUG_USARTx, USART_FLAG_TXE) == RESET);
		}

		USART_SendData(DEBUG_USARTx, *str++);
	  	while (USART_GetFlagStatus(DEBUG_USARTx, USART_FLAG_TXE) == RESET);
	}

    /* 退出临界段 */
    rt_exit_critical();
}

#endif
四、drv_usart.c文件
/***************************************
 * 文件名  :usart1.c
 * 描述    :配置USART1
 * 实验平台:MINI STM32开发板 基于STM32F103C8T6
 * 硬件连接:------------------------
 *          | PA9  - USART1(Tx)      |
 *          | PA10 - USART1(Rx)      |
 *           ------------------------


**********************************************************************************/

#include "drv_usart.h"
#include <stdarg.h>
#include "misc.h"
#include <stdio.h>
#include <rtthread.h>

#define  DEBUG_USARTx USART1


void USART1_Config(void)
{
	GPIO_InitTypeDef GPIO_InitStructure;
	USART_InitTypeDef USART_InitStructure;

	/* 使能 USART1 时钟*/
	RCC_APB2PeriphClockCmd(RCC_APB2Periph_USART1 | RCC_APB2Periph_GPIOA, ENABLE);

	/* USART1 使用IO端口配置 */
	GPIO_InitStructure.GPIO_Pin = GPIO_Pin_9;
	GPIO_InitStructure.GPIO_Mode = GPIO_Mode_AF_PP; //复用推挽输出
	GPIO_InitStructure.GPIO_Speed = GPIO_Speed_50MHz;
	GPIO_Init(GPIOA, &GPIO_InitStructure);

	GPIO_InitStructure.GPIO_Pin = GPIO_Pin_10;
	GPIO_InitStructure.GPIO_Mode = GPIO_Mode_IN_FLOATING;	//浮空输入
	GPIO_Init(GPIOA, &GPIO_InitStructure);   //初始化GPIOA

	/* USART1 工作模式配置 */
	USART_InitStructure.USART_BaudRate = 115200;	//波特率设置:115200
	USART_InitStructure.USART_WordLength = USART_WordLength_8b;	//数据位数设置:8位
	USART_InitStructure.USART_StopBits = USART_StopBits_1; 	//停止位设置:1位
	USART_InitStructure.USART_Parity = USART_Parity_No ;  //是否奇偶校验:无
	USART_InitStructure.USART_HardwareFlowControl = USART_HardwareFlowControl_None;	//硬件流控制模式设置:没有使能
	USART_InitStructure.USART_Mode = USART_Mode_Rx | USART_Mode_Tx;//接收与发送都使能

	USART_Init(USART1, &USART_InitStructure);  //初始化USART1
	USART_Cmd(USART1, ENABLE);// USART1使能

}

#ifdef RT_USING_CONSOLE
void rt_hw_console_output( const char *str )
{

    /* 进入临界段 */
    rt_enter_critical();
    /* 直到字符串结束 */
	while ( *str != '\0' )
	{
		// 换行
		if ( *str == '\n')
		{
			USART_SendData(DEBUG_USARTx, '\r');
			while(USART_GetFlagStatus(DEBUG_USARTx, USART_FLAG_TXE) == RESET);
		}

		USART_SendData(DEBUG_USARTx, *str++);
	  	while (USART_GetFlagStatus(DEBUG_USARTx, USART_FLAG_TXE) == RESET);
	}

    /* 退出临界段 */
    rt_exit_critical();
}

#endif
五、下载测试

六参考文献
重映射串口到 rt_kprintf 函数(学习笔记):https://blog.csdn.net/weixin_43772810/article/details/123652008
本文来自博客园,作者:浇筑菜鸟,转载请注明原文链接:https://www.cnblogs.com/jzcn/p/16348481.html
如本博客的内容侵犯了你的权益,请与以下地址联系,本人获知后,马上删除。同时本人深表歉意,并致以崇高的谢意! cn_jiaozhu@qq.com

 浙公网安备 33010602011771号