[micropython k210] 说说字库和字模的故事,然后在 MaixPy 里实现打印中文字体(任意字体)吧!
2020年8月28日 字模接口的逻辑代码支持到 32 * 32 了,更新的 commit 在此 https://github.com/sipeed/MaixPy/commit/a3a5d1a1975fa19265809d6b81d2ea02e91ce09f 。
关于下文中存在的任何名词和术语,如果不清楚不了解的自行到其他资料中学习得知,除了必要之外我都不会做出相关链接和解释。
背景
此事要从一些奇怪芯片的国产化进程上说起,总得来说,一款有不少屏幕支持的芯片在实现了基础功能后,中文字体的字库功能是始终逃不掉的事实,那么我们该如何看待这样的事实呢?
早在掌控版 esp32 的时期就已经在试图推行这些汉字的操作了,不得不说,这确实是有利于国内用户的需求。
尤其是在一些商业场合上,在中国做中国的生意,显示中文是多么的基本鸭。
刚好在 MaixPy 的代码里做完了这个功能,做得七七八八吧,不算完美,但也够大部分场合使用了。
那么要如何在一款屏幕上显示中文呢?
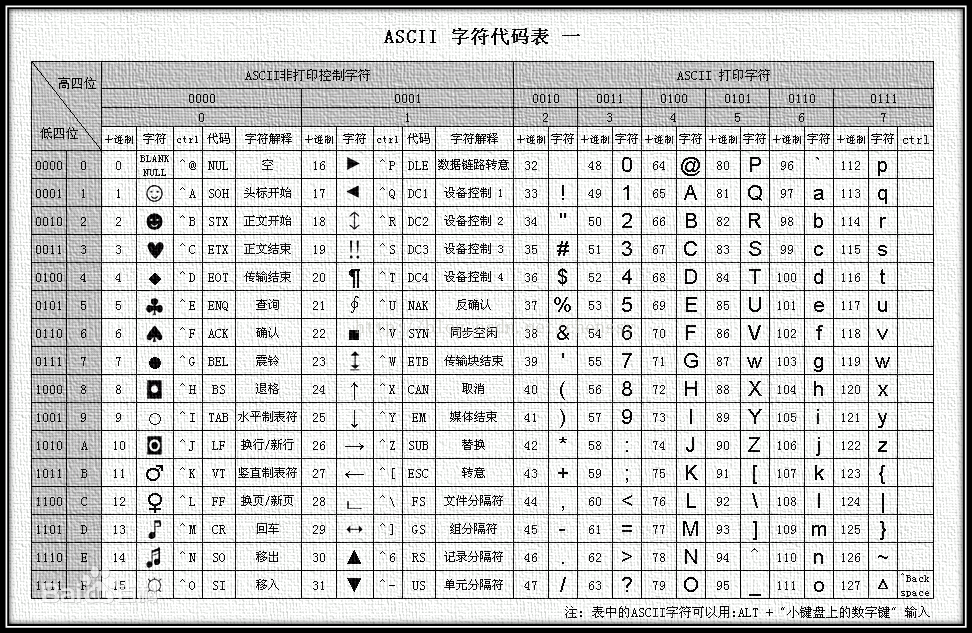
先说点历史进程的事情,最早计算机由美国发展兴起,所以当时设计出了 ASCII ((American Standard Code for Information Interchange): 美国信息交换标准代码),而这个事情应该是在美苏争霸争霸期间,当然我讲的这点故事和编码没关系,主要是当时的美国在航空业上输了苏联后就趁早开了新赛道走起了半导体路线,所以今天我们看到的很多计算机的定义和标准都是来源于美国国家标准学会,所以我们都知道 ASCII 编码表指是下面这张表。
很快计算机兴起了 ASCII 根本不够其他国家表示字符来使用,就在原来的 ASCII 基础上拓展出了 Unicode 万国码,所以说 Unicode 是兼容万国码的,它定义很简单,就两个字节的二进制数据继续拓展编码定义,所以在编码的开头里还是 ASCII 码。
至此 Unicode 够多了,2^16=65536 个编码的可能性,足够将大部分人类的文字涵盖其中,可随着 Web 的兴起 Unicode 码并不适合字符编码的传输,例如两个字节中,开头就为 '\0' 这就会导致 socket 传输的字符串还没开始传就结束了,为了克服这个问题,就引出了 utf-8 的编码设计,类似于上了一层 base64 编码便于传输,也就是后来 unicode 互转 utf-8 的原理,关于这个编码的发展历程可以多看一些知乎的故事。
其实讲到这些,多少都会有些片面,因为事物发展是多种可能性的,我们知道了这些事实,就有利于我们理解为什么会演变成今天这样,而非重新设计一套方案,开历史的倒车。
就像我曾经升级 base64 到 base128 的编码方式,然而我当时对自己的这个设计沾沾自喜,以为创造了新的编码算法,后来才知道,这个叫 base128 编码规则,所以咱们学习要全面,不要经验主义。
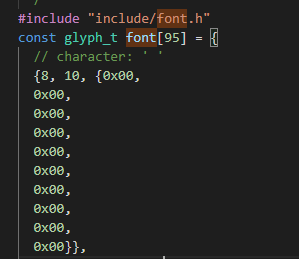
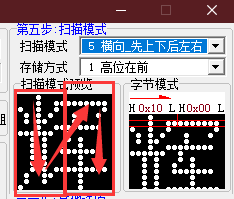
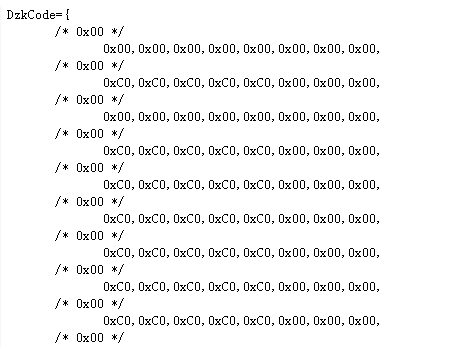
但到这些也只是指文字的编码,并不等于文字的显示内容,从这里开始就引出了字模的定义,字模就像下面这款软件产生的结果一样。
我们可以看到它实际上就是对屏幕的像素点依次打印出来,打印的方式可以称为扫描方式,如我所选的上下到左右,又或是其他,这个关于到字模的存储格式和显示方式,然后我们将这字体中一系列的文字导出来就变成了字库。
所以字库不一定具备兼容性的,相比 ttf 字体,这种字体的手段更为原始一些,因为它通过二进制数据控制打印的数据内容,将字模打印的逻辑也很简单,只需要依次判断所取的行或列的位数据是否存在为 1 即可,若是则打印该像素点。
关于字模的中文资料很多,我想也不是本文的重点了,这些基础的理论知识就留给好奇的你自行去查阅资料吧。
那么如何实现呢?在实现前的准备工作
我们是要在 MaixPy 的环境下实现该功能,在 MaixPy 中存在两类字模的 C 实现,一类为 lcd.draw_string ,另一类为 openmv 的 image.draw_string ,事实上 lcd 不应该参与绘图函数的功能,反而应该放弃这部分实现,转而到 image 的绘图后统一显示(lcd.display)到屏幕上。
但由于 openmv 的字体相当难看,我们若是想全部统一,则要提升 openmv 的字体效果。
关于 openmv 的 字模 定义 在这里。
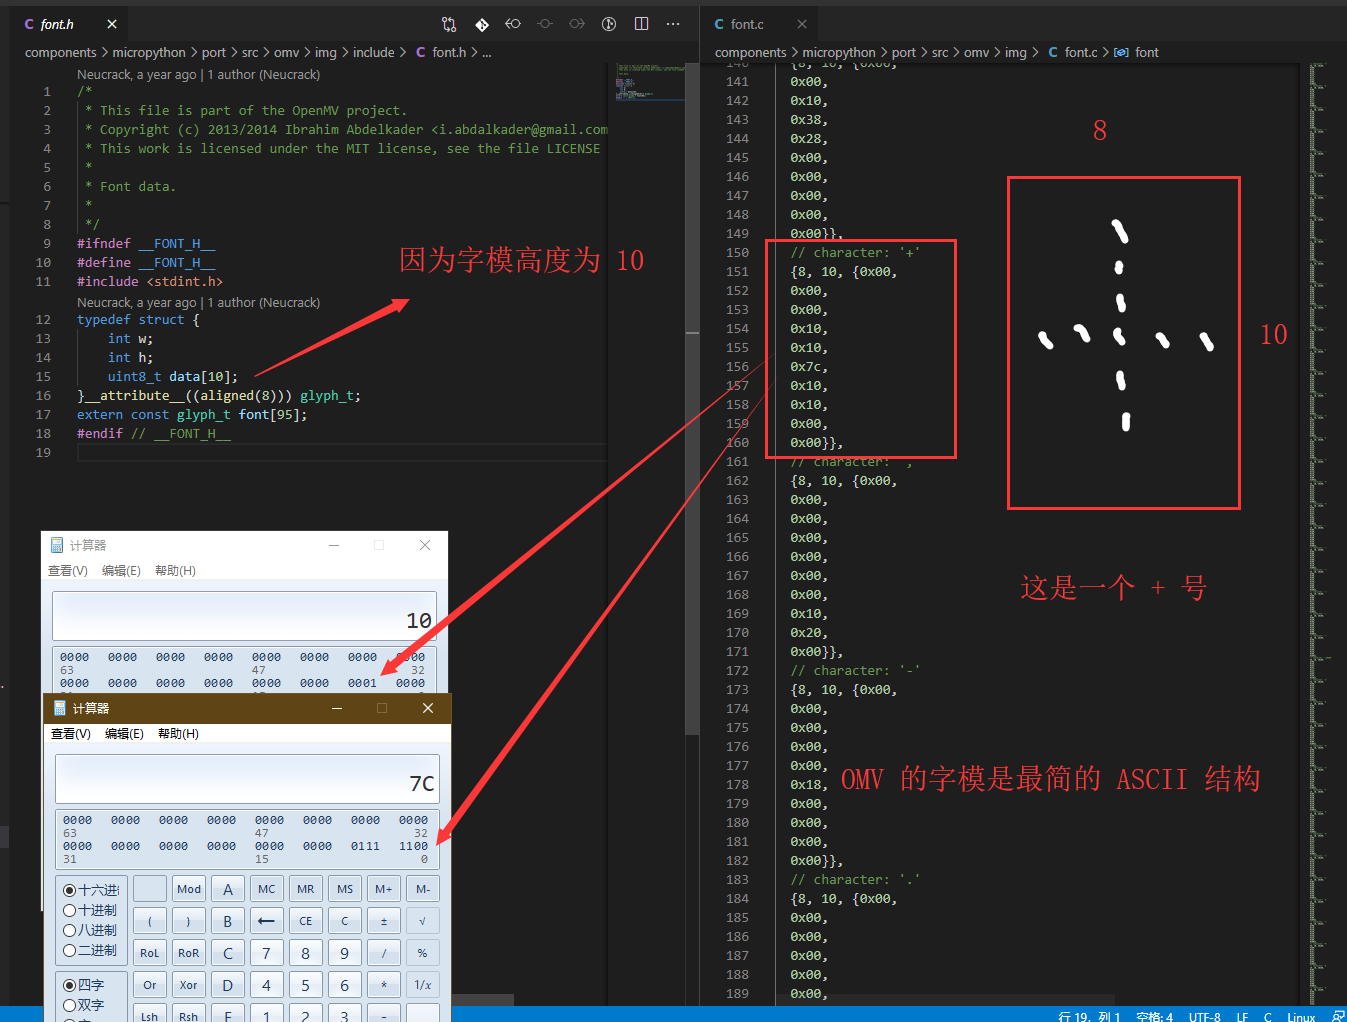
那么它是如何实现的呢?
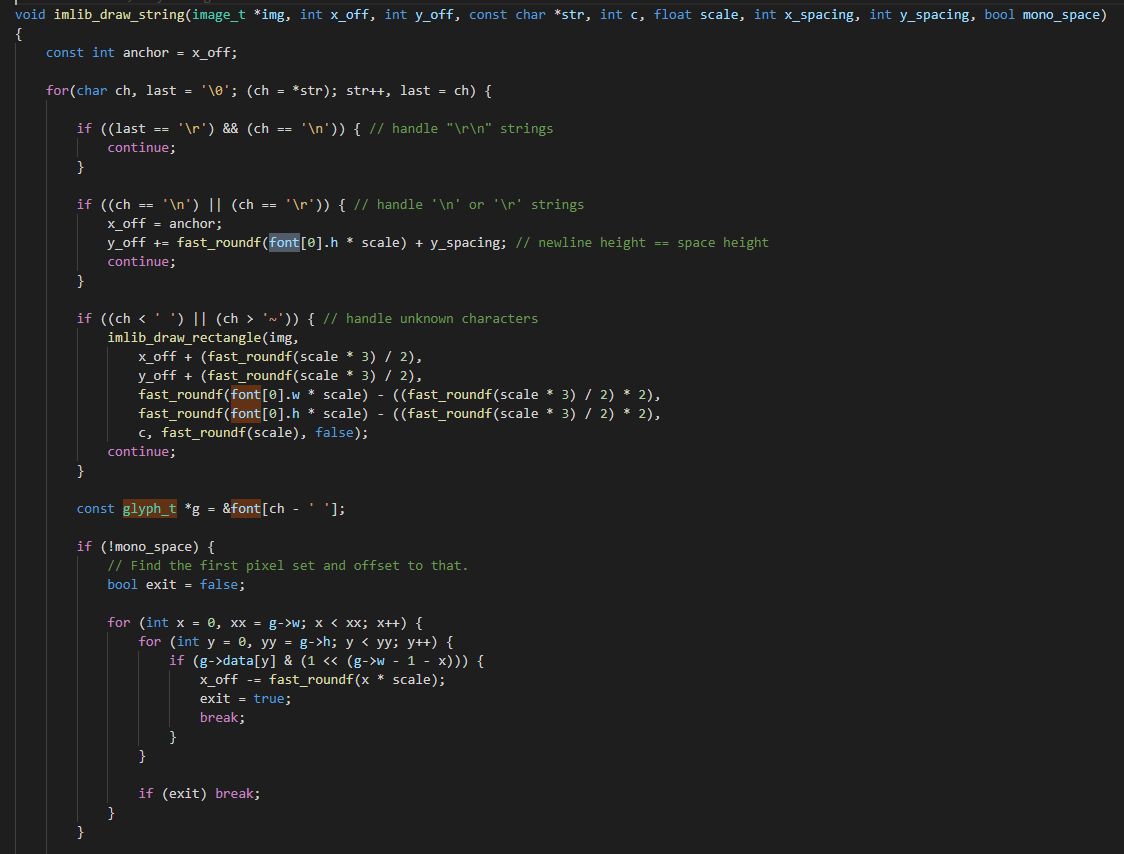
我们在 image 的 draw_string 处理过程中可以看到 const glyph_t *g = &font[ch - ' ']; 在和 ' ' 做差,这表示它只能兼容到 ASCII 的可视化字符 ' ' 部分,这样就能最大程度的压缩体积和保证基本功能。
但事实上这样的做法都暴露了一个问题,字体的定义方式浪费了空间,没有必要为此带入 宽度 和 高度 的变量存储,因为本身就没有解耦接口的实现,就算带入了也都是一堆重复的脏数据。
出现这样的代码都是说明 openmv 的开发者们在思考要不要做兼容,要不要预留字模的控制方法,但事实上这个存储结构和存储逻辑也有密切的关系,例如 8 位 和 16 位的字模在扫描方式上又要分离逻辑,并不能直接使用。
为复杂项目添加代码,应当保证实现的代码尽量都是最小化侵入架构,确保彼此功能独立。
这时候我们就要思考了,现成的代码很多很乱,如何让它们在敏捷开发的思路下被迭代掉,这个思路得提前确定好,为此先梳理一遍整体的逻辑。
想要打印中文字体 < 能够将画布显示到屏幕 < 能够将字模打印到画布上 < 能够从字库中获取字模 < 能够从存储介质中获取字库 < 最终用户能够通过 API 实现打印中文字体。
接下来将顺着这个流程依次实现各组件的功能,最后将其链接起来即可大功告成。
实现字模的打印
我们已经能够在 MaixPy 的基础上实现了将字模打印到画布上,并显示的功能,如下 Python 代码。
import lcd
import image
lcd.init()
img = image.Image(size=(240, 240))
img.draw_rectangle((0,0,240,240), fill=True, color=(150,150,150))
img.draw_string(60, 100, "hello maixpy", scale=4)
lcd.display(img)
我们不难看到 draw_string 就已经实现了该功能,它是如何实现的呢?看如下代码
STATIC mp_obj_t py_image_draw_string(size_t n_args, const mp_obj_t *args, mp_map_t *kw_args)
{
    image_t *arg_img = py_helper_arg_to_image_mutable(args[0]);

    const mp_obj_t *arg_vec;
    uint offset = py_helper_consume_array(n_args, args, 1, 3, &arg_vec);
    int arg_x_off = mp_obj_get_int(arg_vec[0]);
    int arg_y_off = mp_obj_get_int(arg_vec[1]);
    const char *arg_str = mp_obj_str_get_str(arg_vec[2]);

    int arg_c =
        py_helper_keyword_color(arg_img, n_args, args, offset + 0, kw_args, -1); // White.
    float arg_scale =
        py_helper_keyword_float(n_args, args, offset + 1, kw_args, MP_OBJ_NEW_QSTR(MP_QSTR_scale), 1.0);
    PY_ASSERT_TRUE_MSG(0 < arg_scale, "Error: 0 < scale!");
    int arg_x_spacing =
        py_helper_keyword_int(n_args, args, offset + 2, kw_args, MP_OBJ_NEW_QSTR(MP_QSTR_x_spacing), 0);
    int arg_y_spacing =
        py_helper_keyword_int(n_args, args, offset + 3, kw_args, MP_OBJ_NEW_QSTR(MP_QSTR_y_spacing), 0);
    bool arg_mono_space =
        py_helper_keyword_int(n_args, args, offset + 4, kw_args, MP_OBJ_NEW_QSTR(MP_QSTR_mono_space), true);

    imlib_draw_string(arg_img, arg_x_off, arg_y_off, arg_str,
                      arg_c, arg_scale, arg_x_spacing, arg_y_spacing,
                      arg_mono_space);
    return args[0];
}
STATIC MP_DEFINE_CONST_FUN_OBJ_KW(py_image_draw_string_obj, 2, py_image_draw_string);

void imlib_draw_string(image_t *img, int x_off, int y_off, const char *str, int c, float scale, int x_spacing, int y_spacing, bool mono_space)
{
    const int anchor = x_off;

    for(char ch, last = '\0'; (ch = *str); str++, last = ch) {

        if ((last == '\r') && (ch == '\n')) { // handle "\r\n" strings
            continue;
        }

        if ((ch == '\n') || (ch == '\r')) { // handle '\n' or '\r' strings
            x_off = anchor;
            y_off += fast_roundf(font[0].h * scale) + y_spacing; // newline height == space height
            continue;
        }

        if ((ch < ' ') || (ch > '~')) { // handle unknown characters
            imlib_draw_rectangle(img,
                x_off + (fast_roundf(scale * 3) / 2),
                y_off + (fast_roundf(scale * 3) / 2),
                fast_roundf(font[0].w * scale) - ((fast_roundf(scale * 3) / 2) * 2),
                fast_roundf(font[0].h * scale) - ((fast_roundf(scale * 3) / 2) * 2),
                c, fast_roundf(scale), false);
            continue;
        }

        const glyph_t *g = &font[ch - ' '];

        if (!mono_space) {
            // Find the first pixel set and offset to that.
            bool exit = false;

            for (int x = 0, xx = g->w; x < xx; x++) {
                for (int y = 0, yy = g->h; y < yy; y++) {
                    if (g->data[y] & (1 << (g->w - 1 - x))) {
                        x_off -= fast_roundf(x * scale);
                        exit = true;
                        break;
                    }
                }

                if (exit) break;
            }
        }

        for (int y = 0, yy = fast_roundf(g->h * scale); y < yy; y++) {
            for (int x = 0, xx = fast_roundf(g->w * scale); x < xx; x++) {
                if (g->data[fast_roundf(y / scale)] & (1 << (g->w - 1 - fast_roundf(x / scale)))) {
                    imlib_set_pixel(img, (x_off + x), (y_off + y), c);
                }
            }
        }

        if (mono_space) {
            x_off += fast_roundf(g->w * scale) + x_spacing;
        } else {
            // Find the last pixel set and offset to that.
            bool exit = false;

            for (int x = g->w - 1; x >= 0; x--) {
                for (int y = g->h - 1; y >= 0; y--) {
                    if (g->data[y] & (1 << (g->w - 1 - x))) {
                        x_off += fast_roundf((x + 2) * scale) + x_spacing;
                        exit = true;
                        break;
                    }
                }

                if (exit) break;
            }

            if (!exit) x_off += fast_roundf(scale * 3); // space char
        }
    }
}
从逻辑上来说,它过度封装了 string 到 font 的过程,将其逻辑融合在一起,事实上 string 的处理应当和 font 的处理分离成两个函数,为此我将其解耦成一个新的 imlib_draw_font ,并公开接口。
void imlib_draw_font(image_t *img, int x_off, int y_off, uint8_t font_h, uint8_t font_w, const uint8_t *font, int c, float scale, int x_spacing, int y_spacing, bool mono_space)
{
    const int anchor = x_off;

    if (!mono_space) {
        // Find the first pixel set and offset to that.
        bool exit = false;

        for (int x = 0, xx = font_w; x < xx; x++) {
            for (int y = 0, yy = font_h; y < yy; y++) {
                if (font[y] & (1 << (font_w - 1 - x))) {
                    x_off -= fast_roundf(x * scale);
                    exit = true;
                    break;
                }
            }

            if (exit) break;
        }
    }

    for (int y = 0, yy = fast_roundf(font_h * scale); y < yy; y++) {
        uint8_t pos = fast_roundf(y / scale);
        uint16_t tmp = font[pos];
        if (8 < font_w && font_w <= 16) {
            tmp <<= 8, tmp |= font[pos + font_h]; // font ↑ ↓ ← →
        }
        for (int x = 0, xx = fast_roundf(font_w * scale); x < xx; x++) {
            if (tmp & (1 << (font_w - 1 - fast_roundf(x / scale)))) {
                imlib_set_pixel(img, (x_off + x), (y_off + y), c);
            }
        }
    }

    if (mono_space) {
        x_off += fast_roundf(font_w * scale) + x_spacing;
    } else {
        // Find the last pixel set and offset to that.
        bool exit = false;

        for (int x = font_w - 1; x >= 0; x--) {
            for (int y = font_h - 1; y >= 0; y--) {
                if (font[y] & (1 << (font_w - 1 - x))) {
                    x_off += fast_roundf((x + 2) * scale) + x_spacing;
                    exit = true;
                    break;
                }
            }

            if (exit) break;
        }

        if (!exit) x_off += fast_roundf(scale * 3); // space char
    }
}

STATIC mp_obj_t py_image_draw_font(size_t n_args, const mp_obj_t *args, mp_map_t *kw_args)
{
    image_t *arg_img = py_helper_arg_to_image_mutable(args[0]);

    const mp_obj_t *arg_vec;
    uint offset = py_helper_consume_array(n_args, args, 1, 5, &arg_vec);
    int arg_x_off = mp_obj_get_int(arg_vec[0]);
    int arg_y_off = mp_obj_get_int(arg_vec[1]);
    int arg_w_font = mp_obj_get_int(arg_vec[2]);
    int arg_h_font = mp_obj_get_int(arg_vec[3]);
    const uint8_t *arg_font = mp_obj_str_get_str(arg_vec[4]);

    mp_int_t font_len = mp_obj_get_int(mp_obj_len(arg_vec[4]));

    PY_ASSERT_TRUE_MSG(arg_w_font % 8 == 0 && arg_w_font <= 16, "Error: font arg_w_font %% 8 == 0 && arg_w_font <= 16!");

    PY_ASSERT_TRUE_MSG((arg_w_font / 8) * arg_h_font == font_len, "Error: font (arg_w_font / 8) * arg_h_font == font_len!");

    int arg_c =
        py_helper_keyword_color(arg_img, n_args, args, offset + 0, kw_args, -1); // White.
    float arg_scale =
        py_helper_keyword_float(n_args, args, offset + 1, kw_args, MP_OBJ_NEW_QSTR(MP_QSTR_scale), 1.0);
    PY_ASSERT_TRUE_MSG(0 < arg_scale, "Error: 0 < scale!");
    int arg_x_spacing =
        py_helper_keyword_int(n_args, args, offset + 2, kw_args, MP_OBJ_NEW_QSTR(MP_QSTR_x_spacing), 0);
    int arg_y_spacing =
        py_helper_keyword_int(n_args, args, offset + 3, kw_args, MP_OBJ_NEW_QSTR(MP_QSTR_y_spacing), 0);
    bool arg_mono_space =
        py_helper_keyword_int(n_args, args, offset + 4, kw_args, MP_OBJ_NEW_QSTR(MP_QSTR_mono_space), true);

    imlib_draw_font(arg_img, arg_x_off, arg_y_off, arg_h_font, arg_w_font, arg_font,
                      arg_c, arg_scale, arg_x_spacing, arg_y_spacing,
                      arg_mono_space);
    return args[0];
}
STATIC MP_DEFINE_CONST_FUN_OBJ_KW(py_image_draw_font_obj, 2, py_image_draw_font);
使用的 python 代码如下:
# 8 * 8

tmp = b'\x20\xFC\xFC\x2C\xAC\x4C\x4D\xA3'

img.draw_font(10, 20, 8, 8, tmp, scale=1, color=(0,0,0))
img.draw_font(60, 15, 8, 8, tmp, scale=2, color=(255,0,0))
img.draw_font(110, 10, 8, 8, tmp, scale=3, color=(0,255,0))

img.draw_font(150, 10, 16, 8, b'\x00\x00\x00\x00\x7F\x01\x01\xFF\x00\x00\x00\x78\x80\x00\x04\xFE', scale=2, color=(0,0,255))

img.draw_font(200, 10, 8, 16, b'\x00\x00\x00\x00\x7F\x01\x01\xFF\x01\x01\x01\x01\x01\x01\x01\x01', scale=2, color=(0,0,255))

img.draw_font(200, 10, 8, 10, b'\x01\x02\x04\x08\x10\x20\x40\x80\x01\x02', scale=4, color=(0,0,255))

# 16 * 16

qian = b'\x00\x00\x00\x00\x7F\x01\x01\xFF\x01\x01\x01\x01\x01\x01\x01\x01\x00\x00\x00\x78\x80\x00\x04\xFE\x00\x00\x00\x00\x00\x00\x00\x00'

img.draw_font(10, 50, 16, 16, qian, scale=1, color=(0,0,0))
img.draw_font(10, 100, 16, 16, qian, scale=2, color=(0,0,0))
img.draw_font(10, 150, 16, 16, qian, scale=3, color=(0,0,0))

li = b'\x00\x00\x00\x1F\x11\x11\x1F\x11\x1F\x11\x01\x01\x3F\x01\x01\xFF\x00\x00\x08\xF8\x08\x08\xF8\x08\xF8\x08\x00\x08\xFC\x00\x00\xFE'

img.draw_font(60, 50, 16, 16, li, scale=1, color=(255,0,0))
img.draw_font(60, 100, 16, 16, li, scale=2, color=(255,0,0))
img.draw_font(60, 150, 16, 16, li, scale=3, color=(255,0,0))

zhi = b'\x00\x00\x02\x01\x01\x7F\x00\x00\x00\x00\x01\x06\x08\x30\x4C\x03\x00\x00\x00\x00\x08\xFC\x10\x20\x40\x80\x00\x00\x00\x00\x00\xFE'

img.draw_font(120, 50, 16, 16, zhi, scale=1, color=(0,255,0))
img.draw_font(120, 100, 16, 16, zhi, scale=2, color=(0,255,0))
img.draw_font(120, 150, 16, 16, zhi, scale=3, color=(0,255,0))

wai = b'\x00\x00\x04\x08\x08\x0F\x11\x11\x29\x26\x42\x04\x04\x08\x10\x20\x00\x00\x20\x20\x20\xA0\x20\x38\x24\x22\x20\x20\x20\x20\x20\x20'

img.draw_font(180, 50, 16, 16, wai, scale=1, color=(0,0,255))
img.draw_font(180, 100, 16, 16, wai, scale=2, color=(0,0,255))
img.draw_font(180, 150, 16, 16, wai, scale=3, color=(0,0,255))

lcd.display(img)
实现的效果图如下:

这实际上就是开放了一个打印字模的接口,但很遗憾的是,为了照顾旧字模,我指定了扫描方向为 先上下 后左右 ,这表示它的工作方式就是下图所示。
但这个区别只存在于 大于 8 位后的字模存储方式,对比逻辑可以看到我后来设计的过程中,改变字模的到 uint16_t 的结构去方便判断是否打印行像素,暂不支持大于 16 位宽度的字模的处理喔(我没写)。
这在旧代码上是属于兼容实现,不会破坏原有的功能,也更契合 openmv 的架构。
它带来的好处就是方便调试字模的效果,但也舍弃了原本对 string 字符串的处理过程,关于这个我会在之后进行弥补,它涉及到其他编码字符串的处理问题,draw_string 是无法适应的。
与传统的烧写字模数组来提取调用相比,用 Python 接口导入数据可以更快的确认效果,同时也方便调试功能,主体逻辑不变,剩下的只是调参,当然,参数多调几次就出来了,也不碍事。
而这些功能,本来就可以在 C 层面实现,问题只在于,能否 调试接口 和 开发接口 共存,这也是 micropython 模块设计的理念了。
实现字库的索引
关于这个问题,在实现打印字模后就要考虑的问题,我们不可能全部都在 draw_font 接口下人工的输入字模来打印字体吧。
所以用户输入的一定是可视化的中文字符,如下图的内容。

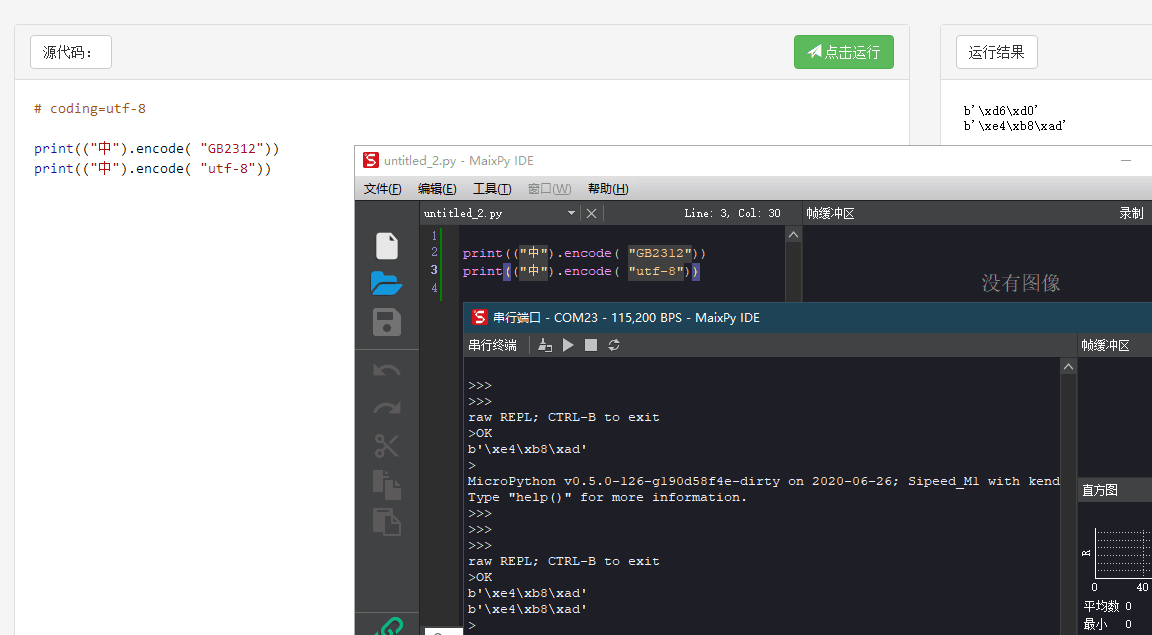
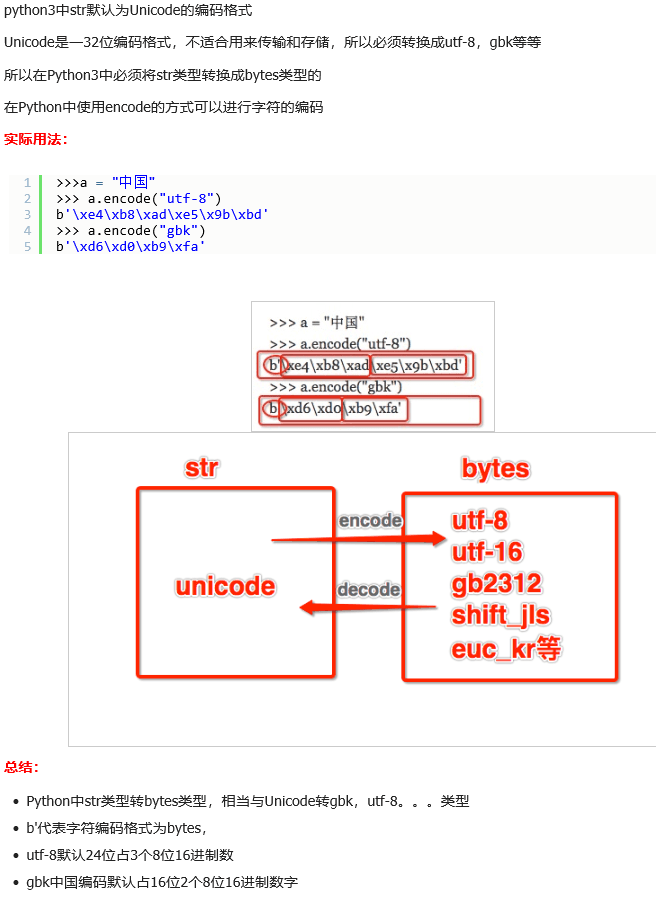
通常来说呢,在 Python3 中,是在 str 中实现了 unicode 的转换,也就是说到了 str 里,都是 unicode 编码,而 micropython 说是支持 python3.5 ,实际上并没有实现 Unicode 的转换,这个做个简单的代码实现就知道了。
本来讲道理应该是下图这个理论的。
而实际上 micropython 的外部输入什么,内部的内容就是什么,并不会做转换,因为代码里根本没有实现编码的转换,不过可以开一个 utf-8 的 check 来帮助屏蔽不合法编码。
那怎么办呢?
没有就创造出来呗。
通常用户使用 IDE 向 micropython 传递的字符多为 utf-8 ,而为什么是 utf-8 前面已经提及了传输过程中可能在 unicode 头部出现的 '\0' 终止写入,事实上你用 base64 包装一下也是可以的,但谁会没事给自己的找麻烦呢?
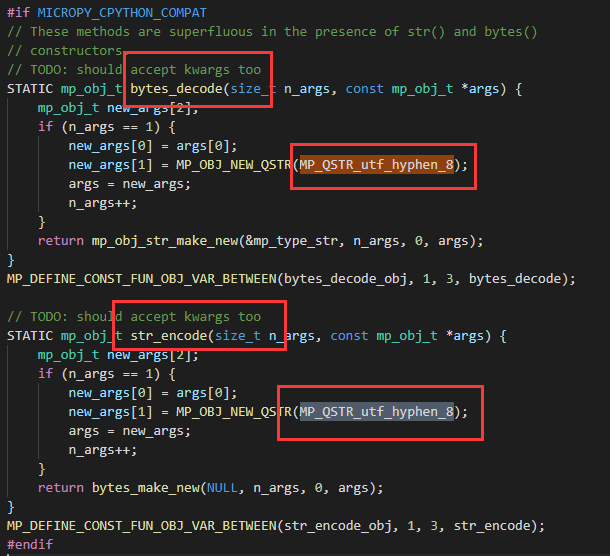
所以我们上图的测试可以得知编辑器输入的中文就是 UTF-8 编码,如果我们想要使用 Unicode 索引的字库,则我们需要将 UTF-8 解码回 Unicode 编码,而这个由于是 Python 的标准实现,所以只能从 C 代码里抄逻辑回来了(摊手)。
只是 cpython 实现的 utf-8 与 Unicode 太完整了,有点难抄啊.....(主要是 Python 类型牵扯太多变量,不想抄了)
所以随便找了份 C 代码来转到 Python 实现了。
def encode_get_utf8_size(utf):
    if utf < 0x80:
        return 1
    if utf >= 0x80 and utf < 0xC0:
        return -1
    if utf >= 0xC0 and utf < 0xE0:
        return 2
    if utf >= 0xE0 and utf < 0xF0:
        return 3
    if utf >= 0xF0 and utf < 0xF8:
        return 4
    if utf >= 0xF8 and utf < 0xFC:
        return 5
    if utf >= 0xFC:
        return 6

def encode_utf8_to_unicode(utf8):
    utfbytes = encode_get_utf8_size(utf8[0])
    if utfbytes == 1:
        unic = utf8[0]
    if utfbytes == 2:
        b1 = utf8[0]
        b2 = utf8[1]
        if ((b2 & 0xE0) != 0x80):
            return -1
        unic = ((((b1 << 6) + (b2 & 0x3F)) & 0xFF) << 8) | (((b1 >> 2) & 0x07) & 0xFF)
    if utfbytes == 3:
        b1 = utf8[0]
        b2 = utf8[1]
        b3 = utf8[2]
        if (((b2 & 0xC0) != 0x80) or ((b3 & 0xC0) != 0x80)):
            return -1
        unic = ((((b1 << 4) + ((b2 >> 2) & 0x0F)) & 0xFF) << 8) | (((b2 << 6) + (b3 & 0x3F)) & 0xFF)

    if utfbytes == 4:
        b1 = utf8[0]
        b2 = utf8[1]
        b3 = utf8[2]
        b4 = utf8[3]
        if (((b2 & 0xC0) != 0x80) or ((b3 & 0xC0) != 0x80) or ((b4 & 0xC0) != 0x80)):
            return -1
        unic = ((((b3 << 6) + (b4 & 0x3F)) & 0xFF) << 16) | ((((b2 << 4) + ((b3 >> 2)
                                                                  & 0x0F)) & 0xFF) << 8) | ((((b1 << 2) & 0x1C) + ((b2 >> 4) & 0x03)) & 0xFF)
    if utfbytes == 5:
        b1 = utf8[0]
        b2 = utf8[1]
        b3 = utf8[2]
        b4 = utf8[3]
        b5 = utf8[4]
        if (((b2 & 0xC0) != 0x80) or ((b3 & 0xC0) != 0x80) or ((b4 & 0xC0) != 0x80) or ((b5 & 0xC0) != 0x80)):
            return -1
        unic = ((((b4 << 6) + (b5 & 0x3F)) & 0xFF) << 24) | (((b3 << 4) + ((b4 >> 2) & 0x0F) & 0xFF) << 16) | ((((b2 << 2) + ((b3 >> 4) & 0x03)) & 0xFF) << 8) | (((b1 << 6)) & 0xFF)
    if utfbytes == 6:
        b1 = utf8[0]
        b2 = utf8[1]
        b3 = utf8[2]
        b4 = utf8[3]
        b5 = utf8[4]
        b6 = utf8[5]

        if (((b2 & 0xC0) != 0x80) or ((b3 & 0xC0) != 0x80) or ((b4 & 0xC0) != 0x80) or ((b5 & 0xC0) != 0x80) or ((b6 & 0xC0) != 0x80)):
            return -1

        unic = ((((b5 << 6) + (b6 & 0x3F)) << 24) & 0xFF) | (((b5 << 4) + ((b6 >> 2) & 0x0F) << 16) & 0xFF) | ((((b3 << 2) + ((b4 >> 4) & 0x03)) << 8) & 0xFF) | ((((b1 << 6) & 0x40) + (b2 & 0x3F)) & 0xFF)

    return unic
实际上只需要得到两个接口,判断当前的是不是 utf-8 编码,如果是则给我它的长度,将 utf-8 的字符串转换回 unicode 编码,常见于 1 字节英文和 3 字节中文的 UTF-8 编码还原回 2 字节的 unicode 编码。
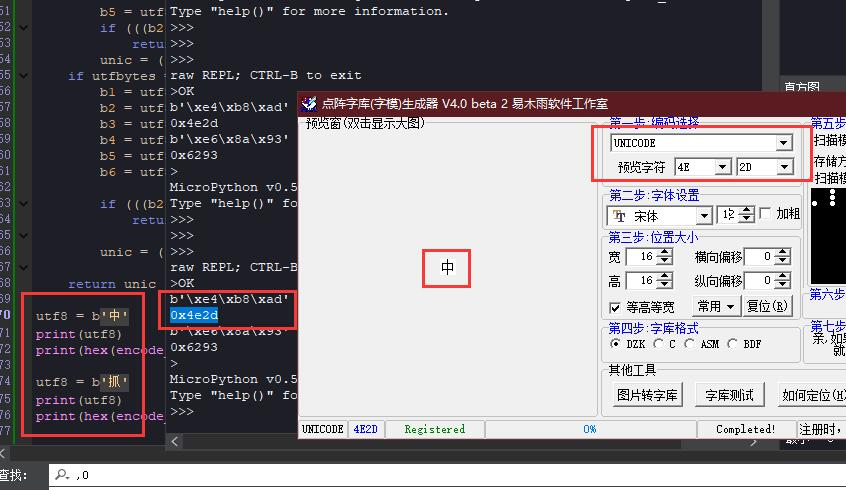
既然确认编码的转换代码可行,字库也可以通过软件导出了,那么现在就是确认一下索引规则了,如下图。
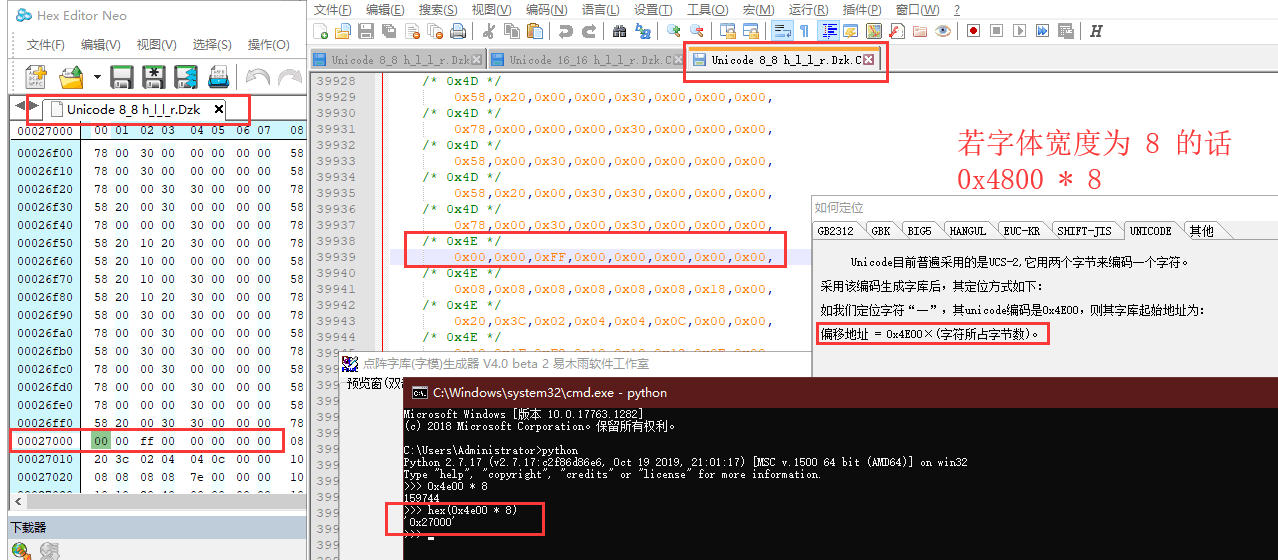
如果是 16*16 则它所占的字符数应为 int(high*(width/8)) ,也就是 32 字节。
如果是其他编码的字库呢?
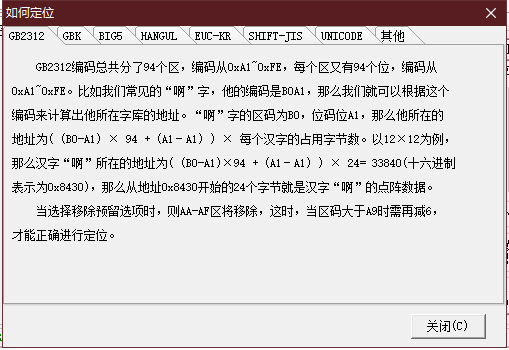
例如 GB2312 的话定位方式是这样的,这些都可以在字库软件中得到,它们的存储结构都是线性的,这也方便在制作字库芯片的时候,将其直接导入 flash 上。
至此我们已经解决了用户输入中文,且中文能够被转码到 unicode 后提取字库中的字模了,也就进一步到打印字模这个接口上了。
实现字库的加载
那么字库可以如何加载呢?
-
直接全部加载到内存上(存放于某个存储器中)?
-
通过文件指针 seek 提取字模?
显然第一个是最符合逻辑的思考,但由于 K210 的执行结构把整个 bin 程序都加载到内存运行,所以将其数组编译进 bin 和加载到内存中的效果是一样的,并不会因此而减少内存的占用。
所以就会导致加载过多的内存了,那前者方案只能加载预置的小字体了,综合考虑来说是这样了,所以我在 Python 层面上实现了 seek 的逻辑。
最终整合所有功能
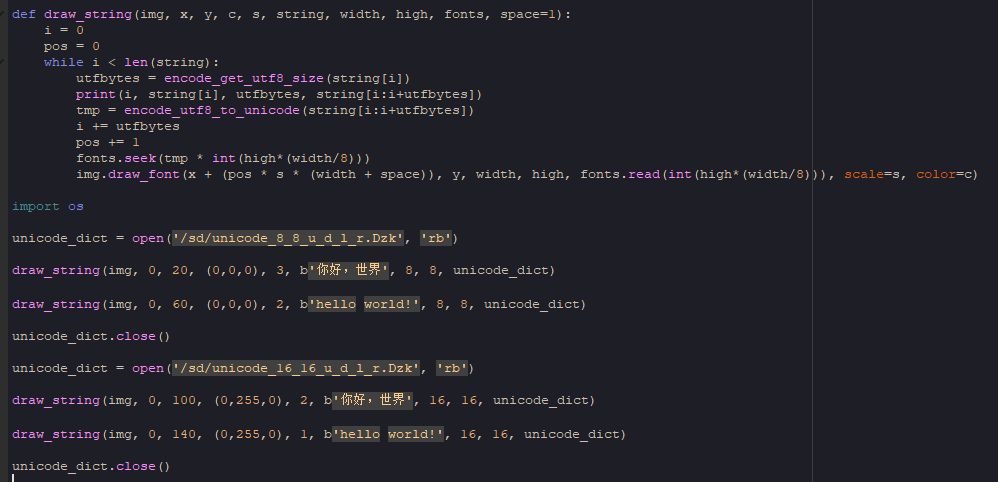
最终的效果如下:

这图就是同时载入了不同规格的字库,提取不同编码的字模,如 8*8 、16*16 的共用 和 b'你好,世界' 的 b'hello world!' 字符串打印,顺便贴 Python 代码,对用户来说,麻烦一些的地方可能就在传入字库这个地方上了吧。
import lcd, time
import image

lcd.init(freq=15000000)

img = image.Image(size=(240, 240))
img.draw_rectangle((0,0,240,240), fill=True, color=(150,150,150))

def draw_string(img, x, y, c, s, string, width, high, fonts, space=1):
    i = 0
    pos = 0
    while i < len(string):
        utfbytes = encode_get_utf8_size(string[i])
        print(i, string[i], utfbytes, string[i:i+utfbytes])
        tmp = encode_utf8_to_unicode(string[i:i+utfbytes])
        i += utfbytes
        pos += 1
        fonts.seek(tmp * int(high*(width/8)))
        img.draw_font(x + (pos * s * (width + space)), y, width, high, fonts.read(int(high*(width/8))), scale=s, color=c)

import os

unicode_dict = open('/sd/unicode_8_8_u_d_l_r.Dzk', 'rb')

draw_string(img, 0, 20, (0,0,0), 3, b'你好,世界', 8, 8, unicode_dict)

draw_string(img, 0, 60, (0,0,0), 2, b'hello world!', 8, 8, unicode_dict)

unicode_dict.close()

unicode_dict = open('/sd/unicode_16_16_u_d_l_r.Dzk', 'rb')

draw_string(img, 0, 100, (0,255,0), 2, b'你好,世界', 16, 16, unicode_dict)

draw_string(img, 0, 140, (0,255,0), 1, b'hello world!', 16, 16, unicode_dict)

unicode_dict.close()

lcd.display(img)
有兴趣的可以自己琢磨 我提供的 draw_string 的 Python 实现,以及 draw_font 的 C 实现,这里面就是我主要写的代码内容了,理解设计后就是理解细节,有心想学的话,是可以拎出来理解的,毕竟理解别人写的代码本身就是一件痛苦的事情。
但这种事情,也只是最初痛苦,久了就成习惯了,也就不痛苦了,你说呢?
后记
关于一些设计上的问题待考虑,主要的问题是,从逻辑上来看,大体是不会有什么改变了,无论是加载完整字模还是小字库都是同一套逻辑,性能方面可能可以从 Python 转 C 编译下手,这样就可以减少 Python 解释的开销,尤其是循环上。
所以应该要把一些功能丢回 C 实现,但由于要外部提供字库,对这个字库的数据源从 C 层面操作的话,可能会给 API 的说明带来一些困扰,例如要求 Python 提供一个字符串或者 file 的支持 StringIO 操作的类供内部使用,从而减少不必要的加载字模到内存的操作,重点在提供 seek 和 read 操作。
大概就这样吧?
junhuanchen 2020年6月27日

 浙公网安备 33010602011771号