【转】Setting up SDL 2 on Visual Studio 2019 Community
FROM: http://lazyfoo.net/tutorials/SDL/01_hello_SDL/windows/msvc2019/index.php
Setting up SDL 2 on Visual Studio 2019 Community
Last Updated 7/20/20
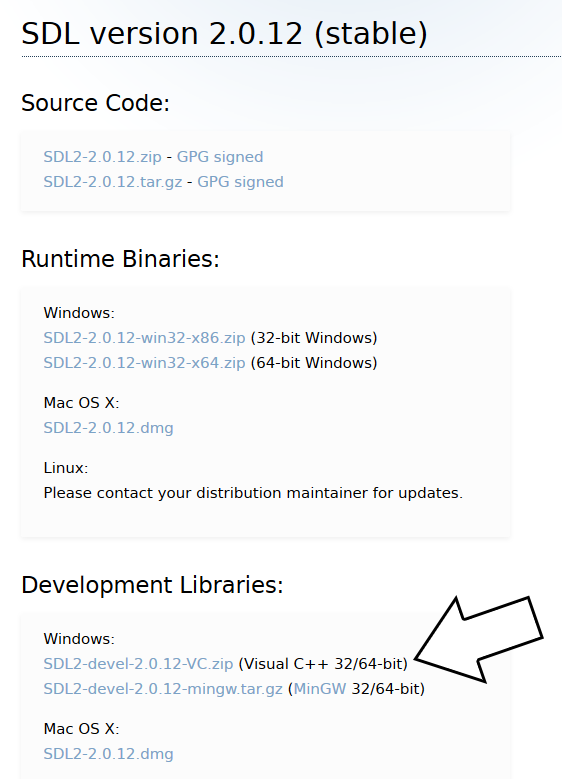
1)First thing you need to do is download SDL 2 headers and binaries. You will find them on the SDL website, specifically on this page.
You'll want to download the Visual C++ development libraries.
![]()
Open the zip archive and there should be a folder called SDL2-2.something.something. Copy the contents of the folder and put it anywhere you'd like. I recommend putting it in a folder that you dedicate to holding all your development libraries for Visual C++. For these tutorials I'm putting them in a directory I created called C:\vclib
2)Start up Visual Studio and create a new empty C++ project.
![]() Give your project/solution whatever name you'd like and place it where ever you'd like.
Give your project/solution whatever name you'd like and place it where ever you'd like.
3)Go download the source for lesson 01 and extract the source file. Right click on the source files folder in your solution, and then add the source file you downloaded.![]() 4)Now, if your default build setting is Debug x86, you may need to change it:
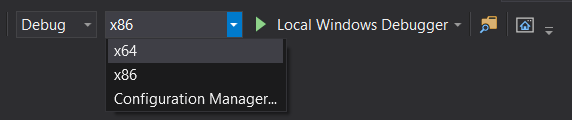
4)Now, if your default build setting is Debug x86, you may need to change it:
![]() For the rest of this tutorial, we will be assuming you are building for Debug x64 so make sure your configuation is set to Debug x64. Because libraries are different per configuation, you will need to add SDL to every configuation you plan on using. So if you want to build for Release x64 or Debug x86, you will need to add SDL2 to each configuation.
For the rest of this tutorial, we will be assuming you are building for Debug x64 so make sure your configuation is set to Debug x64. Because libraries are different per configuation, you will need to add SDL to every configuation you plan on using. So if you want to build for Release x64 or Debug x86, you will need to add SDL2 to each configuation.
5)Build your solution and you should get the following error:
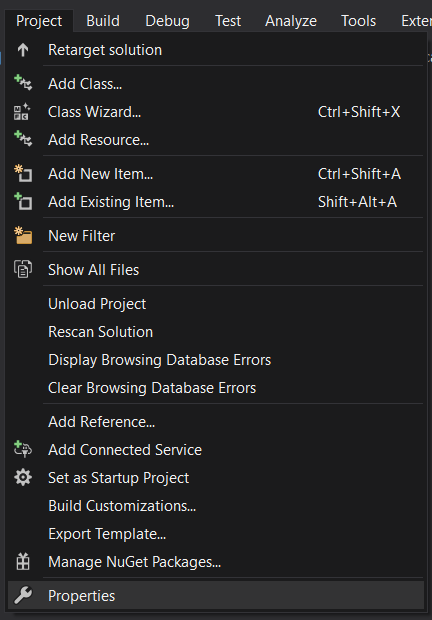
Go to project properties:![]()
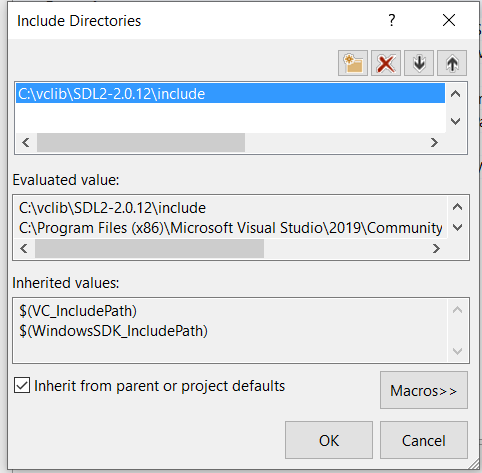
Go to Configuration Properties -> VC++ Directories -> Include Directories -> Edit.![]()
And then add the include directory from the SDL development folder we extracted.![]()
6)Try to build your solution again and you should get a bunch of errors including:![]()
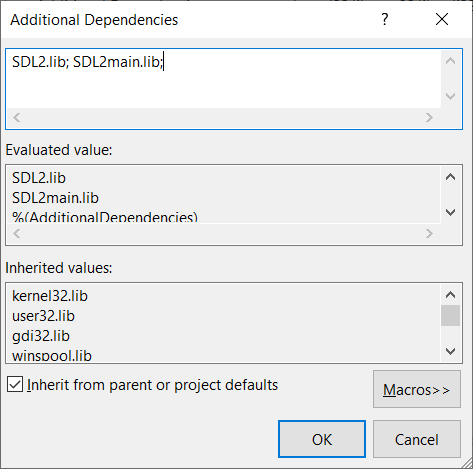
Now add![]()
7)Try to build your solution again and you should get a new error:![]()
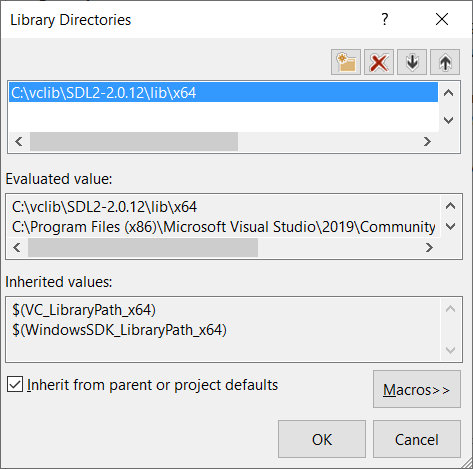
Make sure to add the library that matches your build configuation. If your building for x64, make sure to use the x64 library.![]()
8)Build and your application should build, but try to run it and you'll get this error:![]()
Click environment variables and under System Variables select Path and click Edit![]()
Then click new, then browse to add the lib directory for your build configuation:![]()
Restart Visual Studio so Visual C++ can get the updated path variable, start your program and it should run.
Now that you have SDL 2 compiling, it's time to go onto part 2 of the tutorial.
You'll want to download the Visual C++ development libraries.
Open the zip archive and there should be a folder called SDL2-2.something.something. Copy the contents of the folder and put it anywhere you'd like. I recommend putting it in a folder that you dedicate to holding all your development libraries for Visual C++. For these tutorials I'm putting them in a directory I created called C:\vclib
2)Start up Visual Studio and create a new empty C++ project.

3)Go download the source for lesson 01 and extract the source file. Right click on the source files folder in your solution, and then add the source file you downloaded.

5)Build your solution and you should get the following error:
Cannot open include file: 'SDL.h': No such file or directory
This means Visual C++ cannot find the SDL header files and you need to add the SDL include folder to the Visual C++ include directories.Go to project properties:
Go to Configuration Properties -> VC++ Directories -> Include Directories -> Edit.
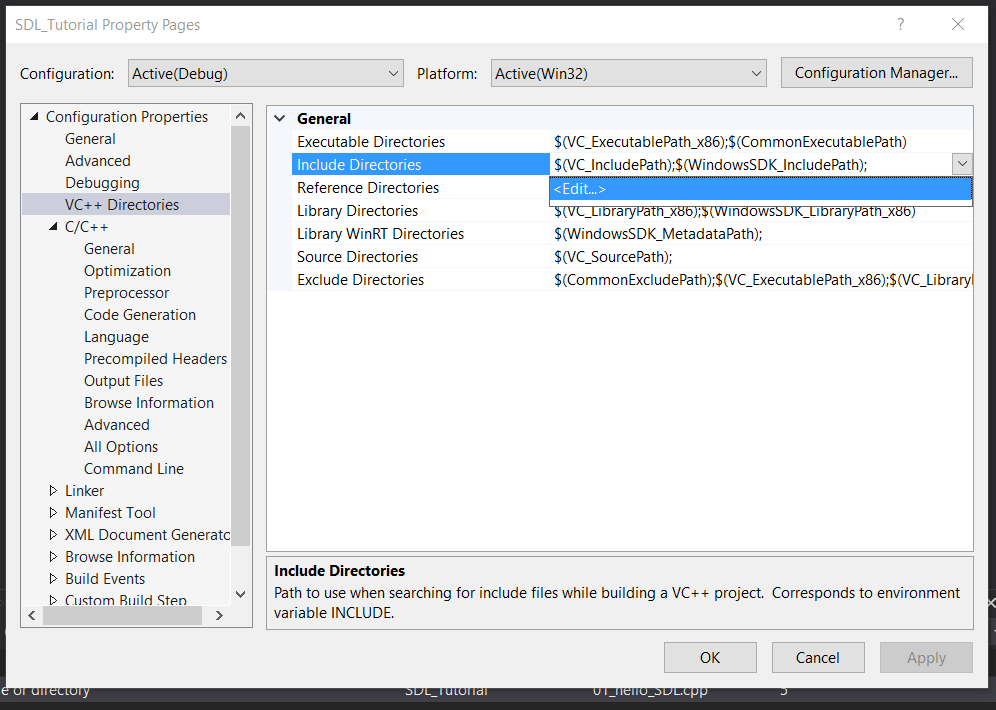
And then add the include directory from the SDL development folder we extracted.
6)Try to build your solution again and you should get a bunch of errors including:
unresolved external symbol SDL_GetError referenced in function SDL_main
The header file tells the compiler what the SDL functions are, not where to find them. The library file tells the compiler where they are and we need to tell it to use the SDL library file. Go to Configuration Properties -> Linker -> Additional Dependencies -> Edit.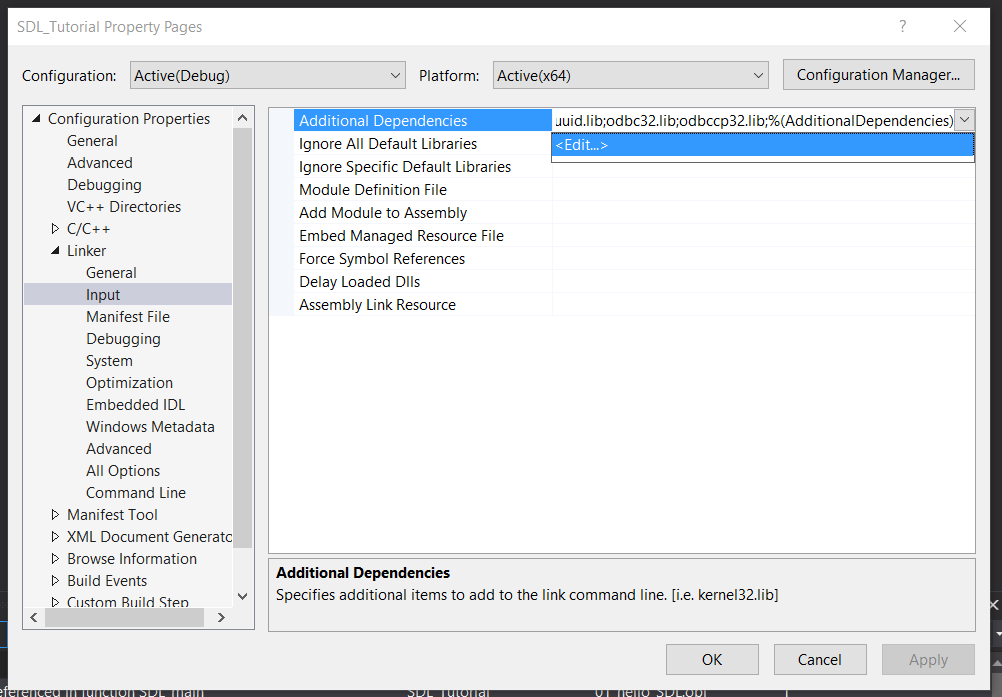
Now add
SDL2.lib; SDL2main.lib;
7)Try to build your solution again and you should get a new error:
cannot open file 'SDL2.lib'
While we did tell Visual C++ to use the SDL library files, we didn't tell it where to find it. Add the library directory like you did the include directory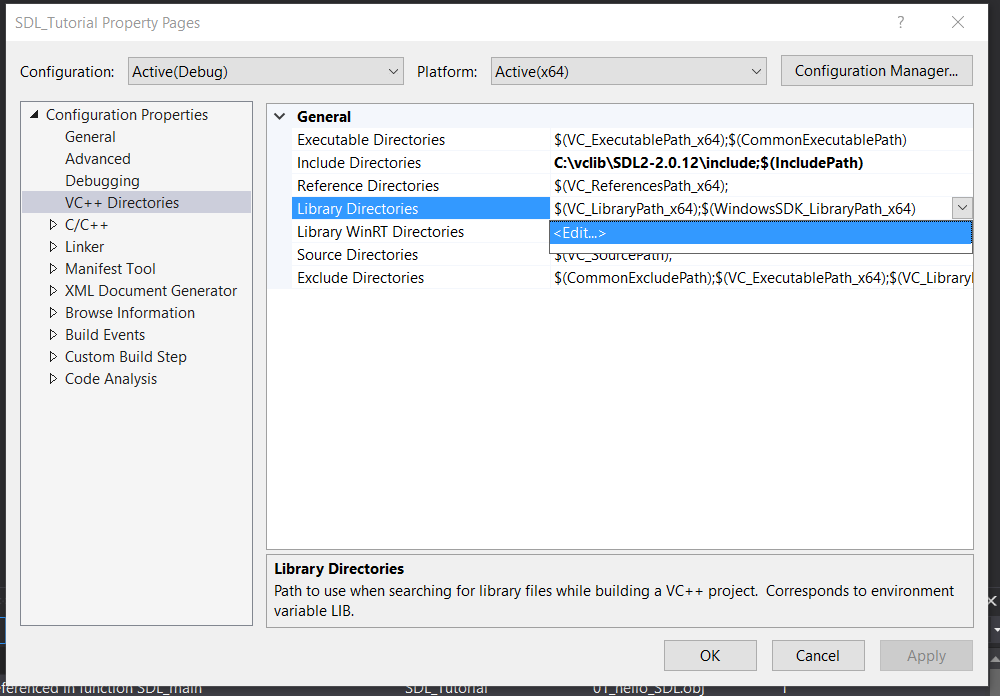
Make sure to add the library that matches your build configuation. If your building for x64, make sure to use the x64 library.
8)Build and your application should build, but try to run it and you'll get this error:
The code execution cannot proceed because SDL2.dll was not found.
This is because your application needs SDL2.dll to run but can't find it. Windows uses environment variables to define where to look for dll files. To edit the PATH environment variable, go into Windows Settings and search for edit the system environment variables: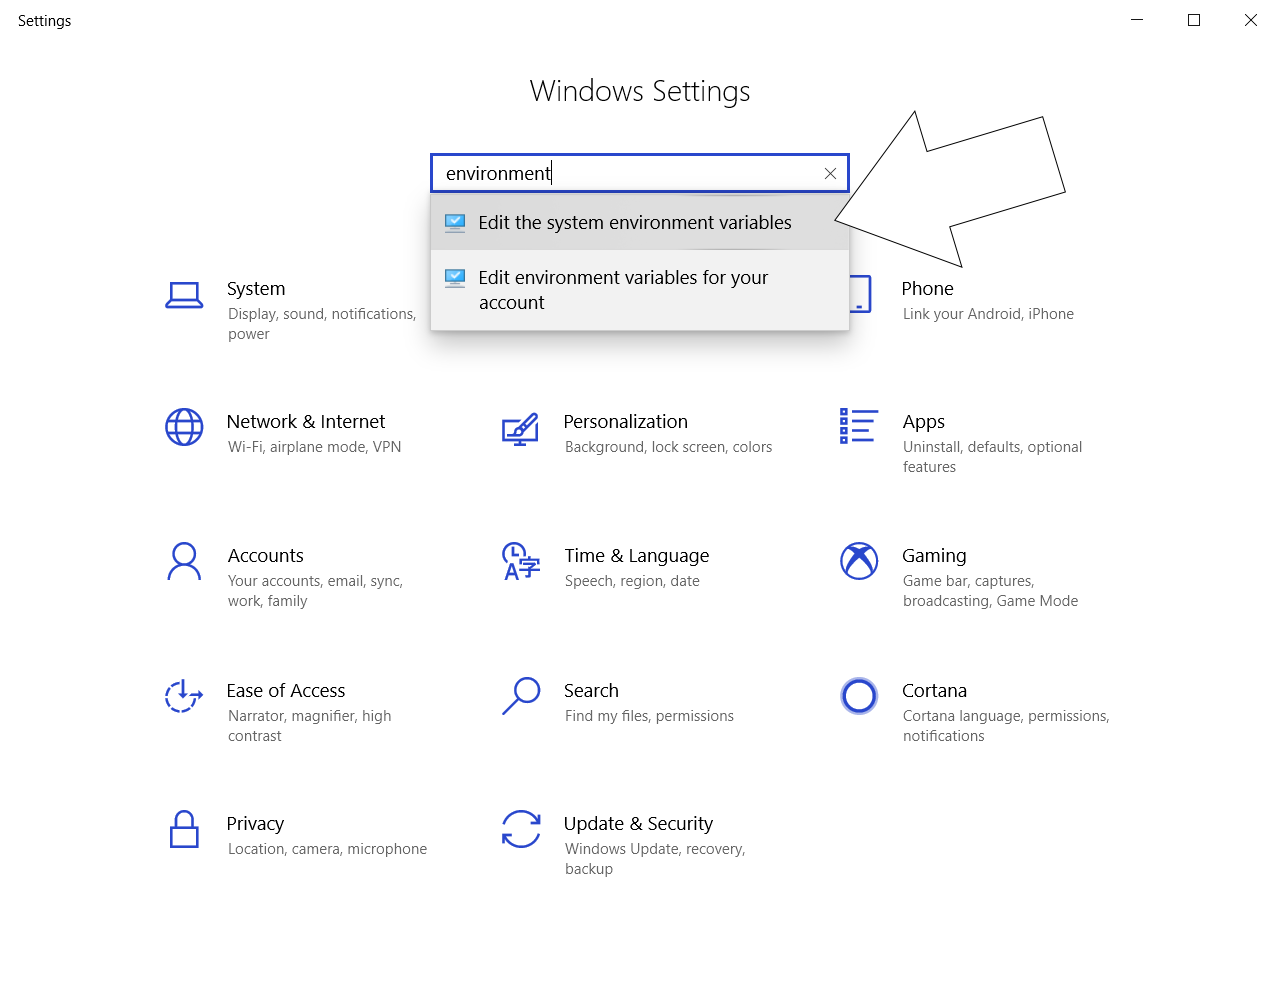
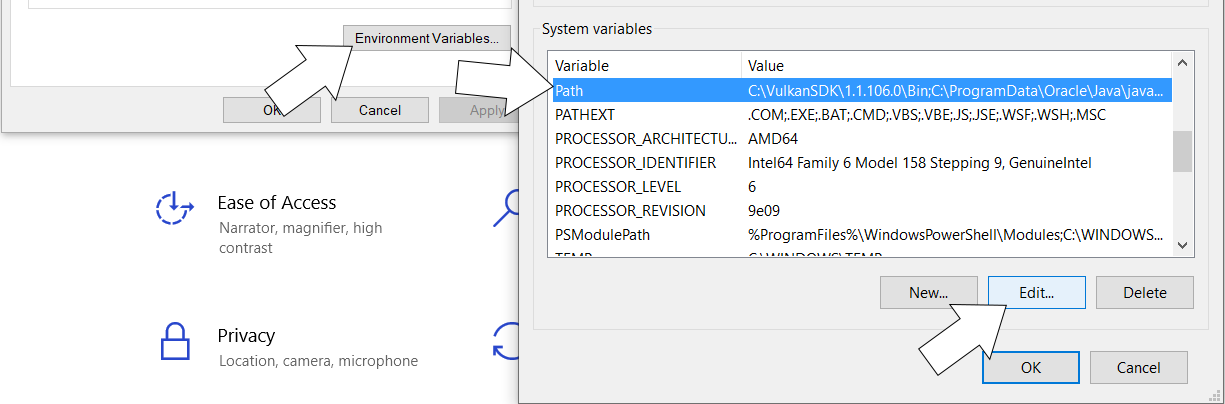
Click environment variables and under System Variables select Path and click Edit
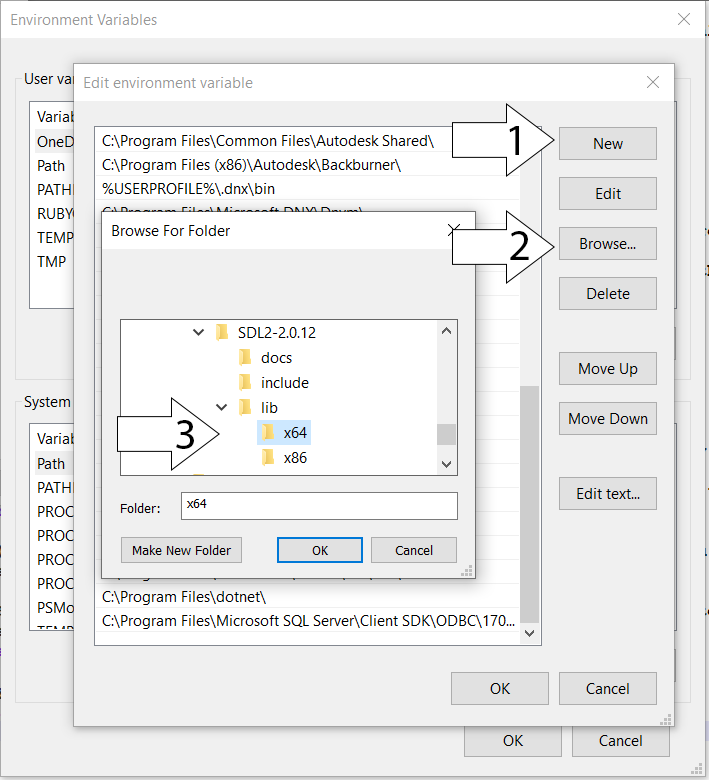
Then click new, then browse to add the lib directory for your build configuation:
Restart Visual Studio so Visual C++ can get the updated path variable, start your program and it should run.
Now that you have SDL 2 compiling, it's time to go onto part 2 of the tutorial.

 浙公网安备 33010602011771号