04、SpringBoot 启动 准备运行环境(prepareEnvironment)流程(一)
目录:Springboot源码学习目录
上文:03、SpringBoot 启动 执行SpringApplication的run方法 准备运行环境前 流程
前言:
一、准备运行环境方法(prepareEnvironment)
    private ConfigurableEnvironment prepareEnvironment(SpringApplicationRunListeners listeners,
		DefaultBootstrapContext bootstrapContext, ApplicationArguments applicationArguments) {
	// 获取配置环境对象 见下文标题二
	ConfigurableEnvironment environment = getOrCreateEnvironment();
        // 对配置环境对象进行相应属性初始化 见下文标题三
	configureEnvironment(environment, applicationArguments.getSourceArgs());
        // 检查环境对象中有没有 名字为 configurationProperties 的配置源,如果有就删除掉,然后创建一个放在第一个位置,见下文标题四
	ConfigurationPropertySources.attach(environment);
        // 发送环境准备完成事件(environmentPrepared),对环境配置环境对象进行增强
        // 其中主要的就是EnvironmentPostProcessorApplicationListener监听器,配置文件的加载和解析都在这个监听器中完成
        // 该步也是准备运行环境的核心步骤,其他步骤都可以不看,无关紧要,但该步是最重要的,我们放到下一篇文章讲解
	listeners.environmentPrepared(bootstrapContext, environment);
        // 移动名称为defaultProperties的属性源到最后面,使其成为配置文件对象中的最后一个源,见下文标题五
	DefaultPropertiesPropertySource.moveToEnd(environment);
        // 将环境对象绑定到当前Spring应用(SpringApplication),见下文标题六
	bindToSpringApplication(environment);
        // 判断是否为定制环境,如果是,将该环境对象转换为StandardEnvironment类型
        // 默认情况下不是定制环境(isCustomEnvironment = false),一般走到该步骤环境对象为StandardServletEnvironment类型
	if (!this.isCustomEnvironment) {
		environment = new EnvironmentConverter(getClassLoader()).convertEnvironmentIfNecessary(environment,
				deduceEnvironmentClass());
	}
        // 再次检查环境对象中有没有 名字为 configurationProperties 的配置源,如果有就删除掉,然后创建一个放在第一个位置,见下文标题四
	ConfigurationPropertySources.attach(environment);
	return environment;
    }
二、获取配置环境对象
    private ConfigurableEnvironment getOrCreateEnvironment() {
        // 判断当前Spring应用中有没有环境属性,如果有直接返回,我们这是第一次启东应用,此时是没有的
        if (this.environment != null) {
            return this.environment;
        }
        // 前面实例化SpringApplication是,推断并初始化了webApplicationType属性,值为SERVLET
        switch (this.webApplicationType) {
            case SERVLET:
                return new StandardServletEnvironment();
            case REACTIVE:
                return new StandardReactiveWebEnvironment();
            default:
                return new StandardEnvironment();
        }
    }
三、对环境对象进行赋值
在该步骤之直接我们先看一下debug截图中环境对象有哪些属性源
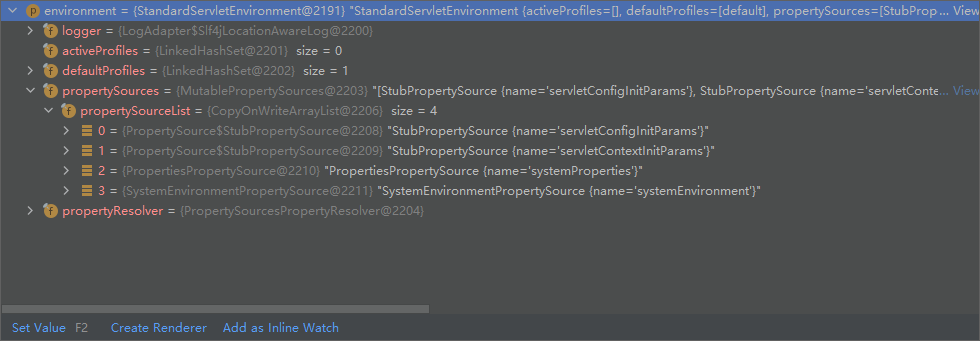
一个servlet配置属性源,一个servlet上下文属性源,一个操作系统环境变量属性源,一个jvm环境变量属性源
然后我们开始执行
    protected void configureEnvironment(ConfigurableEnvironment environment, String[] args) {
        // environment向环境对象中设置一个转换器
	if (this.addConversionService) {
		ConversionService conversionService = ApplicationConversionService.getSharedInstance();
		environment.setConversionService((ConfigurableConversionService) conversionService);
	}
        // 设置属性源,该步就是将程序启动时的入参包装成一个属性源,并添加到环境中
	configurePropertySources(environment, args);
        // 设置环境,空实现
	configureProfiles(environment, args);
    }
继续debug进入上一步中的configurePropertySources方法
    protected void configurePropertySources(ConfigurableEnvironment environment, String[] args) {
        // 获取当前环境中的属性源集合对象
	MutablePropertySources sources = environment.getPropertySources();
        // 如果默认的属性源不为空,则将他合并到 属性源集合对象
	if (!CollectionUtils.isEmpty(this.defaultProperties)) {
		DefaultPropertiesPropertySource.addOrMerge(this.defaultProperties, sources);
	}
        // 判断当前SpringApplication对象是否运行添加命令,以及启动入参是否部位空
	if (this.addCommandLineProperties && args.length > 0) {
                // 判断属性源中是否有名字为commandLineArgs的属性源
		String name = CommandLinePropertySource.COMMAND_LINE_PROPERTY_SOURCE_NAME;
		if (sources.contains(name)) {
                        // 如果有将创建一个名字为commandLineArgs的组合属性源CompositePropertySource
			PropertySource<?> source = sources.get(name);
			CompositePropertySource composite = new CompositePropertySource(name);
                        // // 然后将入参的包装成名字为springApplicationCommandLineArgs的SimpleCommandLinePropertySource类型属性源,加入组合属性源
			composite.addPropertySource(
					new SimpleCommandLinePropertySource("springApplicationCommandLineArgs", args));
                        // 再将原来的属性源也加入组合属性源
			composite.addPropertySource(source);
                        // 再将属性源集合对象中名字为commandLineArgs的属性源替换为组合属性源
			sources.replace(name, composite);
		}
		else {
                        // 如果没有直接将入参包装成SimpleCommandLinePropertySource类型的属性源,并存入第一个位置,名字默认为commandLineArgs
			sources.addFirst(new SimpleCommandLinePropertySource(args));
		}
	}
    }
在该步骤之后我们看一下环境中的属性源有哪些
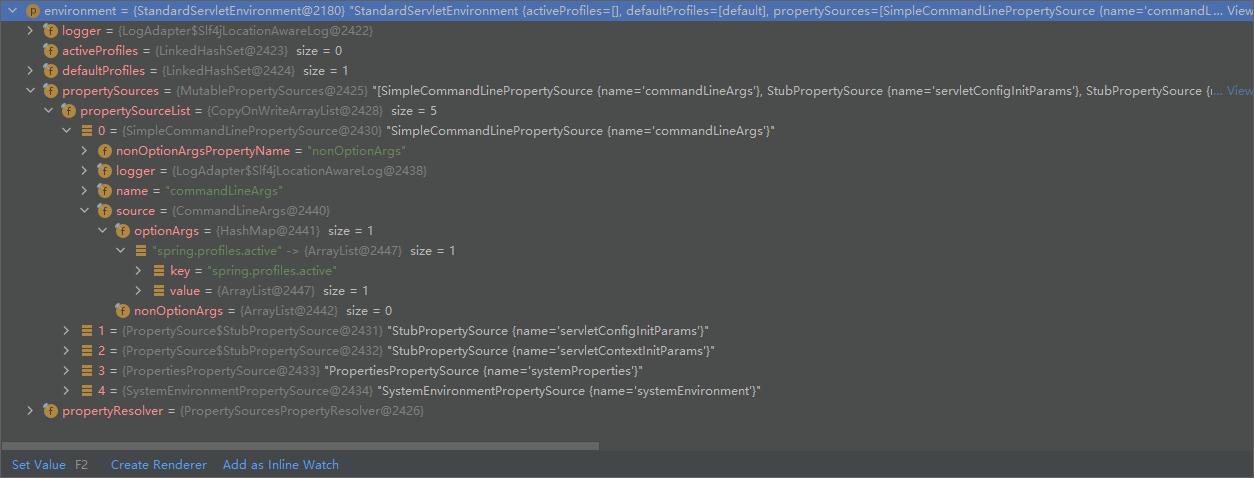
可以看到和执行完该步骤之前比在第一个位置多了一个属性源,名字就是commandLineArgs,并且里面的key-value正式我们启动是加入的参数
四、添加configurationProperties属性源
往环境的属性源集合中增加一个名字为configurationProperties的属性源,但是我其实并没有看明白这个属性的作用是什么
仅仅是看看他的源码中的逻辑
    public static void attach(Environment environment) {
	Assert.isInstanceOf(ConfigurableEnvironment.class, environment);
	MutablePropertySources sources = ((ConfigurableEnvironment) environment).getPropertySources();
        // 从属性源集合中获取名字为configurationProperties的属性源,如果有则删除掉
	PropertySource<?> attached = sources.get(ATTACHED_PROPERTY_SOURCE_NAME);
	if (attached != null && attached.getSource() != sources) {
		sources.remove(ATTACHED_PROPERTY_SOURCE_NAME);
		attached = null;
	}
        // 因为前面的操作,到该步骤,属性源肯定为null,然后创建一个名字为configurationProperties,的ConfigurationPropertySourcesPropertySource类型属性源
        // 并且将属性源集合加入该属性源
	if (attached == null) {
		sources.addFirst(new ConfigurationPropertySourcesPropertySource(ATTACHED_PROPERTY_SOURCE_NAME,
				new SpringConfigurationPropertySources(sources)));
	}
    }
五、将名字为defaultProperties的属性源移动到属性源集合的最后的位置
    public static void moveToEnd(ConfigurableEnvironment environment) {
	moveToEnd(environment.getPropertySources());
    }
    public static void moveToEnd(MutablePropertySources propertySources) {
        // 获取名字为defaultProperties的属性源,如果存在则移动到最后面
	PropertySource<?> propertySource = propertySources.remove(NAME);
	if (propertySource != null) {
		propertySources.addLast(propertySource);
	}
    }
六、将环境对象SpringApplication对象绑定
这一步我也没看明白他的目的是什么,只知道,是从环境对象中的属性源中取出key为spring.main的值,然后赋值给SpringApplication对象
    protected void bindToSpringApplication(ConfigurableEnvironment environment) {
	try {
		Binder.get(environment).bind("spring.main", Bindable.ofInstance(this));
	}
	catch (Exception ex) {
		throw new IllegalStateException("Cannot bind to SpringApplication", ex);
	}
    }

 浙公网安备 33010602011771号