
22.B站薪享宏福笔记——第七章 k8s 存储
7 k8s 存储
——— 存储 - 给数据一个可靠的家
7.1 存储分类
—— 理解特性,使用特性
7.1.1 存储各类特性
简化服务 apache、mysql 等,用户上传的头像、文档等属于真实数据,存储到 apache 目录下。用户名、密码、性别、年龄、手机号等属于元数据,存储在 mysql 中。
(1)元数据类型:
configMap:用于保存配置数据(明文)
Secret:用于保存敏感性数据(编码)
Downward API:容器在运行时从 Kubernetes API 服务器获取有关它们自身的信息
(2)真实数据类型:
Volume:用于存储临时或者持久性数据
PersistentVolume:申请制的持久化存储(PV)
7.2 configMap
——— 配置信息的保存方式
7.2.1 configMap 模型
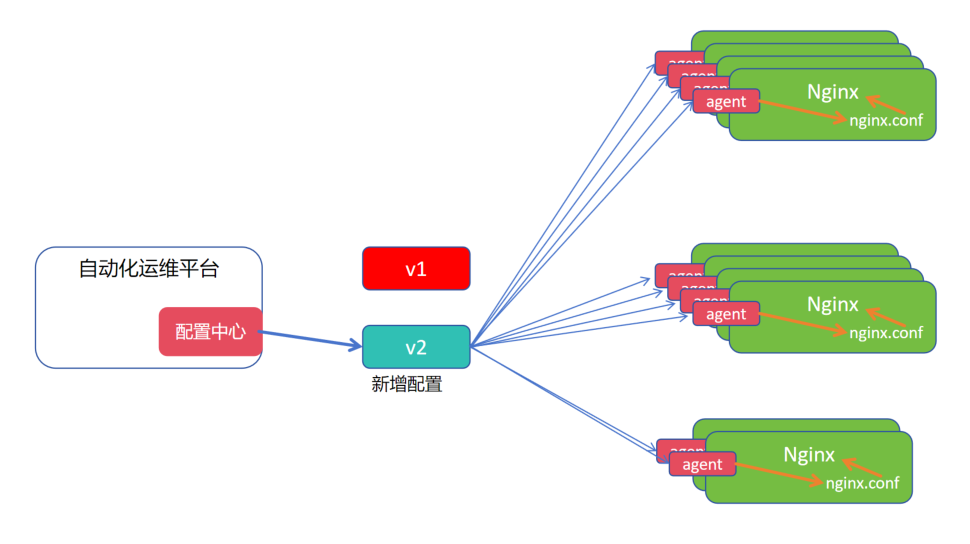
1.大规模业务场景中,nginx 相同作用,配置信息一致,但随着商业化的改变,nginx 的配置信息也需要随之改变
2.在每个 nginx 节点上安装一个 agent 端,用以监听当前目标配置中心的配置选项,是否发生更新动作
3.当配置中心发生更新动作,agent 从远程配置中心下载最新的配置文件替换当前节点的配置文件,再触发 nginx 重载,实现新增配置的生效
7.2.2 configMap 定义
ConfigMap 功能在 Kubernetes1.2 版本中引入,许多应用程序会从配置文件、命令行参数或环境变量中读取配置信息。ConfigMap API 给我们提供了向容器中 注入 配置信息的机制,ConfigMap 可以被用来保存单个属性,也可以用来保存整个配置文件或者JSON 二进制等对象
集群配置文件更改两种策略:
a.共享:
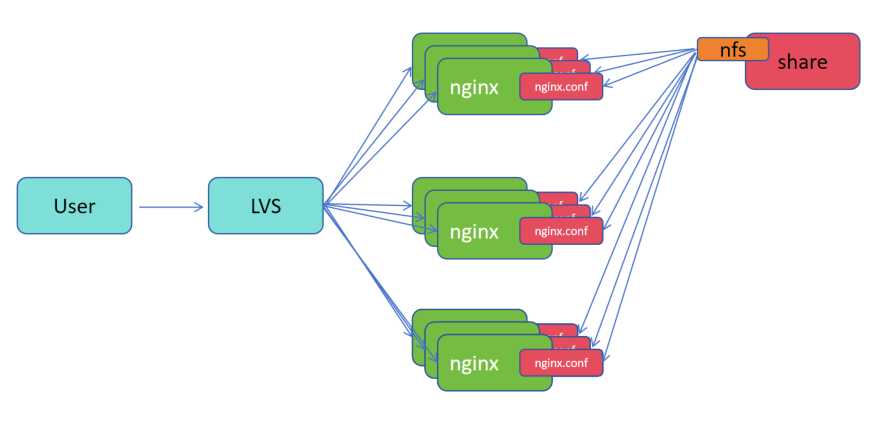
1.将分发的配置文件共享到 nfs
2.nginx 的配置文件 nginx.conf 挂载到 nfs 上,从而将 nginx.conf 数据达到一致
b.注入:
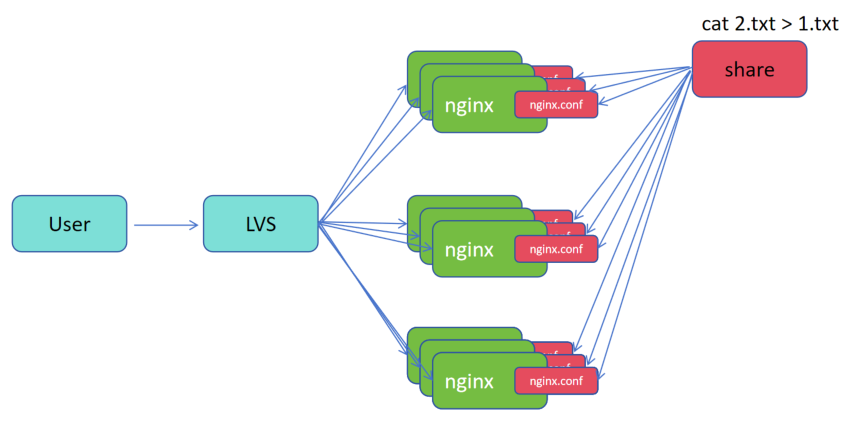
1. 1.txt 是原文件,2.txt 是新文件
2.用一个新的数据,将原来文件替换掉
c.优劣势:
共同点:多个不同的服务内部的文件达到一致
共享:每一次在读取文件的时候,都会发生网络 IO(可能数百台服务器同时读取共享的数据)
注入:一次注入后,多次读取不再消耗网络 IO(还可以分批次、轻重缓急的注入)
7.2.3 configMap 创建
(1)configMap 创建方式
1.kubectl create configmap game-config --from-file=config.file
configmap
  创建
    --from-file
      要求
        a.文件内部必须是一行一对的 k=v,可以在使用的时候注入至 pod 内部 变成环境变量
          1.txt
          name=zhangsan
          passwd=123
        b.文件内部不是一行一对的 k!=v
          2.txt
          今天天气真不错,适合爬山
2.kubectl create configmap literal-config --from-literal=name=dave --from-literal=password=pass
(2)configmap 创建演示
# 基于文件创建
[root@k8s-master01 7.1]# cat config.file
name=zhangsan
password=123
[root@k8s-master01 7.1]# kubectl create configmap game-config --from-file=config.file
configmap/game-config created
# 两种查看的方式,get 和 describe
[root@k8s-master01 7.1]# kubectl get configmap
NAME               DATA   AGE
game-config        1      18s
kube-root-ca.crt   1      18d
[root@k8s-master01 7.1]# kubectl get cm game-config -o yaml
apiVersion: v1
data:
  config.file: |
    name=zhangsan
    password=123
kind: ConfigMap
..........
[root@k8s-master01 7.1]# kubectl describe cm game-config
Name:         game-config
Namespace:    default
Labels:       <none>
Annotations:  <none>

Data
====
config.file:
----
name=zhangsan
password=123
..........
# 命令行参数创建
[root@k8s-master01 7.1]# kubectl create configmap literal-config --from-literal=name=dave --from-literal=password=pass
configmap/literal-config created
[root@k8s-master01 7.1]# kubectl get cm
NAME               DATA   AGE
game-config        1      8m25s
kube-root-ca.crt   1      18d
literal-config     2      6s
[root@k8s-master01 7.1]# kubectl get cm literal-config -o yaml
apiVersion: v1
data:
  name: dave
  password: pass
kind: ConfigMap
..........
(3)configmap 环境变量
# 同一个文件中可以写多个资源清单,使用 --- 进行分割。注意 literal-config 的 configMap 前面已经创建,需先删除,kubectl delete cm literal-config
[root@k8s-master01 7]# cat 2.pod.yaml
apiVersion: v1
kind: ConfigMap
metadata:
 name: literal-config
 namespace: default
data:
 name: dave
 password: pass
---
apiVersion: v1
kind: ConfigMap
metadata:
 name: env-config
 namespace: default
data:
 log_level: INFO
---
apiVersion: v1
kind: Pod
metadata:
 name: cm-env-pod
spec:
 containers:
   - name: myapp-container
     image: myapp:v1.0
     command: [ "/bin/sh", "-c", "env" ]
     env:
       - name: USERNAME
         valueFrom:
           configMapKeyRef:
             name: literal-config
             key: name
       - name: PASSWORD
         valueFrom:
           configMapKeyRef:
             name: literal-config
             key: password
     envFrom:
       - configMapRef:
           name: env-config
 restartPolicy: Never
1.接口组版本:核心组 v1 版
2.类别:ConfigMap 类
3.元数据:configmap 资源名称、configmap 类别所在名称空间
4.定义数据:字段名1:字段值1、字段名2:字段值2
4.定义数据:字段名:字段值
4.期望:容器组:容器名、基于镜像版本、执行启动命令(执行后打印当前容器的env环境变量)、
定义 env:(可以单个引用)
变量名1、变量名1值来源:来源于 configMapKeyRef 的key:来源于configmap 名:literal-config、来源的 key 名(将来源于名为 literal-config 的 configmap 中的 key 为 name 的值赋予给名为 USERNAME 的环境变量);
变量名2、变量名2值来源:来源于 configMapKeyRef 的key:来源于configmap 名:literal-config、来源的 key 名(将来源于名为 literal-config 的 configmap 中的 key 为 password 的值赋予给名为 PASSWORD 的环境变量);
定义 envFrom:(整个引用)
来源于 configMapKeyRef 的key:文件名:文件
重启策略:永不
[root@k8s-master01 7]# kubectl create -f 2.pod.yaml
configmap/literal-config created
configmap/env-config created
pod/cm-env-pod created
[root@k8s-master01 7]# kubectl get pod
NAME         READY   STATUS      RESTARTS   AGE
cm-env-pod   0/1     Completed   0          109s
[root@k8s-master01 7]# kubectl logs cm-env-pod
..........
USERNAME=dave
..........
log_level=INFO
..........
PASSWORD=pass
(4)configmap 启动命令
# 与前面 configmap 设置的一样
[root@k8s-master01 7]# cat literal-config.yaml
apiVersion: v1
kind: ConfigMap
metadata:
 name: literal-config
 namespace: default
data:
 name: dave
 password: pass
[root@k8s-master01 7]# cat 3.pod.yaml
apiVersion: v1
kind: Pod
metadata:
 name: cm-command-pod
spec:
 containers:
   - name: myapp-container
     image: myapp:v1.0
     command: [ "/bin/sh", "-c", "echo $(USERNAME) $(PASSWORD)" ]
     env:
       - name: USERNAME
         valueFrom:
           configMapKeyRef:
             name: literal-config
             key: name
       - name: PASSWORD
         valueFrom:
           configMapKeyRef:
             name: literal-config
             key: password
 restartPolicy: Never
# 提供了一种思想,可以在启动命令中调用 环境变量 env
4.期望:容器组:容器名、基于镜像版本、执行启动命令()、
定义 env:(可以单个引用)
变量名1、变量名1值来源:来源于 configMapKeyRef 的key:来源于configmap 名:literal-config、来源的 key 名(将来源于名为 literal-config 的 configmap 中的 key 为 name 的值赋予给名为 USERNAME 的环境变量);
变量名2、变量名2值来源:来源于 configMapKeyRef 的key:来源于configmap 名:literal-config、来源的 key 名(将来源于名为 literal-config 的 configmap 中的 key 为 password 的值赋予给名为 PASSWORD 的环境变量);
重启策略:永不
[root@k8s-master01 7]# kubectl apply -f 3.pod.yaml
pod/cm-command-pod created
[root@k8s-master01 7]# kubectl get po
NAME             READY   STATUS      RESTARTS   AGE
cm-command-pod   0/1     Completed   0          3m49s
cm-env-pod       0/1     Completed   0          37m
[root@k8s-master01 7]# kubectl logs cm-command-pod
dave pass
(5)configmap 基于文件
# 与前面 configmap 设置的一样
[root@k8s-master01 7]# cat literal-config.yaml
apiVersion: v1
kind: ConfigMap
metadata:
 name: literal-config
 namespace: default
data:
 name: dave
 password: pass
[root@k8s-master01 7]# cat 4.pod.yaml
apiVersion: v1
kind: Pod
metadata:
 name: cm-volume-pod
spec:
 containers:
   - name: myapp-container
     image: myapp:v1.0
     volumeMounts:
     - name: config-volume
       mountPath: /etc/config
 volumes:
   - name: config-volume
     configMap:
       name: literal-config
 restartPolicy: Never
4.期望:容器组:1.容器名、基于镜像版本、卷绑定:卷名称、挂载到容器的路径、2.声明卷:卷名称、基于 configmap 做卷:congfigmap 的名、重启策略:永不
(将名为 literal-config 的 configmap 转化成卷,在容器中将卷挂载到了/etc/config 目录下)
[root@k8s-master01 7]# kubectl apply -f 4.pod.yaml
pod/cm-volume-pod created
[root@k8s-master01 7]# kubectl get pod
NAME             READY   STATUS      RESTARTS   AGE
cm-command-pod   0/1     Completed   0          17m
cm-env-pod       0/1     Completed   0          51m
cm-volume-pod    1/1     Running     0          23s
# 引用 configmap 没有换行符、链接文件、链接文件用于热更新( nginx.conf 原文件被占用,configmap 直接注入新内容时,可能会造成文件的损坏。)
# 由此出现链接文件,配置文件链接原文件,注入新文件后,将配置文件链接修改成新文件,实现热更新。
[root@k8s-master01 7]# kubectl exec -it cm-volume-pod -- /bin/sh
/ # cd /etc/config/
/etc/config # ls
name      password
/etc/config # cat name
dave/etc/config #
/etc/config # cat password
pass/etc/config #
/etc/config # ls -ltr
total 0
lrwxrwxrwx    1 root     root            15 Jun 15 06:41 password -> ..data/password
lrwxrwxrwx    1 root     root            11 Jun 15 06:41 name -> ..data/name
(6)configmap 热更新
[root@k8s-master01 7.5]# cat default.conf
server {
   listen 80 default_server;
   server_name example.com www.example.com;
   location / {
       root   /usr/share/nginx/html;
       index index.html index.htm;
    }
}
[root@k8s-master01 7.5]# cat 5.pod.yaml
apiVersion: apps/v1
kind: Deployment
metadata:
 labels:
   app: hotupdate-deploy
 name: hotupdate-deploy
spec:
 replicas: 3
 selector:
   matchLabels:
     app: hotupdate-deploy
 template:
   metadata:
     labels:
       app: hotupdate-deploy
   spec:
     containers:
     - image: myapp:v1.0
       name: nginx
       volumeMounts:
       - name: config-volume
         mountPath: /etc/nginx/conf.d/
     volumes:
       - name: config-volume
         configMap:
           name: default-nginx
4.期望:deployment 控制器副本数、选择器:匹配标签:标签、标签值、Pod 模板:Pod 元数据:Pod 标签:标签、标签值、Pod 期望:容器组:基于镜像版本、容器名、卷绑定:卷名、绑定到容器路径、定义卷:卷名、以 configmap 提供为卷:configmap名
[root@k8s-master01 7.5]# kubectl create configmap default-nginx --from-file=default.conf
configmap/default-nginx created
[root@k8s-master01 7.5]# kubectl apply -f 5.pod.yaml
deployment.apps/hotupdate-deploy created
[root@k8s-master01 7.5]# kubectl get cm
NAME               DATA   AGE
default-nginx      1      5s
kube-root-ca.crt   1      18d
[root@k8s-master01 7.5]# kubectl get cm default-nginx -o yaml
apiVersion: v1
data:
  default.conf: |
    server {
       listen 80 default_server;
       server_name example.com www.example.com;
       location / {
           root   /usr/share/nginx/html;
           index index.html index.htm;
        }
    }
kind: ConfigMap
..........
[root@k8s-master01 7.5]# kubectl get pod
NAME                                READY   STATUS    RESTARTS   AGE
hotupdate-deploy-5fd69d7649-8j5v5   1/1     Running   0          30s
hotupdate-deploy-5fd69d7649-ffl97   1/1     Running   0          34s
hotupdate-deploy-5fd69d7649-zkq5d   1/1     Running   0          39s
[root@k8s-master01 7.5]# kubectl exec -it hotupdate-deploy-5fd69d7649-8j5v5 -- /bin/sh
/ # cd /etc/nginx/conf.d/
/etc/nginx/conf.d # ls -ltr
total 0
lrwxrwxrwx    1 root     root            19 Jun 15 08:03 default.conf -> ..data/default.conf
/etc/nginx/conf.d # cat default.conf
server {
   listen 80 default_server;
   server_name example.com www.example.com;
   location / {
       root   /usr/share/nginx/html;
       index index.html index.htm;
    }
}

# 新开终端
[root@k8s-master01 7.5]# kubectl edit cm default-nginx
.........
       listen 8080 default_server;
.........
configmap/default-nginx edited

# 原终端容器内
/etc/nginx/conf.d # cat default.conf
server {
   listen 8080 default_server;
   server_name example.com www.example.com;
   location / {
       root   /usr/share/nginx/html;
       index index.html index.htm;
    }
}
/etc/nginx/conf.d # exit
[root@k8s-master01 7.5]# kubectl get pod -o wide
NAME                                READY   STATUS    RESTARTS   AGE   IP              NODE         NOMINATED NODE   READINESS GATES
hotupdate-deploy-5fd69d7649-8j5v5   1/1     Running   0          33m   10.244.58.248   k8s-node02   <none>           <none>
hotupdate-deploy-5fd69d7649-ffl97   1/1     Running   0          33m   10.244.58.249   k8s-node02   <none>           <none>
hotupdate-deploy-5fd69d7649-zkq5d   1/1     Running   0          33m   10.244.85.234   k8s-node01   <none>           <none>
# 配置进行了更改,也经过验证,配置文件为8080端口,但是没有生效,原因是没有重载
[root@k8s-master01 7.5]# curl 10.244.58.248
Hello MyApp | Version: v1 | <a href="hostname.html">Pod Name</a>
[root@k8s-master01 7.5]# curl 10.244.58.248:8080
curl: (7) Failed to connect to 10.244.58.248 port 8080: Connection refused
# k8s 为不支持热更新的服务,提供了触发更新的接口,统计更改接口的值,可以触发滚动更新,不会让客户访问丢失,注意:记得在值两边加引号
[root@k8s-master01 7.5]# kubectl patch deployment hotupdate-deploy --patch '{"spec":{"template":{"metadata":{"annotations":{"version/config":"1"}}}}}'
deployment.apps/hotupdate-deploy patched
[root@k8s-master01 7.5]# kubectl get pod -o wide
NAME                                READY   STATUS    RESTARTS   AGE   IP              NODE         NOMINATED NODE   READINESS GATES
hotupdate-deploy-6ff74c76c8-f5rmv   1/1     Running   0          20s   10.244.58.252   k8s-node02   <none>           <none>
hotupdate-deploy-6ff74c76c8-rrbts   1/1     Running   0          17s   10.244.85.237   k8s-node01   <none>           <none>
hotupdate-deploy-6ff74c76c8-vwjpv   1/1     Running   0          23s   10.244.85.236   k8s-node01   <none>           <none>
[root@k8s-master01 7.5]# curl 10.244.58.252
curl: (7) Failed to connect to 10.244.58.252 port 80: Connection refused
[root@k8s-master01 7.5]# curl 10.244.58.252:8080
Hello MyApp | Version: v1 | <a href="hostname.html">Pod Name</a>
更新 ConfigMap 后:
1.使用该 ConfigMap 挂载的 Env 不会同步更新(配置文件可改,环境变量不可改)
2.使用该 ConfigMap 挂载的 Volume 中的数据需要一段时间(实测大概10秒)才能同步更新
(7)configmap 不可更改
Kubernetes 给不可变的 ConfigMap 和 Secret 提供了一种可选配置,可以设置各个 Secret 和 ConfigMap 为不可变的。对于大量使用 configMap 的集群(至少有成千上万各不相同的 configmap 供 Pod 挂载),禁止变更它们的数据有下列好处:
1.防止意外(或非预期的)更新导致应用程序中断
2.通过将 configmap 标记为不可变来关闭 kube-apiserver 对其的监视,从而显著降低 kube-apiserver 的负载,提升集群性能
[root@k8s-master01 7.5]# kubectl explain configmap.immutable
KIND:       ConfigMap
VERSION:    v1

FIELD: immutable <boolean>

DESCRIPTION:
    Immutable, if set to true, ensures that data stored in the ConfigMap cannot
    be updated (only object metadata can be modified). If not set to true, the
    field can be modified at any time. Defaulted to nil.

# 保存生效
[root@k8s-master01 7.5]# kubectl edit cm default-nginx
# Please edit the object below. Lines beginning with a '#' will be ignored,
# and an empty file will abort the edit. If an error occurs while saving this file will be
# reopened with the relevant failures.
#
apiVersion: v1
data:
  default.conf: |
    server {
       listen 8080 default_server;
       server_name example.com www.example.com;
       location / {
           root   /usr/share/nginx/html;
           index index.html index.htm;
        }
    }
immutable: true
kind: ConfigMap
.........
# 再修改,不被允许,即使强制保存,也无法修改其中信息(不可改变状态,只能删除重建)
[root@k8s-master01 7.5]# kubectl edit cm default-nginx
.........
error: Edit cancelled, no valid changes were saved.
7.3 Secret
——— 编码而来的安全
7.3.1 Secret 定义
Secret 对象类型用来保存敏感信息,例如密码、OAuth 令牌和 SSH 密钥。将这些信息放在 secret 中比放在 Pod 的定义或者容器镜像中来说更加安全和灵活。
7.3.2 Secret 特性
Kubernetes 通过仅仅将 Secret 分发到需要访问 Secret 的 Pod 所在的机器节点来保障其安全性
Secret 只会存储在节点的内存中,永不写入物理存储,这样节点删除 secret 时就不需要擦除磁盘数据
从 Kubernetes1.7 版本开始,etcd 会以加密形式存储 Secret,一定程度的保证了 Secret 安全性
7.3.3 Secret 类型
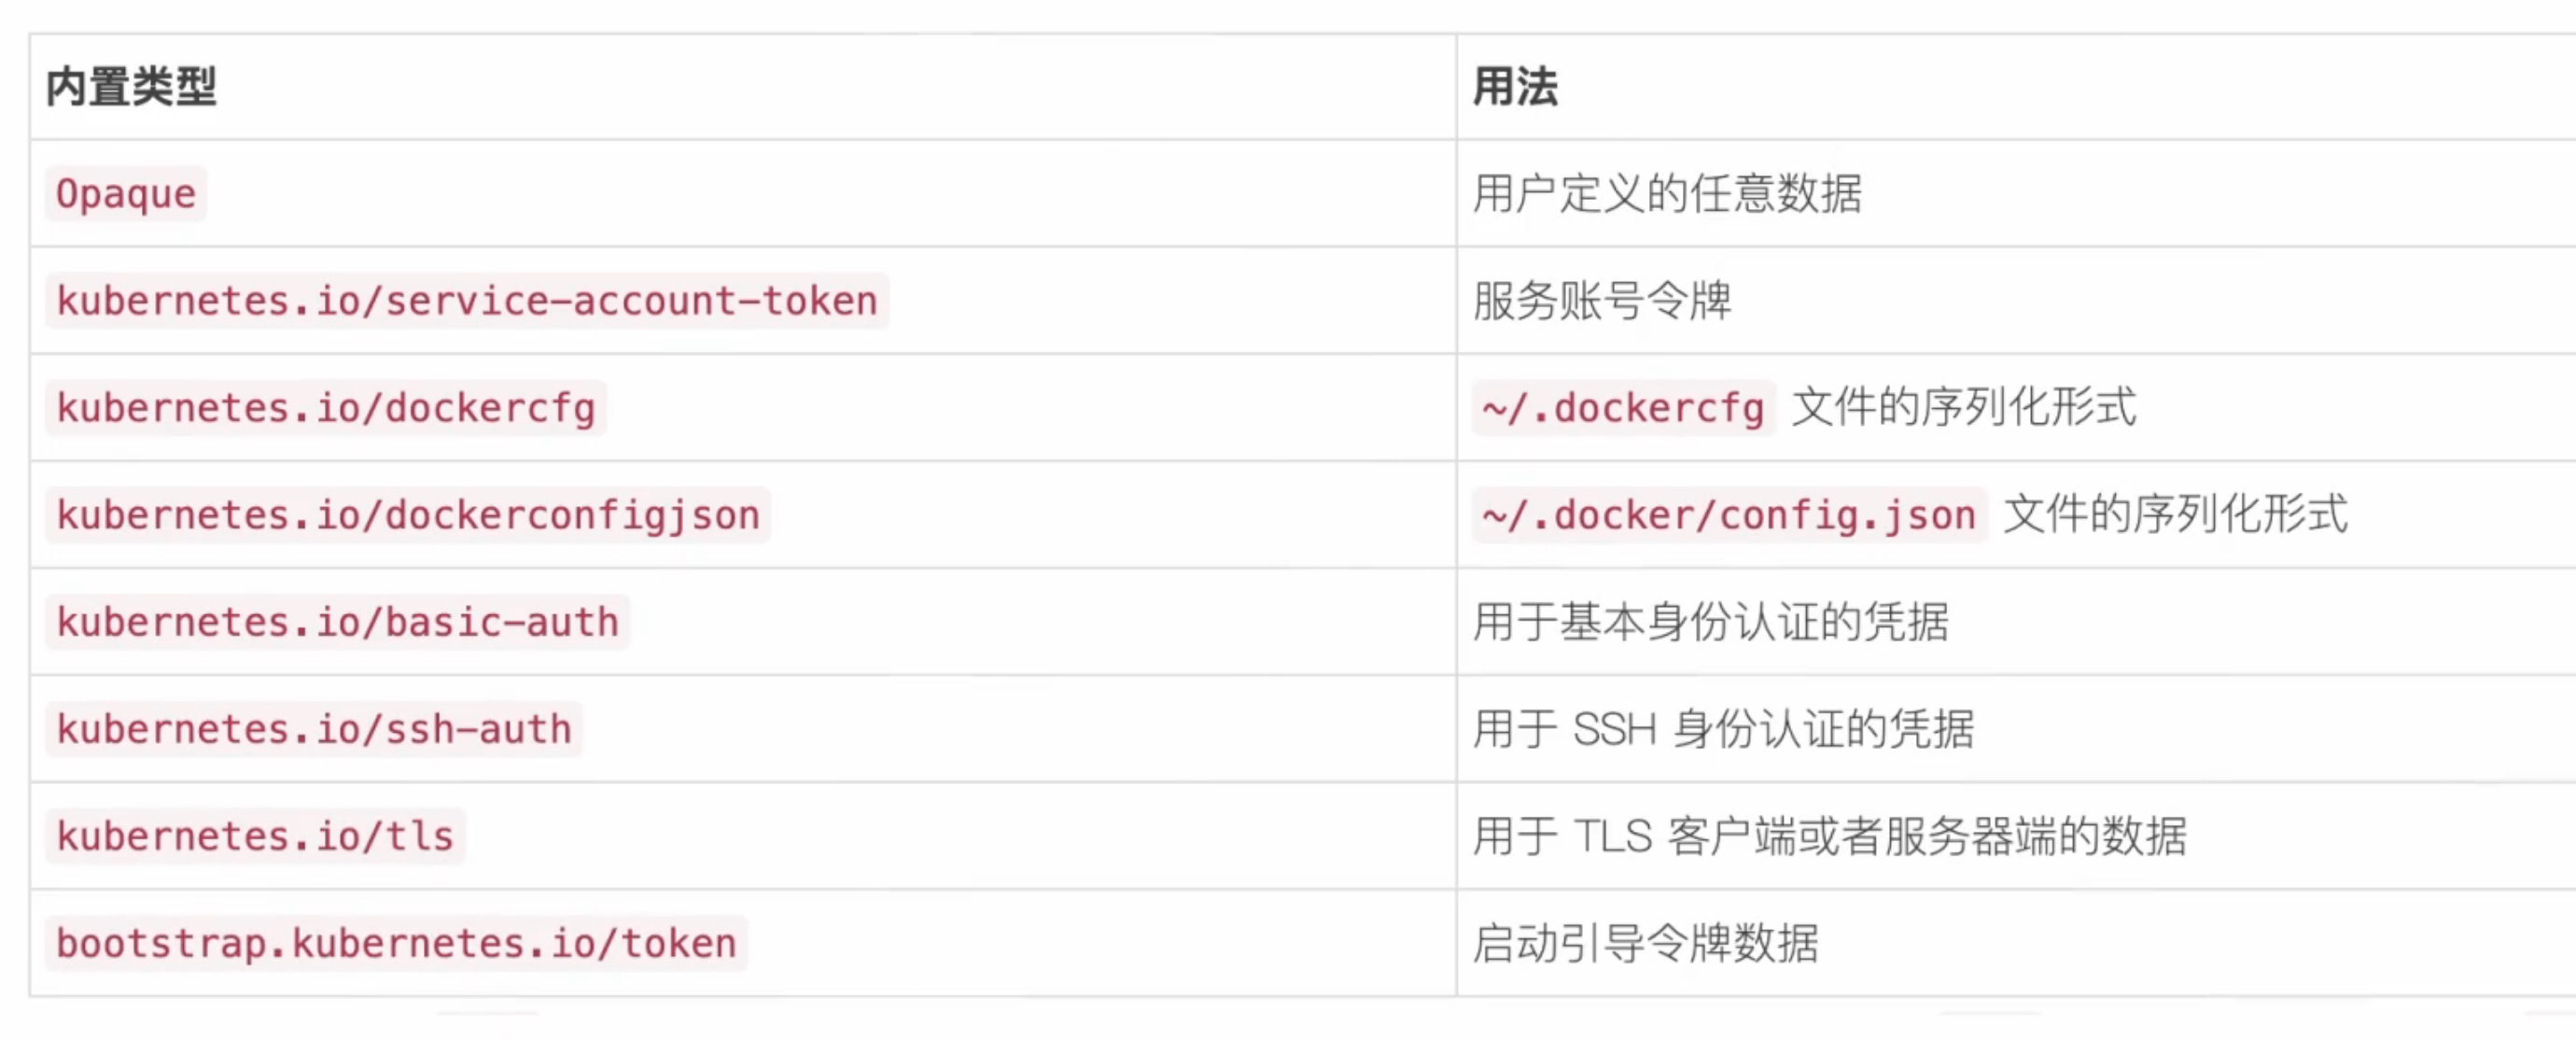
(1)Secret Opaque 概念
当 Secret 配置文件中未做显示设定时,默认的 Secret 类型是 Opaque。当你使用 kubectl 来创建一个 Secret 时,你会使用 generic 子命令来标明要创建的是一个 Opaque 类型 Secret。
(2)Secret Opaque 创建
# 基于 base64 位编码,编码库相同,编码和解码出的数据是一致的
[root@k8s-master01 7]# echo -n "admin"|base64
YWRtaW4=
[root@k8s-master01 7]# echo -n "1f2d1e2e67df"|base64
MWYyZDFlMmU2N2Rm
# 如果对一个未进行编码的字符进行解码,解码后会错乱
[root@k8s-master01 7]# echo -n "junnan"|base64 -d
ꦪbase64: invalid input
[root@k8s-master01 7]# cat 6.secret.yaml
apiVersion: v1
kind: Secret
metadata:
 name: mysecret
type: Opaque
data:
 password: MWYyZDFlMmU2N2Rm
 username: YWRtaW4=
1.接口组版本:核心组 v1 版
2.类别:Secret 类
3.元数据:Secret 名称
4.类型:Opaque 类型
5.数据字段:key1/value1(必须被 base64 编码)、key2/value2(必须被 base64 编码)
# value 的值必须被 base64 进行编码,secret 默认使用 base64 解码,如果对未进行编码的字符进行解码,解码后会错乱
[root@k8s-master01 7]# kubectl apply -f 6.secret.yaml
secret/mysecret created
[root@k8s-master01 7]# kubectl get secret
NAME       TYPE     DATA   AGE
mysecret   Opaque   2      5s
# describe 查看,与configmap 形成明显,configmap 中可以看到其中的 key=value
[root@k8s-master01 7]# kubectl describe secret mysecret
Name:         mysecret
Namespace:    default
Labels:       <none>
Annotations:  <none>

Type:  Opaque

Data
====
password:  12 bytes
username:  5 bytes
# 可以通过 -o yaml 查看到
[root@k8s-master01 7]# kubectl get secret mysecret -o yaml
apiVersion: v1
data:
  password: MWYyZDFlMmU2N2Rm
  username: YWRtaW4=
kind: Secret
..........
type: Opaque
[root@k8s-master01 7]# echo -n "MWYyZDFlMmU2N2Rm"|base64 -d
1f2d1e2e67df[root@k8s-master01 7]# echo -n "YWRtaW4="|base64 -d
admin[root@k8s-master01 7]#
(3)Secret Opaque ENV
[root@k8s-master01 7]# cat 7.deployment.yaml
apiVersion: apps/v1
kind: Deployment
metadata:
 labels:
   app: opaque-secret-env
 name: opaque-secret-env-deploy
spec:
 replicas: 3
 selector:
   matchLabels:
     app: op-se-env-pod
 template:
   metadata:
     labels:
       app: op-se-env-pod
   spec:
     containers:
     - image: myapp:v1.0
       name: myapp-continaer
       ports:
       - containerPort: 80
       env:
       - name: TEST_USER
         valueFrom:
           secretKeyRef:
             name: mysecret
             key: username
       - name: TEST_PASSWORD
         valueFrom:
           secretKeyRef:
             name: mysecret
             key: password
4.期望:副本数、选择器:匹配:标签、标签值、Pod模板:Pod元数据:Pod标签:标签、标签值、Pod期望:
容器组:基于镜像版本、容器名、端口:容器端口、端口值、变量env:
变量名、值来源:来自secret的key:secret的名 mysecret、secret名下的key username字段
变量名、值来源:来自secret的key:secret的名 mysecret、secret名下的key password字段
[root@k8s-master01 7]# kubectl apply -f 7.deployment.yaml
deployment.apps/opaque-secret-env-deploy created
[root@k8s-master01 7]# kubectl get pod
NAME                                        READY   STATUS    RESTARTS   AGE
opaque-secret-env-deploy-6b58d7b999-fbw4z   1/1     Running   0          10s
opaque-secret-env-deploy-6b58d7b999-h28ls   1/1     Running   0          10s
opaque-secret-env-deploy-6b58d7b999-m4srt   1/1     Running   0          10s
[root@k8s-master01 7]# kubectl exec -it opaque-secret-env-deploy-6b58d7b999-fbw4z -- /bin/sh
/ # env
.........
TEST_PASSWORD=1f2d1e2e67df
TEST_USER=admin
.........
/ # exit
(4)Secret Opaque ENV 挂载
a.挂载成目录
[root@k8s-master01 7]# cat 8.pod.yaml
apiVersion: v1
kind: Pod
metadata:
 labels:
   name: secret-volume
 name: secret-volume-pod
spec:
 volumes:
 - name: volumes12
   secret:
     secretName: mysecret
 containers:
 - image: myapp:v1.0
   name: myapp-container
   volumeMounts:
   - name: volumes12
     mountPath: "/data"
4.期望:定义卷:卷名、基于 secret 提供:secret 名、容器组:基于镜像版本、容器名、卷名:绑定卷名、挂载到容器的目录
[root@k8s-master01 7]# kubectl apply -f 8.pod.yaml
pod/secret-volume-pod created
[root@k8s-master01 7]# kubectl get pod
NAME                READY   STATUS    RESTARTS   AGE
secret-volume-pod   1/1     Running   0          60s
# 1.可以通过变量形式,将目录挂载。2.可以修改文件的权限,默认是 644
[root@k8s-master01 7]# kubectl exec -it secret-volume-pod -- /bin/sh
/ # cd /data
/data # ls
password  username
/data # ls -ltr
total 0
lrwxrwxrwx    1 root     root            15 Jun 16 11:54 username -> ..data/username
lrwxrwxrwx    1 root     root            15 Jun 16 11:54 password -> ..data/password
/data # cat username
admin/data #
/data # cat password
1f2d1e2e67df/data #
/data # ls -ltr ..data/*
-rw-r--r--    1 root     root             5 Jun 16 11:54 ..data/username
-rw-r--r--    1 root     root            12 Jun 16 11:54 ..data/password
/data # exit
[root@k8s-master01 7]# kubectl delete pod secret-volume-pod
pod "secret-volume-pod" deleted
b.挂载文件权限
[root@k8s-master01 7]# cat 9.pod.yaml
apiVersion: v1
kind: Pod
metadata:
 labels:
   name: secret-volume
 name: secret-volume-pod
spec:
 volumes:
 - name: volumes12
   secret:
     secretName: mysecret
     defaultMode: 256
 containers:
 - image: myapp:v1.0
   name: myapp-container
   volumeMounts:
   - name: volumes12
     mountPath: "/data"
卷:卷名、基于 secret 提供:提供的 secret 名、文件的权限(八进制的值,)
[root@k8s-master01 7]# kubectl apply -f 9.pod.yaml
pod/secret-volume-pod created
[root@k8s-master01 7]# kubectl get pod
NAME                READY   STATUS    RESTARTS   AGE
secret-volume-pod   1/1     Running   0          3s
# 原文件权限由原来的 644 改为 400,也可以使用 0777、0644 这种方式编辑文件权限
[root@k8s-master01 7]# kubectl exec -it secret-volume-pod -- /bin/sh
/ # cd /data
/data # ls -trl ..data/
total 8
-r--------    1 root     root             5 Jun 16 12:10 username
-r--------    1 root     root            12 Jun 16 12:10 password
/data # exit
[root@k8s-master01 7]# kubectl delete pod secret-volume-pod
pod "secret-volume-pod" deleted
c.部分挂载
[root@k8s-master01 7]# cat 10.pod.yaml
apiVersion: v1
kind: Pod
metadata:
 labels:
   name: secret-volume
 name: secret-volume-pod
spec:
 volumes:
 - name: volumes12
   secret:
     secretName: mysecret
     items:
     - key: username
       path: my-group/my-username
 containers:
 - image: myapp:v1.0
   name: myapp-container
   volumeMounts:
   - name: volumes12
     mountPath: "/data"
卷:卷名、基于 secret 提供:提供的 secret 名、键值:key名、挂载到容器的目录(并不是所有都挂载,使用部分,这里 my-group/my-username 目录要看容器中挂载的目录)
[root@k8s-master01 7]# kubectl apply -f 10.pod.yaml
pod/secret-volume-pod created
[root@k8s-master01 7]# kubectl get pod
NAME                READY   STATUS    RESTARTS   AGE
secret-volume-pod   1/1     Running   0          3s
# 注意这里不是软连接,因为前面软连接是为了防止更新注入的时候,文件不可用,并且文件的名称也被卷覆盖,原 username 被覆盖成了 my-username
# 当单独挂载的时候(选中一部分数据进行挂载),不支持热更新
[root@k8s-master01 7]# kubectl exec -it secret-volume-pod -- /bin/sh
/ # cd /data
/data # ls -ltr
total 0
lrwxrwxrwx    1 root     root            15 Jun 16 12:23 my-group -> ..data/my-group
/data # cat my-group/my-username
admin/data # cd my-group/
/data/..2025_06_16_12_23_12.1837103320/my-group # ls -ltr
total 4
-rw-r--r--    1 root     root             5 Jun 16 12:23 my-username
(5)Secret Opaque Volume 热更新
当已经存储于卷中被使用的 Secret 被更新时,被映射的键也将被更新。组件 kubelet 在周期性同步时检查被挂载的 Secret 是不是最新的。但是,它会使用其本地缓存的数值作为 Secret 的当前值(可能会有延迟)。使用 Secret 作为子路径卷挂载的容器不会收到 Secret 更新。
[root@k8s-master01 7]# kubectl apply -f 9.pod.yaml
pod/secret-volume-pod created
[root@k8s-master01 7]# kubectl get pod
NAME                READY   STATUS    RESTARTS   AGE
secret-volume-pod   1/1     Running   0          3s
[root@k8s-master01 7]# kubectl exec -it secret-volume-pod -- /bin/sh
/ # cd data/
/data # ls
password  username
/data # cat username && date
adminMon Jun 16 12:50:59 UTC 2025
/data #
# 新开一个终端,编辑新的用户,写入新用户
[root@k8s-master01 ~]# kubectl get secret
NAME       TYPE     DATA   AGE
mysecret   Opaque   2      9h
# 生成 新的 base64 编码,编辑 secret ,将新的编码写入
[root@k8s-master01 ~]# echo -n "junnan"|base64
anVubmFu
[root@k8s-master01 ~]# kubectl edit secret mysecret
..........
apiVersion: v1
data:
  password: MWYyZDFlMmU2N2Rm
  username: anVubmFu
..........
# 回到原终端
/data
/data # cat username && date
junnanMon Jun 16 12:54:33 UTC 2025
(6)Secret 不可更改
Kubernetes 给不可变的 ConfigMap 和 Secret 提供了一种可选配置,可以设置各个 Secret 和 ConfigMap 为不可变的。对于大量使用 configMap 的集群(至少有成千上万各不相同的 configmap 供 Pod 挂载),禁止变更它们的数据有下列好处:
1.防止意外(或非预期的)更新导致应用程序中断
2.通过将 configmap 标记为不可变来关闭 kube-apiserver 对其的监视,从而显著降低 kube-apiserver 的负载,提升集群性能
[root@k8s-master01 7]# kubectl get secret
NAME       TYPE     DATA   AGE
mysecret   Opaque   2      10h
# 保存生效
[root@k8s-master01 7]# kubectl edit secret mysecret
..........
immutable: true
apiVersion: v1
data:
  password: MWYyZDFlMmU2N2Rm
  username: anVubmFu
kind: Secret
.........
# 再修改,不被允许,即使强制保存,也无法修改其中信息(不可改变状态,只能删除重建)
[root@k8s-master01 7]# kubectl edit secret mysecret
.........
error: At least one of apiVersion, kind and name was changed
7.4 Downward API
——— 容器在运行时从 Kubernetes API 服务器获取有关它们自身的信息
7.4.1 Downward API 存在的意义
Downward API 是Kubernetes 中的一个功能,它允许容器在运行时从 Kuberees API 服务器获取有关它们自身的信息。这些信息可以作为容器内部环境变量或文件注入到容器中,以便容器可以获取有关其运行环境的各种信息,如 Pod 名称、命名空间、标签等。
提供容器元数据(例如:传递真实的cpu、内存等到容器中)
动态配置(例如:根据 Pod 名称、Pod 标签修改配置参数,可以通过 downward api 提供)
与 Kubernetes 环境集成(调取 kubernetes 内部需要的数据)
7.4.2 Downward API 案例
(1)env 案例
[root@k8s-master01 7.11]# cat 1.pod.yaml
apiVersion: v1
kind: Pod
metadata:
 name: downward-api-env-example
spec:
 containers:
 - name: my-container
   image: myapp:v1.0
   env:
   - name: POD_NAME
     valueFrom:
       fieldRef:
         fieldPath: metadata.name
   - name: POD_NAMESPACE
     valueFrom:
       fieldRef:
         fieldPath: metadata.namespace
   - name: POD_IP
     valueFrom:
       fieldRef:
         fieldPath: status.podIP
   - name: CPU_REQUEST
     valueFrom:
       resourceFieldRef:
         resource: requests.cpu
   - name: CPU_LIMIT
     valueFrom:
       resourceFieldRef:
         resource: limits.cpu
   - name: MEMORY_REQUEST
     valueFrom:
       resourceFieldRef:
         resource: requests.memory
   - name: MEMORY_LIMIT
     valueFrom:
       resourceFieldRef:
         resource: limits.memory
 restartPolicy: Never
4.期望:容器组:容器名、基于镜像版本、env 变量:
1.pod名、值来源:来源字段:来源字段路径(metadata清单中获取)
2.名称空间、值来源:来源字段:来源字段路径(metadata清单中获取)
3.pod IP、值来源:来源字段:来源字段路径(metadata清单中获取)
4.cpu 软限制、值来源:来源字段:来源字段路径(metadata清单中获取)
5.cpu 硬限制、值来源:来源字段:来源字段路径(metadata清单中获取)
6.内存 软限制、值来源:来源字段:来源字段路径(metadata清单中获取)
7.内存 硬限制、值来源:来源字段:来源字段路径(metadata清单中获取)
重启策略:永不
[root@k8s-master01 7.11]# kubectl apply -f 1.pod.yaml
pod/downward-api-env-example created
[root@k8s-master01 7.11]# kubectl get pod
NAME                       READY   STATUS    RESTARTS   AGE
downward-api-env-example   1/1     Running   0          11s
# 资源清单中定义的变量,都获取到了值,从 metadata 元数据中获取到的值
[root@k8s-master01 7.11]# kubectl exec -it downward-api-env-example -- /bin/sh
/ # env
POD_IP=10.244.58.211
MYAPP_SVC_PORT_80_TCP_ADDR=10.98.57.156
KUBERNETES_PORT=tcp://10.0.0.1:443
KUBERNETES_SERVICE_PORT=443
CPU_REQUEST=0
MYAPP_SVC_PORT_80_TCP_PORT=80
HOSTNAME=downward-api-env-example
SHLVL=1
MYAPP_SVC_PORT_80_TCP_PROTO=tcp
HOME=/root
MYAPP_SVC_PORT_80_TCP=tcp://10.98.57.156:80
MEMORY_REQUEST=0
TERM=xterm
NGINX_VERSION=1.12.2
KUBERNETES_PORT_443_TCP_ADDR=10.0.0.1
POD_NAME=downward-api-env-example
PATH=/usr/local/sbin:/usr/local/bin:/usr/sbin:/usr/bin:/sbin:/bin
KUBERNETES_PORT_443_TCP_PORT=443
KUBERNETES_PORT_443_TCP_PROTO=tcp
MYAPP_SVC_SERVICE_HOST=10.98.57.156
CPU_LIMIT=1
KUBERNETES_PORT_443_TCP=tcp://10.0.0.1:443
KUBERNETES_SERVICE_PORT_HTTPS=443
POD_NAMESPACE=default
PWD=/
KUBERNETES_SERVICE_HOST=10.0.0.1
MYAPP_SVC_SERVICE_PORT=80
MYAPP_SVC_PORT=tcp://10.98.57.156:80
MEMORY_LIMIT=1721618432
/ #
(2)volume 案例
[root@k8s-master01 7.11]# cat 2.env.yaml
apiVersion: v1
kind: Pod
metadata:
 name: downward-api-volume-example
spec:
 containers:
 - name: my-container
   image: myapp:v1.0
   resources:
     limits:
       cpu: "1"
       memory: "512Mi"
     requests:
       cpu: "0.5"
       memory: "256Mi"
   volumeMounts:
   - name: downward-api-volume
     mountPath: /etc/podinfo
 volumes:
 - name: downward-api-volume
   downwardAPI:
     items:
     - path: "annotations"
       fieldRef:
         fieldPath: metadata.annotations
     - path: "labels"
       fieldRef:
         fieldPath: metadata.labels
     - path: "name"
       fieldRef:
         fieldPath: metadata.name
     - path: "namespace"
       fieldRef:
         fieldPath: metadata.namespace
     - path: "uid"
       fieldRef:
         fieldPath: metadata.uid
     - path: "cpuRequest"
       resourceFieldRef:
         containerName: my-container
         resource: requests.cpu
     - path: "memoryRequest"
       resourceFieldRef:
         containerName: my-container
         resource: requests.memory
     - path: "cpuLimit"
       resourceFieldRef:
         containerName: my-container
         resource: limits.cpu
     - path: "memoryLimit"
       resourceFieldRef:
         containerName: my-container
         resource: limits.memory
 restartPolicy: Never
4.期望:容器组:容器名、基于镜像版本、资源限制:最大限制:最大 cpu、最大内存、初始限制:初始 cpu、初始内存、卷绑定:定义卷名、绑定的目录
卷定义:卷名、基于downwardAPI 提供:
1.annotations 、值来源:来源字段:来源字段路径(metadata清单中获取)
2.标签 、值来源:来源字段:来源字段路径(metadata清单中获取)
3.Pod 名 、值来源:来源字段:来源字段路径(metadata清单中获取)
4.名字空间 、值来源:来源字段:来源字段路径(metadata清单中获取)
5.uid 、值来源:来源字段:来源字段路径(metadata清单中获取)
6.cpu 初始值 、值来源:来源字段:来源字段路径(metadata清单中获取)
7.内存初始值 、值来源:来源字段:来源字段路径(metadata清单中获取)
8.cpu 最大值 、值来源:来源字段:来源字段路径(metadata清单中获取)
9.内存最大值、值来源:来源字段:来源字段路径(metadata清单中获取)
10.annotations 、值来源:来源字段:来源字段路径(metadata清单中获取)
[root@k8s-master01 7.11]# kubectl apply -f 2.env.yaml
pod/downward-api-volume-example created
[root@k8s-master01 7.11]# kubectl get pod
NAME                          READY   STATUS    RESTARTS   AGE
downward-api-volume-example   1/1     Running   0          3s
# 未给 pod 打标签,但是卷挂载自持热更新
[root@k8s-master01 7.11]# kubectl exec -it downward-api-volume-example -- /bin/sh
/ # cd /etc/podinfo/
/etc/podinfo # ls
annotations    cpuLimit       cpuRequest     labels         memoryLimit    memoryRequest  name           namespace      uid
/etc/podinfo # cat namespace
default/etc/podinfo #
/etc/podinfo # cat name
downward-api-volume-example/etc/podinfo #
/etc/podinfo # cat labels
/etc/podinfo #

# 新开一个终端,给此 pod 打标签
[root@k8s-master01 7.11]# kubectl label po downward-api-volume-example app=junnan
pod/downward-api-volume-example labeled

# 回到原终端的 pod 内,支持热更新
/etc/podinfo # cat labels
app="junnan"/etc/podinfo #
(3)volume 相较于 env 优势
会保持热更新的特性(挂载一部分不支持热更新)
传递一个容器的资源字段到另一个容器中(同一个 Pod 中)
7.4.3 Downward API 扩展
Downward API 提供了一种简单的方式,将 Pod 和容器的元数据传递给在它们内部运行的进程。但这种方式仅可以暴露一个 pod 自身的元数据传递给在它们内部运行的进程。仅仅可以暴露一个 pod 自身的元数据,而且只可以暴露部分的元数据。(Pod 暴露本身且只是一部分,如何一个 pod 内部可以获取另外 pod 的数据?)
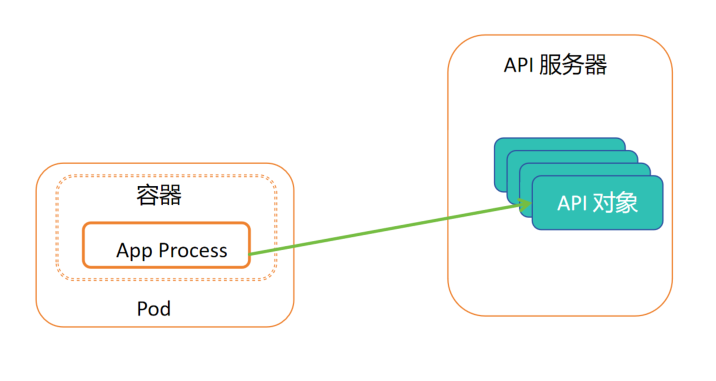
1. API服务器内有 API对象,容器内进程可以理解为 API对象的客户端(或者另一种类型的 kubectl),从而拿到数据
(1)Downward API 获取数据
# RBAC 提供权限,做对接口的授权操作
[root@k8s-master01 7.12]# cat 1.rbac.yaml
apiVersion: rbac.authorization.k8s.io/v1
kind: ClusterRoleBinding
metadata:
  name: test-api-cluster-admin-binding
subjects:
  - kind: ServiceAccount
    name: test-api
    namespace: default
roleRef:
  kind: ClusterRole
  name: cluster-admin
  apiGroup: rbac.authorization.k8s.io
# 创建资源
[root@k8s-master01 7.12]# kubectl apply -f 1.rbac.yaml
clusterrolebinding.rbac.authorization.k8s.io/test-api-cluster-admin-binding created
[root@k8s-master01 7.12]# kubectl create sa test-api
serviceaccount/test-api created
[root@k8s-master01 7.12]# cat 2.pod.yaml
apiVersion: v1
kind: Pod
metadata:
 name: curl
spec:
 serviceAccountName: test-api
 containers:
 - name: main
   image: alpine/curl
   command: ["sleep", "9999"]
4.期望:给 Pod 提供访问 api Service 的权限:名字、容器组:容器名、基于镜像版本、启动命令
[root@k8s-master01 7.12]# kubectl apply -f 2.pod.yaml
pod/curl created
[root@k8s-master01 7.12]# kubectl get pod
NAME   READY   STATUS    RESTARTS   AGE
curl   1/1     Running   0          4s
# 认证信息、证书路径(https建立连接时,确认对方证书是否有效)、当前名字空间、通过接口访问
# 甚至于可以访问kube-system
[root@k8s-master01 7.12]# kubectl exec -it curl -- /bin/sh
/ # TOKEN=$( cat /var/run/secrets/kubernetes.io/serviceaccount/token )
/ # CAPATH="/var/run/secrets/kubernetes.io/serviceaccount/ca.crt"
/ # NS=$( cat /var/run/secrets/kubernetes.io/serviceaccount/namespace )
/ # curl -H "Authorization: Bearer $TOKEN" --cacert $CAPATH https://kubernetes/api/v1/namespaces/$NS/pods
{
  "kind": "PodList",
  "apiVersion": "v1",
  "metadata": {
    "resourceVersion": "906528"
  },
  "items": [
    {
      "metadata": {
        "name": "curl",
        "namespace": "default",
        "uid": "46c77eea-7fdf-4129-b638-ba442327adf9",
        "resourceVersion": "905718",
        "creationTimestamp": "2025-06-17T12:51:13Z",
        "annotations": {
          "cni.projectcalico.org/containerID": "01afa5a188cd4b7743b5f0a42beaf270d10eb506226f87d0c33f3e038e83e531",
          "cni.projectcalico.org/podIP": "10.244.58.220/32",
          "cni.projectcalico.org/podIPs": "10.244.58.220/32",
          "kubectl.kubernetes.io/last-applied-configuration": "{\"apiVersion\":\"v1\",\"kind\":\"Pod\",\"metadata\":{\"annotations\":{},\"name\":\"curl\",\"namespace\":\"default\"},\"spec\":{\"containers\":[{\"command\":[\"sleep\",\"9999\"],\"image\":\"alpine/curl\",\"name\":\"main\"}],\"serviceAccountName\":\"test-api\"}}\n"
        },
        "managedFields": [
          {
            "manager": "kubectl-client-side-apply",
            "operation": "Update",
            "apiVersion": "v1",
            "time": "2025-06-17T12:51:13Z",
.........
/ # curl -H "Authorization: Bearer $TOKEN" --cacert $CAPATH https://kubernetes/api/v1/namespaces/kube-system/pods
{
  "kind": "PodList",
  "apiVersion": "v1",
  "metadata": {
    "resourceVersion": "910135"
  },
  "items": [
    {
      "metadata": {
        "name": "calico-kube-controllers-558d465845-7dhfq",
        "generateName": "calico-kube-controllers-558d465845-",
        "namespace": "kube-system",
        "uid": "c6a2ae16-83ff-4a58-9834-bd10f46a4017",
        "resourceVersion": "894717",
        "creationTimestamp": "2025-05-27T20:53:53Z",
        "labels": {
          "k8s-app": "calico-kube-controllers",
          "pod-template-hash": "558d465845"
        },
        "annotations": {
          "cni.projectcalico.org/containerID": "fdd6ee1e0d23eed9272d3c99740d1139211ec050164ce8d405cf57c0a04d108c",
          "cni.projectcalico.org/podIP": "10.244.85.195/32",
          "cni.projectcalico.org/podIPs": "10.244.85.195/32"
        },
        "ownerReferences": [
          {
            "apiVersion": "apps/v1",
            "kind": "ReplicaSet",
            "name": "calico-kube-controllers-558d465845",
            "uid": "3f74a6d5-2a5a-4b85-8caa-288a266abc24",
.........
(2)Downward API 接口文档
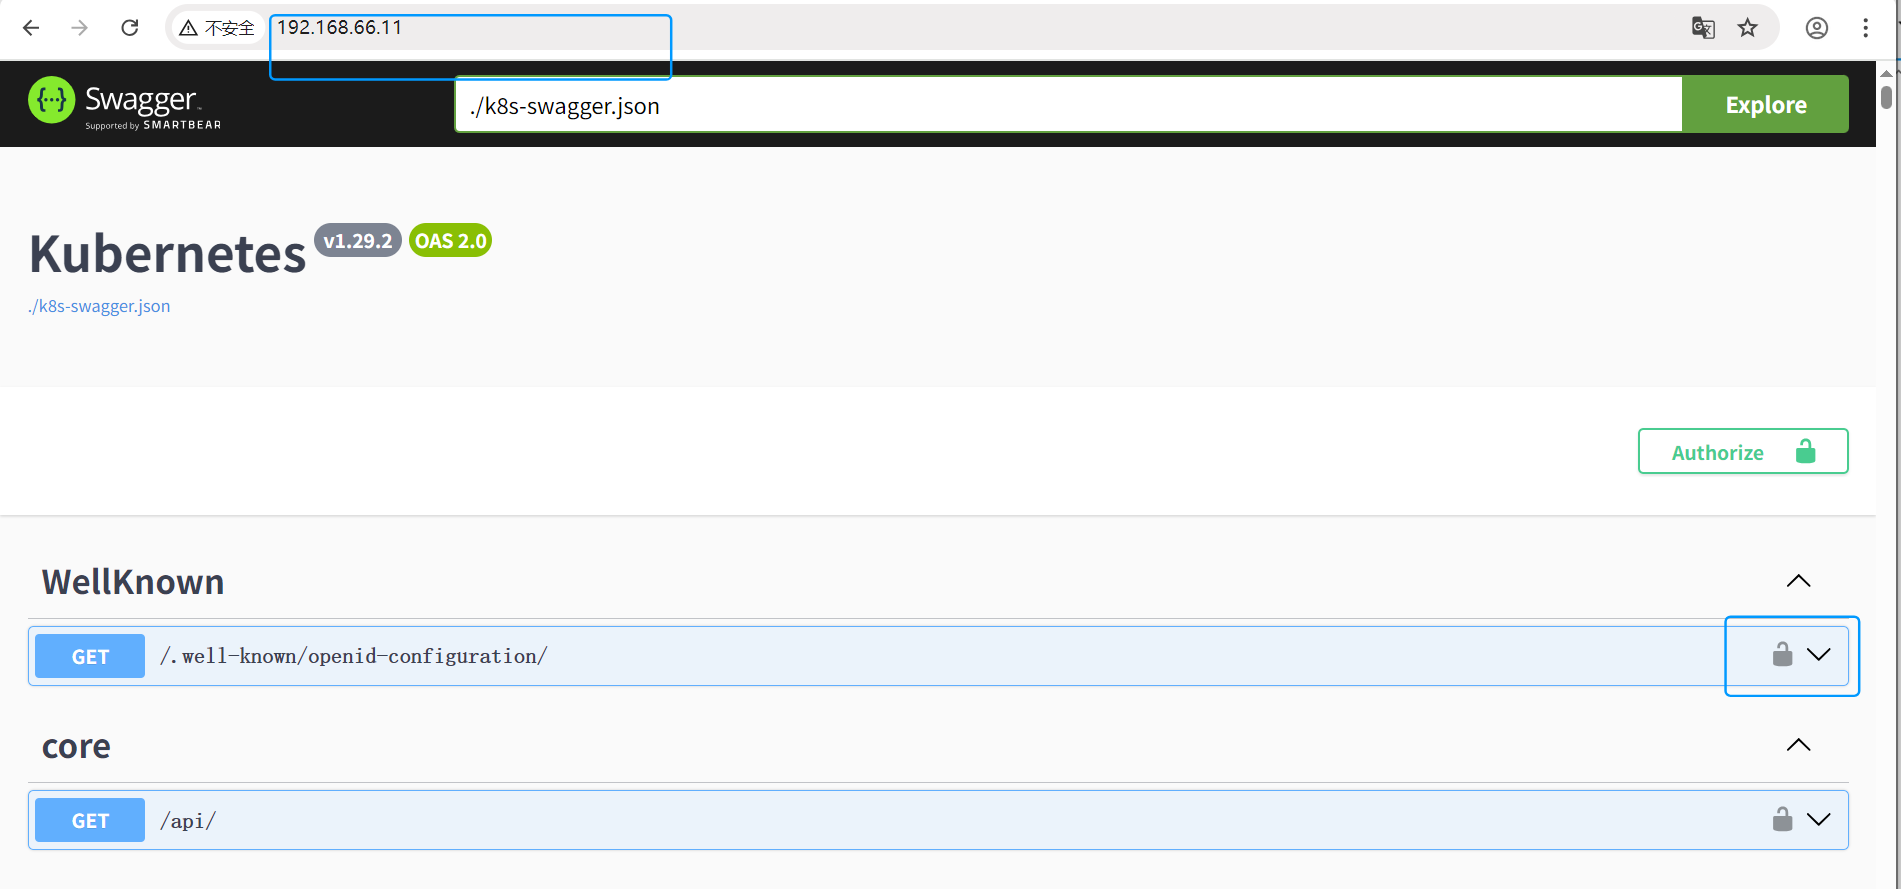
# A 终端打开8080端口,将 apiserver 服务器的 https 转换成 http
[root@k8s-master01 7.12]# kubectl proxy --port=8080
Starting to serve on 127.0.0.1:8080
# 打开 B 终端,将接口文件导出成文件,导出后关闭 A 终端(安全)
[root@k8s-master01 7.13]# curl localhost:8080/openapi/v2 > k8s-swagger.json
  % Total    % Received % Xferd  Average Speed   Time    Time     Time  Current
                                 Dload  Upload   Total   Spent    Left  Speed
100 2159k    0 2159k    0     0  8743k      0 --:--:-- --:--:-- --:--:-- 8708k
[root@k8s-master01 7.13]# ls -ltr
total 2160
-rw-r--r-- 1 root root 2211498 Jun 17 22:20 k8s-swagger.json
# 同样 B 终端执行命令,涉及 docker 挂载目录,所以要到获取的文件目录下执行,或者自写挂载目录
[root@k8s-master01 7.13]# docker run --rm -d -p 80:8080 -e SWAGGER_JSON=/k8s-swagger.json -v $(pwd)/k8s-swagger.json:/k8s-swagger.json swaggerapi/swagger-ui
Unable to find image 'swaggerapi/swagger-ui:latest' locally
latest: Pulling from swaggerapi/swagger-ui
f18232174bc9: Pull complete
61ca4f733c80: Pull complete
b464cfdf2a63: Pull complete
d7e507024086: Pull complete
81bd8ed7ec67: Pull complete
197eb75867ef: Pull complete
34a64644b756: Pull complete
39c2ddfd6010: Pull complete
a58bcc8e1e00: Pull complete
1b63af94e938: Pull complete
5a16395e018d: Pull complete
368ef36e05d8: Pull complete
e26b67cfdf1a: Pull complete
e579edda0a15: Pull complete
Digest: sha256:5d5e46263ac190341b501e49054b0f2e937a9a23c83fd763912721a92cd84f1d
Status: Downloaded newer image for swaggerapi/swagger-ui:latest
f65430974aad1d57e88e360504290c18bcddd96e9f3977f6bb7491f8a7c0d094
[root@k8s-master01 7.13]# docker ps |grep swaggerapi
f65430974aad   swaggerapi/swagger-ui                               "/docker-entrypoint.…"   46 seconds ago   Up 45 seconds   80/tcp, 0.0.0.0:80->8080/tcp, [::]:80->8080/tcp   festive_bohr
浏览器访问服务器 IP,可以查看 apiServer 接口规范
7.5 Volume
——— 数据的持久化方案
7.5.1 Volume 存在的意义
容器磁盘上的文件的生命周期是短暂的,这就使得在容器中运行重要应用时会出现一些问题。首先,当容器崩溃时,kubelet 会重启它,但是容器中的文件将丢失——容器以干净的状态(镜像最初的状态)重新启动(Pod 内部容器重建导致文件丢失)。其次,在 Pod 中同时运行多个容器时,这些容器之间通常需要共享文件。(同一 Pod 内多容器间文件共享)
# 查看 volumes 中支持的 存储类型
[root@k8s-master01 ~]# kubectl explain pod.spec.volumes
KIND:       Pod
VERSION:    v1

FIELD: volumes <[]Volume>

DESCRIPTION:
    List of volumes that can be mounted by containers belonging to the pod. More
    info: https://kubernetes.io/docs/concepts/storage/volumes
    Volume represents a named volume in a pod that may be accessed by any
    container in the pod.

FIELDS:
  awsElasticBlockStore    <AWSElasticBlockStoreVolumeSource>
    awsElasticBlockStore represents an AWS Disk resource that is attached to a
    kubelet's host machine and then exposed to the pod. More info:
    https://kubernetes.io/docs/concepts/storage/volumes#awselasticblockstore

  azureDisk    <AzureDiskVolumeSource>
    azureDisk represents an Azure Data Disk mount on the host and bind mount to
    the pod.

  azureFile    <AzureFileVolumeSource>
    azureFile represents an Azure File Service mount on the host and bind mount
    to the pod.

  cephfs    <CephFSVolumeSource>
    cephFS represents a Ceph FS mount on the host that shares a pod's lifetime

  cinder    <CinderVolumeSource>
    cinder represents a cinder volume attached and mounted on kubelets host
    machine. More info: https://examples.k8s.io/mysql-cinder-pd/README.md

  configMap    <ConfigMapVolumeSource>
    configMap represents a configMap that should populate this volume

  csi    <CSIVolumeSource>
    csi (Container Storage Interface) represents ephemeral storage that is
    handled by certain external CSI drivers (Beta feature).

  downwardAPI    <DownwardAPIVolumeSource>
    downwardAPI represents downward API about the pod that should populate this
    volume

  emptyDir    <EmptyDirVolumeSource>
    emptyDir represents a temporary directory that shares a pod's lifetime. More
    info: https://kubernetes.io/docs/concepts/storage/volumes#emptydir

  ephemeral    <EphemeralVolumeSource>
    ephemeral represents a volume that is handled by a cluster storage driver.
    The volume's lifecycle is tied to the pod that defines it - it will be
    created before the pod starts, and deleted when the pod is removed.

    Use this if: a) the volume is only needed while the pod runs, b) features of
    normal volumes like restoring from snapshot or capacity
       tracking are needed,
    c) the storage driver is specified through a storage class, and d) the
    storage driver supports dynamic volume provisioning through
       a PersistentVolumeClaim (see EphemeralVolumeSource for more
       information on the connection between this volume type
       and PersistentVolumeClaim).

    Use PersistentVolumeClaim or one of the vendor-specific APIs for volumes
    that persist for longer than the lifecycle of an individual pod.

    Use CSI for light-weight local ephemeral volumes if the CSI driver is meant
    to be used that way - see the documentation of the driver for more
    information.

    A pod can use both types of ephemeral volumes and persistent volumes at the
    same time.

  fc    <FCVolumeSource>
    fc represents a Fibre Channel resource that is attached to a kubelet's host
    machine and then exposed to the pod.

  flexVolume    <FlexVolumeSource>
    flexVolume represents a generic volume resource that is provisioned/attached
    using an exec based plugin.

  flocker    <FlockerVolumeSource>
    flocker represents a Flocker volume attached to a kubelet's host machine.
    This depends on the Flocker control service being running

  gcePersistentDisk    <GCEPersistentDiskVolumeSource>
    gcePersistentDisk represents a GCE Disk resource that is attached to a
    kubelet's host machine and then exposed to the pod. More info:
    https://kubernetes.io/docs/concepts/storage/volumes#gcepersistentdisk

  gitRepo    <GitRepoVolumeSource>
    gitRepo represents a git repository at a particular revision. DEPRECATED:
    GitRepo is deprecated. To provision a container with a git repo, mount an
    EmptyDir into an InitContainer that clones the repo using git, then mount
    the EmptyDir into the Pod's container.

  glusterfs    <GlusterfsVolumeSource>
    glusterfs represents a Glusterfs mount on the host that shares a pod's
    lifetime. More info: https://examples.k8s.io/volumes/glusterfs/README.md

  hostPath    <HostPathVolumeSource>
    hostPath represents a pre-existing file or directory on the host machine
    that is directly exposed to the container. This is generally used for system
    agents or other privileged things that are allowed to see the host machine.
    Most containers will NOT need this. More info:
    https://kubernetes.io/docs/concepts/storage/volumes#hostpath

  iscsi    <ISCSIVolumeSource>
    iscsi represents an ISCSI Disk resource that is attached to a kubelet's host
    machine and then exposed to the pod. More info:
    https://examples.k8s.io/volumes/iscsi/README.md

  name    <string> -required-
    name of the volume. Must be a DNS_LABEL and unique within the pod. More
    info:
    https://kubernetes.io/docs/concepts/overview/working-with-objects/names/#names

  nfs    <NFSVolumeSource>
    nfs represents an NFS mount on the host that shares a pod's lifetime More
    info: https://kubernetes.io/docs/concepts/storage/volumes#nfs

  persistentVolumeClaim    <PersistentVolumeClaimVolumeSource>
    persistentVolumeClaimVolumeSource represents a reference to a
    PersistentVolumeClaim in the same namespace. More info:
    https://kubernetes.io/docs/concepts/storage/persistent-volumes#persistentvolumeclaims

  photonPersistentDisk    <PhotonPersistentDiskVolumeSource>
    photonPersistentDisk represents a PhotonController persistent disk attached
    and mounted on kubelets host machine

  portworxVolume    <PortworxVolumeSource>
    portworxVolume represents a portworx volume attached and mounted on kubelets
    host machine

  projected    <ProjectedVolumeSource>
    projected items for all in one resources secrets, configmaps, and downward
    API

  quobyte    <QuobyteVolumeSource>
    quobyte represents a Quobyte mount on the host that shares a pod's lifetime

  rbd    <RBDVolumeSource>
    rbd represents a Rados Block Device mount on the host that shares a pod's
    lifetime. More info: https://examples.k8s.io/volumes/rbd/README.md

  scaleIO    <ScaleIOVolumeSource>
    scaleIO represents a ScaleIO persistent volume attached and mounted on
    Kubernetes nodes.

  secret    <SecretVolumeSource>
    secret represents a secret that should populate this volume. More info:
    https://kubernetes.io/docs/concepts/storage/volumes#secret

  storageos    <StorageOSVolumeSource>
    storageOS represents a StorageOS volume attached and mounted on Kubernetes
    nodes.

  vsphereVolume    <VsphereVirtualDiskVolumeSource>
    vsphereVolume represents a vSphere volume attached and mounted on kubelets
    host machine
hostPath:
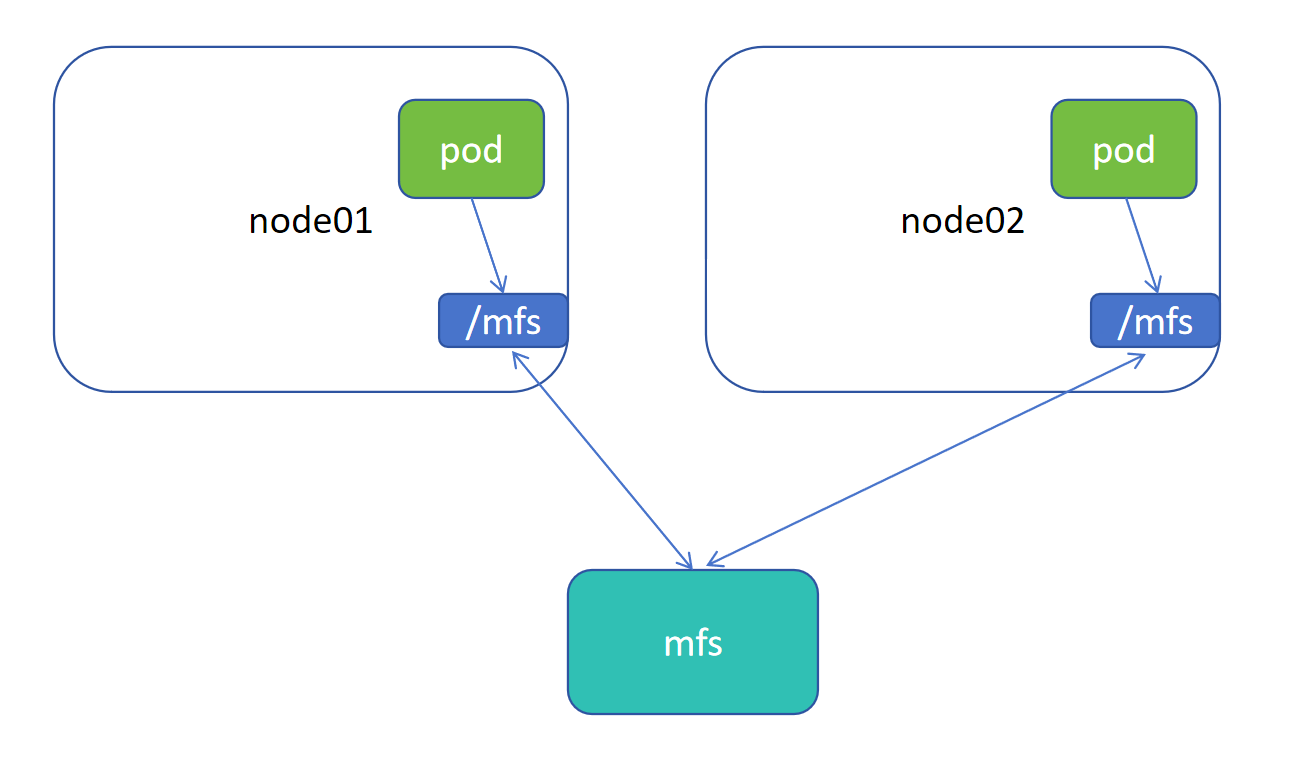
1.通过 mfs 服务将节点目录 /mfs 挂载,mfs 基于网络实现 /mfs 下信息同步
2.Pod 使用 hostPath 的卷模式,挂载当前节点的 /mfs,从而实现多个 Pod 间信息同步,解决本身 Pod 不支持 mfs 类型挂载的问题
7.5.2 volume emptyDIr
(1)volume emptyDIr 概念
当 Pod 被分配给节点时,首先创建 emptyDir 卷,并且只要该 Pod 在该节点上运行,该卷就会存在(绑定到的是Pod,而不是容器)。正如卷的名字所述,它最初是空的。Pod 中的容器可以读取和写入 emptyDir 卷中的相同文件,尽管该卷可以挂载到每个容器中的相同或不同路径上(例如:emptyDir,pod1 的 /tmp,pod2 的 /mnt),当出于任何原因从节点删除 Pod 时,emptyDir 中的数据将被永久删除(生命周期与 Pod 关联)
容器崩溃不会从节点中移除 pod ,因此 emptyDir 卷中的数据在容器崩溃时是安全的
emptyDir 的用法有:
暂存空间,例如用于基于磁盘的合并排序、用作长时间计算崩溃恢复时的检查点(通过emptyDir内部是否有文件判断 Pod 内容器是否是第一次启动)
Web 服务器容器提供数据时,保存内容,管理容器提取的文件(解决 initC 和 mainC 不能同时出现,但是需要共享数据的问题,两个容器都挂载 emptyDir,initC 中操作后退出,mainC 再挂载,可以查看到 emptyDir 的文件信息 )
(2)Volume emptyDIr 创建使用
[root@k8s-master01 7]# cat 14.pod.yaml
apiVersion: v1
kind: Pod
metadata:
 name: volume-emptydir-disk-pod
 namespace: default
spec:
 containers:
 - name: myapp
   image: myapp:v1.0
   ports:
   - containerPort: 80
   volumeMounts:
   - name: logs-volume
     mountPath: /usr/local/nginx/logs
 - name: busybox
   image: busybox:v1.0
   command: ["/bin/sh","-c","touch /logs/access.log && tail -f /logs/access.log"]
   volumeMounts:
   - name: logs-volume
     mountPath: /logs
 volumes:
 - name: logs-volume
   emptyDir: {}
4.期望:容器组:
1.容器名、基于镜像版本、定义端口:端口值、卷绑定:绑定卷名、绑定到容器内路径
2.容器名、基于镜像版本、启动命令、卷绑定:绑定卷名、绑定到容器内路径
定义卷:卷名、卷类型为 emptyDir
[root@k8s-master01 7]# kubectl apply -f 14.pod.yaml
pod/volume-emptydir-disk-pod created
[root@k8s-master01 7]# kubectl get pod -o wide
NAME                       READY   STATUS    RESTARTS   AGE   IP              NODE         NOMINATED NODE   READINESS GATES
volume-emptydir-disk-pod   2/2     Running   0          7s    10.244.58.223   k8s-node02   <none>           <none>
# 修改 myapp 日志配置,打开日志显示
[root@k8s-master01 7]# kubectl exec -it volume-emptydir-disk-pod -c myapp -- /bin/sh
/ # vi /etc/nginx/conf.d/default.conf
..........
    access_log  /usr/local/nginx/logs/access.log  main;
..........
/ # nginx -s reload
2025/06/18 05:43:02 [notice] 17#17: signal process started
/ # tail -f /var/log/nginx/host.access.log

# 新开一个终端,访问 pod, 容器内接收到访问
[root@k8s-master01 7]# curl 10.244.58.223
Hello MyApp | Version: v1 | <a href="hostname.html">Pod Name</a>

# 原终端中收到日志,退出容器
/ # tail -f /var/log/nginx/host.access.log
192.168.66.11 - - [18/Jun/2025:05:44:10 +0000] "GET / HTTP/1.1" 200 65 "-" "curl/7.76.1" "-"
^C
/etc/nginx/conf.d # exit
command terminated with exit code 130
# 登录busybox 容器,因为 emptyDir 挂载,所以也有 myapp 的日志
[root@k8s-master01 7]# kubectl exec -it volume-emptydir-disk-pod -c busybox -- /bin/sh
/ # tail -f logs/access.log
192.168.66.11 - - [18/Jun/2025:06:09:50 +0000] "GET / HTTP/1.1" 200 65 "-" "curl/7.76.1" "-"
在 kubelet 的工作目录(root-dir 参数控制),默认为 /var/lib/kubelet,会为每个使用了emptyDir: {} 的 pod 创建一个目录,格式如 /var/lib/kubelet/pods/{poduid}/volumes/kubernetes.io~empty-dir/,所有放在 emptyDir 中数据,最终都是落在了 node 的上述路径中
[root@k8s-master01 7]# kubectl get pod -o wide
NAME                       READY   STATUS    RESTARTS   AGE   IP              NODE         NOMINATED NODE   READINESS GATES
volume-emptydir-disk-pod   2/2     Running   0          45m   10.244.58.223   k8s-node02   <none>           <none>
[root@k8s-master01 7]# kubectl get pod volume-emptydir-disk-pod -o yaml|grep uid
  uid: 0dd78971-5325-473f-a5b7-d62eb3ab95f3

[root@k8s-node02 ~]# yum -y install tree
..........
Complete!
[root@k8s-node02 ~]# cd /var/lib/kubelet/pods/0dd78971-5325-473f-a5b7-d62eb3ab95f3/
[root@k8s-node02 0dd78971-5325-473f-a5b7-d62eb3ab95f3]# tree
.
├── containers
│   ├── busybox
│   │   └── 378a8aef
│   └── myapp
│       └── 10101931
├── etc-hosts
├── plugins
│   └── kubernetes.io~empty-dir
│       ├── logs-volume
│       │   └── ready
│       └── wrapped_kube-api-access-ck95v
│           └── ready
└── volumes
    ├── kubernetes.io~empty-dir
    │   └── logs-volume
    │       └── access.log
    └── kubernetes.io~projected
        └── kube-api-access-ck95v
            ├── ca.crt -> ..data/ca.crt
            ├── namespace -> ..data/namespace
            └── token -> ..data/token

12 directories, 9 files
# 对当前文件进行写入
[root@k8s-node02 0dd78971-5325-473f-a5b7-d62eb3ab95f3]# cat volumes/kubernetes.io~empty-dir/logs-volume/access.log
192.168.66.11 - - [18/Jun/2025:06:09:50 +0000] "GET / HTTP/1.1" 200 65 "-" "curl/7.76.1" "-"
[root@k8s-node02 0dd78971-5325-473f-a5b7-d62eb3ab95f3]# echo "junnan666" >> volumes/kubernetes.io~empty-dir/logs-volume/access.log
# 通过挂载,查看 busybox 日志可以查看到,说明 卷最后落在宿主机磁盘上
[root@k8s-master01 7]# kubectl logs volume-emptydir-disk-pod -c busybox
192.168.66.11 - - [18/Jun/2025:06:09:50 +0000] "GET / HTTP/1.1" 200 65 "-" "curl/7.76.1" "-"
192.168.66.11 - - [18/Jun/2025:06:30:40 +0000] "GET / HTTP/1.1" 200 65 "-" "curl/7.76.1" "-"
junnan666
(3)Volume emptyDIr 共享内存
[root@k8s-master01 7]# cat 15.pod.yaml
apiVersion: v1
kind: Pod
metadata:
 name: volume-emptydir-mem
 namespace: default
spec:
 containers:
 - name: myapp
   image: myapp:v1.0
   ports:
   - containerPort: 80
   resources:
     limits:
       cpu: "1"
       memory: 1024Mi
     requests:
       cpu: "1"
       memory: 1024Mi
   volumeMounts:
   - name: mem-volume
     mountPath: /data
 volumes:
 - name: mem-volume
   emptyDir:
     medium: Memory
     sizeLimit: 500Mi
4.期望:容器组:容器名、基于镜像版本、定义端口:端口值、资源限制:最大限制:cpu、内存、初始限制:cpu、内存、卷绑定:卷名、挂载到容器路径
定义卷:卷名、卷类型:卷的媒介类型(共享形式)、限制大小(内存要小于资源限制的大小)
优劣势:
内存:速度快、不稳定
磁盘:稳定、速度慢
7.5.3 Volume hostPath
(1)Volume hostPath 概念
hostPath 卷将主机节点的文件系统中的文件或目录挂载到集群中
hostPath 用途如下
运行需要访问 Docker 内部的容器;使用 /var/lib/docker 的 hsotPath(Pod 内通过挂载docker,可以获取其他容器信息)
在容器中共运行 cAdvisor(猫头鹰服务);使用 /dev/cgroups 的 hostPath(监控,收集资源使用情况)
允许 pod 指定给定的 hsotPath 是否应该在 pod 运行之前存在,是否应该创建,以及它应该以什么形式存在(可以前置检测)
除了所需的 path 属性之外,用户还可以为 hostPath 卷指定 type
(2)Volume hostPath 类型
可以做到如下判断:
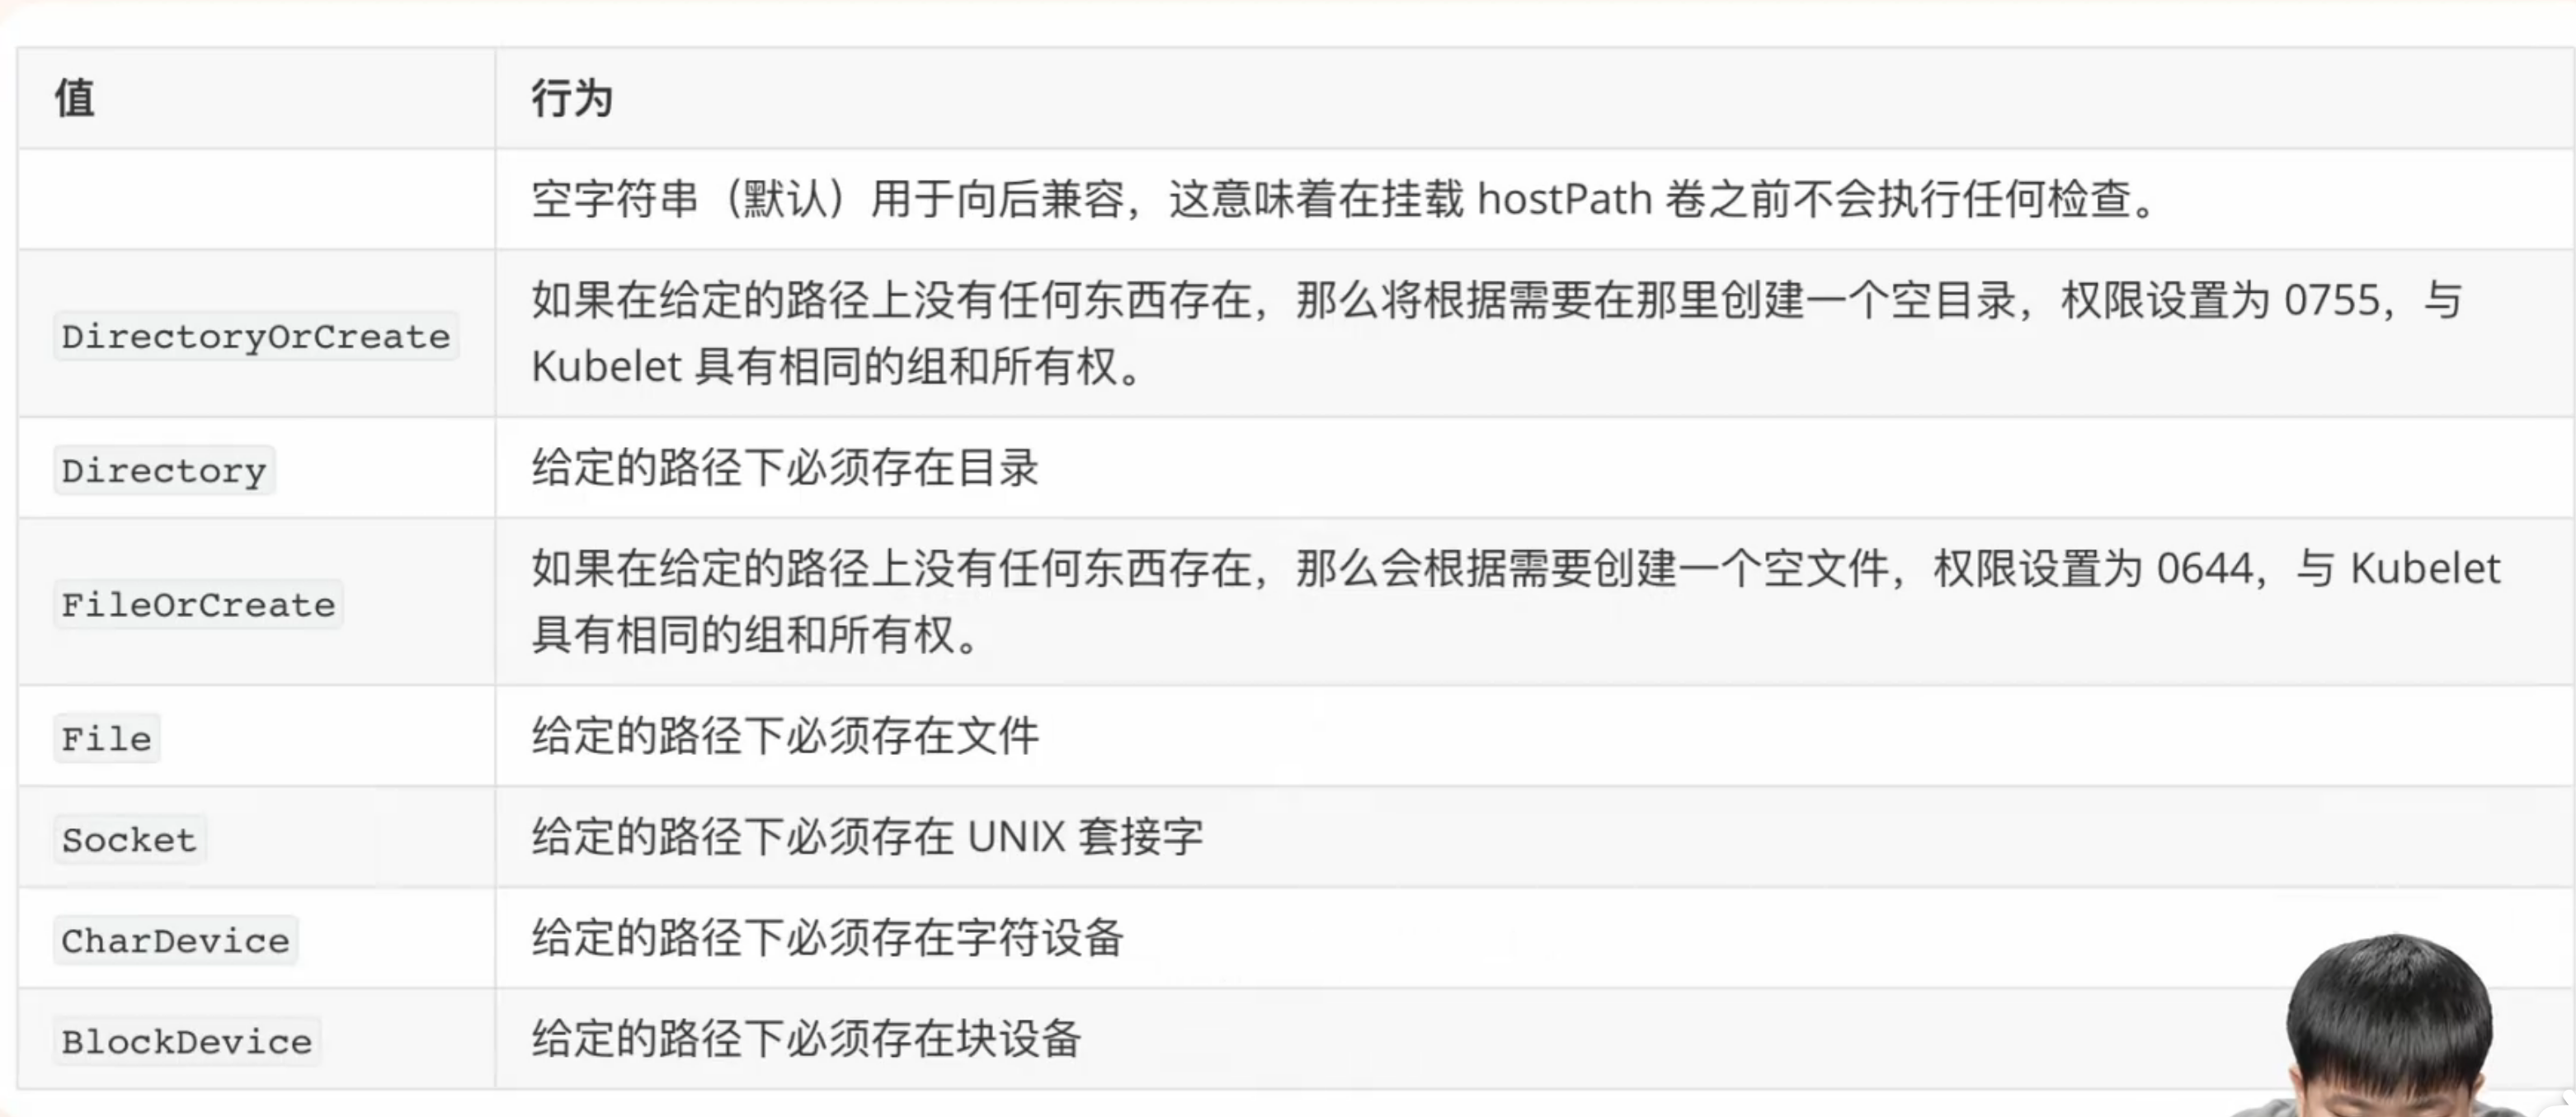
(3)Volume hostPath 注意
由于每个节点上的文件都不同,即使具有相同配置(例如:podTemplate 创建的 Pod)的 pod 在不同节点上的行为也可能会有所不同
当 Kubernetes 按照计划添加资源感知调度时,将无法考虑 hostPath 使用的资源(不同服务器后端挂载的 /mnt 资源不同,可以有nfs、ceph等,调度时无法判断 /mnt 后端的资源类型)
在底层主机上创建的文件或目录只能由 root 写入。需要在特权容器中以 root 身份运行进程,或修改主机上的文件权限以便写入 hostPath 卷(使用主机路径时,要考虑主机路径用户、权限,防止挂载到容器中不能用)
(4)Volume hostPath 实验
[root@k8s-master01 7]# cat 16.pod.yaml
apiVersion: v1
kind: Pod
metadata:
 name: hostpath-pod
spec:
 containers:
 - image: myapp:v1.0
   name: myapp
   volumeMounts:
   - mountPath: /test-pd
     name: test-volume
 volumes:
 - name: test-volume
   hostPath:
      # directory location on host
     path: /test
      # this field is optional
     type: Directory
4.期望:容器组:基于镜像版本、容器名、卷绑定:挂载到容器路径、卷名
定义卷声明:卷名、主机路径:主机路径(分配 pod 所在物理节点的 /test)、卷类型检测:目录
[root@k8s-master01 7]# kubectl apply -f 16.pod.yaml
pod/hostpath-pod created
[root@k8s-master01 7]# kubectl get pod -o wide
NAME           READY   STATUS              RESTARTS   AGE   IP       NODE         NOMINATED NODE   READINESS GATES
hostpath-pod   0/1     ContainerCreating   0          4s    <none>   k8s-node02   <none>           <none>
[root@k8s-master01 7]# kubectl describe pod hostpath-pod
Name:             hostpath-pod
Namespace:        default
........
Events:
  Type     Reason       Age                From               Message
  ----     ------       ----               ----               -------
  Normal   Scheduled    11s                default-scheduler  Successfully assigned default/hostpath-pod to k8s-node02
  Warning  FailedMount  56s (x5 over 64s)  kubelet            MountVolume.SetUp failed for volume "test-volume" : hostPath type check failed: /test is not a directory
[root@k8s-master01 7]# kubectl delete pod hostpath-pod
pod "hostpath-pod" deleted

# 上面是因为没有目录所以 Pod 创建不成功,在node01、node02 物理节点创建目录,并写入主机名
[root@k8s-node01 ~]# mkdir /test
[root@k8s-node01 ~]# hostname > /test/index.html
[root@k8s-node02 ~]# mkdir /test
[root@k8s-node02 ~]# hostname > /test/index.html

# 再次运行 Pod,创建成功,进入 Pod 中,里面有节点的信息,由 -o wide 可知,在 node02 节点,再写入数据,到 node02 节点有信息,验证挂载在物理节点
[root@k8s-master01 7]# kubectl apply -f 16.pod.yaml
pod/hostpath-pod created
[root@k8s-master01 7]# kubectl get pod -o wide
NAME           READY   STATUS    RESTARTS   AGE   IP              NODE         NOMINATED NODE   READINESS GATES
hostpath-pod   1/1     Running   0          5s    10.244.58.231   k8s-node02   <none>           <none>
[root@k8s-master01 7]# kubectl exec -it hostpath-pod -- /bin/sh
/ # cd /test-pd/
/test-pd # cat index.html
k8s-node02
/test-pd # echo "junnan666" >> index.html

[root@k8s-node02 ~]# cat /test/index.html
k8s-node02
junnan666
7.6 Pv/Pvc
——— 存储中的各司其职(静态pv)
7.6.1 结构图解析
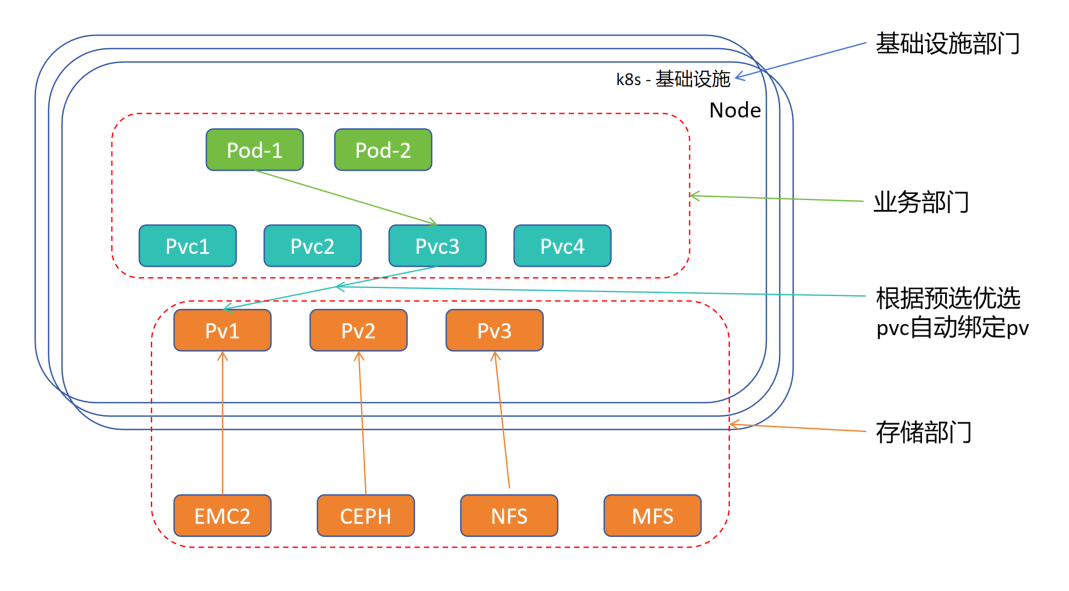
1.各部门责任细分,使各责任人变成可替代性。(各部门需要跨部门沟通,会出现甩锅,推迟现象),创建存储需求后,可以自动匹配后端满足的存储服务,减少沟通成本
2.kubernetes 集群由基础设施部门创建维护,存储由存储部门创建维护,业务部门部署 Pod 资源清单
3.业务部门部署 Pod 资源清单,Pod 去绑定 持久卷申请PVC(PVC中会描述需求,例如:容量、读写策略、类、回收策略等),然后 持久卷申请PVC 去匹配 持久卷PV
4.存储部门搭建各存储服务后,只需要将各个存储服务抽象成各类 PV,自会由有对应需求的 PVC 去根据条件绑定 PV(根据预选和优选,预选:符合条件的,优选:符合条件中评分最高的)
5.实现 Pod -> Pvc -> Pv -> 存储,从而使架构解藕
业务部门部署资源清单,只需要在 Pod 中描述 持久卷申请PVC 既可,PVC 会根据要求自动匹配后端 持久卷PV(PV 会被存储部门创建几类),而不需要每部署一个 Pod,就需要让存储部门去创建对应的存储。
7.6.2 PV/PVC - 关联条件
容量:PV 的值不小于 PVC 要求,可以大于,最好一致(PVC 要求 1G,那么 PV 必须大于等于 1G,这是预选,优选是等于1G)
读写策略:需要完全匹配
单节点读写 ReadWriteOnce - RWO
多节点只读 ReadOnlyMany - ROX
多节点读写 ReadWriteMany - RWX
单 Pod 读写 ReadWriteOncePod - RWOP
例如:ISCSI 叫块存储,挂载使用时,需要进行对应格式化,格式化后的文件系统 EXT4、XFS,都叫本地文件系统,只有本地锁,没有网络锁。GFS 文件系统有网络锁
支持 单节点读写
支持 多节点只读
不支持 多节点读写(是因为ISCSI多节点写入,会错误)
本地锁,例如:一个服务器A上进程a在 共享磁盘 写入,另一个进程b也想写入,进程b要等a写入完再写入(同一服务器,本地可锁),但当出现服务器B上进程c也写入时,多节点写入(不具备网络锁),文件有可能会损坏。
网络锁,例如:一个服务器A上进程a在 共享磁盘 写入,另一个进程b也想写入,进程b要等a写入完再写入,当出现服务器B上进程c也写入时,服务器A与B通信(具备网络锁),服务器B上的c进程也要等a进程写入完再写入,避免多节点写入导致文件损坏。
存储类:PV 的类与 PVC 的类必须一致,不存在包容降级关系(类,人为定义的,可能后端存储稳定性、写入速度有所不同等分类,按类取所需)
7.6.3 PV/PVC - 回收策略
当有一天 pod 被杀死,Pvc 被孤立(Pvc 不死,Pv 将不会被释放),当删除 Pvc 时,Pv 没有绑定的 Pvc 以后,数据的回收策略
Retain(保留):手动回收(标记为不可就绪状态)
Recycle(回收):基本擦除(rm -rf /Thevolume/*)( NFS 和 HostPath 支持)
Delete(删除):关联的存储资产(例如AWS EBS、GCE PD、Azure Disk 和 OpenStack Cinder 卷)将被删除(云上)
当前,只有 NFS 和 HostPath 支持回收策略。AWS EBS、GCE PD、Azure Disk 和 Cinder 卷支持删除策略
7.6.4 PV/PVC - 状态
Available(可用)一块空闲资源还没有被任何声明所绑定
Bound(已绑定)卷已经被声明绑定
Released(已释放)声明被删除,但是资源还未被集群重新声明
Failed(失败)该卷的自动回收失败(返回码非0 )
命令行会显示绑定到 PV 的 PVC 的名称
7.6.5 PV/PVC - PVC 保护
PVC 保护的目的是确保由 pod 正在使用的 PVC 不会从系统中移除,因为如果被移除的话可能会导致数据丢失( Pvc 绑定 Pv 时,Pv 不允许被删除 )
注意:当 pod 状态为 Pending 并且 pod 已经分配给节点或 pod 为 Running 状态时,PVC 处于活动状态
当启用 PVC 保护功能时,如果用户删除了一个 pod 正在使用的 PVC,则该 PVC 不会被立即删除。PVC 的删除将被推迟,直到 PVC 不再被任何 pod 使用(Pod在时,删除 Pvc,Pvc 不会被删除,当使用 Pvc 的 Pod 被删除,Pvc 会被删除)
7.6.6 PV/PVC - StatefulSet 部署
——— 需要保存相关数据的是有状态应用
(1)安装 NFS 服务器
# nfs-common 是 红帽 7.x 以下才有的软件包,7.x 以上不用安转
# 三个节点操作 安装
[root@k8s-master01 ~]# yum install -y nfs-utils rpcbind
[root@k8s-node01 ~]# yum install -y nfs-utils rpcbind
[root@k8s-node02 ~]# yum install -y nfs-utils rpcbind
# nfs 分为服务端和客户端,这里使 master01 即是服务端,也是客户端
# 创建共享目录,并授权,授用户,模拟各目录数据用于验证
[root@k8s-master01 ~]# mkdir /nfsdata
[root@k8s-master01 ~]# chmod 666 /nfsdata
[root@k8s-master01 ~]# chown nobody /nfsdata
[root@k8s-master01 ~]# cd /nfsdata/
[root@k8s-master01 nfsdata]# for i in `seq 10`;do mkdir $i;echo ${i} > ${i}/index.html;done
# /nfsdata 挂载目录,* 授权所有客户端可以绑定,(rw 读写模式,no_root_squash 不能用root用户绑定,no_all_squash 匿名,sync 同步内存到硬盘)
# 基于 nfs 封装成 10 个 Pv
[root@k8s-master01 nfsdata]# cat /etc/exports
/nfsdata/1 *(rw,no_root_squash,no_all_squash,sync)
/nfsdata/2 *(rw,no_root_squash,no_all_squash,sync)
/nfsdata/3 *(rw,no_root_squash,no_all_squash,sync)
/nfsdata/4 *(rw,no_root_squash,no_all_squash,sync)
/nfsdata/5 *(rw,no_root_squash,no_all_squash,sync)
/nfsdata/6 *(rw,no_root_squash,no_all_squash,sync)
/nfsdata/7 *(rw,no_root_squash,no_all_squash,sync)
/nfsdata/8 *(rw,no_root_squash,no_all_squash,sync)
/nfsdata/9 *(rw,no_root_squash,no_all_squash,sync)
/nfsdata/10 *(rw,no_root_squash,no_all_squash,sync)
# 在 RH 8及以下 nfs 就叫 nfs,其上是 nfs-server,目前使用RH 9.5,所以要启动 nfs-server
[root@k8s-master01 nfsdata]# systemctl restart nfs-server && systemctl enable nfs-server
[root@k8s-master01 nfsdata]# systemctl restart rpcbind && systemctl enable rpcbind
# 目录以基于 nfs 实现共享,
[root@k8s-master01 nfsdata]# showmount -e 192.168.66.11
Export list for 192.168.66.11:
/nfsdata/10 *
/nfsdata/9  *
/nfsdata/8  *
/nfsdata/7  *
/nfsdata/6  *
/nfsdata/5  *
/nfsdata/4  *
/nfsdata/3  *
/nfsdata/2  *
/nfsdata/1  *
# 实验验证,挂载数据写入,mount 挂载、nfs 类型、服务端挂载路径、客户端挂载路径
[root@k8s-node01 ~]# mkdir /nfstest
[root@k8s-node01 ~]# mount -t nfs 192.168.66.11:/nfsdata/1 /nfstest
[root@k8s-node01 ~]# cat /nfstest/index.html
1
[root@k8s-node01 ~]# echo 'junnan666' >> /nfstest/index.html
# 验证 node01 节点写入,服务端的挂载数据已经写入
[root@k8s-master01 ~]# cat /nfsdata/1/index.html
1
junnan666
# 解除挂载
[root@k8s-node01 ~]# umount /nfstest/
(2)部署 PV
[root@k8s-master01 7.17]# cat pv.yaml
apiVersion: v1
kind: PersistentVolume
metadata:
 name: nfspv1
spec:
 capacity:
   storage: 1Gi
 accessModes:
   - ReadWriteOnce
 persistentVolumeReclaimPolicy: Recycle
 storageClassName: nfs
 nfs:
   path: /nfsdata/1
   server: 192.168.66.11
---
apiVersion: v1
kind: PersistentVolume
metadata:
 name: nfspv2
spec:
 capacity:
   storage: 0.9Gi
 accessModes:
   - ReadWriteOnce
 persistentVolumeReclaimPolicy: Recycle
 storageClassName: nfs
 nfs:
   path: /nfsdata/2
   server: 192.168.66.11
---
apiVersion: v1
kind: PersistentVolume
metadata:
 name: nfspv3
spec:
 capacity:
   storage: 1.2Gi
 accessModes:
   - ReadWriteOnce
 persistentVolumeReclaimPolicy: Recycle
 storageClassName: nfs
 nfs:
   path: /nfsdata/3
   server: 192.168.66.11
---
apiVersion: v1
kind: PersistentVolume
metadata:
 name: nfspv4
spec:
 capacity:
   storage: 1Gi
 accessModes:
   - ReadWriteOnce
 persistentVolumeReclaimPolicy: Recycle
 storageClassName: nfs
 nfs:
   path: /nfsdata/4
   server: 192.168.66.11
---
apiVersion: v1
kind: PersistentVolume
metadata:
 name: nfspv5
spec:
 capacity:
   storage: 1Gi
 accessModes:
   - ReadWriteMany
 persistentVolumeReclaimPolicy: Recycle
 storageClassName: nfs
 nfs:
   path: /nfsdata/5
   server: 192.168.66.11
---
apiVersion: v1
kind: PersistentVolume
metadata:
 name: nfspv6
spec:
 capacity:
   storage: 1Gi
 accessModes:
   - ReadWriteOnce
 persistentVolumeReclaimPolicy: Recycle
 storageClassName: nfs1
 nfs:
   path: /nfsdata/6
   server: 192.168.66.11
---
apiVersion: v1
kind: PersistentVolume
metadata:
 name: nfspv7
spec:
 capacity:
   storage: 1Gi
 accessModes:
   - ReadWriteOnce
 persistentVolumeReclaimPolicy: Retain
 storageClassName: nfs
 nfs:
   path: /nfsdata/7
   server: 192.168.66.11
1.接口组版本:核心组 v1 版
2.类别:PersistentVolume 类
3.元数据:PersistentVolume 名
4.期望:pv 容量:存储空间、访问模式、持久卷回收策略、存储类名字、由 nfs 服务端提供:服务端提供路径、服务端的地址
# pv 和 pvc 关系:storage:pvc 容量 等于小于 pv 容量、accessModes:读写策略必须相同、storageClassName:类必须相同
[root@k8s-master01 7.17]# kubectl apply -f pv.yaml
persistentvolume/nfspv1 created
persistentvolume/nfspv2 created
persistentvolume/nfspv3 created
persistentvolume/nfspv4 created
persistentvolume/nfspv5 created
persistentvolume/nfspv6 created
persistentvolume/nfspv7 created
[root@k8s-master01 7.17]# kubectl get pv
NAME     CAPACITY         ACCESS MODES   RECLAIM POLICY   STATUS      CLAIM   STORAGECLASS   VOLUMEATTRIBUTESCLASS   REASON   AGE
nfspv1   1Gi              RWO            Recycle          Available           nfs            <unset>                          11s
nfspv2   966367641600m    RWO            Recycle          Available           nfs            <unset>                          11s
nfspv3   1288490188800m   RWO            Recycle          Available           nfs            <unset>                          11s
nfspv4   1Gi              RWO            Recycle          Available           nfs            <unset>                          11s
nfspv5   1Gi              RWX            Recycle          Available           nfs            <unset>                          11s
nfspv6   1Gi              RWO            Recycle          Available           nfs1           <unset>                          11s
nfspv7   1Gi              RWO            Retain           Available           nfs            <unset>                          11s
(3)创建服务并使用 PVC
[root@k8s-master01 7.17]# cat 1.pod.yaml
apiVersion: v1
kind: Service
metadata:
 name: nginx
 labels:
   app: nginx
spec:
 ports:
 - port: 80
   name: web
 clusterIP: None
 selector:
   app: nginx
---
apiVersion: apps/v1
kind: StatefulSet
metadata:
 name: web
spec:
 selector:
   matchLabels:
     app: nginx
 serviceName: "nginx"
 replicas: 3
 template:
   metadata:
     labels:
       app: nginx
   spec:
     containers:
     - name: nginx
       image: myapp:v1.0
       ports:
       - containerPort: 80
         name: web
       volumeMounts:
       - name: www
         mountPath: /usr/share/nginx/html
 volumeClaimTemplates:
 - metadata:
     name: www
   spec:
     accessModes: [ "ReadWriteOnce" ]
     storageClassName: "nfs"
     resources:
       requests:
         storage: 1
4.期望:端口:端口值、端口名、创建 ClusterIP :不创建、标签选择器:标签、标签值
1.接口组版本: apps 组 v1 版
2.类别:statefulSet 类
3.元数据:statefulSet 类名
4.statefulSet 期望:选择器:匹配运算符:标签、标签值、无头服务、副本数
Pod 模板:Pod 元数据:标签、标签值、Pod 期望:容器组:容器名、基于镜像版本、端口:容器端口、端口名、卷挂载绑定:卷名、挂载到容器路径
pvc 模板:元数据:pvc名、pvc 期望:读写模式、存储类型、资源配置:请求容量:存储 1G
# 副本数是3,会自动创建 3 个 PVC,PVC 去匹配满足条件的 PV
[root@k8s-master01 7.17]# kubectl apply -f 1.pod.yaml
service/nginx created
statefulset.apps/web created
# clusterip 类型,但是是 none,没有负载集群,没有 vip,但是又有endpoints,主要为了写 DNS 记录,通过内部可以进行基于域名的访问
[root@k8s-master01 7.17]# kubectl get svc
NAME         TYPE        CLUSTER-IP   EXTERNAL-IP   PORT(S)   AGE
kubernetes   ClusterIP   10.0.0.1     <none>        443/TCP   22d
nginx        ClusterIP   None         <none>        80/TCP    111s
[root@k8s-master01 7.17]# kubectl get endpoints
NAME         ENDPOINTS                                            AGE
kubernetes   192.168.66.11:6443                                   22d
nginx        10.244.58.232:80,10.244.58.233:80,10.244.85.223:80   2m44s
[root@k8s-master01 7.17]# dig -t A nginx.default.svc.cluster.local @10.0.0.10

; <<>> DiG 9.16.23-RH <<>> -t A nginx.default.svc.cluster.local @10.0.0.10
;; global options: +cmd
;; Got answer:
;; WARNING: .local is reserved for Multicast DNS
;; You are currently testing what happens when an mDNS query is leaked to DNS
;; ->>HEADER<<- opcode: QUERY, status: NOERROR, id: 64741
;; flags: qr aa rd; QUERY: 1, ANSWER: 3, AUTHORITY: 0, ADDITIONAL: 1
;; WARNING: recursion requested but not available

;; OPT PSEUDOSECTION:
; EDNS: version: 0, flags:; udp: 4096
; COOKIE: cd7836100062d186 (echoed)
;; QUESTION SECTION:
;nginx.default.svc.cluster.local. IN    A

;; ANSWER SECTION:
nginx.default.svc.cluster.local. 30 IN    A    10.244.85.223
nginx.default.svc.cluster.local. 30 IN    A    10.244.58.233
nginx.default.svc.cluster.local. 30 IN    A    10.244.58.232

;; Query time: 0 msec
;; SERVER: 10.0.0.10#53(10.0.0.10)
;; WHEN: Thu Jun 19 23:18:42 CST 2025
;; MSG SIZE  rcvd: 213

# pod 名字是从 web-0 开始有序递增的
[root@k8s-master01 7.17]# kubectl get pod -o wide
NAME    READY   STATUS    RESTARTS   AGE   IP              NODE         NOMINATED NODE   READINESS GATES
web-0   1/1     Running   0          12m   10.244.85.223   k8s-node01   <none>           <none>
web-1   1/1     Running   0          12m   10.244.58.232   k8s-node02   <none>           <none>
web-2   1/1     Running   0          12m   10.244.58.233   k8s-node02   <none>           <none>
[root@k8s-master01 7.17]# kubectl get statefulset -o wide
NAME   READY   AGE   CONTAINERS   IMAGES
web    3/3     14m   nginx        myapp:v1.0
[root@k8s-master01 7.17]# kubectl scale statefulset web --replicas=10
statefulset.apps/web scaled
# 添加副本,pod 是有序递增的,前一个 pod 启动完成,后一个才会启动
[root@k8s-master01 7.17]# kubectl get pod -o wide
NAME    READY   STATUS    RESTARTS   AGE   IP              NODE         NOMINATED NODE   READINESS GATES
web-0   1/1     Running   0          16m   10.244.85.223   k8s-node01   <none>           <none>
web-1   1/1     Running   0          16m   10.244.58.232   k8s-node02   <none>           <none>
web-2   1/1     Running   0          16m   10.244.58.233   k8s-node02   <none>           <none>
web-3   1/1     Running   0          48s   10.244.85.194   k8s-node01   <none>           <none>
web-4   1/1     Running   0          46s   10.244.58.237   k8s-node02   <none>           <none>
web-5   0/1     Pending   0          42s   <none>          <none>       <none>           <none>
# 创建到第6个 Pod 不创建了,因为有序,web-5 不成功,不会创建web-6,但是 web-5 没有满足的 pv 了
[root@k8s-master01 7.17]# kubectl describe pod web-5
..........
Events:
  Type     Reason            Age    From               Message
  ----     ------            ----   ----               -------
  Warning  FailedScheduling  2m55s  default-scheduler  0/3 nodes are available: pod has unbound immediate PersistentVolumeClaims. preemption: 0/3 nodes are available: 3 Preemption is not helpful for scheduling.
# pv5 不满足是因为要求 RWO,pv6不满足是因为 nfs1,其他 pv 先预选再优选,预选选符合的,优选打分,找分数高的
[root@k8s-master01 7.17]# kubectl get pv -o wide
NAME     CAPACITY         ACCESS MODES   RECLAIM POLICY   STATUS      CLAIM               STORAGECLASS   VOLUMEATTRIBUTESCLASS   REASON   AGE   VOLUMEMODE
nfspv1   1Gi              RWO            Recycle          Bound       default/www-web-2   nfs            <unset>                          48m   Filesystem
nfspv2   966367641600m    RWO            Recycle          Bound       default/www-web-0   nfs            <unset>                          48m   Filesystem
nfspv3   1288490188800m   RWO            Recycle          Bound       default/www-web-4   nfs            <unset>                          48m   Filesystem
nfspv4   1Gi              RWO            Recycle          Bound       default/www-web-1   nfs            <unset>                          48m   Filesystem
nfspv5   1Gi              RWX            Recycle          Available                       nfs            <unset>                          48m   Filesystem
nfspv6   1Gi              RWO            Recycle          Available                       nfs1           <unset>                          48m   Filesystem
nfspv7   1Gi              RWO            Retain           Bound       default/www-web-3   nfs            <unset>                          48m   Filesystem
# 数据持久,pod 内 web-0 写入外部可访问,删除 pod ,Pod 重构后,数据仍然存在
[root@k8s-master01 7.17]# curl 10.244.85.223
2
[root@k8s-master01 7.17]# kubectl exec -it web-0 -- /bin/sh
/ # cd /usr/share/nginx/html/
/usr/share/nginx/html # echo 'junnan666' >> index.html
/usr/share/nginx/html # exit
[root@k8s-master01 7.17]# curl 10.244.85.223
2
junnan666
[root@k8s-master01 7.17]# kubectl delete pod web-0
pod "web-0" deleted
[root@k8s-master01 7.17]# kubectl get pod -o wide
NAME    READY   STATUS    RESTARTS   AGE   IP              NODE         NOMINATED NODE   READINESS GATES
web-0   1/1     Running   0          3s    10.244.85.199   k8s-node01   <none>           <none>
web-1   1/1     Running   0          35m   10.244.58.232   k8s-node02   <none>           <none>
web-2   1/1     Running   0          35m   10.244.58.233   k8s-node02   <none>           <none>
web-3   1/1     Running   0          19m   10.244.85.194   k8s-node01   <none>           <none>
web-4   1/1     Running   0          19m   10.244.58.237   k8s-node02   <none>           <none>
web-5   0/1     Pending   0          19m   <none>          <none>       <none>           <none>
[root@k8s-master01 7.17]# curl 10.244.85.199
2
junnan666
# 启动一个 pod 充当客户端,访问 web-0,
[root@k8s-master01 7.17]# cat 1.yaml
apiVersion: v1
kind: Pod
metadata:
  name: pod-demo
  namespace: default
  labels:
    app: myapp
spec:
  containers:
  - name: myapp-1
    image: myapp:v3.0
    imagePullPolicy: Never
[root@k8s-master01 7.17]# kubectl apply -f 1.yaml
pod/pod-demo created
[root@k8s-master01 7.17]# kubectl get pod -o wide
NAME       READY   STATUS    RESTARTS   AGE   IP              NODE         NOMINATED NODE   READINESS GATES
pod-demo   1/1     Running   0          7s    10.244.58.242   k8s-node02   <none>           <none>
web-0      1/1     Running   0          24m   10.244.85.199   k8s-node01   <none>           <none>
web-1      1/1     Running   0          59m   10.244.58.232   k8s-node02   <none>           <none>
web-2      1/1     Running   0          59m   10.244.58.233   k8s-node02   <none>           <none>
web-3      1/1     Running   0          43m   10.244.85.194   k8s-node01   <none>           <none>
web-4      1/1     Running   0          43m   10.244.58.237   k8s-node02   <none>           <none>
web-5      0/1     Pending   0          43m   <none>          <none>       <none>           <none>
[root@k8s-master01 7.17]# kubectl exec -it pod-demo -- /bin/sh
/ # wget http://web-0.nginx.default.svc.cluster.local./index.html && cat index.html && rm -rf index.html
Connecting to web-0.nginx.default.svc.cluster.local. (10.244.85.199:80)
index.html           100% |********************************************************************************************************************************************|    12   0:00:00 ETA
2
junnan666

# 外部再次删除 web-0 Pod,然后再访问
[root@k8s-master01 7.17]# kubectl delete pod web-0
pod "web-0" deleted

# 客户端 访问相同域名,web-0 Pod 的 IP 地址发生改变
/ # wget http://web-0.nginx.default.svc.cluster.local./index.html && cat index.html && rm -rf index.html
Connecting to web-0.nginx.default.svc.cluster.local. (10.244.85.203:80)
index.html           100% |********************************************************************************************************************************************|    12   0:00:00 ETA
2
junnan666
(4)statefulSet 特性总结
1.有序创建,上一个 pod 没有 RUNNING,下一个 pod 不允许创建,有序回收,倒序
2.数据持久化 Pod 级别(将 Pod 摧毁,数据仍然一致) pod -> pvc -> pv -> nfs
3.稳定的网络访问方式
域名:podName.headlessSvcName.nsName.svc.domainName.
statefulSetName-Num.headlessSvcName.nsName.svc.domainName.
(5)statefulSet 回收
# 删除 Pod , Pvc 仍然存在(pvc 默认保留还是删除在 字段中有定义),再次创建 pod, 因为 pod 中定义没变,pvc 模板没变,所以 pv 可以被复用,且 pv 中的 数据仍然存在, web-0 数据存在
[root@k8s-master01 7.17]# kubectl delete -f 1.pod.yaml
service "nginx" deleted
statefulset.apps "web" deleted
[root@k8s-master01 7.17]# kubectl get pod -o wide
NAME       READY   STATUS    RESTARTS   AGE   IP              NODE         NOMINATED NODE   READINESS GATES
pod-demo   1/1     Running   0          15m   10.244.58.242   k8s-node02   <none>           <none>
[root@k8s-master01 7.17]# kubectl get pvc
NAME        STATUS    VOLUME   CAPACITY         ACCESS MODES   STORAGECLASS   VOLUMEATTRIBUTESCLASS   AGE
www-web-0   Bound     nfspv2   966367641600m    RWO            nfs            <unset>                 75m
www-web-1   Bound     nfspv4   1Gi              RWO            nfs            <unset>                 75m
www-web-2   Bound     nfspv1   1Gi              RWO            nfs            <unset>                 75m
www-web-3   Bound     nfspv7   1Gi              RWO            nfs            <unset>                 59m
www-web-4   Bound     nfspv3   1288490188800m   RWO            nfs            <unset>                 59m
www-web-5   Pending                                            nfs            <unset>                 59m
[root@k8s-master01 7.17]# kubectl apply -f 1.pod.yaml
service/nginx created
statefulset.apps/web created
[root@k8s-master01 7.17]# kubectl get pvc
NAME        STATUS    VOLUME   CAPACITY         ACCESS MODES   STORAGECLASS   VOLUMEATTRIBUTESCLASS   AGE
www-web-0   Bound     nfspv2   966367641600m    RWO            nfs            <unset>                 80m
www-web-1   Bound     nfspv4   1Gi              RWO            nfs            <unset>                 80m
www-web-2   Bound     nfspv1   1Gi              RWO            nfs            <unset>                 80m
www-web-3   Bound     nfspv7   1Gi              RWO            nfs            <unset>                 64m
www-web-4   Bound     nfspv3   1288490188800m   RWO            nfs            <unset>                 64m
www-web-5   Pending                                            nfs            <unset>                 63m
[root@k8s-master01 7.17]# kubectl get pod -o wide
NAME       READY   STATUS    RESTARTS   AGE   IP              NODE         NOMINATED NODE   READINESS GATES
pod-demo   1/1     Running   0          20m   10.244.58.242   k8s-node02   <none>           <none>
web-0      1/1     Running   0          29s   10.244.85.206   k8s-node01   <none>           <none>
web-1      1/1     Running   0          27s   10.244.58.230   k8s-node02   <none>           <none>
web-2      1/1     Running   0          25s   10.244.58.239   k8s-node02   <none>           <none>
[root@k8s-master01 7.17]# curl 10.244.85.206
2
junnan666
[root@k8s-master01 7.17]# kubectl delete -f 1.pod.yaml
service "nginx" deleted
statefulset.apps "web" deleted
[root@k8s-master01 7.17]# kubectl delete pvc --all
persistentvolumeclaim "www-web-0" deleted
persistentvolumeclaim "www-web-1" deleted
persistentvolumeclaim "www-web-2" deleted
persistentvolumeclaim "www-web-3" deleted
persistentvolumeclaim "www-web-4" deleted
persistentvolumeclaim "www-web-5" deleted
# 删除 pvc 后,pv 变成已释放状态 Released, 已释放状态的 pv 没有办法再被 pvc 绑定
[root@k8s-master01 7.17]# kubectl get pv
NAME     CAPACITY         ACCESS MODES   RECLAIM POLICY   STATUS      CLAIM               STORAGECLASS   VOLUMEATTRIBUTESCLASS   REASON   AGE
nfspv1   1Gi              RWO            Recycle          Released    default/www-web-2   nfs            <unset>                          103m
nfspv2   966367641600m    RWO            Recycle          Released    default/www-web-0   nfs            <unset>                          103m
nfspv3   1288490188800m   RWO            Recycle          Released    default/www-web-4   nfs            <unset>                          103m
nfspv4   1Gi              RWO            Recycle          Released    default/www-web-1   nfs            <unset>                          103m
nfspv5   1Gi              RWX            Recycle          Available                       nfs            <unset>                          103m
nfspv6   1Gi              RWO            Recycle          Available                       nfs1           <unset>                          103m
nfspv7   1Gi              RWO            Retain           Released    default/www-web-3   nfs            <unset>                          103m
# 修改 pv 状态的两种方法 一,重新创建(删除后,就不知道之前绑定给那个 pvc, 再创建,是全新的 pv)
[root@k8s-master01 7.17]# kubectl delete pv nfspv1
persistentvolume "nfspv1" deleted
[root@k8s-master01 7.17]# head -n 14 pv.yaml > 1.pv.yaml
[root@k8s-master01 7.17]# kubectl apply -f 1.pv.yaml
persistentvolume/nfspv1 created
[root@k8s-master01 7.17]# kubectl get pv
NAME     CAPACITY         ACCESS MODES   RECLAIM POLICY   STATUS      CLAIM               STORAGECLASS   VOLUMEATTRIBUTESCLASS   REASON   AGE
nfspv1   1Gi              RWO            Recycle          Available                       nfs            <unset>                          4s
nfspv2   966367641600m    RWO            Recycle          Failed      default/www-web-0   nfs            <unset>                          109m
nfspv3   1288490188800m   RWO            Recycle          Failed      default/www-web-4   nfs            <unset>                          109m
nfspv4   1Gi              RWO            Recycle          Failed      default/www-web-1   nfs            <unset>                          109m
nfspv5   1Gi              RWX            Recycle          Available                       nfs            <unset>                          109m
nfspv6   1Gi              RWO            Recycle          Available                       nfs1           <unset>                          109m
nfspv7   1Gi              RWO            Retain           Released    default/www-web-3   nfs            <unset>                          109m

# 修改 pv 状态的两种方法 二,直接删除绑定的 pvc 信息,删除如下字段
[root@k8s-master01 7.17]# kubectl edit pv nfspv7
.........
  claimRef:
    apiVersion: v1
    kind: PersistentVolumeClaim
    name: www-web-3
    namespace: default
    resourceVersion: "1052944"
    uid: fc2e81d7-eb09-4516-a9e5-14228b73808c
.........
persistentvolume/nfspv7 edited
[root@k8s-master01 7.17]# kubectl get pv
NAME     CAPACITY         ACCESS MODES   RECLAIM POLICY   STATUS      CLAIM               STORAGECLASS   VOLUMEATTRIBUTESCLASS   REASON   AGE
nfspv2   966367641600m    RWO            Recycle          Failed      default/www-web-0   nfs            <unset>                          115m
nfspv3   1288490188800m   RWO            Recycle          Failed      default/www-web-4   nfs            <unset>                          115m
nfspv4   1Gi              RWO            Recycle          Failed      default/www-web-1   nfs            <unset>                          115m
nfspv5   1Gi              RWX            Recycle          Available                       nfs            <unset>                          115m
nfspv6   1Gi              RWO            Recycle          Available                       nfs1           <unset>                          115m
nfspv7   1Gi              RWO            Retain           Available                       nfs            <unset>                          115m
7.7 storageClass
——— 一种动态的申请存储机制(动态pv)
7.7.1 storageClass 概念
StorageClass 是一种资源对象,用于定义持久卷( Persistent Volumes )的动态供给 (Dynamic Provisioning)策略。StorageClass 允许管理员定义不同类型的存储,并指定如何动态创建持久卷以供应用程序使用。这使得 Kubernetes 集群中的存储管理更加灵活
1.可能需要一个比较精准的 pv,比如 1.98G,但是没有此大小的 pv,存储工程师能提供 2G,5G这种,又陷入了跨部门沟通环节
2.在 Service 中讲解的 loadbalancer 类型可以对接云供应商的 LAAS 服务,在 LAAS 服务基础上可以通过 API接口调用,创建对应的负载均衡(动态创建的概念)。
3.云供应商提供存储空间并以 API接口 方式对外暴露,通过调用 API接口 可以创建存储和使用存储。
4.集群中有云供应商对集群存储的抽象,储存类(云供应商对比工厂,存储类对比直销店,客户去直销店订车,直销店通知工厂,工厂造好对应需求的车给直销店,直销店给用户交付)
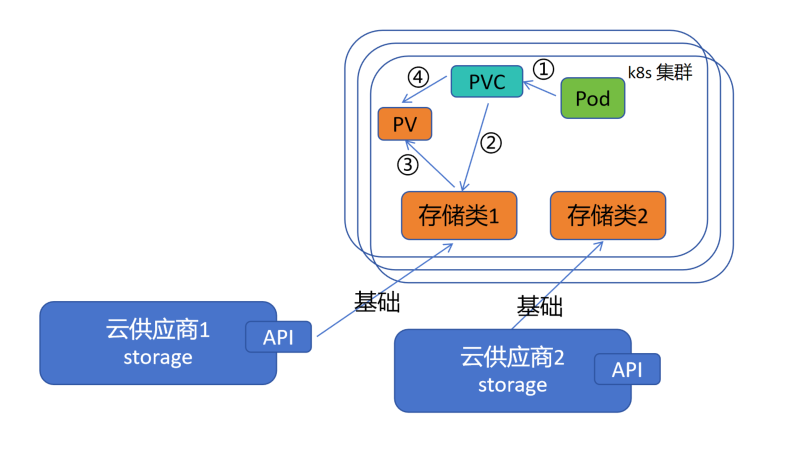
1.在 Pod 的资源清单中,定义 Pod 挂载的 Pvc,在 Pvc 中定义所需 存储空间、存储策略、回收策略 等,包括从哪个供应商中创建 Pv
2.Pvc 根据定义找到对应的存储类(存储类后端可以是阿里、华为、腾讯等云供应商提供),Pod 中资源定义的 Pv 需求创建信息通过 Pvc 传递给 存储类
3.云供应商根据需求量身打造一个需要的 Pv,Pvc 再去绑定定制的 PV
7.7.2 nfs-client-provisioner 供货商
nfs-client-provisioner 是一个 Kubernetes 供应商,用于动态提供由 NFS(Network File System)共享支持的持久卷。在 Kubernetes 中,持久卷是独立于 pod 存在的存储资源,可以在 pod 重新启动或重新调度时持久地存储数据。
nfs-client-provisioner 自动化根据需要创建持久卷的过程,通过与 NFS 服务器交互。在需要再 Kubernetes 集群中为应用程序动态分配存储而无需手动管理 NFS 共享和持久卷创建的情况下,这尤其有用。
1.安装 nfs 服务并把 nfs配置提供给 nsf-client-provisioner 供应商
2.把 nsf-client-provisioner 供应商的项目转换成 存储类,放到集群内部
3.Pod 中定义 Pvc 向 供应商进行申请,供应商创建 PV 卷
4.Pvc 绑定由供应商创建的 Pv,形成绑定关联
5.Pod 可以使用动态提供的 PV 进行数据持久化
7.7.3 动态 Pv 实验
(1)搭建 NFS 服务器
# 前面实验做过已安装 nfs,可以忽略此步
$ dnf install nfs-utils rpcbind
$ mkdir /nfsdata
$ chown nobody /nfsdata
$ cat /etc/exports
 /nfsdata   *(rw,sync,no_subtree_check)
$ systemctl enable nfs-server && systemctl start nfs-server
$ showmount -e 192.168.10.11
(2)部署 nfs-client-provisioner
# 基于前面基础,开始进行实验的搭建,/nfsdata/share 成为动态提供的目录
[root@k8s-master01 ~]# mkdir /nfsdata/share
[root@k8s-master01 ~]# cat /etc/exports
/nfsdata/1 *(rw,no_root_squash,no_all_squash,sync)
/nfsdata/2 *(rw,no_root_squash,no_all_squash,sync)
/nfsdata/3 *(rw,no_root_squash,no_all_squash,sync)
/nfsdata/4 *(rw,no_root_squash,no_all_squash,sync)
/nfsdata/5 *(rw,no_root_squash,no_all_squash,sync)
/nfsdata/6 *(rw,no_root_squash,no_all_squash,sync)
/nfsdata/7 *(rw,no_root_squash,no_all_squash,sync)
/nfsdata/8 *(rw,no_root_squash,no_all_squash,sync)
/nfsdata/9 *(rw,no_root_squash,no_all_squash,sync)
/nfsdata/10 *(rw,no_root_squash,no_all_squash,sync)
/nfsdata/share *(rw,no_root_squash,no_all_squash,sync)
[root@k8s-master01 ~]# systemctl restart nfs-server.service
[root@k8s-master01 ~]# showmount -e 192.168.66.11
Export list for 192.168.66.11:
/nfsdata/share *
/nfsdata/10    *
/nfsdata/9     *
/nfsdata/8     *
/nfsdata/7     *
/nfsdata/6     *
/nfsdata/5     *
/nfsdata/4     *
/nfsdata/3     *
/nfsdata/2     *
/nfsdata/1     *
(3)下载nfs-subdir-external-provisioner镜像包
nfs-subdir-external-provisioner:v4.0.2 容器镜像包下载地址
[root@k8s-master01 7.18]# tar -xvf k8s.gcr.io_sig-storage_nfs-subdir-external-provisioner_v4.0.2.tar.gz
nfs-subdir-external-provisioner.tar
[root@k8s-master01 7.18]# ls -ltr
total 61408
-rw------- 1 root root 45084160 Apr 22  2022 nfs-subdir-external-provisioner.tar
-rw-r--r-- 1 root root 17780875 Jun 23 15:15 k8s.gcr.io_sig-storage_nfs-subdir-external-provisioner_v4.0.2.tar.gz
[root@k8s-master01 7.18]# docker load -i nfs-subdir-external-provisioner.tar
1a5ede0c966b: Loading layer [==================================================>]  3.052MB/3.052MB
ad321585b8f5: Loading layer [==================================================>]  42.02MB/42.02MB
Loaded image: k8s.gcr.io/sig-storage/nfs-subdir-external-provisioner:v4.0.2
[root@k8s-master01 7.18]# docker images
REPOSITORY                                                                     TAG        IMAGE ID       CREATED         SIZE
..........
k8s.gcr.io/sig-storage/nfs-subdir-external-provisioner                         v4.0.2     932b0bface75   4 years ago     43.8MB
.........
# 分发到其他节点node01、node02,导入镜像
[root@k8s-master01 7.18]# scp k8s.gcr.io_sig-storage_nfs-subdir-external-provisioner_v4.0.2.tar.gz n1:/root
root@n1's password:
k8s.gcr.io_sig-storage_nfs-subdir-external-provisioner_v4.0.2.tar.gz                                                                                       100%   17MB  30.0MB/s   00:00
[root@k8s-master01 7.18]# scp k8s.gcr.io_sig-storage_nfs-subdir-external-provisioner_v4.0.2.tar.gz n2:/root
root@n2's password:
k8s.gcr.io_sig-storage_nfs-subdir-external-provisioner_v4.0.2.tar.gz                                                                                       100%   17MB  37.3MB/s   00:00

[root@k8s-node01 ~]# tar -xvf k8s.gcr.io_sig-storage_nfs-subdir-external-provisioner_v4.0.2.tar.gz
nfs-subdir-external-provisioner.tar
[root@k8s-node01 ~]# docker load -i nfs-subdir-external-provisioner.tar
1a5ede0c966b: Loading layer [==================================================>]  3.052MB/3.052MB
ad321585b8f5: Loading layer [==================================================>]  42.02MB/42.02MB
Loaded image: k8s.gcr.io/sig-storage/nfs-subdir-external-provisioner:v4.0.2
[root@k8s-node02 ~]# tar -xvf k8s.gcr.io_sig-storage_nfs-subdir-external-provisioner_v4.0.2.tar.gz
nfs-subdir-external-provisioner.tar
[root@k8s-node02 ~]# docker load -i nfs-subdir-external-provisioner.tar
1a5ede0c966b: Loading layer [==================================================>]  3.052MB/3.052MB
ad321585b8f5: Loading layer [==================================================>]  42.02MB/42.02MB
Loaded image: k8s.gcr.io/sig-storage/nfs-subdir-external-provisioner:v4.0.2
(4)资源清单部署
[root@k8s-master01 7.18]# cat deployment.yaml
kind: Deployment
apiVersion: apps/v1
metadata:
 name: nfs-client-provisioner
 namespace: nfs-storageclass
spec:
 replicas: 1
 selector:
   matchLabels:
     app: nfs-client-provisioner
 strategy:
   type: Recreate
 template:
   metadata:
     labels:
       app: nfs-client-provisioner
   spec:
     serviceAccountName: nfs-client-provisioner
     containers:
       - name: nfs-client-provisioner
          # image: registry.k8s.io/sig-storage/nfs-subdir-externalprovisioner:v4.0.2
         image: k8s.gcr.io/sig-storage/nfs-subdir-external-provisioner:v4.0.2
         volumeMounts:
           - name: nfs-client-root
             mountPath: /persistentvolumes
         env:
           - name: PROVISIONER_NAME
             value: k8s-sigs.io/nfs-subdir-external-provisioner
           - name: NFS_SERVER
              # value: <YOUR NFS SERVER HOSTNAME>
             value: 192.168.66.11
           - name: NFS_PATH
              # value: /var/nfs
             value: /nfsdata/share
     volumes:
       - name: nfs-client-root
         nfs:
            # server: <YOUR NFS SERVER HOSTNAME>
           server: 192.168.66.11
            # share nfs path
           path: /nfsdata/share
[root@k8s-master01 7.18]# cat rbac.yaml
apiVersion: v1
kind: ServiceAccount
metadata:
 name: nfs-client-provisioner
  # replace with namespace where provisioner is deployed
 namespace: nfs-storageclass
---
kind: ClusterRole
apiVersion: rbac.authorization.k8s.io/v1
metadata:
 name: nfs-client-provisioner-runner
rules:
 - apiGroups: [""]
   resources: ["nodes"]
   verbs: ["get", "list", "watch"]
 - apiGroups: [""]
   resources: ["persistentvolumes"]
   verbs: ["get", "list", "watch", "create", "delete"]
 - apiGroups: [""]
   resources: ["persistentvolumeclaims"]
   verbs: ["get", "list", "watch", "update"]
 - apiGroups: ["storage.k8s.io"]
   resources: ["storageclasses"]
   verbs: ["get", "list", "watch"]
 - apiGroups: [""]
   resources: ["events"]
   verbs: ["create", "update", "patch"]
---
kind: ClusterRoleBinding
apiVersion: rbac.authorization.k8s.io/v1
metadata:
 name: run-nfs-client-provisioner
subjects:
 - kind: ServiceAccount
   name: nfs-client-provisioner
    # replace with namespace where provisioner is deployed
   namespace: nfs-storageclass
roleRef:
 kind: ClusterRole
 name: nfs-client-provisioner-runner
 apiGroup: rbac.authorization.k8s.io
---
kind: Role
apiVersion: rbac.authorization.k8s.io/v1
metadata:
 name: leader-locking-nfs-client-provisioner
  # replace with namespace where provisioner is deployed
 namespace: nfs-storageclass
rules:
 - apiGroups: [""]
   resources: ["endpoints"]
   verbs: ["get", "list", "watch", "create", "update", "patch"]
---
kind: RoleBinding
apiVersion: rbac.authorization.k8s.io/v1
metadata:
 name: leader-locking-nfs-client-provisioner
  # replace with namespace where provisioner is deployed
 namespace: nfs-storageclass
subjects:
 - kind: ServiceAccount
   name: nfs-client-provisioner
    # replace with namespace where provisioner is deployed
   namespace: nfs-storageclass
roleRef:
 kind: Role
 name: leader-locking-nfs-client-provisioner
 apiGroup: rbac.authorization.k8s.io
[root@k8s-master01 7.18]# cat storageclass.yaml
apiVersion: storage.k8s.io/v1
kind: StorageClass
metadata:
 name: nfs-client
 namespace: nfs-storageclass
provisioner: k8s-sigs.io/nfs-subdir-external-provisioner
parameters:
 pathPattern: ${.PVC.namespace}/${.PVC.name}
 onDelete: delete
1.接口组版本:storage.k8s.io 组 v1 版
2.类别:StorageClass 类
3.元数据:StorageClass 类名、StorageClass 类的名字空间
4.供应商:供应商接口类型
5.创建的要求:创建路径(在原共享 /nfsdata/share/ 下创建共享的格式,在原共享目录下创建各个子目录)、删除后回收策略
[root@k8s-master01 7.18]# kubectl create namespace nfs-storageclass
namespace/nfs-storageclass created
[root@k8s-master01 7.18]# ls -ltr
total 61408
-rw------- 1 root root 45084160 Apr 22  2022 nfs-subdir-external-provisioner.tar
-rw-r--r-- 1 root root 17780875 Jun 23 15:15 k8s.gcr.io_sig-storage_nfs-subdir-external-provisioner_v4.0.2.tar.gz
-rw-r--r-- 1 root root     1188 Jun 23 16:13 deployment.yaml
-rw-r--r-- 1 root root     1907 Jun 23 16:15 rbac.yaml
-rw-r--r-- 1 root root      239 Jun 23 16:16 storageclass.yaml
[root@k8s-master01 7.18]# kubectl apply -f .
deployment.apps/nfs-client-provisioner created
serviceaccount/nfs-client-provisioner unchanged
clusterrole.rbac.authorization.k8s.io/nfs-client-provisioner-runner unchanged
clusterrolebinding.rbac.authorization.k8s.io/run-nfs-client-provisioner unchanged
role.rbac.authorization.k8s.io/leader-locking-nfs-client-provisioner unchanged
rolebinding.rbac.authorization.k8s.io/leader-locking-nfs-client-provisioner unchanged
storageclass.storage.k8s.io/nfs-client unchanged
[root@k8s-master01 7.18]# kubectl get pod -n nfs-storageclass
NAME                                    READY   STATUS    RESTARTS   AGE
nfs-client-provisioner-cf8b5f8f-tc2f6   1/1     Running   0          20s
[root@k8s-master01 7.18]# kubectl get storageclasses
NAME         PROVISIONER                                   RECLAIMPOLICY   VOLUMEBINDINGMODE   ALLOWVOLUMEEXPANSION   AGE
nfs-client   k8s-sigs.io/nfs-subdir-external-provisioner   Delete          Immediate           false                  36h
(5)动态 PV 验证
[root@k8s-master01 7.18]# cat pod.yaml
kind: PersistentVolumeClaim
apiVersion: v1
metadata:
 name: test-claim
 annotations:
spec:
 accessModes:
   - ReadWriteMany
 resources:
   requests:
     storage: 1Mi
 storageClassName: nfs-client
---
kind: Pod
apiVersion: v1
metadata:
 name: test-pod
spec:
 containers:
 - name: test-pod
   image: myapp:v1.0
   volumeMounts:
     - name: nfs-pvc
       mountPath: "/usr/share/nginx/html"
 restartPolicy: "Never"
 volumes:
   - name: nfs-pvc
     persistentVolumeClaim:
       claimName: test-claim
1.类别:persistentVolumeClaim(pvc)
2.接口组版本:核心组 v1 版
3.元数据:persistentVolumeClaim(pvc)名称、描述信息(内部约定达成的信息)
4.期望:访问模式:多人读写、请求资源:资源限制:存储1M、存储类名称
---
4.期望:容器组:容器名、基于镜像、卷挂载:卷名、挂载到容器路径、重启策略、定义卷:卷名、基于 pvc 提供:pvc 名称
[root@k8s-master01 7.18]# kubectl apply -f pod.yaml
persistentvolumeclaim/test-claim created
pod/test-pod created
[root@k8s-master01 7.18]# kubectl get pod
NAME       READY   STATUS    RESTARTS   AGE
test-pod   1/1     Running   0          11s
# 根据 pvc 内容自动创建了 pv
[root@k8s-master01 7.18]# kubectl get pvc,pv
NAME                               STATUS   VOLUME                                     CAPACITY   ACCESS MODES   STORAGECLASS   VOLUMEATTRIBUTESCLASS   AGE
persistentvolumeclaim/test-claim   Bound    pvc-82d6c1c5-8ddb-4734-af62-36572a26f8ad   1Mi        RWX            nfs-client     <unset>                 70s

NAME                                                        CAPACITY   ACCESS MODES   RECLAIM POLICY   STATUS   CLAIM                STORAGECLASS   VOLUMEATTRIBUTESCLASS   REASON   AGE
persistentvolume/pvc-82d6c1c5-8ddb-4734-af62-36572a26f8ad   1Mi        RWX            Delete           Bound    default/test-claim   nfs-client     <unset>                          69s
# 自动创建的目录,名字空间下/pod名
[root@k8s-master01 7.18]# tree /nfsdata/
/nfsdata/
├── 1
│   └── index.html
├── 10
│   └── index.html
├── 2
│   └── index.html
├── 3
│   └── index.html
├── 4
│   └── index.html
├── 5
│   └── index.html
├── 6
│   └── index.html
├── 7
│   └── index.html
├── 8
│   └── index.html
├── 9
│   └── index.html
└── share
    └── default
        └── test-claim

13 directories, 10 files

# 访问文件为 403 是正常的,因为挂载目录,容器中的文件会被覆盖
# 例如原 Linux 中 /data 目录下有两个文件 1.txt 2.txt,有一个分区 /dev/sdb1
# 将磁盘挂载到分区。mount -t ext4 /dev/sdb1 /data 后,cd /data,无法看到 1.txt 2.txt
[root@k8s-master01 7.18]# kubectl get pod -o wide
NAME       READY   STATUS    RESTARTS   AGE     IP              NODE         NOMINATED NODE   READINESS GATES
test-pod   1/1     Running   0          3m28s   10.244.58.195   k8s-node02   <none>           <none>
[root@k8s-master01 7.18]# curl 10.244.58.195
<html>
<head><title>403 Forbidden</title></head>
<body bgcolor="white">
<center><h1>403 Forbidden</h1></center>
<hr><center>nginx/1.12.2</center>
</body>
</html>
[root@k8s-master01 7.18]# kubectl exec -it test-pod -- /bin/sh
/ # cd /usr/share/nginx/html/
/usr/share/nginx/html # ls
/usr/share/nginx/html # echo '666' > index.html
/usr/share/nginx/html # exit
[root@k8s-master01 7.18]# curl 10.244.58.195
666
# 进入到 容器挂载目录,写入新内容,通过pod 仍能访问
[root@k8s-master01 7.18]# cd /nfsdata/share/default/test-claim/
[root@k8s-master01 test-claim]# ls
index.html
[root@k8s-master01 test-claim]# cat index.html
666
[root@k8s-master01 test-claim]# date >> index.html
[root@k8s-master01 test-claim]# curl 10.244.58.195
666
Mon Jun 23 16:57:55 CST 2025
# 删除 pod , pvc,pv 都被删除,pv 定义的策略是删除
[root@k8s-master01 7.18]# kubectl delete -f pod.yaml
persistentvolumeclaim "test-claim" deleted
pod "test-pod" deleted
[root@k8s-master01 7.18]# kubectl get pod,pvc,pv
No resources found
7.8 插曲
——— 释放键入速度
# 7 版本以下默认安转,7 版本以上需要手动安装
[root@k8s-master01 ~]# yum install -y bash-completion
..........
Complete!
# 添加如下信息(把 kubectl 交给 bash 补全命令处理),然后 执行 source 命令,退出终端重新连接
[root@k8s-master01 ~]# cat .bashrc
..........
alias vim='vim -c "set paste"'
source <(kubectl completion bash)
..........
[root@k8s-master01 ~]# source .bashrc
[root@k8s-master01 ~]# exit

# 可以 Tab 补全 svc 下的所有可执行信息
[root@k8s-master01 ~]# kubectl get services
kubernetes  nginx
[root@k8s-master01 ~]# kubectl get services
NAME         TYPE        CLUSTER-IP   EXTERNAL-IP   PORT(S)   AGE
kubernetes   ClusterIP   10.0.0.1     <none>        443/TCP   23d
nginx        ClusterIP   None         <none>        80/TCP    16h
———————————————————————————————————————————————————————————————————————————
无敌小马爱学习

 浙公网安备 33010602011771号