
C++智能指针
一、头文件
#include <memory>
二、独占智能指针unique_ptr
1、生成
//生成
1、创建空的
std::unique_ptr<int> ptr1;
2、通过指针创建
std::unique_ptr<Task> taskPtr(new iTask(22));
3、通过make_unique创建【C++14】
std::unique_ptr<Task> taskPtr = std::make_unique<Task>(34);
4、通过移动构造创建
std::unique_ptr<Task> taskPtr1(new Task(55));
std::unique_ptr<Task> taskPtr2 = std::move(taskPtr1);
5、其他错误方式
// 编译错误 : unique_ptr 不能复制
std::unique_ptr<Task> taskPtr1 = taskPtr2; // Compile error
// 编译错误 : unique_ptr 不能复制
taskPtr1 = taskPtr2; //compile error
注意:make_unique是C++14功能,建议不要使用
2、判断为空
// 方法1
if(!ptr1)
    std::cout<<"ptr1 is empty"<<std::endl;
// 方法2
if(ptr1 == nullptr){
    std::cout<<"ptr1 is empty"<<std::endl;
}
3、获取
//获取关联指针
Task* task = ptr.get();
//获取关联对象
Task   task = *(ptr.get());
4、常用接口
| 成员函数 | 作用 |
|---|---|
| reset() | 重置unique_ptr为空,delete其关联的指针。 |
| release() | 不delete关联指针,并返回关联指针。释放关联指针的所有权,unique_ptr为空。 |
| get() | 仅仅返回关联指针 |
5、使用场景
①、避免函数内部return时忘记delete
void fun(A* a)
{
     std::unique_ptr<A>(a);
     if(xxxx){
        return;//如果不是智能指针,则需要delete a然后再return
    }
}
6、VS例子
// Test.cpp : 定义控制台应用程序的入口点。
//

#include "stdafx.h"
#include <thread>
#include <memory>
#include <iostream>
#include <assert.h>

class A
{
public:
    A()
    {
        std::cout << "A Create" << std::endl;
    }
    ~A()
    {
        std::cout << "A Destroy" << std::endl;
    }
    void fun()
    {
        std::cout << "A Fun" << std::endl;
    }
private:
};

int main()
{
    A* a = new A();
    std::unique_ptr<A> myPtr(a);
    myPtr->fun();//重载的->,可以理解为直接返回a指针
    (*myPtr).fun();//直接取指向的对象,所以不再使用指针
    std::unique_ptr<A> myOtherPtr = std::move(myPtr);//myPtr将指向a的权利移动给myOtherPtr,myPtr变为空指针
    assert(myPtr != nullptr);
    myOtherPtr.reset();
    assert(myOtherPtr != nullptr);
    assert(a != nullptr);
    getchar();
    return 0;
}
7、Qt例子
mainwindow.h:
class A
{
public:
    A()
    {
        qDebug()<<"A";
    }
    ~A()
    {
        qDebug()<<"~A";
    }
};
class MainWindow : public QMainWindow
{
    Q_OBJECT

public:
    explicit MainWindow(QWidget *parent = 0);
    ~MainWindow();

private:
    Ui::MainWindow *ui;
    std::unique_ptr<A> uptr_AllData;
private slots:
};
mainwindow.cpp:
    {
        std::unique_ptr<A> tmepPtr(new A);//打印A
        uptr_AllData = std::move(tmepPtr);//
    }
现象:
在new A的时候打印A,在窗口关闭后,自动回收A的内存,打印~A。
8、智能指针数组
mainwindow.h
class A
{
public:
    A()
    {
        qDebug()<<"A";
    }
    ~A()
    {
        qDebug()<<"~A";
    }
    void print()
    {
        qDebug()<<"print function";
    }
};
class MainWindow : public QMainWindow
{
    Q_OBJECT

public:
    explicit MainWindow(QWidget *parent = 0);
    ~MainWindow();

private:
    Ui::MainWindow *ui;
    queue<unique_ptr<A>> allPacket;

private slots:
    void on_pushButton_clicked();
};
mainwindow.cpp
MainWindow::MainWindow(QWidget *parent) :
    QMainWindow(parent),
    ui(new Ui::MainWindow)
{
    ui->setupUi(this);
    {
        unique_ptr<A> data(new A);
        allPacket.push(std::move(data));
    }
}

void MainWindow::on_pushButton_clicked()
{
    allPacket.front()->print();
    allPacket.pop();
}
现象:
在new的时候打印A,在pop之后打印~A
9、智能指针作为参数传递
①、看函数原型

②、传参
核心:转移指针所有权【std::move】,把所有权从实参传到形参

③、作为函数返回值
直接返回,切记不能先move再返回

10、QTimer例子
//头文件
std::unique_ptr<QTimer> m_pTimer = std::make_unique<QTimer>();
//cpp
QObject::connect(m_pTimer.get(), &QTimer::timeout, this, [=](){
    qDebug()<<111;
});
m_pTimer->setInterval(100);
m_pTimer->start();
PS:
1、智能指针的核心就是在析构的时候自动帮你delete所指向的指针。
2、如果希望将此智能指针作为类的属性,那么在赋值的时候:先生成一个临时的智能指针,再用std::move来赋值给这个属性,否则就必须在声明的时候就初始化。
3、使用此智能指针的优点就是不用自己在析构函数中delete指针。【感觉缺点多多了】
三、共享智能指针share_ptr
1、例子
// Test.cpp : 定义控制台应用程序的入口点。
//

#include "stdafx.h"
#include <thread>
#include <memory>
#include <iostream>
#include <assert.h>
#include <thread>
#include<windows.h>


#define OPEN_IF 1
#define CLOSE_IF 0

class B
{
public:
    B()
    {
        std::cout << "B Create" << std::endl;
    }
    ~B()
    {
        std::cout << "B Destroy" << std::endl;
    }
    void fun()
    {
        std::cout << "B fun" << std::endl;
    }
private:
};

void threadFun(std::shared_ptr<B> ptr)
{
    int count = 5;
    auto source = ptr.get();
    std::cout << "thread ptr:" << ptr << std::endl;
#if CLOSE_IF
    std::cout << "source address:" << source << std::endl;
    std::cout << "current thread id:" << GetCurrentThreadId() << std::endl;
#endif
    while (count--)
    {
        ptr->fun();
        Sleep(1000);
    }
    ptr.reset();
    std::cout << "B after use count:" << ptr.use_count() << std::endl;
}

int main()
{
    B *b = new B();
    std::shared_ptr<B> myPtr1(b);
    std::cout << "source ptr:" << myPtr1 << std::endl;
    std::thread threadA(threadFun, myPtr1);
    std::cout << "B before use count:" << myPtr1.use_count() << std::endl;
    threadA.detach();
    myPtr1.reset();

    getchar();
    return 0;
}
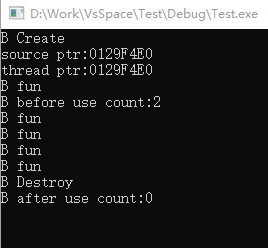
注意:shared_ptr作为参数【函数参数、线程参数】时,不管是不是引用传递,都是拷贝复制,所以它们的计数器是同一个,所以计数+1
2、关于线程安全
shared_ptr的引用计数是线程安全的,但是指向的对象不是线程安全的。
3、原理【伪代码】
①、在类里加一个指向堆的int计数
temple<typename T>
class SharedPtr {
public:
   ...
private:
    T *_ptr;      //指向资源
    int *_refCount;   //指向计数,必须是堆的资源,should be int*, rather than int
};
②、智能指针拷贝时计数加一
 SharedPtr(SharedPtr &other) : _ptr(other._ptr), _refCount(&(++*other._refCount))
{

}
③、析构时计数减一,如果计数为0则回收资源
~SharedPtr()
{
    if (_ptr && --*_refCount == 0) {
        delete _ptr;
        delete _refCount;
    }
}
4、应尽量避免循环引用,shared_ptr的一个最大的陷阱是循环引用【互相引用?】,循环引用会导致堆内存无法正确释放,导致内存泄漏
默认构造函数初始化智能指针:
SharedPtr(T *obj) : _ptr(obj), _refCount(new int(1))
{

} //这里无法防止循环引用,若我们用同一个普通指针去初始化两个shared_ptr,此时两个ptr均指向同一片内存区域,但是引用计数器均为1,使用时需要注意。
5、共享指针作为参数传递
class A {
public:
    A(){qDebug()<<"A";}
    ~A(){qDebug()<<"~A";}
};

void fun(const std::shared_ptr<A>& sp)
{
    qDebug()<<sp.get();
}
void main()
{
    {
        std::shared_ptr<A> aa = std::make_shared<A>();
        fun(aa);
    }
}
打印:
A
~A
四、weak_ptr
该类型指针通常不单独使用(没有实际用处),只能和 shared_ptr 类型指针搭配使用。甚至于,我们可以将 weak_ptr 类型指针视为 shared_ptr 指针的一种辅助工具,借助 weak_ptr 类型指针, 我们可以获取 shared_ptr 指针的一些状态信息,比如有多少指向相同的 shared_ptr 指针、shared_ptr 指针指向的堆内存是否已经被释放等等
五、auto_ptr
直接不用学习,已被淘汰
长风破浪会有时,直挂云帆济沧海!
可通过下方链接找到博主
https://www.cnblogs.com/judes/p/10875138.html
