《Java Spring框架》Spring切面(AOP)配置详解
1. Spring 基本概念
AOP(Aspect Oriented Programming)称为面向切面编程,在程序开发中主要用来解决一些系统层面上的问题,比如日志,事务,权限等待,Struts2的拦截器设计就是基于AOP的思想,是个比较经典的例子。
在不改变原有的逻辑的基础上,增加一些额外的功能。代理也是这个功能,读写分离也能用aop来做。
2. 原理图:
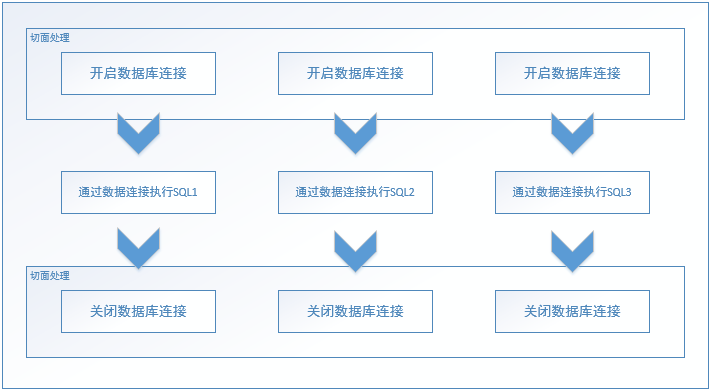
我们希望业务开发人员只关心中间部分,不再需要关系开启和关闭数据库连接的情况,同时也避免了代码重复和可能出现的问题。
3. 代码
public interface UserService {
    //删
    void save();

    String getStr();

    void setStr(String str);
}
public class UserServiceImpl implements UserService {
    private String str = "0";

    public String getStr() {
        return str;
    }

    public void setStr(String str) {
        this.str = str;
    }

    @Override
    public void save() {
        System.out.println("--------- save --------------");
    }
}
import org.aspectj.lang.ProceedingJoinPoint;

/**
 * 自定义通知类
 */
public class MyAdvice {

    //before 前置通知 在目标方法前调用
    public void before() {
        System.out.println("before");
    }

    //after 最终通知(后置通知)在目标方法后调用,无论是否出现异常都会执行 finally
    public void after() {
        System.out.println("after");
    }

    //afterReturning 成功通知(后置通知)在目标方法执行后,并且执行成功,如果方法出现异常则不调用
    public void afterReturning() {
        System.out.println("afterReturning");
    }

    //afterThrowing 异常通知(后置通知)在目标方法执行出现异常的时候才会调用
    public void afterThrowing() {
        System.out.println("afterThrowing");
    }

    //around 环绕通知 需要我们手动调用目标方法,并且可以设置通知
    public Object around(ProceedingJoinPoint pjp) throws Throwable {
        System.out.println("around before");
        Object proceed = pjp.proceed();
        System.out.println("around after");
        return proceed;
    }
}
import com.bing.aop.service.UserService;
import org.junit.Test;
import org.junit.runner.RunWith;
import org.springframework.test.context.ContextConfiguration;
import org.springframework.test.context.junit4.SpringJUnit4ClassRunner;

import javax.annotation.Resource;

@RunWith(SpringJUnit4ClassRunner.class)
@ContextConfiguration("classpath:applicationContext_aop.xml")
public class AopTest {

    @Resource(name="userService")
    UserService us;
    @Test
    public void Test2() {
        us.save();
    }
}
配置文件:文件名(applicationContext_aop.xml)
<?xml version="1.0" encoding="UTF-8"?>
<beans xmlns="http://www.springframework.org/schema/beans"
       xmlns:xsi="http://www.w3.org/2001/XMLSchema-instance"
       xmlns:aop="http://www.springframework.org/schema/aop"
       xsi:schemaLocation="http://www.springframework.org/schema/beans http://www.springframework.org/schema/beans/spring-beans-4.3.xsd
        http://www.springframework.org/schema/aop http://www.springframework.org/schema/aop/spring-aop-4.3.xsd">
    <!-- 目标对象 -->
    <bean name="userService" class="com.bing.aop.service.UserServiceImpl"></bean>

    <!-- 通知对象 -->
    <bean name="myAdvice" class="com.bing.aop.MyAdvice"></bean>

    <aop:config>
        <!-- 切入点  expression 切入点表达式 可以配置要增强的方法
                            public void com.bing.aop.service.UserServiceImpl.save()
                            * com.bing.aop.service.*ServiceImpl.*(..)
                           id 就是唯一标识
        -->
        <aop:pointcut expression="execution(* com.bing.aop.service.*ServiceImpl.*(..))" id="servicePc"/>

        <!-- 切面 通知+切入点 -->
        <aop:aspect ref="myAdvice">
            <!-- 通知类型 -->
            <aop:before method="before" pointcut-ref="servicePc"/>
            <!-- 最终通知 后置通知 -->
            <aop:after method="after" pointcut-ref="servicePc"/>
            <!-- 成功通知 后置通知 -->
            <aop:after-returning method="afterReturning" pointcut-ref="servicePc"/>
            <!-- 异常通知 后置通知 -->
            <aop:after-throwing method="afterThrowing" pointcut-ref="servicePc"/>
            <!--  环绕通知-->
            <aop:around method="around" pointcut-ref="servicePc"/>
        </aop:aspect>
    </aop:config>
</beans>
运行结果:

到这里其实发现这个AOP没有什么实际用处,前后中间执行的东西都没有关系,并不能体现真正的AOP思想。
我们将上述代码修改一下:修改环绕通知的方法。
import com.bing.aop.service.UserService;
import com.bing.aop.service.UserServiceImpl;
import org.aspectj.lang.ProceedingJoinPoint;

/**
 * 自定义通知类
 */
public class MyAdvice {

    //before 前置通知 在目标方法前调用
    public void before() {
        System.out.println("before");
    }

    //after 最终通知(后置通知)在目标方法后调用,无论是否出现异常都会执行 finally
    public void after() {
        System.out.println("after");
    }

    //afterReturning 成功通知(后置通知)在目标方法执行后,并且执行成功,如果方法出现异常则不调用
    public void afterReturning() {
        System.out.println("afterReturning");
    }

    //afterThrowing 异常通知(后置通知)在目标方法执行出现异常的时候才会调用
    public void afterThrowing() {
        System.out.println("afterThrowing");
    }

    //around 环绕通知 需要我们手动调用目标方法,并且可以设置通知
    public Object around(ProceedingJoinPoint pjp) throws Throwable {
        UserService userService = (UserServiceImpl)pjp.getTarget();
        Object proceed = null;
        if("1".equals(userService.getStr()) || "setStr".equals(pjp.getSignature().getName())){
            proceed = pjp.proceed();
        }
        return proceed;
    }
}
import com.bing.aop.service.UserService;
import org.junit.Test;
import org.junit.runner.RunWith;
import org.springframework.test.context.ContextConfiguration;
import org.springframework.test.context.junit4.SpringJUnit4ClassRunner;

import javax.annotation.Resource;

@RunWith(SpringJUnit4ClassRunner.class)
@ContextConfiguration("classpath:applicationContext_aop.xml")
public class AopTest {

    @Resource(name="userService")
    UserService us;
    @Test
    public void Test2() {
        System.out.println("设置前:------------Str == 0");
        us.save();
        us.setStr("1");
        System.out.println("设置前:------------Str == 1");
        us.save();
    }
}
然后将配置文件的其他通知都去掉:
<?xml version="1.0" encoding="UTF-8"?>
<beans xmlns="http://www.springframework.org/schema/beans"
       xmlns:xsi="http://www.w3.org/2001/XMLSchema-instance"
       xmlns:aop="http://www.springframework.org/schema/aop"
       xsi:schemaLocation="http://www.springframework.org/schema/beans http://www.springframework.org/schema/beans/spring-beans-4.3.xsd
        http://www.springframework.org/schema/aop http://www.springframework.org/schema/aop/spring-aop-4.3.xsd">
    <!-- 目标对象 -->
    <bean name="userService" class="com.bing.aop.service.UserServiceImpl"></bean>

    <!-- 通知对象 -->
    <bean name="myAdvice" class="com.bing.aop.MyAdvice"></bean>

    <aop:config>
        <!-- 切入点  expression 切入点表达式 可以配置要增强的方法
                            public void com.bing.aop.service.UserServiceImpl.save()
                            * com.bing.aop.service.*ServiceImpl.*(..)
                           id 就是唯一标识
        -->
        <aop:pointcut expression="execution(* com.bing.aop.service.*ServiceImpl.*(..))" id="servicePc"/>

        <!-- 切面 通知+切入点 -->
        <aop:aspect ref="myAdvice">
            <!--  环绕通知-->
            <aop:around method="around" pointcut-ref="servicePc"/>
        </aop:aspect>
    </aop:config>
</beans>
运行效果:

把实体类和MyAdvice 结合起来,可以更加方便的写你想要处理的逻辑。
XML 用的越来越少了,现在大部分都使用注解了,下面是使用注解的Demo
import org.springframework.context.annotation.ComponentScan;
import org.springframework.context.annotation.Configuration;
import org.springframework.context.annotation.EnableAspectJAutoProxy;

@ComponentScan("com.hundsun.cop.aop")
@Configuration
@EnableAspectJAutoProxy
public class AppConfig {

}
import org.aspectj.lang.ProceedingJoinPoint;
import org.aspectj.lang.annotation.After;
import org.aspectj.lang.annotation.AfterReturning;
import org.aspectj.lang.annotation.AfterThrowing;
import org.aspectj.lang.annotation.Around;
import org.aspectj.lang.annotation.Aspect;
import org.aspectj.lang.annotation.Before;
import org.aspectj.lang.annotation.Pointcut;
import org.springframework.stereotype.Component;

@Aspect
@Component
public class MyAdvice {

    //设置切点
    @Pointcut("execution(public * com.hundsun.cop.aop.UserService.*(..))")
    public void execution(){

    }

    // 执行前
    @Before("MyAdvice.execution()")
    public void before(){

    }

    // 执行后
    @After("MyAdvice.execution()")
    public void after() {
        System.out.println("after");
    }

    //afterReturning 成功通知(后置通知)在目标方法执行后,并且执行成功,如果方法出现异常则不调用
    @AfterReturning("MyAdvice.execution()")
    public void afterReturning() {
        System.out.println("afterReturning");
    }

    //afterThrowing 异常通知(后置通知)在目标方法执行出现异常的时候才会调用
    @AfterThrowing("MyAdvice.execution()")
    public void afterThrowing() {
        System.out.println("afterThrowing");
    }

    //around 环绕通知 需要我们手动调用目标方法,并且可以设置通知
    @Around("MyAdvice.execution()")
    public Object around(ProceedingJoinPoint pjp) throws Throwable {
        System.out.println("around before");
        Object proceed = pjp.proceed();
        System.out.println("around after");
        return proceed;
    }
}
public interface UserService {
    void save();

    String getStr();

    void setStr(String str);
}
@Component
public class UserServiceImpl implements UserService {
    private String str = "0";

    public String getStr() {
        return str;
    }

    public void setStr(String str) {
        this.str = str;
    }

    @Override
    public void save() {
        System.out.println("--------- save --------------");
    }
}
import org.springframework.context.annotation.AnnotationConfigApplicationContext;

public class Test {
    public static void main(String[] args) {
        AnnotationConfigApplicationContext annotationConfigApplicationContext = new AnnotationConfigApplicationContext(AppConfig.class);
        UserService userService = annotationConfigApplicationContext.getBean(UserService.class);
        userService.save();
    }
}
运行结果

通过注解来表示切点的方式:
import lombok.extern.slf4j.Slf4j;
import org.aspectj.lang.ProceedingJoinPoint;
import org.aspectj.lang.annotation.Around;
import org.aspectj.lang.annotation.Aspect;
import org.aspectj.lang.annotation.Pointcut;
import org.springframework.stereotype.Component;

@Slf4j
@Aspect
@Component
public class ExecTimeAdvice {

    //设置切点(设置成注解类,后面需要的地方加上注解即可)
    @Pointcut("@annotation(com.hundsun.o45.repeat.advice.ExecTimeMonitor)")
    public void execution(){

    }

    @Around("ExecTimeAdvice.execution()")
    public Object around(ProceedingJoinPoint pjp) throws Throwable {
        System.out.println("AOP测试");
        return null;
    }
}
注解:
import java.lang.annotation.Documented;
import java.lang.annotation.ElementType;
import java.lang.annotation.Retention;
import java.lang.annotation.RetentionPolicy;
import java.lang.annotation.Target;

@Target(value = {ElementType.METHOD})
@Retention(RetentionPolicy.RUNTIME)
@Documented
public @interface ExecTimeMonitor {
}
不喜欢夸夸奇谈,实战才是真理。代码是说明原理的最可靠的方式。
This moment will nap, you will have a dream; But this moment study,you will interpret a dream.

 浙公网安备 33010602011771号