第十七周作业
1、利用SAMBA实现指定目录共享
答:
环境:
centos8(10.0.0.8):samba服务端
centos7(10.0.0.7):samba客户端
部署samba服务端
- 安装服务端软件包
[root@centos8 ~]#yum install samba
[root@centos8 ~]#systemctl start smb
[root@centos8 ~]#ss -lnt
State            Recv-Q           Send-Q                     Local Address:Port                      Peer Address:Port
LISTEN           0                50                               0.0.0.0:139                            0.0.0.0:*
LISTEN           0                128                              0.0.0.0:22                             0.0.0.0:*
LISTEN           0                50                               0.0.0.0:445                            0.0.0.0:*
LISTEN           0                50                                  [::]:139                               [::]:*
LISTEN           0                128                                 [::]:22                                [::]:*
LISTEN           0                50                                  [::]:445                               [::]:*
[root@centos8 ~]#
- 创建samba用户
[root@centos8 ~]#useradd smbuser1    #创建用户
[root@centos8 ~]#smbpasswd -a smbuser1    #给用户添加密码
New SMB password:
Retype new SMB password:
Added user smbuser1.
- 创建共享目录
[root@centos8 ~]#mkdir /data/share

#在配置文件中添加此目录
[root@centos8 ~]#vim /etc/samba/smb.conf
[share]
        path = /data/share
[root@centos8 ~]#systemctl restart smb
部署samba客户端
- 安装samba客户端所需软件包
[root@localhost ~]#yum install -y samba-client cifs-utils
- 访问共享目录
[root@localhost ~]#smbclient -L 10.0.0.8
Enter SAMBA\root's password:
Anonymous login successful

    Sharename       Type      Comment
    ---------       ----      -------
    print$          Disk      Printer Drivers
    share           Disk
    IPC$            IPC       IPC Service (Samba 4.11.2)
Reconnecting with SMB1 for workgroup listing.
smbXcli_negprot_smb1_done: No compatible protocol selected by server.
protocol negotiation failed: NT_STATUS_INVALID_NETWORK_RESPONSE
Unable to connect with SMB1 -- no workgroup available
[root@localhost ~]#smbclient -L 10.0.0.8 -U smbuser1
Enter SAMBA\smbuser1's password:

    Sharename       Type      Comment
    ---------       ----      -------
    print$          Disk      Printer Drivers
    share           Disk
    IPC$            IPC       IPC Service (Samba 4.11.2)
    smbuser1        Disk      Home Directories
Reconnecting with SMB1 for workgroup listing.
smbXcli_negprot_smb1_done: No compatible protocol selected by server.
protocol negotiation failed: NT_STATUS_INVALID_NETWORK_RESPONSE
Unable to connect with SMB1 -- no workgroup available
2、实现不同samba用户访问相同的samba共享,实现不同的配置
答:
- 再新建个samba用户
[root@centos8 ~]#useradd smbuser2
[root@centos8 ~]#smbpasswd -a smbuser2
New SMB password:
Retype new SMB password:
Added user smbuser2.
- 配置文件中,分别对不同用户设定不同配置
#修改共享目录权限,使samba用户可以上传,删除目录内的文件
[root@centos8 ~]#chmod o+w /data/share

#修改配置文件
[root@centos8 ~]#vim /etc/samba/smb.conf
[share]
        path = /data/share
        write list = smbuser1    #配置smbuser1可以修改
        read list = smbuser2     #配置smbuser2只读
- 使用smbuser1用户上传文件
[root@localhost ~]#smbclient //10.0.0.8/share -U smbuser1
Enter SAMBA\smbuser1's password:
Try "help" to get a list of possible commands.
smb: \>
smb: \> ls
  .                                   D        0  Sat Oct  3 19:26:55 2020
  ..                                  D        0  Sat Oct  3 19:26:55 2020

        52403200 blocks of size 1024. 52004796 blocks available
smb: \> put text1
putting file text1 as \text1 (0.0 kb/s) (average 0.0 kb/s)
smb: \> ls
  .                                   D        0  Sat Oct  3 19:54:35 2020
  ..                                  D        0  Sat Oct  3 19:26:55 2020
  text1                               A        0  Sat Oct  3 19:54:35 2020

        52403200 blocks of size 1024. 52004796 blocks available
- 使用smbuser2登陆共享目录,只能查看,不能修改
[root@localhost ~]#smbclient //10.0.0.8/share -U smbuser2
Enter SAMBA\smbuser2's password:
Try "help" to get a list of possible commands.
smb: \>
smb: \> ls
  .                                   D        0  Sat Oct  3 19:54:35 2020
  ..                                  D        0  Sat Oct  3 19:26:55 2020
  text1                               A        0  Sat Oct  3 19:54:35 2020

        52403200 blocks of size 1024. 52004796 blocks available
smb: \> put text2
NT_STATUS_ACCESS_DENIED opening remote file \text2
3、远程主机通过链接openvpn修复内网里 httpd 服务主机,假如现在 httpd 宕机了,我们需要链接进去让 httpd 启动
答:
环境
内网主机(centos8):172.19.237.221/20
openvpn服务端主机(centos8):172.19.237.216/20
这2台主机都的私网地址都在172.19.240.0/20 这一网段

Windows:安装openvpn客户端
部署openvpn服务端
- 安装服务端所需软件包,并复制相应配置文件
[root@aliyun ~]# yum install -y openvpn easy-rsa

[root@aliyun ~]# cp /usr/share/doc/openvpn/sample/sample-config-files/server.conf /etc/openvpn/  #openvpn配置文件
[root@aliyun ~]# cp -r /usr/share/easy-rsa/ /etc/openvpn/easy-rsa-server  #创建CA及服务端证书相关目录
[root@aliyun ~]# cp /usr/share/doc/easy-rsa/vars.example /etc/openvpn/easy-rsa-server/3/vars  #创建证书所需的参数文件
- 创建CA
[root@aliyun ~]# cd /etc/openvpn/easy-rsa-server/3/
[root@aliyun 3]# ls
easyrsa  openssl-easyrsa.cnf  pki  vars  x509-types
[root@aliyun 3]# ./easyrsa init-pki    #生成pki目录结构
[root@aliyun 3]# ./easyrsa build-ca nopass    #生成CA
Note: using Easy-RSA configuration from: /etc/openvpn/easy-rsa-server/3.0.8/vars
Using SSL: openssl OpenSSL 1.1.1c FIPS  28 May 2019
Generating RSA private key, 2048 bit long modulus (2 primes)
.....................+++++
.......................................................+++++
e is 65537 (0x010001)
You are about to be asked to enter information that will be incorporated
into your certificate request.
What you are about to enter is what is called a Distinguished Name or a DN.
There are quite a few fields but you can leave some blank
For some fields there will be a default value,
If you enter '.', the field will be left blank.
-----
Common Name (eg: your user, host, or server name) [Easy-RSA CA]:  #此处直接回车即可

CA creation complete and you may now import and sign cert requests.
Your new CA certificate file for publishing is at:
/etc/openvpn/easy-rsa-server/3/pki/ca.crt
- 生成服务端所需证书
[root@aliyun 3]# ./easyrsa gen-req openvpn nopass

Note: using Easy-RSA configuration from: /etc/openvpn/easy-rsa-server/3.0.8/vars
Using SSL: openssl OpenSSL 1.1.1c FIPS  28 May 2019
Generating a RSA private key
..............+++++
................................................................................................................................................+++++
writing new private key to '/etc/openvpn/easy-rsa-server/3/pki/easy-rsa-1339.yq0k3p/tmp.GTsFHX'
-----
You are about to be asked to enter information that will be incorporated
into your certificate request.
What you are about to enter is what is called a Distinguished Name or a DN.
There are quite a few fields but you can leave some blank
For some fields there will be a default value,
If you enter '.', the field will be left blank.
-----
Common Name (eg: your user, host, or server name) [openvpn]:    #此处直接回车即可

Keypair and certificate request completed. Your files are:
req: /etc/openvpn/easy-rsa-server/3/pki/reqs/openvpn.req    #证书请求
key: /etc/openvpn/easy-rsa-server/3/pki/private/openvpn.key    #服务端私钥


#签署证书
[root@aliyun 3]# ./easyrsa sign-req server openvpn

Note: using Easy-RSA configuration from: /etc/openvpn/easy-rsa-server/3.0.8/vars
Using SSL: openssl OpenSSL 1.1.1c FIPS  28 May 2019


You are about to sign the following certificate.
Please check over the details shown below for accuracy. Note that this request
has not been cryptographically verified. Please be sure it came from a trusted
source or that you have verified the request checksum with the sender.

Request subject, to be signed as a server certificate for 825 days:

subject=
    commonName                = openvpn


Type the word 'yes' to continue, or any other input to abort.
  Confirm request details: yes    #此处输入yes
Using configuration from /etc/openvpn/easy-rsa-server/3/pki/easy-rsa-1375.xsTjkE/tmp.V45rX5
Check that the request matches the signature
Signature ok
The Subject's Distinguished Name is as follows
commonName            :ASN.1 12:'openvpn'
Certificate is to be certified until Jan  7 06:59:20 2023 GMT (825 days)

Write out database with 1 new entries
Data Base Updated

Certificate created at: /etc/openvpn/easy-rsa-server/3/pki/issued/openvpn.crt    #服务端证书
创建DH密钥
[root@aliyun 3]# ./easyrsa gen-dh

Note: using Easy-RSA configuration from: /etc/openvpn/easy-rsa-server/3.0.8/vars
Using SSL: openssl OpenSSL 1.1.1c FIPS  28 May 2019
Generating DH parameters, 2048 bit long safe prime, generator 2
This is going to take a long time
...........................+................+..............................................................+............................................
DH parameters of size 2048 created at /etc/openvpn/easy-rsa-server/3/pki/dh.pem    #DH密钥文件
- 生成客户端所需证书
#复制客户端证书相关目录
[root@aliyun 3]# cp -r /usr/share/easy-rsa/ /etc/openvpn/easy-rsa-client

#创建客户端的pki目录结构
[root@aliyun 3]# cd /etc/openvpn/easy-rsa-client/3/
[root@aliyun 3]# ./easyrsa init-pki

init-pki complete; you may now create a CA or requests.
Your newly created PKI dir is: /etc/openvpn/easy-rsa-client/3/pki

#生成证书请求
[root@aliyun 3]# ./easyrsa gen-req magedu nopass
Using SSL: openssl OpenSSL 1.1.1c FIPS  28 May 2019
Generating a RSA private key
............................+++++
.....+++++
writing new private key to '/etc/openvpn/easy-rsa-client/3/pki/easy-rsa-1532.ujsRhu/tmp.Zc4HbB'
-----
You are about to be asked to enter information that will be incorporated
into your certificate request.
What you are about to enter is what is called a Distinguished Name or a DN.
There are quite a few fields but you can leave some blank
For some fields there will be a default value,
If you enter '.', the field will be left blank.
-----
Common Name (eg: your user, host, or server name) [magedu]:    #此处直接回车即可

Keypair and certificate request completed. Your files are:
req: /etc/openvpn/easy-rsa-client/3/pki/reqs/magedu.req    #客户端证书请求
key: /etc/openvpn/easy-rsa-client/3/pki/private/magedu.key    #客户端私钥

将客户端证书请求复制到服务端pki目录结构下
[root@aliyun 3]# cp /etc/openvpn/easy-rsa-client/3/pki/reqs/magedu.req /etc/openvpn/easy-rsa-server/3/pki/reqs/

#切换到服务端目录结构下,为客户端签署证书
[root@aliyun 3]# cd /etc/openvpn/easy-rsa-server/3
[root@aliyun 3]# ./easyrsa sign-req client magedu

Note: using Easy-RSA configuration from: /etc/openvpn/easy-rsa-server/3.0.8/vars
Using SSL: openssl OpenSSL 1.1.1c FIPS  28 May 2019


You are about to sign the following certificate.
Please check over the details shown below for accuracy. Note that this request
has not been cryptographically verified. Please be sure it came from a trusted
source or that you have verified the request checksum with the sender.

Request subject, to be signed as a client certificate for 825 days:

subject=
    commonName                = magedu


Type the word 'yes' to continue, or any other input to abort.
  Confirm request details: yes    #此处输入yes
Using configuration from /etc/openvpn/easy-rsa-server/3/pki/easy-rsa-1576.0E5JYX/tmp.dEkpuc
Check that the request matches the signature
Signature ok
The Subject's Distinguished Name is as follows
commonName            :ASN.1 12:'magedu'
Certificate is to be certified until Jan  7 07:13:45 2023 GMT (825 days)

Write out database with 1 new entries
Data Base Updated

Certificate created at: /etc/openvpn/easy-rsa-server/3/pki/issued/magedu.crt
#客户端证书
- 将服务端和客户端所需CA证书、私钥、证书准备到各自单独的目录中
#将服务端所需文件复制到/etc/openvpn/server下
[root@aliyun ~]# cd /etc/openvpn/
[root@aliyun openvpn]# ls
client  easy-rsa-client  easy-rsa-server  server  server.conf
[root@aliyun openvpn]# cp easy-rsa-server/3/pki/ca.crt server/
[root@aliyun openvpn]# cp easy-rsa-server/3/pki/private/openvpn.key server/
[root@aliyun openvpn]# cp easy-rsa-server/3/pki/issued/openvpn.crt server/
[root@aliyun openvpn]# cp easy-rsa-server/3/pki/dh.pem server/
[root@aliyun openvpn]# ll server
total 20
-rw------- 1 root root 1204 Oct  4 15:18 ca.crt
-rw------- 1 root root  424 Oct  4 15:19 dh.pem
-rw------- 1 root root 4614 Oct  4 15:19 openvpn.crt
-rw------- 1 root root 1708 Oct  4 15:18 openvpn.key


#将客户端所需文件复制到/etc/openvpn/client/magedu下
#由于客户端可能有多个,所以在client目录下单独建立对应的子目录
[root@aliyun openvpn]# ls
client  easy-rsa-client  easy-rsa-server  server  server.conf
[root@aliyun openvpn]# mkdir client/magedu
[root@aliyun openvpn]# cp easy-rsa-server/3/pki/ca.crt client/magedu/
[root@aliyun openvpn]# cp easy-rsa-server/3/pki/issued/magedu.crt client/magedu/
[root@aliyun openvpn]# cp easy-rsa-client/3/pki/private/magedu.key client/magedu/
[root@aliyun openvpn]# ll client/magedu/
total 16
-rw------- 1 root root 1204 Oct  4 15:22 ca.crt
-rw------- 1 root root 4492 Oct  4 15:23 magedu.crt
-rw------- 1 root root 1704 Oct  4 15:23 magedu.key
- 准备openvpn服务端配置文件
[root@aliyun openvpn]# vim server.conf
port 1194
proto tcp    #使用tcp协议
;proto udp  #使用udp协议
;dev tap   #使用以太网隧道
dev tun    #使用ip隧道
ca /etc/openvpn/server/ca.crt
cert /etc/openvpn/server/openvpn.crt
key /etc/openvpn/server/openvpn.key  # This file should be kept secret
dh /etc/openvpn/server/dh.pem
server 10.8.0.0 255.255.255.0
push "route 172.19.224.0 255.255.240.0"  服务器后端内网的地址池
keepalive 10 120
;tls-auth ta.key 0 # This file is secret
cipher AES-256-CBC
compress lz4-v2    #使用的压缩方式
push "compress lz4-v2"
;comp-lzo
max-clients 100   #并发连接的客户端数量
user openvpn
group openvpn
status /var/log/openvpn/openvpn-status.log  #状态日志的位置
log-append  /var/log/openvpn/openvpn.log
verb 3
mute 20
;explicit-exit-notify 1  #若使用udp协议,此选项需打开

[root@aliyun openvpn]# mkdir /var/log/openvpn
[root@aliyun openvpn]# chown openvpn.openvpn /var/log/openvpn
- 由于centos8缺少openvpn启动的service文件,这里可以从centoos7上的openvpn复制过来
[root@aliyun openvpn]# vim /usr/lib/systemd/system/openvpn@.service

[Unit]
Description=OpenVPN Robust And Highly Flexible Tunneling Application On %I
After=network.target

[Service]
Type=notify
PrivateTmp=true
ExecStart=/usr/sbin/openvpn --cd /etc/openvpn/ --config %i.conf

[Install]
WantedBy=multi-user.target
- 开启服务端的ip_forward功能,并设定iptables规则
[root@aliyun openvpn]# echo "net.ipv4.ip_forward = 1" >> /etc/sysctl.conf
[root@aliyun openvpn]# sysctl -p
vm.swappiness = 0
kernel.sysrq = 1
net.ipv4.neigh.default.gc_stale_time = 120
net.ipv4.conf.all.rp_filter = 0
net.ipv4.conf.default.rp_filter = 0
net.ipv4.conf.default.arp_announce = 2
net.ipv4.conf.lo.arp_announce = 2
net.ipv4.conf.all.arp_announce = 2
net.ipv4.tcp_max_tw_buckets = 5000
net.ipv4.tcp_syncookies = 1
net.ipv4.tcp_max_syn_backlog = 1024
net.ipv4.tcp_synack_retries = 2
net.ipv4.ip_forward = 1

#准备iptables规则
[root@aliyun openvpn]# echo "iptables -t nat -A POSTROUTING -s 10.8.0.0/24 -j MASQUERADE" >> /etc/rc.d/rc.local
[root@aliyun openvpn]# chmod +x /etc/rc.d/rc.local
[root@aliyun openvpn]# /etc/rc.d/rc.local
- 启动openvpn服务端
[root@aliyun openvpn]# systemctl enable --now openvpn@server
Created symlink /etc/systemd/system/multi-user.target.wants/openvpn@server.service → /usr/lib/systemd/system/openvpn@.service.
[root@aliyun openvpn]# ss -lnt
State              Recv-Q              Send-Q                             Local Address:Port                             Peer Address:Port
LISTEN             0                   32                                       0.0.0.0:1194                                  0.0.0.0:*
- 准备客户端配置文件
[root@aliyun openvpn]# cp /usr/share/doc/openvpn/sample/sample-config-files/client.conf /etc/openvpn/client/magedu/client.ovpn

[root@aliyun openvpn]# vim /etc/openvpn/client/client.ovpn
client
;dev tap
dev tun   #这里服务端使用哪种隧道,客户端就使用哪种
proto tcp #这里也要通服务端
;proto udp
remote 服务端公网地址 1194   #指定服务端的公网地址和openvpn端口为1194
resolv-retry infinite
nobind
;persist-key
;persist-tun
ca ca.crt
cert magedu.crt
key magedu.key
remote-cert-tls server
;tls-auth ta.key 1
cipher AES-256-CBC
verb 3
compress lz4-v2   #压缩方式也要同服务端
;mute 20
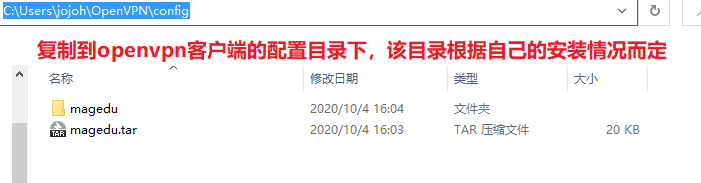
Windows客户端部署
将客户端所需文件打包,发送到windows上
[root@aliyun openvpn]# tar cf magedu.tar /etc/openvpn/client/magedu/
tar: Removing leading `/' from member names
[root@aliyun openvpn]# tar tf magedu.tar
etc/openvpn/client/magedu/
etc/openvpn/client/magedu/ca.crt
etc/openvpn/client/magedu/magedu.crt
etc/openvpn/client/magedu/magedu.key
etc/openvpn/client/magedu/client.ovpn

[root@aliyun openvpn]# sz magedu.tar

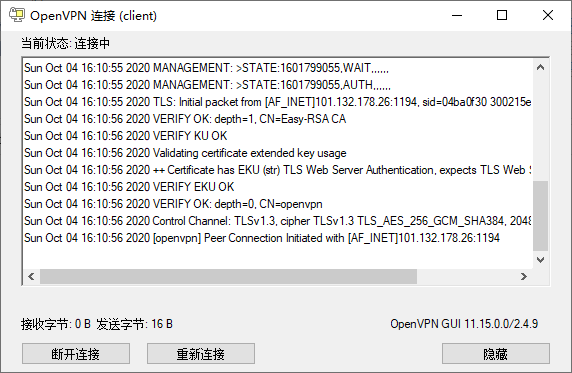
- 启动openvpn客户端
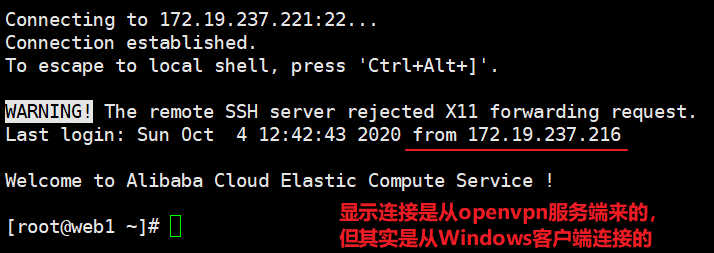
- 远程连接内网主机

 浙公网安备 33010602011771号