LinkedBlockingQueue底层原理结构
一、类结构
先看一下LinkedBlockingQueue类里面有哪些属性:
public class LinkedBlockingQueue
extends AbstractQueue
implements BlockingQueue
// 容量大小
private final int capacity;
// 元素个数
private final AtomicInteger count = new AtomicInteger();
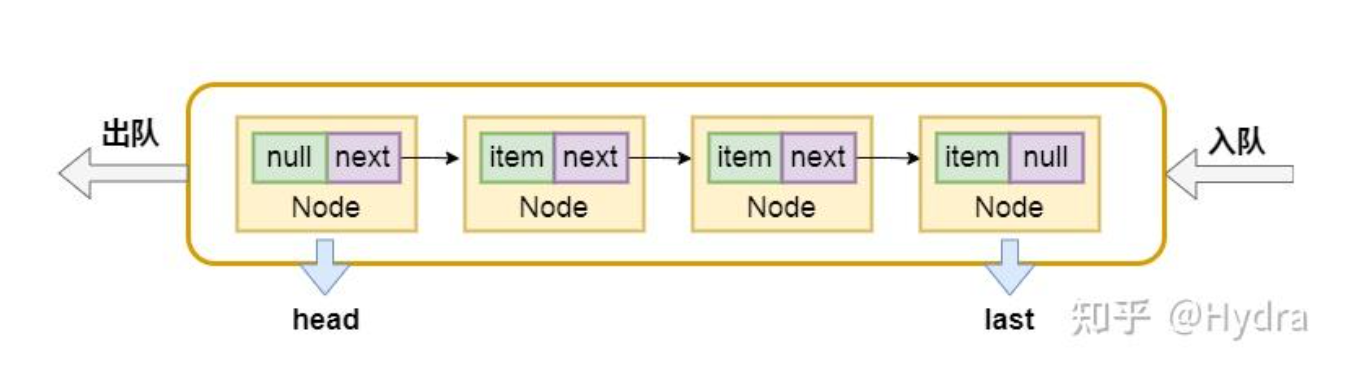
// 头节点
transient Node
// 尾节点
private transient Node
// 取数据的锁
private final ReentrantLock takeLock = new ReentrantLock();
// 取数据的条件(队列非空)
private final Condition notEmpty = takeLock.newCondition();
// 放数据的锁
private final ReentrantLock putLock = new ReentrantLock();
// 放数据的条件(队列非满)
private final Condition notFull = putLock.newCondition();
/**
* 链表节点类
*/
static class Node
// 节点元素
E item;
// 后继节点
Node
Node(E x) {
item = x;
}
}
}
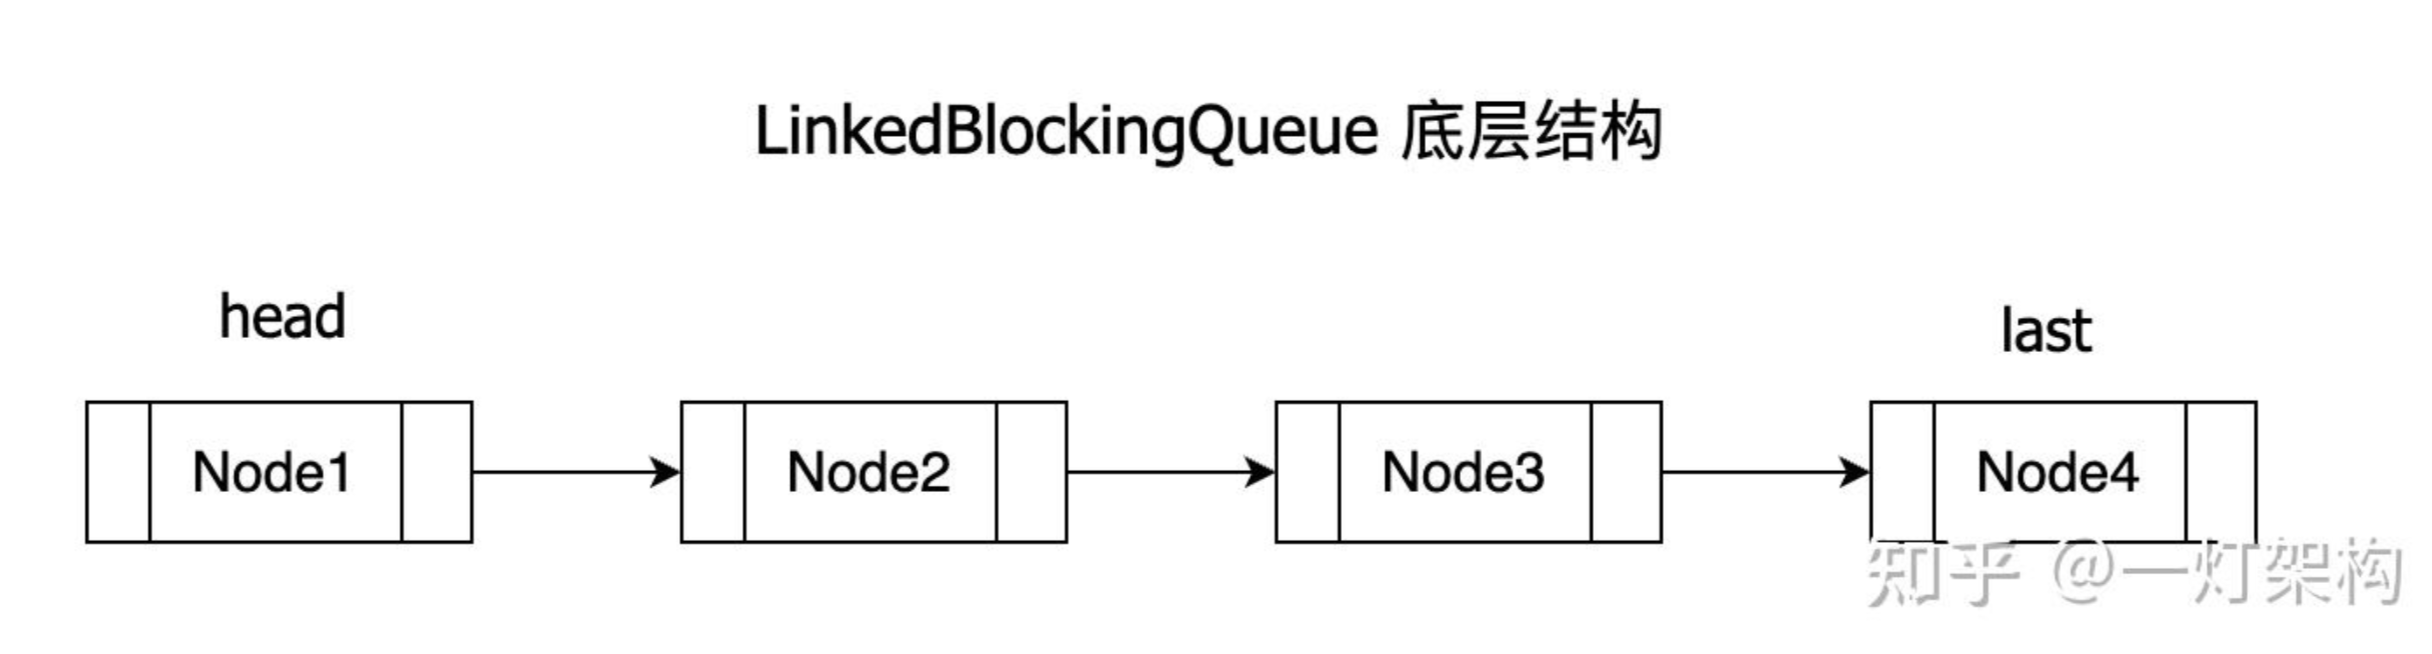
二、结构图

三、初始化
LinkedBlockingQueue常用的初始化方法有两个:
-
无参构造方法
-
指定容量大小的有参构造方法
/**
* 无参构造方法
*/
BlockingQueueblockingQueue1 = new LinkedBlockingQueue<>(); /**
* 指定容量大小的构造方法
*/
BlockingQueueblockingQueue2 = new LinkedBlockingQueue<>(10);
再看一下对应的源码实现:
/**
* 无参构造方法
*/
public LinkedBlockingQueue() {
this(Integer.MAX_VALUE);
}
/**
* 指定容量大小的构造方法
*/
public LinkedBlockingQueue(int capacity) {
if (capacity <= 0) {
throw new IllegalArgumentException();
}
// 设置容量大小,初始化头尾结点
this.capacity = capacity;
last = head = new Node
}
可以看出LinkedBlockingQueue的无参构造方法使用的链表容量是Integer的最大值,存储大量数据的时候,会有内存溢出的风险,建议使用有参构造方法,指定容量大小。
有参构造方法还会初始化head (头节点)、head (尾节点),节点值为null。 LinkedBlockingQueue初始化的时候,不支持指定是否使用公平锁,只能使用非公平锁
四、存放数据源码
存放数据的方法有四个:

1、add方法源码
add()方法在数组满的时候,会抛出异常,底层基于offer()实现
/**
* add方法入口
*
* @param e 元素
* @return 是否添加成功
*/
public boolean add(E e) {
if (offer(e)) {
return true;
} else {
throw new IllegalStateException("Queue full");
}
}
2、offer方法源码
offer()方法源码,其他放数据方法逻辑也是大同小异,都是在链表尾部插入。 offer()方法在队列满的时候,会直接返回false,表示插入失败
/**
* offer方法入口
*
* @param e 元素
* @return 是否插入成功
*/
public boolean offer(E e) {
// 1. 判空,传参不允许为null
if (e == null) {
throw new NullPointerException();
}
// 2. 如果队列已满,则直接返回false,表示插入失败
final AtomicInteger count = this.count;
if (count.get() == capacity) {
return false;
}
int c = -1;
Node
// 3. 获取put锁,并加锁
final ReentrantLock putLock = this.putLock;
putLock.lock();
try {
// 4. 加锁后,再次判断队列是否已满,如果未满,则入队
if (count.get() < capacity) {
enqueue(node);
// 5. 队列个数加一
c = count.getAndIncrement();
// 6. 如果队列未满,则唤醒因为队列已满而等待存放数据的线程(用来补偿,不加也行)
if (c + 1 < capacity) {
notFull.signal();
}
}
} finally {
// 7. 释放锁
putLock.unlock();
}
// 8. c等于0,表示插入前,队列为空,是第一次插入,需要唤醒因为队列为空而等待取数据的线程
if (c == 0) {
signalNotEmpty();
}
// 9. 返回是否插入成功
return c >= 0;
}
3、enqueue方法源码
/**
* 入队
*
* @param node 节点
*/
private void enqueue(LinkedBlockingQueue.Node
// 直接追加到链表末尾
last = last.next = node;
}
4、signalNotEmpty方法源码
/**
* 唤醒因为队列为空而等待取数据的线程
*/
private void signalNotEmpty() {
final ReentrantLock takeLock = this.takeLock;
takeLock.lock();
try {
notEmpty.signal();
} finally {
takeLock.unlock();
}
}
offer()方法逻辑也很简单,追加元素到链表末尾,如果是第一次添加元素,就唤醒因为队列为空而等待取数据的线程
5、put方法源码
put()方法在队列满的时候,会一直阻塞,直到有其他线程取走数据,空出位置,才能添加成功
/**
* put方法入口
*
* @param e 元素
*/
public void put(E e) throws InterruptedException {
// 1. 判空,传参不允许为null
if (e == null) {
throw new NullPointerException();
}
int c = -1;
Node
// 2. 加可中断的锁,防止一直阻塞
final ReentrantLock putLock = this.putLock;
putLock.lockInterruptibly();
final AtomicInteger count = this.count;
try {
// 3. 如果队列已满,就一直阻塞,直到被唤醒
while (count.get() == capacity) {
notFull.await();
}
// 4. 如果队列未满,则直接入队
enqueue(node);
c = count.getAndIncrement();
// 5. 如果队列未满,则唤醒因为队列已满而等待放数据的线程(用来补偿,不加也行)
if (c + 1 < capacity) {
notFull.signal();
}
} finally {
// 6. 释放锁
putLock.unlock();
}
// 7. c等于0,表示插入前,队列为空,是第一次插入,需要唤醒因为队列为空而等待取数据的线程
if (c == 0) {
signalNotEmpty();
}
}
五、取出数据源码
取出数据(取出数据并删除)的方法有四个:

1、remove 方法源码
remove()方法源码,如果队列为空,remove()会抛出异常
/**
* remove方法入口
*/
public E remove() {
// 1. 直接调用poll方法
E x = poll();
// 2. 如果取到数据,直接返回,否则抛出异常
if (x != null) {
return x;
} else {
throw new NoSuchElementException();
}
}
2、poll 方法源码
poll()方法源码,是从链表头部弹出元素。 poll()方法在弹出元素的时候,如果队列为空,直接返回 null,表示弹出失败
/**
* poll方法入口
*/
public E poll() {
// 1、如果队列为空,则返回null
final AtomicInteger count = this.count;
if (count.get() == 0) {
return null;
}
E x = null;
int c = -1;
// 2. 加锁
final ReentrantLock takeLock = this.takeLock;
takeLock.lock();
try {
// 3. 如果队列不为空,则取出队头元素
if (count.get() > 0) {
x = dequeue();
// 4. 元素个数减一
c = count.getAndDecrement();
// 5. 如果队列不为空,则唤醒因为队列为空而等待取数据的线程
if (c > 1) {
notEmpty.signal();
}
}
} finally {
// 6. 释放锁
takeLock.unlock();
}
// 7. 如果取数据之前,队列已满,取数据之后队列肯定不满了,则唤醒因为队列已满而等待放数据的线程
if (c == capacity) {
signalNotFull();
}
return x;
}
3、dequeue 方法源码
/**
* 取出队头元素
*/
private E dequeue() {
Node
Node
h.next = h;
head = first;
E x = first.item;
first.item = null;
return x;
}
4、signalNotFull 方法源码
/**
* 唤醒因为队列已满,而阻塞等待存放数据的线程
*/
private void signalNotFull() {
final ReentrantLock putLock = this.putLock;
putLock.lock();
try {
notFull.signal();
} finally {
putLock.unlock();
}
}
5、take方法源码
take()方法源码,如果队列为空,take()方法就一直阻塞,直到被唤醒
/**
* take方法入口
*/
public E take() throws InterruptedException {
E x;
int c = -1;
final AtomicInteger count = this.count;
// 1. 加可中断的锁,防止一直阻塞
final ReentrantLock takeLock = this.takeLock;
takeLock.lockInterruptibly();
try {
// 2. 如果队列为空,就一直阻塞,直到被唤醒
while (count.get() == 0) {
notEmpty.await();
}
// 3. 如果队列不为空,则取出队头元素
x = dequeue();
// 4. 队列元素个数减一
c = count.getAndDecrement();
// 5. 如果队列不为空,则唤醒因为队列为空而等待取数据的线程
if (c > 1) {
notEmpty.signal();
}
} finally {
// 6. 释放锁
takeLock.unlock();
}
// 7. 如果取数据之前,队列已满,取数据之后队列肯定不满了,则唤醒因为队列已满而等待放数据的线程
if (c == capacity) {
signalNotFull();
}
return x;
}
六、查看数据源码
再看一下查看数据源码,查看数据,并不删除数据

1、peek方法源码
peek()方法源码,如果数组为空,直接返回 null
/**
* peek方法入口
*/
public E peek() {
// 1. 如果队列为空,则返回null
if (count.get() == 0) {
return null;
}
// 2. 加锁
final ReentrantLock takeLock = this.takeLock;
takeLock.lock();
try {
// 3. 取出队头元素
Node
if (first == null) {
return null;
} else {
return first.item;
}
} finally {
// 4. 释放锁
takeLock.unlock();
}
}
2、element方法源码
element()方法源码,如果队列为空,则抛出异常
/**
* element方法入口
*/
public E element() {
// 1. 调用peek方法查询数据
E x = peek();
// 2. 如果查到数据,直接返回
if (x != null) {
return x;
} else {
// 3. 如果没找到,则抛出异常
throw new NoSuchElementException();
}
}
七、总结
-
LinkedBlockingQueue实现了BlockingQueue接口,提供了四组放数据和读数据的方法,来满足不同的场景
-
LinkedBlockingQueue底层基于链表实现,支持从头部弹出数据,从尾部添加数据
-
LinkedBlockingQueue初始化的时候,如果不指定队列长度,默认长度是Integer最大值,有内存溢出风险,建议初始化的时候指定队列长度
-
LinkedBlockingQueue的方法是线程安全的,分别使用了读写两把锁,比ArrayBlockingQueue性能更好

 浙公网安备 33010602011771号