
Cinder 架构分析、高可用部署与核心功能解析
2019-02-26 12:39 云物互联 阅读(4273) 评论(0) 收藏 举报目录
文章目录
Cinder
操作系统获得外部存储空间一般有以下两种方式:
-
Block Storage:通过某种协议(e.g.SAS、SCSI、SAN、iSCSI)从后端存储 Assigned、Attached 块设备(Volume),然后分区格式化、创建文件系统并 mount 到操作系统,然后就可以在此文件系统之上存储数据,或者也可以直接使用裸硬盘来存储数据(e.g. 数据库系统)
-
FileSystem Storage:通过 NFS、CIFS 等协议,mount 远程文件系统到本地操作系统。NAS、NFS 服务器,以及各种分布式文件系统提供的都是这种存储。
-
Object Storage:对象存储是以对象形式存储数据的存储系统,最大的优势就是可以让用户更加灵活的处理海量数据。操作系统客户端可以通过对象存储提供的存储网关接口(一般是 HTTP/S)来上传或下载存储数据。
而本篇的主角就是 Cinder,OpenStack Block Storage as a Services(块存储即服务)。
Cinder is the OpenStack Block Storage service for providing volumes to Nova virtual machines, Ironic bare metal hosts, containers and more. Some of the goals of Cinder are to be/have:
- Component based architecture: Quickly add new behaviors
- Highly available: Scale to very serious workloads
- Fault-Tolerant: Isolated processes avoid cascading failures
- Recoverable: Failures should be easy to diagnose, debug, and rectify
- Open Standards: Be a reference implementation for a community-driven api
— — 官方文档:https://docs.openstack.org/cinder/latest/
需要注意的是,正如 Nova 本身不提供 Hypervisor 技术一般,Cinder 自身也不提供存储技术,而是作为一个抽象的中间管理层,北向提供稳定而统一的 Block Storage 资源模型、南向通过 Plug-ins&Drivers 模型对接多样化的后端存储设备(e.g. LVM、CEPH、NetApp、Datastore etc.)。所以 Cinder 的精华从不在于存储技术,而是在于对 Block Storage as a Service 需求(创建、删除、快照、挂载、分离、备份卷)的抽象与理解。
- 存储资源模型(e.g. Volume, Snapshot, Pool etc.)
- 兼容多样化存储设备的 “逻辑驱动层”
- 分布式架构
- 高可用设计
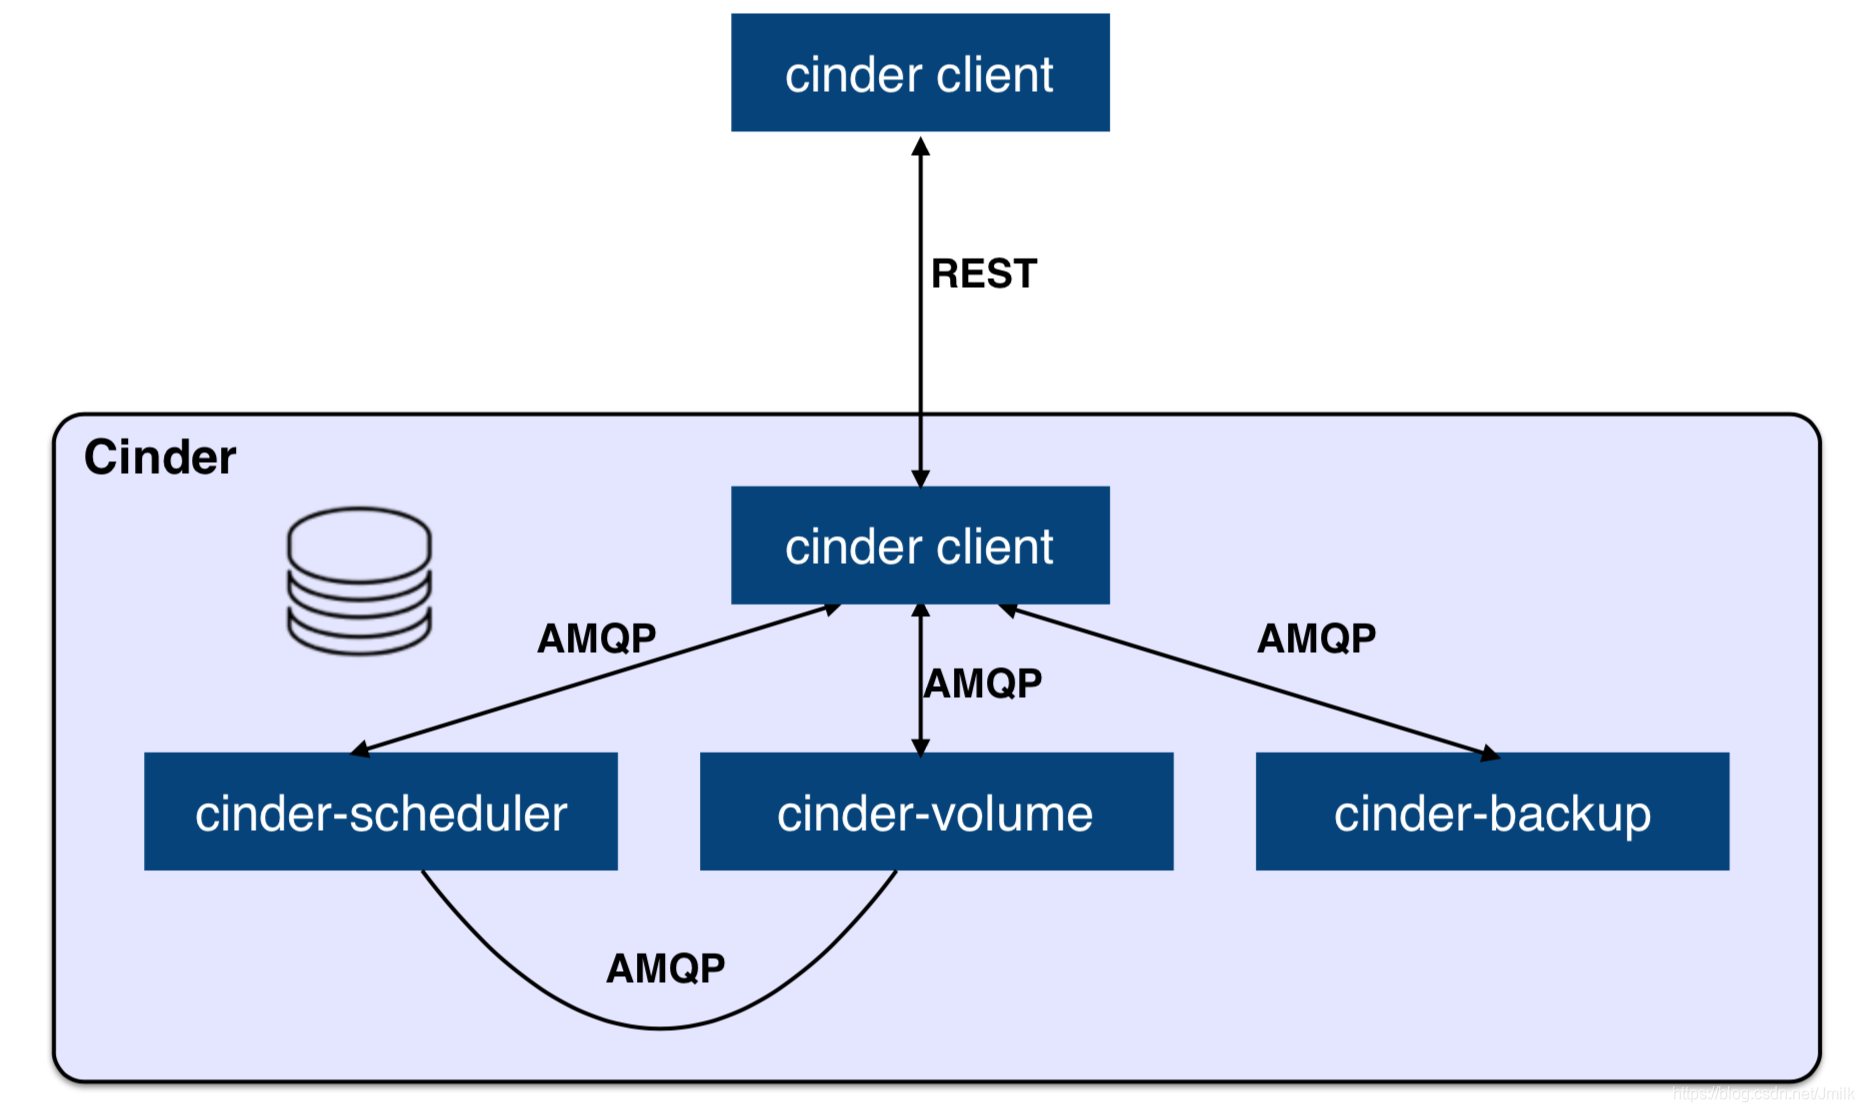
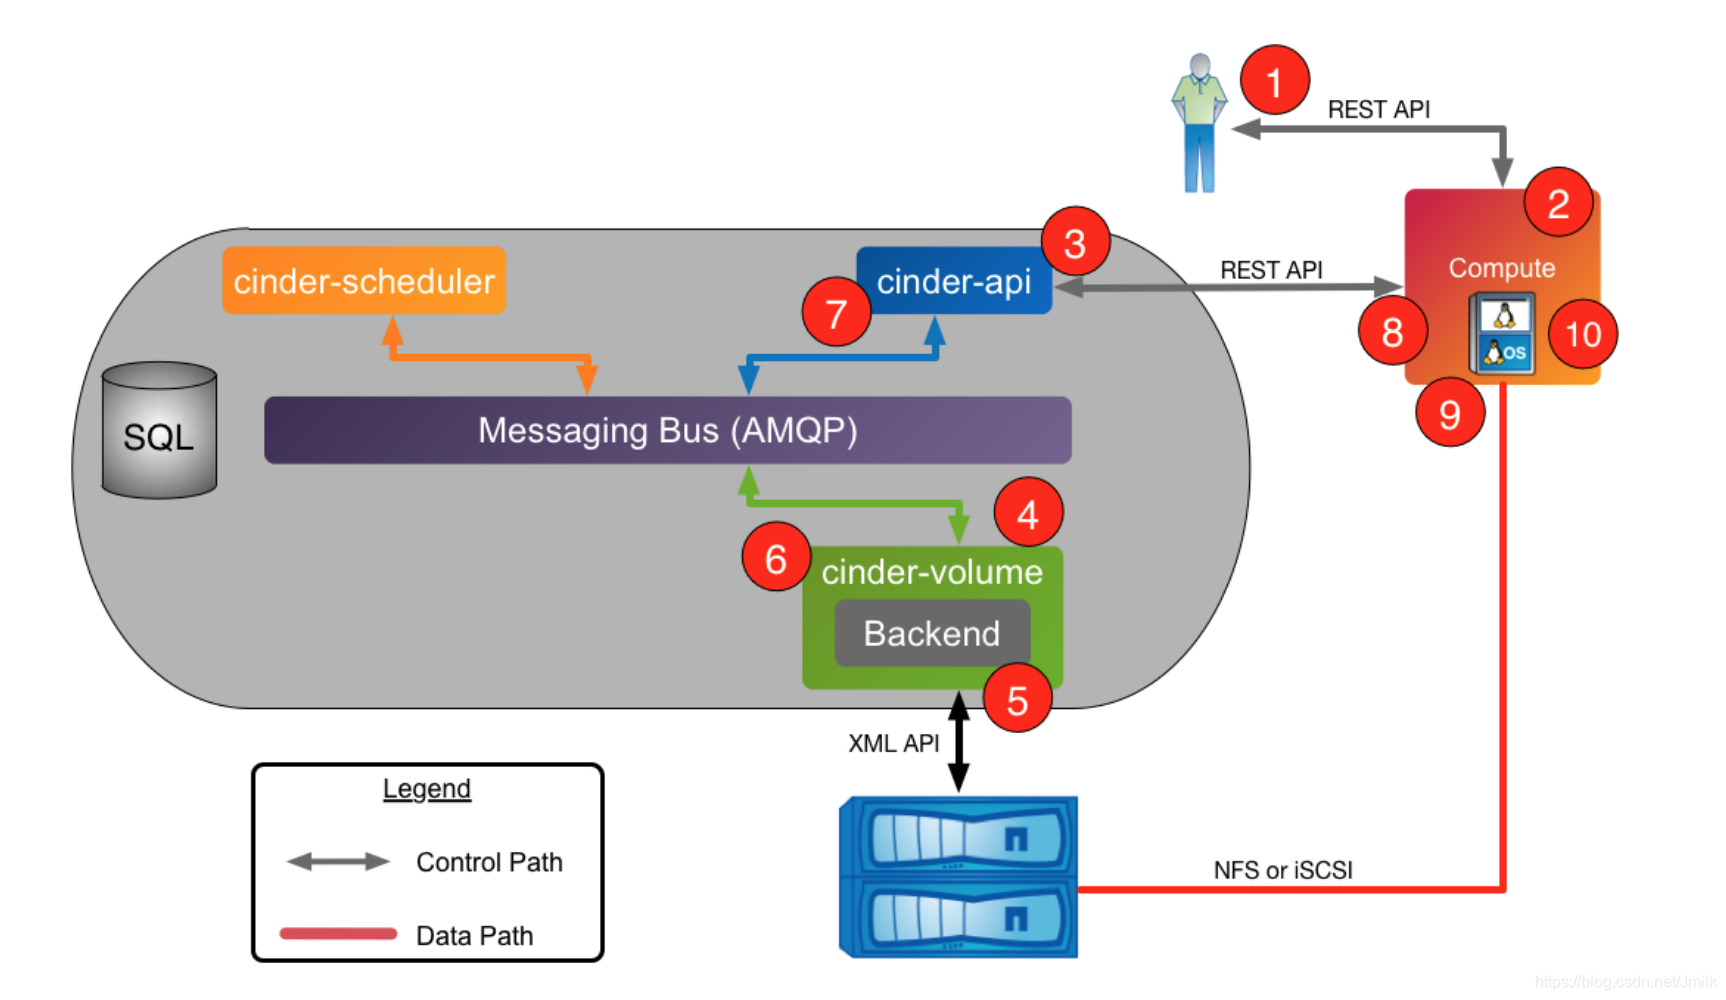
Cinder 的软件架构
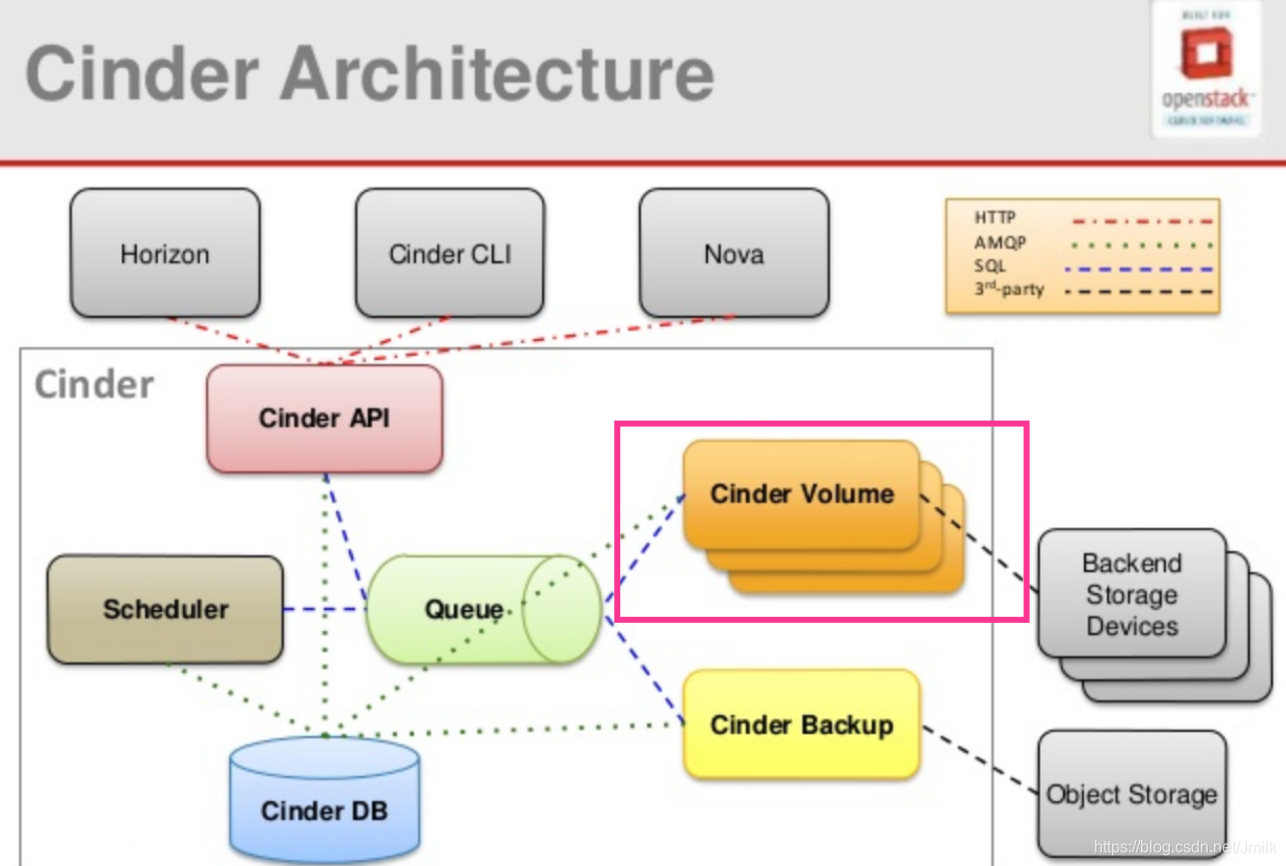
cinder-api
a WSGI app that authenticates and routes requests throughout the Block Storage service. It supports the OpenStack APIs only, although there is a translation that can be done through Compute’s EC2 interface, which calls in to the Block Storage client.
对外提供稳定而统一的北向 RESTful API,cinder-api service 服务进程通常运行在控制节点,支持多 Workers 进程(通过配置项 osapi_volume_workers 设定)。接收到的合法请求会经由 MQ 传递到 cinder-volume 执行。Cinder API 现存 v2(DEPRECATED)、v3(CURRENT) 两个版本,可以通过配置文件来启用。
Cinder API 官方文档:https://developer.openstack.org/api-ref/block-storage/
NOTE:从 API 的官方文档,或从 /opt/stack/cinder/cinder/db/sqlalchemy/models.py 都可以从侧面对 Cinder 的资源模型定义有所了解。
cinder-scheduler
schedules and routes requests to the appropriate volume service. Depending upon your configuration, this may be simple round-robin scheduling to the running volume services, or it can be more sophisticated through the use of the Filter Scheduler. The Filter Scheduler is the default and enables filters on things like Capacity, Availability Zone, Volume Types, and Capabilities as well as custom filters.
如果说 cinder-api 接收的是关于 “创建” 的请求(e.g. Create Volume),那么该请求就会通过 MQ 转发到 cinder-scheduler service 服务进程,cinder-scheduler 与 nova-scheduler 一般,顾名思义是调度的层面。通过 Filters 选择最 “合适” 的 Storage Provider Node 来对请求资源(e.g. Volume)进行创建。不同的 Filters 具有不同的过滤(调度)算法,所谓的 “合适” 就是达到客户预期的结果,用户还可以自定义 Filter Class 来实现符合自身需求的过滤器,让调度更加灵活。与 nova-scheduler 一般,cinder-scheduler 同样需要维护调度对象(存储节点)“实时” 状态,cinder-volume service 会定期的向 cinder-scheduler service 上报存储节点状态(注:这实际上是通过后端存储设备的驱动程序上报了该设备的状态)。
- 首先判断存储节点状态,只有状态为 up 的存储节点才会被考虑。
- 创建 Volume 时,根据 Filter 和 Weight 算法选出最优存储节点。
- 迁移 Volume 时,根据 Filter 和 Weight 算法来判断目的存储节点是否符合要求。
现支持的 Filters 清单如下:
- AffinityFilter
- AvailabilityZoneFilter:可以在 cinder-volume(存储节点)的 cinder.conf 中设置
storage_availability_zone=az1来指定该存储节点的 Zone。配合 AvailabilityZoneFilter,用户创建 Volume 时选择期望的 AZ,就可以实现将 Volume 创建到指定的 AZ 中了。 默认 Zone 为 nova。 - CapabilitiesFilter:不同的 Volume Provider 自然具有不同的特点,用户可以通过设置 Volume Type 的 extra specs 来描述这些特性,该 Filter 就是为了通过这些特性来过滤存储节点。
- CapacityFilter:根据存储节点上的剩余空间(free_capacity_gb)大小来进行过滤,存储节点的 free_capacity_gb 正是由 cinder-volume service 上报的。
- DriverFilter
- IgnoreAttemptedHostsFilter
- InstanceLocalityFilter
- JsonFilter
通过 nova-scheduler service 的配置文件 cinder.conf 指定你需要使用的 Filters 列表,e.g.
[DEFAULT]
...
scheduler_driver =cinder.scheduler.filter_scheduler.FilterScheduler
scheduler_default_filters =AvailabilityZoneFilter,CapacityFilter,CapabilitiesFilter
现支持的 Weights 算法如下:
- AllocatedCapacityWeigher:有最先可使用空间的权重大,相关配置项有
allocated_capacity_weight_multiplier。 - CapacityWeigher:有最大可使用空间的权重大,相关配置项有
capacity_weight_multiplier。 - ChanceWeigher:随意选取
- VolumeNumberWeigher
- GoodnessWeigher
当然了,在实际使用中也存在不需要或者说不希望进行调度的情况,还是正如 Nova 一般,创建虚拟机时可以通过 --availability-zone AZ:Host:Node 来强制指定计算节点,Cinder 也有这般手段。
cinder-volume
manages Block Storage devices, specifically the back-end devices themselves.
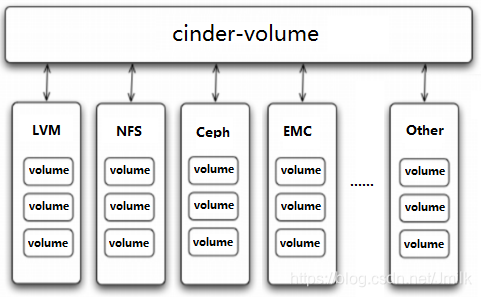
cinder-volume service 是 Cinder 的核心服务进程,运行该服务进程的节点都可以被称之为存储节点。cinder-volume 通过抽象出统一的 Back-end Storage Driver 层,让不同存储厂商得以通过提供各自的驱动程序来对接自己的后端存储设备,实现即插即用(通过配置文件指定),多个这样的存储节点共同构成了一个庞大而复杂多样的存储资源池系统。
Driver 框架
OpenStack 作为开放的 Infrastracture as a Service 云操作系统,支持业界各种优秀的技术,这些技术可能是开源免费的,也可能是商业收费的。 这种开放的架构使得 OpenStack 保持技术上的先进性,具有很强的竞争力,同时又不会造成厂商锁定(Lock-in)。
以 Cinder 为例,存储节点支持多种 Volume Provider,包括 LVM、NFS、Ceph、GlusterFS 以及 EMC、IBM 等商业存储系统。 cinder-volume 为这些 Volume Provider 抽象了统一的 Driver 接口,Volume Provider 只需要实现这些接口,就可以以 Driver 的形式即插即(volume_driver 配置项)用到 OpenStack 中。下面是 Cinder Driver 的架构示意图:
在 cinder-volume 的配置文件 /etc/cinder/cinder.conf 中设置该存储节点使用的 Volume Provider Driver 类型:
# 启用 LVM Provider(默认)
volume_driver=cinder.volume.drivers.lvm.LVMVolumeDriver
Plugin 框架
Driver 和 Plugin 通常不会分家,Driver 是由各存储厂商提供的,那么 Plugin(插槽)就应该有 Cinder 的提供。
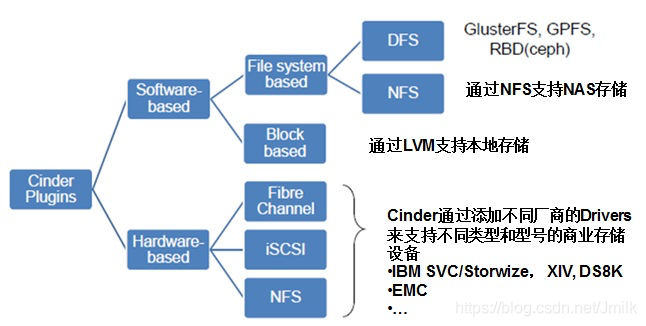
根据 FileSystem Storage 和 Block Storage 两个不同类型的外部存储系统,Cinder Plugins 也提供了 FileSystem based 和 Block based 两种不同类型 Plugin。除此之外,Cinder Plugins 还提供了 iSCSC、FC、NFS 等常用的数据传输协议 Plugin 框架,上传逻辑得以根据实际情况来使用(Attached/Dettached)存储资源。
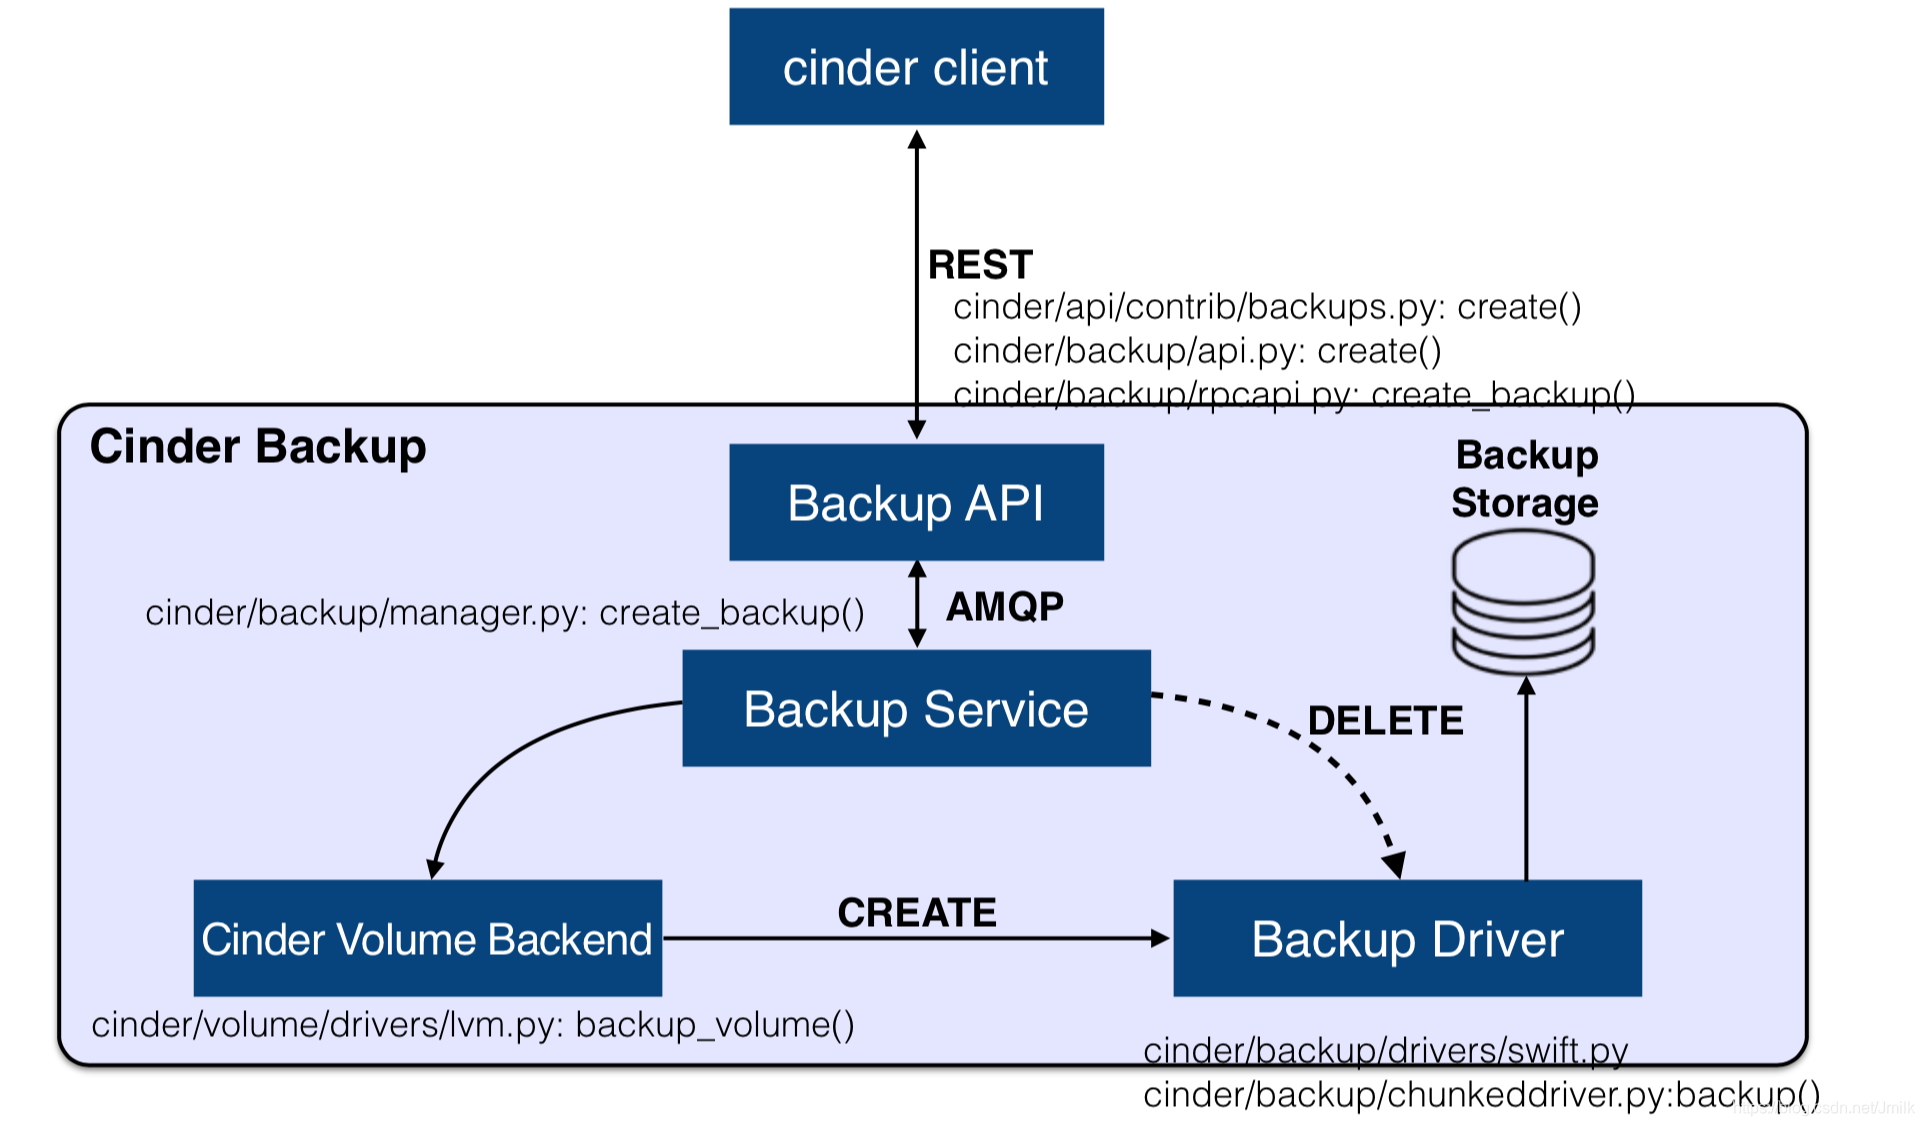
cinder-backup
provides a means to back up a Block Storage volume to OpenStack Object Storage (swift).
提供 Volume 的备份功能,支持将 Volume 备份到对象存储中(e.g. Swift、Ceph、IBM TSM、NFS),也支持从备份 Restore 成为 Volume。
Cinder Backup 架构实现:
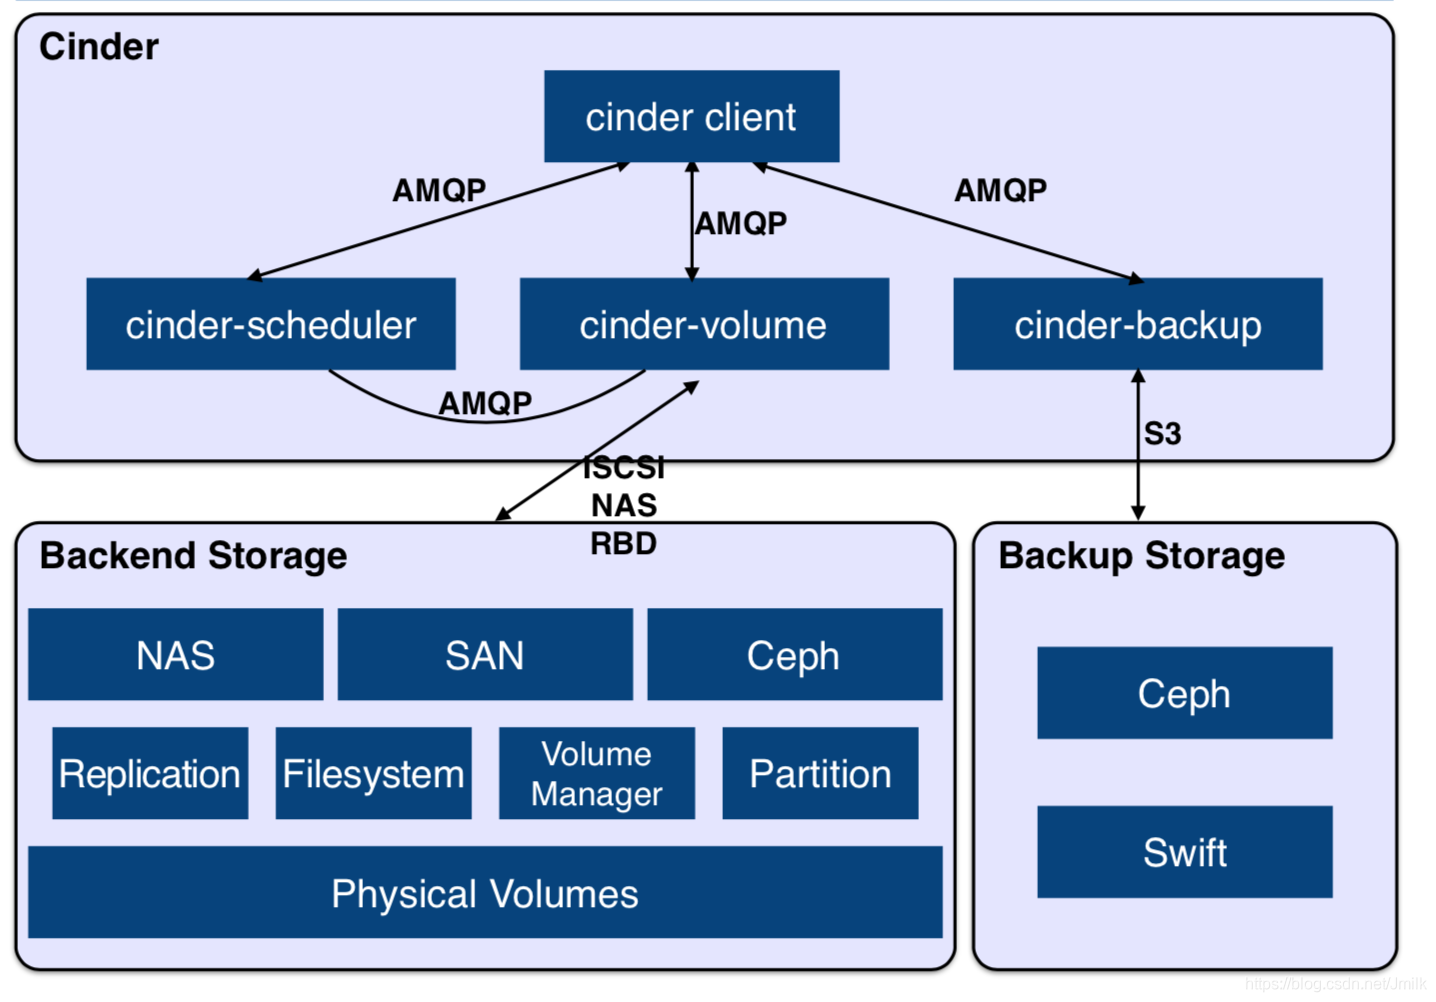
Volume Provider
Volume Provider 不属于 Cinder 架构的组件,其含义是真实的物理数据存储设备,为 Volume 提供物理存储空间,故又称 Backend Storage。Cinder 支持多种 Volume Provider,每种 Volume Provider 都通过自己的 Driver 与 cinder-volume 通信。之所以单独列出 Volume Provider,是为了强调 Cinder 本身并不具备存储技术,真实的存储资源,由后端 Volume Provider 提供。
Cinder 与 Volume Provider 之间的关系:
中间件
- Messaging queue:Routes information between the Block Storage processes.
- DB:sql database for data storage. Used by all components (LINKS NOT SHOWN).
创建 Volume 流程分析
创建 Volume 是 Cinder 的头一号功能,自然花样也就多了。
- 创建 RAW 格式的卷
- 从快照创建卷
- 从已有卷创建卷(克隆)
- 从 Image 创建卷
- source_replica 创建卷
# /opt/stack/cinder/cinder/volume/flows/manager/create_volume.py

        # 根据不同的类型有不同的创建执行细节
        create_type = volume_spec.pop('type', None)
        LOG.info("Volume %(volume_id)s: being created as %(create_type)s "
                 "with specification: %(volume_spec)s",
                 {'volume_spec': volume_spec, 'volume_id': volume_id,
                  'create_type': create_type})
        if create_type == 'raw':
            model_update = self._create_raw_volume(
                context, volume, **volume_spec)
        elif create_type == 'snap':
            model_update = self._create_from_snapshot(context, volume,
                                                      **volume_spec)
        elif create_type == 'source_vol':
            model_update = self._create_from_source_volume(
                context, volume, **volume_spec)
        elif create_type == 'image':
            model_update = self._create_from_image(context,
                                                   volume,
                                                   **volume_spec)
        elif create_type == 'backup':
            model_update, need_update_volume = self._create_from_backup(
                context, volume, **volume_spec)
            volume_spec.update({'need_update_volume': need_update_volume})
        else:
            raise exception.VolumeTypeNotFound(volume_type_id=create_type)
这里我们先不考虑这些 “花样” 底层细节的区别,主要关注 create_volume 在 Cinder 所有服务部件之间的流转过程。
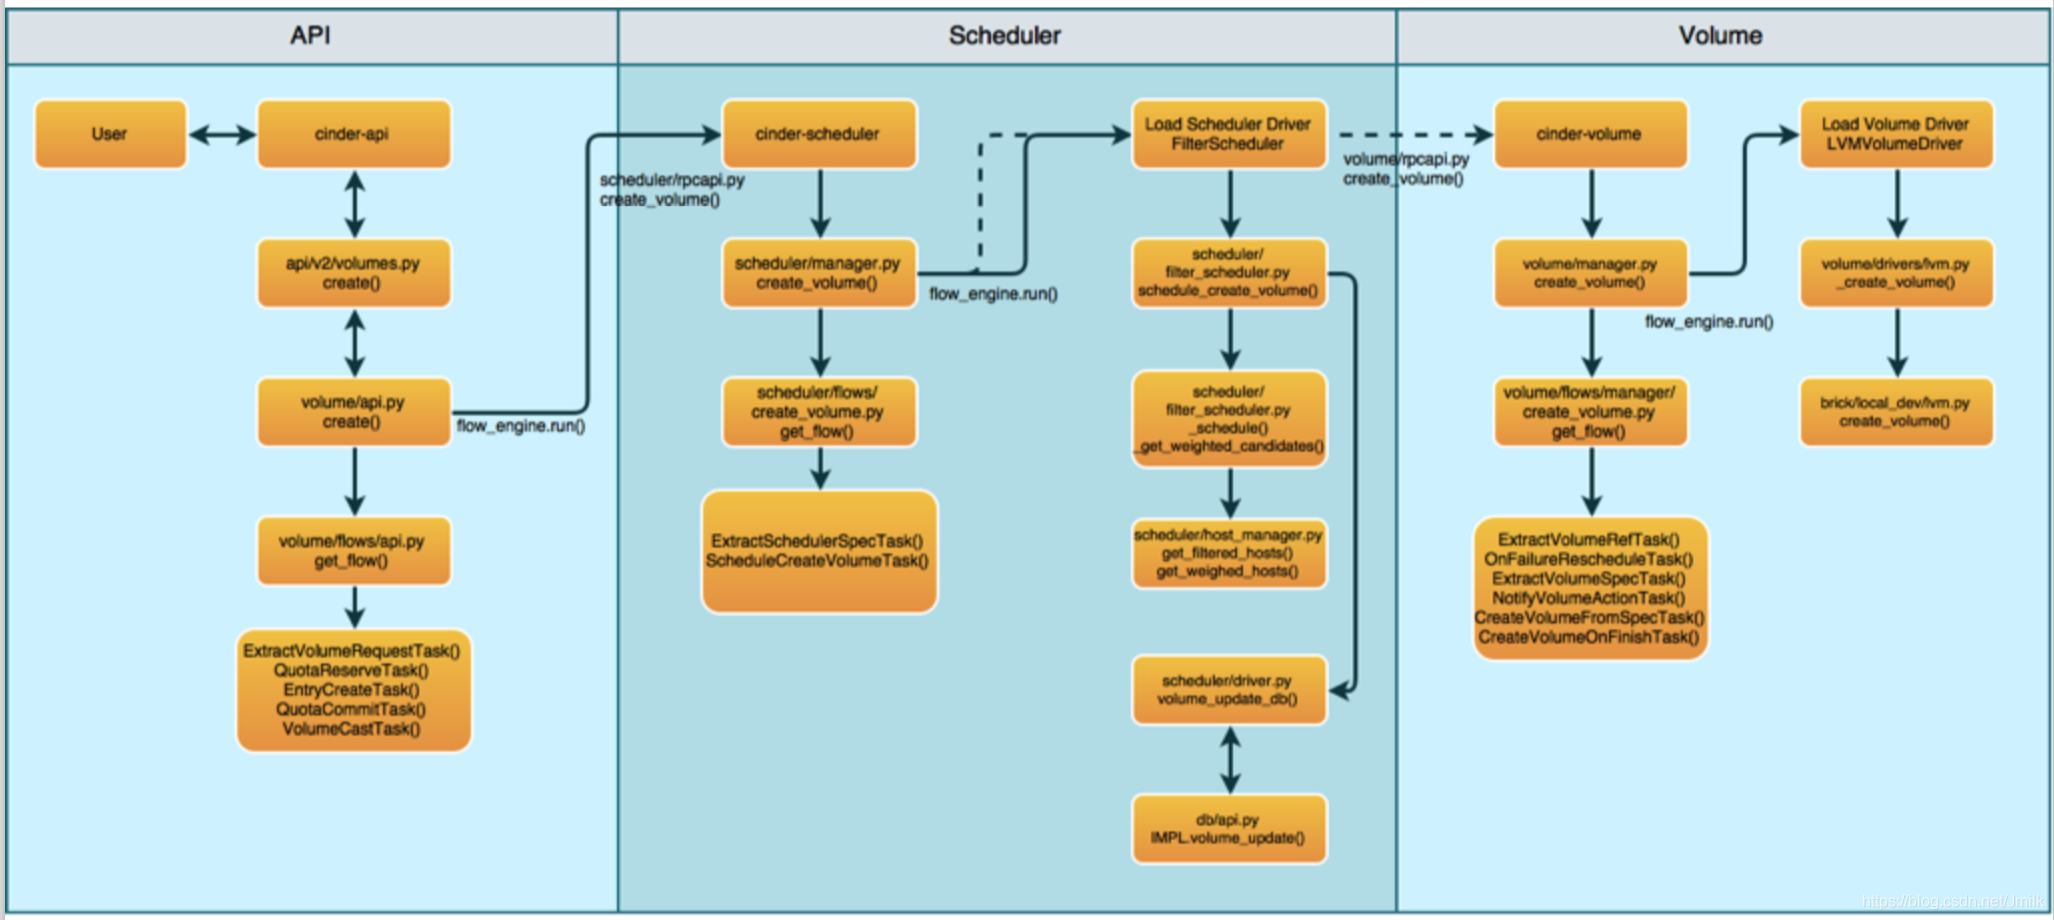
cinder-api 阶段
cinder-api service 接收 Post /v3/{project_id}/volumes 请求,经过了一系列的 Body 数据校验、数据类型转换(UUID => Object Model)和操作授权校验(context.authorize)之后,启动 volume_create_api flow,此 Flow 中包含了下列 Tasks:
- ExtractVolumeRequestTask:获取(Extract)、验证(Validates)create volume 在 cinder-api 阶段相关的信息
- QuotaReserverTask:预留配额
- EntryCreateTask:在数据库中创建 Volume 条目
- QuotaCommitTask:确认配额
- VolumeCastTask:发出一个 Cast 异步请求,将创建请求丢到 MQ,最终被 cinder-scheduler service 接收
自此 volume_create_api flow 完成了 pending -> running -> success 的整个流程,cinder-api 阶段结束。
需要注意的是,正如上文提到过的 create volume 也存在不需要进入 cinder-scheduler 的情况:
# /opt/stack/cinder/cinder/volume/api.py

            # sched_rpcapi 可能为 None
            sched_rpcapi = (self.scheduler_rpcapi if (
                            not cgsnapshot and not source_cg and
                            not group_snapshot and not source_group)
                            else None)
            volume_rpcapi = (self.volume_rpcapi if (
                             not cgsnapshot and not source_cg and
                             not group_snapshot and not source_group)
                             else None)
            flow_engine = create_volume.get_flow(self.db,
                                                 self.image_service,
                                                 availability_zones,
                                                 create_what,
                                                 sched_rpcapi,
                                                 volume_rpcapi)
cinder-scheduler 阶段
cinder-scheduler service 接收到了 create volume request 之后也会启动一个 volume_create_scheduler flow,此 Flow 包含了一下 Tasks:
- ExtraceSchedulerSpecTask:将 request body 转换成为 Scheduler Filter 中通用的 RequestSpec 数据结构(实例对象)。
- SchedulerCreateVolumeTask:完成 Filter 和 Weight 的调度算法。
最终在 cinder-scheduler service 选出一个最佳的存储节点(cinder-volume),并继续讲 create volume request 通过 RPC 丢到选中的 cinder-volume service 接收。
cinder-volume 阶段
同样的,cinder-volume service 还是启用了 TaskFlow:volume_create_manager,该 Flow 具有以下 Tasks:
- ExtractVolumeRefTask:Extracts volume reference for given volume id
- OnFailureRescheduleTask:Triggers a rescheduling request to be sent when reverting occurs
- ExtractVolumeSpecTask:Extracts a spec of a volume to be created into a common structure
- NotifyVolumeActionTask:Performs a notification about the given volume when called.
- CreateVolumeFromSpecTask:Creates a volume from a provided specification.
- CreateVolumeOnFinishTask:On successful volume creation this will perform final volume actions.
其中最主要的我们关注 CreateVolumeFromSpecTask,该 Task 调用了后端存储设备的 Driver 真正执行 Volume 创建的任务。
# /opt/stack/cinder/cinder/volume/flows/manager/create_volume.py

    def _create_raw_volume(self, context, volume, **kwargs):
        try:
            # 后端存储设备的驱动程序
            ret = self.driver.create_volume(volume)
        except Exception as ex:
            with excutils.save_and_reraise_exception():
                self.message.create(
                    context,
                    message_field.Action.CREATE_VOLUME_FROM_BACKEND,
                    resource_uuid=volume.id,
                    detail=message_field.Detail.DRIVER_FAILED_CREATE,
                    exception=ex)
        finally:
            self._cleanup_cg_in_volume(volume)
        return ret
这里以 LVM Backend 为例,该 Task 的本质就是调用操作系统指令 lvcreate 从 Backend 对应的 VG 中划分出 LV(Volume)。
# /opt/stack/cinder/cinder/brick/local_dev/lvm.py

    def create_volume(self, name, size_str, lv_type='default', mirror_count=0):
        """Creates a logical volume on the object's VG.

        :param name: Name to use when creating Logical Volume
        :param size_str: Size to use when creating Logical Volume
        :param lv_type: Type of Volume (default or thin)
        :param mirror_count: Use LVM mirroring with specified count

        """

        if lv_type == 'thin':
            pool_path = '%s/%s' % (self.vg_name, self.vg_thin_pool)
            cmd = LVM.LVM_CMD_PREFIX + ['lvcreate', '-T', '-V', size_str, '-n',
                                        name, pool_path]
        else:
            cmd = LVM.LVM_CMD_PREFIX + ['lvcreate', '-n', name, self.vg_name,
                                        '-L', size_str]

        if mirror_count > 0:
            cmd.extend(['--type=mirror', '-m', mirror_count, '--nosync',
                        '--mirrorlog', 'mirrored'])
            terras = int(size_str[:-1]) / 1024.0
            if terras >= 1.5:
                rsize = int(2 ** math.ceil(math.log(terras) / math.log(2)))
                # NOTE(vish): Next power of two for region size. See:
                #             http://red.ht/U2BPOD
                cmd.extend(['-R', str(rsize)])

        try:
            # 执行组装好的 CLI
            self._execute(*cmd,
                          root_helper=self._root_helper,
                          run_as_root=True)
        except putils.ProcessExecutionError as err:
            LOG.exception('Error creating Volume')
            LOG.error('Cmd     :%s', err.cmd)
            LOG.error('StdOut  :%s', err.stdout)
            LOG.error('StdErr  :%s', err.stderr)
            LOG.error('Current state: %s',
                      self.get_all_volume_groups(self._root_helper))
            raise
NOTE: 需要注意的是,虽然 LVM Driver 是通过 CLI 的方式来对 VG 进行操作的,但每种不同的后端存储设备都有自己的实现方式,例如:通过 HTTP/HTTPS、TCP Socket 来进行 Driver 与存储设备的连接。
TaskFlow
通过上述流程的分析,或者你会疑惑什么是 Flow?什么是 Task?这是因为 Cinder 在 create volume 的流程中采用了 TaskFlow 通用技术库,其带来的好处就是能够有效的保证了实际存储资源与代码逻辑记录的一致性,说白了就是避免了程序帐数据的出现。这不能算做一个小问题,因为存储卷管理的流程往往是长线、长时间的操作,自动化流程脆弱,如果没有一个有效的 “流程原子性” 机制,将导致程序的稳定性无法得到保证。
更多的 TaskFlow 资料请浏览:《Openstack 实现技术分解 (4) 通用技术 — TaskFlow》
创建 Volume 失败重试机制
可以在 cinder-volume service 的配置文件 cinder.conf 中 使用 scheduler_max_attempts 来配置 Volume 创建失败重试的次数,默认值为 3,值为 1 则表示不启用失败重试机制。
# Maximum number of attempts to schedule an volume (integer value)
scheduler_max_attempts=3
cinder-sheduler 和 cinder-volume 之间会传递当前的失败重试次数。当 Volume 创建失败,cinder-volume 会通过 RPC 通知 cinder-scheduler 重新进行调度。
# /opt/stack/cinder/cinder/volume/manager.py

            # 确定需要重新调度
            if rescheduled:
                # NOTE(geguileo): Volume was rescheduled so we need to update
                # volume stats because the volume wasn't created here.
                # Volume.host is None now, so we pass the original host value.
                self._update_allocated_capacity(volume, decrement=True,
                                                host=original_host)
cinder-scheduler 检查当前重试次数若没有超出最大重试次数,则会重新进入调度环节,选择当前最优存储节点重新创建 Volume。否则,就触发 No valid host was found 异常。Nova 同样具有 RetryFilter 机制,这是为了防止 “实时资源缺失(调度时参考的资源存量与实际资源存量有差距)” 问题的出现,进一步保障了操作的成功率。
删除 Volume 流程分析
还是从 REST API 看起:DELETE /v3/{project_id}/volumes/{volume_id}。删除的请求比较简单,指定要删除的 UUID of Volume。在版本较新的 API 中还支持 cascade 和 force 两个可选的 request query parameter。
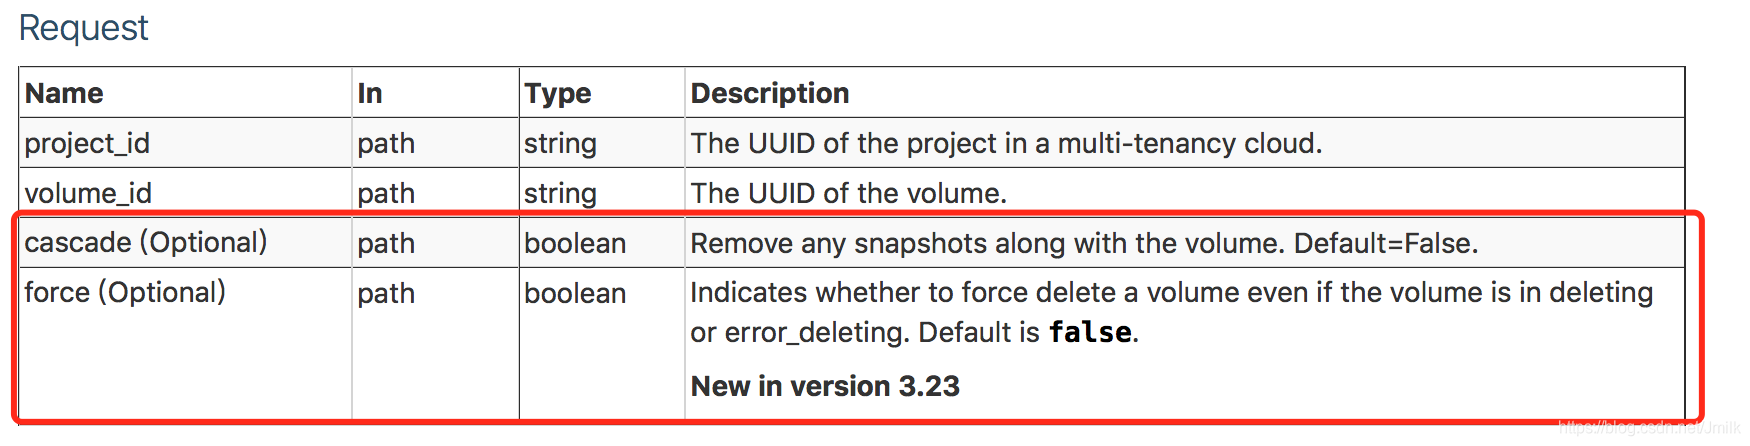
- cascade:删除所有相关的快照和卷。
- force:无视卷状态,强制删除。
在经过 cinder-api service 一系列的删除 “预准备(主要是看这个 Volume 删了适合不适合)” 操作之后,delete volume request 依旧会进入 cinder-volume service。
# /opt/stack/cinder/cinder/volume/manager.py

        """Deletes and unexports volume.

        1. Delete a volume(normal case)
           Delete a volume and update quotas.

        2. Delete a migration volume
           If deleting the volume in a migration, we want to skip
           quotas but we need database updates for the volume.

        3. Delete a temp volume for backup
           If deleting the temp volume for backup, we want to skip
           quotas but we need database updates for the volume.
      """
最后的最后实际上还是交由后端存储设备的驱动程序来完成 “真·卷” 的删除。当然了,在整个删除的过程中还需要处理多种多样的复杂场景的问题,这里就不一一列举了,代码会清晰的告诉你。
    @utils.retry(putils.ProcessExecutionError)
    def delete(self, name):
        """Delete logical volume or snapshot.

        :param name: Name of LV to delete

        """

        def run_udevadm_settle():
            cinder.privsep.lvm.udevadm_settle()

        # LV removal seems to be a race with other writers or udev in
        # some cases (see LP #1270192), so we enable retry deactivation
        LVM_CONFIG = 'activation { retry_deactivation = 1} '

        try:
            # 执行 CLI 完成 LV 的删除
            self._execute(
                'lvremove',
                '--config', LVM_CONFIG,
                '-f',
                '%s/%s' % (self.vg_name, name),
                root_helper=self._root_helper, run_as_root=True)
        except putils.ProcessExecutionError as err:
            LOG.debug('Error reported running lvremove: CMD: %(command)s, '
                      'RESPONSE: %(response)s',
                      {'command': err.cmd, 'response': err.stderr})

            LOG.debug('Attempting udev settle and retry of lvremove...')
            run_udevadm_settle()

            # The previous failing lvremove -f might leave behind
            # suspended devices; when lvmetad is not available, any
            # further lvm command will block forever.
            # Therefore we need to skip suspended devices on retry.
            LVM_CONFIG += 'devices { ignore_suspended_devices = 1}'

            self._execute(
                'lvremove',
                '--config', LVM_CONFIG,
                '-f',
                '%s/%s' % (self.vg_name, name),
                root_helper=self._root_helper, run_as_root=True)
            LOG.debug('Successfully deleted volume: %s after '
                      'udev settle.', name)
Volume 的资源模型
Data Module:
# /opt/stack/cinder/cinder/db/sqlalchemy/models.py

class Volume(BASE, CinderBase):
    """Represents a block storage device that can be attached to a vm."""
    __tablename__ = 'volumes'
    __table_args__ = (Index('volumes_service_uuid_idx',
                            'deleted', 'service_uuid'),
                      CinderBase.__table_args__)

    id = Column(String(36), primary_key=True)
    _name_id = Column(String(36))  # Don't access/modify this directly!

    @property
    def name_id(self):
        return self.id if not self._name_id else self._name_id

    @name_id.setter
    def name_id(self, value):
        self._name_id = value

    @property
    def name(self):
        return CONF.volume_name_template % self.name_id

    ec2_id = Column(Integer)
    user_id = Column(String(255))
    project_id = Column(String(255))

    snapshot_id = Column(String(36))

    cluster_name = Column(String(255), nullable=True)
    host = Column(String(255))  # , ForeignKey('hosts.id'))
    size = Column(Integer)
    availability_zone = Column(String(255))  # TODO(vish): foreign key?
    status = Column(String(255))  # TODO(vish): enum?
    attach_status = Column(String(255))  # TODO(vish): enum
    migration_status = Column(String(255))

    scheduled_at = Column(DateTime)
    launched_at = Column(DateTime)
    terminated_at = Column(DateTime)

    display_name = Column(String(255))
    display_description = Column(String(255))

    provider_location = Column(String(255))
    provider_auth = Column(String(255))
    provider_geometry = Column(String(255))
    provider_id = Column(String(255))

    volume_type_id = Column(String(36))
    source_volid = Column(String(36))
    encryption_key_id = Column(String(36))

    consistencygroup_id = Column(String(36), index=True)
    group_id = Column(String(36), index=True)

    bootable = Column(Boolean, default=False)
    multiattach = Column(Boolean, default=False)

    replication_status = Column(String(255))
    replication_extended_status = Column(String(255))
    replication_driver_data = Column(String(255))

    previous_status = Column(String(255))

    consistencygroup = relationship(
        ConsistencyGroup,
        backref="volumes",
        foreign_keys=consistencygroup_id,
        primaryjoin='Volume.consistencygroup_id == ConsistencyGroup.id')

    group = relationship(
        Group,
        backref="volumes",
        foreign_keys=group_id,
        primaryjoin='Volume.group_id == Group.id')

    service_uuid = Column(String(36), index=True)
    service = relationship(Service,
                           backref="volumes",
                           foreign_keys=service_uuid,
                           primaryjoin='Volume.service_uuid == Service.uuid')
    shared_targets = Column(Boolean, default=True)  # make an FK of service?
数据库属性:
MariaDB [cinder]> desc volumes;
+-----------------------------+--------------+------+-----+---------+-------+
| Field                       | Type         | Null | Key | Default | Extra |
+-----------------------------+--------------+------+-----+---------+-------+
| created_at                  | datetime     | YES  |     | NULL    |       |
| updated_at                  | datetime     | YES  |     | NULL    |       |
| deleted_at                  | datetime     | YES  |     | NULL    |       |
| deleted                     | tinyint(1)   | YES  |     | NULL    |       |
| id                          | varchar(36)  | NO   | PRI | NULL    |       |
| ec2_id                      | varchar(255) | YES  |     | NULL    |       |
| user_id                     | varchar(255) | YES  |     | NULL    |       |
| project_id                  | varchar(255) | YES  |     | NULL    |       |
| host                        | varchar(255) | YES  |     | NULL    |       |
| size                        | int(11)      | YES  |     | NULL    |       |
| availability_zone           | varchar(255) | YES  |     | NULL    |       |
| status                      | varchar(255) | YES  |     | NULL    |       |
| attach_status               | varchar(255) | YES  |     | NULL    |       |
| scheduled_at                | datetime     | YES  |     | NULL    |       |
| launched_at                 | datetime     | YES  |     | NULL    |       |
| terminated_at               | datetime     | YES  |     | NULL    |       |
| display_name                | varchar(255) | YES  |     | NULL    |       |
| display_description         | varchar(255) | YES  |     | NULL    |       |
| provider_location           | varchar(256) | YES  |     | NULL    |       |
| provider_auth               | varchar(256) | YES  |     | NULL    |       |
| snapshot_id                 | varchar(36)  | YES  |     | NULL    |       |
| volume_type_id              | varchar(36)  | YES  |     | NULL    |       |
| source_volid                | varchar(36)  | YES  |     | NULL    |       |
| bootable                    | tinyint(1)   | YES  |     | NULL    |       |
| provider_geometry           | varchar(255) | YES  |     | NULL    |       |
| _name_id                    | varchar(36)  | YES  |     | NULL    |       |
| encryption_key_id           | varchar(36)  | YES  |     | NULL    |       |
| migration_status            | varchar(255) | YES  |     | NULL    |       |
| replication_status          | varchar(255) | YES  |     | NULL    |       |
| replication_extended_status | varchar(255) | YES  |     | NULL    |       |
| replication_driver_data     | varchar(255) | YES  |     | NULL    |       |
| consistencygroup_id         | varchar(36)  | YES  | MUL | NULL    |       |
| provider_id                 | varchar(255) | YES  |     | NULL    |       |
| multiattach                 | tinyint(1)   | YES  |     | NULL    |       |
| previous_status             | varchar(255) | YES  |     | NULL    |       |
| cluster_name                | varchar(255) | YES  |     | NULL    |       |
| group_id                    | varchar(36)  | YES  | MUL | NULL    |       |
| service_uuid                | varchar(36)  | YES  | MUL | NULL    |       |
| shared_targets              | tinyint(1)   | YES  |     | NULL    |       |
+-----------------------------+--------------+------+-----+---------+-------+
39 rows in set (0.00 sec)
多后端存储(Multi-Backend Storage)
从 Havana 开始 Cinder 支持通过启用多个不同类型的存储后端(Backend),并为每一个 Backend 启动一个 cinder-volume service 服务进程。对于用户而言,只需要通过对配置文件的修改即可实现。
e.g. 同时启用 LVM 和 GlusterFS 后端存储
# /etc/cinder/cinder.conf

[DEFAULT]
...
enabled_backends =lvmdriver,glusterfs

[lvmdriver]
volume_driver = cinder.volume.drivers.lvm.LVMISCSIDriver
volume_group = cinder-volumes
volume_backend_name =LVM_iSCSI

[glusterfs]
volume_driver =cinder.volume.drivers.glusterfs.GlusterfsDriver
glusterfs_shares_config =/etc/cinder/glusterfs_shares
glusterfs_mount_point_base =/var/lib/nova
glusterfs_disk_util = df
glusterfs_qcow2_volumes = true
glusterfs_sparsed_volumes = true
volume_backend_name = GlusterFS
volume_backend_name:会被 Volume Type 功能用到,通过--property volume_backend_name属性来设置。- 多个 backends 之间可以设置相同 volume_backend_name,这样 cinder-scheduler 可以按照指定的调度算法在相同 volume_backend_name 的多个 backends 之内选择一个最合适的 backend。
- 启用了多后端存储后,cinder-volume service 服务进程会 fock 出相应数量的子进程,可以通过指令
openstack volume service list查看。
NOTE:开发调试阶段不建议开启多后端存储或者建议使用 remote_pdb 进行调试。
Tranfer Volume
Tranfer Volume 将 Volume 的拥有权从一个 Tenant 用户转移到另一个 Tenant 用户。该功能的本质就是 修改了 volume 的 tenant id 属性(os-vol-tenant-attr:tenant_id)而已。
- 在 Volume 所属的 Tenant 用户使用命令
cinder transfer-create创建 tranfer 时候会产生transfer id和authkey。 - 在另一个期望接管该 Volume 的 Tenant 用户使用命令
cinder transfer-accept接受 transfer 时将 1 中的transfer id和auth_key填入即可。
Migrate Volume
Migrate Volume 即将 Volume 从一个 Backend 迁移至另一个 Backend。
if 如果 Volume 没有 Attach:
- 迁移:如果是同一个存储设备上不同 Backend 之间迁移,需要存储 Driver 支持本地 Migrate。
- 克隆:如果是不同存储设备上的 Backend 之间的 Volume 迁移,或者存储 Driver 不支持本地 Backend 之间的迁移,那么 Cinder 会启用克隆操作进行迁移。
- 首先创建一个新的 Volume
- 然后从旧 Volume 的数据拷贝到新 Volume
- 最后旧 Volume 删除
else Volume 已经被 Attach 到虚拟机:
- 克隆:同上
NOTE:migration-policy 有两个选项 never 和 on-demand,如果设置了 never,是无法实现 Volume 迁移的。
Mutli-Attach
Mutli-Attach - Support for attaching a single Cinder volume to multile VM instances.
OpenStack’s Mutli-Attach Feature 在早前的版本的定义是:允许一个 RO volume 经 iSCSI/FC 被 Attached 到多个 VM;直到 Queens 版本之后,Mutil-Attach 的定义被更新为:「The ability to attach a volume to multiple hosts/servers simultaneously is a use case desired for active/active or active/standby scenarios.」,即 Volume 支持以 RO/RW 的方式被挂载到多个 VM。
官方文档:Volume multi-attach: Enable attaching a volume to multiple servers
Multi-Attach 最直接的价值就是支撑核心业务数据盘的高可用冗余特性,比如说:一个 Volume 同时挂载在两个 VM 上,当 ACTIVE VM 失联时,可以由另外的 PASSIVE VM 继续访问(RO、R/W)这个卷。
Multi-Attach RO:以 RO 模式将 Volume Attach 到另一个主机/服务器。问题在于,要求使用者(e.g. KVM)知道如何在 Volume 上设置只读模式和强制执行只读模式。
Multi-Attach RW:以 RW 模式将 Volume Attach 到另一个主机/服务器。这种情况下,多个 Attachment(Volume 与 Instance 的隐射关系)之间没有区别,它们都被视为独立项目,并且都是读写卷。
NOTE:目前,所有 Volume 都可以以 RW 模式 Attach,包括 Boot From Volume 模式。
代码实现原理:
- 首先通过定义一个 multiattach=True 标志的 Volume.
- Attach 时,Nova 需要支持即使在 Volume in-use status 下仍然可以 Attach。Nova 为每一个 Attachment 指定 RO 或 RW 类型。Cinder 需要支持 Volume status 为 available 或 in-use 状态下仍然可以 Attach。multiattach 字段设置可以被 Attach 多次。Attach 之后将 Volume 和 Instance 的关系(m:n)记录到 Attachment 表中。Libvirt 需要将这个 Volume 设置为 shareable 标签,这样 Hypervisor 就不会在 Volume 上设置独占锁以及相关针对 VM 的 SELinux 隔离设置了。
- Detach 时,Nova 需要传递 attachment_id 到 clinderclient,告知 Cinder 哪一个 Attahment 需要被 Detach。然后 Cinder 结合 instance_id 与 attachment_id 执行 Detach Volume。如果 Cinder 设置了 multiattach=True 但又没有传入 attachment_id 的话就应该 Detach 失败。
使用:
# 创建 Multi-Attach Volume Type
cinder type-create multiattach
cinder type-key multiattach set multiattach="<is> True"

# Create Volume
cinder create 10 --name multiattach-volume --volume-type <volume_type_uuid>

# multiattach-volume
nova volume-attach test01 <volume_uuid>
nova volume-attach test02 <volume_uuid>
对于版本比较旧的 Cinder(< Q)可以使用下述方式进行 Multi-Attach:
[root@overcloud-controller-0 ~]# cinder create --allow-multiattach --name vol_shared 1
+--------------------------------+--------------------------------------+
| Property | Value |
+--------------------------------+--------------------------------------+
| attachments | [] |
| availability_zone | nova |
| bootable | false |
| consistencygroup_id | None |
| created_at | 2019-03-04T02:44:51.000000 |
| description | None |
| encrypted | False |
| id | 240a94b6-6f8c-4797-9379-eebeda984c95 |
| metadata | {} |
| migration_status | None |
| multiattach | True |
| name | vol_shared |
| os-vol-host-attr:host | None |
| os-vol-mig-status-attr:migstat | None |
| os-vol-mig-status-attr:name_id | None |
| os-vol-tenant-attr:tenant_id | f745745cebce4a609f074b0121ae3a53 |
| replication_status | disabled |
| size | 1 |
| snapshot_id | None |
| source_volid | None |
| status | creating |
| updated_at | None |
| user_id | 11b816e454384d038472c7c89d2544f4 |
| volume_type | None |
+--------------------------------+--------------------------------------+
[root@overcloud-controller-0 ~]# openstack volume show vol_shared
+--------------------------------+------------------------------------------------+
| Field | Value |
+--------------------------------+------------------------------------------------+
| attachments | [] |
| availability_zone | nova |
| bootable | false |
| consistencygroup_id | None |
| created_at | 2019-03-04T02:44:51.000000 |
| description | None |
| encrypted | False |
| id | 240a94b6-6f8c-4797-9379-eebeda984c95 |
| migration_status | None |
| multiattach | True |
| name | vol_shared |
| os-vol-host-attr:host | hostgroup@tripleo_iscsi#tripleo_iscsi_fanguiju |
| os-vol-mig-status-attr:migstat | None |
| os-vol-mig-status-attr:name_id | None |
| os-vol-tenant-attr:tenant_id | f745745cebce4a609f074b0121ae3a53 |
| properties | |
| replication_status | disabled |
| size | 1 |
| snapshot_id | None |
| source_volid | None |
| status | available |
| type | None |
| updated_at | 2019-03-04T02:44:52.000000 |
| user_id | 11b816e454384d038472c7c89d2544f4 |
+--------------------------------+------------------------------------------------+
[root@overcloud-controller-0 ~]# openstack server add volume VM1 vol_shared
[root@overcloud-controller-0 ~]# openstack server add volume VM2 vol_shared
[root@overcloud-controller-0 ~]# openstack volume show 87213d56-8bb3-494e-9477-5cea3f0fed83
+--------------------------------+---------------------------------------------------------------------------------------------------------------------------------------------------------------------------------------------------------------------------------------------+
| Field | Value |
+--------------------------------+---------------------------------------------------------------------------------------------------------------------------------------------------------------------------------------------------------------------------------------------+
| attachments | [{u'server_id': u'6cd7f5e2-9782-446c-b9fe-c9423341ac23', u'attachment_id': u'136ce8d6-e82e-4db6-8742-6c4d0d4fa410', u'attached_at': u'2019-03-04T07:34:58.000000', u'host_name': None, u'volume_id': |
| | u'87213d56-8bb3-494e-9477-5cea3f0fed83', u'device': u'/dev/vdb', u'id': u'87213d56-8bb3-494e-9477-5cea3f0fed83'}, {u'server_id': u'e9131a29-c32e-4f8f-a1ac-7e8d09bb09d3', u'attachment_id': u'502cc9b7-cc3e-4796-858b-940ba6423788', |
| | u'attached_at': u'2019-03-04T07:30:12.000000', u'host_name': None, u'volume_id': u'87213d56-8bb3-494e-9477-5cea3f0fed83', u'device': u'/dev/vdb', u'id': u'87213d56-8bb3-494e-9477-5cea3f0fed83'}, {u'server_id': u'120d49e5-8942-4fec- |
| | a54c-6e2ab5ab4bf2', u'attachment_id': u'd0fd3744-6135-485f-a358-c5e333658a32', u'attached_at': u'2019-03-04T07:36:25.000000', u'host_name': None, u'volume_id': u'87213d56-8bb3-494e-9477-5cea3f0fed83', u'device': u'/dev/vdb', u'id': |
| | u'87213d56-8bb3-494e-9477-5cea3f0fed83'}] |
| availability_zone | nova |
| bootable | false |
| consistencygroup_id | None |
| created_at | 2019-03-04T07:20:40.000000 |
| description | None |
| encrypted | False |
| id | 87213d56-8bb3-494e-9477-5cea3f0fed83 |
| migration_status | None |
| multiattach | True |
| name | vol_shared |
| os-vol-host-attr:host | hostgroup@tripleo_iscsi#tripleo_iscsi_fanguiju |
| os-vol-mig-status-attr:migstat | None |
| os-vol-mig-status-attr:name_id | None |
| os-vol-tenant-attr:tenant_id | f745745cebce4a609f074b0121ae3a53 |
| properties | attached_mode='rw', readonly='False' |
| replication_status | disabled |
| size | 1 |
| snapshot_id | None |
| source_volid | None |
| status | in-use |
| type | None |
| updated_at | 2019-03-04T07:36:26.000000 |
| user_id | 11b816e454384d038472c7c89d2544f4 |
+--------------------------------+---------------------------------------------------------------------------------------------------------------------------------------------------------------------------------------------------------------------------------------------+
VolumeType
Volume Type 常被用来满足用户对 Volume 的一些自定义需求,例如:选择存储后端,开启 Thin/Thick Provisioning(精简置备与厚置备),Deduplication(去重)或 Compression(压缩)等高级功能。
EXAMPLE 1:假设有两个 Cinder 存储池,后端名(backend_name)分别是 ssd_pool 与 hdd_pool。如何实现创建 Volume 时指定后端的存储池?
# 1. 分别创建两个 volume type:ssd-type 与 hdd-type
cinder type create "ssd-type"
cinder type create "hdd-type"

# 2. 为这两个 volume type 指定后端名
cinder type-key "ssd-type" set volume_backend_name=ssd_pool
cinder type-key "hdd-type" set volume_backend_name=hdd_pool

# 3. 指定 volume type 创建 volume
cinder create --name --volume-type ssd-type
cinder create --name --volume-type hdd-type
如此 Cinder 就会根据 volume type 所具有的 extra spec key(e.g. volume_backend_name:ssd_pool),将 Volume 创建到 backend_name 所对应的 Cinder Backend 上(Backend Section 会定义 backend_name 配置项)。
EXAMPLE 2:开启 Thin Provisioning(精简置备),首先需要注意的是,Thin Provisioning 需要后端存储设备支持。如果使用 Ceph 作为存储后端,则不需要考虑开启此功能,因为 Ceph 的 rbd device 默认就是 Thin Provisioning 且无法选择。
# 1. 创建一个 volume type:thin-type
cinder type create "thin-type"

# 2. 为 thin-type 设定 extra-spec:
cinder type-key "thin-type" set provisioning:type=thin
cinder type-key "thin-type" set thin_provisioning_support="True"

# 3. 使用 thin-type 创建 volume
cinder create --name --volume-type thin-type
EXAMPLE:如果切换 Volume 的 Thin/Thick provisioning?使用 Cinder Retype 功能,Retype 常用来改变 Volume 的 volume type,从而达到切换或开关某项功能(特性)的作用。
# retype              Changes the volume type for a volume.

usage: cinder retype [--migration-policy <never|on-demand>]
                     <volume> <volume-type>
Volume Type 可以用来选择后端存储,那 retype 就可以用来改变 Volume 的后端存储池,所以 retype 可以被用来实现 Volume 的迁移功能。e.g. 用户有一个属于 ssd_pool 的 Volume,想把其迁移至 hdd_pool 里,可以用 retype 命令实现:
cinder retype --migration-policy on-demand hdd-type
存储 QoS
在《[Cinder] 存储 Qos》一文中已经说到,这里不再赘述。简单演示一个示例:
# 1. 创建两个 QoS 规格与 volume type:
cinder qos-create qos1 write_iops_sec=500
cinder qos-create qos2 write_iops_sec=50000
cinder type create "qos1-type"
cinder type create "qos2-type"

# 2. 将 QoS 规格与 volume type 关联:
cinder qos-associate

# 3. 创建一个 volume,并设置其 QoS 规格为 qos1
cinder create --name --volume-type qos1-type

# 4. 重新设置 volume 的 QoS 规格为 qos2
cinder retype qos2-type
设置或更改 Volume 的 QoS 需要注意两点:
- QoS 规格可以设置 consumer 为 front-end、back-end 或 both,front-end 表示 Volume 的 QoS 是在 Hypervisor(QEMU-KVM)设置并生效的,这种情况下改变 Volume 的 QoS 规格后,需要重新 Attach 才能生效。
- 更改 Volume 的 QoS,为什么要用 retype?这是因为如果直接修改 QoS 的设置项(e.g. write_iops_sec),会直接影响到所有使用了该 QoS 的 Volumes。所以建议通过 retype 来更改 Volume 的 QoS,避免造成群体性伤害。
Replication
Replication(复制)、Snapshot(快照)、Backup(备份)是存储领域最为常见的数据保护三剑客。Cinder 从 Juno 版开始支持 Replication。
在衡量数据保护技术优劣时,通常使用 RPO(Recovery Point Objective,复原点目标,当服务恢复后得来的数据所对应的时间点)与 RTO(Recovery Time Objective,复原时间目标,企业可容许服务中断的时间长度)两个指标。优秀的数据保护技术可以使得 RPO=0 且 RTO 趋近于 0。Replication 与 Snapshot 相比,它不依赖于数据源,可以做到异地容灾;而与 Backup 相比,它轻量,可以恢复到任意时间点数据源。Replication 技术因其可靠的数据保护作用,常常被用来构建高可用数据中心。
简单来说,
Replication 通过在两个 Volume(卷)之间创建一个 Session(会话),并进行数据同步。这两个 Volume 可以处于同一台存储阵列中,也可以处于两个异地的存储阵列中。但同时只有一个 Volume 会提供生产服务,当提供生产服务的 Primary Volume 发生故障时,立即切换至备用的 Secondary Volume,从而保证业务的连续性。Replication 根据数据同步的方式分为 Sync(同步)与 Async(异步)两种模式。Sync 模式下,数据在写入 Primary Volume 与 Secondary Volume 后才可用;Async 模式反之,响应时间更短。因此,只有 Sync Replication 可以提供 RPO=0 的保障,但 Volume 性能却见不得是最高的。
Cinder Replication 操作对象:
-
Failover:是一个具体的 Backend,我们成为 Replication Backend(以区别于承载业务的 Cinder Backend)。当用于生产的某个 Cinder Backend 发生故障时,其中所有的 Volume 将不可访问,从而导致业务中断。这时可以考虑其进行 Cinder Replication 的 failover-host 操作以恢复被中断的业务。在进行 failover-host 操作时需要指定的 backend-id 就是 Replication 目的端(Replication Backend),当 failover-host 操作完成后,Cinder Backend 上所有的 Volume 将由目的端上的 Volume 替代,提供生产服务。当然了,前提是运管人员为 Cinder Backend 上所有的 Volume 都启用了 Replication 功能,如果 Cinder Backend 上的某些 Volume 没有开启 Replication 功能,那么这些 Volume 将不会 Failover 到目的端。
-
Replication 目的端:Cinder 支持一对多的 Replication,即一个 Cinder Backend 可以 Replicate 到多个目的端,但并非所有后端存储设备都支持一对多的 Relication。Replication 目的端的信息需要在 cinder.conf 里配置,其中 backend_id 是必须配置的,该参数用于进行 failover-host 操作时指定目的端。Replication 目的端一般是灾备数据中心的存储阵列,用来做主业务数据中心的冗余设备。
# Multi opt of dictionaries to represent the aggregate mapping between source
# and destination back ends when using whole back end replication. For every
# source aggregate associated with a cinder pool (NetApp FlexVol), you would
# need to specify the destination aggregate on the replication target device. A
# replication target device is configured with the configuration option
# replication_device. Specify this option as many times as you have replication
# devices. Each entry takes the standard dict config form:
# netapp_replication_aggregate_map =
# backend_id:<name_of_replication_device_section>,src_aggr_name1:dest_aggr_name1,src_aggr_name2:dest_aggr_name2,...
-
Failback:当 Cinder Backend 源端的故障排除后,可以对该 Cinder Backend 执行 Failback 操作,即将生产业务从 Replication 目的端重新接管回阿里。这样 Cinder Backend 源端的 Volume 就可以继续提供服务了。而且在故障处理期间,向 Replication 目的端的 Volumes 写入的数据也会同步回源端。
-
Sync/Async:目前 Cinder 并不支持显示的设置 Replication 的同步模式,这是因为 Replication 极度依赖实际的后端存储设备功能集以及驱动程序的实现。一般而言,各存储厂商的具体实现中,会使用 volume type 中的 extra spec key 来设置 Volume 的 Replication Sync/Async 模式。
Step 1. 创建开启 Replication 的 Volume
- 首先需要创建支持 Replication 的 volume type
cinder type-create replication-type
cinder type-key replication-type set replication_enabled=True
- 使用 replication volume type 创建 volume
cinder create --volume-type replication_type --name vol001 100
Step 2. 发生故障时对指定的 Cinder Backend 执行 Failover 操作
cinder failover-host --backend-id storage-node2@replication2
Step 3. 待 Cinder Backend 源端故障清理完毕,执行 Failback 操作
cinder failover-host --backend-id <cinder_backend> <replication_backend>
# e.g.
cinder failover-host --backend-id default storage-node2@replication2
Cinder 的高可用部署架构
- 无状态服务(cinder-api、cinder-scheduler、cinder-volume)使用多活(无状态服务利于横向扩展,高并发):Active/Active(A/A)
- 有状态服务使用主备:Active/Passive(A/P)
- cinder-api + cinder-scheduler 都部署在 Controller,3 个 Controller 同时共享同一个 VIP 实现多活
- 一个存储设备可以对应多个 cinder-volume,结合 cinder-volume 分布式锁实现多活,分布式锁可以避免不同的 cinder-scheduler 同时调用到同一个 cinder-volume,从而避免多活部署的 cinder-volume 同时操作后端存储设备,简而言之就是避免并发操作带来(cinder-volume 与后端存储设备之间的)数据不一致性。锁是为了通过互斥访问来保证共享资源在并发环境中的数据一致性。分布式锁主要解决的是分布式资源访问冲突的问题,保证数据的一致性(Etcd、Zookeeper)。
Cinder 的分布式锁
在了解 Cinder 的分布式锁之前,先了解 Cinder 的本地锁。显然 Volume 资源本身也是一种共享资源,也需要处理并发访问冲突的问题,比如:删除一个 Volume 时,另一个线程正在基于该 Volume 创建快照;又或者同时有两个线程都在执行 Volume 挂载操作。cinder-volume 也是使用锁机制来实现 Volume 资源的并发访问的,Volume 的删除、挂载、卸载等操作都会对 Volume 上锁。在 Newton 版本以前,cinder-volume 的锁实现是基于本地文件实现的,使用了 Linux 的 flock 工具进行锁的管理。Cinder 执行加锁操作默认会从配置指定的 lockpath 目录下创建一个命名为 cinder-volume_uuid-{action} 的空文件,并对该文件使用 flock 加锁。flock 只能作用于同一个操作系统的文件锁。即使使用共享存储,另一个操作系统也不能通过 flock 工具判断该空文件是否有锁。可见 Cinder 使用的是本地锁。
本地锁的局限,只能够保证同一个 cinder-volume 下的共享资源(e.g. Volume)的数据一致性,也就只能使用 A/P 主备的模式进行高可用,不能管理分布式 cinder-volume 下共享资源,导致了 cinder-volume 不支持多实例高可用的问题。所以为了避免 cinder-volume 服务宕机,就需要引入自动恢复机制来进行管理。比如: Pacemaker,Pacemaker 轮询判断 cinder-volume 的存活状态,一旦发现挂了,Pacemaker 会尝试重启服务。如果 Pacemaker 依然重启失败,则尝试在另一台主机启动该服务,实现故障的自动恢复。
显然,这种方式是初级而原始的。你或许会想到引入分布式锁,比如 Zookeeper、Etcd 等服务,但这需要用户自己部署和维护一套 DLM,无疑增加了运维的成本,并且也不是所有的存储后端都需要分布式锁。Cinder 社区为了满足不同用户、不同场景的需求,并没有强制用户部署固定的 DLM,而是采取了非常灵活的可插除方式,就是 Tooz 库。
引入了 Tooz 库之后,当用户不需要分布式锁时,只需要指定后端为本地文件即可,此时不需要部署任何 DLM,和引入分布式锁之前的方式保持一致,基本不需要执行大的变更。当用户需要 cinder-volume 支持 AA 时,可以选择部署一种 DLM,比如 Zookeeper 服务。Cinder 对 Tooz 又封装了一个单独的 coordination 模块,其源码位于 cinder/coordination.py,当代码需要使用同步锁时,只需要在函数名前面加上 @coordination.synchronized 装饰器即可,方便易用,并且非常统一。
Tooz 库
社区为了解决项目中的分布式问题,开发了一个非常灵活的通用框架,项目名为 Tooz,它是一个 Python 库,提供了标准的 coordination API,其主要目标是解决分布式系统的通用问题,比如节点管理、主节点选举以及分布式锁等。简而言之,Tooz 实现了非常易用的分布式锁接口。
Tooz 封装了一套锁管理的库或者框架,只需要简单调用 lock、trylock、unlock 即可完成实现,不用关心底层细节,也不用了解后端到底使用的是 Zookeeper、Redis 还是 Etcd。使用 Tooz 非常方便,只需要三步:
- 与后端 DLM 建立连接,获取 coordination 实例。
- 声明锁名称,创建锁实例。
- 使用锁:
coordinator = coordination.get_coordinator('zake://', b'host-1’)
coordinator.start()
#Create a lock
lock = coordinator.get_lock("foobar”)
with lock:
    …
    print("Do something that is distributed”)
coordinator.stop()
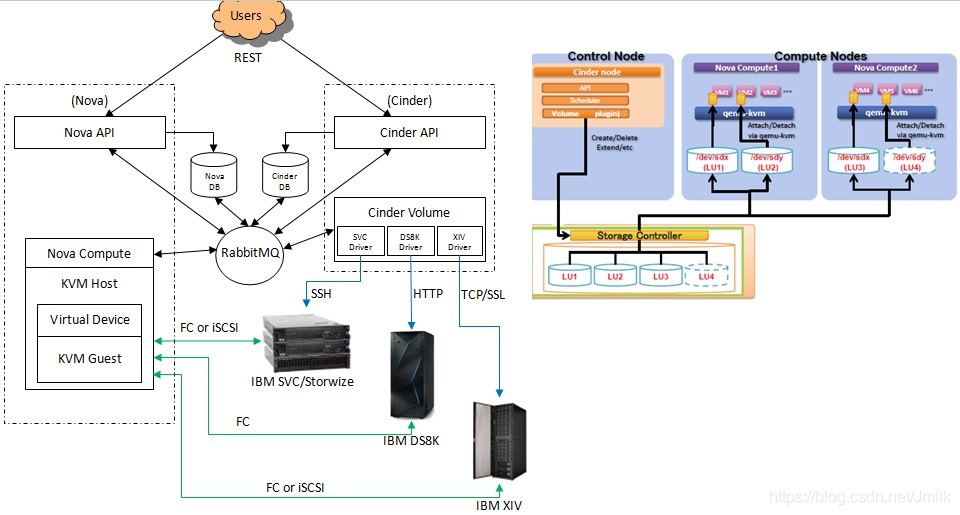
Cinder 与 Nova 的协同
从 Cinder 架构图可以看出,Nova 和 Cinder 是交互最密切的两个项目。Cinder 的功能集涵盖了 Nova 虚拟机的整个生命周期。
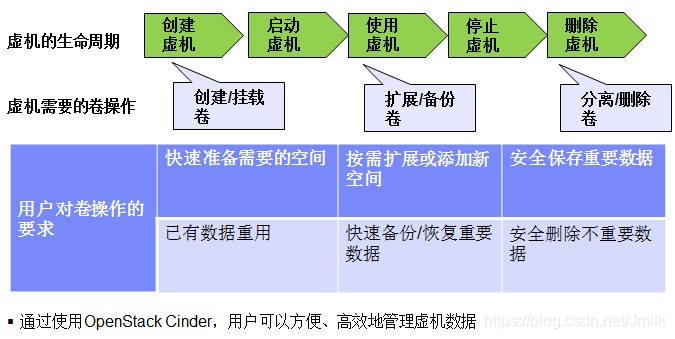
Cinder 与 Nova 的协同方式:
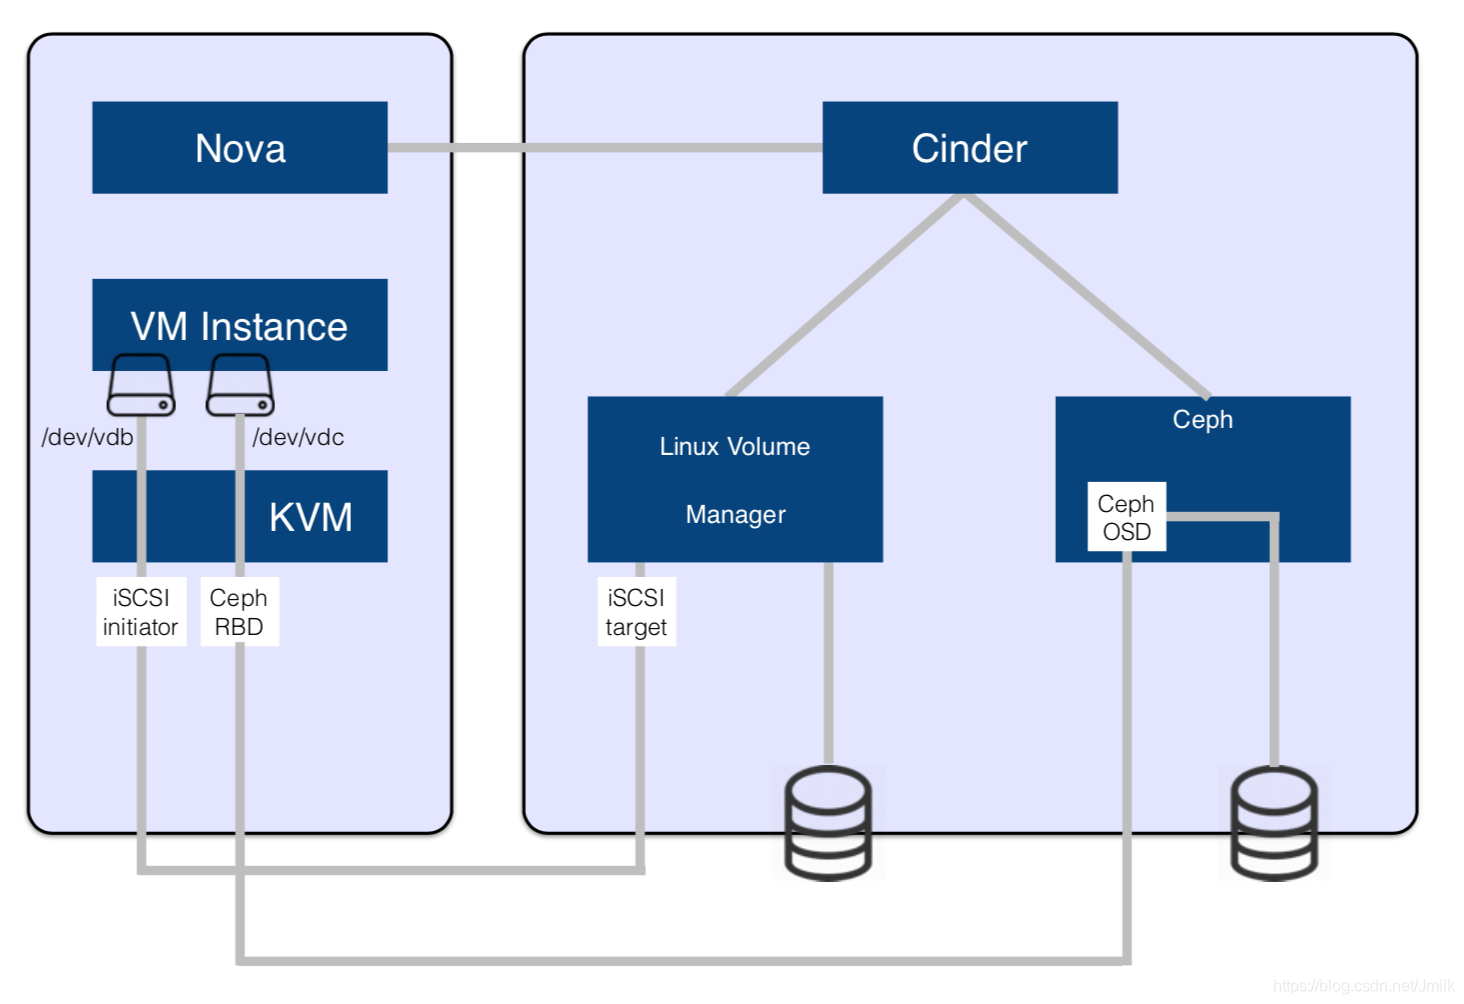
以 LVM 与 iSCSI 为例
下面以 LVMVolumeDriver + iSCSI target_driver 的组合来说明 Cinder 是如何通过 iSCSI 协议将 LVM LV(Volume) 挂载到计算节点中供虚拟机当作数据盘或系统盘(Boot from volume)使用的。
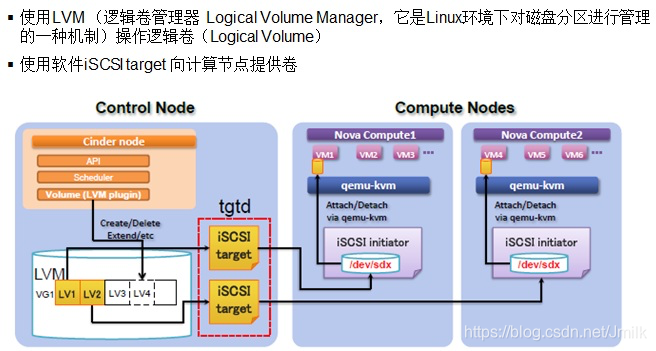
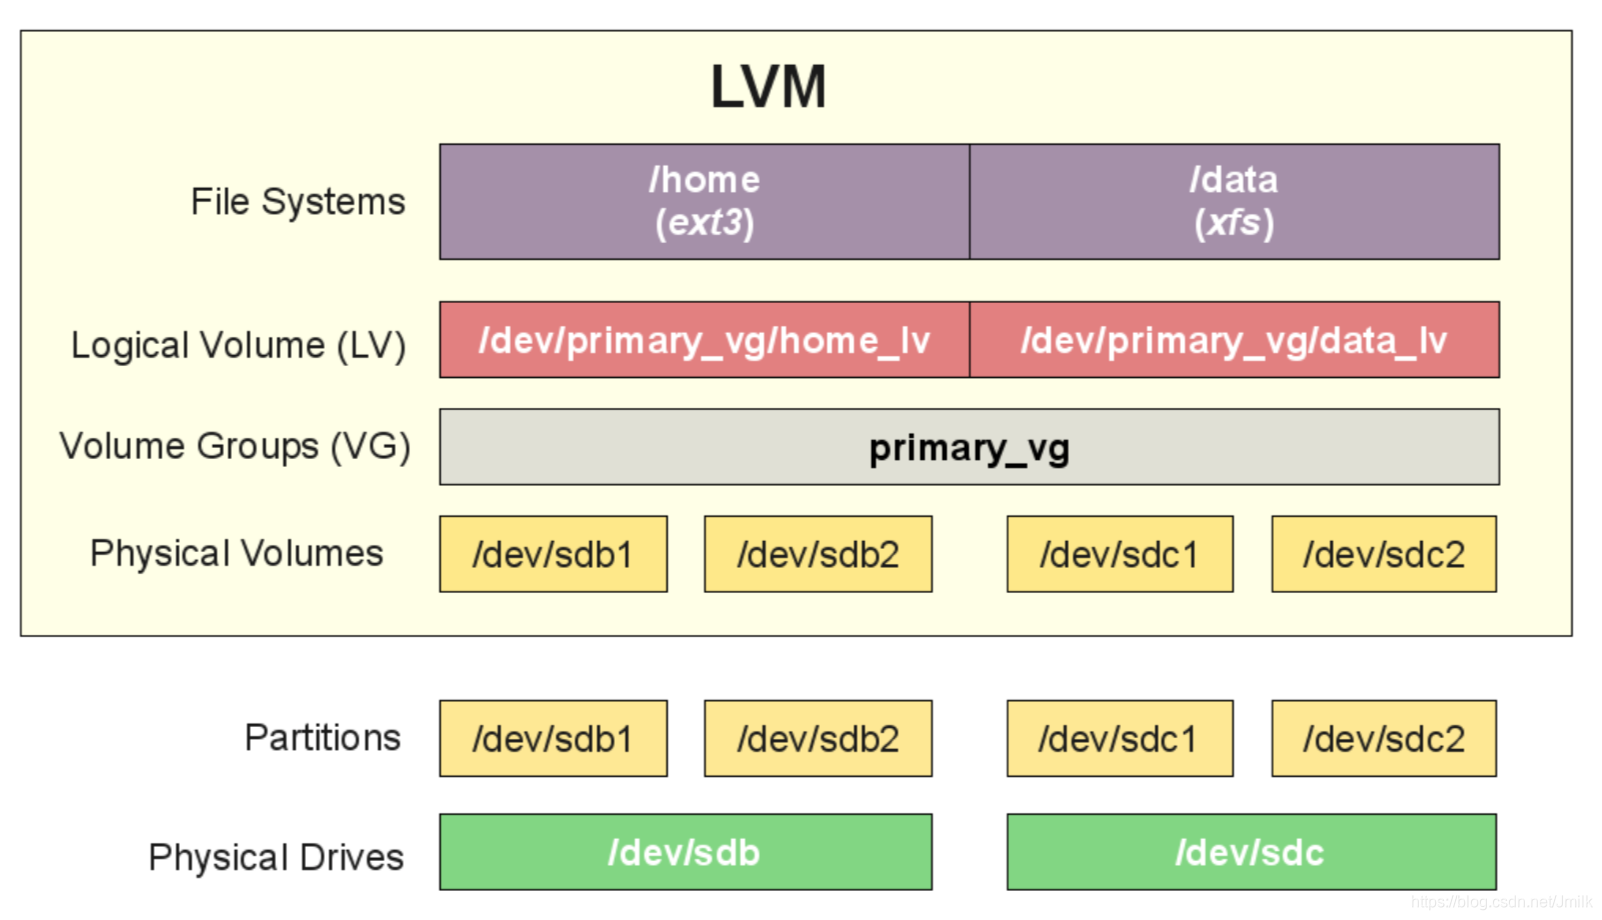
LVM(逻辑卷管理)
LVM backend 的配置:
[lvmdriver-1]
image_volume_cache_enabled = True
volume_clear = zero
lvm_type = auto
target_helper = lioadm
volume_group = stack-volumes-lvmdriver-1
volume_driver = cinder.volume.drivers.lvm.LVMVolumeDriver
volume_backend_name = lvmdriver-1
从上述配置可以看出一个 VG 就对应一个 LVM Backend,一个 VG(Backend)有可以划分为多个 LV(Volume),Volume 通过 iSCSI 的方式挂载到计算节点作为一个块设备(/dev/sdx),然后这个块设备会被 qemu-kvm 提供给虚拟机使用。
iSCSI
iSCSI 协议和工具非常常用,这里不再赘述,只是简单说明 iSCSI 挂载卷的过程:
- 每个 Hyperviosor(计算机节点)作为一个 iSCSI initiator(客户端),具有唯一的 Initiatorname,e.g.
Initiator: iqn.1993-08.org.debian:01:8d794081cd6a alias: compute1
- iSCSI Server(存储设备)上的每个 Lun(Volume)作为一个 iSCSI Target
- 将 Target Assign 并 Attached 到 iSCSI Initiator之后,Initiator 和 Target 之间会建立 TCP Session,直至 Target 给 Detached。可以在计算节点上查看,e.g.
iscsiadm -m session
一般的,在划分网络的时候应该考虑是否需要将 OpenStack Management Network 与 OpenStack Storage Network 分开,避免网络阻塞(e.g. Download/Upload 大数据)。此时可以通过 cinder-volume service 的配置文件 cinder.conf 中的 iscsi_ip_address、iscsi_port 来指定 iSCSI Session 所使用的网卡,从而做到管理网络(ControlPath)和数据网络(DataPath)分离的效果。
当然,除了 LVMISCSIDriver 之外,Cinder 还支持非常丰富的后端存储类型(e.g. IBM SVC、DS8K、XIV)以及数据传输方式(e.g. FC、iSCSI)。

 浙公网安备 33010602011771号