样例GeoQuiz应用开发 第2章
先介绍一下MVC,Model View Controller,是软件架构中最常见的一种框架。
简单来说就是通过 controller 的控制去操作 model 层的数据,并且返回给 view 层展示,具体见下图
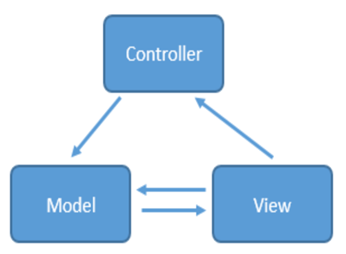
当用户出发事件的时候,view 层会发送指令到 controller 层,接着 controller 去通知model层更新数据,model层更新完数据以后直接显示在view层上,这就是MVC的工作原理。
1)模型(Model)
Model是一个应用系统的核心部分,代表了该系统实际要实现的所有功能处理。比如:在视频播放器中,模型代表一个视频数据库及播放视频的程序函数代码;在拍照应用中,模型代表一个照片数据库,及看图片时的程序函数代码。在一个电话应用中,Model代表一个电话号码簿,以及拨打电话和发送短信的程序函数代码。Model在values目录下通过xml文件格式生成,也可以通过硬编码的方式直接Java代码生成。
2)视图(View)
View是软件应用传送给用户的一个反馈结果。它代表软件应用中的图形展示、声音播放、触觉反馈等职责。视图的根节点是应用程序的自身窗口。比如,视频播放器中可能包含当前播放的画面,这个画面就是一个视图。另一个视图组件可能是该视频的文字标题。再一个就是一些播放按键,View在layout目录下通过xml文件格式生成,用findViewById()获取;也可以通过硬编码的方式直接Java代码生成。
3)控制器(Controller)
Controller在软件应用负责对外部事件的响应,包括:键盘敲击、屏幕触摸、电话呼入等。Controller实现了一个事件队列,每一个外部事件均在事件队列中被唯一标识。框架依次将事件从队列中移出并派发出去。
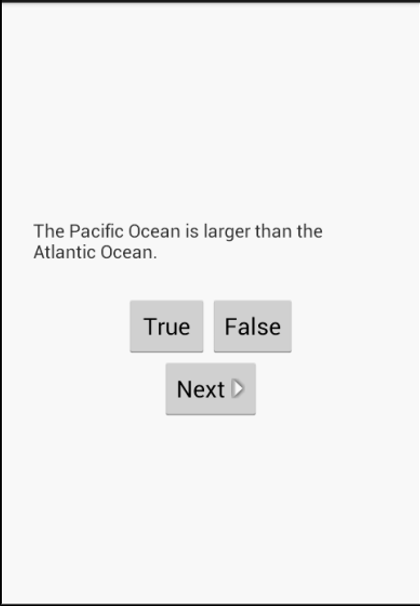
任务要求实现GeoQuiz 能从多个题目之间切换。(所有的代码都会更新)
代码更新:
activity_main.xml代码:
<LinearLayout xmlns:android="http://schemas.android.com/apk/res/android"
    android:layout_width="match_parent"
    android:layout_height="match_parent"
    android:gravity="center"
    android:orientation="vertical">

    <TextView
        android:id="@+id/question_text_view"
        android:layout_width="wrap_content"
        android:layout_height="wrap_content"
        android:padding="24dp"
        />

    <LinearLayout
        android:layout_width="wrap_content"
        android:layout_height="wrap_content"
        android:orientation="horizontal">
        <Button
            android:id="@+id/true_button"
            android:layout_width="wrap_content"
            android:layout_height="wrap_content"
            android:text="@string/true_button"/>
        <Button
            android:id="@+id/false_button"
            android:layout_width="wrap_content"
            android:layout_height="wrap_content"
            android:text="@string/false_button"/>
    </LinearLayout>
    <Button
        android:id="@+id/next_button"
        android:layout_width="wrap_content"
        android:layout_height="wrap_content"
        android:text="@string/next_button"/>
</LinearLayout>
MainActivity.java代码 :
package com.example.a83856.myapplication1;

import android.support.v7.app.AppCompatActivity;
import android.os.Bundle;
import android.view.View;
import android.widget.Button;
import android.widget.ImageButton;
import android.widget.TextView;
import android.widget.Toast;

public class MainActivity extends AppCompatActivity {

    private Button mTrueButton;
    private Button mFalseButton;
    private Button mNextButton;
    private TextView mQuestionTextView;

    private Question[] mQuestionBank=new Question[]{
            new Question(R.string.question_ocean,true),
            new Question(R.string.question_mideast,false),
            new Question(R.string.question_africa,false),
            new Question(R.string.question_americas,true),
            new Question(R.string.question_asia,true),
    };

    private int mCurrentIndex=0;

    private void updateQuestion(){
        int question=mQuestionBank[mCurrentIndex].getTextResId();
        mQuestionTextView.setText(question);
    }

    private void checkAnswer(boolean uesrPressesTrue){
        boolean answerIsTrue=mQuestionBank[mCurrentIndex].isAnswerTrue();
        int messageResId=0;
        if(uesrPressesTrue==answerIsTrue)
            messageResId=R.string.correct_toast;
        else
            messageResId=R.string.incorrect_toast;
        Toast.makeText(this,messageResId,Toast.LENGTH_SHORT).show();
    }

    @Override
    protected void onCreate(Bundle savedInstanceState) {
        super.onCreate(savedInstanceState);
        setContentView(R.layout.activity_main);

        mQuestionTextView=(TextView)findViewById(R.id.question_text_view);
        updateQuestion();
        mTrueButton=(Button)findViewById(R.id.true_button);
        mTrueButton.setOnClickListener(new View.OnClickListener() {
            @Override
            public void onClick(View v) {
                checkAnswer(true);
            }
        });

        mFalseButton=(Button)findViewById(R.id.false_button);
        mFalseButton.setOnClickListener(new View.OnClickListener() {
            @Override
            public void onClick(View v) {
                checkAnswer(false);
            }
        });

        mNextButton=(Button)findViewById(R.id.next_button);
        mNextButton.setOnClickListener(new View.OnClickListener() {
            @Override
            public void onClick(View v) {
                mCurrentIndex=(mCurrentIndex+1)%mQuestionBank.length;
                updateQuestion();
            }
        });

        updateQuestion();
    }
}
strings.xml代码:
<resources>
    <string name="app_name">My Application1</string>
    <string name="question_text">Constantinople is the largest city in Turkey</string>
    <string name="true_button">TRUE</string>
    <string name="false_button">FALSE</string>
    <string name="correct_toast">Correct!</string>
    <string name="incorrect_toast">Incorrect!</string>

    <string name="next_button">NEXT</string>
    <string name="question_ocean">The Pacific Ocean is larger than the Atlantic Qcean.</string>
    <string name="question_mideast">The Suez Canal connects the Red Sea and the Indian Ocean.</string>
    <string name="question_africa">The source of the Nile River is in Egypt.</string>
    <string name="question_americas">The Amazon River is the longest river in the Americas.</string>
    <string name="question_asia">Lake Baikal is the world\'s oldest and deepest freshwater lake.</string>
</resources>
1. Question类中封装了什么东西?为什么能这么用?
Question类中封装了两部分数据:问题文本和问题答案。
但是注意mTextResId是int类型而不是String 类型,是因为该变量保存的是地理知识问题的字符串资源的ID而资源ID总是int类型同时为这两个变量设置获取方法和设置方法。
同时根据我们上面说到的MVC模式,可以知道,模型对象不关心用户界面,它存在的目的就是存储和管理应用数据。这里面的Question类其实就很类似,它只存储对应的地理知识的题面和答案,其他的和它并没有什么关系,所以只需要再控制视图层,逐条显示对应的题面就可以了。
挑战题:
1. 用户点击应用的Textview文字区域,也可以跳转到下一题。
mQuestionTextView=(TextView)findViewById(R.id.question_text_view);
        updateQuestion();
被替换为,设置监听器即可。(TextView也是View的一个子类,和Button一样都可以设置监听器)

mQuestionTextView=(TextView)findViewById(R.id.question_text_view);//给TextView设计监听器,达到点击也会进行题面变化
        mQuestionTextView.setOnClickListener(new View.OnClickListener() {
            @Override
            public void onClick(View v) {
                mCurrentIndex=(mCurrentIndex+1)%mQuestionBank.length;
                updateQuestion();
            }
        });
2. 添加后退按钮。
string.xml增加:
<string name="pre_button">PRE</string>
actiity_main.xml中:
<Button
        android:id="@+id/next_button"
        android:layout_width="wrap_content"
        android:layout_height="wrap_content"
        android:text="@string/next_button"/>

这块要增加对应的模块,变化为:

<LinearLayout
        android:layout_width="wrap_content"
        android:layout_height="wrap_content"
        android:orientation="horizontal">

        <Button
            android:id="@+id/pre_button"
            android:layout_width="wrap_content"
            android:layout_height="wrap_content"
            android:text="@string/pre_button"
            android:drawableLeft="@drawable/arrow_left"
            android:drawablePadding="4dp"/>

        <Button
            android:id="@+id/next_button"
            android:layout_width="wrap_content"
            android:layout_height="wrap_content"
            android:text="@string/next_button"
            android:drawableRight="@drawable/arrow_right"
            android:drawablePadding="4dp"/>
    </LinearLayout>
对应的MainActivity.java中增加:
mPreButton=(Button)findViewById(R.id.pre_button);
        mPreButton.setOnClickListener(new View.OnClickListener() {
            @Override
            public void onClick(View v) {
                if(mCurrentIndex== 0){
                    int question = mQuestionBank[mQuestionBank.length -1].getTextResId();
                    mQuestionTextView.setText(question);
                    mCurrentIndex=4;
                } else{
                    mCurrentIndex=(mCurrentIndex -1);
                    updateQuestion();
                }
            }
        });

注意0的时候要特判一下,不然会运行错误。
3. 从按钮到图标按钮:
完成这个需要使用ImageButton组件,对应的代码改变。
activity_main.xml中:
<LinearLayout
        android:layout_width="wrap_content"
        android:layout_height="wrap_content"
        android:orientation="horizontal">
        <ImageButton
            android:id="@+id/pre_button"
            android:layout_width="wrap_content"
            android:layout_height="wrap_content"
            android:src="@drawable/arrow_left"/>
        <ImageButton
            android:id="@+id/next_button"
            android:layout_width="wrap_content"
            android:layout_height="wrap_content"
            android:src="@drawable/arrow_right"/>
    </LinearLayout>
Activity_main.java中:
mPreButton=(Button)findViewById(R.id.pre_button);
mNextButton=(Button)findViewById(R.id.next_button);

替换为,其他的没有什么变化。
mPreButton=(ImageButton)findViewById(R.id.pre_button);
mNextButton=(ImageButton)findViewById(R.id.next_button);

 浙公网安备 33010602011771号