
vue学习笔记(九)vue-cli中的组件通信
前言
在上一篇博客vue学习笔记(八)组件校验&通信中,我们学会了vue中组件的校验和父组件向子组件传递信息以及子组件通知父组件(父子组件通信),上一篇博客也提到那是对组件内容的刚刚开始,而本章博客将会重点的讲解vue-cli中的组件通信,毕竟这在以后的开发内容中是非常普遍使用的。那么一起来看看本篇博客需要学习的知识点吧!
本章目标
-
学会使用vue-cli中父组件向子组件传递信息
-
学会使用vue-cli中子组件向父组件传递信息
-
学会使用vue-cli中非父子组件传递信息
vue-cli中的父组件向子组件传递信息
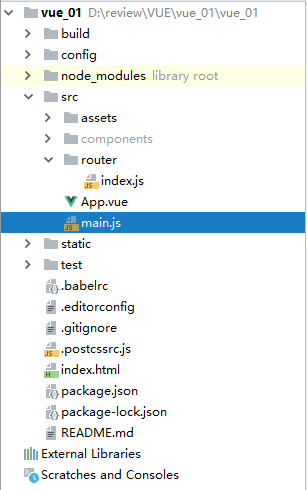
既然提到要使用vue-cli实现组件通信,那么肯定要有vue-cli的环境,没有搭建vue-cli环境的园友可以参考这篇博客使用webstorm搭建vue-cli项目,这篇博客讲解的非常透彻,大家可以先将环境搭建好,然后再来看这篇博客,假设我们项目搭建好了,项目目录结构如下
(1)创建两个组件父组件和子组件
我们需要在src/components/parent/创建两个组件ParentComponent.vue和ChildComponent.vue,创建好之后目录如下

(2)分别在对应的组件中编写代码
ParentComponent.vue
<template>
    <div>
      <h1>{{title}}</h1>
      <!--注意:每个组件注册必须有一个根元素-->
      <Child :message="message"></Child>
    </div>
</template>

<script>
  import Child from './ChildComponent'
    export default {
        name: "ParentComponent",
        data() {
          return {
            title:'这是父组件',
            message: '我是父组件'
          }
        },
        components:{
          Child
        }
    }
</script>

<style scoped>

</style>
首先在父组件中定义两个数据title和message,message是要传递給子组件的信息,第二步导入子组件和注册子组件,第三步将需要传递的信息绑定到组件上。
总结
- 定义数据
- 导入组件和注册组件
- 数据绑定到组件上
ChildComponent.vue
<template>
    <div>
      <!--注意每个组件注册必须有一个根元素-->
      <h1>{{title}}</h1>
      <span>父组件传递过来的消息是:{{message}}</span>
    </div>
</template>

<script>
    export default {
      name: "ChildComponent",
      props:['message'],  //使用props接收父组件传递的信息
      data(){
          return{
            title:'这是子组件',

          }
      }
    }
</script>

<style scoped>

</style>
在子组件中我们使用props来接收父组件传递过来的信息,然后进行渲染数据就可以了。
index.vue
import Vue from 'vue'
import Router from 'vue-router'
import HelloWorld from '@/components/HelloWorld'
import Hi from '@/components/Test/Hi'
import parent from '@/components/parent/ParentComponent'
Vue.use(Router)

export default new Router({
  routes: [
    {
      path:'/',
      component:parent,
      name:parent
    }
  ]
})
结果:
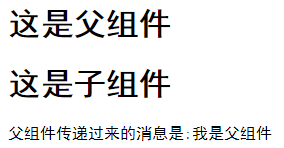
讲到这里使用vue-cli实现父组件向子组件传递信息我就讲解完了,接下来实现子组件向父组件传递信息。
vue-cli中的子组件向父组件传递信息
学会了父组件向子组件传递信息,接下来就要学习子组件向父组件传递信息,同样我们还是使用如上的两个组件,更新之后的代码
ParentComponent.vue
<template>
    <div>
      <h1>{{title}}</h1>
      <!--注意:每个组件注册必须有一个根元素-->
      <Child :message="message" @send="getChildMsg"></Child>
      <h1>来自子组件的消息:{{childMsg}}</h1>
    </div>
</template>

<script>
  import Child from './ChildComponent'
    export default {
        name: "ParentComponent",
        data() {
          return {
            title:'这是父组件',
            message: '我是父组件',
            childMsg:''
          }
        },
        components:{
          Child
        },
        methods:{
          getChildMsg(data){
            this.childMsg=data;
          }
        }
    }
</script>

<style scoped>

</style>
父组件中我们重新定义了一个新的属性(childMsg)来接收子组件传递过来的消息,可以知道子组件向父组件传递的事件是send,然后调用send来接收子组件传递过来的数据
ChildComponent.vue
<template>
    <div>
      <!--注意每个组件注册必须有一个根元素-->
      <h1>{{title}}</h1>
      <span>父组件传递过来的消息是:{{message}}</span>
      <input type="button" value="向父组件传递信息" @click="sendMsgToParent">
    </div>
</template>

<script>
    export default {
      name: "ChildComponent",
      props:['message'],  //使用props接收父组件传递的信息
      data(){
          return{
            title:'这是子组件',
            fromChildMsg:'我是来自子组件的消息',
          }
      },
      methods:{
        sendMsgToParent(){
          this.$emit('send',this.fromChildMsg);
        }
      }
    }
</script>

<style scoped>

</style>
子组件中也是重新定义了一个新的属性(fromChildMsg),这个属性是需要传递给父组件的,然后通过按钮的点击事件使用this.$emit()将事件名称和数据传递给父组件,父组件注册send方法之后就可以接收到子组件传递过来的消息了
结果:

讲到这里父组件向子组件传递信息和子组件向父组件传递消息就全部讲解完了,可以说是讲解的非常详细,每一步我写的都是非常清楚
总结:
- 父组件向子组件传递信息通过props
- 子组件向父组件传递信息通过this.$emit(‘事件名称’,值1,值2,....)
vue-cli中的非父子组件传递信息
在组件通信中除了有父组件向子组件传递信息和子组件向父组件传递信息,还有非父子组件通信,同样我也会讲解的非常详细。
(1)新建目录用于非父子组件通信
在src/components新建other目录和两个组件分别:BrotherComponent.vue,SisterComponent.vue,以及在src/assets下创建一个event.js文件,创建之后的目录如下

(2)event.js充当总线
event.js这个文件中我们只创建了一个新的Vue实例,以后它就承担起了组件之间通信的用来充当总线桥梁了,也就是中央事件总线,为的就是将BrotherComponent.vue和SisterComponent.vue联系起来。
event.js
//方式一
import Vue from 'Vue'
export  default  new Vue
/*方式二
let bus=new Vue
export  default  bus
*/
BrotherComponent.vue
<template>
  <div>
    <h1>兄弟组件</h1>
    <input type="button" @click="sendMsg" value="向姐妹组件传递信息">
    <sister></sister>
  </div>
</template>

<script>
    //导入总线
    import bus from '../../assets/event'
    //导入姐妹组件
    import sister from './SisterComponent'
    export default {
        name: "BrotherComponent",
      data(){
          return{
            tips:'I am your brother'
          }
      },
      components:{
          sister  //注册界面组件
      },
      methods:{
        sendMsg(){
          bus.$emit('send',this.tips);
        }
      }
    }
</script>

<style scoped>

</style>
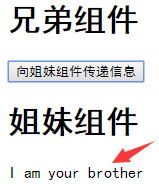
在这个组件中首先是导入的总线和姐妹组件,然后注册了姐妹组件,我们在响应点击事件的sendMsg函数中用$emit触发了一个自定义的send事件,并传递了一个字符串参数,
这个参数就是需要传递个姐妹组件的值。$emit实例方法触发当前实例(这里的当前实例就是bus)上的事件,附加参数都会传给监听器回调
SisterComponent.vue
<template>
  <div>
    <h1>姐妹组件</h1>
    <span>{{msg}}</span>
  </div>
</template>

<script>
  import bus from '../../assets/event'
    export default {
        name: "SisterComponent",
      data(){
          return{
            msg:''
          }
      },
      methods:{
        getMsg(){
          bus.$on('send',data=>{
            this.msg=data;
          })
        }
      },
      mounted(){
          this.getMsg();
      }
    }
</script>

<style scoped>

</style>
在这个组件中,我们在mounted中,监听了send,并把传递过来的字符串参数传递给了$on监听器的回调函数,mounted:是一个Vue生命周期中的钩子函数,简单点说就类似于jquery的ready,Vue会在文档加载完毕后调用mounted函数,$on:监听当前实例上的自定义事件(此处当前实例为bus)。事件可以由$emit触发,回调函数会接收所有传入事件触发函数($emit)的额外参数
index.js
import Vue from 'vue'
import Router from 'vue-router'
import HelloWorld from '@/components/HelloWorld'
import Hi from '@/components/Test/Hi'
import parent from '@/components/parent/ParentComponent'
import brother from '@/components/other/BrotherComponent'
Vue.use(Router)

export default new Router({
  routes: [
    {
      path:'/',
      component:brother,
      name:brother
    }
  ]
})
结果
总结:
- 创建一个事件总线,例如示例中event.js,用它作为通信桥梁
- 在需要传值的组件中用bus.$emit触发一个自定义事件,并传递参数
- 在需要接收数据的组件中用bus.$on监听自定义事件,并在回调函数中处理传递过来的参数
讲到这里组件基本通信方式的已经讲解完成了,之后等学习了更高级的内容之后再补充新的组件通信的方式,一共讲解了三种通信方式,分别是父组件向子组件传递信息,子组件向父组件传递信息,非父子组件传递信息。内容不多讲解的也十分详细,那么为了巩固组件的知识下面也会讲解一些示例。
综合练习
普通版任务清单
这个版本的任务清单在上一篇博客中已经讲解过了,为什么在这里又要重新提到呢?博主觉得上一篇博客没有讲解的很详细,而且本篇博客也是还有其它版本的任务清单,所以将这两个结合起来,学习起来也比较方便。
<!DOCTYPE html>
<html>
    <head>
        <meta charset="UTF-8">
        <title>普通版任务清单</title>
    </head>
    <body>
        <div id="app">
            <input type="text"  v-model="newTask" @keyup.enter="addNew" placeholder="请输入你要完成的任务"/>
            <todo-item v-for="(item,index) of tasks" :title='item' :index="index" @remove="removeItem"></todo-item>
        </div>
        <script src="../js/vue.js" type="text/javascript" charset="utf-8"></script>
        <script type="text/javascript">
            let vm=new Vue({
                el:'#app',
                data:{
                    newTask:'',
                    tasks:['看一场电影','读一本书','请朋友吃一顿饭'],
                },
                methods:{
                    addNew(){
                        this.tasks.unshift(this.newTask);//向任务清单的最前面添加任务
                        this.newTask='';    //清空文本框中的内容
                    },
                    removeItem(index){
                        if(confirm('你确定要删除吗?')){
                            this.tasks.splice(index);
                        }
                    }
                },
                computed:{

                },
                components:{
                    'todoItem':{
                        props:['title',"index"],
                        template:'<li><span>{{title}}</span><button @click="sendMsg(index)">X</button></li>',
                        methods:{
                            sendMsg(index){
                                console.log(index);
                                this.$emit('remove',index);
                            }
                        }
                    }
                }

            })

        </script>
    </body>
</html>
步骤分析:
- 1.定义好要添加的任务(newTask)和全部的任务清单(tasks),按下enter键的时候向任务清单添加一条任务,
- 2.定义好任务列表清单组件,然后将任务列表和索引传递进去
- 3.定义好子组件通知父组件的事件this.$emite('remove',index)
- 4.父组件接收到子组件通知的事件和下标索引,然后做出相应的处理
vue-cli版任务清单
普通版的任务清单我们就结束了,接下来需要实现的是vue-cli中的任务清单,这个任务清单和普通版的没有多大区别,只不过是换了一种写法,原理还是没有改变的(换汤不换药),那么跟随我一起来瞧瞧吧!
1.新建目录和组件
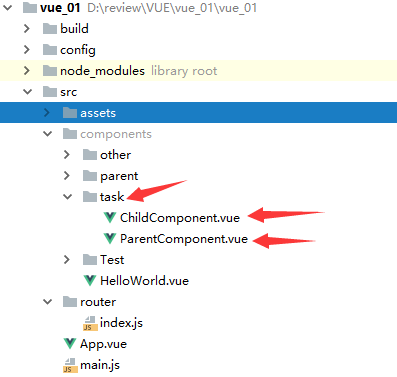
在src/components下新建taks目录和ParentComponent.vue和ChildComponent.vue两个组件,建立之后的目录如下
2.对应的组件中编写代码
ParentComponent.vue
<template>
  <div>
    <h1>这是父组件</h1>
    <input type="text" v-model="newTask" @keyup.enter="addNew" placeholder="请输入你要添加的任务">
    <child v-for="(item,index) of tasks" :item="item" :index="index" @remove="removeItem" :key="index"></child>
  </div>
</template>

<script>
    import Child from './ChildComponent'
    export default {
        name: "ParentComponent",
        components:{
          Child     //注册子组件
        },
      data(){
          return{
            newTask:'',
            tasks:['买一本书','看一场电影','写一篇博客'],
          }
      },
      methods:{
        addNew(){
          this.tasks.unshift(this.newTask);
          this.newTask="";
        },
        removeItem(index){  //删除任务
          if(confirm('你确定要删除吗?')){
            this.tasks.splice(index);
          }
        }
      }
    }
</script>

<style scoped>

</style>
- 父组件中首先导入子组件和注册子组件,然后定义要添加的任务清单(newTask)和全部的任务清单列表(tasks),输入框中addNew方法是当我们按下enter键时向tasks添加一条新的任务清单。
- 注册好子组件之后,将任务清单项和每一条任务清单项的索引传递给子组件。
- 父组件接收子组件通知的方法(remove),然后对任务清单做出相应的处理。
ChildComponent.vue
<template>
    <div>
      <li>{{item}}<button @click="sendMsg(index)">X</button></li>
    </div>
</template>

<script>
    export default {
        name: "ChildComponent",
        props:['item','index'],
      data(){
          return{

          }
      },
      methods:{
        sendMsg(index){
            this.$emit('remove',index);
          }
      }
    }
</script>

<style scoped>

</style>
- 在子组件中,首先使用props接收父组件传递过来的两个参数item,index。
- 定义一个通知父组件的方法,告诉父组件需要删除那个任务清单。
index.js
import Vue from 'vue'
import Router from 'vue-router'
import  parent from '@/components/task/ParentComponent'
Vue.use(Router)

export default new Router({
  routes: [
    {
      path:'/',
      component:parent,
      name:parent
    }
  ]
})
vue-cli版本的任务清单我们也就完成了,总之换汤不换药,还是那句老话,父组件向子组件传递信息使用props,子组件向父组件传递信息使用this.$emit('事件名称',值1,值2,...)
普通版蜀国交税
这个案例和之前的也差不多,原理还是一样的,那么一起来看看吧!
<!DOCTYPE html>
<html>
    <head>
        <meta charset="UTF-8">
        <title>普通版蜀国交税</title>
    </head>
    <body>
        <div id="app">
            <h2>{{name}}</h2>
            <h3>总数:{{total}}</h3>
            <me-tax @tax="undateTotal" name="赵云" :unit="unit"></me-tax>
            <me-tax @tax="undateTotal" name="马超" :unit="unit"></me-tax>
            <me-tax @tax="undateTotal" name="张飞" :unit="unit"></me-tax>
            <me-tax @tax="undateTotal" name="关羽" :unit="unit"></me-tax>
            <me-tax @tax="undateTotal" name="黄忠" :unit="unit"></me-tax>
            <h3>{{msg}}</h3>
        </div>
        <script src="../js/vue.js" type="text/javascript" charset="utf-8"></script>
        <script type="text/javascript">
            Vue.component('me-tax',{
                template:'<button @click="upTax">{{money}}</button>',
                data(){
                    return{
                        money:0,
                    }
                },
                props:['name','unit'],
                methods:{
                    upTax(){
                        this.money+=this.unit;    //税收总和
                        this.$emit('tax',{name:this.name,money:this.money});//    通知父组件
                    }
                }
            })
            let vm=new Vue({
                el:'#app',
                data:{
                    name:'蜀国交税',
                    total:0,
                    unit:10,    //每次交税的量
                    msg:''
                },
                methods:{
                    undateTotal(obj){
                        this.total+=this.unit;
                        this.msg=obj.name+"交税成功,已交税"+obj.money;
                    }
                },
                computed:{

                }

            })

        </script>
    </body>
</html>
结果
思路分析:
- 父组件中定义好交税的总和(total)和每次交税的数量(unit)
- 定义好子组件,接收父组件传递过来的两个参数name和unit,定义一个计算自己交税的总量和通知父组件的方法tax
- 父组件接收到子组件的通知之后,计算所交税的总和,并显示那位蜀将交的税收
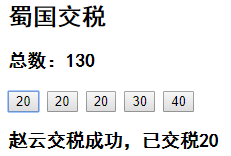
vue-cli版蜀国交税
vue-cli版的蜀国交税的话,我们同样按照步骤进行,一步一步来解析
(1)新建目录和定义六个组件
在src/components新建money目录和UnitTotalComponent.vue,UnitComponentA.vue,UnitComponentB.vue,UnitComponentC.vue,UnitComponentD.vue,UnitComponentE.vue六个组件,目录结构如下
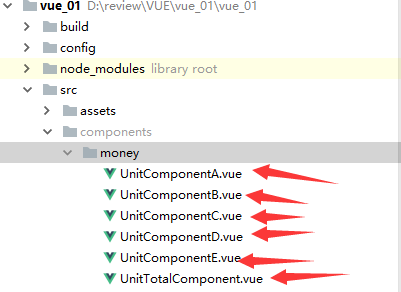
在这里我们将组件拆分了,上面是复制同样的组件,而这里是一个文件对应一个组件
(2)在对应的组件中编写代码
UnitTotalComponent.vue
<template>
  <div>
    <h1>{{name}}</h1>
    <h3>总交税:{{total}}</h3>
    <A title="张飞" :unit="unit" @tax="updateTotal"></A>
    <B title="关羽" :unit="unit" @tax="updateTotal"></B>
    <C title="马超" :unit="unit" @tax="updateTotal"></C>
    <D title="赵云" :unit="unit" @tax="updateTotal"></D>
    <E title="黄忠" :unit="unit" @tax="updateTotal"></E>
    <h3>{{msg}}</h3>
  </div>
</template>

<script>
  //导入相应的组件
  import A from './UnitComponentA'
  import B from './UnitComponentB'
  import C from './UnitComponentC'
  import D from './UnitComponentD'
  import E from './UnitComponentE'
    export default {
        name: "UnitTotalComponent",
        data(){
          return{
            name:'蜀国交税',
            total:0,
            unit:10,  //每次交税的量
            msg:''
          }
        },
      components:{  //注册组件
          A,
          B,
          C,
          D,
          E
      },
        methods:{
          updateTotal(obj){
            this.total+=this.unit;
            this.msg=obj.name+'交税成功,已交税'+obj.money;
          }
        }
    }
</script>

<style scoped>

</style>
- UnitTotalComponent组件中首先导入了五个组件以及注册了这五个组件
- 定义需要传递的数数据(每次交税的量unit)
- 根据每个子组件通知的方法将所交的税计算总和,并显示哪位蜀将
UnitComponentA.vue
<template>
    <div>
      <button @click="upTax">{{money}}</button>
    </div>
</template>

<script>
    export default {
        name: "UnitComponentA",
      props:['title','unit'],
      methods:{
        upTax(){
          this.money+=this.unit;
          this.$emit('tax',{name:this.title,money:this.money});

        }
      },
      data(){
          return{
            money:0,
          }
      }
    }
</script>

<style scoped>

</style>
- UnitComponentA组件接收父组件传递过来的两个属性title和unit
- 定义好通知父组件的方法tax,将参数和方法传过去
UnitComponentB.vue
<template>
  <div>
    <button @click="upTax">{{money}}</button>
  </div>
</template>

<script>
    export default {
      name: "UnitComponentB",
      props:['title','unit'],
      methods:{
        upTax(){
          this.money+=this.unit;
          this.$emit('tax',{name:this.title,money:this.money});

        }
      },
      data(){
        return{
          money:0,
        }
      }
    }
</script>

<style scoped>

</style>
- UnitComponentB组件接收父组件传递过来的两个属性title和unit
- 定义好通知父组件的方法tax,将参数和方法传过去
UnitComponentC.vue
<template>
  <div>
    <button @click="upTax">{{money}}</button>
  </div>
</template>

<script>
    export default {
        name: "UnitComponentC",
      props:['title','unit'],
      methods:{
        upTax(){
          this.money+=this.unit;
          this.$emit('tax',{name:this.title,money:this.money});

        }
      },
      data(){
        return{
          money:0,
        }
      }
    }
</script>

<style scoped>

</style>
- UnitComponentC组件接收父组件传递过来的两个属性title和unit
- 定义好通知父组件的方法tax,将参数和方法传过去
UnitComponentD.vue
<template>
  <div>
    <button @click="upTax">{{money}}</button>
  </div>
</template>

<script>
    export default {
        name: "UnitComponentD",
      props:['title','unit'],
      methods:{
        upTax(){
          this.money+=this.unit;
          this.$emit('tax',{name:this.title,money:this.money});

        }
      },
      data(){
        return{
          money:0,
        }
      }
    }
</script>

<style scoped>

</style>
- UnitComponentD组件接收父组件传递过来的两个属性title和unit
- 定义好通知父组件的方法tax,将参数和方法传过去
UnitComponentE.vue
<template>
  <div>
    <button @click="upTax">{{money}}</button>
  </div>
</template>

<script>
    export default {
        name: "UnitComponentE",
      props:['title','unit'],
      methods:{
        upTax(){
          this.money+=this.unit;
          this.$emit('tax',{name:this.title,money:this.money});

        }
      },
      data(){
        return{
          money:0,
        }
      }
    }
</script>

<style scoped>

</style>
- UnitComponentE组件接收父组件传递过来的两个属性title和unit
- 定义好通知父组件的方法tax,将参数和方法传过去
index.js
import Vue from 'vue'
import Router from 'vue-router'
import total from '@/components/money/UnitTotalComponent'
Vue.use(Router)

export default new Router({
  routes: [
    {
      path:'/',
      component:total,
      name:total
    }
  ]
})
结果

vue的组件通信到这里就要告一段落了,该讲解的知识点也讲解完成了,反正这篇博客你反复去看总会有收获的。学习起来并不难,任务清单和蜀国交税这两个案例将所学的组件通信结合了起来,学习起来也非常方便。
总结
本篇博客主要讲解了三个知识点,父组件向子组件传递信息,子组件向父组件传递信息,非父子组件通信,父组件向子组件传递信息主要是通过props进行数据传递,子组件向父组件传递信息主要是通过this.$emit('事件名',值1,值2,...),非父子组件通信,先建立中央通信总线,传递数据的一方使用bus.$emit(),接收数据的一方使用bus.$on(),本篇博客已经将组件通信这一方面的知识讲解的非常透彻,后期所有的博客几乎都会围绕vue-cli项目的格式进行讲解其它的知识点。
| 作者:一只流浪的kk 出处:https://www.cnblogs.com/jjgw/ 本文版权归作者和博客园共有,欢迎转载,但未经作者同意必须保留原文链接,否则将追究法律责任 |
微信扫一扫 |

 浙公网安备 33010602011771号