Ansible之Playbook详解、案例
什么是playbook
playbooks是一个不同于使用Ansible命令行执行方式的模式,其功能更强大灵活。
简单来说,playbook是一个非常简单的配置管理和多主机部署系统,不同于任何已经存在的模式,可作为一个适合部署复杂应用程序的基础。
Playbook可以定制配置,可以按照指定的操作步骤有序执行,支持同步和异步方式。
值得注意的是playbook是通过YAML格式来进行描述定义的。
playbook是由一个或多个模块组成的,使用多个不同的模块,完成一件事情。
playbook通过yaml语法识别描述的状态文件。扩展名是yaml
YAML语法
缩进
YAML使用一个固定的缩进风格表示层级结构,每个缩进由两个空格组成, 不能使用tab
冒号
以冒号结尾的除外,其他所有冒号后面所有必须有空格。
短横线
表示列表项,使用一个短横杠加一个空格。
多个项使用同样的缩进级别作为同一列表。
核心元素
Tasks:任务,由模板定义的操作列表
Variables:变量
Templates:模板,即使用模板语法的文件
Handlers:处理器 ,当某条件满足时,触发执行的操作
Roles:角色
hosts和users介绍
---
- hosts: abc                   #可以是一个主机组、主机、多个主机,中间以冒号分隔,也可以用all参数表示所有主机
    remote_user: root          #表示执行的用户账号
    become: yes                #2.6版本以后的参数,之前是sudo,意思为切换用户运行
    become_user: mysql         #指定sudo用户为mysql
become 和become_user 作为指定远程主机sudo切换用
Tasks list 和action介绍
1、Play的主体部分是task列表,task列表中的各任务按次序逐个在hosts中指定的主机上执行,即在所有主机上完成第一个任务后再开始第二个任务。

2、在运行playbook时(从上到下执行),如果一个host执行task失败,整个tasks都会回滚,请修正playbook 中的错误,然后重新执行即可。

3、每一个task必须有一个名称name,这样在运行playbook时,从其输出的任务执行信息中可以很好的辨别出是属于哪一个task的。
   如果没有定义name,‘action’的值将会用作输出信息中标记特定的task。

4、定义一个task,常见的格式:”module: options” 例如:yum: name=httpd

5、ansible的自带模块中,command模块和shell模块无需使用key=value格式
常用命令
# ansible-playbook first.yml --syntax-check    #检查yaml文件的语法是否正确
# ansible-playbook first.yml --list-task       #检查tasks任务
# ansible-playbook first.yml --list-hosts      #检查生效的主机
# ansible-playbook first.yml --start-at-task='Copy Nginx.conf'     #指定从某个task开始运行
# ansible-playbook first.yml -k      #用来交互输入ssh密码
# ansible-playbook first.yml -K      #用来交互输入sudo密码
# ansible-playbook first.yml -u      #指定用户
playbook变量
变量使用
变量定义有三种方式
1) playbook的yaml文件中定义变量赋值
2) --extra-vars执行参数赋给变量
3) 在文件中定义变量
1、playbook的yaml文件中定义变量赋值
- hosts: all
  vars:  #定义变量
    file_name: bgx_yaml_vars

  tasks:
  - name: # {{ file_name }}引用上面定义的变量
    file: path=/tmp/{{ file_name }} state=touch


#playbook执行,在/tmp目录创建bgx_yaml_vars文件
2、--extra-vars执行参数赋给变量
[root@manager ~]# cat f3.yml
- hosts: all

  tasks:
  - name: Create New File
    file: path=/tmp/{{ file_name }} state=touch

#playbook执行时传入file_name变量的参数,在/tmp目录创建bgx_extra-vars文件
[root@manager ~]# ansible-playbook f2.yml --extra-vars "file_name=bgx_extra-vars"
3) 在文件中定义变量: 可以在/etc/ansible/hosts主机组中定义,然后使用palybook进行调度该变量
cat /etc/ansible/hosts
[ceshi]
10.17.12.98
10.17.12.99
10.17.12.60
[ceshi:vars]
file_name=bgx_filename

[root@manager ~]# cat f4.yml
---
- hosts: all

  tasks:
  - name: Create New File
    file: path=/tmp/{{ file_name }} state=touch

#playbook执行,在/tmp目录创建bgx_filename文件
如果定义的变量出现重复,且造成冲突,优先级如下:
1.extra-vars外置传参的优先级最高 [所有执行的主机都生效]
2.定义在yml文件中的优先级其次 [所有执行的主机都生效]
3.hosts文件中定义的变量优先级最低 [当前主机组定义会生效]
变量注册
1) 注册变量: register关键字可以存储指定命令的输出结果到一个自定义的变量中
[root@manager ~]# cat f5.yml
---
- hosts: all
tasks:
- name:
shell: netstat -lntp
register: System_Status
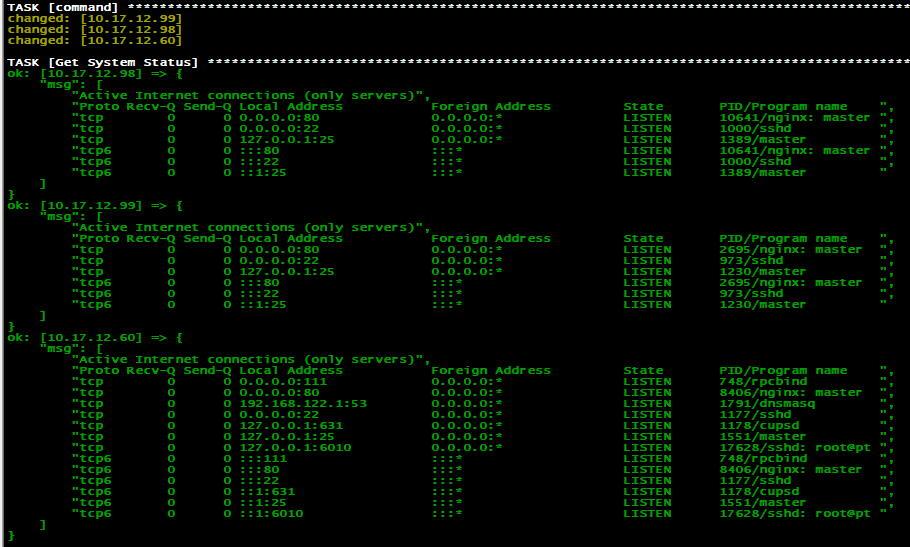
- name: Get System Status
debug: msg={{System_Status.stdout_lines}}
#playbook执行结果
条件判断
playbook中的条件判断语句使用when
- hosts: all
remote_user: root
tasks:
#如果系统中存在主机名为nfs或者backup的主机,则创建文件
- name: Create File
file: path=/tmp/this_is_{{ ansible_hostname }}_file state=touch
when: (ansible_hostname == "nfs") or (ansible_hostname == "backup")
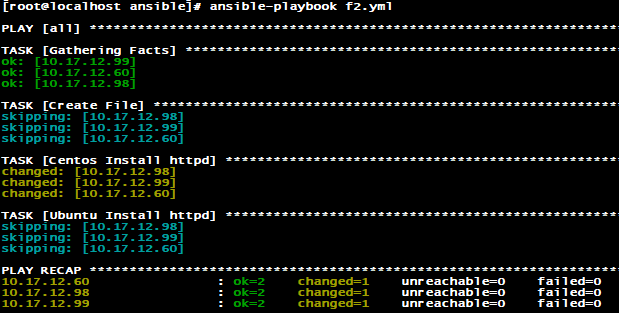
#系统为centos的主机才会执行
- name: Centos Install httpd
yum: name=httpd state=present
when: (ansible_distribution == "CentOS")
#系统为ubuntu的主机才会执行
- name: Ubuntu Install httpd
yum: name=httpd2 state=present
when: (ansible_distribution == "Ubuntu")
循环语句
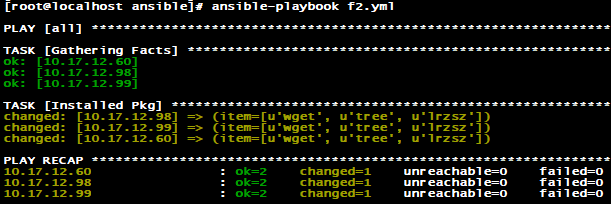
1、标准循环使用场景-批量安装软件
[root@manager ~]# cat f7.yml
---
- hosts: all
  remote_user: root
  tasks:
    - name: Installed Pkg
      yum: name={{ item }} state=present
      with_items:
        - wget
        - tree
        - lrzsz
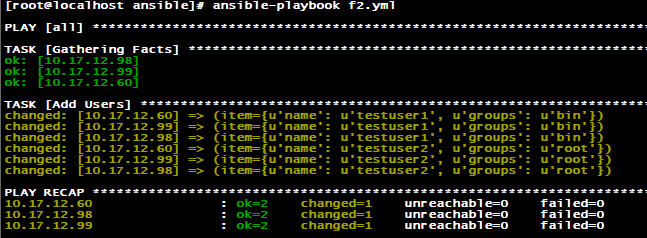
2、标准循环使用场景-批量创建用户
[root@manager ~]# cat f7.yml
- hosts: all
  remote_user: root
  tasks:
    - name: Add Users
      user: name={{ item.name }} groups={{ item.groups }} state=present
      with_items:
        - { name: 'testuser1', groups: 'bin' }
        - { name: 'testuser2', groups: 'root' }
3、标准循环使用场景-拷贝多个目录
[root@manager ~]# cat f7.yml
- hosts: all
  remote_user: root
  tasks:
    - name: Configure Rsync Server
      copy: src={{ item.src }} dest=/etc/{{ item.dest }} mode={{ item.mode }}
      with_items:
        - {src: "rsyncd.conf", dest: "rsyncd.conf", mode: "0644"}
        - {src: "rsync.passwd", dest: "rsync.passwd", mode: "0600"}
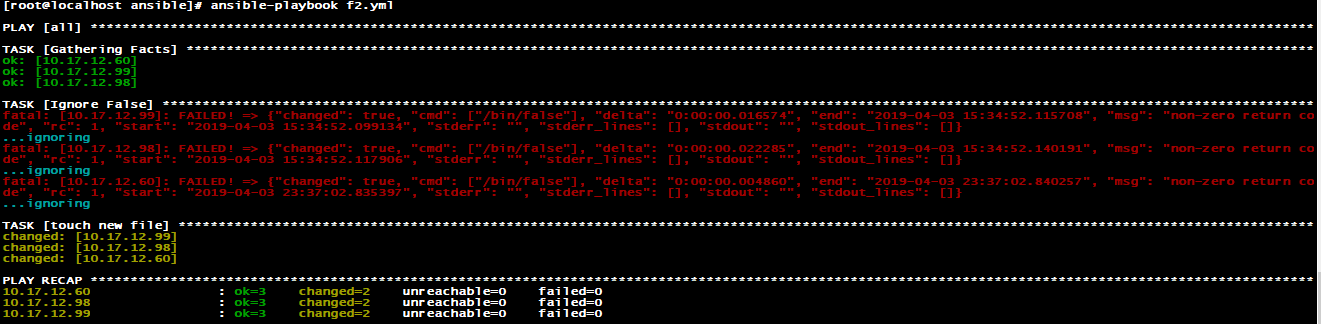
异常处理
默认Playbook会检查命令和模块的返回状态,如遇到错误就中断playbook的执行
加入参数: ignore_errors: yes 忽略错误
[root@manager ~]# cat f9.yml
---
- hosts: all
  remote_user: root
  tasks:
    - name: Ignore False
      command: /bin/false
      ignore_errors: yes

    - name: touch new file
      file: path=/tmp/bgx_ignore state=touch
tags标签
1、打标签
对一个对象打一个标签
对一个对象打多个标签
对多个对象打一个标签
2、标签使用,通过tags和任务对象进行捆绑,控制部分或者指定的task执行
-t: 执行指定的tag标签任务
--skip-tags: 执行--skip-tags之外的标签任务
[root@manager ~]# cat f10.yml
---
- hosts: all
  remote_user: root
  tasks:
    - name: Install Nfs Server
      yum: name=nfs-utils state=present
      tags:
        - install_nfs
        - install_nfs-server

    - name: Service Nfs Server
      service: name=nfs-server state=started enabled=yes
      tags: start_nfs-server
使用-t指定tags执行, 多个tags使用逗号隔开即可
[root@manager ~]# ansible-playbook -t install_nfs-server f10.yml
使用--skip-tags排除不执行的tags
[root@manager ~]# ansible-playbook --skip-tags install_nfs-server f10.yml
playbook参数
执行方式:ansible-playbook playbook.yml [options]
 -u REMOTE_USER, --user=REMOTE_USER
# ssh连接的用户名

 -k, --ask-pass
#ssh登录认证密码

 -s, --sudo
#sudo 到root用户相当于Linux系统下的sudo命令

 -U SUDO_USER, --sudo-user=SUDO_USER
#sudo到对应的用户

 -K, --ask-sudo-pass
#用户的密码(—sudo时使用)

 -T TIMEOUT, --timeout=TIMEOUT
# ssh连接超时,默认10秒

 -C, --check
# 指定该参数后,执行playbook文件不会真正去执行,而是模拟执行一遍,然后输出本次执行会对远程主机造成的修改

 -e EXTRA_VARS, --extra-vars=EXTRA_VARS
# 设置额外的变量如:key=value形式或者 YAML or JSON,以空格分隔变量,或用多个-e

 -f FORKS, --forks=FORKS
# 进程并发处理,默认5

 -i INVENTORY, --inventory-file=INVENTORY
# 指定 hosts 文件路径,默认 default=/etc/ansible/hosts

 -l SUBSET, --limit=SUBSET
# 指定一个pattern,对-hosts:匹配到的主机再过滤一次

 --list-hosts
# 只打印有哪些主机会执行这个playbook文件,不是实际执行该playbook

 --list-tasks
# 列出该playbook中会被执行的task

 --private-key=PRIVATE_KEY_FILE
# 私钥路径

 --step
# 同一时间只执行一个task,每个task 执行前都会提示确认一遍

 --syntax-check
# 只检测playbook文件语法是否有问题,不会执行该playbook

 -t TAGS, --tags=TAGS
#当play和task的tag为该参数指定的值时才执行,多个tag以逗号分隔

 --skip-tags=SKIP_TAGS
# 当play和task的tag不匹配该参数指定的值时,才执行

 -v, --verbose
#输出更详细的执行过程信息,-vvv可得到所有执行过程信息。
实例
1、简单实例
创建一个first.yml文件
---
- hosts: 10.17.12.60 #指定主机
remote_user: root #指定在被管理的主机上执行任务的用户
tasks: #任务列表
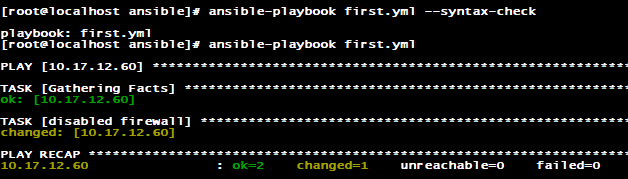
- name: disabled firewall #任务名关闭防火墙
command: 'systemctl stop firewalld.service' #调用command模块执行命令
注意-后面有空格
注意对齐关系,注意语法不然很容易会报错
ansible-playbook first.yml --syntax-check    #检查yml文件的语法是否正确
ansible-playbook a.yml  #执行
- play中只要执行命令的返回值不为0,就会报错,tasks停止,可以添加下面
- ignore_errors: True #忽略错误,强制返回成功

2、批量安装nginx
1、编辑playbook代码
[root@localhost ansible]# more second.yml
---
- hosts: all
  tasks:
      - name: Extended Nginx
        yum: name=epel-release state=present
      - name: Install Nginx Package
        yum: name=nginx state=present
      - name: Copy Nginx.conf
        template: src=./nginx.conf.j2 dest=/etc/nginx/nginx.conf owner=root group=root mode=0644 validate='nginx -t -c %s'
        notify:
             - Restart Nginx Service
  handlers:
      - name: Restart Nginx Service
        service: name=nginx state=restarted
#使用template模块去管理/etc/nginx/nginx.conf文件,owner,group定义该文件的属主与属组,validate参数是指文件生成后使用nginx -t -c %s命令去做nginx语法检测
#notify是触发handlers,如果同步后,文件的MD5值有变化会触发ReStart Nginx Service 这个handlers
2、编辑nginx.conf.j2文件
# For more information on configuration, see:
#   * Official English Documentation: http://nginx.org/en/docs/
#   * Official Russian Documentation: http://nginx.org/ru/docs/

user nginx;
worker_processes {{ ansible_processor_cores}};
error_log /var/log/nginx/error.log;
pid /run/nginx.pid;

# Load dynamic modules. See /usr/share/nginx/README.dynamic.
include /usr/share/nginx/modules/*.conf;

events {
    worker_connections 1024;
}

http {
    log_format  main  '$remote_addr - $remote_user [$time_local] "$request" '
                      '$status $body_bytes_sent "$http_referer" '
                      '"$http_user_agent" "$http_x_forwarded_for"';

    access_log  /var/log/nginx/access.log  main;

    sendfile            on;
    tcp_nopush          on;
    tcp_nodelay         on;
    keepalive_timeout   65;
    types_hash_max_size 2048;

    include             /etc/nginx/mime.types;
    default_type        application/octet-stream;

    # Load modular configuration files from the /etc/nginx/conf.d directory.
    # See http://nginx.org/en/docs/ngx_core_module.html#include
    # for more information.
    include /etc/nginx/conf.d/*.conf;

    server {
        listen       80 default_server;
        listen       [::]:80 default_server;
        server_name  _;
        root         /usr/share/nginx/html;

        # Load configuration files for the default server block.
        include /etc/nginx/default.d/*.conf;

        location / {
        }

        error_page 404 /404.html;
            location = /40x.html {
        }

        error_page 500 502 503 504 /50x.html;
            location = /50x.html {
        }
    }

# Settings for a TLS enabled server.
#
#    server {
#        listen       443 ssl http2 default_server;
#        listen       [::]:443 ssl http2 default_server;
#        server_name  _;
#        root         /usr/share/nginx/html;
#
#        ssl_certificate "/etc/pki/nginx/server.crt";
#        ssl_certificate_key "/etc/pki/nginx/private/server.key";
#        ssl_session_cache shared:SSL:1m;
#        ssl_session_timeout  10m;
#        ssl_ciphers HIGH:!aNULL:!MD5;
#        ssl_prefer_server_ciphers on;
#
#        # Load configuration files for the default server block.
#        include /etc/nginx/default.d/*.conf;
#
#        location / {
#        }
#
#        error_page 404 /404.html;
#            location = /40x.html {
#        }
#
#        error_page 500 502 503 504 /50x.html;
#            location = /50x.html {
#        }
#    }

}
此处注意在其中指定了一个变量worker_processes {{ ansible_processor_cores}};
他针对nginx的worker_process参数通过facts信息中的cpu核心数目生成,其他的配置都是默认的。
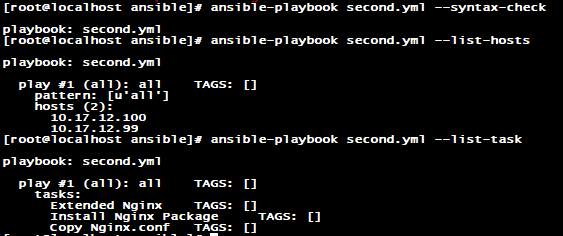
3、检测可行性,并确认信息
ansible-playbook second.yml --syntax-check
ansible-playbook second.yml --list-hosts
ansible-playbook second.yml --list-task
4、执行命令
ansible-playbook second.yml
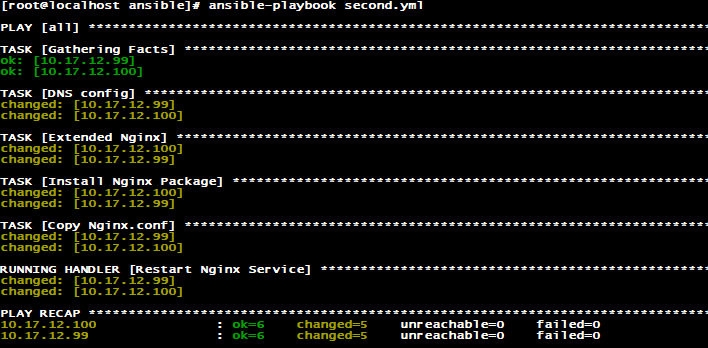
查看检验,各主机nginx都已经安装,并且参数也已经按照需求修改,docker启动状态。

 浙公网安备 33010602011771号