

自动化运维
自动化运维
1.1 自动化运维介绍
随着信息时代的持续发展,IT运维已经成为IT服务内涵中重要的组成部分。面对越来越复杂的业务,面对越来越多样化的用户需求,不断扩展的IT应用,需要越来越合理的模式来保障IT服务能灵活便捷、安全稳定地持续保障,这种模式中的保障因素就是IT运维(其他因素是更加优越的IT架构等)。从初期的几台服务器发展到庞大的数据中心,单靠人工已经无法满足在技术、业务、管理等方面的要求,那么标准化、自动化、架构优化、过程优化等降低IT服务成本的因素越来越被人们所重视。其中,自动化最开始作为代替人工操作为出发点的诉求被广泛研究和应用。
IT运维从诞生发展至今,自动化作为其重要属性之一,已经不仅仅只是代替人工操作,更重要的是深层探知和全局分析,关注的是在当前条件下如何实现性能与服务最优化,同时保障投资收益最大化。自动化对IT运维的影响,已经不仅仅是人与设备之间的关系,已经发展到了面向客户服务、驱动IT运维决策的层面,IT运维团队的构成,也从各级技术人员占大多数发展到业务人员甚至用户占大多数的局面。
因此,IT运维自动化是一组将静态的设备结构转化为根据IT服务需求动态弹性响应的策略,目的就是实现IT运维的质量,降低成本。可以说自动化一定是IT运维最高层面的重要属性之一,但不是全部。
1.2 常用工具
(1)Puppet(www.puppetlabs.com)
Puppet是早期的Linux自动化运维工具,是一种LINUX、WINDOWS、UNIX平台的集中配置管理系统,到现在已经非常成熟,可以批量管理远程服务器,模块丰富、配置复杂、基于Ruby语言编写。是最典型的C/S结构,需要安装服务端和客户端。
Puppet采用C/S星状的结构,所有的客户端和一个或者多个服务器交互,每个客户端周期地(默认半个小时)向服务器发送请求,获得最新的配置信息,保证和配置信息同步。
每个Puppet客户端周期地连接一次服务器,下载最新的配置文件,并且严格按照配置文件来配置客户端。配置完成后,Puppet客户端可以反馈给服务器端一个消息,如果出错也会给服务器端反馈一个消息。
Puppet适用于服务器管理的整个过程,比如初始安装、配置、更新等。
(2)SaltStack(官网 https://saltstack.com、文档docs.saltstack.com )
SaltStack和Puppet一样,也是C/S模式,需要安装服务端和客户端,基于Python编写,加入了MQ消息同步,可以使执行命令和执行结果高效返回,但其执行过程需要等待客户端全部返回,如果客户端没有及时返回或者没有响应的话,可能会导致部分机器没有执行结果。
(3)Ansible(www.ansible.com)
Ansible基于Python开发的,Ansible不需要在客户端服务器上安装客户端。因为Ansible基于SSH远程管理,而Linux服务器大部分都离不开SSH,所以Ansible不需要为配置添加额外的支持。
Ansible安装使用都很简单,而且基于上千个插件和模块,实现各种软件、平台、版本的管理,支持虚拟容器多层级的部署。
Ansible
2.1 Ansible介绍
(1)Ansible不需要安装客户端,通过sshd去通信(无密钥登录)。
(2)Ansible基于模块工作,模块可以由任何语言开发。
(3)Ansible不仅支持命令行使用模块,也支持编写Yaml格式的playbook,易于编写和阅读。
(4)Ansible安装十分简单,CentOS上可直接Yum安装。
(5)Ansible有提供UI(浏览器图形化)www.ansible.com/tower,收费的官方文档 http://docs.ansible.com/ansible/latest/index.html。
Ansible已经被RedHat公司收购,它在Github(https://github.com/ansible/ansible)上是一个非常受欢迎的开源软件。
一本不错的入门电子书 https://ansible-book.gitbooks.io/ansible-first-book/
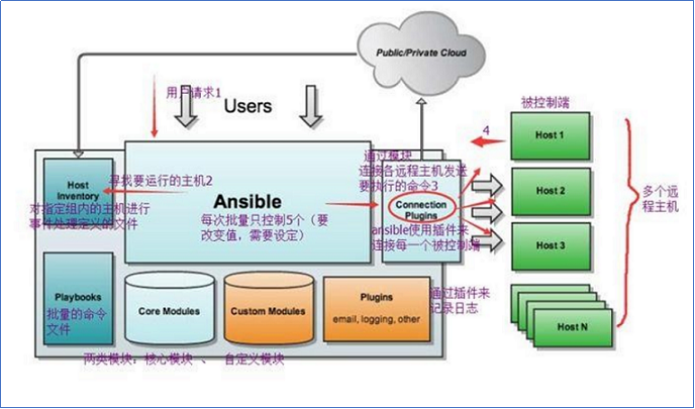
2.1.1 Ansible架构图

2.1.2 Ansible执行流程
2.2 Ansible安装
(1)环境准备
在两台机器上关闭防火墙和SELinux,并修改/etc/hosts文件。
[root@ansible-test1 ~]# systemctl stop firewalld
[root@ansible-test1 ~]# systemctl disable firewalld
[root@ansible-test1 ~]# setenforce 0
[root@ansible-test1 ~]# vi /etc/selinux/config

# This file controls the state of SELinux on the system.
# SELINUX= can take one of these three values:
#     enforcing - SELinux security policy is enforced.
#     permissive - SELinux prints warnings instead of enforcing.
#     disabled - No SELinux policy is loaded.
SELINUX=disabled    //将此处改为disabled
# SELINUXTYPE= can take one of three two values:
#     targeted - Targeted processes are protected,
#     minimum - Modification of targeted policy. Only selected processes are protected.
#     mls - Multi Level Security protection.
SELINUXTYPE=targeted
[root@ansible-test2 ~]# vi /etc/hosts
127.0.0.1   localhost localhost.localdomain localhost4 localhost4.localdomain4
::1         localhost localhost.localdomain localhost6 localhost6.localdomain6
192.168.174.30 ansible-test1
192.168.174.31 ansible-test2
(2)安装Ansible
准备两台机器anisble-test1和anisble-test2,只需要在anisble-test1上安装Ansible,先安装epel仓库。
[root@ansible-test1 ~]# yum -y install epel-release
[root@ansible-test1 ~]# yum -y install ansible
[root@ansible-test1 ~]# ansible --version
ansible 2.9.21
  config file = /etc/ansible/ansible.cfg
  configured module search path = [u'/root/.ansible/plugins/modules', u'/usr/share/ansible/plugins/modules']
  ansible python module location = /usr/lib/python2.7/site-packages/ansible
  executable location = /usr/bin/ansible
  python version = 2.7.5 (default, Nov 20 2015, 02:00:19) [GCC 4.8.5 20150623 (Red Hat 4.8.5-4)]
(3)免密配置
anisble-test1上生成密钥对ssh-keygen -t rsa,把公钥放到anisble-test2上,设置密钥认证。
注意:需要将本机也配置免密。
[root@ansible-test1 ~]# ssh-keygen -t rsa
Generating public/private rsa key pair.
Enter file in which to save the key (/root/.ssh/id_rsa):
/root/.ssh/id_rsa already exists.
Overwrite (y/n)? y
Enter passphrase (empty for no passphrase):
Enter same passphrase again:
Your identification has been saved in /root/.ssh/id_rsa.
Your public key has been saved in /root/.ssh/id_rsa.pub.
The key fingerprint is:
1f:6d:78:86:bf:7a:1e:be:07:e7:60:c1:00:05:24:c4 root@ansible-test1
The key's randomart image is:
+--[ RSA 2048]----+
|     oo.++.      |
|      E.  .      |
|           o     |
|           +o    |
|        S + =.   |
|         . *+ .  |
|          ..o=   |
|           ..oo  |
|          .+=o   |
+-----------------+
[root@ansible-test1 ~]# ssh-copy-id 192.168.174.31
/usr/bin/ssh-copy-id: INFO: attempting to log in with the new key(s), to filter out any that are already installed
/usr/bin/ssh-copy-id: INFO: 1 key(s) remain to be installed -- if you are prompted now it is to install the new keys
root@192.168.174.31's password:

Number of key(s) added: 1

Now try logging into the machine, with:   "ssh '192.168.174.31'"
and check to make sure that only the key(s) you wanted were added.
[root@ansible-test1 ~]# ssh 192.168.174.31
Last login: Fri Jul  2 14:05:55 2021 from 192.168.174.1
[root@ansible-test2 ~]# exit
logout
Connection to 192.168.174.31 closed.
(4)主机组设置
在/etc/ansible/hosts文件中添加本机和另一台机器的IP:
[root@ansible-test1 ~]# vi /etc/ansible/hosts
。。。。。
[testhost]
127.0.0.1
192.168.174.31
。。。。。
[root@ansible-test1 ~]# ssh-copy-id 127.0.0.1(对此ip进行免密操作)
/usr/bin/ssh-copy-id: INFO: attempting to log in with the new key(s), to filter out any that are already installed
/usr/bin/ssh-copy-id: INFO: 1 key(s) remain to be installed -- if you are prompted now it is to install the new keys
root@127.0.0.1's password:

Number of key(s) added: 1

Now try logging into the machine, with:   "ssh '127.0.0.1'"
and check to make sure that only the key(s) you wanted were added.
说明:testhost为自定义的主机组名字,下面两个IP为组内的机器IP。
2.3 Ansible远程执行命令
这样就可以批量执行命令了。这里的testhost为主机组名,-m后边是模块名字,-a后面是命令。当然我们也可以直接写一个IP,针对某一台机器来执行命令。
[root@ansible-test1 ~]# ansible 127.0.0.1 -m command -a 'hostname'
127.0.0.1 | CHANGED | rc=0 >>
ansible-test1
[root@ansible-test1 ~]# ansible 192.168.174.31 -m command -a 'hostname'
192.168.174.31 | CHANGED | rc=0 >>
ansible-test2
[root@ansible-test1 ~]# ansible testhost -m command -a 'hostname'
127.0.0.1 | CHANGED | rc=0 >>
ansible-test1
192.168.174.31 | CHANGED | rc=0 >>
ansible-test2
2.4 Ansible拷贝文件或目录
源目录会放到目标目录下面去,如果目标指定的目录不存在,它会自动创建。如果拷贝的是文件,如果dest指定的名字和源不同,并且它不是已经存在的目录,相当于拷贝过去后又重命名。但相反,如果desc是目标机器上已经存在的目录,则会直接把文件拷贝到该目录下面。
[root@ansible-test1 ~]# ls
anaconda-ks.cfg
[root@ansible-test1 ~]# vi test.txt
123456
[root@ansible-test1 ~]# cat test.txt
123456
[root@ansible-test1 ~]# ansible 192.168.174.31 -m copy -a "src=test.txt dest=/tmp/123"
192.168.174.31 | CHANGED => {
    "ansible_facts": {
        "discovered_interpreter_python": "/usr/bin/python"
    },
    "changed": true,
    "checksum": "c4f9375f9834b4e7f0a528cc65c055702bf5f24a",
    "dest": "/tmp/123",
    "gid": 0,
    "group": "root",
    "md5sum": "f447b20a7fcbf53a5d5be013ea0b15af",
    "mode": "0644",
    "owner": "root",
    "secontext": "unconfined_u:object_r:admin_home_t:s0",
    "size": 7,
    "src": "/root/.ansible/tmp/ansible-tmp-1625251298.67-11115-34943827020331/source",
    "state": "file",
    "uid": 0
}
[root@ansible-test2 ~]# ls /tmp/
123
[root@ansible-test2 ~]# cat /tmp/123
123456
这里的/tmp/123和源机器上的/etc/test.txt是一致的,但如果目标机器上已经有/tmp/123目录,则会再/tmp/123目录下面建立test.txt文件。
[root@ansible-test1 ~]# ansible 192.168.174.31 -m copy -a "src=test1 dest=/tmp/test1"
192.168.174.31 | CHANGED => {
    "ansible_facts": {
        "discovered_interpreter_python": "/usr/bin/python"
    },
    "changed": true,
    "checksum": "c4f9375f9834b4e7f0a528cc65c055702bf5f24a",
    "dest": "/tmp/test1/test1/test.txt",
    "gid": 0,
    "group": "root",
    "md5sum": "f447b20a7fcbf53a5d5be013ea0b15af",
    "mode": "0644",
    "owner": "root",
    "secontext": "unconfined_u:object_r:admin_home_t:s0",
    "size": 7,
    "src": "/root/.ansible/tmp/ansible-tmp-1625251699.66-11158-159313763318939/source",
    "state": "file",
    "uid": 0
}
[root@ansible-test2 ~]# ls /tmp/
123  test1
[root@ansible-test2 ~]# cd /tmp/test1
[root@ansible-test2 test1]# ls
test1
[root@ansible-test2 test1]# cd test1/
[root@ansible-test2 test1]# ls
test.txt
[root@ansible-test2 test1]# cat test.txt
123456
2.5 Ansible远程执行脚本
[root@ansible-test2 ~]# yum -y install vim
首先创建一个shell脚本。
[root@ansible-test1 ~]# vi /tmp/test.sh
#!/bin/bash
echo `date` > /tmp/ansible_test.txt
然后把该脚本分发到各个机器上。
[root@ansible-test1 ~]# ansible testhost -m copy -a "src=/tmp/test.sh dest=/tmp/test.sh mode=0755"
127.0.0.1 | CHANGED => {
    "ansible_facts": {
        "discovered_interpreter_python": "/usr/bin/python"
    },
    "changed": true,
    "checksum": "1a6e4af02dba1bda6fc8e23031d4447efeba0ade",
    "dest": "/tmp/test.sh",
    "gid": 0,
    "group": "root",
    "mode": "0755",
    "owner": "root",
    "path": "/tmp/test.sh",
    "secontext": "unconfined_u:object_r:user_tmp_t:s0",
    "size": 48,
    "state": "file",
    "uid": 0
}
192.168.174.31 | CHANGED => {
    "ansible_facts": {
        "discovered_interpreter_python": "/usr/bin/python"
    },
    "changed": true,
    "checksum": "1a6e4af02dba1bda6fc8e23031d4447efeba0ade",
    "dest": "/tmp/test.sh",
    "gid": 0,
    "group": "root",
    "md5sum": "edfaa4371316af8c5ba354e708fe8a97",
    "mode": "0755",
    "owner": "root",
    "secontext": "unconfined_u:object_r:admin_home_t:s0",
    "size": 48,
    "src": "/root/.ansible/tmp/ansible-tmp-1625253038.03-11466-76404192701372/source",
    "state": "file",
    "uid": 0
}
[root@ansible-test2 tmp]# ls
123  test1  test2.txt  test.sh
最后是批量执行该shell脚本。
[root@ansible-test1 ~]# ansible testhost -m shell -a "/tmp/test.sh"
192.168.174.31 | CHANGED | rc=0 >>

127.0.0.1 | CHANGED | rc=0 >>
shell模块,还支持远程执行命令并且带管道。
[root@ansible-test1 ~]# ansible testhost -m shell -a "cat /etc/passwd|wc -l"
192.168.174.31 | CHANGED | rc=0 >>
21
127.0.0.1 | CHANGED | rc=0 >>
21
[root@ansible-test1 ~]# cat /tmp/ansible_test.txt
Fri Jul 2 15:13:20 EDT 2021
###运行成功
2.6 Ansible管理任务计划
创建任务计划,命名并定义工作。
[root@ansible-test1 ~]# ansible testhost -m cron -a "name='test cron' job='/bin/touch /tmp/1212.txt' weekday=6"
192.168.174.31 | CHANGED => {
    "ansible_facts": {
        "discovered_interpreter_python": "/usr/bin/python"
    },
    "changed": true,
    "envs": [],
    "jobs": [
        "test cron"
    ]
}
127.0.0.1 | CHANGED => {
    "ansible_facts": {
        "discovered_interpreter_python": "/usr/bin/python"
    },
    "changed": true,
    "envs": [],
    "jobs": [
        "test cron"
    ]
}
[root@ansible-test1 ~]# crontab -e
#Ansible: test cron
* * * * 6 /bin/touch /tmp/1212.txt
[root@ansible-test2 tmp]# crontab -e
#Ansible: test cron
* * * * 6 /bin/touch /tmp/1212.txt
若要删除该cron只需要加一个字段state=absent。
[root@ansible-test1 ~]# ansible testhost -m cron -a "name='test cron' state=absent"
192.168.174.31 | CHANGED => {
    "ansible_facts": {
        "discovered_interpreter_python": "/usr/bin/python"
    },
    "changed": true,
    "envs": [],
    "jobs": []
}
127.0.0.1 | CHANGED => {
    "ansible_facts": {
        "discovered_interpreter_python": "/usr/bin/python"
    },
    "changed": true,
    "envs": [],
    "jobs": []
}
[root@ansible-test1 ~]# crontab [root@ansible-test2 ~]# crontab -e
其他的时间表示——分钟:minute;小时:hour;日期:day;月份:month2.7 Ansible安装RPM包/使用Yum模块安装httpd
[root@ansible-test1 ~]# ansible testhost -m yum -a "name=httpd"
192.168.174.31 | CHANGED => {
"ansible_facts": {
"discovered_interpreter_python": "/usr/bin/python"
    },
    "changed": true,
    "changes": {
        "installed": [
            "httpd"
        ]
    },
    "msg": "",
    "rc": 0,
    "results": [
        "Loaded plugins: fastestmirror\nLoading mirror speeds from cached hostfile\n * base: mirrors.aliyun.com\n * epel: mirrors.ustc.edu.cn\n * extras: mirrors.aliyun.com\n * updates: mirrors.cn99.com\nResolving Dependencies\n--> Running transaction check\n---> Package httpd.x86_64 0:2.4.6-97.el7.centos will be installed\n--> Processing Dependency: httpd-tools = 2.4.6-97.el7.centos for package: httpd-2.4.6-97.el7.centos.x86_64\n--> Processing Dependency: /etc/mime.types for package: httpd-2.4.6-97.el7.centos.x86_64\n--> Processing Dependency: libaprutil-1.so.0()(64bit) for package: httpd-2.4.6-97.el7.centos.x86_64\n--> Processing Dependency: libapr-1.so.0()(64bit) for package: httpd-2.4.6-97.el7.centos.x86_64\n--> Running transaction check\n---> Package apr.x86_64 0:1.4.8-7.el7 will be installed\n---> Package apr-util.x86_64 0:1.5.2-6.el7 will be installed\n---> Package httpd-tools.x86_64 0:2.4.6-97.el7.centos will be installed\n---> Package mailcap.noarch 0:2.1.41-2.el7 will be installed\n--> Finished Dependency Resolution\n\nDependencies Resolved\n\n================================================================================\n Package           Arch         Version                     Repository     Size\n================================================================================\nInstalling:\n httpd             x86_64       2.4.6-97.el7.centos         updates       2.7 M\nInstalling for dependencies:\n apr               x86_64       1.4.8-7.el7                 base          104 k\n apr-util          x86_64       1.5.2-6.el7                 base           92 k\n httpd-tools       x86_64       2.4.6-97.el7.centos         updates        93 k\n mailcap           noarch       2.1.41-2.el7                base           31 k\n\nTransaction Summary\n================================================================================\nInstall  1 Package (+4 Dependent packages)\n\nTotal download size: 3.0 M\nInstalled size: 10 M\nDownloading packages:\n--------------------------------------------------------------------------------\nTotal                                              1.6 MB/s | 3.0 MB  00:01     \nRunning transaction check\nRunning transaction test\nTransaction test succeeded\nRunning transaction\n  Installing : apr-1.4.8-7.el7.x86_64                                       1/5 \n  Installing : apr-util-1.5.2-6.el7.x86_64                                  2/5 \n  Installing : httpd-tools-2.4.6-97.el7.centos.x86_64                       3/5 \n  Installing : mailcap-2.1.41-2.el7.noarch                                  4/5 \n  Installing : httpd-2.4.6-97.el7.centos.x86_64                             5/5 \n  Verifying  : httpd-2.4.6-97.el7.centos.x86_64                             1/5 \n  Verifying  : apr-1.4.8-7.el7.x86_64                                       2/5 \n  Verifying  : mailcap-2.1.41-2.el7.noarch                                  3/5 \n  Verifying  : httpd-tools-2.4.6-97.el7.centos.x86_64                       4/5 \n  Verifying  : apr-util-1.5.2-6.el7.x86_64                                  5/5 \n\nInstalled:\n  httpd.x86_64 0:2.4.6-97.el7.centos                                            \n\nDependency Installed:\n  apr.x86_64 0:1.4.8-7.el7                     apr-util.x86_64 0:1.5.2-6.el7    \n  httpd-tools.x86_64 0:2.4.6-97.el7.centos     mailcap.noarch 0:2.1.41-2.el7    \n\nComplete!\n"
    ]
}
127.0.0.1 | CHANGED => {
    "ansible_facts": {
        "discovered_interpreter_python": "/usr/bin/python"
    },
    "changed": true,
    "changes": {
        "installed": [
            "httpd"
        ]
    },
    "msg": "",
    "rc": 0,
    "results": [
        "Loaded plugins: fastestmirror\nLoading mirror speeds from cached hostfile\n * base: mirrors.aliyun.com\n * epel: mirrors.tuna.tsinghua.edu.cn\n * extras: mirrors.aliyun.com\n * updates: mirrors.aliyun.com\nResolving Dependencies\n--> Running transaction check\n---> Package httpd.x86_64 0:2.4.6-97.el7.centos will be installed\n--> Processing Dependency: httpd-tools = 2.4.6-97.el7.centos for package: httpd-2.4.6-97.el7.centos.x86_64\n--> Processing Dependency: /etc/mime.types for package: httpd-2.4.6-97.el7.centos.x86_64\n--> Processing Dependency: libaprutil-1.so.0()(64bit) for package: httpd-2.4.6-97.el7.centos.x86_64\n--> Processing Dependency: libapr-1.so.0()(64bit) for package: httpd-2.4.6-97.el7.centos.x86_64\n--> Running transaction check\n---> Package apr.x86_64 0:1.4.8-7.el7 will be installed\n---> Package apr-util.x86_64 0:1.5.2-6.el7 will be installed\n---> Package httpd-tools.x86_64 0:2.4.6-97.el7.centos will be installed\n---> Package mailcap.noarch 0:2.1.41-2.el7 will be installed\n--> Finished Dependency Resolution\n\nDependencies Resolved\n\n================================================================================\n Package           Arch         Version                     Repository     Size\n================================================================================\nInstalling:\n httpd             x86_64       2.4.6-97.el7.centos         updates       2.7 M\nInstalling for dependencies:\n apr               x86_64       1.4.8-7.el7                 base          104 k\n apr-util          x86_64       1.5.2-6.el7                 base           92 k\n httpd-tools       x86_64       2.4.6-97.el7.centos         updates        93 k\n mailcap           noarch       2.1.41-2.el7                base           31 k\n\nTransaction Summary\n================================================================================\nInstall  1 Package (+4 Dependent packages)\n\nTotal download size: 3.0 M\nInstalled size: 10 M\nDownloading packages:\n--------------------------------------------------------------------------------\nTotal                                              3.8 MB/s | 3.0 MB  00:00     \nRunning transaction check\nRunning transaction test\nTransaction test succeeded\nRunning transaction\n  Installing : apr-1.4.8-7.el7.x86_64                                       1/5 \n  Installing : apr-util-1.5.2-6.el7.x86_64                                  2/5 \n  Installing : httpd-tools-2.4.6-97.el7.centos.x86_64                       3/5 \n  Installing : mailcap-2.1.41-2.el7.noarch                                  4/5 \n  Installing : httpd-2.4.6-97.el7.centos.x86_64                             5/5 \n  Verifying  : httpd-2.4.6-97.el7.centos.x86_64                             1/5 \n  Verifying  : apr-1.4.8-7.el7.x86_64                                       2/5 \n  Verifying  : mailcap-2.1.41-2.el7.noarch                                  3/5 \n  Verifying  : httpd-tools-2.4.6-97.el7.centos.x86_64                       4/5 \n  Verifying  : apr-util-1.5.2-6.el7.x86_64                                  5/5 \n\nInstalled:\n  httpd.x86_64 0:2.4.6-97.el7.centos                                            \n\nDependency Installed:\n  apr.x86_64 0:1.4.8-7.el7                     apr-util.x86_64 0:1.5.2-6.el7    \n  httpd-tools.x86_64 0:2.4.6-97.el7.centos     mailcap.noarch 0:2.1.41-2.el7    \n\nComplete!\n"
在name后面还可以加上state=installed/removed设置服务状态,这里的name是CentOS系统里的服务名,可以通过chkconfig –list
[root@ansible-test1 ~]# ansible testhost -m service -a "name=httpd state=started enabled=yes"
192.168.174.31 | CHANGED => {
"ansible_facts": {
        "discovered_interpreter_python": "/usr/bin/python"
    },
    "changed": true,
    "enabled": true,
    "name": "httpd",
    "state": "started",
    ....}
}
127.0.0.1 | CHANGED => {
    "ansible_facts": {
        "discovered_interpreter_python": "/usr/bin/python"
    },
    "changed": true,
    "enabled": true,
    "name": "httpd",
    "state": "started",
......

    }
}
Ansible文档的使用:
[root@ansible-test1 ~]# ansible-doc -l   //列出所有模块
fortios_router_community_list                                 Conf
azure_rm_devtestlab_info                                      Get
ecs_taskdefinition                                            regi
avi_alertscriptconfig                                         Modu
tower_receive                                                 Rece
netapp_e_iscsi_target                                         NetA
azure_rm_acs                                                  Mana
fortios_log_syslogd2_filter                                   Filt
junos_rpc                                                     Runs
na_elementsw_vlan                                             NetA
pn_ospf                                                       CLI
pn_snmp_vacm                                                  CLI
cp_mgmt_service_sctp                                          Mana
onyx_ospf                                                     Mana
icx_command                                                   Run
cs_snapshot_policy                                            Mana
nxos_install_os                                               Set
cnos_static_route                                             Mana
win_eventlog                                                  Mana
vmware_category                                               Mana
vmware_host_feature_info                                      Gath
avi_cluster                                                   Modu
na_ontap_user                                                 NetA
....
[root@ansible-test1 ~]# ansible-doc cron
> CRON    (/usr/lib/python2.7/site-packages/ansible/modules/system

        Use this module to manage crontab and environment variable
        entries. This module allows you to create environment
        variables and named crontab entries, update, or delete the
        When crontab jobs are managed: the module includes one lin
        with the description of the crontab entry `"#Ansible: <nam
        corresponding to the "name" passed to the module, which is
        used by future ansible/module calls to find/check the stat
        The "name" parameter should be unique, and changing the "n
        value will result in a new cron task being created (or a
        different one being removed). When environment variables a
        managed, no comment line is added, but, when the module ne
        to find/check the state, it uses the "name" parameter to f
        the environment variable definition line. When using symbo
        such as %, they must be properly escaped.

  * This module is maintained by The Ansible Community
OPTIONS (= is mandatory):

- backup
        If set, create a backup of the crontab before it is modifi
        The location of the backup is returned in the `backup_file
        variable by this module.
        [Default: False]
        type: bool

- cron_file
        If specified, uses this file instead of an individual user
        crontab.
        If this is a relative path, it is interpreted with respect
        `/etc/cron.d'.
        If it is absolute, it will typically be `/etc/crontab'.
        Many linux distros expect (and some require) the filename
        portion to consist solely of upper- and lower-case letters
        digits, underscores, and hyphens.
......
[root@ansible-test1 ~]# ansible-doc yum   //查看指定模块的文档
> YUM    (/usr/lib/python2.7/site-packages/ansible/modules/packagi

        Installs, upgrade, downgrades, removes, and lists packages
        groups with the `yum' package manager. This module only wo
        on Python 2. If you require Python 3 support see the [dnf]
        module.

  * This module is maintained by The Ansible Core Team
  * note: This module has a corresponding action plugin.

OPTIONS (= is mandatory):

- allow_downgrade
        Specify if the named package and version is allowed to
        downgrade a maybe already installed higher version of that
        package. Note that setting allow_downgrade=True can make t
        module behave in a non-idempotent way. The task could end
        with a set of packages that does not match the complete li
        of specified packages to install (because dependencies bet
        the downgraded package and others can cause changes to the
        packages which were in the earlier transaction).
        [Default: no]
        type: bool
        version_added: 2.4

- autoremove
        If `yes', removes all "leaf" packages from the system that
        were originally installed as dependencies of user-installe
        packages but which are no longer required by any such pack
        Should be used alone or when state is `absent'
        NOTE: This feature requires yum >= 3.4.3 (RHEL/CentOS 7+)
        [Default: no]
        type: bool
        version_added: 2.7
.....
Ansible playbook使用
3.1 ansible playbook中的使用
相当于把模块写入到配置文件里面,例:
[root@ansible-test1 ansible]# vi /etc/ansible/test.yml
---
- hosts: 192.168.174.31
  remote_user: root
  tasks:
    - name: test_playbook
      shell: touch /tmp/ansible_test.txt
说明:第一行需要有三个杠,hosts参数指定了对哪些主机进行参作,如果是多台机器可以用逗号作为分隔,也可以使用主机组,在/etc/ansible/hosts里定义,user参数指定了使用什么用户登录远程主机操作,tasks指定了一个任务,其下面的name参数同样是对任务的描述,在执行过程中会打印出来,shell是ansible模块名字
[root@ansible-test1 ansible]# ansible-playbook test.yml

PLAY [192.168.174.31] **********************************************************

TASK [Gathering Facts] *********************************************************
ok: [192.168.174.31]

TASK [test_playbook] ***********************************************************
[WARNING]: Consider using the file module with state=touch rather than running
'touch'.  If you need to use command because file is insufficient you can add
'warn: false' to this command task or set 'command_warnings=False' in
ansible.cfg to get rid of this message.
changed: [192.168.174.31]

PLAY RECAP *********************************************************************
192.168.174.31             : ok=2    changed=1    unreachable=0    failed=0    skipped=0    rescued=0    ignored=0
再来一个创建用户的例子:
[root@ansible-test1 ansible]# vi /etc/ansible/create_user.yml
---
- name: create_user
  hosts: 192.168.174.31
  user: root
  gather_facts: false
  vars:
    - user: "test"
  tasks:
    - name: create user
      user: name="{{ user }}"
说明:name参数对该playbook实现的功能做一个概述,后面执行过程中,会打印 name变量的值 ,可以省略;gather_facts参数指定了在以下任务部分执行前,是否先执行setup模块获取主机相关信息,这在后面的task会使用到setup获取的信息时用到;vars参数,指定了变量,这里指字一个user变量,其值为test ,需要注意的是,变量值一定要用引号引住;user提定了调用user模块,name是user模块里的一个参数,而增加的用户名字调用了上面user变量的值。
[root@ansible-test1 ansible]# ansible-playbook create_user.yml

PLAY [create_user] *************************************************************

TASK [create user] *************************************************************
changed: [192.168.174.31]

PLAY RECAP *********************************************************************
192.168.174.31             : ok=1    changed=1    unreachable=0    failed=0    skipped=0    rescued=0    ignored=0
3.2 ansible playbook中的循环
[root@ansible-test1 tmp]# touch 1.txt 2.txt 3.txt
[root@ansible-test1 tmp]# ll
total 8
-rw-r--r--  1 root root  0 Jul 16 07:15 1.txt
-rw-r--r--  1 root root  0 Jul 16 07:15 2.txt
-rw-r--r--  1 root root  0 Jul 16 07:15 3.txt
[root@ansible-test2 tmp]# touch 1.txt 2.txt 3.txt
[root@ansible-test2 tmp]# ll
total 12
-rw-r--r--. 1 root root  7 Jul  2 14:39 123
-rw-r--r--. 1 root root  0 Jul  2 17:20 1.txt
-rw-r--r--. 1 root root  0 Jul  2 17:20 2.txt
-rw-r--r--. 1 root root  0 Jul  2 17:20 3.txt
创建while.yml文件
[root@ansible-test1 ~]# vi /etc/ansible/while.yml
---
- hosts: testhost
  user: root
  tasks:
    - name: change mode for files
      file: path=/tmp/{{ item }} mode=600
      with_items:
       - 1.txt
       - 2.txt
       - 3.txt
说明: with_items为循环的对象
执行while.yml。
[root@ansible-test1 ansible]# ansible-playbook while.yml

PLAY [testhost] ****************************************************************

TASK [Gathering Facts] *********************************************************
ok: [192.168.174.31]
ok: [127.0.0.1]

TASK [change mode for files] ***************************************************
ok: [127.0.0.1] => (item=1.txt)
changed: [192.168.174.31] => (item=1.txt)
ok: [127.0.0.1] => (item=2.txt)
changed: [192.168.174.31] => (item=2.txt)
ok: [127.0.0.1] => (item=3.txt)
changed: [192.168.174.31] => (item=3.txt)

PLAY RECAP *********************************************************************
127.0.0.1                  : ok=2    changed=0    unreachable=0    failed=0    skipped=0    rescued=0    ignored=0
192.168.174.31             : ok=2    changed=1    unreachable=0    failed=0    skipped=0    rescued=0    ignored=0
3.3 ansible playbook中的条件判断
创建when.yml文件。
[root@ansible-test1 ansible]# vi /etc/ansible/when.yml
---
- hosts: testhost
  user: root
  gather_facts: True
  tasks:
    - name: use when
      shell: touch /tmp/when.txt
      when: ansible_eno16777736.ipv4.address == "192.168.174.31"
[root@ansible-test1 ansible]# ansible 192.168.174.31 -m setup
说明:ansible anisble-02 -m setup 可以查看到所有的facter信息
执行when.yml。
[root@ansible-test1 ansible]# ansible-playbook when.yml

PLAY [testhost] ****************************************************************

TASK [Gathering Facts] *********************************************************
ok: [127.0.0.1]
ok: [192.168.174.31]

TASK [use when] ****************************************************************
skipping: [127.0.0.1]
[WARNING]: Consider using the file module with state=touch rather than running
'touch'.  If you need to use command because file is insufficient you can add
'warn: false' to this command task or set 'command_warnings=False' in
ansible.cfg to get rid of this message.
changed: [192.168.174.31]

PLAY RECAP *********************************************************************
127.0.0.1                  : ok=1    changed=0    unreachable=0    failed=0    skipped=1    rescued=0    ignored=0
192.168.174.31             : ok=2    changed=1    unreachable=0    failed=0    skipped=0    rescued=0    ignored=0
3.4 ansible playbook中的handlers
执行task之后,服务器发生变化之后要执行的一些操作,比如我们修改了配置文件后,需要重启一下服务,创建handlers.yml文件加入如下内容
[root@ansible-test1 ansible]# vi /etc/ansible/handlers.yml
---
- name: handlers test
  hosts: 192.168.174.31
  user: root
  tasks:
    - name: copy file
      copy: src=/etc/passwd dest=/tmp/aaa.txt
      notify: test handlers
  handlers:
    - name: test handlers
      shell: echo "111111" >> /tmp/aaa.txt
说明,只有copy模块真正执行后,才会去调用下面的handlers相关的操作。也就是说如果1.txt和2.txt内容是一样的,并不会去执行handlers里面的shell相关命令。 这种比较适合配置文件发生更改后,重启服务的操作。
[root@ansible-test1 ansible]# ansible-playbook handlers.yml

PLAY [handlers test] ***********************************************************

TASK [Gathering Facts] *********************************************************
ok: [192.168.174.31]

TASK [copy file] ***************************************************************
changed: [192.168.174.31]

RUNNING HANDLER [test handlers] ************************************************
changed: [192.168.174.31]

PLAY RECAP *********************************************************************
192.168.174.31             : ok=3    changed=2    unreachable=0    failed=0    skipped=0    rescued=0    ignored=0
Ansible playbook实战
4.1 ansible自动化安装nginx
(1)编译安装nginx
1)使用wget下载nginx包,下载地址:
http://mirrors.sohu.com/nginx/nginx-1.9.6.tar.gz
[root@ansible-test1 ansible]# wget http://mirrors.sohu.com/nginx/nginx-1.9.6.tar.gz
--2021-07-16 07:54:14--  http://mirrors.sohu.com/nginx/nginx-1.9.6.tar.gz
Resolving mirrors.sohu.com (mirrors.sohu.com)... 123.125.123.141
Connecting to mirrors.sohu.com (mirrors.sohu.com)|123.125.123.141|:80... connected.
HTTP request sent, awaiting response... 200 OK
Length: 884733 (864K) [application/octet-stream]
Saving to: ‘nginx-1.9.6.tar.gz’

100%[========================>] 884,733     66.1KB/s   in 13s

2021-07-16 07:54:27 (66.5 KB/s) - ‘nginx-1.9.6.tar.gz’ saved [884733/884733]
2)解压下载的nginx包
安装依赖
[root@ansible-test1 nginx-1.9.6]# yum -y install gcc gcc-c++ pcre-devel zlib-devel openssl-devel
[root@ansible-test1 ansible]# tar zxvf nginx-1.9.6.tar.gz
[root@ansible-test1 nginx-1.9.6]# ./configure --prefix=/usr/local/nginx
[root@ansible-test1 nginx-1.9.6]# make && make install
3)编写/etc/init.d/nginx文件
内容如下:
[root@ansible-test1 nginx-1.9.6]# cat /etc/init.d/nginx
#!/bin/bash
# chkconfig: - 30 21
# description: http service.
# Source Function Library
. /etc/init.d/functions
# Nginx Settings
NGINX_SBIN="/usr/local/nginx/sbin/nginx"
NGINX_CONF="/usr/local/nginx/conf/nginx.conf"
NGINX_PID="/usx/local/nginx/logs/nginx.pid"
RETVAL=0
prog="Nginx"

start()
{
        echo -n $"Starting $prog: "
        mkdir -p /dev/shm/nginx_temp
        daemon $NGINX_SBIN -c $NGINX_CONF
        RETVAL=$?
        echo
        return $RETVAL
}
stop()
{
        echo -n $"Stopping $prog: "
        killproc -p $NGINX_PID $NGINX_SBIN -TERM
        rm -rf /dev/shm/nginx_temp
        RETVAL=$?
        echo
        return $RETVAL
}
reload()
{
        echo -n $"Reloading $prog: "
        killproc -p $NGINX_PID $NGINX_SBIN -HUP
        RETVAL=$?
        echo
        return $RETVAL
}
restart()
{
        stop
        start
}
configtest()
{
        $NGINX_SBIN -c $NGINX_CONF -t
        return 0
}
case "$1" in
        start)
                start
                ;;
        stop)
                stop
                ;;
        reload)
                reload
                ;;
        restart)
                restart
                ;;
        configtest)
                configtest
                ;;
        *)
                echo $"Usage: $0 {start|stop|reload|restart|configtest}"
                RETVAL=1
esac
exit $RETVAL
4)清空配置文件并重新编写
[root@ansible-test1 nginx-1.9.6]# > /usr/local/nginx/conf/nginx.conf
内容如下:
[root@ansible-test1 nginx-1.9.6]# cat /usr/local/nginx/conf/nginx.conf
user nobody nobody;
worker_processes 2;
error_log /usr/local/nginx/logs/nginx_error.log crit;
pid /usr/local/nginx/logs/nginx.pid;
worker_rlimit_nofile 51200;
events
{
use epoll;
worker_connections 6000;
}
http
{
include mime.types;
default_type application/octet-stream;
server_names_hash_bucket_size 3526;
server_names_hash_max_size 4096;
log_format combined_realip '$remote_addr $http_x_forwarded_for [$time_local]'
'$host "$request_uri" $status'
'"$http_referer" "$http_user_agent"';
sendfile on;
tcp_nopush on;
keepalive_timeout 30;
client_header_timeout 3m;
client_body_timeout 3m;
send_timeout 3m;
connection_pool_size 256;
client_header_buffer_size 1k;
large_client_header_buffers 8 4k;
request_pool_size 4k;
output_buffers 4 32k;
postpone_output 1460;
client_max_body_size 10m;
client_body_buffer_size 256k;
client_body_temp_path /usr/local/nginx/client_body_temp;
proxy_temp_path /usr/local/nginx/proxy_temp;
fastcgi_temp_path /usr/local/nginx/fastcgi_temp;
fastcgi_intercept_errors on;
tcp_nodelay on;
gzip on;
gzip_min_length 1k;
gzip_buffers 4 8k;
gzip_comp_level 5;
gzip_http_version 1.1;
gzip_types text/plain application/x-javascript text/css text/htm
application/xml;
server
{
listen 80;
server_name localhost;
index index.html index.htm index.php;
root /usr/local/nginx/html;
location ~ \.php$
{
include fastcgi_params;
fastcgi_pass unix:/tmp/php-fcgi.sock;
fastcgi_index index.php;
fastcgi_param SCRIPT_FILENAME /usr/1ocal/nginx/html$fastcgi_script_name;
}
}
}
5)编写完成后可以检查一下
[root@ansible-test1 nginx-1.9.6]# /usr/local/nginx/sbin/nginx -t
nginx: the configuration file /usr/local/nginx/conf/nginx.conf syntax is ok
nginx: configuration file /usr/local/nginx/conf/nginx.conf test is successful
6)启动nginx
[root@ansible-test1 nginx-1.9.6]# chmod 777 /etc/init.d/nginx
[root@ansible-test1 nginx-1.9.6]# netstat -lntp
Active Internet connections (only servers)
Proto Recv-Q Send-Q Local Address           Foreign Address         State       PID/Program name
tcp        0      0 0.0.0.0:22              0.0.0.0:*               LISTEN      1086/sshd
tcp        0      0 127.0.0.1:25            0.0.0.0:*               LISTEN      2183/master
tcp6       0      0 :::80                   :::*                    LISTEN      1083/httpd
tcp6       0      0 :::22                   :::*                    LISTEN      1086/sshd
tcp6       0      0 ::1:25                  :::*                    LISTEN      2183/master
[root@ansible-test1 nginx-1.9.6]# systemctl stop httpd
[root@ansible-test1 nginx-1.9.6]# service nginx start
Starting nginx (via systemctl):  [  OK  ]
编译安装完成
(2)环境准备
[root@ansible-test1 nginx-1.9.6]# cd
[root@ansible-test1 ~]# cd /etc/ansible/
[root@ansible-test1 ansible]# mkdir nginx_install
[root@ansible-test1 ansible]# cd nginx_install/
[root@ansible-test1 nginx_install]# mkdir -p roles/{common,install}/{handlers,files,meta,tasks,templates,vars}
1)将nginx.tar.gz复制到/etc/ansible/nginx_install/roles/install/files下
手动打包
[root@ansible-test1 ~]# cd /usr/local/
[root@ansible-test1 local]# tar -cvf nginx.tar.gz nginx
nginx/
nginx/sbin/
nginx/sbin/nginx
nginx/conf/
nginx/conf/koi-win
nginx/conf/koi-utf
nginx/conf/win-utf
nginx/conf/mime.types
nginx/conf/mime.types.default
nginx/conf/fastcgi_params
nginx/conf/fastcgi_params.default
nginx/conf/fastcgi.conf
nginx/conf/fastcgi.conf.default
nginx/conf/uwsgi_params
nginx/conf/uwsgi_params.default
nginx/conf/scgi_params
nginx/conf/scgi_params.default
nginx/conf/nginx.conf.default
nginx/conf/nginx.conf
nginx/logs/
nginx/logs/error.log
nginx/logs/nginx.pid
nginx/logs/nginx_error.log
nginx/logs/access.log
nginx/html/
nginx/html/50x.html
nginx/html/index.html
nginx/client_body_temp/
nginx/proxy_temp/
nginx/fastcgi_temp/
nginx/uwsgi_temp/
nginx/scgi_temp/
[root@ansible-test1 local]# ls
bin  games    lib    libexec  nginx.tar.gz  share
etc  include  lib64  nginx    sbin          src
启动脚本和配置文件都放到/etc/ansible/nginx_install/roles/install/template下
[root@ansible-test1 local]# mv nginx.tar.gz /etc/ansible/nginx_install/roles/install/files/
[root@ansible-test1 local]# ls
bin  games    lib    libexec  sbin   src
etc  include  lib64  nginx    share
[root@ansible-test1 local]# cd nginx/
[root@ansible-test1 nginx]# cp conf/nginx.conf /etc/ansible/nginx_install/roles/install/templates/
[root@ansible-test1 nginx]# cp /etc/init.d/nginx /etc/ansible/nginx_install/roles/install/templates/
2)编写需要的yml文件
[root@ansible-test1 ~]# vi /etc/ansible/nginx_install/roles/common/tasks/main.yml
- name: install initialization require software
  yum: name={{ item }} state=installed
  with_items:
    - zlib-devel
    - pcre-devel
[root@ansible-test1 ~]# vi /etc/ansible/nginx_install/roles/install/vars/main.yml
nginx_user: www
nginx_port: 80
nginx_basedir: /usr/local/nginx
[root@ansible-test1 ~]# vi /etc/ansible/nginx_install/roles/install/tasks/copy.yml
- name: Copy Nginx Software
  copy: src=nginx.tar.gz dest=/tmp/nginx.tar.gz owner=root group=r
oot
- name: Uncompression Nginx Software
  shell: tar zxf /tmp/nginx.tar.gz -C /usr/local
- name: Copy Nginx Start Script
  template: src=nginx dest=/etc/init.d/nginx owner=root group=root mode=0755
- name: Copy Nginx Config
  template: src=nginx.conf dest={{ nginx_basedir }}/conf/ owner=root group=root mode=0644
[root@ansible-test1 ~]# vi /etc/ansible/nginx_install/roles/install/tasks/install.yml
- name: Create Nginx User
  user: name={{ nginx_user }} state=present createhome=no shell=/s
bin/nologin
- name: Start Nginx Service
  shell: /etc/init.d/nginx start
- name: Add Boot Start Nginx Service
  shell: chkconfig --level 345 nginx on
- name: Delete Nginx compression files
  shell: rm -rf /tmp/nginx.tar.gz
[root@ansible-test1 ~]# vi /etc/ansible/nginx_install/roles/install/tasks/main.yml
- include: copy.yml
- include: install.yml
[root@ansible-test1 ~]# vi /etc/ansible/nginx_install/install.yml
---
- hosts: 192.168.174.31
  remote_user: root
  gather_facts: True
  roles:
    - common
    - install
(3)执行文件
运行install.yml文件
[root@ansible-test1 ~]# ansible-playbook /etc/ansible/nginx_install/install.yml
注:要检查远程机器存在端口占用,及时卸载。
结果如下:
[root@ansible-test1 ~]# ansible-playbook /etc/ansible/nginx_install/install.yml

PLAY [192.168.174.31] **********************************************************

TASK [Gathering Facts] *********************************************************
ok: [192.168.174.31]

TASK [common : install initialization require software] ************************
[DEPRECATION WARNING]: Invoking "yum" only once while using a loop via
squash_actions is deprecated. Instead of using a loop to supply multiple items
and specifying `name: "{{ item }}"`, please use `name: ['zlib-devel', 'pcre-
devel', 'gcc']` and remove the loop. This feature will be removed in version
2.11. Deprecation warnings can be disabled by setting
deprecation_warnings=False in ansible.cfg.
ok: [192.168.174.31] => (item=[u'zlib-devel', u'pcre-devel', u'gcc'])

TASK [install : Copy Nginx Software] *******************************************
ok: [192.168.174.31]

TASK [install : Uncompression Nginx Software] **********************************
[WARNING]: Consider using the unarchive module rather than running 'tar'.  If
you need to use command because unarchive is insufficient you can add 'warn:
false' to this command task or set 'command_warnings=False' in ansible.cfg to
get rid of this message.
fatal: [192.168.174.31]: FAILED! => {"changed": true, "cmd": "tar zxf /tmp/nginx.tar.gz -C /usr/local", "delta": "0:00:00.044374", "end": "2021-07-02 19:56:54.830307", "msg": "non-zero return code", "rc": 2, "start": "2021-07-02 19:56:54.785933", "stderr": "\ngzip: stdin: not in gzip format\ntar: Child returned status 1\ntar: Error is not recoverable: exiting now", "stderr_lines": ["", "gzip: stdin: not in gzip format", "tar: Child returned status 1", "tar: Error is not recoverable: exiting now"], "stdout": "", "stdout_lines": []}

PLAY RECAP *********************************************************************
192.168.174.31             : ok=3    changed=0    unreachable=0    failed=0    skipped=0    rescued=0    ignored=0
4.2 管理配置文件
生产环境中大多时候是需要管理配置文件的,安装软件包只是在初始化环境的时候用一下。下面我们来写个管理nginx配置文件的playbook。
[root@ansible2nginx_config]#cat
/etc/ansible/nginx_config/roles/new/handlers/main.yml
- name: restart nginx //用于重新加载nginx服务
shell: /etc/init.d/nginx reload
[root@ansible2nginx_config]# cat /etc/ansible/nginx_config/roles/new/tasks/main.yml
- name: copy conf file //复制.conf和hosts文件
copy: src={{ item.src }} dest={{ nginx_basedir }}/{{ item.dest }} backup=yes owner=root group=root mode=0644
with_items:
- { src: nginx.conf, dest: conf/nginx.conf }
- { src: vhosts, dest: conf/ }
notify: restart nginx
[root@ansible2 nginx_config]# cat /etc/ansible/nginx_config/roles/new/vars/main.yml
nginx_basedir: /usr/local/nginx //定义变量
[root@ansible2 nginx_config]# cat update.yml
---
- hosts: 192.168.2.101 //入口文件
user: root
roles:
- new //这里只有new
old目录中的yml文件与new目录中的相同,files中的配置文件不同。
其中new为更新时用到的,old为回滚时用到的,files下面为nginx.conf和vhosts目录,handlers为重启nginx服务的命令
在执行update.yml前,应备份当前配置文件,当执行之后发现错误,则进行回滚操作。关于回滚,需要在执行playbook之前先备份一下旧的配置,所以对于老配置文件的管理一定要严格,千万不能随便去修改线上机器的配置,并且要保证new/files下面的配置和线上的配置一致,命令如下:
# rsync -av /etc/ansible/nginx_config/roles/new/
/etc/ansible/nginx_config/roles/old/
回滚操作就是把旧的配置覆盖,然后重新加载nginx服务, 每次改动nginx配置文件之前先备份到old里,对应目录为/etc/ansible/nginx_config/roles/old/files。
更新操作结果:
[root@ansible-01 nginx_config]# ansible-playbook
/etc/ansible/nginx_config/update.yml
PLAY [testhost] ********************************************************************************************************
TASK [Gathering Facts] *************************************************************************************************
ok: [192.168.2.31]
ok: [127.0.0.1]
TASK [new : copy conf file] ********************************************************************************************
ok: [192.168.2.31] => (item={u'dest': u'conf/nginx.conf', u'src': u'nginx.conf'})
ok: [127.0.0.1] => (item={u'dest': u'conf/nginx.conf', u'src': u'nginx.conf'})
ok: [127.0.0.1] => (item={u'dest': u'conf/', u'src': u'vhosts'})
changed: [192.168.2.31] => (item={u'dest': u'conf/', u'src': u'vhosts'})
RUNNING HANDLER [new : restart nginx] **********************************************************************************
changed: [192.168.2.31]
PLAY RECAP *************************************************************************************************************
127.0.0.1 : ok=2 changed=0 unreachable=0 failed=0 skipped=0 rescued=0 ignored=0
192.168.2.31 : ok=3 changed=2 unreachable=0 failed=0 skipped=0 rescued=0 ignored=0
回滚操作结果:
[root@ansible-01 nginx_config]# ansible-playbook /etc/ansible/nginx_config/rollback.yml
PLAY [testhost] ********************************************************************************************************
TASK [Gathering Facts] *************************************************************************************************
ok: [192.168.2.31]
ok: [127.0.0.1]
TASK [old : copy conf file] ********************************************************************************************
ok: [192.168.2.31] => (item={u'dest': u'conf/nginx.conf', u'src': u'nginx.conf'})
ok: [127.0.0.1] => (item={u'dest': u'conf/nginx.conf', u'src': u'nginx.conf'})
ok: [192.168.2.31] => (item={u'dest': u'conf/', u'src': u'vhosts'})
ok: [127.0.0.1] => (item={u'dest': u'conf/', u'src': u'vhosts'})
PLAY RECAP *************************************************************************************************************
127.0.0.1 : ok=2 changed=0 unreachable=0 failed=0 skipped=0 rescued=0 ignored=0
192.168.2.31 : ok=2 changed=0 unreachable=0 failed=0 skipped=0 rescued=0 ignored=0
注:本次实验并未改变配置文件,故changed为0。
