
SSH框架
整合SSH框架
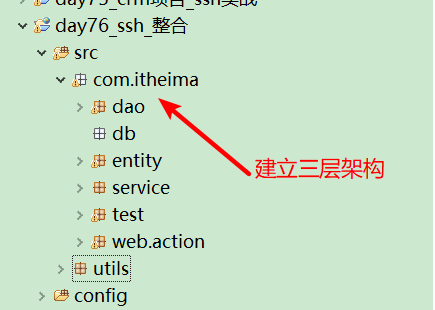
、环境
创建一个web工程,创建实体类、创建业务层接口和实现类、创建持久层接口和实现类
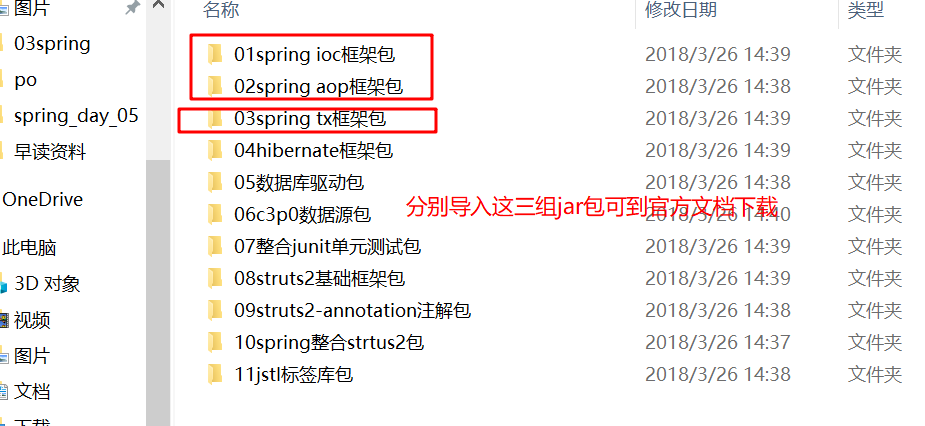
不要导入任何jar包
2、SSH整合【注解】
2.1保证Spring独立运行
1)导入jar包
2)编写spring框架配置文件(applicationContext.xml)
<?xml version="1.0" encoding="UTF-8"?>
<beans xmlns="http://www.springframework.org/schema/beans"
        xmlns:xsi="http://www.w3.org/2001/XMLSchema-instance"
        xmlns:aop="http://www.springframework.org/schema/aop"
        xmlns:context="http://www.springframework.org/schema/context"
        xmlns:tx="http://www.springframework.org/schema/tx" xsi:schemaLocation="
            http://www.springframework.org/schema/beans
            http://www.springframework.org/schema/beans/spring-beans-4.0.xsd
            http://www.springframework.org/schema/tx
            http://www.springframework.org/schema/tx/spring-tx-4.0.xsd
            http://www.springframework.org/schema/aop
            http://www.springframework.org/schema/aop/spring-aop-4.0.xsd
            http://www.springframework.org/schema/context
            http://www.springframework.org/schema/context/spring-context-4.0.xsd">

            <!-- 开启spring对注解包的扫描 -->
            <context:component-scan base-package="com.itheima"></context:component-scan>
3)在实现类上编写创建对象的注解
@Component 衍生注解:@Controller(动作类) 、 @Service(业务层) 、 @Repository(持久层)
此时运行Tomcat服务器无异常报错就表示spring框架环境搭建成功
2.2 保证Hibernate独立运行
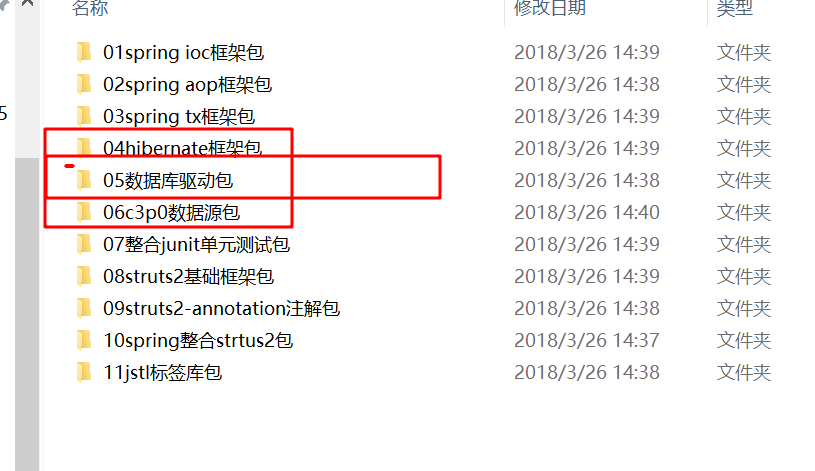
1)导入jar包
2)从ORM入手:编写M(O表示object,R 关系型数据库,M映射文件)
package com.itheima.entity;

import java.io.Serializable;

import javax.persistence.Column;
import javax.persistence.Entity;
import javax.persistence.GeneratedValue;
import javax.persistence.GenerationType;
import javax.persistence.Id;
import javax.persistence.Table;

/**
 * 客户类
 *
 */
@Entity
@Table(name="cus_customer")
public class Customer implements Serializable{
    @Id
    @Column(name="cust_id")
    @GeneratedValue(strategy=GenerationType.IDENTITY)
    private int custId;

    @Column(name="cust_name")
    private String custName;

    @Column(name="cust_source")
    private String custSource;

    @Column(name="cust_industry")
    private String custIndustry;

    @Column(name="cust_level")
    private String custLevel;

    @Column(name="cust_address")
    private String custAddress;

    @Column(name="cust_phone")
    private String custPhone;
    public Customer() {
        super();
    }

    public Customer(String custName, String custSource) {
        super();
        this.custName = custName;
        this.custSource = custSource;
    }

    public int getCustId() {
        return custId;
    }
    public void setCustId(int custId) {
        this.custId = custId;
    }
    public String getCustName() {
        return custName;
    }
    public void setCustName(String custName) {
        this.custName = custName;
    }
    public String getCustSource() {
        return custSource;
    }
    public void setCustSource(String custSource) {
        this.custSource = custSource;
    }
    public String getCustIndustry() {
        return custIndustry;
    }
    public void setCustIndustry(String custIndustry) {
        this.custIndustry = custIndustry;
    }
    public String getCustLevel() {
        return custLevel;
    }
    public void setCustLevel(String custLevel) {
        this.custLevel = custLevel;
    }
    public String getCustAddress() {
        return custAddress;
    }
    public void setCustAddress(String custAddress) {
        this.custAddress = custAddress;
    }
    public String getCustPhone() {
        return custPhone;
    }
    public void setCustPhone(String custPhone) {
        this.custPhone = custPhone;
    }
    @Override
    public String toString() {
        return "Customer [custId=" + custId + ", custName=" + custName
                + ", custSource=" + custSource + ", custIndustry="
                + custIndustry + ", custLevel=" + custLevel + ", custAddress="
                + custAddress + ", custPhone=" + custPhone + "]";
    }

}
3)编写Hibernate的主配置文件
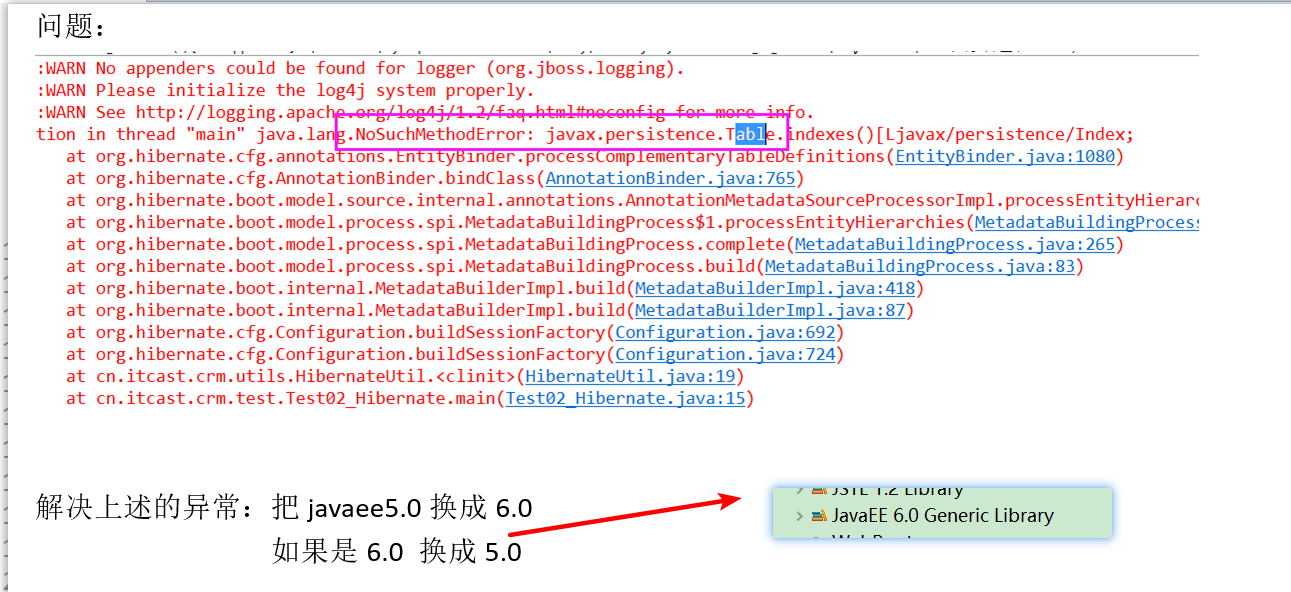
<?xml version="1.0" encoding="UTF-8"?>

<!DOCTYPE hibernate-configuration PUBLIC
    "-//Hibernate/Hibernate Configuration DTD 3.0//EN"
    "http://www.hibernate.org/dtd/hibernate-configuration-3.0.dtd">
<hibernate-configuration>
    <session-factory>
        <!-- 连接数据库四要素 -->
        <!-- hibernate配置参数 -->
        <!-- 映射文件 -->
        <!-- 1. 这里面的配置都能从 \hibernate-release-5.0.7.Final\project\etc\hibernate.properties中找到
            连接数据库四要素 #hibernate.connection.driver_class com.mysql.jdbc.Driver 驱动 #hibernate.connection.url
            jdbc:mysql:///test 域名ip #hibernate.connection.username gavin 数据库用户名 #hibernate.connection.password
            登陆密码 -->
        <property name="hibernate.connection.driver_class">
            com.mysql.jdbc.Driver
        </property>
        <property name="hibernate.connection.url">
            jdbc:mysql://localhost:3306/78_crm
        </property>
        <property name="hibernate.connection.username">root</property>
        <property name="hibernate.connection.password">root</property>

        <!-- 2.hibernate的配置信息 -->
        <!-- 配置数据库方言 -->
        <!-- #hibernate.dialect org.hibernate.dialect.MySQLDialect -->
        <property name="hibernate.dialect">
            org.hibernate.dialect.MySQLDialect
        </property>

        <!-- 配置显示sql语句 hibernate.show_sql true -->
        <property name="hibernate.show_sql">true</property>

        <!-- 格式化sql语句 hibernate.format_sql true -->
        <property name="hibernate.format_sql">true</property>

        <!-- 自动维护表结构 #hibernate.hbm2ddl.auto create-drop :创建完表就删除 #hibernate.hbm2ddl.auto
            create :创建表 #hibernate.hbm2ddl.auto update :没有表就创建表,有表就更新表 #hibernate.hbm2ddl.auto
            validate :验证表 -->

        <property name="hibernate.hbm2ddl.auto">update</property>
        <!-- 配置c3p0链接池 -->
        <!-- org.hibernate.c3p0.internal.C3P0ConnectionProvider #hibernate.connection.provider_class
            org.hibernate.connection.C3P0ConnectionProvider 错误的 要使用新版的 -->
        <property name="hibernate.connection.provider_class">
            org.hibernate.c3p0.internal.C3P0ConnectionProvider
        </property>

        <!-- 把session绑定到线程上 -->
        <!-- <property name="hibernate.current_session_context_class"> thread </property> -->

        <property name="hibernate.current_session_context_class">
            org.springframework.orm.hibernate5.SpringSessionContext
        </property>

        <!-- 3.映射文件位置 -->
        <mapping class="com.itheima.entity.Customer" />
    </session-factory>
</hibernate-configuration>
4)编写工具类
package utils;

import org.hibernate.Session;
import org.hibernate.SessionFactory;
import org.hibernate.cfg.Configuration;

/**
 * HibernateUtil工具类
 */
public class HibernateUtil {

    private static SessionFactory factory;

    static{
        //加载配置文件
        Configuration configuration = new Configuration();
        configuration.configure("/hibernate/hibernate.cfg.xml");

        factory = configuration.buildSessionFactory();
    }


    //从当前线程取出同一个Session

    public static Session getCurrentSession(){

        return factory.getCurrentSession();
    }
}
5)测试
2.3 Spring整合Hibernate
1)Spring接管SessionFactory的创建
applicationContext.xml添加
<?xml version="1.0" encoding="UTF-8"?>
<beans xmlns="http://www.springframework.org/schema/beans"
        xmlns:xsi="http://www.w3.org/2001/XMLSchema-instance"
        xmlns:aop="http://www.springframework.org/schema/aop"
        xmlns:context="http://www.springframework.org/schema/context"
        xmlns:tx="http://www.springframework.org/schema/tx" xsi:schemaLocation="
            http://www.springframework.org/schema/beans
            http://www.springframework.org/schema/beans/spring-beans-4.0.xsd
            http://www.springframework.org/schema/tx
            http://www.springframework.org/schema/tx/spring-tx-4.0.xsd
            http://www.springframework.org/schema/aop
            http://www.springframework.org/schema/aop/spring-aop-4.0.xsd
            http://www.springframework.org/schema/context
            http://www.springframework.org/schema/context/spring-context-4.0.xsd">

            <!-- 开启spring对注解包的扫描 -->
            <context:component-scan base-package="com.itheima"></context:component-scan>
<!-- 配置hibernateTemplate -->
<bean id="hibernateTemplate" class="org.springframework.orm.hibernate5.HibernateTemplate">
<property name="sessionFactory" ref="sessionFactory"></property>
</bean>
<!-- 配置sessionFactory -->
<!-- 独立式整合 -->
<bean id="sessionFactory" class="org.springframework.orm.hibernate5.LocalSessionFactoryBean">
<property name="configLocation" value="classpath:/hibernate/hibernate.cfg.xml"></property>
</bean>
注:上面是独立式整合Hibernate
下面是引入式整合Hibernate(两种都可以)
<!-- 配置sessionFactory对象-->
<bean id="sessionFactory" class="org.springframework.orm.hibernate5.LocalSessionFactoryBean">
<property name="dataSource" ref="dataSource"></property>
<property name="hibernateProperties">
<props>
<!-- 配置数据库方法 -->
<prop key="hibernate.dialect">org.hibernate.dialect.MySQLDialect</prop>
<!-- 配置显示sql语句 -->
<prop key="hibernate.show_sql">true</prop>
<!-- 配置格式化sql语句 -->
<prop key="hibernate.format_sql">false</prop>
<!-- 配置是否维护表结构 -->
<prop key="hibernate.hbm2ddl.auto">update</prop>
<!-- 配置session绑定当前线程上 -->
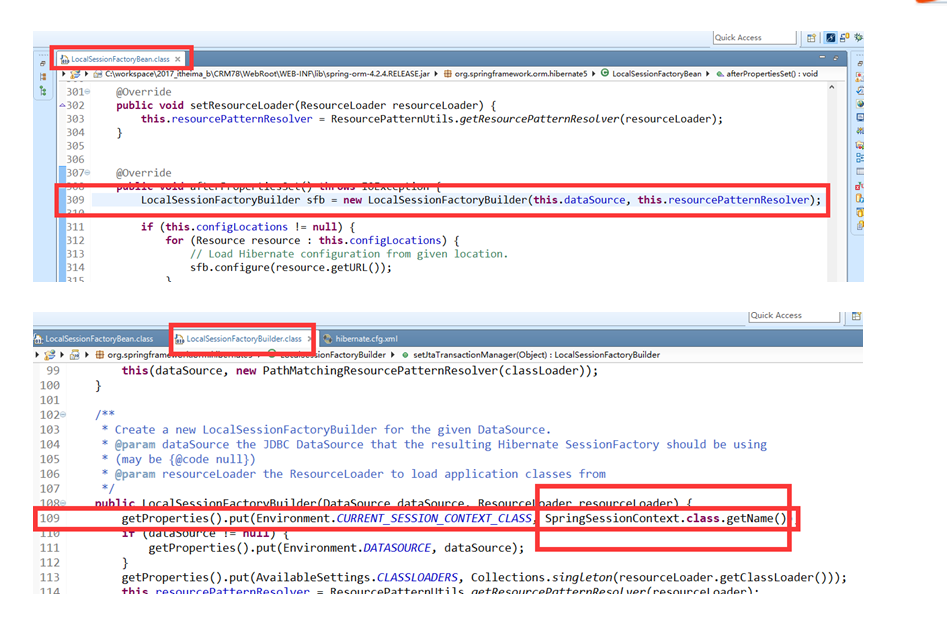
<prop key="hibernate.current_session_context_class">org.springframework.orm.hibernate5.SpringSessionContext</prop>
</props>
</property>
<!-- 映射实体类包 -->
<property name="packagesToScan">
<array>
<value>com.itheima.po</value>
</array>
</property>
</bean>
<!-- 配dataSource数据源 -->
<bean id="dataSource" class="com.mchange.v2.c3p0.ComboPooledDataSource">
<!-- 配置链接数据库的四要素 -->
<property name="driverClass" value="com.mysql.jdbc.Driver"></property>
<property name="jdbcUrl" value="jdbc:mysql://localhost:3306/ssh_crm"></property>
<property name="user" value="root"></property>
<property name="password" value="root"></property>
</bean>
2)HibernateTemplate的使用
我们操作它就相当于操作Session
package com.itheima.dao.imp;

import java.util.List;

import org.springframework.beans.factory.annotation.Autowired;
import org.springframework.orm.hibernate5.HibernateTemplate;
import org.springframework.stereotype.Repository;

import com.itheima.dao.CustomerDao;
import com.itheima.entity.Customer;

/**
 * 持久层实现类
 */
@Repository("customerDao")
public class CustomerDaoImp implements CustomerDao {

    /**
     * 添加客户
     */
    @Autowired
    private HibernateTemplate hibernateTemplate;

    @Override
    public void saveCustomer(Customer customer) {

        hibernateTemplate.save(customer);
    }

    /**
     * 查询客户
     */
    @Override
    public List<Customer> findAllCustomer() {

        return (List<Customer>) hibernateTemplate.find("from Customer");
    }

}
3)配置声明式事务
applicationContext.xml的配置
<?xml version="1.0" encoding="UTF-8"?>
<beans xmlns="http://www.springframework.org/schema/beans"
        xmlns:xsi="http://www.w3.org/2001/XMLSchema-instance"
        xmlns:aop="http://www.springframework.org/schema/aop"
        xmlns:context="http://www.springframework.org/schema/context"
        xmlns:tx="http://www.springframework.org/schema/tx" xsi:schemaLocation="
            http://www.springframework.org/schema/beans
            http://www.springframework.org/schema/beans/spring-beans-4.0.xsd
            http://www.springframework.org/schema/tx
            http://www.springframework.org/schema/tx/spring-tx-4.0.xsd
            http://www.springframework.org/schema/aop
            http://www.springframework.org/schema/aop/spring-aop-4.0.xsd
            http://www.springframework.org/schema/context
            http://www.springframework.org/schema/context/spring-context-4.0.xsd">

            <!-- 开启spring对注解包的扫描 -->
            <context:component-scan base-package="com.itheima"></context:component-scan>

            <!-- 配置hibernateTemplate -->
            <bean id="hibernateTemplate" class="org.springframework.orm.hibernate5.HibernateTemplate">
                <property name="sessionFactory" ref="sessionFactory"></property>
            </bean>

            <!-- 配置sessionFactory -->
            <!-- 独立式整合 -->
            <bean id="sessionFactory" class="org.springframework.orm.hibernate5.LocalSessionFactoryBean">
                <property name="configLocation" value="classpath:/hibernate/hibernate.cfg.xml"></property>
            </bean>

            <!-- 配置平台事务管理器 -->
            <bean id="transactionManager" class="org.springframework.orm.hibernate5.HibernateTransactionManager">
                <property name="sessionFactory" ref="sessionFactory"></property>
            </bean>


            <!-- 配置事务通知 -->
            <tx:advice id="myAdvice" transaction-manager="transactionManager">
                <!-- 配置事务属性 -->
                <tx:attributes>
                    <!-- 配置证删改方法事物传播 -->
                    <tx:method name="save*" propagation="REQUIRED" read-only="false" isolation="DEFAULT"/>
                    <!-- 配置查询方法事物不传播 -->
                    <tx:method name="find*" propagation="SUPPORTS" read-only="true"/>
                </tx:attributes>
            </tx:advice>

            <!--配置Aop -->
            <aop:config>
                <!-- 配置切入点表达式 -->
                <aop:pointcut expression="execution(* com.itheima.service..*.*(..))" id="pt1"/>
                <!-- 建立切入表达式与事务通知的关系 -->
                <aop:advisor advice-ref="myAdvice" pointcut-ref="pt1"/>
            </aop:config>
</beans>
注解的事务:
<!-- 使用注解的事务,要告知Spring框架 -->
    <tx:annotation-driven transaction-manager="transactionManager"/>

    <!-- 在业务层实现类中使用事务注解: @Transactional -->
2.4 保证Struts2独立运行
1)导入jar包
2)从MVC入手:配置Struts2核心控制器
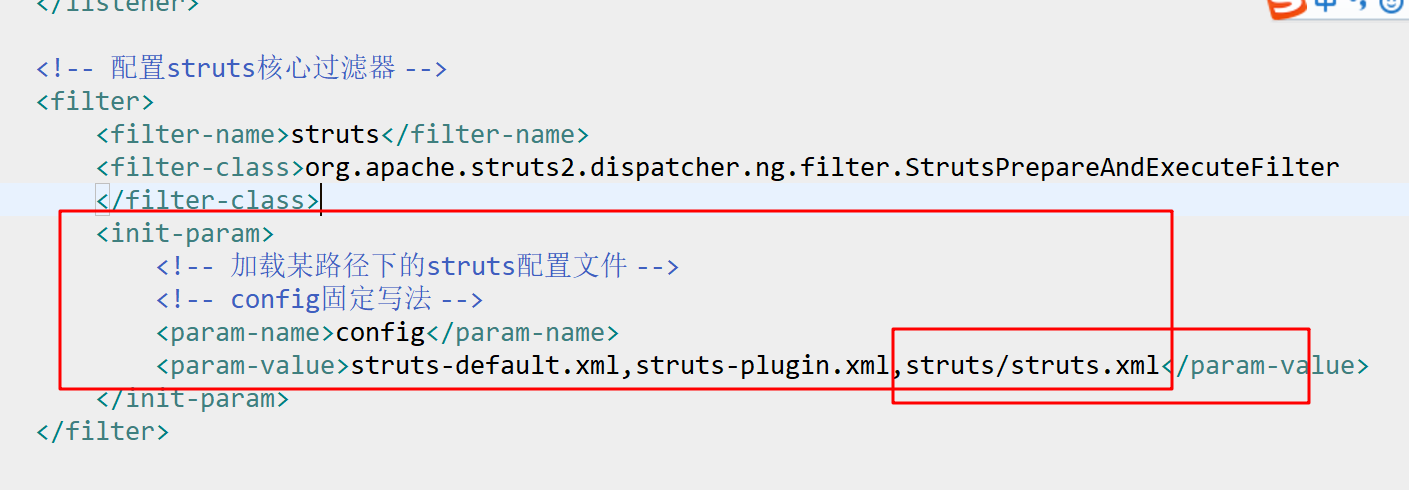
web.xml
<!-- Struts2的核心过滤器 -->
  <filter>
      <filter-name>struts2</filter-name>
      <filter-class>org.apache.struts2.dispatcher.ng.filter.StrutsPrepareAndExecuteFilter</filter-class>
  </filter>
  <filter-mapping>
      <filter-name>struts2</filter-name>
      <url-pattern>/*</url-pattern>
  </filter-mapping>
3)编写配置文件
struts.xml
<?xml version="1.0" encoding="UTF-8"?>

<!DOCTYPE struts PUBLIC
    "-//Apache Software Foundation//DTD Struts Configuration 2.3//EN"
    "http://struts.apache.org/dtds/struts-2.3.dtd">

    <struts>
        <!-- 开启开发者模式 -->
        <constant name="struts.devMode" value="true"></constant>

        <!-- 配置UI模式 -->
        <constant name="struts.ui.theme" value="simple"></constant>

        <!-- 配置公共包 -->
        <package name="myFather" extends="struts-default" abstract="true">
            <global-results>
                <result name="success" type="redirect">/jsp/success.jsp</result>
            </global-results>
        </package>

    </struts>
5)编写动作类
struts.xml
<?xml version="1.0" encoding="UTF-8"?>

<!DOCTYPE struts PUBLIC
    "-//Apache Software Foundation//DTD Struts Configuration 2.3//EN"
    "http://struts.apache.org/dtds/struts-2.3.dtd">

    <struts>
        <!-- 开启开发者模式 -->
        <constant name="struts.devMode" value="true"></constant>

        <!-- 配置UI模式 -->
        <constant name="struts.ui.theme" value="simple"></constant>

        <!-- 配置公共包 -->
        <package name="myFather" extends="struts-default" abstract="true">
            <global-results>
                <result name="success" type="redirect">/jsp/success.jsp</result>
            </global-results>
        </package>

        <!-- 创建Action动作类对象 -->
        <!-- <package name="sun" extends="myFather" namespace="/customer">
            <action name="addCustomerUI" class="com.itheima.web.action.CustomerAction" method="addCustomerUI">
                <result name="addCustomerUI" type="redirect" >/jsp/customer/add.jsp</result>
            </action>
        </package> -->
    </struts>
6)编写动作类
package com.itheima.web.action;

import org.apache.struts2.convention.annotation.Action;
import org.apache.struts2.convention.annotation.Namespace;
import org.apache.struts2.convention.annotation.ParentPackage;
import org.apache.struts2.convention.annotation.Result;
import org.springframework.beans.factory.annotation.Autowired;
import org.springframework.context.annotation.Scope;
import org.springframework.stereotype.Controller;

import com.itheima.entity.Customer;
import com.itheima.service.CustomerService;
import com.opensymphony.xwork2.ActionSupport;
import com.opensymphony.xwork2.ModelDriven;

@Controller("customerAction")//让spring容器管理
@ParentPackage("myFather")//继承包
@Namespace("/customer")//指定命名空间
@Scope("prototype")//Action是多例的
public class CustomerAction extends ActionSupport implements ModelDriven<Customer> {

    //创建模型
    private Customer customer = new Customer();

    @Autowired
    private CustomerService customerService;
    @Override
    public Customer getModel() {
        return customer;
    }

    /**
     * 跳转到添加页面
     */
    @Action(value="addCustomerUI",results={
            @Result(name="addCustomerUI",type="redirect",location="/jsp/customer/add.jsp")
    })
    public String addCustomerUI(){

        return "addCustomerUI";
    }

    /**
     * 添加客户
     */
    @Action(value="addCustomer")//配置文件配置了公共的跳转视图
    public String addCustomer(){
        customerService.saveCustomer(customer);
        return SUCCESS;
    }
}
7)测试
修改引入的struts.xml的位置
2.5 Spring整合Struts2
1)保证一个web项目只有一个Spring容器
ServletContext : 应用域,一个web项目只有一个
把Spring容器放入应用域
监听器:ContextLoaderListner
监听ServletContext启动,如果启动了,就是实例化一个Spring的容器放入这个域中
导入一个jar包:
配置监听器:
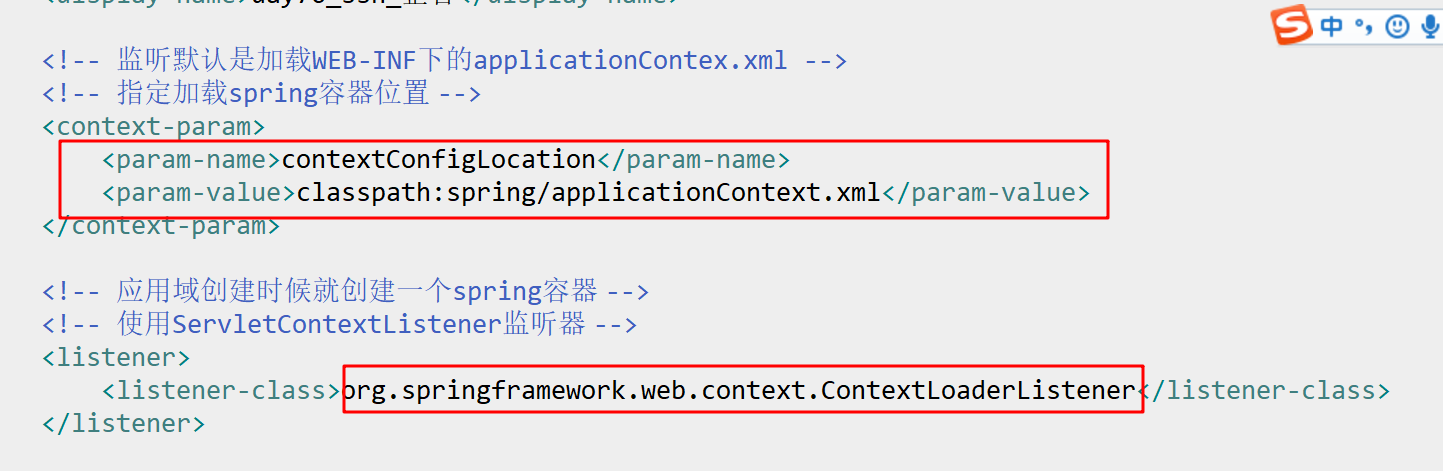
从域中获取Spring容器:
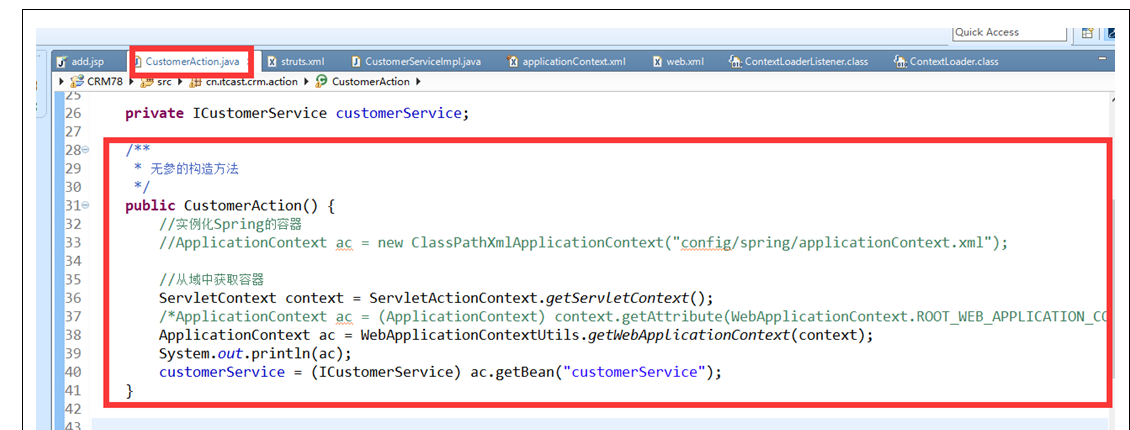
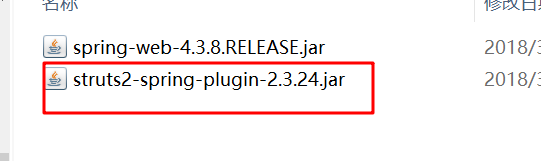
2)把动作类交给Spring管理
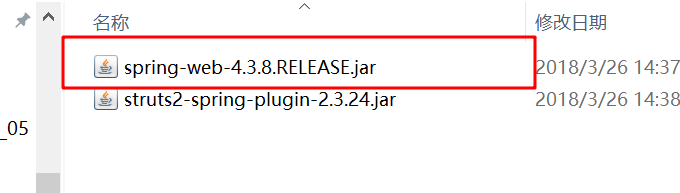
导入jar包:
在动作类上使用创建对象的注解:@Controller
在struts.xml中的class标签,写上动作类在Spring容器的id
最后全部代码
DAO层实现类
package com.itheima.dao.imp;

import java.util.List;

import org.springframework.beans.factory.annotation.Autowired;
import org.springframework.orm.hibernate5.HibernateTemplate;
import org.springframework.stereotype.Repository;

import com.itheima.dao.CustomerDao;
import com.itheima.entity.Customer;

/**
 * 持久层实现类
 */
@Repository("customerDao")
public class CustomerDaoImp implements CustomerDao {

    /**
     * 添加客户
     */
    @Autowired
    private HibernateTemplate hibernateTemplate;

    @Override
    public void saveCustomer(Customer customer) {

        hibernateTemplate.save(customer);
    }

    /**
     * 查询客户
     */
    @Override
    public List<Customer> findAllCustomer() {

        return (List<Customer>) hibernateTemplate.find("from Customer");
    }

}
Service实现类
package com.itheima.service.imp;

import java.util.List;

import org.springframework.beans.factory.annotation.Autowired;
import org.springframework.stereotype.Service;

import com.itheima.dao.CustomerDao;
import com.itheima.entity.Customer;
import com.itheima.service.CustomerService;

/**
 * 业务层实现类
 */
@Service("customerService")
public class CustomerServiceImp implements CustomerService {

    @Autowired
    private CustomerDao customerDao;
    /**
     * 保存客户
     */
    @Override
    public void saveCustomer(Customer customer) {

        customerDao.saveCustomer(customer);
    }

    /**
     * 查询客户
     */
    @Override
    public List<Customer> findAllCustomer() {

        return  customerDao.findAllCustomer();

    }

}
动作类
package com.itheima.web.action;

import org.apache.struts2.convention.annotation.Action;
import org.apache.struts2.convention.annotation.Namespace;
import org.apache.struts2.convention.annotation.ParentPackage;
import org.apache.struts2.convention.annotation.Result;
import org.springframework.beans.factory.annotation.Autowired;
import org.springframework.context.annotation.Scope;
import org.springframework.stereotype.Controller;

import com.itheima.entity.Customer;
import com.itheima.service.CustomerService;
import com.opensymphony.xwork2.ActionSupport;
import com.opensymphony.xwork2.ModelDriven;

@Controller("customerAction")//让spring容器管理
@ParentPackage("myFather")//继承包
@Namespace("/customer")//指定命名空间
@Scope("prototype")//Action是多例的
public class CustomerAction extends ActionSupport implements ModelDriven<Customer> {

    //创建模型
    private Customer customer = new Customer();

    @Autowired
    private CustomerService customerService;
    @Override
    public Customer getModel() {
        return customer;
    }

    /**
     * 跳转到添加页面
     */
    @Action(value="addCustomerUI",results={
            @Result(name="addCustomerUI",type="redirect",location="/jsp/customer/add.jsp")
    })
    public String addCustomerUI(){

        return "addCustomerUI";
    }

    /**
     * 添加客户
     */
    @Action(value="addCustomer")//配置文件配置了公共的跳转视图
    public String addCustomer(){
        customerService.saveCustomer(customer);
        return SUCCESS;
    }
}
测试类
package com.itheima.test;

import java.util.List;

import org.junit.Test;
import org.junit.runner.RunWith;
import org.springframework.beans.factory.annotation.Autowired;
import org.springframework.test.context.ContextConfiguration;
import org.springframework.test.context.junit4.SpringJUnit4ClassRunner;
/**
 *
 * spring 整合junit
 *         1.导入juit jar包
 *         2.导入spring aop/test包
 *         3.使用@RunWith注解,加载spring提供的整合类SpringJUnit4ClassRunner.class
 *         4.使用@ContextConfiguration注解,加载spring配置文件
 */

import com.itheima.entity.Customer;
import com.itheima.service.CustomerService;

@RunWith(SpringJUnit4ClassRunner.class)//替换为Junit运行工具
@ContextConfiguration(locations={"classpath:/spring/applicationContext.xml"})//加载配置文件
public class TestJunit {

    //依赖注入
    @Autowired
    private CustomerService customerService;

    @Test
    public void test01(){
        List<Customer> customer = customerService.findAllCustomer();


        for (Customer customer2 : customer) {

            System.out.println(customer2);
        }
    }

    @Test
    public void test02(){

        Customer customer = new Customer();
        customer.setCustName("万有引力");
        customerService.saveCustomer(customer);
    }
}
配置文件hibernate.cfg.xml
<?xml version="1.0" encoding="UTF-8"?>

<!DOCTYPE hibernate-configuration PUBLIC
    "-//Hibernate/Hibernate Configuration DTD 3.0//EN"
    "http://www.hibernate.org/dtd/hibernate-configuration-3.0.dtd">
<hibernate-configuration>
    <session-factory>
        <!-- 连接数据库四要素 -->
        <!-- hibernate配置参数 -->
        <!-- 映射文件 -->
        <!-- 1. 这里面的配置都能从 \hibernate-release-5.0.7.Final\project\etc\hibernate.properties中找到
            连接数据库四要素 #hibernate.connection.driver_class com.mysql.jdbc.Driver 驱动 #hibernate.connection.url
            jdbc:mysql:///test 域名ip #hibernate.connection.username gavin 数据库用户名 #hibernate.connection.password
            登陆密码 -->
        <property name="hibernate.connection.driver_class">
            com.mysql.jdbc.Driver
        </property>
        <property name="hibernate.connection.url">
            jdbc:mysql://localhost:3306/78_crm
        </property>
        <property name="hibernate.connection.username">root</property>
        <property name="hibernate.connection.password">root</property>

        <!-- 2.hibernate的配置信息 -->
        <!-- 配置数据库方言 -->
        <!-- #hibernate.dialect org.hibernate.dialect.MySQLDialect -->
        <property name="hibernate.dialect">
            org.hibernate.dialect.MySQLDialect
        </property>

        <!-- 配置显示sql语句 hibernate.show_sql true -->
        <property name="hibernate.show_sql">true</property>

        <!-- 格式化sql语句 hibernate.format_sql true -->
        <property name="hibernate.format_sql">true</property>

        <!-- 自动维护表结构 #hibernate.hbm2ddl.auto create-drop :创建完表就删除 #hibernate.hbm2ddl.auto
            create :创建表 #hibernate.hbm2ddl.auto update :没有表就创建表,有表就更新表 #hibernate.hbm2ddl.auto
            validate :验证表 -->

        <property name="hibernate.hbm2ddl.auto">update</property>
        <!-- 配置c3p0链接池 -->
        <!-- org.hibernate.c3p0.internal.C3P0ConnectionProvider #hibernate.connection.provider_class
            org.hibernate.connection.C3P0ConnectionProvider 错误的 要使用新版的 -->
        <property name="hibernate.connection.provider_class">
            org.hibernate.c3p0.internal.C3P0ConnectionProvider
        </property>

        <!-- 把session绑定到线程上 -->
        <!-- <property name="hibernate.current_session_context_class"> thread </property> -->

        <property name="hibernate.current_session_context_class">
            org.springframework.orm.hibernate5.SpringSessionContext
        </property>

        <!-- 3.映射文件位置 -->
        <mapping class="com.itheima.entity.Customer" />
    </session-factory>
</hibernate-configuration>
applicationContext.xml
<?xml version="1.0" encoding="UTF-8"?>
<beans xmlns="http://www.springframework.org/schema/beans"
        xmlns:xsi="http://www.w3.org/2001/XMLSchema-instance"
        xmlns:aop="http://www.springframework.org/schema/aop"
        xmlns:context="http://www.springframework.org/schema/context"
        xmlns:tx="http://www.springframework.org/schema/tx" xsi:schemaLocation="
            http://www.springframework.org/schema/beans
            http://www.springframework.org/schema/beans/spring-beans-4.0.xsd
            http://www.springframework.org/schema/tx
            http://www.springframework.org/schema/tx/spring-tx-4.0.xsd
            http://www.springframework.org/schema/aop
            http://www.springframework.org/schema/aop/spring-aop-4.0.xsd
            http://www.springframework.org/schema/context
            http://www.springframework.org/schema/context/spring-context-4.0.xsd">

            <!-- 开启spring对注解包的扫描 -->
            <context:component-scan base-package="com.itheima"></context:component-scan>

            <!-- 配置hibernateTemplate -->
            <bean id="hibernateTemplate" class="org.springframework.orm.hibernate5.HibernateTemplate">
                <property name="sessionFactory" ref="sessionFactory"></property>
            </bean>

            <!-- 配置sessionFactory -->
            <!-- 独立式整合 -->
            <bean id="sessionFactory" class="org.springframework.orm.hibernate5.LocalSessionFactoryBean">
                <property name="configLocation" value="classpath:/hibernate/hibernate.cfg.xml"></property>
            </bean>

            <!-- 配置平台事务管理器 -->
            <bean id="transactionManager" class="org.springframework.orm.hibernate5.HibernateTransactionManager">
                <property name="sessionFactory" ref="sessionFactory"></property>
            </bean>


            <!-- 配置事务通知 -->
            <tx:advice id="myAdvice" transaction-manager="transactionManager">
                <!-- 配置事务属性 -->
                <tx:attributes>
                    <!-- 配置证删改方法事物传播 -->
                    <tx:method name="save*" propagation="REQUIRED" read-only="false" isolation="DEFAULT"/>
                    <!-- 配置查询方法事物不传播 -->
                    <tx:method name="find*" propagation="SUPPORTS" read-only="true"/>
                </tx:attributes>
            </tx:advice>

            <!--配置Aop -->
            <aop:config>
                <!-- 配置切入点表达式 -->
                <aop:pointcut expression="execution(* com.itheima.service..*.*(..))" id="pt1"/>
                <!-- 建立切入表达式与事务通知的关系 -->
                <aop:advisor advice-ref="myAdvice" pointcut-ref="pt1"/>
            </aop:config>
</beans>
struts.xml
<?xml version="1.0" encoding="UTF-8"?>

<!DOCTYPE struts PUBLIC
    "-//Apache Software Foundation//DTD Struts Configuration 2.3//EN"
    "http://struts.apache.org/dtds/struts-2.3.dtd">

    <struts>
        <!-- 开启开发者模式 -->
        <constant name="struts.devMode" value="true"></constant>

        <!-- 配置UI模式 -->
        <constant name="struts.ui.theme" value="simple"></constant>

        <!-- 配置公共包 -->
        <package name="myFather" extends="struts-default" abstract="true">
            <global-results>
                <result name="success" type="redirect">/jsp/success.jsp</result>
            </global-results>
        </package>

        <!-- 创建Action动作类对象 -->
        <!-- <package name="sun" extends="myFather" namespace="/customer">
            <action name="addCustomerUI" class="com.itheima.web.action.CustomerAction" method="addCustomerUI">
                <result name="addCustomerUI" type="redirect" >/jsp/customer/add.jsp</result>
            </action>
        </package> -->
    </struts>
web.xml
<?xml version="1.0" encoding="UTF-8"?>
<web-app xmlns:xsi="http://www.w3.org/2001/XMLSchema-instance"
    xmlns="http://java.sun.com/xml/ns/javaee"
    xsi:schemaLocation="http://java.sun.com/xml/ns/javaee http://java.sun.com/xml/ns/javaee/web-app_2_5.xsd"
    id="WebApp_ID" version="2.5">
    <display-name>day76_ssh_整合</display-name>

    <!-- 监听默认是加载WEB-INF下的applicationContex.xml -->
    <!-- 指定加载spring容器位置 -->
    <context-param>
        <param-name>contextConfigLocation</param-name>
        <param-value>classpath:spring/applicationContext.xml</param-value>
    </context-param>

    <!-- 应用域创建时候就创建一个spring容器 -->
    <!-- 使用ServletContextListener监听器 -->
    <listener>
        <listener-class>org.springframework.web.context.ContextLoaderListener</listener-class>
    </listener>

    <!-- 配置struts核心过滤器 -->
    <filter>
        <filter-name>struts</filter-name>
        <filter-class>org.apache.struts2.dispatcher.ng.filter.StrutsPrepareAndExecuteFilter
        </filter-class>
        <init-param>
            <!-- 加载某路径下的struts配置文件 -->
            <!-- config固定写法 -->
            <param-name>config</param-name>
            <param-value>struts-default.xml,struts-plugin.xml,struts/struts.xml</param-value>
        </init-param>
    </filter>


    <filter-mapping>
        <filter-name>struts</filter-name>
        <url-pattern>/*</url-pattern>
    </filter-mapping>

    <welcome-file-list>
        <welcome-file>index.html</welcome-file>
        <welcome-file>index.htm</welcome-file>
        <welcome-file>index.jsp</welcome-file>
        <welcome-file>default.html</welcome-file>
        <welcome-file>default.htm</welcome-file>
        <welcome-file>default.jsp</welcome-file>
    </welcome-file-list>
</web-app>
=================================================================================================================================================
有很多梦想都是遥不可及的,除非你能坚持。
=================================================================================================================================================

 浙公网安备 33010602011771号