MySQL基本操作
1.1 MySQL 三种数据类型(数值,字符串,日期)
1、数值格式有哪
|
数值型分为两种: 1. 整形 2. 浮点型 |
整形常用有5类 |
非常小的整形 |
1字节:-128~127;0~255 |
Tinyint |
|
较小的整形 |
2字节:-32768~32767 |
Smallint |
||
|
中等大小整形 |
3字节:0~224 |
Mediumint |
||
|
标准整形 |
4字节:0~232 |
int |
||
|
大整形 |
8字节:0~264 |
Bigint |
||
|
浮点型有3类 |
Float(H,D) |
4字节 |
||
|
Double(H,D) |
8字节 |
|||
|
Decinal(H,D)定点数 |
H+2字节 |
|||
2、字符串格式有哪些
|
字符型分为4类 |
Char(n) |
255(固定长度) |
常用于长度不变的(如:性名列)索引快,但浪费空间 |
|
varchar |
255(可变长度) |
节省空间但索引慢 |
|
|
text |
216-1 |
文本数据(文章) |
|
|
blog |
|
二进制数据(相片) |
3、日期型
|
Date(日期) |
YYYY-MM-DD |
|
TIME(时间) |
hh:mm:ss |
|
DATETIME(日期和时间) |
YYYY-MM-DD hh:mm:ss |
|
TIMESTAMP(时间戳) |
YYYYMMDDhhmmss |
|
YEAR(年) |
YYYY |
1.2 MySQL常用增删改查命令
1、创建数据库和表
1. 创建数据库
mysql> show databases;
mysql> create database tomdb charset utf8; #创建数据库tomdb,使用utf-8做字符编码
mysql> use tomdb #选择使用tomdb数据库
mysql> drop database tomdb;
mysql> show create database tomdb; # 查看创建数据库的语法
2.创建表结构
mysql> show tables
mysql> desc student;
mysql> drop table student;


create table student(
id int auto_increment,
name char(32) not null,
age int not null,
register_data date not null,
primary key (id));

mysql> create table student(               #在tomdb数据库中创建表:student
    -> id int auto_increment,              #在表中创建第一个字段:“id”
    -> name char(32) not null,             #在表中创建第二个字段:“name”
    -> age int not null,                   #在表中创建第三个字段:“age”
    -> register_data date not null,        #在表中创建第四个字段:日期
    -> primary key (id));                  #将表的主键设置为字段:“id
Query OK, 0 rows affected (0.10 sec)       #这里是创建成功的提示
create table MyClass(
id int(4) not null primary key auto_increment,
name char(20) not null,
sex int(4) not null default '0',
degree double(16,2));
2、插入数据
mysql> desc student; # 查看student表所有字段
mysql> insert into student(name,age,register_data) values("zhangsan",100,"2016-06-20");
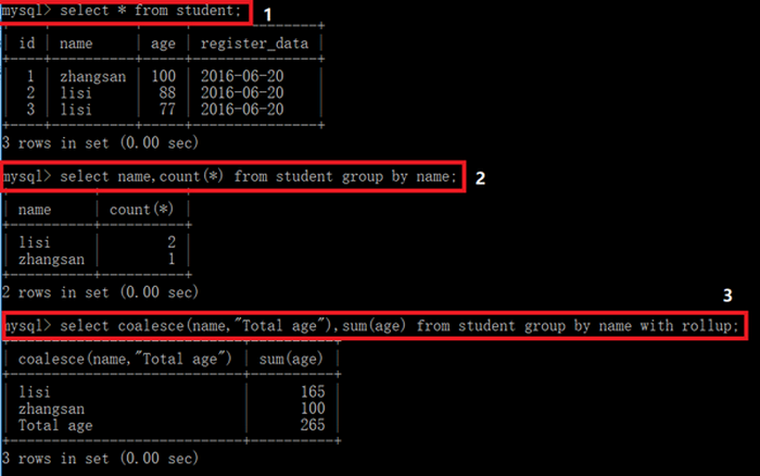
mysql> select * from student; #查看student表有哪些数据
3、常用查询语句
1. 最基本查询语句
mysql> select * from student limit 2; #仅查看student表中前两行数据
mysql> select * from student limit 5 offset 3; #从第三行开始查询,并且只显示5行数据
2. where; like; order by;使用
mysql> select * from student where id >3 and age >103;
mysql> select * from student where register_data like "2016-06%"; #查询所有在2016-06这一条新建的条目
mysql> select * from student order by id desc; #按主键降续
mysql> select * from student order by id asc; #按主键升续排序(默认升续)
mysql> select * from student where name like binary "%si" order by id desc; #查找名字以“si”结尾的所有条目,并且按照id降续排列
3. GROUP BY 语句:指定以什么分组(比如可以统计出有多少同名数据)
mysql> select name,count(*) from student group by name;
mysql> select coalesce(name,"Total age"),sum(age) from student group by name with rollup;
4、修改(update)
mysql> update student set name="lisi",age=22 where id=1; #将表中id=1的条目改成name=lisi,age=22
mysql> update student set name="lisi",age=22 where id>4; #上面仅仅修改一条,这里修改id>4的所有
5、删除(delete)
mysql> delete from student where name="zhangsan"; #删除student表中所有name=“zhangsan”
1.3 删除,添加或修改表字段
1、添加一个字段(add)
mysql> alter table student add sex enum("M","F"); #添加一个字段sex,只能用M,或者F
mysql> insert into student(name,age,register_data,sex) values("zhangsan",100,"2016-06-20","M");
mysql> ALTER TABLE user MODIFY COLUMN NAME VARCHAR(50) default null; # 修改字段属性
mysql> ALTER TABLE user CHANGE name new_name char(32); # 修改字段名称
2、删除一个字段(drop)
mysql> alter table student drop age; #删除student表的age字段
3、仅能修改一个字段的属性(modify)
mysql> alter table student modify sex enum("F","M") not null; #修改刚创建的student表属性不能为空
4、把字段的名字也能改掉(change)
mysql> alter table student change sex gender char(32) not null default "x"; #将sex字段名由sex改成gender,设置不能为空,默认值为“x”
5、修改表名
mysql> alter table student rename to student_table; #将表名从student修改成student_table
6、删除有依赖关系的表
导入sql文件前,取消外键检查:set foreign_key_checks=0;
导入sql文件后,加入外键检查:set foreign_key_checks=1;
7、django中,在已有表添加新字段和新外键关系手动解决migrate失败问题
1. 添加普通字段
#1、将notify_notifybytagrelation表添加一个新字段max_times,为int类型,不为空,默认值为0
alter table notify_notifybytagrelation add column max_times int not null default 0;
2. 创建外键关联的表
create table notify_tagnotifygroup(
id int auto_increment,
name char(255) not null,
notify_interval int not null default 0,
max_times int not null default 0,
primary key (id));
1.4 MySQL外键关联(一对多)
1、外键说明
1. 什么是外键?
1)表A中有字段(如身份证号)做了主键,表B中也有这个字段(身份证号),这里的身份证号一定来自表A同样字段里的内容,但再B表中身份证号对应id可以重复
2)那么表B的这个字段就叫表A字段的外键,也就是两个表以身份证号这个字段建立了联系。
2. 外键作用
1)为了一张表记录的数据不要太过冗余。
2)保持数据的一致性、完整性。
一致性: 外键的作用就是可以让身份证号保证是来自表A中,也就是保证了数据的一致性;
完整性: 如果要删除A表中的某个身份证号,那么首先要删除B表中同样的身份证号,这保证了数据的完整性
2、创建学生表(student), 和学生每天上课记录表(student_record)
1. 创建student和student_record表
#1、student表
create table student(
id int auto_increment,
name char(32) not null,
age int not null,
register_data date not null,
primary key (id))
engine=InnoDB
;

#2、student_record表
create table study_record (
  id int(11) auto_increment,
  day int NOT NULL,
  status char(32) NOT NULL,
  stu_id int(11) NOT NULL,
  primary key (id),
  CONSTRAINT fk_student_key FOREIGN KEY (stu_id) REFERENCES student (id)
)
engine=InnoDB
;
2. 在student表中创建两条记录
mysql> insert into student(name,age,register_data) values("zhangsan",100,"2016-06-20");
mysql> insert into student(name,age,register_data) values("lisi",101,"2016-06-21");
3. 在student_record表中创建与student表的关联记录(day,status,stu_id)
mysql> insert into study_record (day,status,stu_id) values(1,"yes",1); # student表id=1第一天到了
mysql> insert into study_record (day,status,stu_id) values(1,"yes",2); # student表id=2第一天到了
mysql> insert into study_record (day,status,stu_id) values(1,"yes",3); # 会报错,因为student没id=3
4. 如果有student表中有student_record表关联的数据,你是不能删除student表中的记录(报错)
mysql> delete from student where name='lisi';
5. 查看刚刚创建study_record表结构创建记录
mysql> show create table study_record;
6. 使用左连接查询student表中学生每天上课记录
mysql> select name,day,status from student left join study_record on student.id=study_record.stu_id;

3、django在model中添加一对多字段后migrate报错,手动解决冲突
1. 添加普通字段(django model中添加 max_times 字段)
alter table notify_notifybytagrelation add column max_times int not null;
2. 创建外键关联的表(django model添加了notify_tagnotifygroup表)
create table notify_tagnotifygroup(
id int auto_increment,
name char(255) not null,
notify_interval int not null,
max_times int not null,
primary key (id));
3. 添加外键(django model中已有表的group_notify字段关联了2中的表,一对多)
1)添加字段(这个字段作为本表外键)
alter table notify_notifybytagrelation add column group_notify_id int;
2)创建外键关系(将上面创建的 group_notify_id 外键添加外键关系)
# 说明:notify_notifybytagrelation 表中的group_notify_id作为外键关联notify_tagnotifygroup表的主键id
alter table notify_notifybytagrelation add foreign key(group_notify_id) references notify_tagnotifygroup(id);
4、mysql手动创建和删除外键约束
参考博客:https://blog.csdn.net/wyswlp/article/details/8881103
1. 创建student和student_record表
#1、student表
create table student(
id int auto_increment,
name char(32) not null,
age int not null,
primary key (id))
engine=InnoDB
;

#2、student_record表
create table study_record (
  id int(11) auto_increment,
  day int NOT NULL,
  status char(32) NOT NULL,
  primary key (id))
engine=InnoDB
;
2. 手动创建外键关联的字段和外键约束
alter table study_record add column stu_id int; # 创建stu_id作为外键关联字段
# 说明:创建外键约束study_record 表中的 stu_id 字段 一对多外键关联 student 表的 id 字段
alter table study_record add foreign key(stu_id) references student(id);
3. 查看数据库表创建的sql语句
mysql> show create table study_record;
| study_record | CREATE TABLE `study_record` (
  `id` int(11) NOT NULL AUTO_INCREMENT,
  `day` int(11) NOT NULL,
  `status` char(32) NOT NULL,
  `stu_id` int(11) DEFAULT NULL,
  PRIMARY KEY (`id`),
  KEY `stu_id` (`stu_id`),
  CONSTRAINT `study_record_ibfk_1` FOREIGN KEY (`stu_id`) REFERENCES `student` (`id`)
) ENGINE=InnoDB DEFAULT CHARSET=utf8 |
4. 解除外键约束
alter table study_record drop foreign key study_record_ibfk_1;
| study_record | CREATE TABLE `study_record` (
  `id` int(11) NOT NULL AUTO_INCREMENT,
  `day` int(11) NOT NULL,
  `status` char(32) NOT NULL,
  `stu_id` int(11) DEFAULT NULL,
  PRIMARY KEY (`id`),
  KEY `stu_id` (`stu_id`)
) ENGINE=InnoDB DEFAULT CHARSET=utf8 |
5. 删除外键
mysql> alter table study_record drop stu_id;
| study_record | CREATE TABLE `study_record` (
  `id` int(11) NOT NULL AUTO_INCREMENT,
  `day` int(11) NOT NULL,
  `status` char(32) NOT NULL,
  PRIMARY KEY (`id`)
) ENGINE=InnoDB DEFAULT CHARSET=utf8 |
5、手动创建django表关联关系
class NewFlowUserRoleActionConf(models.Model):
    flowconf = models.ForeignKey(FlowConf, verbose_name='流程审批名称')
    approvetype = models.CharField(max_length=32, verbose_name='审批类型')
    sequence = models.IntegerField(verbose_name='审批序号')
    approvetogroupuser = models.BooleanField(default=True, verbose_name='是否允许指派组内执行')
    approvetorole = models.BooleanField(default=False, verbose_name='是否角色组审批')

create table workflow_newflowuserroleactionconf (
  id int(11) auto_increment,
  flowconf_id int NOT NULL,
  approvetype char(64) NOT NULL,
  sequence int NOT NULL,
  approvetogroupuser int NOT NULL,
  approvetorole int NOT NULL,
  primary key (id),
  CONSTRAINT fk_workflow_flowconf_key FOREIGN KEY (flowconf_id) REFERENCES workflow_newflowuserroleactionconf (id)
)
engine=InnoDB
;
1.5 MySQL连接查询:两个表之间外键关联
1. left join (左连接:两个表的差集)
1、左连接where只影向右表,所以左表(student)中数据全部显示,右表study_record表中不符合where条件的数据不会显示
2、select * from student left join study_record on student.id=study_record.stu_id;

2. right join (右连接:两个表的差集)
1、右连接where只影向左表,所以左表(student)中不符合where条件的数据不会显示,右表study_record表内容全部显示
2、select * from student right join study_record on student.id=study_record.stu_id;

3. inner join (内连接:两个表的交集)
inner join:理解为“有效连接”,两张表中都有的数据才会显示left join
select * from student inner join study_record on student.id=study_record.stu_id; # 等价于面这条语句
select * from student,study_record where study_record.stu_id = student.id;

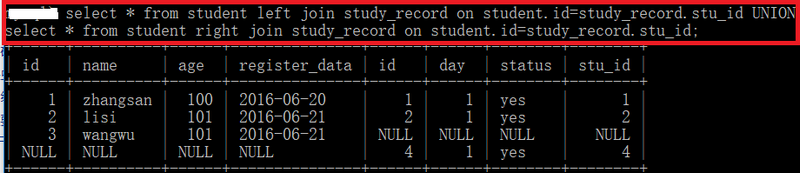
4. Full join(两个表的并集)
select * from a FULL JOIN b on a.a = b.b; # MySQL不支持这个命令(可以使用下面语句代替,两行是一个语句)
select * from student left join study_record on student.id=study_record.stu_id UNION
select * from student right join study_record on student.id=study_record.stu_id;
1.6 mysql导入导出
参考博客:https://www.cnblogs.com/chandb/p/7425680.html
1、首先linux 下查看mysql相关目录
[root@op-workorder bin]# whereis mysql
mysql: /usr/bin/mysql /usr/lib64/mysql /usr/include/mysql
2、导出数据库用mysqldump命令
cd /home/work/mysql/bin # 先cd到mysql的运行路径下,再执行一下命令
1. 导出数据和表结构
./mysqldump -uroot -p bsp > bsp.sql
mysqldump -u用户名 -p密码 数据库名 > 数据库名.sql
2. 只导出表结构
mysqldump -u用户名 -p密码 -d 数据库名 > 数据库名.sql
mysqldump -uroot -p -d dbname > dbname .sql
3、导入数据库
1、首先建空数据库
mysql>create database bsp charset utf8;
2、导入数据库(方法一)
(1)选择数据库
mysql>use bsp;
(2)导入数据(注意sql文件的路径)
mysql>source /home/work/project/bsp/bsp.sql
3、导入数据库(方法二)
mysql -u用户名 -p密码 数据库名 < 数据库名.sql
4、执行导出数据库报错问题解决
报错:mysqldump: Couldn't execute 'SHOW VARIABLES LIKE 'gtid\_mode'': Table 'performance_schema.session_variables' doesn't exist (1146)
1)mysql_upgrade -u root -p --force #更新
2)service mysql restart #restart mysql service
3)mysqldump -u root -p test > test.sql #重新备份数据
