
合宙ESP32C3使用PlatformIO开发点亮ST7735S
开发背景
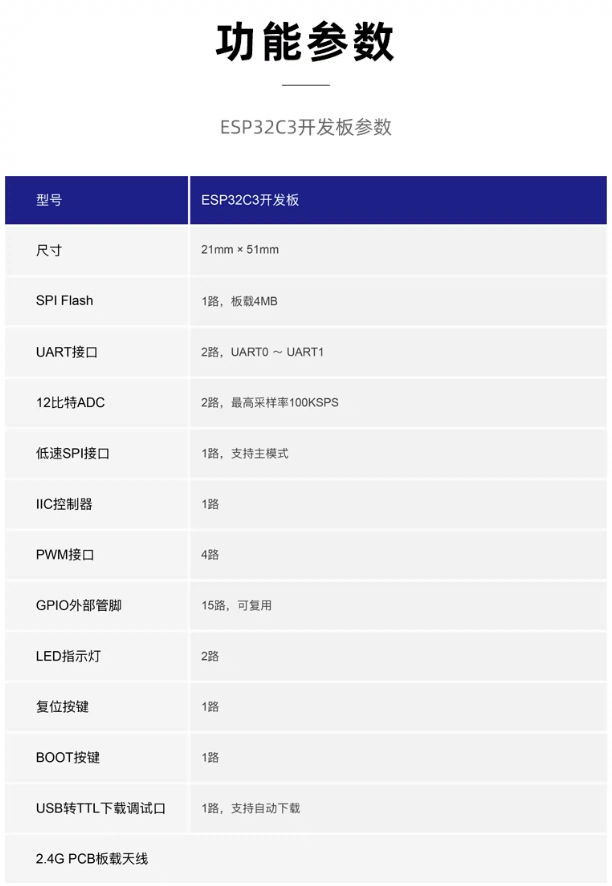
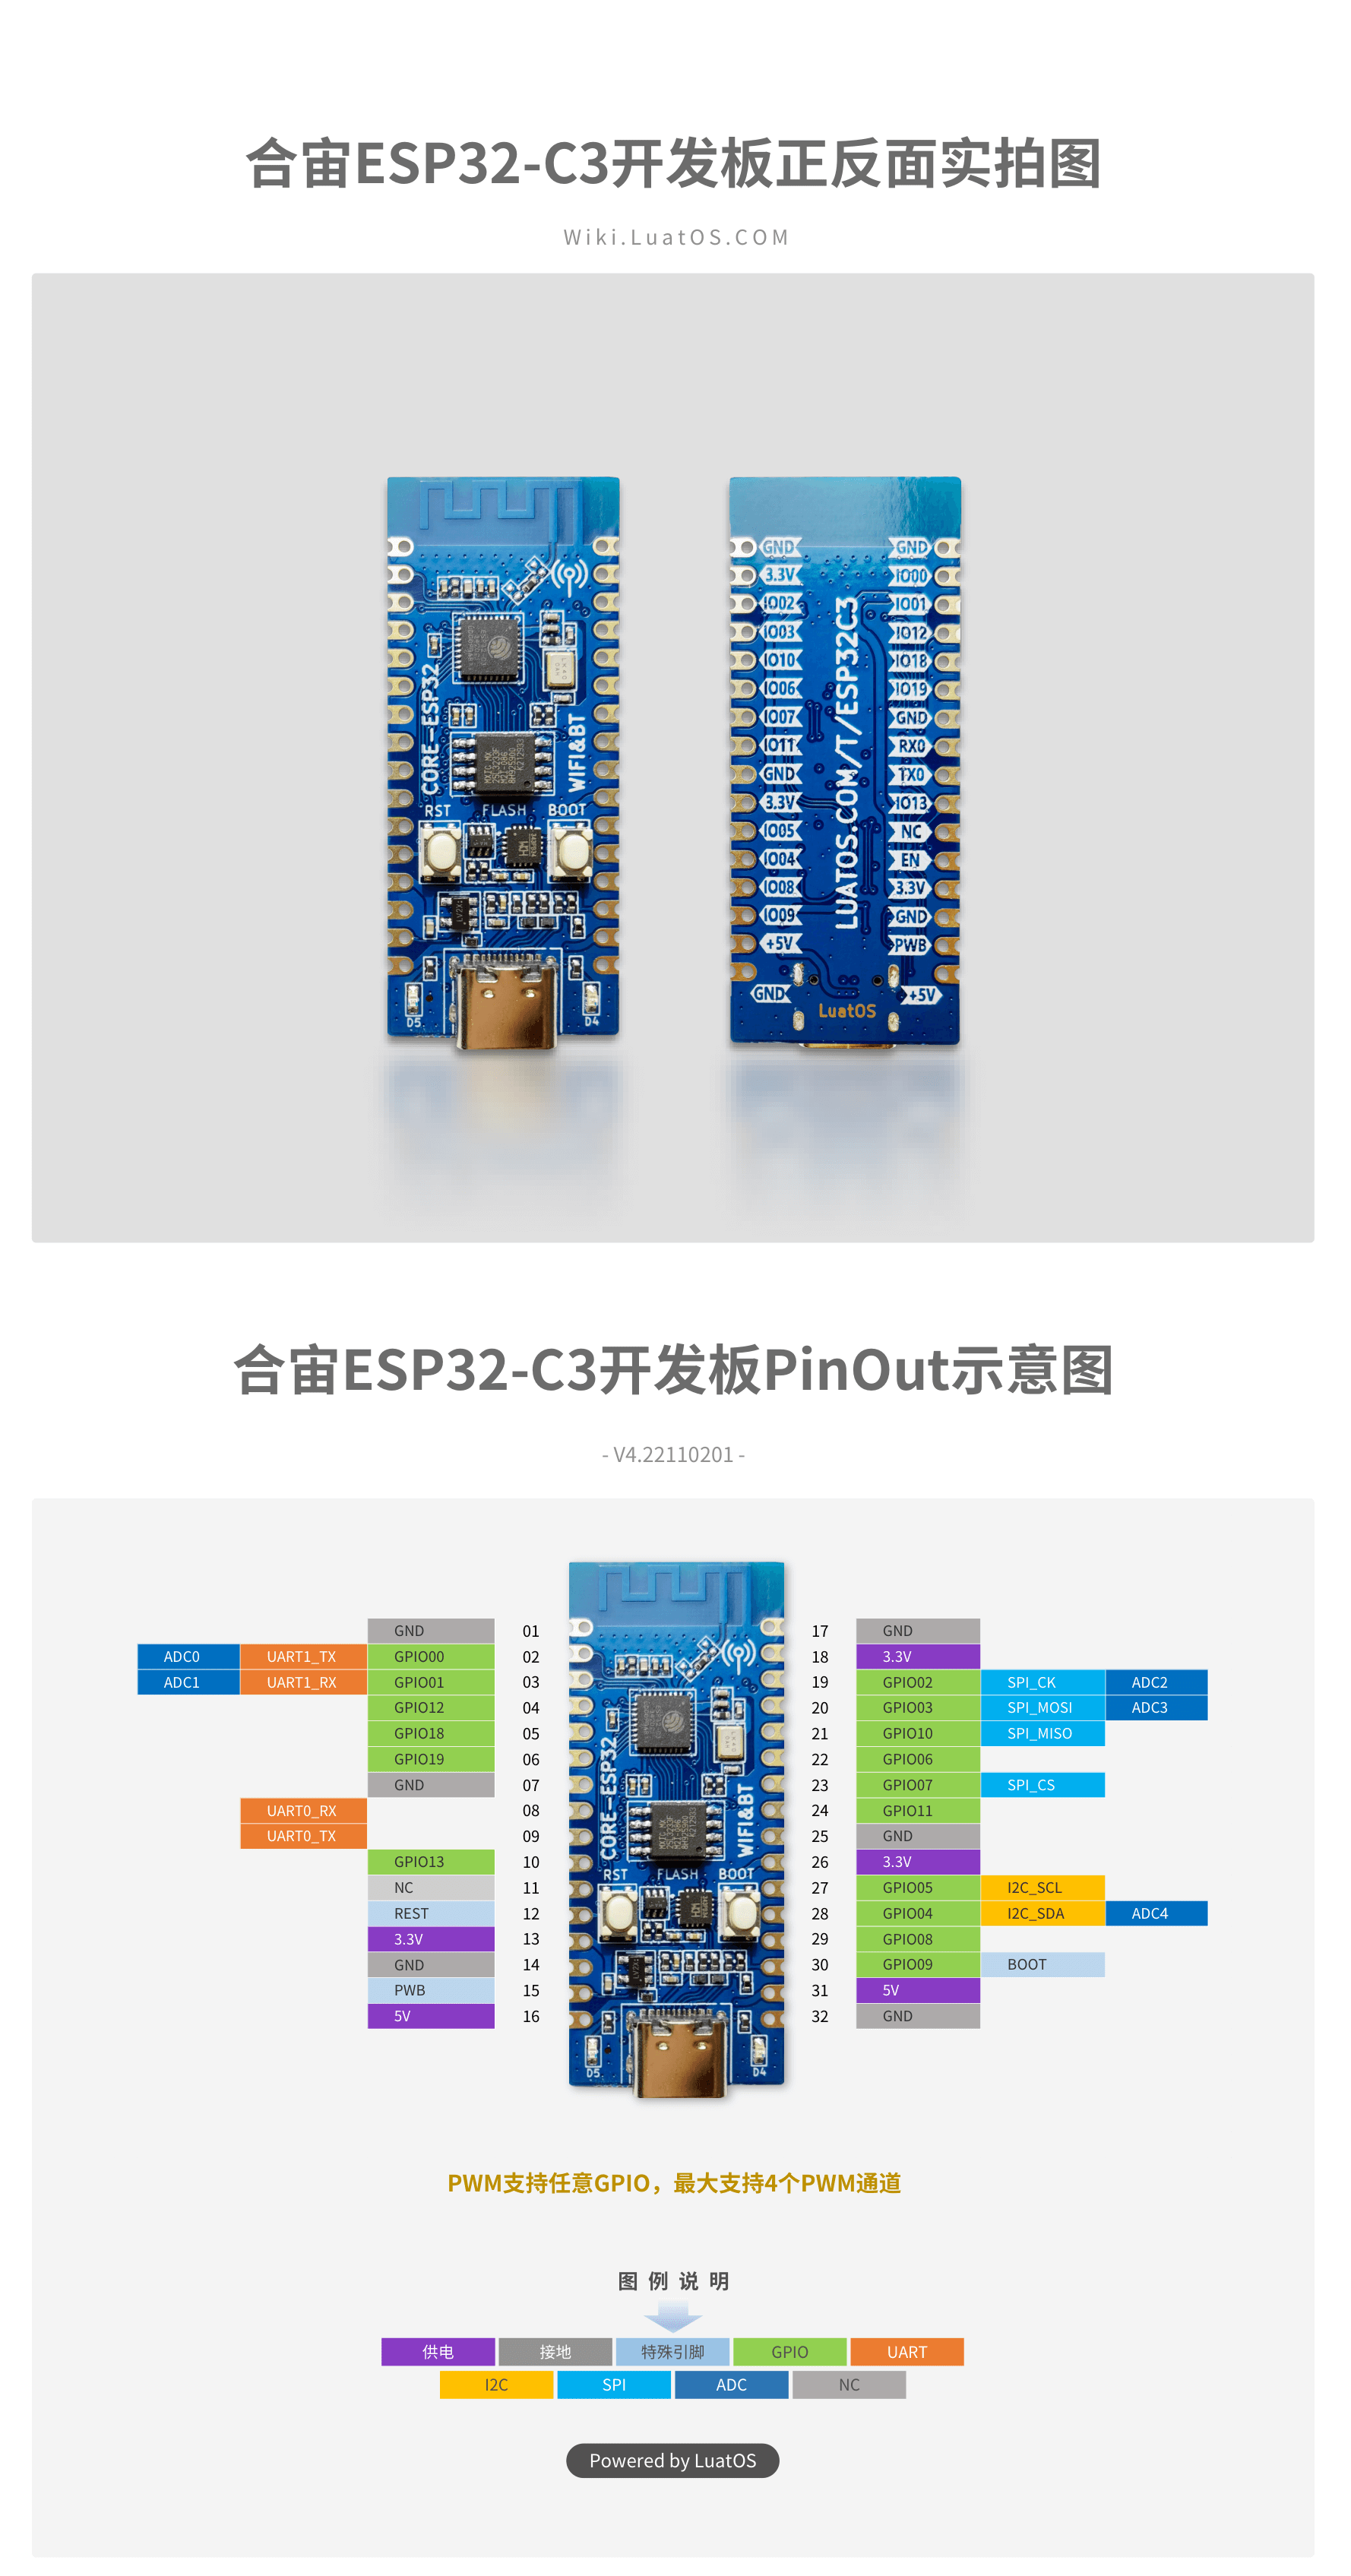
模块使用的合宙的ESP32-C3(经典款) 购买连接
CORE ESP32核心板是基于乐鑫ESP32-C3进行设计的一款核心板,尺寸仅有21mm*51mm,板边采用邮票孔设计,方便开发者在不同场景下的使用。核心板支持UART、GPIO、SPI、I2C、ADC、PWM等接口,可根据实际需要选择。
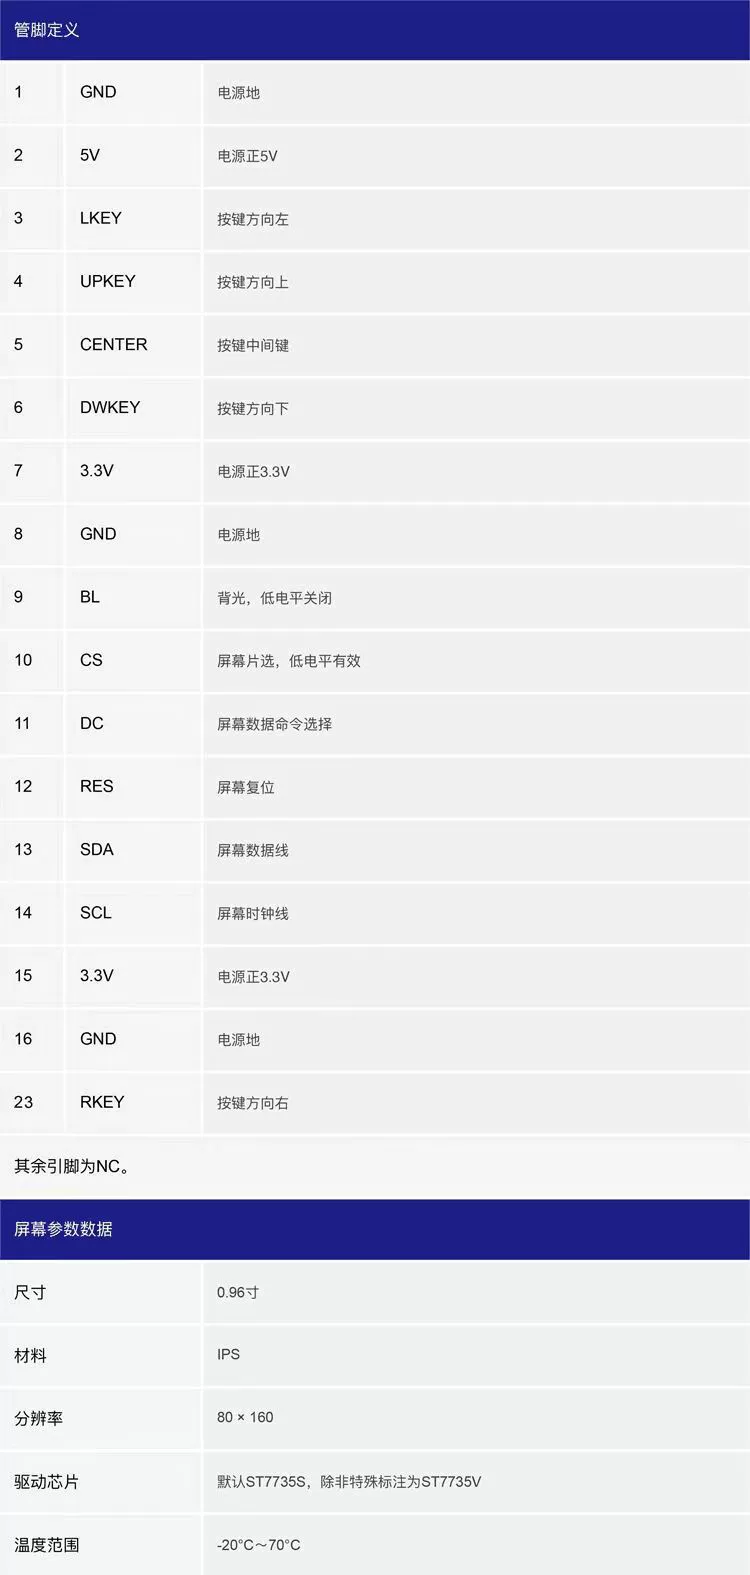
屏幕使用的LuatOS屏幕扩展板 购买连接
驱动芯片:ST7735S 屏幕尺寸:80 X 160
我们使用VSCODE,安装PlatformIO插件进行开发
首先在Platforms中安装Espressif 32
都说lvgl暂不支持新版的idfV5版本
这里我们安装Espressif 32的5.4.0版本,ESP-IDF版本是v4.4.5
完整的代码我放在GITEE
模块信息
屏幕信息
开发过程
创建项目
| 配置 | 值 |
|---|---|
| Name | ESP32C3 ST7735S |
| Board | Espressif ESP32-C3-DevKitM-1 |
| Framework | Espidf |
项目名称可以自己随意更改

在最新版idf开发时我一直使用的esp32-c3-devkitc-02,更换为v4.x后始终不会打印,耽误了一点时间
修改配置文件
[env:esp32-c3-devkitm-1]
;平台
platform = espressif32@5.4.0
;模块
board = esp32-c3-devkitm-1
;闪存芯片接口方式
board_build.flash_mode = dio
;框架
framework = espidf
;串口监视波特率
monitor_speed = 115200
;串口监视过滤器 解码异常 颜色展示
monitor_filters = direct, esp32_exception_decoder
;内置调试器 重点是配置这个
debug_tool = esp-builtin
安装依赖
我这里git拉取都使用的ssh的方式,如果是http的方式,自己修改一下连接
LVGL 依赖库
git submodule add -b release/v7 git@github.com:lvgl/lvgl.git components/lvgl
ESP32 芯片系列的 LVGL 驱动库
git submodule add git@github.com:lvgl/lvgl_esp32_drivers.git components/lvgl_esp32_drivers
直接编译会提示'SPI_HOST_MAX' undeclared错误
components\lvgl_esp32_drivers\lvgl_helpers.c: In function 'lvgl_spi_driver_init':
components\lvgl_esp32_drivers\lvgl_helpers.c:157:28: error: 'SPI_HOST_MAX' undeclared (first use in this function); did you mean 'GPIO_PORT_MAX'?
     assert((0 <= host) && (SPI_HOST_MAX > host));
在components\lvgl_esp32_drivers\lvgl_helpers.h头部增加
#define SPI_HOST_MAX 2
在components\lvgl_esp32_drivers目录提交一下git更改
Lvgl 示例
git submodule add -b release/v7 git@github.com:littlevgl/lv_examples.git components/lv_examples/lv_examples
为了等下测试方便,我们这里自己新增一些文件
增加自定义文件
增加文件:components\lv_examples\CMakeLists.txt
if(ESP_PLATFORM)

file(GLOB_RECURSE SOURCES lv_examples/*.c)

idf_component_register(SRCS ${SOURCES}
                       INCLUDE_DIRS .
                       REQUIRES lvgl)

else()
    message(FATAL_ERROR "LVGL LV examples: ESP_PLATFORM is not defined. Try reinstalling ESP-IDF.")
endif()
增加文件:components\lv_examples\component.mk
#
# Component Makefile
#

CFLAGS += -DLV_LVGL_H_INCLUDE_SIMPLE

COMPONENT_SRCDIRS := lv_examples           \
    lv_examples/src/lv_demo_benchmark      \
    lv_examples/src/lv_demo_keypad_encoder \
    lv_examples/src/demo_stress            \
    lv_examples/src/lv_demo_widgets        \
    lv_examples/src/lv_ex_style            \
    lv_examples/src/lv_ex_widgets          \
    lv_examples/assets

COMPONENT_ADD_INCLUDEDIRS := $(COMPONENT_SRCDIRS) .
增加文件:components\lv_examples\Kconfig
# Kconfig for lv_examples v7.4.0

menu "lv_examples configuration"

    config LV_EX_PRINTF
        bool "Enable printf-ing data in demos and examples."

    choice LV_EX_CHOICE
        prompt "Select the demo you want to run."
        default LV_USE_DEMO_WIDGETS

        config LV_USE_DEMO_WIDGETS
            bool "Show demo widgets."

        config LV_USE_DEMO_KEYPAD_AND_ENCODER
            bool "Demonstrate the usage of encoder and keyboard."

        config LV_USE_DEMO_BENCHMARK
            bool "Benchmark your system."

        config LV_USE_DEMO_STRESS
            bool "Stress test for LVGL."
    endchoice

    config LV_DEMO_WIDGETS_SLIDESHOW
        bool "Slide demo widgets automatically."
        depends on LV_USE_DEMO_WIDGETS
        default y
endmenu
增加文件:components\lv_examples\lv_ex_conf.h
/**
 * @file lv_ex_conf.h
 * Configuration file for v7.4.0
 *
 */
/*
 * COPY THIS FILE AS lv_ex_conf.h
 */

#if 1 /*Set it to "1" to enable the content*/

#ifndef LV_EX_CONF_H
#define LV_EX_CONF_H


/*******************
 * GENERAL SETTING
 *******************/

/* Enable printf-ing data in demoes and examples */
#ifdef CONFIG_LV_EX_PRINTF
#define LV_EX_PRINTF       1
#else
#define LV_EX_PRINTF       0
#endif

#define LV_EX_KEYBOARD     0       /*Add PC keyboard support to some examples (`lv_drivers` repository is required)*/
#define LV_EX_MOUSEWHEEL   0       /*Add 'encoder' (mouse wheel) support to some examples (`lv_drivers` repository is required)*/

/*********************
 * DEMO USAGE
 *********************/

/*Show some widget*/
#ifdef CONFIG_LV_USE_DEMO_WIDGETS
#define LV_USE_DEMO_WIDGETS        1
#else
#define LV_USE_DEMO_WIDGETS        0
#endif

#if LV_USE_DEMO_WIDGETS
#ifdef CONFIG_LV_DEMO_WIDGETS_SLIDESHOW
#define LV_DEMO_WIDGETS_SLIDESHOW   1
#else
#define LV_DEMO_WIDGETS_SLIDESHOW   0
#endif
#endif

/*Printer demo, optimized for 800x480*/
#define LV_USE_DEMO_PRINTER     0

/*Demonstrate the usage of encoder and keyboard*/
#ifdef CONFIG_LV_USE_DEMO_KEYPAD_AND_ENCODER
#define LV_USE_DEMO_KEYPAD_AND_ENCODER  1
#else
#define LV_USE_DEMO_KEYPAD_AND_ENCODER  0
#endif

/*Benchmark your system*/
#ifdef CONFIG_LV_USE_DEMO_BENCHMARK
#define LV_USE_DEMO_BENCHMARK   1
#else
#define LV_USE_DEMO_BENCHMARK   0
#endif

/*Stress test for LVGL*/
#ifdef CONFIG_LV_USE_DEMO_STRESS
#define LV_USE_DEMO_STRESS  1
#else
#define LV_USE_DEMO_STRESS  0

#endif

#endif /*LV_EX_CONF_H*/

#endif /*End of "Content enable"*/
开始开发
在正式写代码前,先验证一下依赖库是否存在异常
点击编辑器下方的Clean按钮,清理完成后点击Build
如果提示Successfully created esp32c3 image.就可以继续我们的开发了
菜单配置
执行命令:pio run -t menuconfig打开菜单
通过使用键盘的J和K来控制上下移动,ESC返回上层
按照下方的说明配置,全部修改完成后,按下S保存成功后,一路ESC关闭窗口
lv_examples configuration
| 参数 | 值 | 备注 |
|---|---|---|
| Enable printf-ing data in demos and examples. | 勾选 | 在演示和示例中启用打印数据 |
| Select the demo you want to run. | Show demo widgets. | 选择演示:小部件 |
LVGL configuration
| 参数 | 值 | 备注 |
|---|---|---|
| Maximal horizontal resolution to support by the library. | 160 | 水平分辨率 |
| Maximal vertical resolution to support by the library. | 80 | 垂直分辨率 |
| Swap the 2 bytes of RGB565 color. Useful if the display has a 8 bit interface (e.g. SPI). | 选中 | 颜色反转 |
LVGL ESP Drivers
进入 LVGL TFT Display controller
| 参数 | 值 | 备注 |
|---|---|---|
| Display orientation | Landscape | 竖屏 |
| Select a display controller model. | ST7735S | 屏幕驱动 |
| Use custom SPI clock frequency | 勾选 | 自定义SPI时钟频率 |
| Select a custom frequency. | 26.67 MHz | 设置频率 |
| GPIO for MOSI (Master Out Slave In) | 3 | MOSI引脚 |
| GPIO for CLK (SCK / Serial Clock) | 2 | CLK时钟引脚 |
| GPIO for CS (Slave Select) | 7 | 片选引脚 |
| GPIO for DC (Data / Command) | 6 | DC引脚 |
| GPIO for Reset | 10 | 重置引脚 |
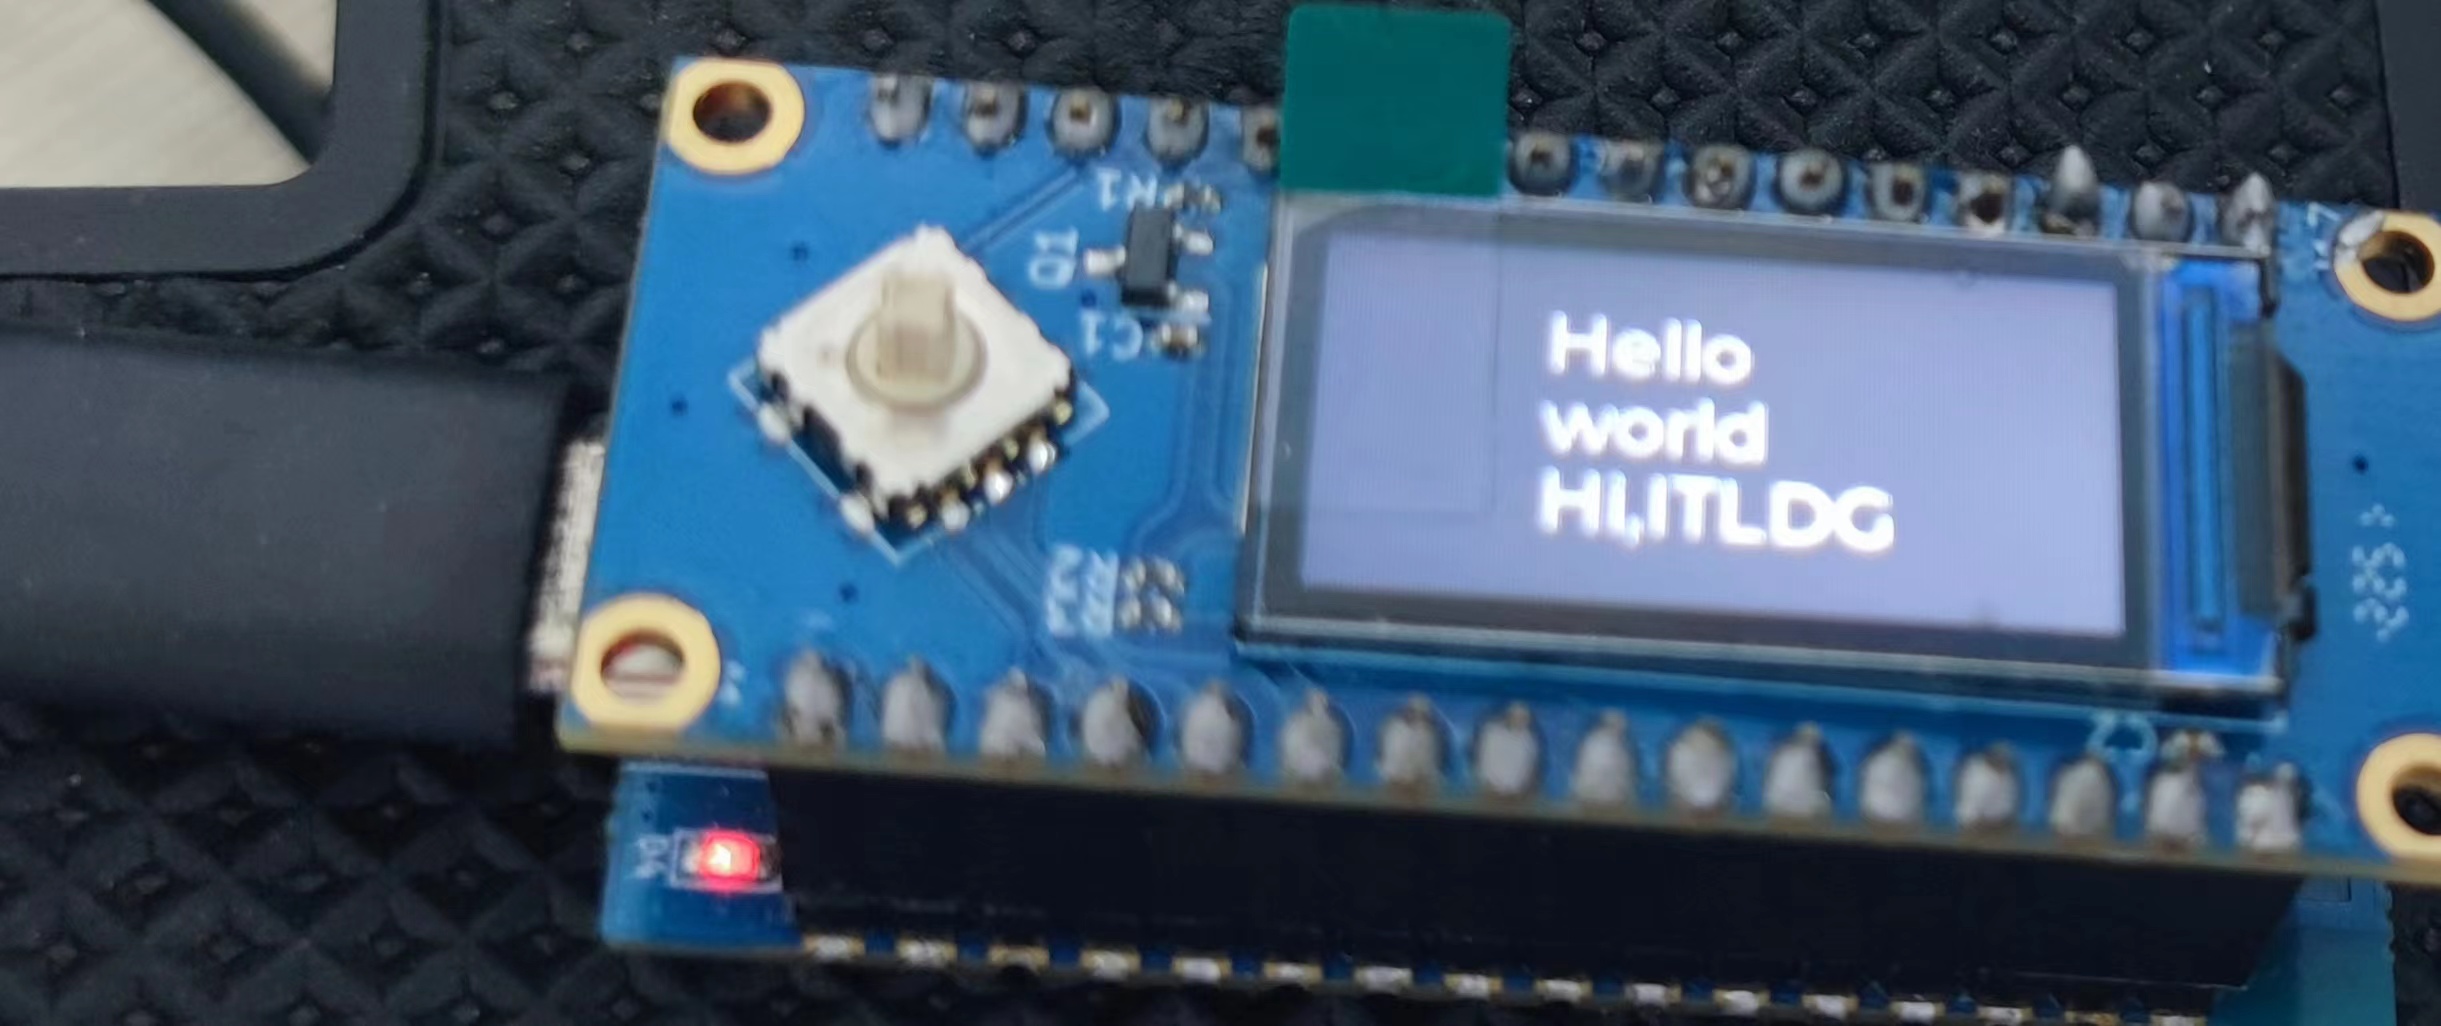
点亮屏幕
将以下代码复制到src/main.c中
/* LVGL Example project
 *
 * Basic project to test LVGL on ESP32 based projects.
 *
 * This example code is in the Public Domain (or CC0 licensed, at your option.)
 *
 * Unless required by applicable law or agreed to in writing, this
 * software is distributed on an "AS IS" BASIS, WITHOUT WARRANTIES OR
 * CONDITIONS OF ANY KIND, either express or implied.
 */
#include <stdbool.h>
#include <stdio.h>
#include <stdlib.h>
#include <string.h>

#include "freertos/FreeRTOS.h"
#include "freertos/task.h"
#include "esp_freertos_hooks.h"
#include "freertos/semphr.h"
#include "esp_system.h"
#include "driver/gpio.h"

/* Littlevgl specific */
#ifdef LV_LVGL_H_INCLUDE_SIMPLE
#include "lvgl.h"
#else
#include "lvgl/lvgl.h"
#endif

#include "lvgl_helpers.h"
#ifndef CONFIG_LV_TFT_DISPLAY_MONOCHROME
    #if defined CONFIG_LV_USE_DEMO_WIDGETS
        #include "lv_examples/lv_examples/src/lv_demo_widgets/lv_demo_widgets.h"
    #elif defined CONFIG_LV_USE_DEMO_KEYPAD_AND_ENCODER
        #include "lv_examples/lv_examples/src/lv_demo_keypad_encoder/lv_demo_keypad_encoder.h"
    #elif defined CONFIG_LV_USE_DEMO_BENCHMARK
        #include "lv_examples/lv_examples/src/lv_demo_benchmark/lv_demo_benchmark.h"
    #elif defined CONFIG_LV_USE_DEMO_STRESS
        #include "lv_examples/lv_examples/src/lv_demo_stress/lv_demo_stress.h"
    #else
        #error "No demo application selected."
    #endif
#endif

/*********************
 *      DEFINES
 *********************/
#define TAG "demo"
#define LV_TICK_PERIOD_MS 1

/**********************
 *  STATIC PROTOTYPES
 **********************/
static void lv_tick_task(void *arg);
static void guiTask(void *pvParameter);
static void create_demo_application(void);

/**********************
 *   APPLICATION MAIN
 **********************/
void app_main() {
    /* If you want to use a task to create the graphic, you NEED to create a Pinned task
     * Otherwise there can be problem such as memory corruption and so on.
     * NOTE: When not using Wi-Fi nor Bluetooth you can pin the guiTask to core 0 */
    xTaskCreatePinnedToCore(guiTask, "gui", 4096*2, NULL, 0, NULL, 1);
}

/* Creates a semaphore to handle concurrent call to lvgl stuff
 * If you wish to call *any* lvgl function from other threads/tasks
 * you should lock on the very same semaphore! */
SemaphoreHandle_t xGuiSemaphore;

static void guiTask(void *pvParameter) {

    (void) pvParameter;
    xGuiSemaphore = xSemaphoreCreateMutex();

    lv_init();

    /* Initialize SPI or I2C bus used by the drivers */
    lvgl_driver_init();

    lv_color_t* buf1 = heap_caps_malloc(DISP_BUF_SIZE * sizeof(lv_color_t), MALLOC_CAP_DMA);
    assert(buf1 != NULL);

    /* Use double buffered when not working with monochrome displays */
#ifndef CONFIG_LV_TFT_DISPLAY_MONOCHROME
    lv_color_t* buf2 = heap_caps_malloc(DISP_BUF_SIZE * sizeof(lv_color_t), MALLOC_CAP_DMA);
    assert(buf2 != NULL);
#else
    static lv_color_t *buf2 = NULL;
#endif

    static lv_disp_buf_t disp_buf;

    uint32_t size_in_px = DISP_BUF_SIZE;

#if defined CONFIG_LV_TFT_DISPLAY_CONTROLLER_IL3820         \
    || defined CONFIG_LV_TFT_DISPLAY_CONTROLLER_JD79653A    \
    || defined CONFIG_LV_TFT_DISPLAY_CONTROLLER_UC8151D     \
    || defined CONFIG_LV_TFT_DISPLAY_CONTROLLER_SSD1306

    /* Actual size in pixels, not bytes. */
    size_in_px *= 8;
#endif

    /* Initialize the working buffer depending on the selected display.
     * NOTE: buf2 == NULL when using monochrome displays. */
    lv_disp_buf_init(&disp_buf, buf1, buf2, size_in_px);

    lv_disp_drv_t disp_drv;
    lv_disp_drv_init(&disp_drv);
    disp_drv.flush_cb = disp_driver_flush;

#if defined CONFIG_DISPLAY_ORIENTATION_PORTRAIT || defined CONFIG_DISPLAY_ORIENTATION_PORTRAIT_INVERTED
    disp_drv.rotated = 1;
#endif

    /* When using a monochrome display we need to register the callbacks:
     * - rounder_cb
     * - set_px_cb */
#ifdef CONFIG_LV_TFT_DISPLAY_MONOCHROME
    disp_drv.rounder_cb = disp_driver_rounder;
    disp_drv.set_px_cb = disp_driver_set_px;
#endif

    disp_drv.buffer = &disp_buf;
    lv_disp_drv_register(&disp_drv);

    /* Register an input device when enabled on the menuconfig */
#if CONFIG_LV_TOUCH_CONTROLLER != TOUCH_CONTROLLER_NONE
    lv_indev_drv_t indev_drv;
    lv_indev_drv_init(&indev_drv);
    indev_drv.read_cb = touch_driver_read;
    indev_drv.type = LV_INDEV_TYPE_POINTER;
    lv_indev_drv_register(&indev_drv);
#endif

    /* Create and start a periodic timer interrupt to call lv_tick_inc */
    const esp_timer_create_args_t periodic_timer_args = {
        .callback = &lv_tick_task,
        .name = "periodic_gui"
    };
    esp_timer_handle_t periodic_timer;
    ESP_ERROR_CHECK(esp_timer_create(&periodic_timer_args, &periodic_timer));
    ESP_ERROR_CHECK(esp_timer_start_periodic(periodic_timer, LV_TICK_PERIOD_MS * 1000));

    /* Create the demo application */
    create_demo_application();

    while (1) {
        /* Delay 1 tick (assumes FreeRTOS tick is 10ms */
        vTaskDelay(pdMS_TO_TICKS(10));

        /* Try to take the semaphore, call lvgl related function on success */
        if (pdTRUE == xSemaphoreTake(xGuiSemaphore, portMAX_DELAY)) {
            lv_task_handler();
            xSemaphoreGive(xGuiSemaphore);
       }
    }

    /* A task should NEVER return */
    free(buf1);
#ifndef CONFIG_LV_TFT_DISPLAY_MONOCHROME
    free(buf2);
#endif
    vTaskDelete(NULL);
}

static void create_demo_application(void)
{
    /* When using a monochrome display we only show "Hello World" centered on the
     * screen */
#if defined CONFIG_LV_TFT_DISPLAY_MONOCHROME || \
    defined CONFIG_LV_TFT_DISPLAY_CONTROLLER_ST7735S

    /* use a pretty small demo for monochrome displays */
    /* Get the current screen  */
    lv_obj_t * scr = lv_disp_get_scr_act(NULL);

    /*Create a Label on the currently active screen*/
    lv_obj_t * label1 =  lv_label_create(scr, NULL);

    /*Modify the Label's text*/
    lv_label_set_text(label1, "Hello\nworld\nHi,ITLDG");

    /* Align the Label to the center
     * NULL means align on parent (which is the screen now)
     * 0, 0 at the end means an x, y offset after alignment*/
    lv_obj_align(label1, NULL, LV_ALIGN_CENTER, 0, 0);
#else
    /* Otherwise we show the selected demo */

    #if defined CONFIG_LV_USE_DEMO_WIDGETS
        lv_demo_widgets();
    #elif defined CONFIG_LV_USE_DEMO_KEYPAD_AND_ENCODER
        lv_demo_keypad_encoder();
    #elif defined CONFIG_LV_USE_DEMO_BENCHMARK
        lv_demo_benchmark();
    #elif defined CONFIG_LV_USE_DEMO_STRESS
        lv_demo_stress();
    #else
        #error "No demo application selected."
    #endif
#endif
}

static void lv_tick_task(void *arg) {
    (void) arg;

    lv_tick_inc(LV_TICK_PERIOD_MS);
}
去掉代码中的
|| \
    defined CONFIG_LV_TFT_DISPLAY_CONTROLLER_ST7735S
将可以看到小组件的自动演示
注册按键
由于屏幕是反的,这里按键的上下左右也是反过来的
使用 ESP 的按键 SDK 实现短按,长按,双击等功能
触发时间可在 menuconfig→ Component config → IoT Button 中配置
git clone git@github.com:espressif/esp-iot-solution.git
将components/button复制过来
在main.c中增加以下代码
#include "esp_log.h"
#include "iot_button.h"
//由于屏幕是反的,这里的上下左右也是反着写的
#define BUTTON_IO_LKEY 9
#define BUTTON_IO_UPKEY 13
#define BUTTON_IO_CENTER 4
#define BUTTON_IO_DWKEY 8
#define BUTTON_IO_RKEY 5

static void button_left_single_click_cb(void *arg, void *data)
{
    ESP_LOGI(TAG, "左键单击");
}

static void button_right_single_click_cb(void *arg, void *data)
{
    ESP_LOGI(TAG, "右键单击");
}

static void button_up_single_click_cb(void *arg, void *data)
{
    ESP_LOGI(TAG, "上键单击");
}
static void button_down_single_click_cb(void *arg, void *data)
{
    ESP_LOGI(TAG, "下键单击");
}
static void button_center_single_click_cb(void *arg, void *data)
{
    ESP_LOGI(TAG, "中键单击");
}

void btnAdd(gpio_num_t gpio, button_event_t event, button_cb_t cb)
{
    button_config_t cfg = {
        .type = BUTTON_TYPE_GPIO,
        .gpio_button_config = {
            .gpio_num = gpio,
        },
    };
    button_handle_t btn = iot_button_create(&cfg);
    iot_button_register_cb(btn, event, cb, NULL);
}
void button_init()
{
    btnAdd(BUTTON_IO_LKEY, BUTTON_SINGLE_CLICK, button_left_single_click_cb);     // 左键按下
    btnAdd(BUTTON_IO_UPKEY, BUTTON_SINGLE_CLICK, button_up_single_click_cb);      // 上键按下
    btnAdd(BUTTON_IO_DWKEY, BUTTON_SINGLE_CLICK, button_down_single_click_cb);    // 下键按下
    btnAdd(BUTTON_IO_RKEY, BUTTON_SINGLE_CLICK, button_right_single_click_cb);    // 右键按下
    btnAdd(BUTTON_IO_CENTER, BUTTON_SINGLE_CLICK, button_center_single_click_cb); // 中键按下
}
在app_main中调用button_init

 浙公网安备 33010602011771号