7、线程、进程、协程进阶篇
1.1.继上一讲,知道了如何创建多线程和GIL的原理,接下来要说的是线程锁,那为什么需要线程锁呢?
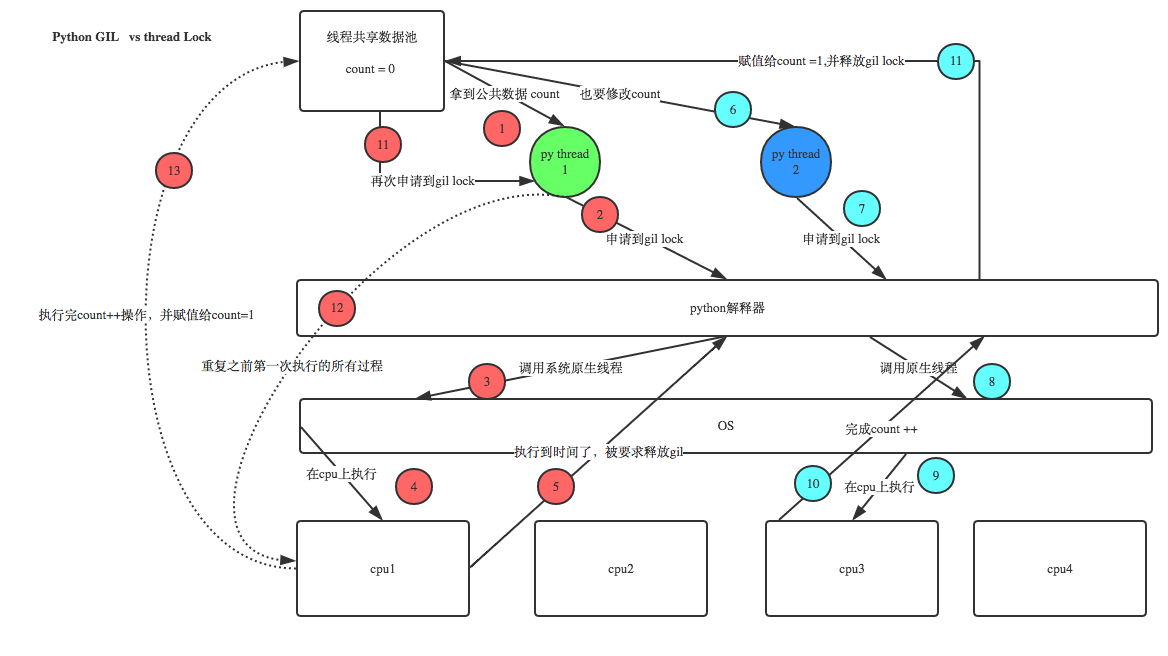
先看下图,此图来自:http://www.cnblogs.com/alex3714/articles/5230609.html,我就不自己动手画了,比我画得好

分析:
(1)线程1拿到count=0并获得GIL,依次执行1,2,3,4,5,然后执行时间到了释放GIL
(2)线程2拿到count=0并获得GIL,依次执行6,7,8,9,10,11,修改count的值,此时count的值由0变成1,并释放GIL
(3)线程1再次拿到GIL并继续执行12,13,修改count的值,count的值还是1
问题出现了:线程1和线程2都把count+1,但是最后count的值还是1
线程锁:cpu在执行任务时,在线程之间是进行随机调度的,并且每个线程在执行一段时间之后会切换到另外一个线程,但是由于线程之间堆数据是共享的,所以就会有可能出现上述问题。
没加锁时的代码:
# -*- coding: utf-8 -*-
#__author:jiangjing
#date:2018/2/4

#!/usr/bin/env python
# -*- coding:utf-8 -*-
import threading
import time
NUM = 0
def func():
    global NUM
    temp = NUM + 1
    name = t.getName()
    time.sleep(1)       # 由于sleep导致了线程切换
    NUM = temp
    print(name, "执行完毕后,NUM的值为: ", NUM)

for i in range(10):
    t = threading.Thread(target=func)
    t.start()

运行结果:
Thread-2 执行完毕后,NUM的值为:  1
Thread-4 执行完毕后,NUM的值为:  1
Thread-1 执行完毕后,NUM的值为:  1
Thread-5 执行完毕后,NUM的值为:  1
Thread-3 执行完毕后,NUM的值为:  1
Thread-10 执行完毕后,NUM的值为:  1
Thread-9 执行完毕后,NUM的值为:  1
Thread-7 执行完毕后,NUM的值为:  1
Thread-8 执行完毕后,NUM的值为:  1
Thread-6 执行完毕后,NUM的值为:  1
加锁之后:
# -*- coding: utf-8 -*-
#__author:jiangjing
#date:2018/2/4

#!/usr/bin/env python
# -*- coding:utf-8 -*-
import threading
import time
NUM = 0
LOCK = threading.Lock()
def func():
    global NUM,LOCK
    name = t.getName()
    LOCK.acquire()
    temp = NUM + 1
    time.sleep(1)       # 由于sleep导致了线程切换
    NUM = temp
    LOCK.release()
    print(name, "执行完毕后,NUM的值为: ", NUM)

for i in range(10):
    t = threading.Thread(target=func)
    t.start()

执行结果:
Thread-1 执行完毕后,NUM的值为:  1
Thread-2 执行完毕后,NUM的值为:  2
Thread-3 执行完毕后,NUM的值为:  3
Thread-4 执行完毕后,NUM的值为:  4
Thread-5 执行完毕后,NUM的值为:  5
Thread-6 执行完毕后,NUM的值为:  6
Thread-7 执行完毕后,NUM的值为:  7
Thread-8 执行完毕后,NUM的值为:  8
Thread-9 执行完毕后,NUM的值为:  9
Thread-10 执行完毕后,NUM的值为:  10
以上的threading.Lock()是普通锁,这种普通锁在特定情况下会出现死锁的情况,所谓死锁就是两个线程都在等待对方释放锁定资源实例如下:
# -*- coding: utf-8 -*-
#__author:jiangjing
#date:2018/2/4

import threading
import time
loack1 = threading.Lock()
loack2 = threading.Lock()

class MyThreading(threading.Thread):
    def __init__(self, name):
        threading.Thread.__init__(self)
        self.name = name

    def doA(self):
        loack1.acquire()
        print('doA %s get lock1' % self.name)
        time.sleep(2)
        loack2.acquire()
        print('doA %s get lock2' % self.name)
        loack2.release()
        print('doA %s release lock2' % self.name)
        loack1.release()
        print('doA %s release lock1' % self.name)

    def doB(self):
        loack2.acquire()
        print('doB %s get lock2' % self.name)
        time.sleep(2)
        loack1.acquire()
        print('doB %s get lock1' % self.name)
        loack1.release()
        print('doB %s release lock1' % self.name)
        loack2.release()
        print('doB %s release lock2' % self.name)

    def run(self):
        self.doA()
        self.doB()

t1 = MyThreading("thread1")
t2 = MyThreading('threa2')
t1.start()
t2.start()

运行结果:
doA thread1 get lock1
doA thread1 get lock2
doA thread1 release lock2
doA thread1 release lock1
doB thread1 get lock2
doA threa2 get lock1
为了防止死锁情况发生,就出现了递归锁,递归锁实现原理是引用计数,就是一把锁可以被嵌套使用,实例如下:
# -*- coding: utf-8 -*-
#__author:jiangjing
#date:2018/2/4

import threading
import time
loack = threading.RLock()

class MyThreading(threading.Thread):
    def __init__(self, name):
        threading.Thread.__init__(self)
        self.name = name

    def doA(self):
        loack.acquire()
        print('doA %s get lock1' % self.name)
        time.sleep(2)
        loack.acquire()
        print('doA %s get lock2' % self.name)
        loack.release()
        print('doA %s release lock2' % self.name)
        loack.release()
        print('doA %s release lock1' % self.name)

    def doB(self):
        loack.acquire()
        print('doB %s get lock2' % self.name)
        time.sleep(2)
        loack.acquire()
        print('doB %s get lock1' % self.name)
        loack.release()
        print('doB %s release lock1' % self.name)
        loack.release()
        print('doB %s release lock2' % self.name)

    def run(self):
        self.doA()
        self.doB()

t1 = MyThreading("thread1")
t2 = MyThreading('threa2')
t1.start()
t2.start()

执行结果:
doA thread1 get lock1
doA thread1 get lock2
doA thread1 release lock2
doA thread1 release lock1
doA threa2 get lock1
doA threa2 get lock2
doA threa2 release lock2
doA threa2 release lock1
doB thread1 get lock2
doB thread1 get lock1
doB thread1 release lock1
doB thread1 release lock2
doB threa2 get lock2
doB threa2 get lock1
doB threa2 release lock1
doB threa2 release lock2
1.2接下来说一下线程池
开启一个新的线程是比较耗费性能的,所在提前开启合适的线程来执行不用的任务
# -*- coding: utf-8 -*-
#__author:jiangjing
#date:2018/2/5

# -*- coding: utf-8 -*-
import threading
import queue


class Work_Thread(threading.Thread):
    """工作线程类
    """
    def __init__(self, work_queue):
        """工作线程类初始化函数
        """
        threading.Thread.__init__(self)
        self._work_queue = work_queue #线程同步队列
        self.setDaemon(True) #主线程退出后,子线程也退出
        self.start()

    def run(self):
        """任务接口
        """
        while True:
            try:
                func, args = self._work_queue.get()
                func(args)
                self._work_queue.task_done()
            except Exception as reason:
                print(reason)
                break


class Thread_Pool(object):
    """线程池管理类
    """
    def __init__(self, thread_count = 1):
        """线程池管理器初始化函数
        Args:
            thread_count: 线程池中的线程个数
        """
        self._thread_count = thread_count
        self._work_queue = queue.Queue()
        self._threads = []
        self.init_threads_pool()

    def init_threads_pool(self):
        """建立并启动thread_count个线程
        """
        for index in range(self._thread_count):
            self._threads.append(Work_Thread(self._work_queue))

    def add_work(self, function, param):
        """增加新任务。 (调用函数,参数)
        """
        self._work_queue.put((function, param))

    def wait_queue_empty(self):
        """等待队列为空。某些场景下可等同于所有任务均执行完
        """
        self._work_queue.join()

def work_func(num):
    """测试函数,在控制台打印num
    """
    print(num)

def main():
   """Thread_Pool使用例子
   """
   thread_count = 5
   thread_pool = Thread_Pool(thread_count)
   for num in range(0, 100):
       thread_pool.add_work(work_func, num) #添加任务
   thread_pool.wait_queue_empty() #等待任务执行完

   print("---end---")

if __name__ == "__main__":
   main()
2.1进程
(1)继上一节,进程拥有自己独立的堆和栈空间,因此数据不能共享,实例
# -*- coding: utf-8 -*-
#__author:jiangjing
#date:2018/2/4

from multiprocessing import Process
import queue
l = []
def func(i):
    l.append(i)
    print("This is Process ", i," and list_1 is ", l)

if __name__ == '__main__':
    for i in range(5):
        p = Process(target=func, args=(i,))
        p.start()
    print("The end of l:", l)

执行结果:
The end of l: []
This is Process  0  and list_1 is  [0]
This is Process  1  and list_1 is  [1]
This is Process  2  and list_1 is  [2]
This is Process  3  and list_1 is  [3]
This is Process  4  and list_1 is  [4]
那怎么让进程之间共享数据呢?multiprocess模块提供了三个类:queues,Array,Manager
queues共享数据实例:
# -*- coding: utf-8 -*-
#__author:jiangjing
#date:2018/2/5

import multiprocessing
from multiprocessing import Process
from multiprocessing import queues

def foo(i, q):
    q.put(i)
    print('Process-%d size:%d' % (i, q.qsize()))
    #print('The Process is ', i, "and the queue's size is ", arg.qsize())


if __name__ == "__main__":
    q = queues.Queue(20, ctx=multiprocessing)
    for i in range(5):
        p = Process(target=foo, args=(i, q))
        p.start()

执行结果:
Process-0 size:1
Process-1 size:2
Process-2 size:3
Process-3 size:4
Process-4 size:5
(2)再来说一下进程池,跟线程不同的是,python已经提供了内置的进程池
实例:
# -*- coding: utf-8 -*-
#__author:jiangjing
#date:2018/2/5

from multiprocessing import Pool
import time


def func(i):
    time.sleep(1)
    print(i)


if __name__ == '__main__':
    p = Pool(5)
    for i in range(10):
        p.apply_async(func=func, args=(i,))
    p.close()
    p.join()

执行结果:
0
1
2
3
4
5
6
7
8
9
进程池中的几个方法:
apply:从进程池里取一个进程并执行
apply_async:apply的异步版本
terminate:立刻关闭进程池
join:主进程等待所有子进程执行完毕。必须在close或terminate之后
close:等待所有进程结束后,才关闭进程池
3.关于协程的知识上一节已经谈过了
posted on 2018-02-04 15:08 后端bug开发工程师 阅读(197) 评论(0) 收藏 举报


 浙公网安备 33010602011771号